16. Molding and casting
Modeling In Fusion
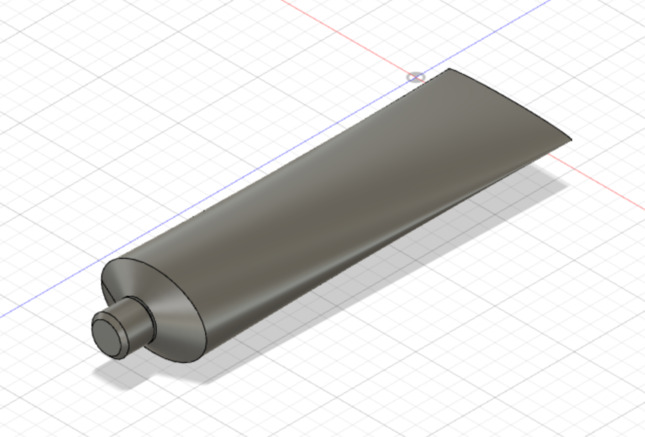
For this week, I wanted to cast a used toothpaste tube. I needed to lean to make this in Fusion. I knew that I would need to do something a bit more free form than typical fusion modeling, but I did not remember how to do this/if you could do this in Fusion as it had been a while since I used it. After looking through a few youtube videos, I realized the form, or T-Spline workspace was what I wanted.
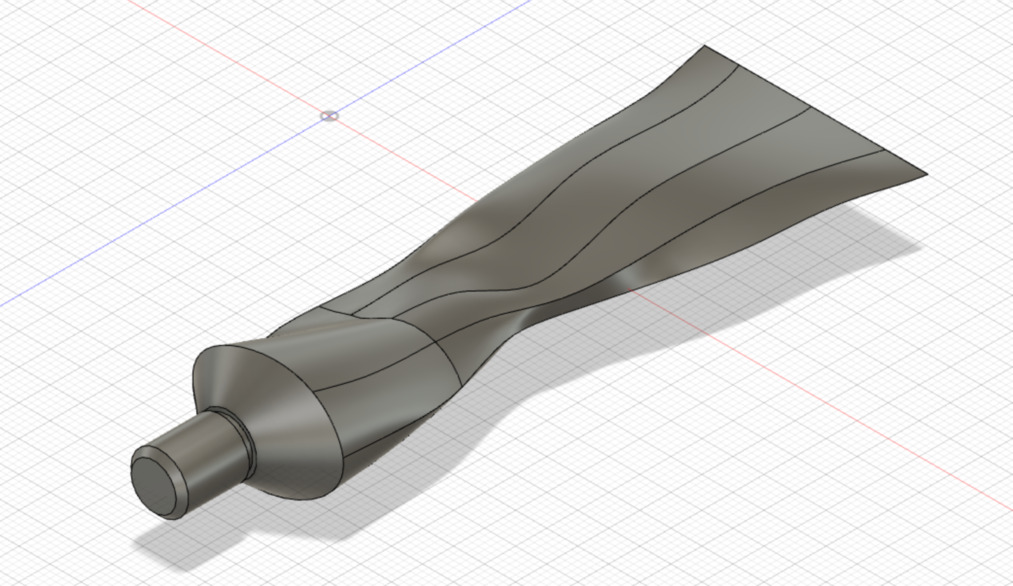
I first made a toothpaste tube in the standard design workspace, then realized I would not be able to convert this into a form easily. So I decided to make the form anew using the same sketches, as this wasnt too hard with them already in place. After doing so, I went about adding wrinkles and indents by selecting sections of the tube and using the scale tool in the “Edit form” menu. This was easy enough once I got used to it.
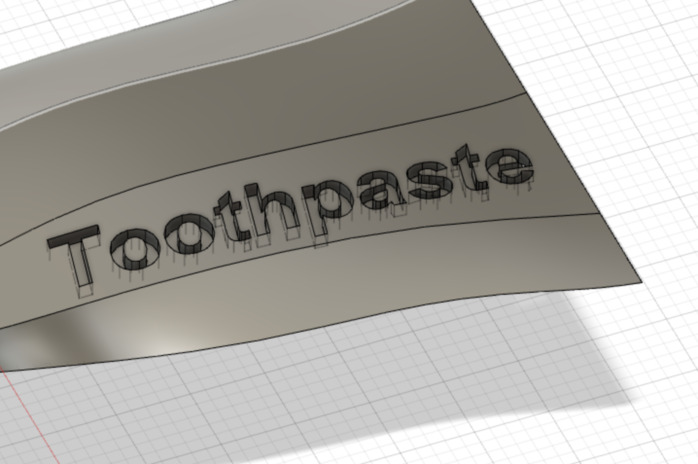
Next, I wanted to add text ‘Toothpaste’ to the tube. I looked up how to add text evenly over an uneven surface. This also seems to be something Fusion does not really excel at. The simplest, and seemingly most effective, method that i came across was to place the text inside of an object, and extrude it while selecting ‘From Object’. The downside to this was that it only worked if I selected a single surface plane, and as the toothpaste tube was very uneven, it had many. I decided I was ok with placing it on a single surface for now and did not want to get hung up on the text.
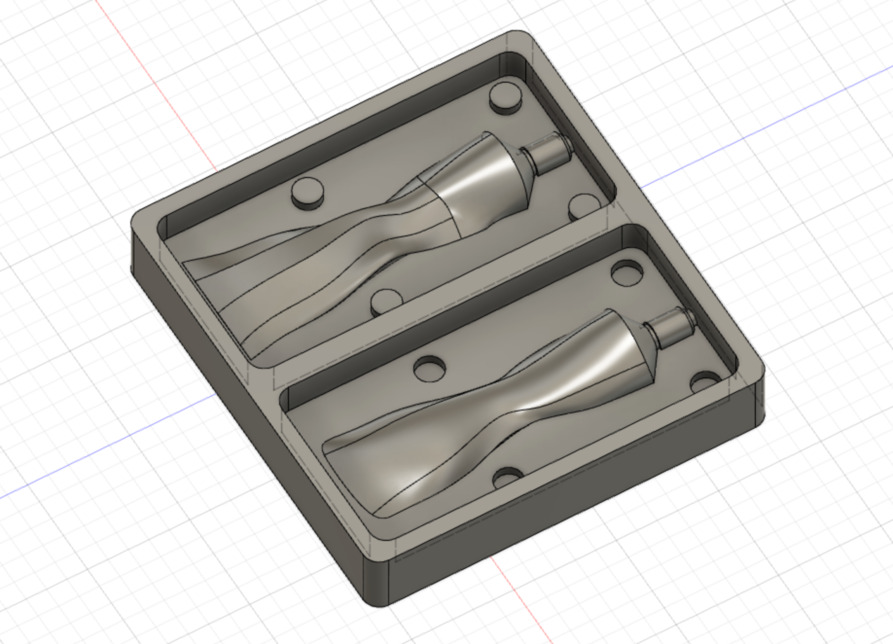
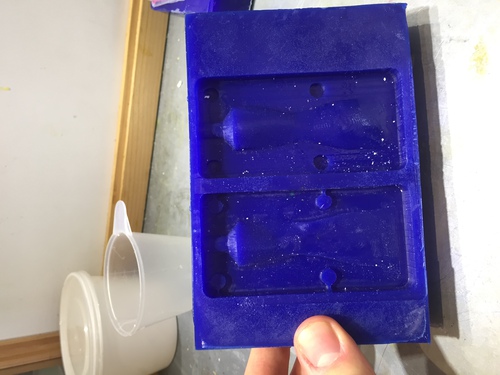
Next, I had to make this into a mold. I first tried splitting the body then placing it over two of the same sketch, but then realized this would not ensure that the sketches were mirrors of each other, as I had not made them perfectly symmetrical and constrained. I decided to split the body with a sketch in between them, that way i could extrude the mold from opposite sides of the sketch, thus ensuring they would fit into each other.
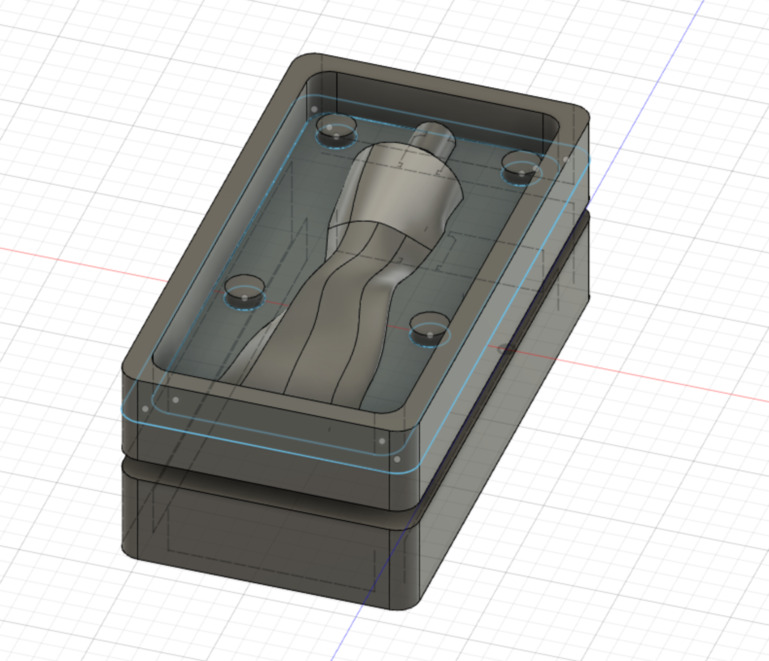
I intended to place these on either side of my wax block so that i could have a larger mold, but Henk suggested I not do this as I was limited on time and would have to wait for each side to set separately when creating the silicon mold. So while I was setting up the cnc, I finally made my final design: a single block on the same surface.
CNC Mill
Tessel helped me through this process to speed things along. I was rushing as it was the end of the day and we were alternating days because of covid, so unfortunately do not have a lot of pics here. You can see more photos of how to set up the machine on my computer controlled cutting assignment.
- Create a new file in V-Carve Pro
- Enter job size (in X, Y, and Z) as the size of your material. X is the long side of the table.
- Select work from the left-bottom corner
- Click import file, and bring in your STL or OBJ file from fusion. Find the correct orientation
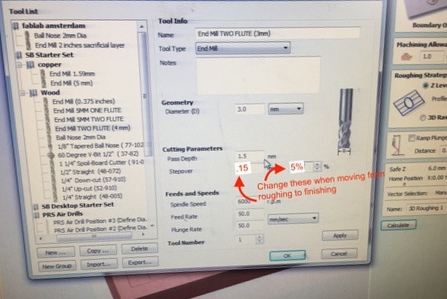
- Click select tool and choose your drillbit (we used 3mm 2 flute)
- Now select settings for the roughing, starting with pass depth 1/2 flute diameter
- Stepover 1.35, 45%
- Spindle speed, which is normally 18000, should be reduced to 6000 for the wax so that it does not get too hot.
- Feed and plunge: 50mm/s
- Out of the tool menu, choose limit boundary : Model
- For roughing directio , choose the axes on which your material is longer
- hit calculate, and preview the path
- Now click on finishing, go again to select tool, and change the stepover to 5%
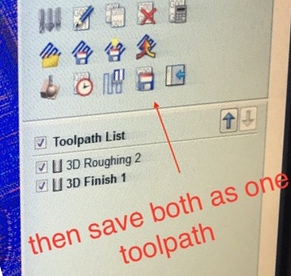
- Hit calculate toolpath. Save toolpath, and choose to save both paths as one file if you are using the same bit for both.
Machine
- Clean surface area of the machine
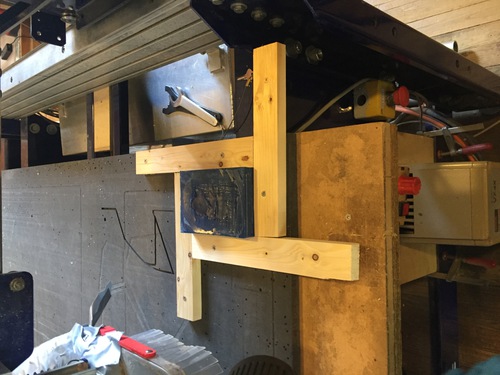
- Secure the wax block to the machine by screwing wooden supports to either side
- Turn it on with the switch, not yet with the key
- open shopbot software
- Press k to bring up machine controls
- Press zero x, y and move into place
- Take out the z plate and check that the light appears in the input window when touching the plate to the bit. If it does, place it under the bit
- Hit Zero Z, it should find it automatically
- Turn on the spindle with the key
- Set spindle speed to 6000
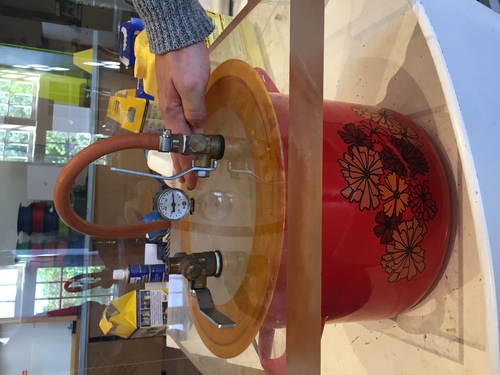
Casting
We used a silicon mixture in unmarked bottles that Rutger brough from home, which required a 10:1 ratio of A:B. I later found out this was Silicon 15 Fast which has a cure time of only 15 minutes and is made to be skin safe.
To estimate the volume I would need, i filled my wax brick with water then poured it into a measuring cup. It came out at a little under 100ml. This was convenient, as I could do 100ml A to 10ml B. I enjoyed measuring out the 10ml of B in the syringe for a more exact measurement. Pouring and mixing the silicon was easy. I made the mistake of trying to get air bubbles out of it in the vacuum chamber, however. By the time I took it out, it was already too viscous to pour. This is why it is smart to ask for the product info and data sheets ahead of time- as I said above, I only found out what the product was and that it had a 15 minute cure time later.
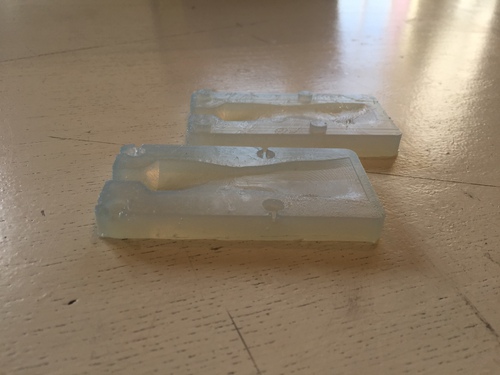
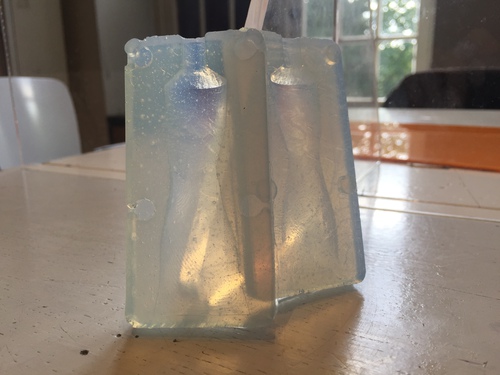
I had to mix again, just tapped out air bubbles this time, and poured. It set quickly, but I left it until the next day as I did not have time to cast anyway. The next morning, I took the mold out, and it looked great! I was also happy to see that it fit together.
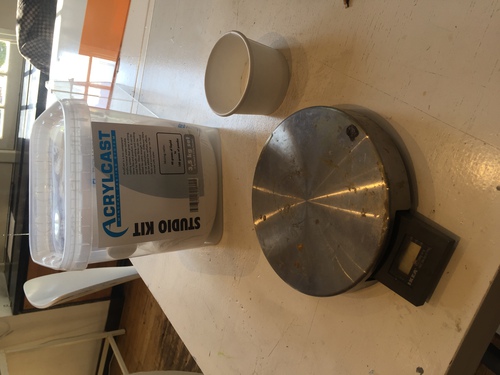
I had wanted to cast with Hydrocal, and Rutger got me Acrylcast instead as they did not have hydrocal at FormEx. I asked henk for a scale, as this had a powder and a liquid that needed to be measured in a ratio by weight. When I started trying to do this, it was a disaster.
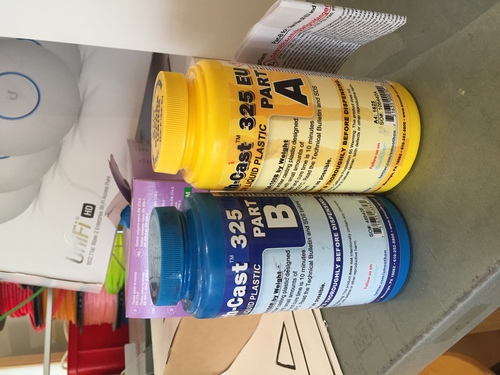
The scale kept turning off, so I had to estimate the ratio by seeing whether the mixture seemed like it had the right consistency. It said it would be like yogurt, so i added bits of powder and liquid until it seemed like yogurt. When i tried to pour it, it was too thick and I had to poke it into the mold. This resulted in the mold opening a bit and plaster mixture spilling. It got all over the mold. On top of this, i had never been sure I had the right ratio, so i decided to wash out my mold and start over with a different casting material that did not need to be weighed. I decided on 325, as Tessel had just used it and recommended it. This was a much easier procedure- I simply mixed equal parts A and B, stirred, tapped out the air bubbles, and poured.
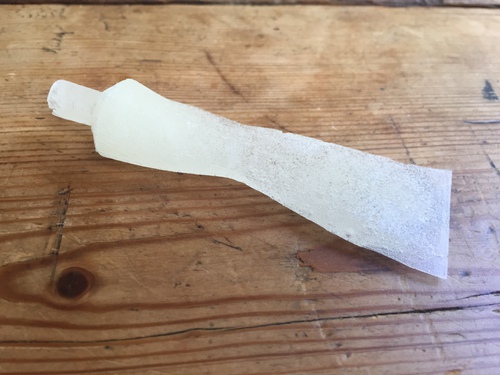
I was surprised at how quickly this cured- i was still trying to scrape some of the liquid mixture off the hole at the top of the mold when it started to pull at the contents inside and so i decided to leave it alone. In the end, the results were ok. I think resizing the mold and losing detail made this a strange object. If i could, I would recast in solid white, and also try a bigger mold, so that I could keep some wrinkles, separation of the lid from the body, the text etc.
Group Assignment
Group page can be found here
review the safety data sheets for each of your molding and casting materials, then make and compare test casts with each of them
14.5 x 10cm x 3.2 wax block
Mold Qualities:
- Hole for pouring
- Hole for air release
- Make design not too deep so that mill can reach lowest parts
- try not to have 90 degree angles
Make the object in Fusion or CAD software, export as obj or stl then import into Freecarve pro
Fold the silicon instead of mixing it. Make Zs
Polyurethane has a snap cure
Metal powder
We will make a mold with a release hole
One hole for
For the group assignment, I tested Tarbender. A summary of the safety sheet follows:
Read the safety sheets of a material. There is both a part A and part B
Tarbender clear epoxy encapsulant
Safety Precautions
These are the key areas of safety information pulled from the safety sheet:
Health Hazard - Causes skin irritation - May cause an allergic skin reaction - Causes serious eye irritation
Prevention Precautions - Avoid breathing dust/fume/gas/mist/vapors/spray. - Wash with soap and water thoroughly after handling. - Do not eat, drink or smoke when using this product. - Contaminated work clothing should not be allowed out of the workplace. - Wear protective gloves/protective clothing/eye protection/face protection. - Wear any liquid-tight gloves such as butyl rubber, neoprene or PVC. - Safety glasses with side shields. Contact lenses are not eye protective devices. Appropriate eye protection must be worn instead of, or in conjunction with contact lenses.
Response Precautions - IF ON SKIN: Wash with plenty of soap and water - IF ON SKIN (or hair): Take off immediately all contaminated clothing. Rinse skin with water. - IF IN EYES: Rinse cautiously with water for several minutes. Remove contact lenses, if present and easy to do. Continue rinsing. - If skin irritation occurs: Get medical advice/attention. - If eye irritation persists: Get medical advice/attention. - Wash contaminated clothing before reuse.
Disposal Precautions - Dispose of contents/container in accordance with local regulations.
First Aid
Inhalation Remove source(s) of contamination and move victim to fresh air. If breathing has stopped, give artificial respiration, then oxygen if needed. Contact physician immediately.
Eye Contact Flush eyes with plenty of water occasionally lifting the upper and lower eyelids. Check and remove any contact lenses if safe to do so. Continue to rinse for at least 15 minutes. If irritation develops, seek medical attention.
Skin Contact In case of skin contact, wash thoroughly with soap and water. Continue to rinse for at least 15 minutes. Chemical burns must be treated promptly by a physician.
Ingestion Do not induce vomiting unless instructed by a physician. Never give anything by mouth to an unconscious person. If material has been swallowed and the exposed person is conscious, give small quantities of water to drink. Stop if the exposed person feels sick as vomiting may be dangerous. If vomiting occurs, the head should be kept low so that vomit does not enter the lungs.
How to Use
Technical specifications: - Pot Life: 45 Minutes (how long can you use it after mixing) - Cure time :16 hours
Instructions
- Prepare equipment:
- Containers should have straight edges and a flat bottom. They should be made of plastic, metal, or wax coated paper. Due to high temperatures, do not use foam or glass
- Mixing sticks should be flat and stiff with defined edges
- Use in high ventilation
-Measuring - Accurately measure 2A:1B
- Pre-Mixing
-
Stir or shake Part A and Part B thoroughly before dispensing
-
Mixing
- Mix with a flat edge mixing stick for 2 minutes. Scrape the sides and bottom of the container with the edge several times
- Pour contents into a new, clean mixing container and mix again for 2 minutes.
- Greater masses of epoxy will reduce pot life
-Color - You can add UVO™ or IGNITE™ colorants or Cast Magic™ Effects Fillers. Pre-mix color or filler into Tarbender™ Part A thoroughly and then add Part B.
-Surface Release - If you do not want Tarbender to adhere to a surface, add two coats of sonite wax to the surface and allow it to dry for 1 hour before applying epoxy
Casting
I made a cast of a single die from a mold that was laying around Waag. I followed the instructions above, mixing two parts A to one B and mixing in the proper order. I taped up the mold and poured into it. The main obstacle I faced was using the vacuum machine we have at De Waag. I wanted to get bubbles in the mixture out, so I placed the cup into the machine and turned it on. Bubbles rose to the surface and made a kind of foam, but never dissipated, as long as I left the mixture in, or as much as I tapped it. I ended up pouring the mixture with the foam anyway. After more research, I saw it is recommended that bubbles in Tarbender be dissipated with a blowtorch. I am not sure if this technique is required, or if we just dont have a great vacuum chamber at waag…
I was using tarbender, which needs at least 16 hours to cure, so I checked my die the next day. Sure enough, it had a lot of bubbles, and one big air gap at the top. Considering this is manily used for counter tops, I am not sure it is the best material for a tiny mold like this, especially since it is so hard to get bubbles out.
Summary
I was not completely happy with the final result this week, as I feel like the shape lost a lot of the detail I was excited about learning in Fusion over the course of the casting process. But as a first test, I am happy with the results- the process went relatively smoothly. Next time, I will keep the issue of scale in mind for this process.