15. Networking and communications
individual assignment:
      design, build, and connect wired or wireless node(s)
      with network or bus addresses
   group assignment:
      send a message between two projects
Group Assignment
I worked on the group assignment with Tessel. Our part is copied below:
Group assignment Nathan and Tessel: connecting devices over WiFi using mesh networking.
For the group assignment, Tessel and I created a mesh network between our two ESP-32 boards. The ESP-32 are WiFi enabled so we connected wirelessly.
I downloaded the ‘Painless Mesh’ library from the Arduino library manager, which also asked that I download the task manager library.
After downloading this, I opened the Basic example sketch from the painless mesh library. Tessel had different code on her device. The codes are added below. In this example sketch, we only had to change our username and password to the same network, as well as make sure we listed the same port.
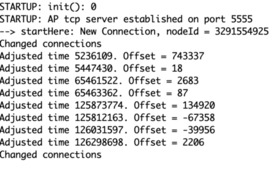
Upon upload to both of our individual boards, we then opened the serial monitors on our respective computers. The monitor on each of our computers showed that a connection was established. Tessel’s monitor then began to display messages from my ESP, which were randomly generated every 5 seconds.

Node Red
This week, I wanted to work on using Node Red to send images to my board over wifi.
Information on how I installed Node-Red can be found during the Output Devices week.
I watched this tutorial to get a sense of how to start a flow with a microcontroller.
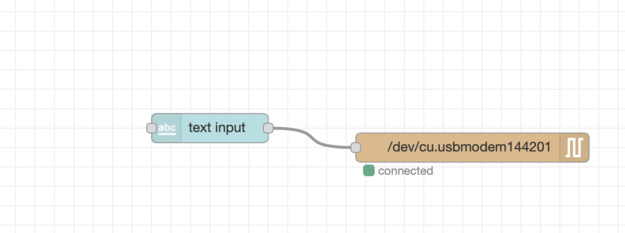
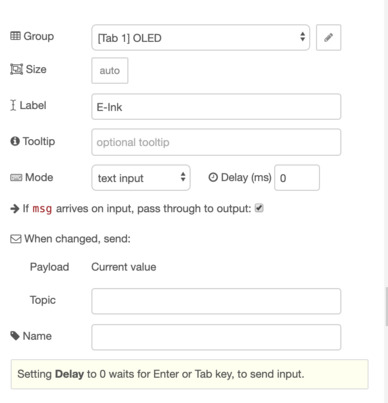
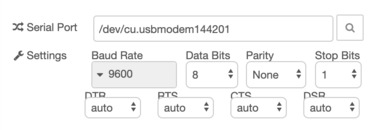
I found it strange I had to enter the serial port details manually- it actually took a while to connect to both the Arduino and ESP8266, I am not sure if these controls had to do with it.
ESP8266 Web Servers
I wanted to try to control the ESP8266 on the NodeMCU from a web server. I found the following code online and ran it:
ESP Web Server
#include <ESP8266WiFi.h>
#include <WiFiClient.h>
#include <ESP8266WebServer.h>
#ifndef APSSID
#define APSSID "ESPap"
#define APPSK "thereisnospoon"
#endif
/* Set these to your desired credentials. */
const char *ssid = APSSID;
const char *password = APPSK;
ESP8266WebServer server(80);
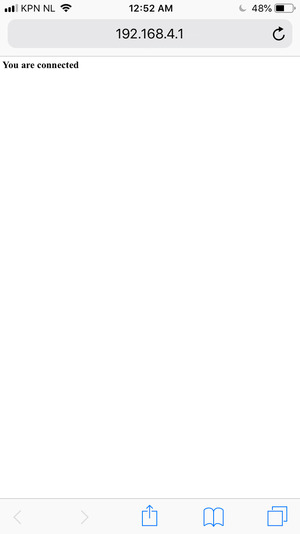
/* Just a little test message. Go to http://192.168.4.1 in a web browser
connected to this access point to see it.
*/
void handleRoot() {
server.send(200, "text/html", "<h1>You are connected</h1>");
}
void setup() {
delay(1000);
Serial.begin(115200);
Serial.println();
Serial.print("Configuring access point...");
/* You can remove the password parameter if you want the AP to be open. */
WiFi.softAP(ssid, password);
IPAddress myIP = WiFi.softAPIP();
Serial.print("AP IP address: ");
Serial.println(myIP);
server.on("/", handleRoot);
server.begin();
Serial.println("HTTP server started");
}
void loop() {
server.handleClient();
}
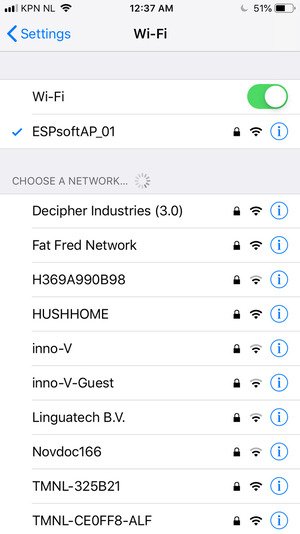
It was exciting to find the board in the wifi list!
After this, I wanted to control the ESP8266 from a similar web server.
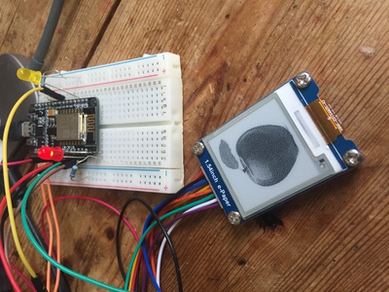
I set up the following code, a mix from multiple examples online and the serial print code I used for the Node-Red Setup.
// Load Wi-Fi library
#include <ESP8266WiFi.h>

#include <GxFont_GFX.h>
#include <GxEPD.h>
#include <GxGDEP015OC1/GxGDEP015OC1.h>
#include <GxIO/GxIO_SPI/GxIO_SPI.h>
#include <GxIO/GxIO.h>
#include <Fonts/FreeMonoBold9pt7b.h>
GxIO_Class io(SPI, /*CS=D8*/ SS, /*DC=D3*/ 0, /*RST=D4*/ 2); // arbitrary selection of D3(=0), D4(=2), selected for default of GxEPD_Class
GxEPD_Class display(io, /*RST=D4*/ 2, /*BUSY=D2*/ 4); // default selection of D4(=2), D2(=4)


// Replace with your network credentials
const char* ssid     = "......";
const char* password = ".......";

// Set web server port number to 80
WiFiServer server(80);

// Variable to store the HTTP request
String header;

// Auxiliar variables to store the current output state
String output5State = "off";
String output4State = "off";

// Assign output variables to GPIO pins
const int output5 = 5;
const int output4 = 9;

// Current time
unsigned long currentTime = millis();
// Previous time
unsigned long previousTime = 0;
// Define timeout time in milliseconds (example: 2000ms = 2s)
const long timeoutTime = 2000;

void setup() {
  Serial.begin(115200);
  // Initialize the output variables as outputs
  pinMode(output5, OUTPUT);
  pinMode(output4, OUTPUT);
  // Set outputs to LOW
  digitalWrite(output5, LOW);
  digitalWrite(output4, LOW);
    display.init(115200);

  // Connect to Wi-Fi network with SSID and password
  Serial.print("Connecting to ");
  Serial.println(ssid);
  WiFi.begin(ssid, password);
  while (WiFi.status() != WL_CONNECTED) {
    delay(500);
    Serial.print(".");

               display.fillScreen(GxEPD_WHITE);
                  display.setTextColor(GxEPD_BLACK);

                  // load a font - in the library
                  display.setFont(&FreeMonoBold9pt7b);

                  // let the strings begin
                  display.setCursor(0, 10);
                  display.println("Connected...");
                    display.update();
  }
  // Print local IP address and start web server
  Serial.println("");
  Serial.println("WiFi connected.");
  Serial.println("IP address: ");
  Serial.println(WiFi.localIP());
  server.begin();
}

void loop(){
  WiFiClient client = server.available();   // Listen for incoming clients

  if (client) {                             // If a new client connects,
    Serial.println("New Client.");          // print a message out in the serial port
    String currentLine = "";                // make a String to hold incoming data from the client
    currentTime = millis();
    previousTime = currentTime;
    while (client.connected() && currentTime - previousTime <= timeoutTime) { // loop while the client's connected
      currentTime = millis();
      if (client.available()) {             // if there's bytes to read from the client,
        char c = client.read();             // read a byte, then
        Serial.write(c);                    // print it out the serial monitor
        header += c;
        if (c == '\n') {                    // if the byte is a newline character
          // if the current line is blank, you got two newline characters in a row.
          // that's the end of the client HTTP request, so send a response:
          if (currentLine.length() == 0) {
            // HTTP headers always start with a response code (e.g. HTTP/1.1 200 OK)
            // and a content-type so the client knows what's coming, then a blank line:
            client.println("HTTP/1.1 200 OK");
            client.println("Content-type:text/html");
            client.println("Connection: close");
            client.println();

            // turns the GPIOs on and off
            if (header.indexOf("GET /5/on") >= 0) {
              Serial.println("GPIO 5 on");
              output5State = "on";
              digitalWrite(output5, HIGH);

                  display.println("RED LED on");
                    display.update();
            } else if (header.indexOf("GET /5/off") >= 0) {
              Serial.println("RED LED off");
              output5State = "off";
              digitalWrite(output5, LOW);

                  display.println("RED LED off");
                    display.update();
            } else if (header.indexOf("GET /4/on") >= 0) {
              Serial.println("GPIO 4 on");
              output4State = "on";
              digitalWrite(output4, HIGH);

                  display.println("YELLOW LED on");
                    display.update();
            } else if (header.indexOf("GET /4/off") >= 0) {
              Serial.println("GPIO 4 off");
              output4State = "off";
              digitalWrite(output4, LOW);

                  display.println("YELLOW LED off");
                    display.update();
            }

            // Display the HTML web page
            client.println("<!DOCTYPE html><html>");
            client.println("<head><meta name=\"viewport\" content=\"width=device-width, initial-scale=1\">");
            client.println("<link rel=\"icon\" href=\"data:,\">");
            // CSS to style the on/off buttons
            // Feel free to change the background-color and font-size attributes to fit your preferences
            client.println("<style>html { font-family: Helvetica; display: inline-block; margin: 0px auto; text-align: center;}");
            client.println(".button { background-color: #195B6A; border: none; color: white; padding: 16px 40px;");
            client.println("text-decoration: none; font-size: 30px; margin: 2px; cursor: pointer;}");
            client.println(".button2 {background-color: #77878A;}</style></head>");

            // Web Page Heading
            client.println("<body><h1>ESP8266 Web Server</h1>");

            // Display current state, and ON/OFF buttons for GPIO 5
            client.println("<p>RED LED - State " + output5State + "</p>");
            // If the output5State is off, it displays the ON button
            if (output5State=="off") {
              client.println("<p><a href=\"/5/on\"><button class=\"button\">ON</button></a></p>");
            } else {
              client.println("<p><a href=\"/5/off\"><button class=\"button button2\">OFF</button></a></p>");
            }

            // Display current state, and ON/OFF buttons for GPIO 4
            client.println("<p>YELLOW LED - State " + output4State + "</p>");
            // If the output4State is off, it displays the ON button
            if (output4State=="off") {
              client.println("<p><a href=\"/4/on\"><button class=\"button\">ON</button></a></p>");
            } else {
              client.println("<p><a href=\"/4/off\"><button class=\"button button2\">OFF</button></a></p>");
            }
            client.println("</body></html>");

            // The HTTP response ends with another blank line
            client.println();
            // Break out of the while loop
            break;
          } else { // if you got a newline, then clear currentLine
            currentLine = "";
          }
        } else if (c != '\r') {  // if you got anything else but a carriage return character,
          currentLine += c;      // add it to the end of the currentLine
        }
      }
    }
    // Clear the header variable
    header = "";
    // Close the connection
    client.stop();
    Serial.println("Client disconnected.");
    Serial.println("");
  }
}
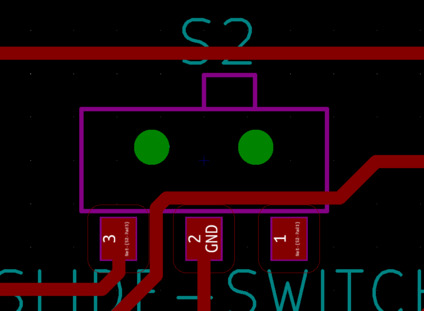
Designing a Board
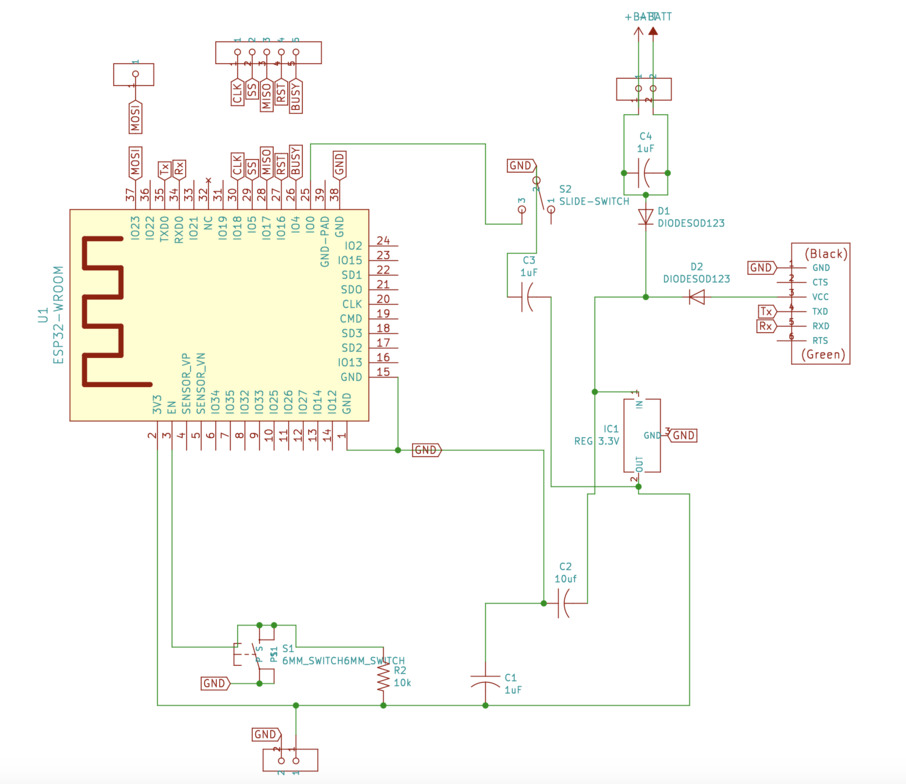
This week, I septn forever deciding on a board design, and I settled on the simplest option, then even that took longer than expected. I made an ESP-32 WRoom board with battery connectors, SPI pins, and an FTDI header.
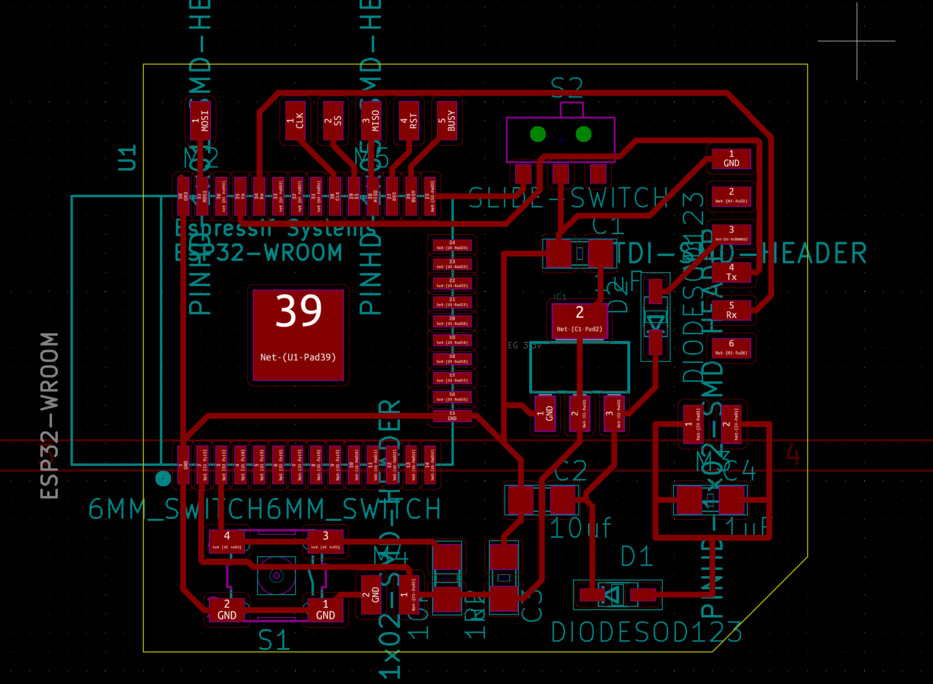
I had some of the most trouble, surprisingly, with creating holes in the design. I drew circles in Kicad, then tried to fill them in illustrator and inkscape and got the following results:


My final solution was just to draw a path over the holes in Kicad…
I looked it up and people suggested making a component for them. I am not sure what the simplest solution is.
I continued making this board as part of my final project and it can be viewed there
I am including excerpts from that page here:
OTA programming
Next, I wanted to place all of this inside of some code that would allow the board to be programmed remotely. This was another feature of the ESP32 that I wanted to take advantage of, as low power consumption + OTA programming, would make it unnecessary to open the display casing very often, and iit would only be necessary to do so to change the battery. In the networking week, I liked controlling the ESP32 off of a webserver run from the board. I wanted to do something like this to allow the board to be reprogrammed.
I found this tutorial for OTA programming using the board’s IP address. I copied this bit of the code to prepare the board for wifi and added it to the beginning of my code:
#include <WiFi.h>
#include <WiFiClient.h>
#include <WebServer.h>
#include <ESPmDNS.h>
#include <Update.h>

const char* host = "esp32";
const char* ssid = "REPLACE_WITH_YOUR_SSID";
const char* password = "REPLACE_WITH_YOUR_PASSWORD";

WebServer server(80);

const char* serverIndex =
"<script src='https://ajax.googleapis.com/ajax/libs/jquery/3.2.1/jquery.min.js'></script>"
"<form method='POST' action='#' enctype='multipart/form-data' id='upload_form'>"
   "<input type='file' name='update'>"
        "<input type='submit' value='Update'>"
    "</form>"
 "<div id='prg'>progress: 0%</div>"
 "<script>"
  "$('form').submit(function(e){"
  "e.preventDefault();"
  "var form = $('#upload_form')[0];"
  "var data = new FormData(form);"
  " $.ajax({"
  "url: '/update',"
  "type: 'POST',"
  "data: data,"
  "contentType: false,"
  "processData:false,"
  "xhr: function() {"
  "var xhr = new window.XMLHttpRequest();"
  "xhr.upload.addEventListener('progress', function(evt) {"
  "if (evt.lengthComputable) {"
  "var per = evt.loaded / evt.total;"
  "$('#prg').html('progress: ' + Math.round(per*100) + '%');"
  "}"
  "}, false);"
  "return xhr;"
  "},"
  "success:function(d, s) {"
  "console.log('success!')"
 "},"
 "error: function (a, b, c) {"
 "}"
 "});"
 "});"
 "</script>";
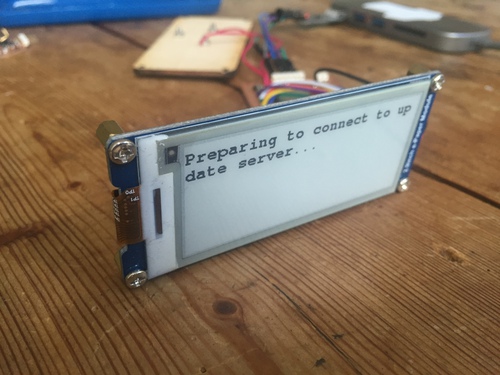
I then took the part of the code which establishes a connection to the server, which was placed in the setup in the tutorial, and added it to a new position in my case statement. I additionally added a message to display to the e-ink that it was starting to connect, and would add a delay before it actually did so. As connecting to wifi consumes more power, I wanted to give the user the option to scroll past this before it started:
case 6:
display.fillScreen(GxEPD_WHITE);
 display.setTextColor(GxEPD_BLACK);

// load a font - in the library
 display.setFont(&FreeMonoBold9pt7b);

 display.setCursor(0, 0);
 display.println();
 display.println("Preparing to connect to update server..." );
  display.update();
 delay(8000)
 display.println("Connecting." );
  display.update();

// Connect to WiFi network
  WiFi.begin(ssid, password);
  Serial.println("");

  // Wait for connection
  while (WiFi.status() != WL_CONNECTED) {
    delay(500);
    Serial.print(".");
  }
  Serial.println("");
  Serial.print("Connected to ");
  Serial.println(ssid);
  Serial.print("IP address: ");
  Serial.println(WiFi.localIP());

  /*use mdns for host name resolution*/
  if (!MDNS.begin(host)) { //http://esp32.local
    Serial.println("Error setting up MDNS responder!");
    while (1) {
      delay(1000);
    }
  }
  Serial.println("mDNS responder started");
  /*return index page which is stored in serverIndex */
  server.on("/", HTTP_GET, []() {
    server.sendHeader("Connection", "close");
    server.send(200, "text/html", loginIndex);
  });
  server.on("/serverIndex", HTTP_GET, []() {
    server.sendHeader("Connection", "close");
    server.send(200, "text/html", serverIndex);
  });
  /*handling uploading firmware file */
  server.on("/update", HTTP_POST, []() {
    server.sendHeader("Connection", "close");
    server.send(200, "text/plain", (Update.hasError()) ? "FAIL" : "OK");
    ESP.restart();
  }, []() {
    HTTPUpload& upload = server.upload();
    if (upload.status == UPLOAD_FILE_START) {
      Serial.printf("Update: %s\n", upload.filename.c_str());
      if (!Update.begin(UPDATE_SIZE_UNKNOWN)) { //start with max available size
        Update.printError(Serial);
      }
    } else if (upload.status == UPLOAD_FILE_WRITE) {
      /* flashing firmware to ESP*/
      if (Update.write(upload.buf, upload.currentSize) != upload.currentSize) {
        Update.printError(Serial);
      }
    } else if (upload.status == UPLOAD_FILE_END) {
      if (Update.end(true)) { //true to set the size to the current progress
        Serial.printf("Update Success: %u\nRebooting...\n", upload.totalSize);
      } else {
        Update.printError(Serial);
      }
    }
  });
  server.begin();
}

server.handleClient();
  delay(10000);

  touch1detected = false;
   break;
}
At first, I added a delay of 10 seconds after the server.handleClient() command, but this did not give adequate time even to connect to the server. So i changed this to 30 and uploaded again. Now, I could connect to the server! everything was working. However, I realized this still would not be enough time to upload a sketch. Instead of a delay, I put the server.handleClient in a while (true) loop. I thought that I would still be able to break out of this by using the touch pin I assigned to scrolling through the case statement.
I ran the code again, but realized that once I entered the handleClient loop, I could not break out of it! So to make the touch pin work to break from the wifi connection and restart the slideshow, I changed the code like this:
touch1detected = false;

        while (true) {
          server.handleClient();
          if (touch1detected){
            break;
          }
         }

         touch1detected = false;
         break;
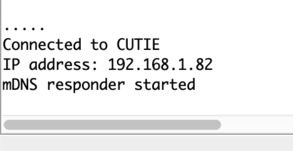
To program over the air, grab the IP address of the board from the Serial monitor, as displayed in the picture from the readout above.
Visit this in a browser from the same network that the ESP is connected to, and you will see this page:

After entering the username and password that you set, you will be brought to this page:
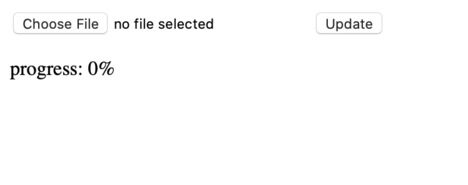
Where you can upload the compiled bin.
In order to upload sketches over the webserver, they must be exported as compiled binaries. This can be done in Arduino, by clicking Sketch > Export as compiled binary. The .bin file will then appear in the sketch’s folder in the Arduino library. I tested this by OTA uploading a different sketch with the same format, only one of the images in the slideshow changed out, and it works well. Just always remember to include the OTA code in the program, or it will lose this ability.
Summary
I had been wanting to use node red for a while, so I was excited to see how easy it actually was. If I make a project with multiple displays, this would definitely be the first spiral tool I could use to integrate them. I also found the ESP running a webserver that it could be controlled from, so that I would not have to rely on external wifi, a very easy solution to make the project portable. For my final project I hope to be able to use this to program/control the displays, as I do not want to have the display be reliant on a single network.