2. Project management
assignment: work through a git tutorial
build a personal site in the class archive describing you and your final project
A description of who I am can be found in the ‘About’ page in the site navigation, and a description of some initial ideas for my final project can be found under the assignment ‘1. Principles and Practices.’
Git Tutorial
I decided to follow the Git tutorial linked to in the project management page of the FabAcademy schedule.
The tutorial is bare-bones, but that is fine, as I already have an understanding of Git’s history and the uses for a version control System from Monday’s recitation and Fiore’s videos.
I found all of the commands a bit abstract and difficult to understand during the first read through, but I referred back to this tutorial after actually using the commands to publish the site and it helped me to understand the commands in depth.
While branching is interesting, I doubt I will find much use for it in creating this website.
The commands I expect to use each week are:
git pull
git status
git add .
git commit -m “message”
git push
Additionally, I used
git clone
To establish my local repository this first week. I will explain what each of these commands do below, when I talk about how I used them to make the website.
Making the Website
After doing the Git tutorial, the bulk of the work this week was setting up the website for our FabAcademy documentation, and figuring out a process for documenting our assignments. Git, GitLab, and MkDocs–as difficult as they are to understand at first–make this process easier. I will outline the steps I followed here:
Step 1: Downloads
Before getting started, Henk advised me that I would need some new software.
-
I downloaded Git by following a link on the Git website’s downloads page. Easy enough.
-
I downloaded Homebrew, a package management system which “software package management system that simplifies the installation of software on Apple’s macOS” - Homebrew’s Wikipedia Page. I installed HomeBrew by entering the following command in Terminal:
/usr/bin/ruby -e "$(curl -fsSL https://raw.githubusercontent.com/Homebrew/install/master/install)"
- Next, I installed MkDocs. I did this using a command from HomeBrew in terminal. It was as simple as entering:
brew install mkdocs -
I then downloaded Sublime, an editor, from the Sublime text website. As I am a bit out of practice with code, Sublime helps me keep my bearings by color coding commands in the text, and allows me to highlight, delete, and move large chunks of code, which I could not do in Terminal.
-
Finally, I downloaded ImageMagick, a tool to help me resize images for the web. I again installed this with HomeBrew, using the two lines of code below, as directed by the ImageMagick website
brew install imagemagick
brew install ghostscript
I will describe how I used all of this software in following steps.
Step 2: Building My Local Git Repository
I got a bit of a late start on everything from this point on. As I only joined FabAcademy on Friday, I was not able to access GitLab until Monday. As a result, I rushed through the process a bit at this point and don’t have as many screenshots of terminal as I would like to post here. I learned my lesson, though– document EVERYTHING!
Henk walked me through the first few steps of building my local Git repository, which corresponded to the steps on the Git cheat sheet from the FabAcademy website.
To start, we had to generate my SSH key by entering the following code into terminal:
ssh-keygen -t rsa -C "$your_email"
cat ~/.ssh/id_rsa.pub
I made a folder on my computer where I could clone my personal repo from FabCloud.
mkdir FabAcademy
then entered that directory.
cd FabAcademy
git clone git@gitlab.fabcloud.org:academany/fabacademy/2020/labs/waag/students/nathan-harris.git
Inital setup complete!

Step 3: Editing the Site
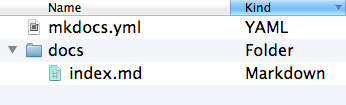
The repo that I cloned from GitLab came MkDocs ready. This means that the directory included these basic elements, the key ingredients to any MkDocs Site:
-a file titled “mkdocs.yml” a configuration file which includes basic information such as my name, the website theme, and directions to the “docs” folder which would house the site content and navigation
-The Docs folder, which contains an index.md file.
On top of these basic ingredients, the docs folder from the site I cloned from the GitLab also included several directories that mirrored the navigation I would need, as well as one to store images for the website:
- An assignments folder, which houses an .md file for each week of the fabacademy. The text inside of these files already includes the titles of each week of the FabAcademy.
- An About folder, which similarly houses the .md files in which we can write general information about ourselves
- A projects folder, in which we can describe larger projects, such as our final project.
- an images folder, which houses the images we use on the site. This folder ensures that the images we use will be stored in the GitLab repo to
As the site was already (mostly) built for us, the rest of the work was figuring out how to edit in MkDocs with Markdown, a simple markup language that MkDocs converts to html. This was pretty simple as many of the markdown commands, as well as instructions for how to use each doc, were already explained in the cloned docs.
For this page, for example, I am typing in the week02.md file, which already existed in the assignments folder from my cloned personal repo. I am mostly just adding text, with the occasional markdown command sprinkled in. Those I am using most include:
Headers, such as
#H1
##H2
Placing hashtags before text changes the text’s formatting so that it can appear as a header. The number of hashtags used corresponds to different header styles. So, for example, there is one hashtag before the title project management, and two before the title making the website, creating two separate header styles.
Inline links, such as those I used to link to Fiore’s videos, are created using:
[I'm an inline-style link](https://www.google.com)
Numbered lists, like the one I used to describe the contents of the Docs folder, are generated automatically when numbers are used at the start of a line of text. So my list above is identical to the code used to write it, only the line breaks are added when it runs through MkDocs:
1. An index.md file, which acts as the site's homepage
2. An assignments folder, which houses an .md file for each week of the fabacademy. The text inside of these files already includes the titles of each week of the FabAcademy.
More commands can be found on this [markdown cheat sheet](https://github.com/adam-p/markdown-here/wiki/Markdown-Cheatsheet#images).
Finally, I made very simple changes to the website's color palette and font by editing this section of the mkdocs.yml file:

### Adding Images to The Site
I am giving images their own subheading here because they require a bit of processing before I bring them into the MkDocs site.
Currently, I am placing images and screenshots I want to use on this website in a desktop folder titled FabAcademyImages. I then create new, resized versions of each image inside of that folder before bringing them into the Images folder on my MkDocs site.
There is a size limit on our personal GitLab sites, and Neil has threatened to call out students who take up too much space during his next lecture. So the smaller the better!
I am using ImageMagick to change the file size of images.
I have experimented with two commands so far.
The first is a resize command and looks like this:
This command scales an image, so the above line of code would shrink the original image to 10% of its original size. The shrunken image will be named smallimage.jpg, as directed in the same command.
The second command is:
This one changes image resolution, but not dimensions. If, in the above line of code, the original image.jpg was 300dpi, lowresimage.jpg would be 100dpi.
For screenshots, I prefer the -resample command, and for other images, -resize tends to be more appropriate.
I can also edit a batch of images with a command like
After I have resized an image, I place it in the images folder of the Docs directory in my MkDocs site.
Images can also be changed to a different format with:
magick mogrify -format jpg *.png
From there, it is easy to place images on the website using markdown and a relative local address:

Step 4: Publishing the Site
With MkDocs, all of this work can be previewed in my browser by entering the following command in the terminal:
mkdocs serve

You can then navigate to the ip address generated by this command (127.0.0.1:8000 in the above screenshot) to preview the site.
If I like how it looks on there, I then publish to my personal site on GitLab.
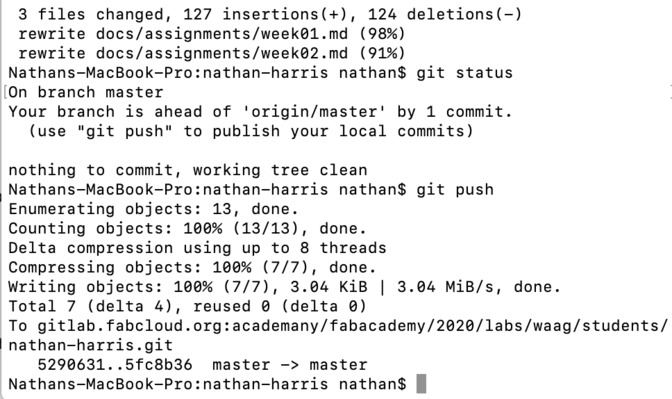
In terminal, once I am inside the Git Repository I will first use:
git pull

This readout means all clear!
Next, I use the command:
git add .
which “tells Git to take a snapshot of the contents of all files under the current directory. This snapshot is now stored in a temporary staging area which Git calls the “index”.” -git-scm.com
After that, I am ready to permanently store the contents of that index in the repository. I use the following command:
git commit -m "message"
git status
which lets me know how many commits I am ahead of the origin.
Finally, I am ready to use
git push
which will push the latest commit to the origin repository on the server.
Here is a screenshot from my first push:
Problems
I had the most trouble with getting images to appear on the site.
At first, I tried using the same address format for the image that came preloaded on our home page:

I removed the period from the beginning of the address, and images began to appear locally!
When I pushed the site, however, they all showed up as tiny question mark icons. Harm, my classmate, suggested I open an image in a new tab and check the address. It read:
http://fabacademy.org/images/week01/final.jpg
In my first attempt to resolve this, I thought I could avoid changing the code for each image by adding the part of the address missing from the url to my .yml. So, inside of my mkdocs.yml, I changed:
site_author: Nathan Harris
docs_dir: docs
site_dir: _site
to
site_author: Nathan Harris
docs_dir: docs
site_dir: _site/2020/labs/waag/students/nathan-harris/docs
After a git push, this caused my whole website to disappear with a 403 forbidden error.
After removing the new addition to site_dir, I checked the code on other sample images from the template, and saw that these used two periods:

Summary
I took a couple of programming classes in university, but as it has been years, it was nice to start working with terminal and basic programming again. I did not find any of the syntax, using terminal, etc this week too difficult, and really liked using Homebrew and imagemagick in particular— will make downloads and image formatting much easier in general.
Though I was able to get my GitLab page working and found MkDocs and Markdown easy enough to use, I still hope to gain a better understanding of Git. I know how to go through the motions of pulling, adding, making commits and pushing, but not sure if I completely understand git overall. We will not be working too much with branching in FabAcademy, so I hope I can revisit this aspect of git in the future to be more comfortable with the system overall rather than just for updating my documentation. Additionally, I wish I had a bit more time to customize my site more, or even work with Jekyll, as I am not in love with the layout of MkDocs material or any of the available themes. But as we move quickly through FabAcademy, I want to be able to document as easily as possible, so I can’t complain. Hopefully I can learn a bit more about web design and git after FabAcademy.