13. Interface and application programming
Assignments for week 12 :
-
This week we have a group assignment and an individual assignment .
-
The group assignment for this week is to compare as many tool options as possible .
-
The individual assignment for this week is to write an application that interfaces a user with an input &/or output device that i made .
The goal for this week is to learn about programming languages such as python, C++, javaScript and more then to learn about device, data, and user interfaces in order to interface a user with an input or an output device that i will make .
Files to download :
I have included all the files that you can download down below and here you can find them directly :
- Download python
- Download pycharm .
- Arduino LED code
- Python LED code
- Arduino Ultrasonic code
- Processing Ultrasonic code
Group assignment :
-
For the group assignment this week we have to compare as many tool options as possible and to do that we had a 3 hours meeting just explaining and comparing as many tools as possible.
-
Our instructor walk us throw the tools we might need so first we started by explaining processing and how we can use it and because it has some similarity to Arduino .
-
Then we discussed how we can use Python and explained why it needs an interrupter such as Pycharm and the libraries needed to interface .
-
Next we discussed Firefly and this a blug in for grasshopper also explained that we can use it in many different ways such as creating an interface with just the sound of the sea and much more.
-
Finally we had a discussion about the MIT app inventor and how we can use it to create apps in order to interface with an output or an input .
Individual assignment :
For the individual assignment this week i have to write an application that interfaces a user with an input &/or output device that i made and to do that i am going to learn processing and python in order to create a graphical interface to control a microchip, lets start !!
Python :
- To start with pyhton i had to do a lot of research and to be honest i always wanted to learn about pyhton but i never had time so this week is really helpful to understand and learn more about it, so lets start !!
What is python ?
-
Python is an interpreted, object-oriented, high-level programming language with dynamic semantics. Its high-level built in data structures, combined with dynamic typing and dynamic binding, make it very attractive for Rapid Application Development, as well as for use as a scripting or glue language to connect existing components together.
-
Python’s simple, easy to learn syntax emphasizes readability and therefore reduces the cost of program maintenance.
-
Python supports modules and packages, which encourages program modularity and code reuse. The Python interpreter and the extensive standard library are available in source or binary form without charge for all major platforms, and can be freely distributed.
-
Often, programmers fall in love with Python because of the increased productivity it provides. Since there is no compilation step, the edit-test-debug cycle is incredibly fast.
-
Debugging Python programs is easy: a bug or bad input will never cause a segmentation fault. Instead, when the interpreter discovers an error, it raises an exception. When the program doesn’t catch the exception, the interpreter prints a stack trace.
-
A source level debugger allows inspection of local and global variables, evaluation of arbitrary expressions, setting breakpoints, stepping through the code a line at a time, and so on. The debugger is written in Python itself, testifying to Python’s introspective power. On the other hand, often the quickest way to debug a program is to add a few print statements to the source: the fast edit-test-debug cycle makes this simple approach very effective.
Starting with python
-
To start with python you have to download it first so Click here to download python .
-
Next you have to download an interrupter in order to start with python so Click here to download pycharm .
-
Now you can start working with python and i will explain how to do that .
How to Program Using pyhton :
-
If you dont know anything about python just follow this Tutorial because i have found really helpful .
-
In order to interface with an output or an input device you have to work on Arduino and Python , in my case, at the same time and if you wonder what that means i will explain it now .
-
First you have to write a code that controls you microchip and in my case i wanted to control and use Arduino so first i have used LED’s as an output and i have written a code in Arduino to control those LEDS’s then i have written a code on python in order to interface with the Output which is in my case the LED’s .
-
Now the code in arduino is not like every code we write but if you want this code to be interfaced with you must added the “Serial communication” in between and to do that just added “Serial begin (9600)” you must keep in mind that the number “9600” is the baud number which can be different from one controller to another and now i will make stuff easier by showing you exactly what i mean .
-
Here you can see what mean by the “Serial begin” and the “Baud number” that you must added :
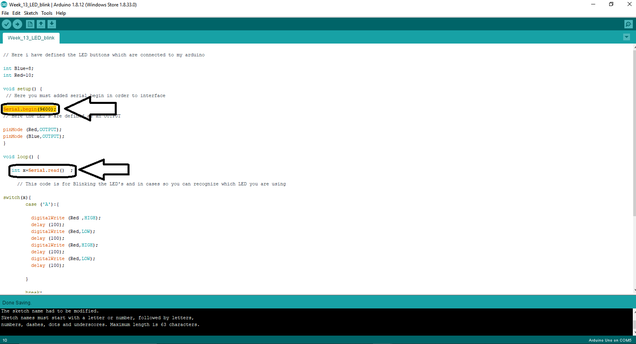
- Also Here you can see the “port number” that you must added :

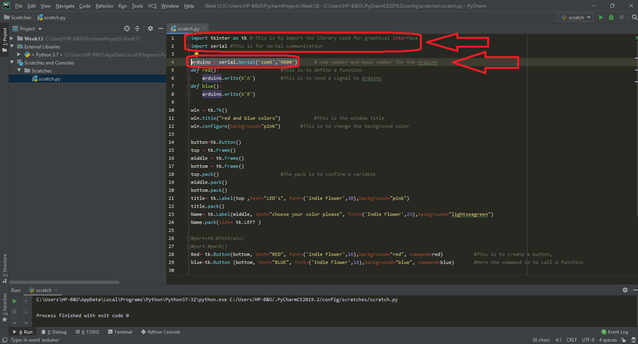
- Here you can see that you also have to added the “Port number”, “Baud number” and the “serial begin” in python :
- Now after i explained everything lets start Programming .
Programming with python :
-
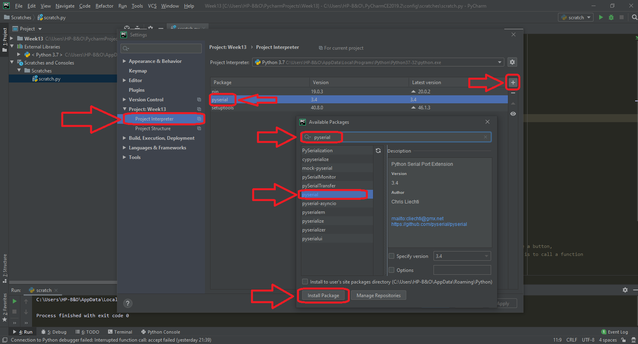
Before starting you have to added a library which is Pyserial in python in order to provide support for serial connection, which I am going to be using to communicate between my Arduino code and python to start the serial communication like this :
-
Here is how to added the library, first click on settings >> project interrupter >> The + sign >> Type in search “Pyserial” >> Choose Pyserial Library >> Install package, and you are ready to go :
- Here is the Arduino code for the LED’s to blink :
// Here i have defined the LED buttons which are connected to my arduino

int Blue=8;
int Red=10;

void setup() {
 // Here you must added serial begin in order to interface

Serial.begin(9600);
// Here the LED's are defined as an OUTPUT

pinMode (Red,OUTPUT);
pinMode (Blue,OUTPUT);
}

void loop() {

   int Y=Serial.read()  ;

     // This code is for Blinking the LED's and in cases so you can recognize which LED you are using

switch(Y){
        case ('A'):{

          digitalWrite (Red ,HIGH);
          delay (100);
          digitalWrite (Red,LOW);
          delay (100);
          digitalWrite (Red,HIGH);
          delay (100);
          digitalWrite (Red,LOW);
          delay (100);

        }

        break;
        case ('B'):{

        digitalWrite (Blue,HIGH);
        delay (100);
        digitalWrite (Blue,LOW);
        delay (100);
        digitalWrite (Blue,HIGH);
        delay (100);
        digitalWrite (Blue,LOW);
        delay (100);

        }
        break;
     }
}
- And here is the Pyhton code for the LED’s:
import tkinter as tk   #This is to import the library used for graphical interface
import serial          #This is for serial communication

arduino = serial.Serial('com5','9600')      # com number and baud number for the Arduino
def red():                      #This is to define a function
    arduino.write(b'A')         #This is to send a signal to Arduino
def blue():
    arduino.write(b'B')

win = tk.Tk()
win.title("red and blue colors")            #This is the window title
win.configure(background="pink")       #This is to change the background color

button=tk.Button()
top = tk.Frame()
middle = tk.Frame()
bottom = tk.Frame()
top.pack()                      #The pack is to confirm a variable
middle.pack()
bottom.pack()
title= tk.Label(top ,text="LED's", font=('Indie Flower',30),background="pink")
title.pack()
Name= tk.Label(middle, text="choose your color please", font=('Indie Flower',23),background="lightseagreen")
Name.pack(side= tk.LEFT )


Red= tk.Button(bottom, text="RED", font=('Indie Flower',16),background="red", command=red)           #This is to create a button,
blue=tk.Button (bottom, text="BLUE", font=('Indie Flower',16),background="blue", command=blue)       #Here the command is to call a function

Red.pack(side= tk.LEFT)    #This to make the buttons appear next to each other
blue.pack(side= tk.LEFT)


win.mainloop()      #This is to make the window open
Hero shot “Python” :
- Here i uploaded The Arduino Code :
- And here is the final result :
Processing :
- To start with processing i had to do a lot of research so lets start
What is processing ?
-
Processing is an open-source graphical library and integrated development environment (IDE) built for the electronic arts, new media art, and visual design communities with the purpose of teaching non-programmers the fundamentals of computer programming in a visual context.
-
Processing uses the Java language, with additional simplifications such as additional classes and aliased mathematical functions and operations. It also provides a graphical user interface for simplifying the compilation and execution stage.
-
The Processing language and IDE have been the precursor to other projects including Arduino, Wiring and P5.js.
Starting with processing :
-
To start with processing you have to download it first so Click here to download Processing .
-
There is no need for an interrupter as python so you are ready to start .
How to Program Using Processing :
-
If you dont know anything about processing just follow this Tutorial because i have found it really helpful .
-
As i said before if you want to interface with an input or an output you have to work on Arduino and Processing at the same time .
-
First you have to write a code that controls you microchip and in my case i wanted to control and use Arduino so secondly i have used the ultrasonic sensor as an input and i have written a code in Arduino to read the ultrasonic sensor data then i have written a code on processing in order to interface with the input which is in my case the ultrasonic sensor .
-
Now the code in arduino is not like every code we write but if you want this code to be interfaced with you must added the “Serial communication” in between and to do that just added “Serial begin (9600)” you must keep in mind that the number “9600” is the baud number which can be different from one controller to another and now i will make stuff easier by showing you exactly what i mean .
-
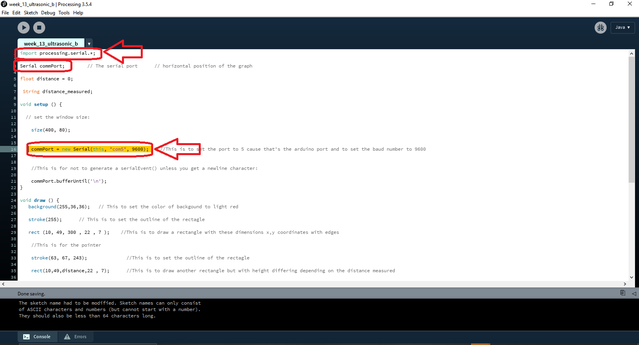
Here you can see what mean by the “Serial begin” and the “Baud number” that you must added :
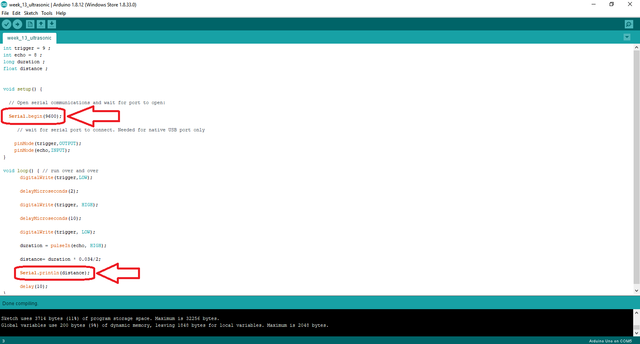
- Also Here you can see the “port number” that you must added :
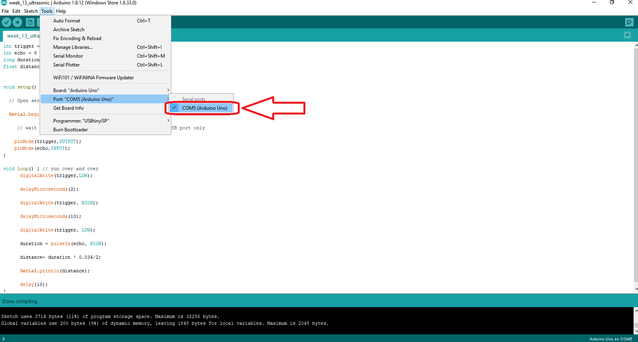
- Here you can see that you also have to added the “Port number”, “Baud number” and the “serial begin” in processing :
- Now after i explained everything lets start Programming .
Programming with processing :
-
Processing is easy to deal with because its more like Arduino so i wanted to illustrate the reading of the ultrasonic using Processing .
-
Here is the Arduino code for the ultrasonic sensor :
int trigger = 9 ;
int echo = 8 ;
long duration ;
float distance ;


void setup() {

  // Open serial communications and wait for port to open:

  Serial.begin(9600);

     // wait for serial port to connect. Needed for native USB port only

    pinMode(trigger,OUTPUT);
    pinMode(echo,INPUT);
}

void loop() { // run over and over
      digitalWrite(trigger,LOW);

      delayMicroseconds(2);

      digitalWrite(trigger, HIGH);

      delayMicroseconds(10);

      digitalWrite(trigger, LOW);

      duration = pulseIn(echo, HIGH);

      distance= duration * 0.034/2;

      Serial.println(distance);

      delay(10);
}
- And here is the processing code for the ultrasonic :
import processing.serial.*;

Serial commPort;        // The serial port      // horizontal position of the graph

float distance = 0;

 String distance_measured;

void setup () {

  // set the window size:

    size(400, 80);


    commPort = new Serial(this, "com5", 9600);    //This is to set the port to 5 cause that's the arduino port and to set the baud number to 9600


    //This is for not to generate a serialEvent() unless you get a newline character:

    commPort.bufferUntil('\n');
}

void draw () {
   background(255,36,36);   // This to set the color of backgound to light red

   stroke(255);      // This is to set the outline of the rectagle

   rect (10, 49, 300 , 22 , 7 );    //This is to draw a rectangle with these dimensions x,y coordinates with edges

    //This is for the pointer

    stroke(63, 67, 243);              //This is to set the outline of the rectagle

    rect(10,49,distance,22 , 7);      //This is to draw another rectangle but with height differing depending on the distance measured

    textAlign(RIGHT);

    text("The Distance measured ="+ distance_measured, 250, 25);  //This is to write the distance measured
}

void serialEvent (Serial commPort) {

  // get the ASCII string:

    distance_measured = commPort.readStringUntil('\n');

    if (distance_measured != null) {

      // trim off any whitespace:

      distance_measured = trim(distance_measured);

      // convert to an int and map to the screen height:

      distance = float(distance_measured);

      println(distance);

      distance = map(distance, 0, 250 , 15, 250); //This is to map the distance measured depending on the size of the rectangle I drew
    }
}
Hero shot “Processing” :
- Here i uploaded the Arduino code :
- And here is the final result :