15. Networking and Communications
This week I was challenged to design, build, and connect wired or wireless nodes with network or bus addresses. I decided to use my ESP32 board and the dev board I bought in the beginning of the class to practice with.
Useful links
Code Used
I used the code provided by Neil on the assignments page. It can be found under the ESP 32 UDP connection. I was able to use this code on both of my boards separately. I downloaded the code to each board using its respective port. I changed the code to provide my wifi ssid and password, as well as the IP address. The IP address was changed to reflect a connection with the IP of the machine each board is cross communicating to. This is how the boards were able to complete a wireless connection and send messages back and forth.
//
// hello.ESP32-WROOM.UDP.ino
//
// ESP32 UDP hello-world
//
// Neil Gershenfeld 11/16/19
//
// This work may be reproduced, modified, distributed,
// performed, and displayed for any purpose, but must
// acknowledge this project. Copyright is retained and
// must be preserved. The work is provided as is; no
// warranty is provided, and users accept all liability.
//

#include "WiFi.h"
#include "AsyncUDP.h"

const char* ssid = "???"; // replace with your WiFi SSID
const char* password = "???"; // replace with your WiFi password
const uint8_t address[] = {???,???,???,???}; // replace with UDP IP address
const uint16_t port = ???; // replace with UDP port number

AsyncUDP udp;

void setup() {
  //
  // start serial
  //
  Serial.begin(115200);
  //
  // connect to WiFi
  //
  Serial.print("\nConnecting ");
  WiFi.begin(ssid,password);
  while (WiFi.status() != WL_CONNECTED) {
    delay(100);
    Serial.print(".");
    }
  Serial.print("\nConnected with local address ");
  Serial.print(WiFi.localIP());
  Serial.print("\n");
  //
  // start UDP
  //
  udp.listen(1234);
  //
  // UDP packet handler
  //
  udp.onPacket([](AsyncUDPPacket packet) {
    //
    // write to serial
    //
    Serial.print("Received from ");
    Serial.print(packet.remoteIP());
    Serial.print(": ");
    Serial.write(packet.data(),packet.length());
    Serial.print("\n");
    });
  }

void loop() {
  //
  // check for serial
  //
  if (Serial.available()) {
    //
    // read from serial
    //
    String s = Serial.readStringUntil('\n');
    Serial.print("Sending to ");
    Serial.print(IPAddress(address));
    Serial.print(": ");
    Serial.print(s);
    Serial.print("\n");
    //
    // send to UDP
    //
    udp.connect(IPAddress(address),port);
    udp.print(s);
    udp.close();
    }
  }
About the Code
-
The first chunk of the code sets up the communication between he two boards. The serial monitor prints the communications so that the user can visually see the connection.
-
The serial monitor must be reading at a baud rate of 112500 in order to be interpreted. The terminal is being used in the example as an addition serial monitor for the corresponding Arduino IDE upload.
-
The serial print functions allows us to understand which of the boards is sending and which is receiving the messages.
-
void loop is then checking for the message that is being sent to the board that has this code.
-
The boards use their IP addresses to communicate back and forth.
-
The protocol connection is UDP (user datagram protocol) or connectionless protocol. Privacy News Online provides a great resource in explaining UDP connection and how it different from the other most common TCP. In short it boils down to function, connectivity, and dependability. TCP is for tasks that need more dependability and assured connectivity, whereas UDP is better with speed and efficiency.
Set Up
For this assignments I used an FTDI cable to connect my board to the computer. I am using a MacBook so I also have a USB to C adapters at the end. My board communicated through the /dev/cu.usbserial-FTBB94GD port. I used the code created by Neil above and applied the correct information. I then uploaded the program. Once the ESP32 was reset it was connected to the IP address of the dev ESP32.
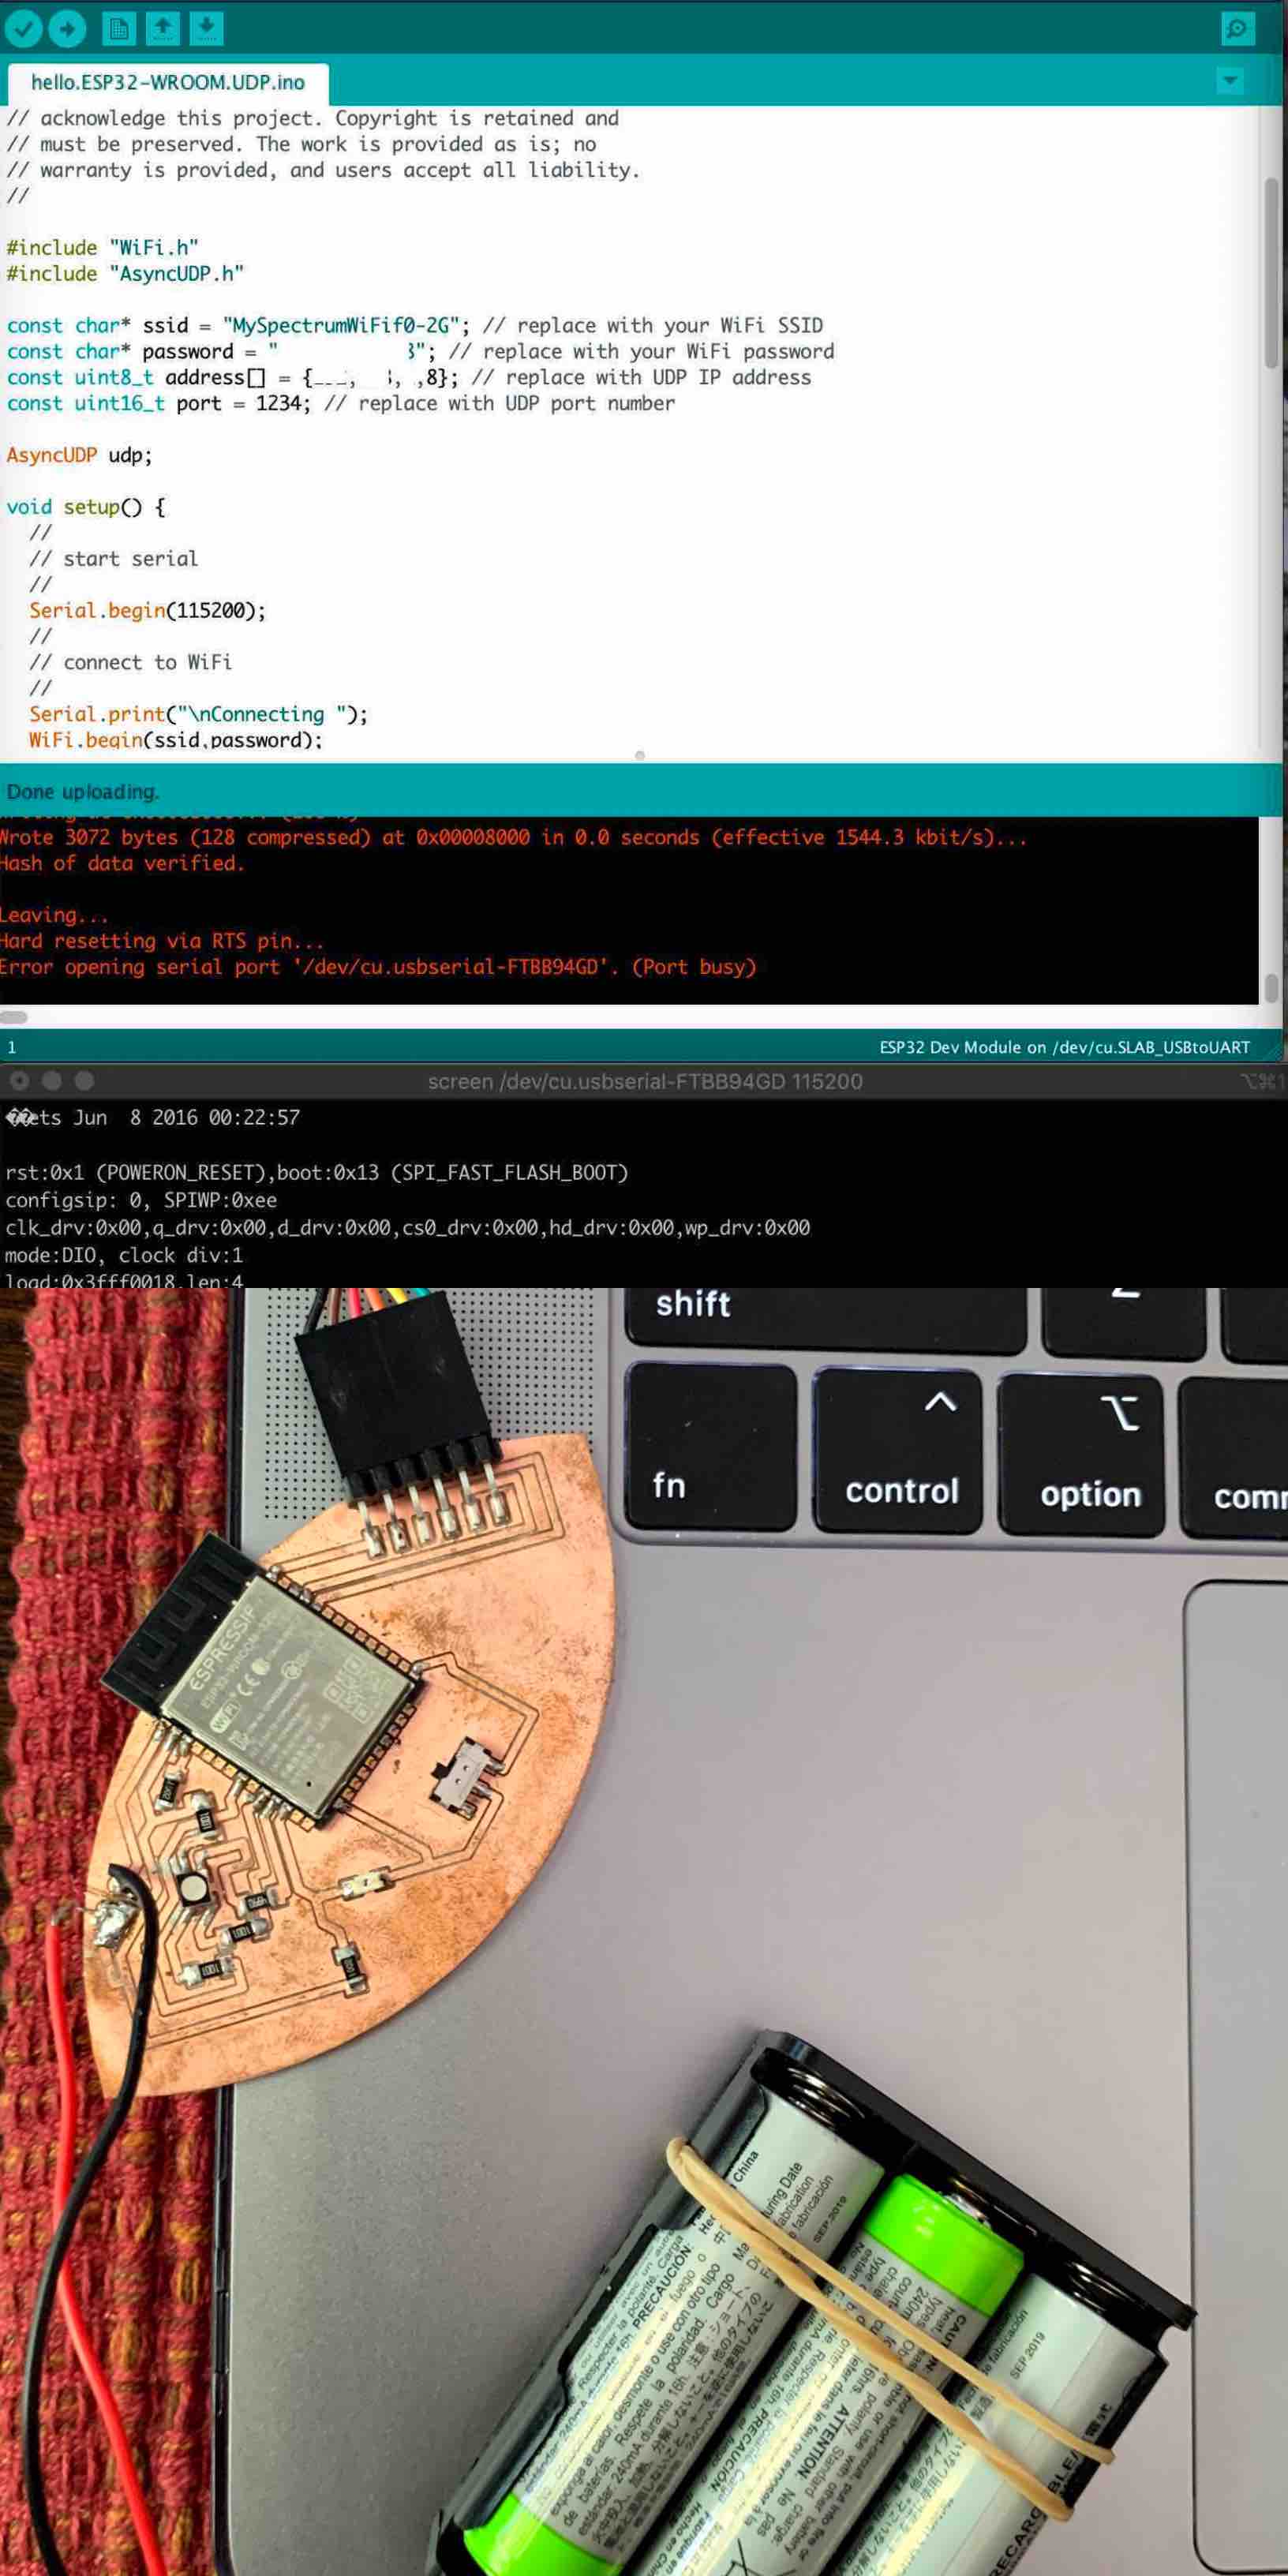
I used a USB to Micro cable to connect the dev board to the computer. I also have a USB to C adapters at the end of this cord. My board communicated through the /dev/cu.SLAB_USBtoUART port. I used the code created by Neil above and applied the correct information. I then uploaded the program. Once the code was finished uploading it was connected to the IP address of the my ESP32 board through the corresponding IP Address.

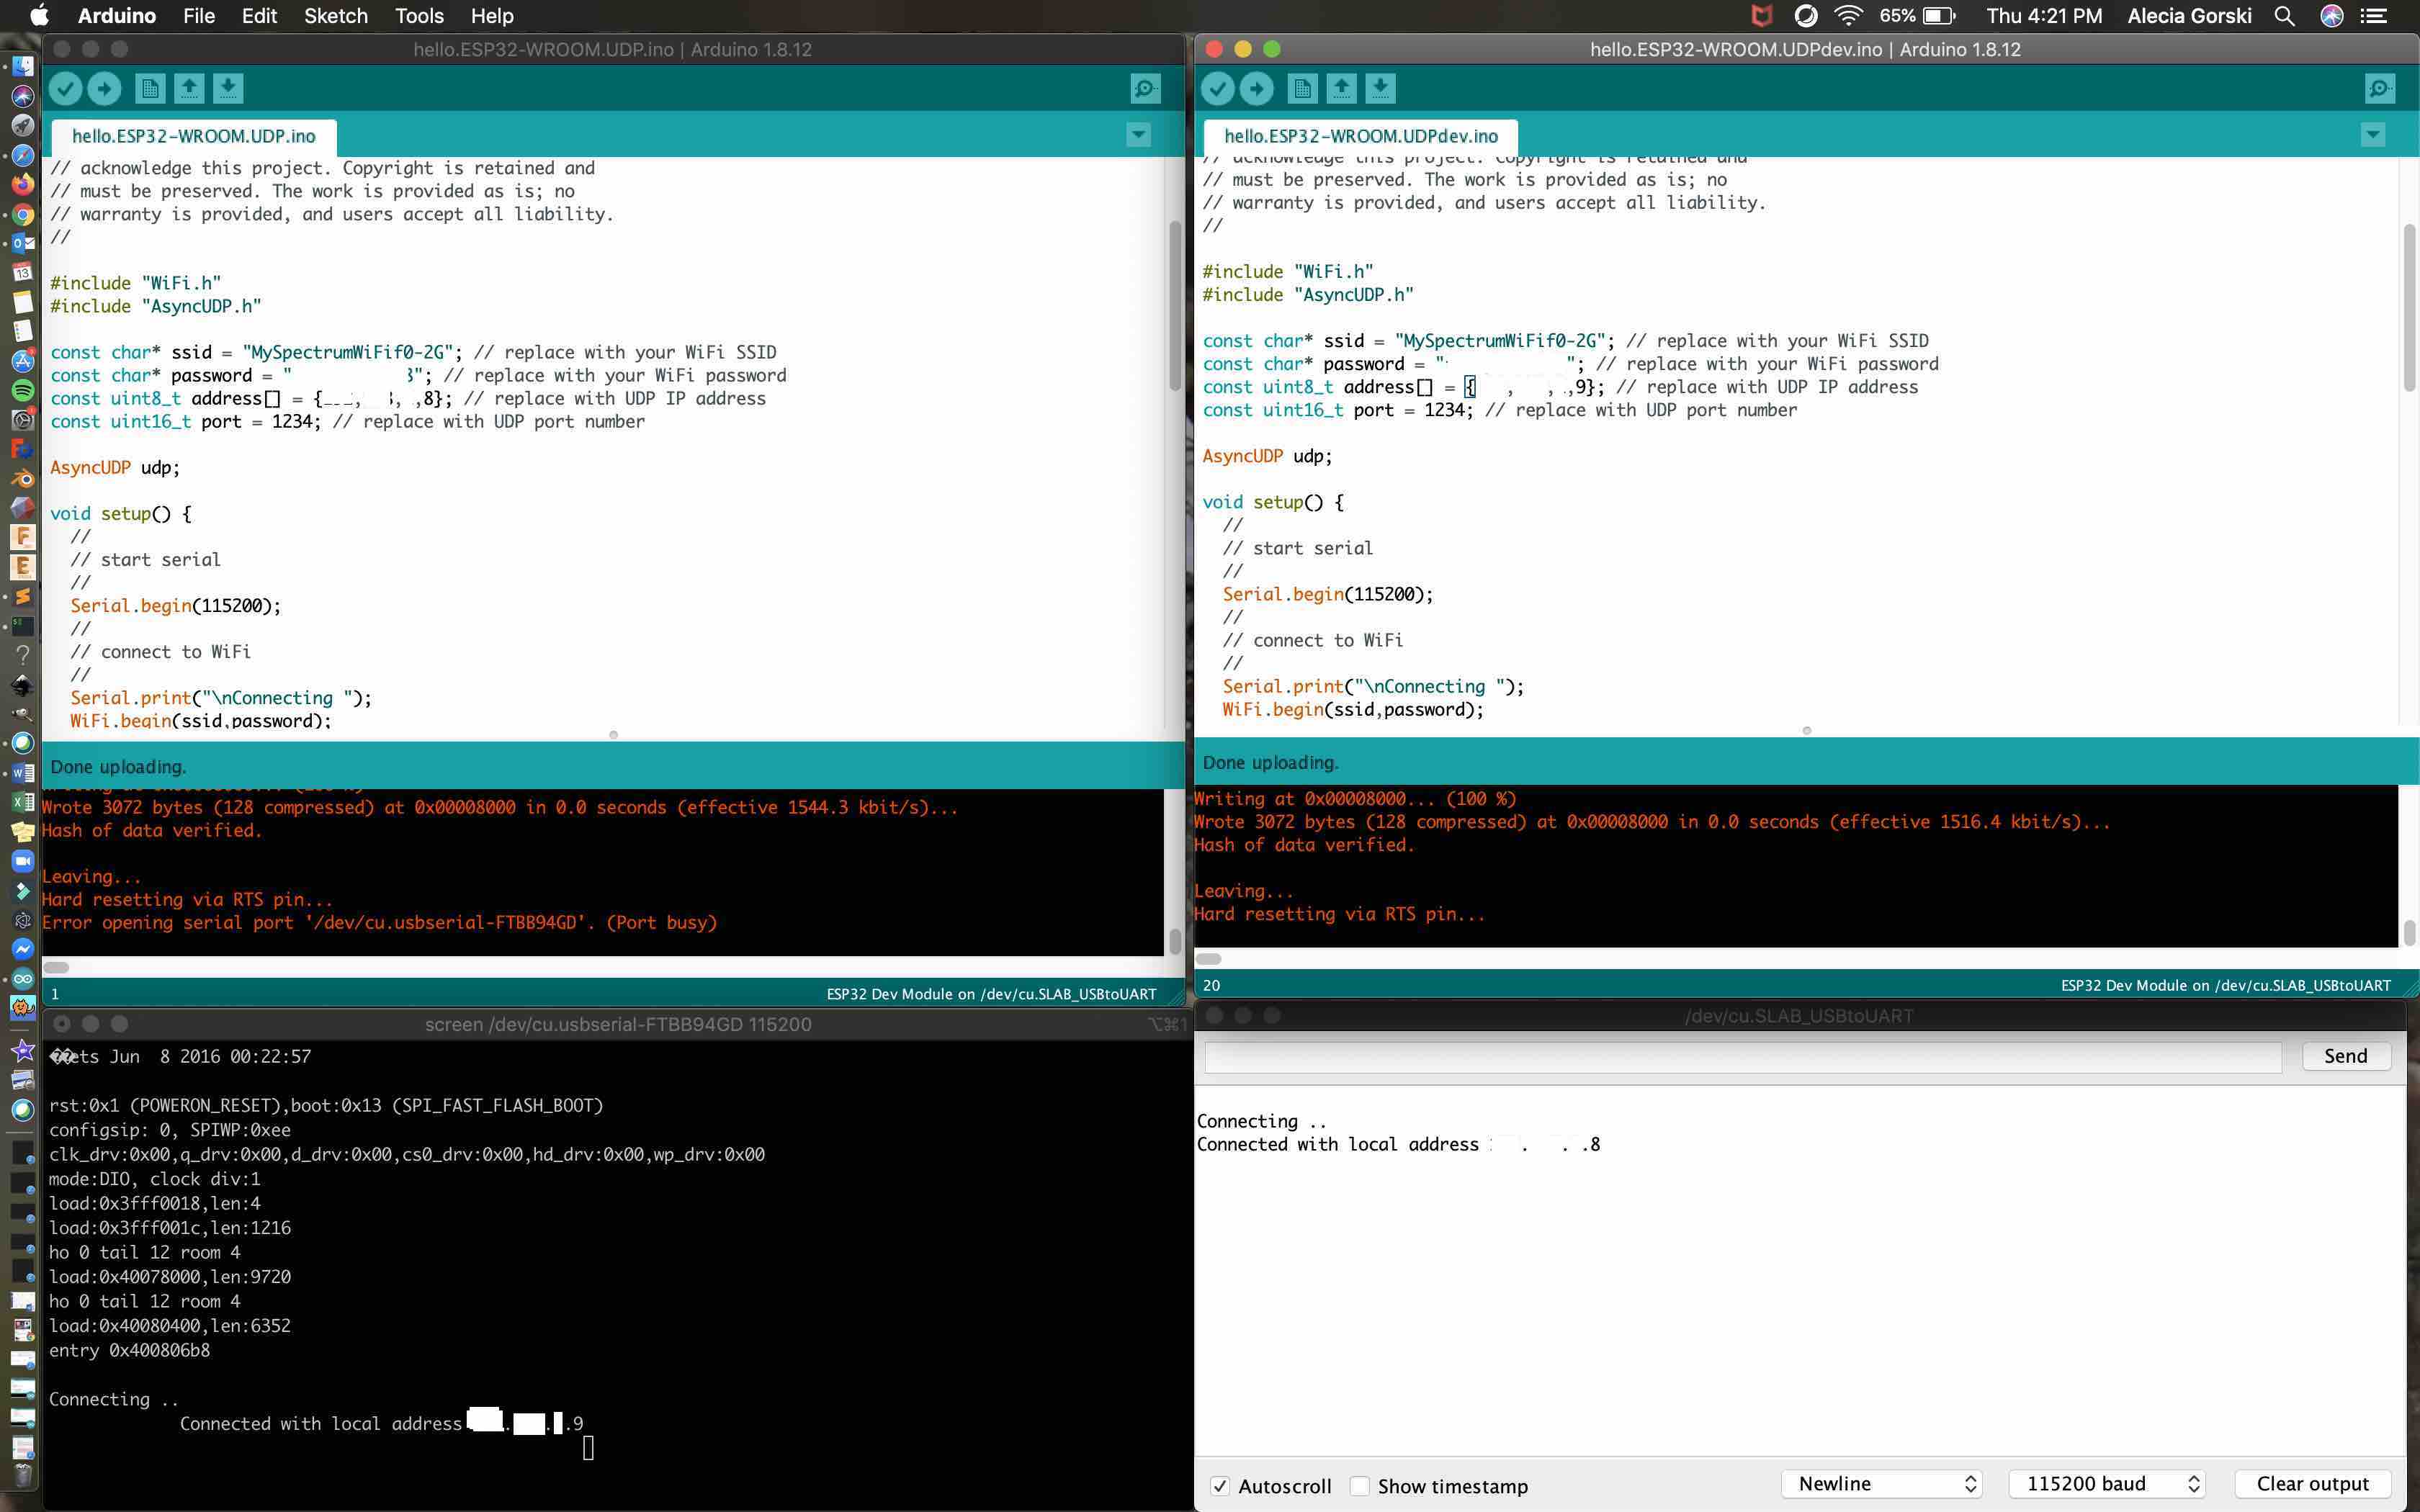
Connection Process
Some information has been blocked out to protect the privacy of the connections. As mentioned above each of the boards is associated with its own individual IP Address. By adding the IP Address of the board I want to connect to I am able to communicate without the use of wires. I upload the code and reset the ESP32. The Arduino screen on the top left is associated with the ESP32 board I created. The top Arduino screen on the right is associated with the dev board. The terminal screen below my ESP32 board is set as the serial monitor of the Arduino file for the /dev.cu.usbserial-FTBB94GD port and the Arduino serial monitor screen below the code file for the dev board file for the /dev/cu.SLAB_USBtoUART port. Each serial monitor screen shows the successful connection to the other device.
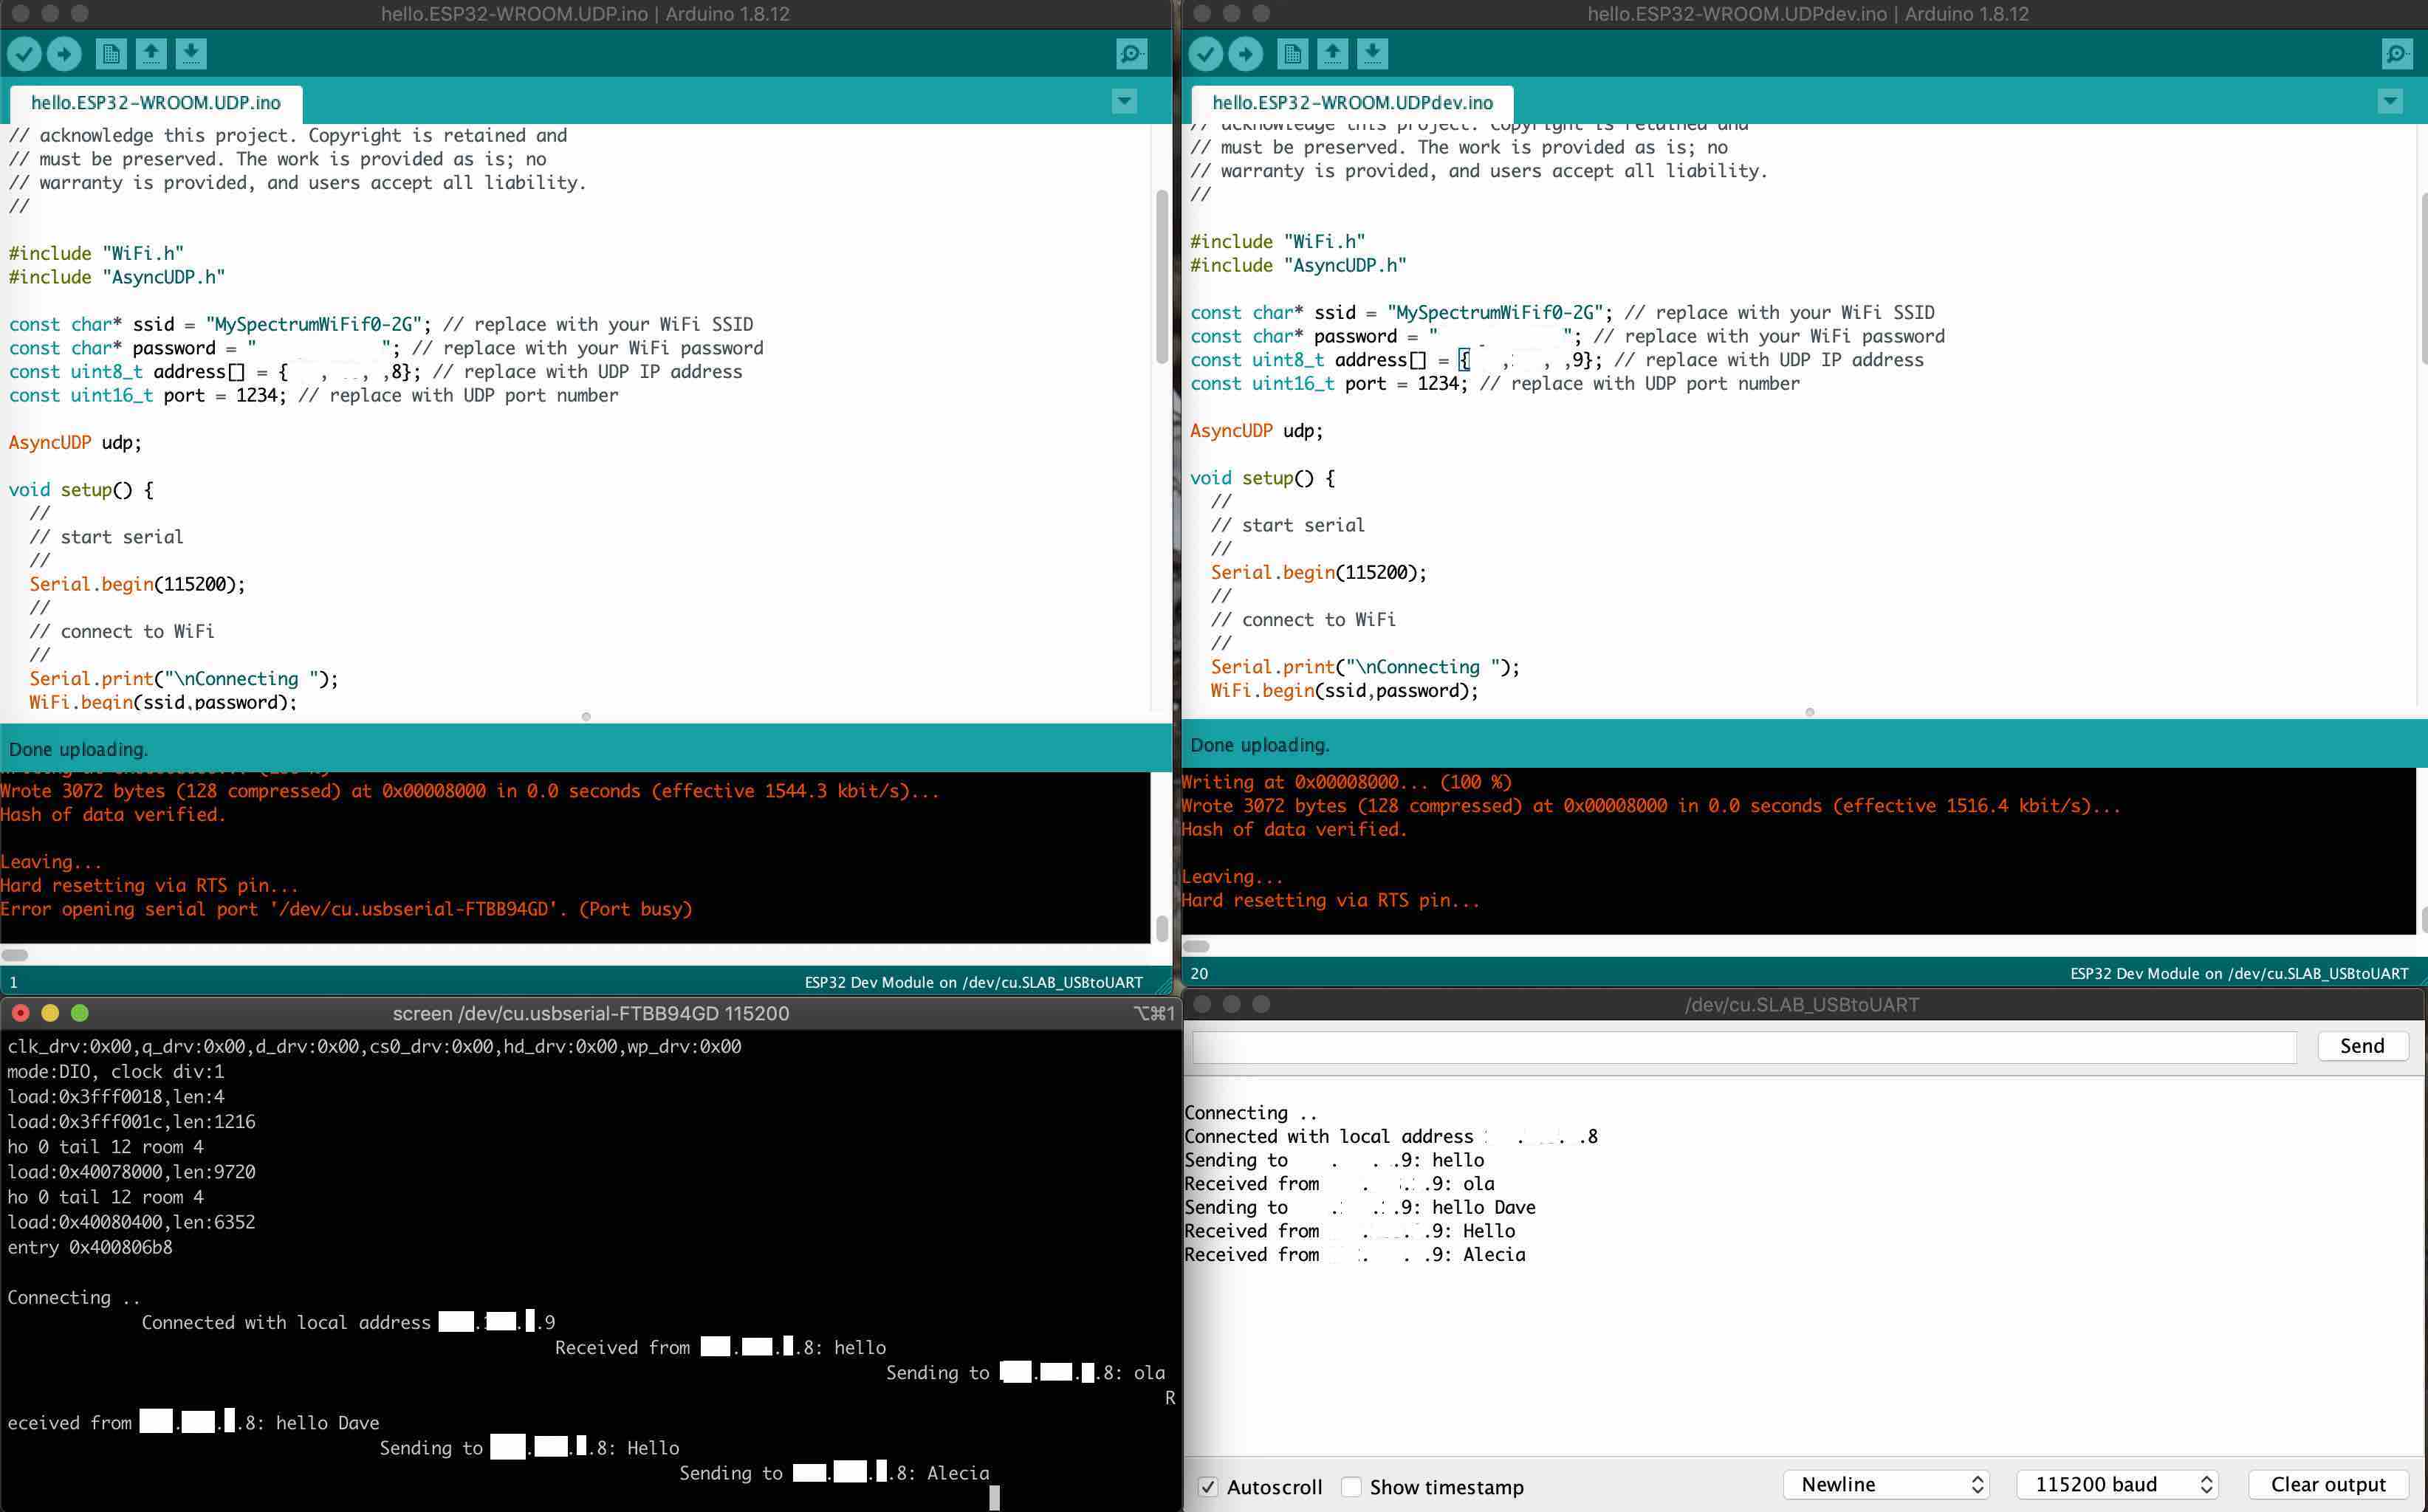
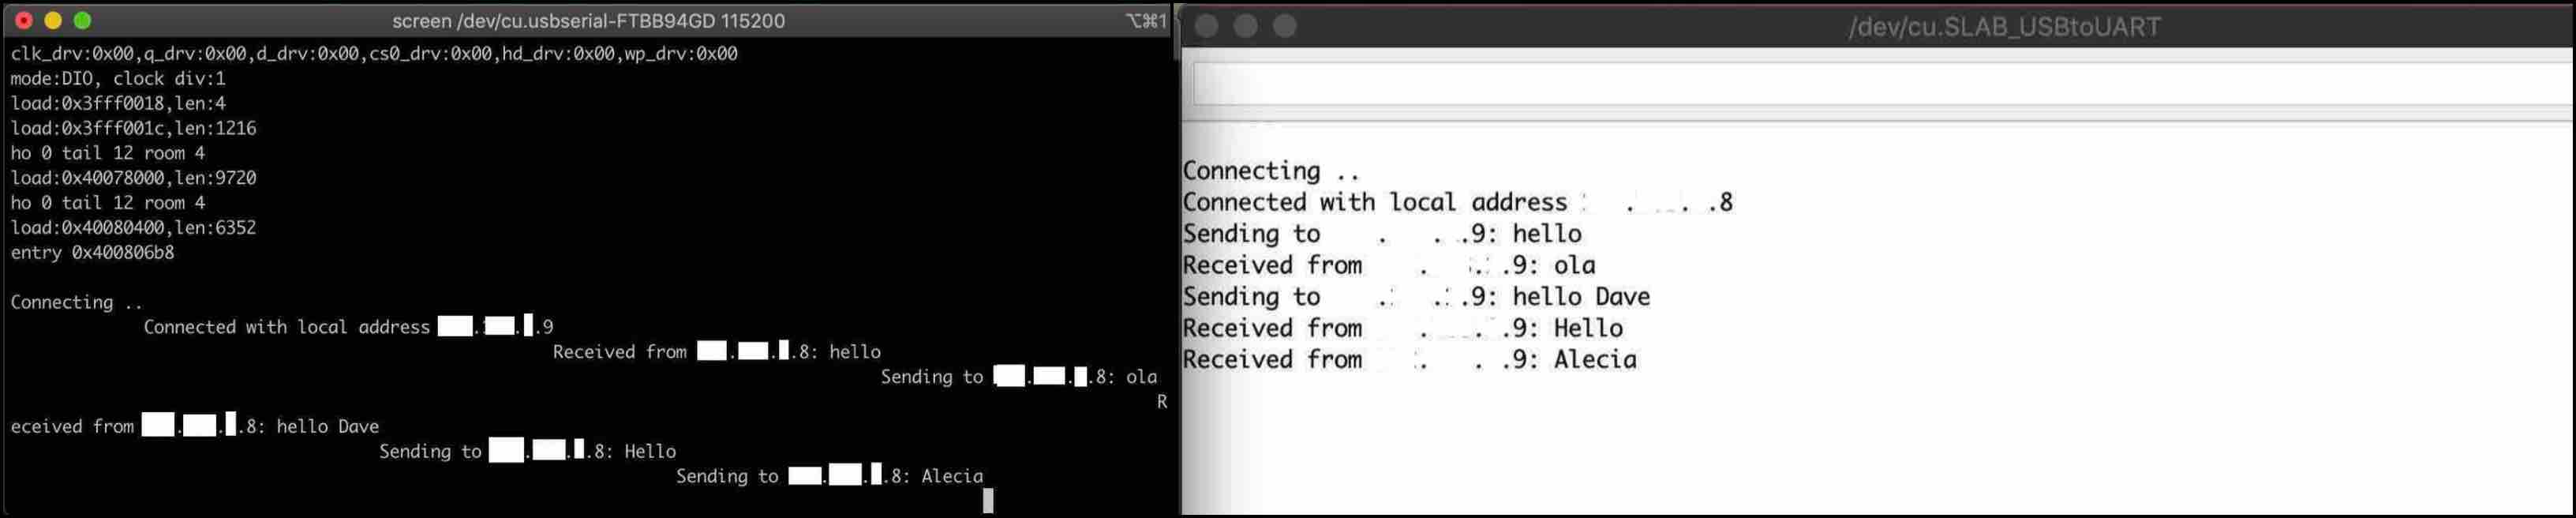
Communication Process
The set up described above is the same in the depiction below. The serial monitors however now show communication between the two boards. Hello is exchanged with hola, as well as hello Dave exchanged with Hello Alecia.
What I Learned
This assignment came completely new to me. I learned what wired and wireless connections are and how they communicate with each other. For my project I learned about IP Addresses and bus addresses. I read over Neils code and learned how to make it interact between the two machines.
One of the largest challenges I face is one I chose to face from the beginning, my devotion to Mac and iOS. I have really enjoyed the challenge of digging for the language to communicate with my machine. I learned where more information on chips I am programming can be found and how it can be used to expand the capabilities of the code and what it can accomplish.