Week 20
Final Project Requirements
Final documentation and verification of Fab Train as an integrated Fab Academy final project.
1. Checklist
- ✅ Made the final project slide in 1920 × 1080 px with my name, project name, Fab Lab name, project image and short description
- ✅ Made the final project video showing the fabrication, construction and operation of the project
- ✅ Made a separate final project page that summarizes and documents Fab Train
- ✅ Included the Bill of Materials for the project
- ✅ Linked from this page to the weekly assignments used to develop the project
- ✅ Documented how system integration was implemented in the final project
- ✅ Linked to
presentation.pngandpresentation.mp4located in the root directory of the website - ✅ Included editable source files and fabrication files in a downloadable archive
- ✅ Documented the packaging design and fabrication process with photographic evidence
- ✅ Included the license chosen for the project
- ✅ Acknowledged the work and support of others
2. Final Project Summary
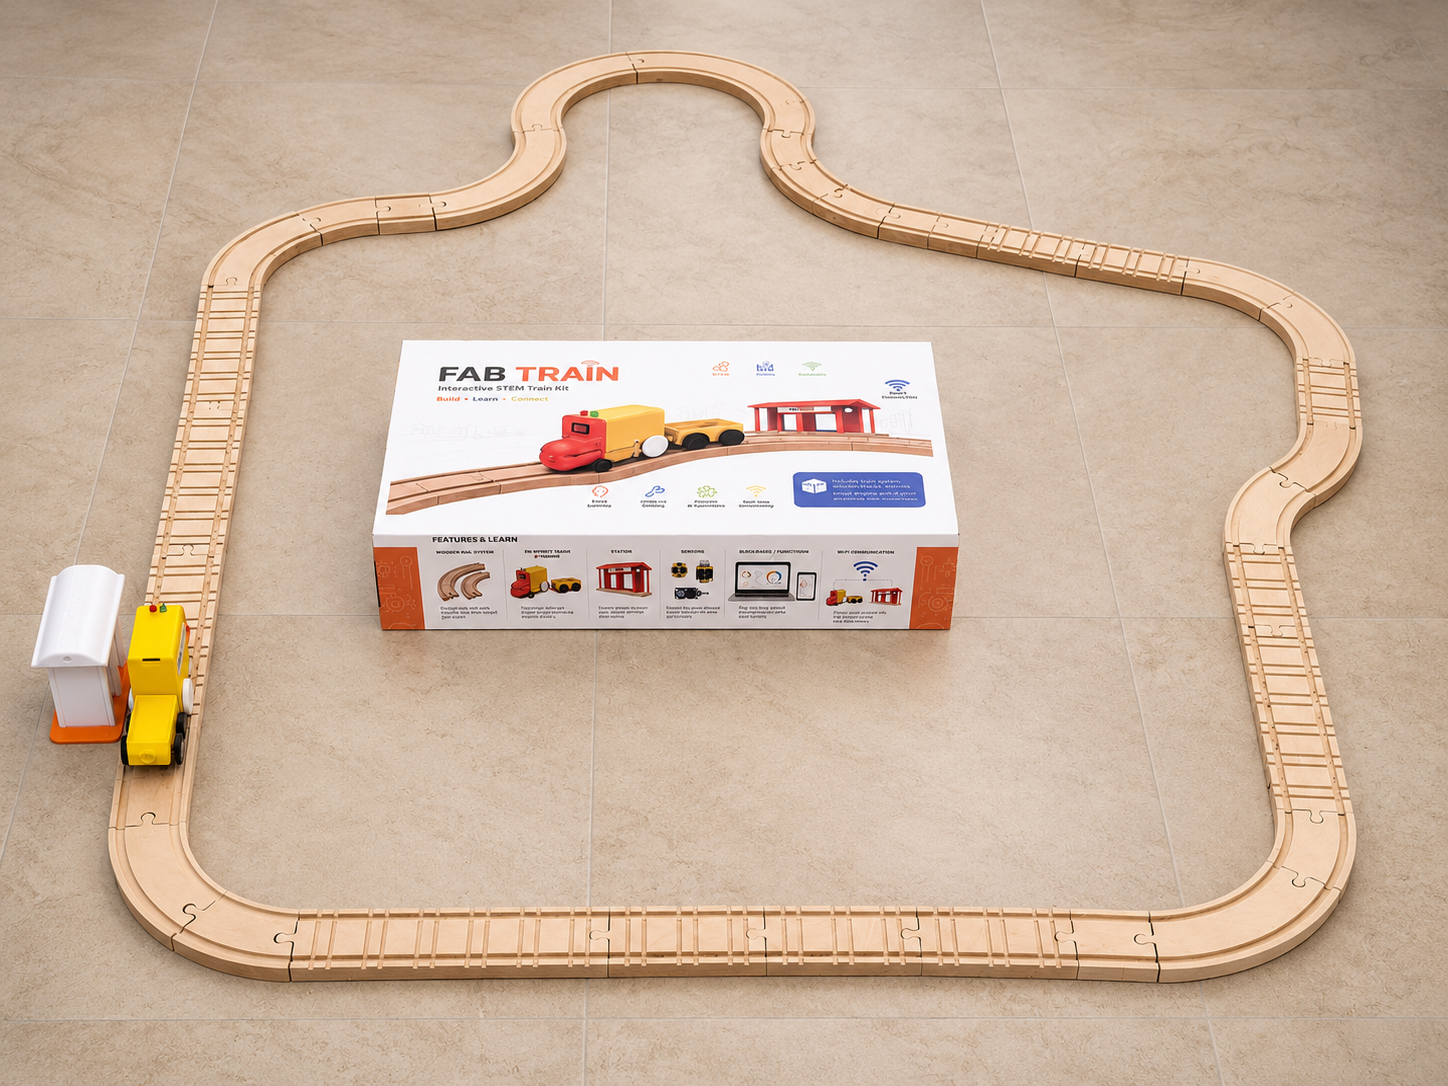
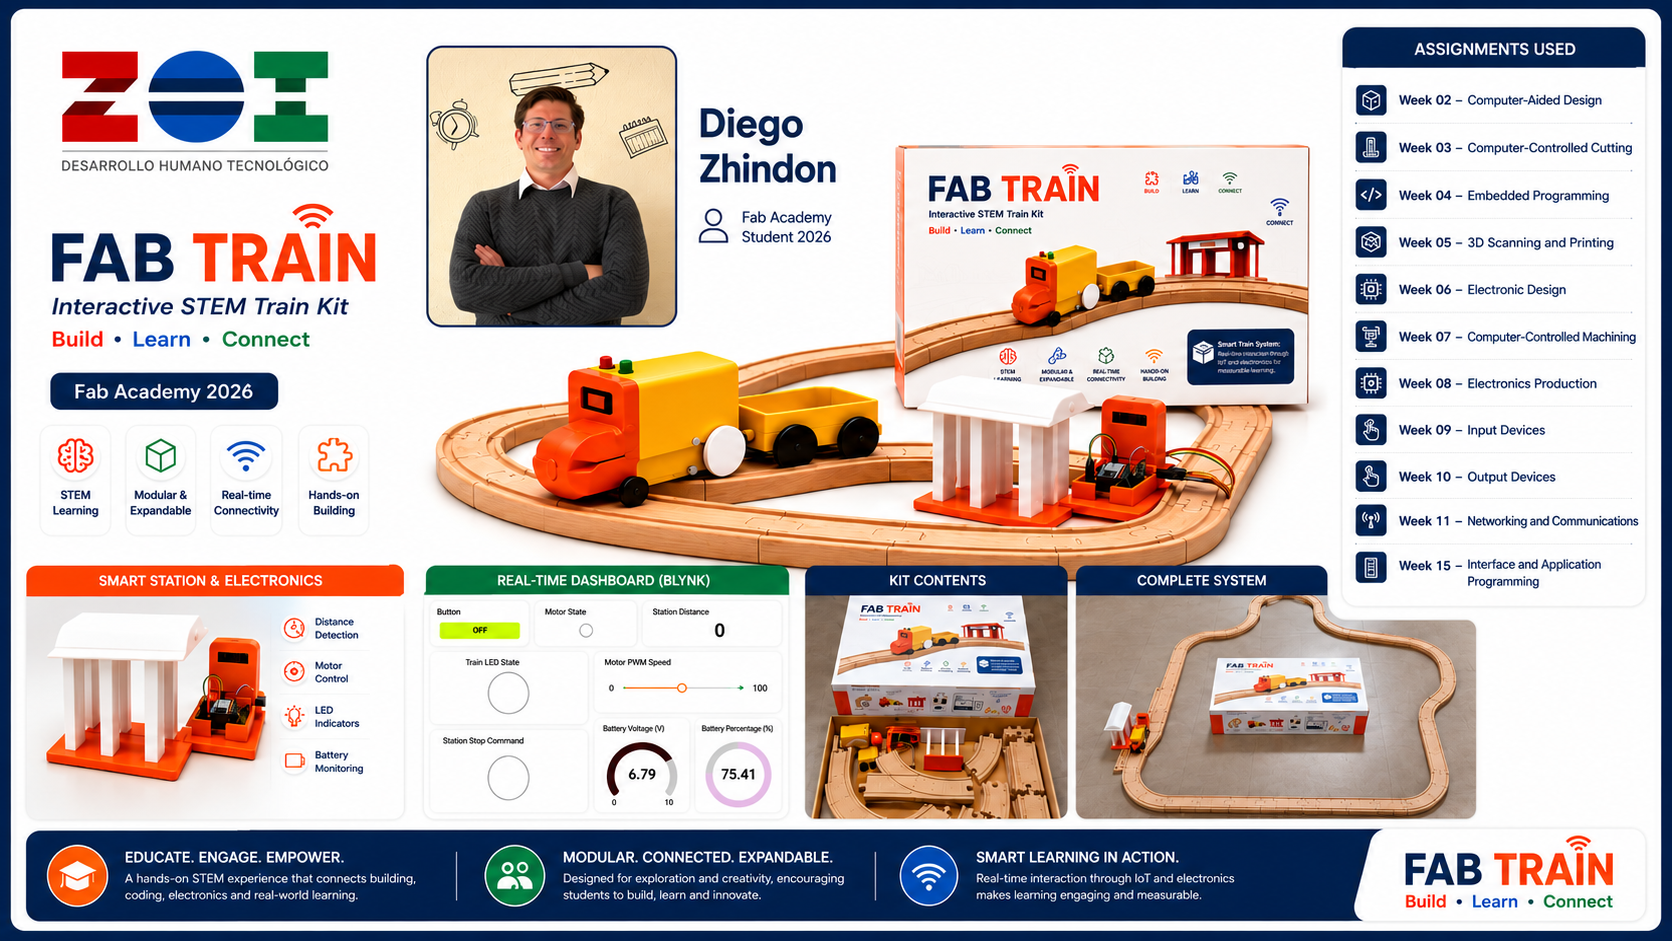
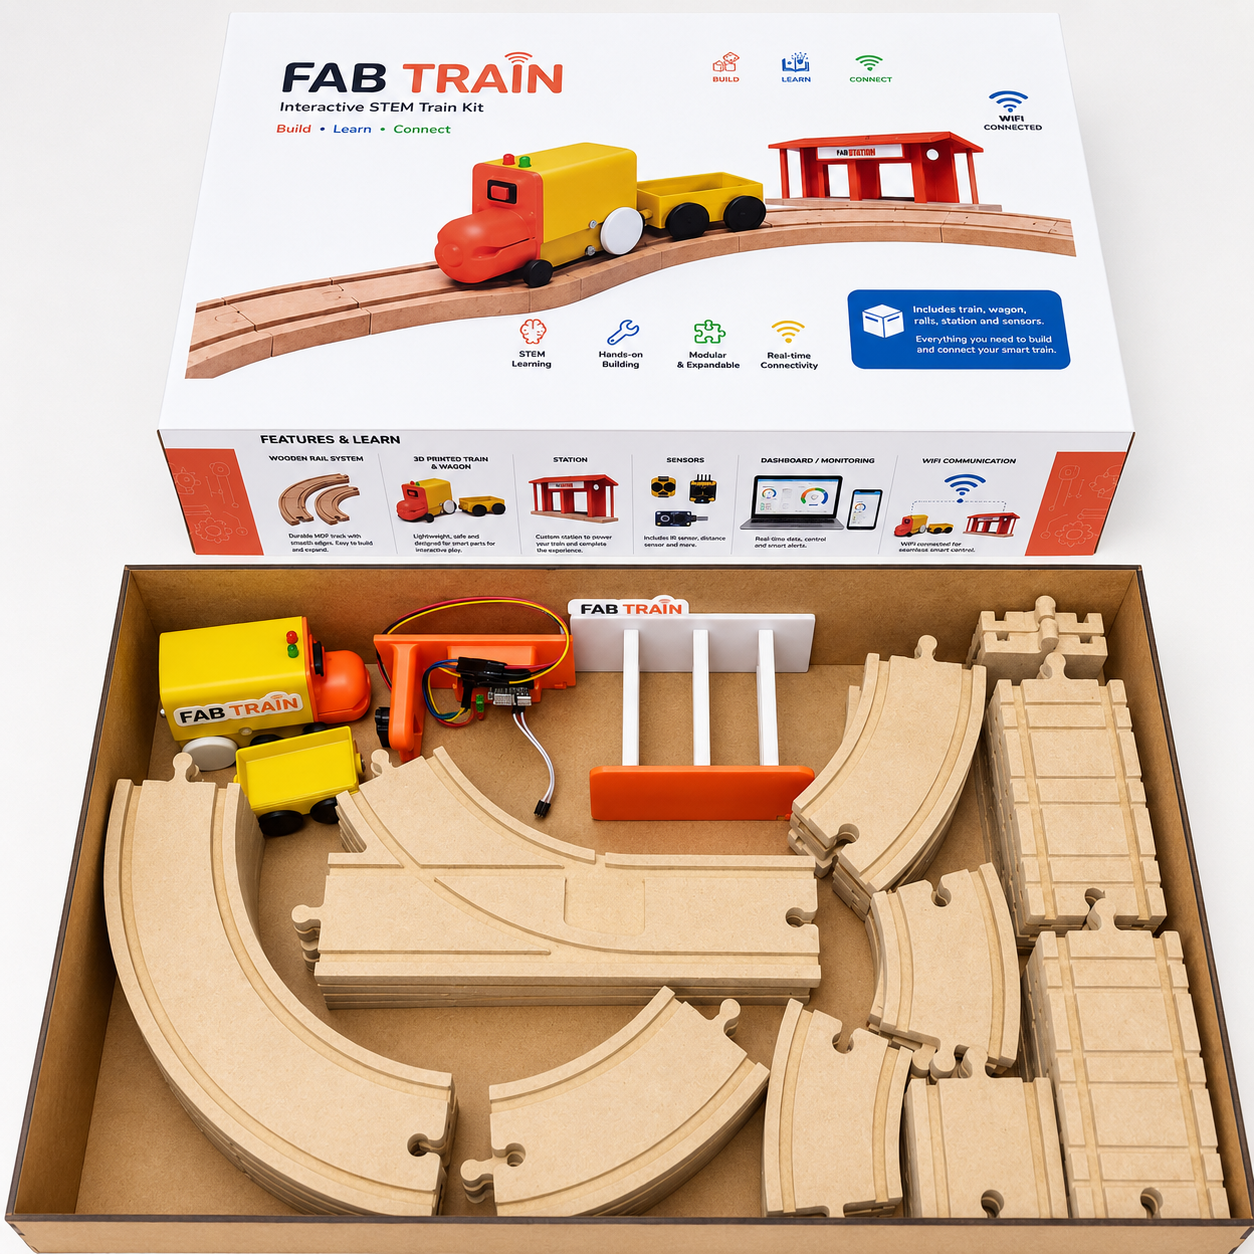
My final project is called Fab Train. It is an interactive STEM train kit that integrates modular wooden rails, a 3D printed train, a wagon, a smart station, custom electronics, WiFi communication and a real-time Blynk dashboard.
The project was designed as an educational and demonstrative kit where the user can assemble the rail circuit, place the train and station, turn on the system and observe how the train interacts with the station. The train can be started and controlled from Blynk, the station detects the train using a Sharp distance sensor, and the dashboard shows the state of the system in real time.
Fab Train demonstrates the synthesis of skills developed during Fab Academy: computer-aided design, additive fabrication, subtractive fabrication, electronics design, electronics production, embedded programming, input devices, output devices, networking, interface programming, system integration and packaging.
3. Final Project Slide
The final slide was prepared as presentation.png. It includes
the project name, my name, the Fab Lab, a project image, the main features
of the system, the assignments used and a short description of what the
project does.
The slide was created in horizontal format with a resolution of 1920 × 1080 px, as required for the Fab Academy final presentation.
presentation.png.
Image source: The image presentation.png was generated
with an AI image generation tool.
Final Slide Generation Workflow
For the final project slide, I created a horizontal summary image with the required
Fab Academy presentation format. The slide was prepared at
1920 × 1080 px in a 16:9 aspect ratio, and it was exported as
presentation.png.
The slide was designed to communicate the complete Fab Train system in one image. It includes the project name, my name, Fab Academy 2026, ZOI Lab identity, the final packaging, train, wagon, station, rails, dashboard and the main assignments used to develop the project.
Prompt — Final project slide
Create a professional high-impact horizontal 16:9 final presentation slide for a Fab Academy 2026 final project called “FAB TRAIN”. The slide must be exactly 1920 × 1080 px. Use a clean white background with a premium educational product style. Show the complete interactive STEM train kit as the central focus: a yellow and orange 3D printed train with wagon on modular wooden rails, a smart station, a real-time IoT dashboard, and the final packaging box. Include the project title “FAB TRAIN”, subtitle “Interactive STEM Train Kit”, tagline “Build • Learn • Connect”, student name “Diego Zhindon”, Fab Academy 2026, and ZOI Lab logo. Add a section titled “Assignments Used” listing Week 02 Computer-Aided Design, Week 03 Computer-Controlled Cutting, Week 04 Embedded Programming, Week 05 3D Scanning and Printing, Week 06 Electronics Design, Week 07 Computer-Controlled Machining, Week 08 Electronics Production, Week 09 Input Devices, Week 10 Output Devices, Week 11 Networking and Communications, and Week 15 Interface and Application Programming. Add small feature icons for STEM learning, modular and expandable rails, real-time connectivity, hands-on building, smart station and electronics, and dashboard monitoring. The composition should look polished, modern, readable, visually balanced, high resolution, professional, and suitable for a Fab Academy final project presentation.
After generating the slide, I verified that the final image matched the required
horizontal format and used it as the final presentation.png file.
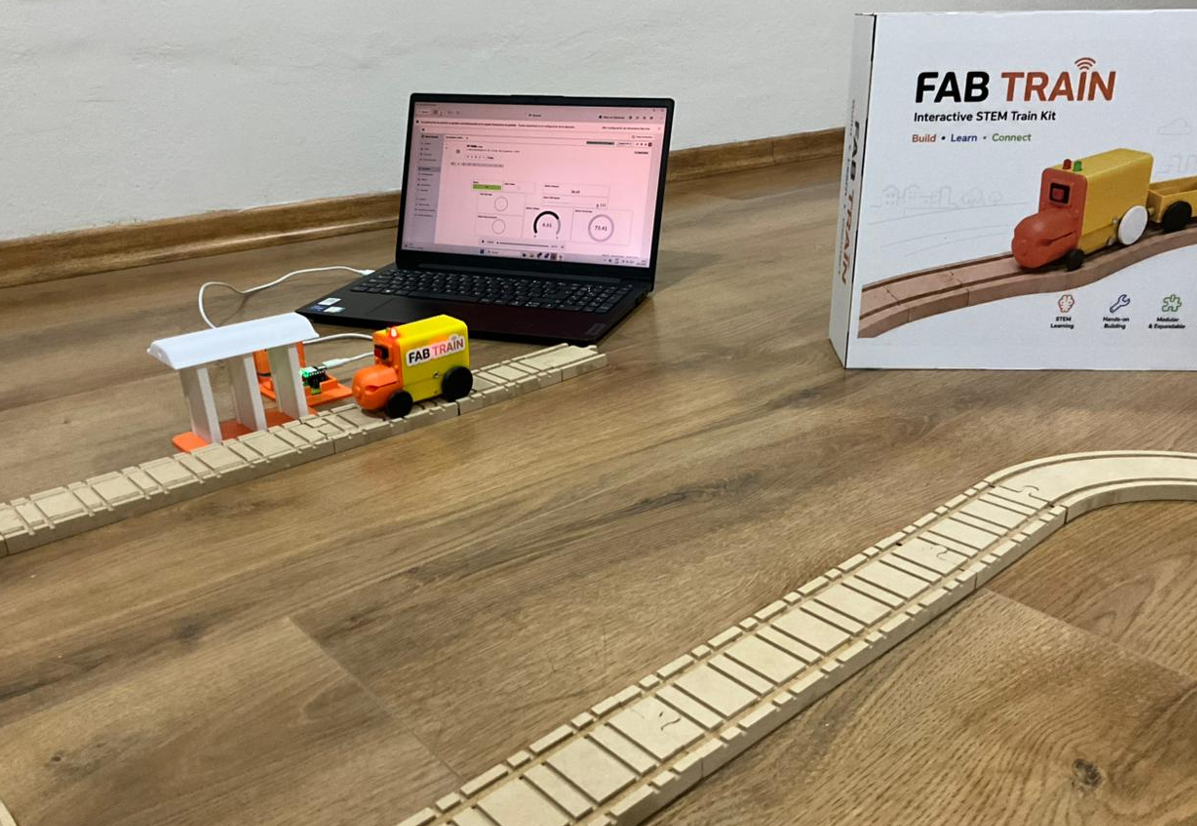
4. Final Project Video
The final video was prepared as presentation.mp4. The video
shows the final project concept, construction, integrated system and
operation. It presents the train moving on the rail system, the smart station,
the dashboard and the final kit as a complete product.
The video is linked from this page and located in the root directory of the website, following the Fab Academy final presentation requirement.
presentation.mp4.
5. Final Project Page
I created a separate final project page where the complete documentation of Fab Train is presented. This page includes the project overview, development process, design decisions, fabrication, electronics, programming, integration, testing, packaging and final results.
This Week 20 page works as a final requirements checklist and links to the complete final project documentation.
6. Weekly Assignments Used
Fab Train was developed progressively through several weekly assignments. Each assignment contributed a specific skill or subsystem to the final project.
| Week | Assignment | Contribution to Fab Train |
|---|---|---|
| Week 02 | Computer-Aided Design | 2D and 3D design of the rails, train, wagon, station and packaging concepts. |
| Week 03 | Computer-Controlled Cutting | Laser cutting knowledge used for packaging, box design and fabrication logic. |
| Week 04 | Embedded Programming | Programming logic for microcontroller control, motor behavior and system states. |
| Week 05 | 3D Scanning and Printing | 3D printed train body, wagon, wheels, axles and station components. |
| Week 06 | Electronics Design | Custom PCB design for train and station circuits. |
| Week 07 | Computer-Controlled Machining | CNC machining of the MDF rail system. |
| Week 08 | Electronics Production | PCB fabrication and soldering of the electronic boards. |
| Week 09 | Input Devices | Sharp distance sensor reading and analog signal interpretation. |
| Week 10 | Output Devices | Motor and LED control for the train and station. |
| Week 11 | Networking and Communications | WiFi communication between train, station and dashboard. |
| Week 15 | Interface and Application Programming | Blynk dashboard for monitoring and control. |
| Week 16 | System Integration | Integration of rails, train, station, electronics, dashboard and packaging. |
| Week 18 | Applications and Implications | BOM, costs, evaluation, final development planning and project implications. |
7. Final Project Requirements Mapping
The final project incorporates the required range of Fab Academy skills. The following table summarizes how each requirement was implemented in Fab Train.
| Fab Academy requirement | Implementation in Fab Train |
|---|---|
| 2D design | Rail layouts, packaging artwork, box design and fabrication drawings. |
| 3D design | Train body, wagon, wheels, axles and station components. |
| Additive fabrication | 3D printed train, wagon, wheels, axles and station parts. |
| Subtractive fabrication | CNC-machined MDF rails and fabricated packaging elements. |
| Electronics design | Train PCB and station PCB designed for the project. |
| Electronics production | PCB fabrication in FR4 and soldering of through-hole and SMD components. |
| Embedded microcontroller interfacing and programming | Two XIAO ESP32-C6 boards programmed in Arduino IDE. |
| Input devices | Sharp distance sensor for station detection and analog battery reading for train monitoring. |
| Output devices | DC motor, LEDs and dashboard indicators. |
| Networking and communication | WiFi communication between train, station and Blynk dashboard. |
| Interface and application programming | Blynk dashboard with buttons, indicators, gauges and speed control. |
| System integration and packaging | Final integrated STEM kit with rails, train, wagon, station, electronics, dashboard and packaging. |
8. Bill of Materials
The Bill of Materials was documented in detail in Week 18. For this final requirements page, I include a summary of the main components used in the project and link to the complete project development documentation.
| Category | Main items | Use in the project |
|---|---|---|
| Fabrication materials | 3 mm MDF, 12 mm MDF, PLA filament and adhesive vinyl | Rails, train parts, station parts and packaging. |
| Microcontrollers | Two XIAO ESP32-C6 boards | One controller for the train and one controller for the station. |
| Power and motion | 9 V battery, DC motor with gearbox and L9110S motor driver | Power and movement of the train. |
| Input devices | Sharp distance sensor and battery voltage divider | Station detection and train battery monitoring. |
| Output devices | LEDs and motor output | Visual feedback and train movement. |
| Electronics | FR4 boards, resistors, capacitors, regulator, pin headers and jumpers | Custom train and station PCBs. |
| Mechanical assembly | Magnets, M3 screws and nuts | Assembly and connection of physical parts. |
The estimated total cost of the final prototype was approximately 124.95 USD, based on the detailed BOM prepared in Week 18.
9. System Integration
System integration was one of the most important stages of the final project. Fab Train had to work as a single system, not only as separated mechanical, electronic and digital parts.
The integrated system includes the rail circuit, the train, the wagon, the smart station, the custom electronics, the WiFi communication, the Blynk dashboard and the packaging. The user can assemble the rails, place the station, start the train from the dashboard and monitor the system in real time.
The station detects the train using the Sharp distance sensor. When the train reaches the station detection range, the station activates the stop command. The train receives the command through Blynk, stops, and waits until the user presses the Blynk button again to continue.
10. Original, Editable and Fabrication Files
To make Fab Train reproducible and editable, the downloadable archive includes both the original source files and the derived fabrication files. The original files can be modified in their corresponding design or programming software, while the fabrication files can be used directly for 3D printing, CNC machining, laser cutting, PCB production and embedded programming.
The archive is organized by subsystem so that the train, wagon, rails, packaging,
electronics and code can be reviewed independently. This distinction is important
because formats such as IPT, DWG, AI,
JSON and INO preserve the editable design information,
while formats such as STL, DXF and Gerber are intended
mainly for fabrication.
| File group | Editable / original formats | Fabrication / production formats | Content |
|---|---|---|---|
| 3D mechanical design | .ipt |
.stl |
Train body, wagon, wheels, axles, station parts and other 3D printed components. |
| 2D rail design | .dwg |
.dxf |
Modular rail layouts and CNC cutting geometry. |
| Packaging structure | .dwg |
.dxf |
Internal and external box parts prepared for laser cutting. |
| Packaging graphic design | .ai |
Print-ready adhesive vinyl artwork | Graphic composition, dimensions and artwork applied to the external walls of the packaging. |
| Electronics design | .json |
Gerber files | Editable train and station PCB designs and production files for PCB fabrication. |
| Embedded programming | .ino |
.ino |
Arduino programs for the train and station XIAO ESP32-C6 controllers. |
The archive therefore contains the files required not only to manufacture the current prototype, but also to modify dimensions, update the packaging artwork, edit the PCB layouts and continue developing the train and station firmware.
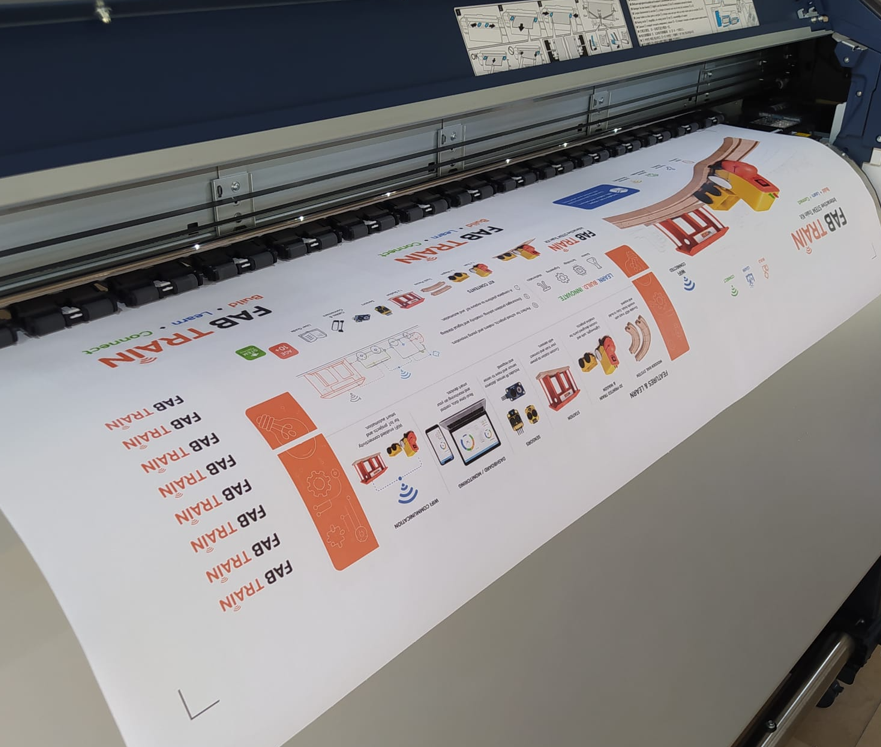
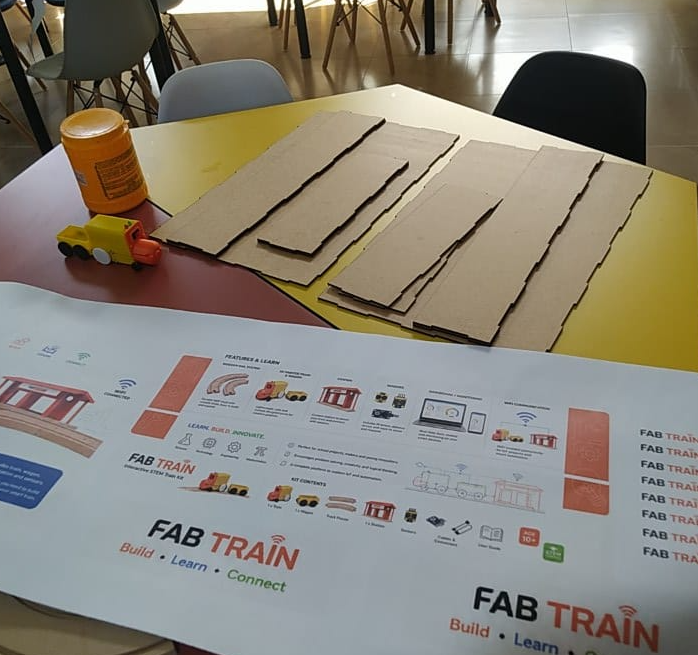
11. Packaging Design and Fabrication Process
The packaging was developed as part of the final product integration. Its purpose was to protect, organize and present the train, wagon, rails and station as a complete educational kit. The process combined vector graphic design, adhesive vinyl printing, laser cutting, manual assembly and plotter cutting.
First, I designed the packaging artwork in Adobe Illustrator, defining the graphic composition and the dimensions required for the external surfaces of the box. The final artwork was printed on adhesive vinyl so that the graphics could be applied directly to the packaging walls.
The packaging structure was divided into two main box parts and fabricated by
laser cutting. The cutting geometry was prepared from the corresponding
DWG and DXF files. After cutting, the pieces were checked,
aligned and joined using adhesive to form the internal and external packaging
structures.
Finally, the printed adhesive vinyl was cut to the dimensions defined in the Illustrator design. A cutting plotter was used to prepare the graphic elements, and the stickers were carefully positioned and applied to the external walls of the packaging. This final step improved the visual finish and transformed the fabricated box into a coherent presentation for the Fab Train kit.

| Step | Process / tool | Result |
|---|---|---|
| 1 | Graphic design in Adobe Illustrator | Editable .ai artwork with the dimensions and visual identity of the packaging. |
| 2 | Adhesive vinyl printing | Printed graphic layer prepared for application to the box surfaces. |
| 3 | Laser cutting from .dxf / .dwg files |
Two structural box sections fabricated with the required dimensions. |
| 4 | Manual assembly with adhesive | Internal and external packaging structures joined and aligned. |
| 5 | Plotter cutting and sticker application | Adhesive graphics accurately positioned on the external packaging walls. |
12. Final Project Operation
The operation of Fab Train is designed to be simple for the user. The user assembles the rail circuit, places the station next to the track, places the train and wagon on the rails, turns on the train and uses the Blynk dashboard to start or resume movement.
The electronics are integrated inside the train and station, so the user does not need to manipulate the internal circuits during normal operation. This makes the project more appropriate as an educational kit and improves the final product experience.
13. License
The project is documented openly through the Fab Academy website and GitLab. The intention is to share the design, fabrication process, code and project development so that other students, makers and educators can study it, reproduce it or adapt it for educational purposes.
For the final project documentation, I use a Creative Commons Attribution-NonCommercial approach. This means that the project can be shared and adapted with attribution, but it is not intended for direct commercial use without permission.
This licensing decision supports the educational nature of Fab Train. The project is intended as an open learning resource and a possible base for future STEM workshops, classroom activities and maker projects.
14. Acknowledgements
This project was developed as part of Fab Academy 2026 at ZOI Lab. I want to acknowledge the support of the local instructors, classmates and Fab Lab community during the design, fabrication, electronics and integration process.
The weekly assignments, group reviews and technical feedback helped improve the project step by step. The final result is the product of individual work, but also of the learning environment created by Fab Academy and the support available inside the lab.
I also acknowledge the use of open documentation, component references, Blynk tools, Arduino IDE and digital fabrication workflows that made it possible to integrate mechanical parts, electronics and software into one final system.
15. What Worked and What Did Not
| Aspect | Result | Comment |
|---|---|---|
| Rail system | Worked | The MDF rails were successfully fabricated and assembled as a modular circuit. |
| Train movement | Worked | The train moved on the rails using the DC motor and custom train design. |
| 3D printed train and wagon | Worked | The printed parts fit the rail system after design adjustments. |
| Train PCB | Worked | The PCB controlled the motor, LEDs and battery monitoring system. |
| Station sensor | Worked | The Sharp sensor detected the train in the station range. |
| Blynk dashboard | Worked | The dashboard displayed motor state, battery, distance and stop command. |
| Train stop at station | Worked after adjustment | The stop command required a latch logic because the train could pass the sensor quickly. |
| Battery system | Worked with limitations | The 9 V battery can power the train, but a rechargeable battery would be better for future versions. |
| Packaging | Worked | The final box stores the train, wagon, rails and station as a complete kit. |
16. Final Evaluation
The project was evaluated by checking whether the complete system could be assembled, powered, controlled and monitored. The final evaluation focused on mechanical movement, sensor detection, electronic control, dashboard visualization, packaging and user interaction.
- The train moves on the CNC-machined MDF rails.
- The wagon follows the train as part of the kit.
- The station detects the train using the Sharp distance sensor.
- The train stops when the station sends the stop command.
- The user can start and resume the train from Blynk.
- The dashboard shows motor state, battery voltage, battery percentage, distance and PWM speed.
- The final packaging contains the main project parts and presents the project as a finished kit.
- The project demonstrates integration of digital fabrication, electronics, programming and interface design.
Based on these results, Fab Train meets the final project requirements and demonstrates the integration of the Fab Academy skills developed throughout the program.
17. Final Reflection
- Fab Train helped me understand that a final project is not only a single object, but a complete system where design, fabrication, electronics, programming, communication and user interaction must work together.
- One of the most important lessons was learning how to divide a complex project into subsystems. The rails, train, station, electronics, dashboard and packaging were developed separately, but the final value came from integrating them correctly.
- The rail system showed me the importance of subtractive fabrication and manufacturing planning. CNC machining requires correct tool selection, toolpaths, tolerances, material preparation and finishing.
- The 3D printed train and wagon showed me that additive manufacturing is powerful for iteration. I was able to test dimensions, correct geometry and improve the fit between the train and the rails.
- Designing and fabricating custom PCBs helped me move from prototype wiring to a more reliable and organized electronic system.
- The input and output devices were essential for the project behavior. The Sharp sensor allowed the station to detect the train, while the motor and LEDs gave the system movement and visual feedback.
- The Blynk dashboard made the project easier to understand because it transformed hidden electronic states into visible information for the user.
- System integration was the most challenging part. Individual components can work separately, but a final project requires timing, power, signals, communication and physical assembly to work as one coordinated system.
- Packaging changed the perception of the project. Once the parts were organized inside a designed box, Fab Train became closer to a finished educational product rather than only a prototype.
- The project also showed the importance of testing. Some solutions only appeared after real tests, such as improving the stop command logic so the train could react correctly when passing the station.
- From a broader perspective, Fab Academy helped me understand the value of digital fabrication as a complete workflow: imagining, designing, fabricating, measuring, programming, testing, documenting and improving.
- I also learned that using machines correctly is part of responsible fabrication. CNC machines, laser cutters, 3D printers and electronics tools require planning, safety, calibration and respect for the process.
- The final project confirmed that technical knowledge becomes stronger when it is connected to a real objective. Each weekly assignment became more meaningful because it contributed directly to Fab Train.
- Overall, this project represents my synthesis of Fab Academy: a digitally fabricated, electronically controlled, connected and documented system that can be used as a base for future educational STEM experiences.