Week 18
Applications and Implications / Project Development
Planning, documenting and evaluating Fab Train as a complete final project that integrates design, fabrication, electronics, programming, IoT, system integration and packaging.
1. Checklist
- ✅ Answered what the final project does
- ✅ Researched and described previous related work, including Adrián Torres' Fab Academy train project
- ✅ Identified the sources used for inspiration, technology and documentation
- ✅ Documented what I designed for the final project
- ✅ Listed the materials and components used in the project
- ✅ Created a detailed integrated BOM with exact component values, package types, quantities, sources, unit costs and subtotals
- ✅ Explained where the materials and components came from
- ✅ Estimated the cost of the final project using a Bill of Materials
- ✅ Documented the parts and systems made for the final project
- ✅ Documented the processes used to fabricate and program the project
- ✅ Identified the questions that were answered during project development
- ✅ Explained how the project was evaluated
- ✅ Added quantitative performance results for sensor range, communication latency, stopping time and stopping distance
- ✅ Verified that the final slide and video are documented in Week 20
- ✅ Added buttons to access the final slide, video and Week 20 requirements page
- ✅ Included links to downloadable design and code files
- ✅ Documented the current status of the project as a complete integrated system
2. Nueval Evaluation Mapping
This table maps the Fab Academy project development questions to the sections of this documentation. I organized the page this way so that each evaluation point can be reviewed clearly.
| Nueval / Fab Academy question | Where it is addressed | Short answer |
|---|---|---|
| What will it do? | Section 4 | Fab Train moves on wooden rails, interacts with a smart station, communicates through WiFi and shows data in Blynk. |
| Who has done what beforehand? | Section 5 | I reviewed Adrián Torres' Fab Academy train project, educational train kits, STEM kits, IoT toys and dashboard-based monitoring systems. |
| What sources will you use? | Section 6 | I used Fab Academy documentation, GitLab, Blynk, XIAO ESP32-C6 references, educational toy references and component datasheets. |
| What will you design? | Section 7 | I designed rails, train, wagon, wheels, axles, PCBs, station, packaging and dashboard configuration. |
| What materials and components will be used? | Section 8 | The project uses MDF, PLA, XIAO ESP32-C6 boards, battery, motor, sensor, PCBs, LEDs, resistors, jumpers, vinyl and hardware. |
| Where will they come from? | Section 9 | The BOM identifies the source or origin of each material and component. |
| How much will they cost? | Section 9 | The BOM includes estimated unit costs and subtotals for the final prototype. |
| What parts and systems will be made? | Section 10 | The project includes rails, train, wagon, station, train PCB, station PCB, Blynk dashboard, packaging and final integration. |
| What processes will be used? | Section 11 | The project uses 2D/3D design, CNC machining, 3D printing, electronics design, PCB production, embedded programming, WiFi, Blynk and packaging. |
| What questions need to be answered? | Section 12 | The main technical questions were about movement, battery monitoring, station detection, WiFi communication, dashboard visualization and packaging. |
| How will it be evaluated? | Sections 13 and 14 | The project is evaluated by testing movement, sensing, communication, dashboard data, packaging, repeatability and user interaction. Section 14 adds quantitative performance results. |
| Uploaded summary slide and video clip | Section 16 | This page links to Week 20, where the final presentation.png and presentation.mp4 are documented. |
3. Project Overview
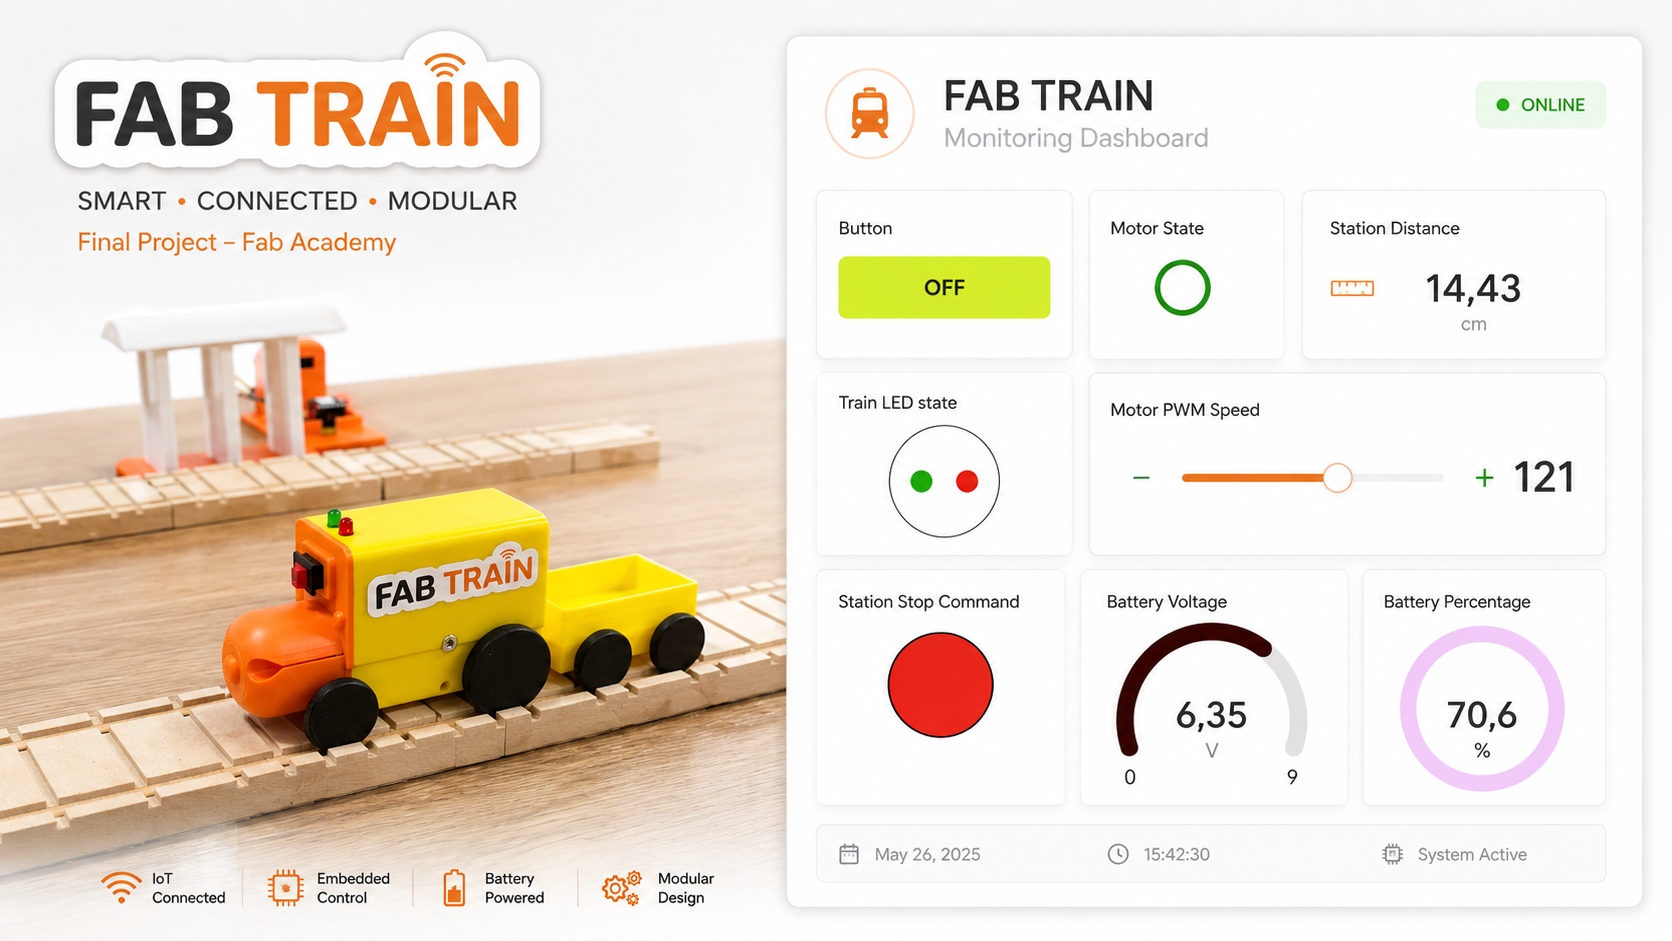
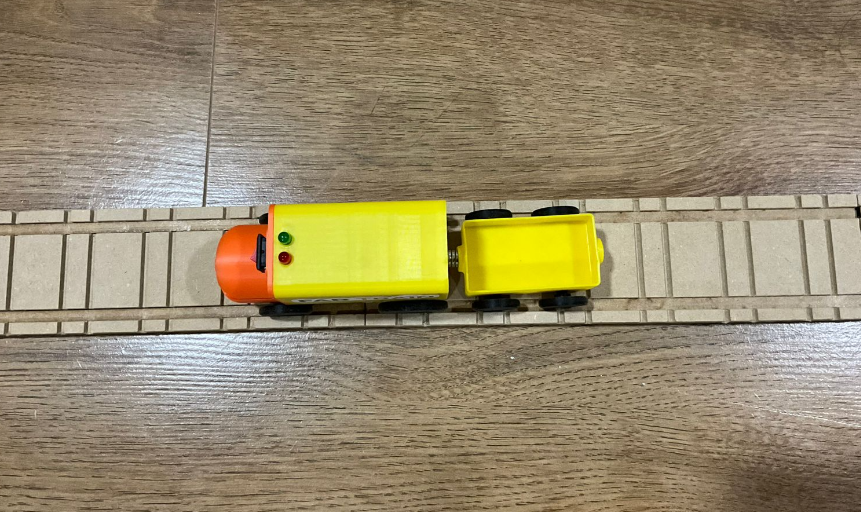
My final project is called Fab Train. It is an interactive STEM train kit where a 3D printed train moves on CNC-machined wooden rails, communicates with a smart station through WiFi, controls motor and LED behavior, and sends data to a Blynk dashboard.
The project integrates several Fab Academy skills into one system: 2D and 3D design, CNC machining, 3D printing, electronics design, electronics production, embedded programming, input devices, output devices, networking, interface design, system integration and packaging.
The current version is documented as a completed final project. The train has already been tested on the wooden rail circuit. The project includes the train, wagon, rail system, smart station, electronics, dashboard and final packaging. The station detects the train using a Sharp distance sensor, updates data in Blynk and interacts with the train through WiFi.
4. What Will It Do?
Fab Train is a modular train system designed for STEM learning. The user can assemble different rail configurations, place the train on the track, turn it on and observe how the train moves through the circuit.
The train includes an internal PCB with a XIAO ESP32-C6, motor control, LEDs and battery monitoring. The station includes another XIAO ESP32-C6, a Sharp distance sensor and LEDs. Both systems communicate through WiFi and their states are visualized in Blynk.
When the train reaches the station, the station detects the train using the distance sensor. The station updates the distance value in Blynk, changes LED states and sends a stop command. The train stops until the user presses the Blynk button again to resume movement.
The Blynk dashboard allows the user to view and control the system. It shows motor state, train LED state, station distance, station stop command, battery voltage, battery percentage and motor PWM speed. The motor speed can be adjusted from the dashboard.
5. Who Has Done What Beforehand?
Before developing Fab Train, I reviewed different types of existing projects and products related to educational trains, STEM kits, interactive toys and IoT dashboards. These references helped me understand what already exists and how my project could combine these ideas through digital fabrication.
| Reference area | Example / source | What I learned | Difference in Fab Train |
|---|---|---|---|
| Fab Academy train project | Fab Train Model — Adrián Torres | Adrián Torres developed a Fab Academy train-related project based on modular railway model elements, train detection and an automated level crossing. | My Fab Train focuses on an educational STEM kit with CNC-machined wooden rails, a 3D printed train, a smart station, WiFi communication, Blynk dashboard monitoring and final packaging. |
| Interactive train toys | BRIO Smart Tech Sound | Interactive train systems can combine play, movement, sounds, lights and user interaction. | Fab Train is digitally fabricated, documented openly and integrates custom PCBs, WiFi and dashboard visualization. |
| IoT dashboards | Blynk IoT Platform | Blynk allows connected devices to send data to a dashboard and receive control commands from widgets. | Fab Train uses Blynk to visualize and control a physical educational train and station system. |
| Connected microcontrollers | Seeed Studio XIAO ESP32-C6 | Compact microcontrollers with WiFi can be used for small IoT projects with limited space. | Fab Train uses two XIAO ESP32-C6 boards, one inside the train and one inside the station. |
| STEM education kits | General educational robotics and maker kits | Educational kits work best when users can build, test, modify and understand the system. | Fab Train is a modular kit that combines physical assembly, electronics and dashboard interaction. |
| Wooden train systems | Modular wooden toy rail systems | Modular rail systems allow users to create different paths and layouts. | Fab Train uses custom CNC-machined MDF rails designed and fabricated as part of the final project. |
6. What Sources Will I Use?
The project uses different types of sources: Fab Academy documentation, component datasheets, software documentation, existing educational products and my own design and fabrication files.
| Source | Use in the project |
|---|---|
| Fab Academy documentation | Used as the main framework to document weekly processes and final project development. |
| GitLab repository | Used to host the documentation, source files, code and design files. |
| Component datasheets | Used to review pinout, voltage limits, current requirements and connection rules. |
| Blynk documentation and platform | Used to configure datastreams, dashboard widgets and IoT communication. |
| XIAO ESP32-C6 references | Used to understand WiFi connectivity, pins and embedded programming requirements. |
| Educational train and STEM kit references | Used as inspiration for the educational and interactive direction of the project. |
| My own weekly assignments | Used as the technical base for CAD, CNC, 3D printing, electronics, programming, inputs, outputs, networking and interfaces. |
7. What Will I Design?
For the final project, I designed the complete Fab Train system instead of buying a finished product. The project includes custom mechanical parts, custom rail geometry, custom electronics, custom station parts and custom packaging.
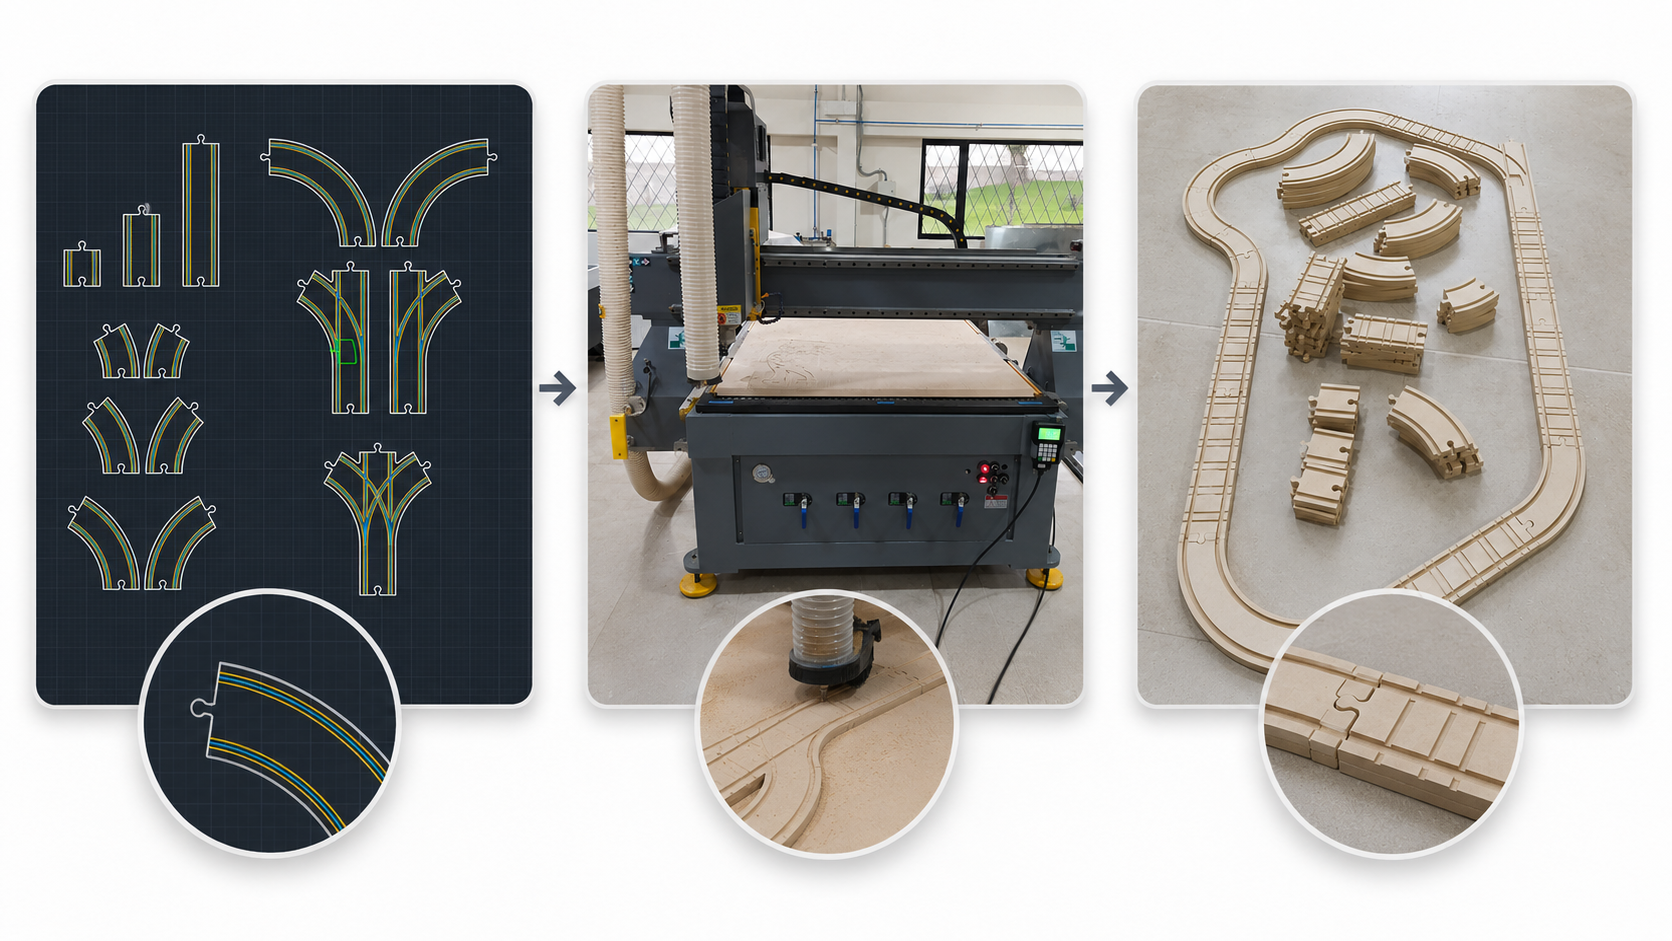
- Modular wooden rail system with straight pieces, curves and bifurcations.
- 3D printed locomotive body.
- 3D printed wagon.
- 3D printed wheels and axles.
- Train PCB with XIAO ESP32-C6, power regulation, motor control and battery reading.
- Station structure for the sensor and LEDs.
- Station PCB with XIAO ESP32-C6, Sharp distance sensor and LEDs.
- Blynk dashboard with widgets and datastreams for train and station data.
- Packaging design using a box structure and adhesive vinyl artwork.
8. What Materials and Components Will Be Used?
The project uses materials for digital fabrication, electronic components, mechanical assembly components and packaging materials. The following table summarizes the main material groups used in the final project.
| Category | Material / component | Quantity / used amount | Use |
|---|---|---|---|
| Fabrication | 3 mm MDF and 12 mm MDF | Boards | Packaging, support parts and CNC-machined wooden rail system. |
| 3D printing | PLA filament, 1.75 mm | Approx. 440 g used | Train body, wagon, wheels, axles and station components. |
| Electronics | XIAO ESP32-C6, PCBs, resistors, capacitors, regulator and headers | Several units | Train and station control systems. |
| Power and motion | 9 V battery, DC motor and L9110S H-bridge driver | Several units | Train power and movement. |
| Input and output | Sharp distance sensor and LEDs | Several units | Station detection and visual feedback. |
| Mechanical assembly | Magnets, M3 screws, nuts and jumpers | Several units | Assembly, connections and internal wiring. |
| Packaging | Matte white adhesive vinyl | 0.5 m | Final packaging graphic finish. |
9. Where Will They Come From and How Much Will They Cost?
To answer the origin, quantity, technical specification and cost questions clearly, I created a single integrated Bill of Materials. The table includes the exact component values, package type, quantity, source, function, unit cost and subtotal for the complete Fab Train prototype.
The costs are based on real local prices when available. For small electronic components without an individual purchase invoice, I used a reasonable local electronics market estimate. Workshop tools and consumables such as CNC end mills, sandpaper and general equipment are not included because they are not part of the final kit.
| Item and technical specification | Quantity / used amount | Source / origin | Use in Fab Train | Unit or used cost (USD) | Subtotal (USD) |
|---|---|---|---|---|---|
| 3 mm MDF board, 1.22 m × 1.22 m | 1 board | Local material supplier / Fab Lab stock | Packaging and support parts | 8.00 | 8.00 |
| 12 mm MDF board, 1.22 m × 2.44 m | 1 board | Local material supplier / Fab Lab stock | CNC-machined wooden rails | 30.00 | 30.00 |
| PLA filament, 1.75 mm | Approx. 440 g used | Fab Lab / local 3D printing supplier | Train, wagon, wheels, axles and station parts | 25.00 per kg | 11.00 |
| XIAO ESP32-C6 | 2 units | Electronics supplier | Main microcontrollers for the train and station | 17.00 | 34.00 |
| 9 V battery | 1 unit | Local electronics supplier | Train power source | 4.50 | 4.50 |
| DC motor with dual-shaft gearbox | 1 unit | Local electronics supplier | Train movement | 3.00 | 3.00 |
| L9110S H-bridge motor driver | 1 unit | Local electronics supplier | DC motor speed and direction control | 3.50 | 3.50 |
| Sharp GP2Y0A21 distance sensor | 1 unit | Local electronics supplier | Train detection at the station | 12.50 | 12.50 |
| Red LED, 5 mm, THT | 2 units | Local electronics supplier / Fab Lab stock | Red visual indicators for the train and station | 0.07 | 0.14 |
| Green LED, 5 mm, THT | 2 units | Local electronics supplier / Fab Lab stock | Green visual indicators for the train and station | 0.07 | 0.14 |
| 220 Ω resistor, 1/2 W, THT | 4 units | Local electronics supplier / Fab Lab stock | Current limiting for the four 5 mm LEDs | 0.04 | 0.16 |
| 180 kΩ resistor, THT | 1 unit | Local electronics supplier / Fab Lab stock | Upper resistor of the train battery voltage divider | 0.04 | 0.04 |
| 100 kΩ resistor, THT | 1 unit | Local electronics supplier / Fab Lab stock | Lower resistor of the train battery voltage divider | 0.04 | 0.04 |
| 4.7 kΩ resistor, THT | 1 unit | Local electronics supplier / Fab Lab stock | Upper resistor of the station sensor signal divider | 0.04 | 0.04 |
| 10 kΩ resistor, THT | 1 unit | Local electronics supplier / Fab Lab stock | Lower resistor of the station sensor signal divider | 0.04 | 0.04 |
| Red LED, SMD 1206 | 1 unit | Local electronics supplier / Fab Lab stock | PCB power or status indicator | 0.65 | 0.65 |
| 499 Ω resistor, SMD 1206 | 1 unit | Local electronics supplier / Fab Lab stock | Current limiting for the red SMD LED | 0.65 | 0.65 |
| 10 µF capacitor, SMD | 2 units | Local electronics supplier / Fab Lab stock | Input and output filtering in the voltage regulation circuit | 0.65 | 1.30 |
| 100 nF capacitor, SMD | 2 units | Local electronics supplier / Fab Lab stock | High-frequency decoupling at regulator input and output | 0.65 | 1.30 |
| 100 µF, 16 V electrolytic capacitor, THT | 1 unit | Local electronics supplier / Fab Lab stock | Input power stabilization and filtering | 0.15 | 0.15 |
| Two-position switch | 1 unit | Local electronics supplier | Train ON/OFF control | 1.00 | 1.00 |
| Female-female and female-male jumper wires | 16 total | Local electronics supplier / Fab Lab stock | Testing and internal wiring | 0.10 | 1.60 |
| FR4 single-sided PCB board, 10 cm × 10 cm — train PCB | 1 unit | Electronics production inventory / supplier | Fabrication of the train control PCB | 2.00 | 2.00 |
| FR4 single-sided PCB board, 10 cm × 10 cm — station PCB | 1 unit | Electronics production inventory / supplier | Fabrication of the station control PCB | 2.00 | 2.00 |
| Male pin header strip, 40 pins | 1 strip | Local electronics supplier | PCB and module connections | 0.75 | 0.75 |
| Female pin header strip, 40 pins | 2 strips | Local electronics supplier | XIAO and module sockets | 1.00 | 2.00 |
| 1117 5 V voltage regulator | 1 unit | Local electronics supplier | Voltage regulation for the train electronics | 0.50 | 0.50 |
| Neodymium magnets, 8 mm × 2 mm | 6 units | Local supplier / maker inventory | Magnetic coupling or assembly support | 0.25 | 1.50 |
| M3 screws and nuts | 10 sets | Local hardware supplier / Fab Lab stock | Mechanical assembly | 0.10 | 1.00 |
| Matte white adhesive vinyl | 0.5 m | Local printing / signage supplier | Final packaging graphic finish | 3.00 used amount | 3.00 |
| Estimated total | 126.50 |
The estimated total cost of the complete Fab Train prototype is approximately 126.50 USD. This value includes the individually detailed resistors, LEDs, capacitors, PCB materials, mechanical components and fabrication materials. The final value may vary depending on local suppliers, available Fab Lab inventory, shipping costs and material waste.
10. What Parts and Systems Were Made?
Fab Train is made from several subsystems that were designed, fabricated and integrated into one final product.
| System | Parts made | Function |
|---|---|---|
| Rail system | Straights, curves and bifurcations in 12 mm MDF | Creates the modular path for the train. |
| Train | Locomotive body, wheels, axles and internal PCB | Moves through the track and communicates with the system. |
| Wagon | 3D printed wagon and wheels | Complements the train as part of the educational kit. |
| Train electronics | Custom PCB, XIAO ESP32-C6, motor driver, voltage divider, LEDs and power circuit | Controls motor, LEDs and battery monitoring. |
| Station | Station structure, sensor mount, LEDs and custom PCB | Detects the train and sends stop/status information through WiFi. |
| Dashboard | Blynk template, datastreams and widgets | Visualizes train and station data and controls motor speed. |
| Packaging | Box structure, Illustrator artwork and adhesive vinyl | Turns the project into a finished educational product. |
11. What Processes Were Used?
The final project integrates additive, subtractive, electronic and digital processes. Each process was connected to a specific part of the system.
| Process | Tool / machine | Application in Fab Train |
|---|---|---|
| 2D design | AutoCAD and Illustrator | Rail geometry, packaging graphics and box design. |
| 3D design | Autodesk Inventor | Train, wagon, wheels, axles and station components. |
| CNC machining | CNC router and Aspire Vectric | Fabrication of the MDF rail system. |
| 3D printing | Bambu Lab X1E | Fabrication of the train, wagon and mechanical details. |
| Electronics design | EasyEDA | Train PCB and station PCB design. |
| Electronics production | PCB milling / fabrication and soldering | Fabrication and assembly of custom PCBs. |
| Embedded programming | Arduino IDE | Programming the train and station XIAO ESP32-C6 boards. |
| Input devices | Sharp distance sensor and analog battery reading | Train detection at the station and battery monitoring. |
| Output devices | DC motor and LEDs | Train movement and visual state feedback. |
| Networking | WiFi communication | Train and station interaction through connected microcontrollers. |
| Interface | Blynk dashboard | Visualization and control of the final system. |
| Packaging | Laser cutting, Illustrator and adhesive vinyl | Final product presentation and storage box. |
12. What Questions Were Answered?
During development, the project answered several technical and design questions related to movement, electronics, sensing, communication and user experience.
| Question | Answer / result |
|---|---|
| Can the train move on CNC-machined MDF rails? | Yes. The train was tested on the rail system and can move through the track. |
| Can the 3D printed train fit the rail geometry? | Yes. Several prototypes were printed and adjusted to improve the fit with the rails. |
| Can the custom train PCB control motor and LEDs? | Yes. The PCB controls motor behavior and LED states. |
| Can the battery be monitored safely? | Yes. A voltage divider allows the battery voltage to be read safely by the XIAO ESP32-C6. |
| Can the station detect the train? | Yes. The station uses a Sharp distance sensor to detect the arrival of the train. |
| Can the train and station communicate through WiFi? | Yes. Both devices use WiFi and their data is visualized together in Blynk. |
| Can the user monitor the system from a dashboard? | Yes. Blynk shows motor state, LEDs, distance, battery voltage, battery percentage and PWM speed. |
| Can the project be presented as a finished educational kit? | Yes. The project includes packaging, modular rails, train, wagon, station, electronics and dashboard. |
13. How Will It Be Evaluated?
The evaluation of Fab Train is based on functionality, integration, reliability and presentation as a finished product.
| Evaluation criterion | Expected result | Status |
|---|---|---|
| Rail assembly | The user can assemble the rail circuit in different configurations. | Completed |
| Train movement | The train moves correctly on the MDF rails. | Completed |
| Motor control | The train PCB controls the DC motor and motor state. | Completed |
| Speed control | The motor PWM speed can be adjusted from Blynk. | Completed |
| Battery monitoring | Blynk shows battery voltage and battery percentage. | Completed |
| Station detection | The station detects the train with the Sharp distance sensor. | Completed |
| Train-station interaction | The station sends a stop command and the train reacts to it. | Completed |
| Dashboard visualization | Blynk displays train and station information at the same time. | Completed |
| Packaging | The project is presented as a finished kit with a designed box and vinyl graphic. | Completed |
| User interaction | The user only needs to assemble the rails and turn the train on/off; internal electronics are protected. | Completed |
14. Quantitative Performance Results
To improve the evaluation of the final project, I documented quantitative performance results from the tests performed with the integrated Fab Train system. These tests focused on station detection, communication response, stopping behavior, repeatability and dashboard monitoring.
The system was tested with the train moving on the MDF rail circuit, the station powered from an external 5 V supply, and the train communicating with the Blynk dashboard through WiFi. The values below were obtained from repeated functional tests and observation of the dashboard, station LEDs and train behavior.
| Performance test | Measured result | Method | Technical observation |
|---|---|---|---|
| Station detection range | Approximately 11 cm to 14 cm | The train was moved in front of the Sharp distance sensor and the detection state was observed using the station LEDs and Blynk distance value. | The reading was not perfectly stable and showed noise inside this range. For this reason, the final detection logic was configured around this practical detection window. |
| Sensor reading noise | Variation between 11 cm and 14 cm during detection | The distance value was observed while the train was positioned in front of the station sensor. | The Sharp sensor output is analog and non-linear, so small fluctuations are expected. The final code uses the detected range as a practical trigger instead of relying on one exact distance value. |
| WiFi / Blynk communication latency | Approximately 0.7 s | The delay was estimated by observing the time between the station detection event and the command update through the WiFi/Blynk system. | The communication delay is small but relevant because the train is moving. This confirmed that the stop logic needed to store the detection event. |
| Train stopping response time | Approximately 1.0 s after detection | The stopping time was estimated during repeated tests by observing the moment when the station detected the train and when the train stopped. | The train does not stop exactly at the sensor position. It stops slightly after the station because of communication latency, motor inertia and the time needed to process the stop command. |
| Stopping distance after station detection | Approximately 5 cm after passing the station detection point | The distance was estimated by observing where the train stopped after the station detected it. | This value was acceptable for the prototype because the objective was to demonstrate station interaction, not high-precision positioning. |
| Repeatability | Several repeated station-pass tests after code correction | The train was tested repeatedly by passing through the station detection area and checking whether it stopped after receiving the station command. | In the first tests, the train did not stop reliably because the detection event was too short. After modifying the code with a latch logic, the station stored the detection event and the train stopped more consistently. |
| Station power supply | 5 V external supply | The station was powered from an external 5 V source connected to the station electronics. | Using an external supply helped keep the sensor and station electronics stable during testing. |
| Motor speed control | PWM controlled from Blynk | The train speed was adjusted using the Blynk PWM slider. | The PWM value allowed the train speed to be adapted during testing. Higher PWM values can compensate partially when the battery voltage decreases. |
These tests showed that the project works as an integrated system, but also revealed important limitations. The first version of the station logic did not stop the train reliably because the train could pass through the detection zone before the command was fully processed. To solve this, I modified the code so that once the station detects the train, the event is stored as a latched stop command. With this correction, even if the train passes the sensor quickly, the stop command remains active and the train stops approximately one second later.
The final behavior is acceptable for this educational prototype: the station detects the train in the 11–14 cm range, the command is transmitted through WiFi and Blynk, and the train stops approximately 5 cm after the detection point. This validates the interaction between input sensing, communication, output control and dashboard monitoring.
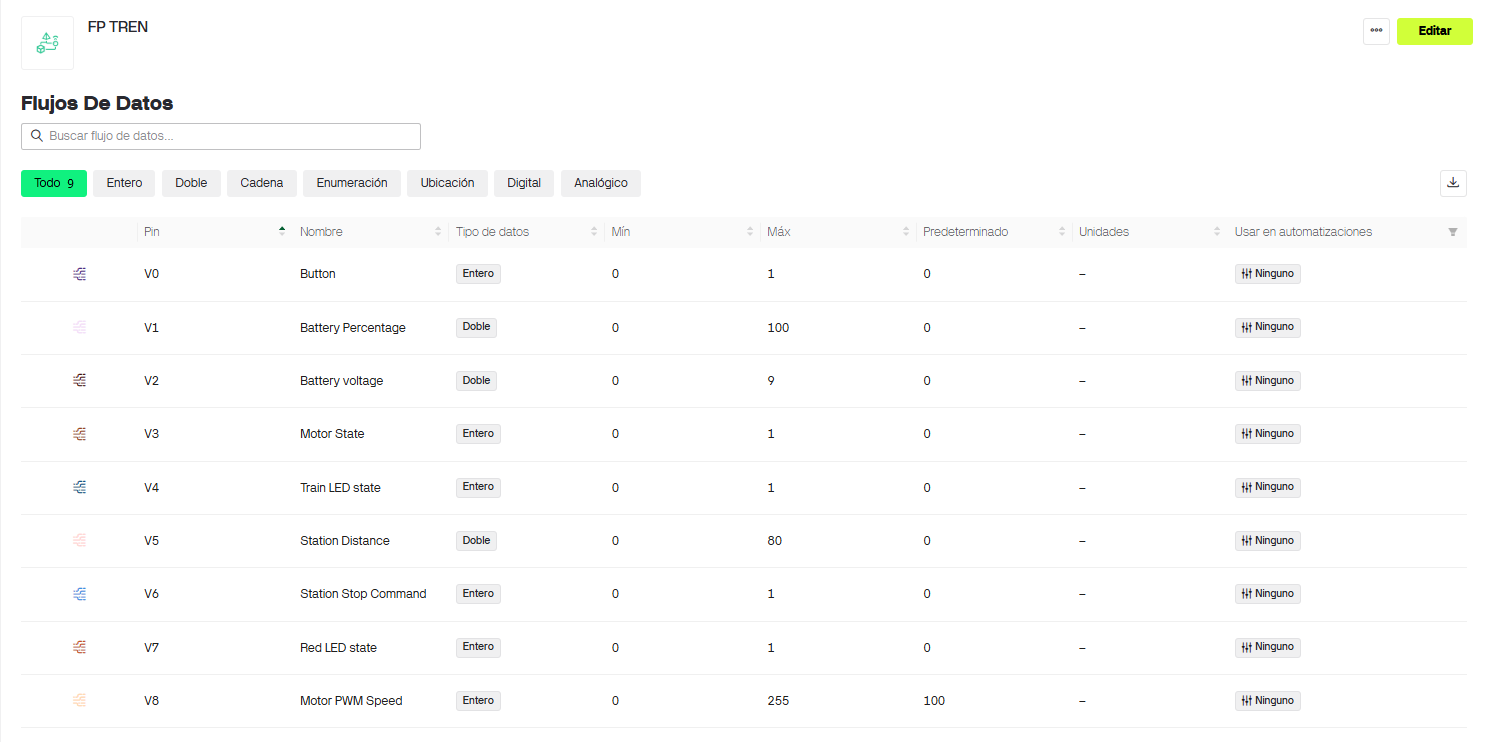
15. Blynk Dashboard and Data Flow
The interface was created using Blynk. I used the Blynk panel, widgets and datastreams to visualize and control the train and the station at the same time. The programming was done in the Arduino IDE.
The train and station communicate through WiFi and update their values in the Blynk dashboard. This makes the system easier to understand because the user can see what is happening in both devices from one interface.
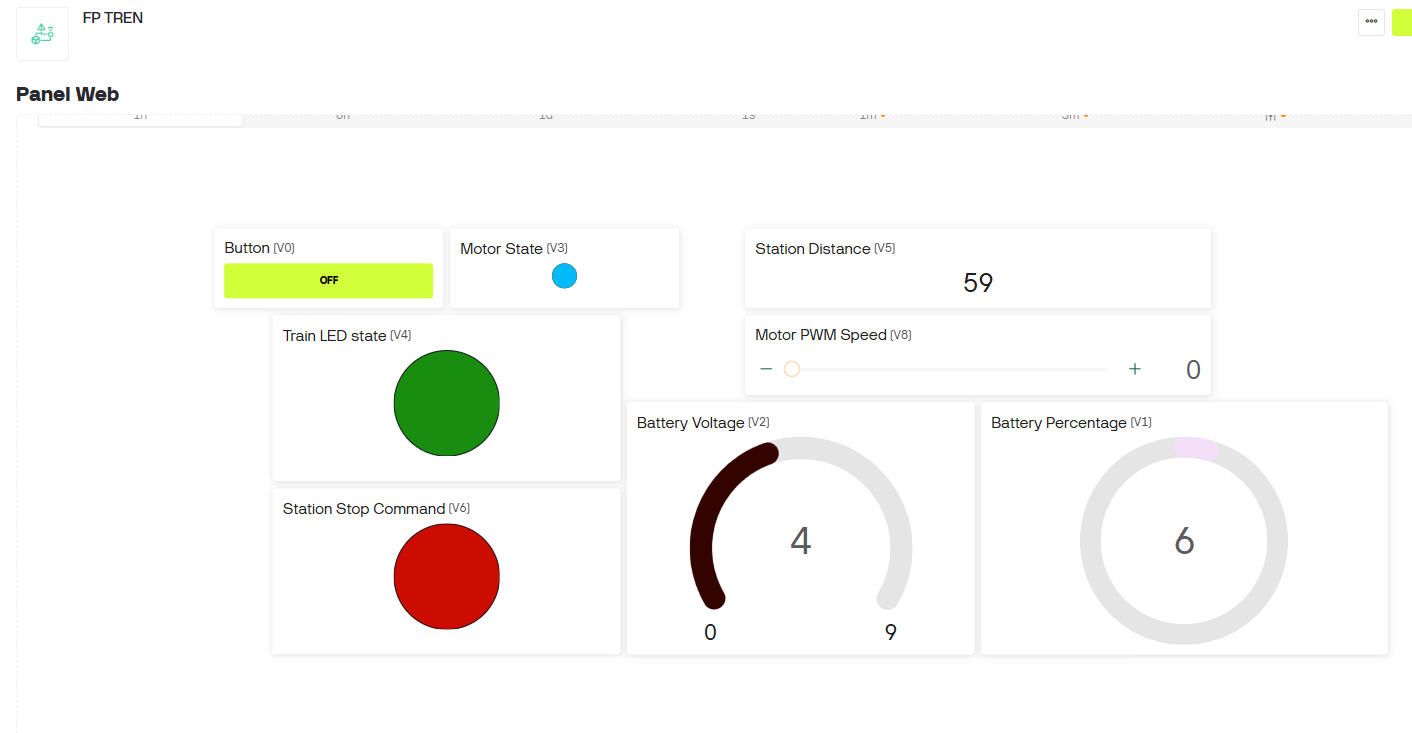
| Virtual pin | Datastream / widget | Range | Function |
|---|---|---|---|
| V0 | Button | ON / OFF | Main control button to start or resume the train. |
| V1 | Battery Percentage | 0–100% | Shows the estimated battery percentage. |
| V2 | Battery Voltage | 0–9 V | Shows the train battery voltage. |
| V3 | Motor State | 0 / 1 | Shows whether the motor is active or inactive. |
| V4 | Train LED State | 0 / 1 | Shows the state of the train LEDs. |
| V5 | Station Distance | 0–80 cm | Shows the distance detected by the station sensor. |
| V6 | Station Stop Command | 0 / 1 | Shows when the station sends a stop command to the train. |
| V7 | Red LED State | 0 / 1 | Shows the red LED state of the station. |
| V8 | Motor PWM Speed | 0–255 | Controls the train motor speed. Default value: 100. |
16. Presentation Slide and Video Check
As part of the project development requirement, I prepared and verified the
final project presentation files: presentation.png and
presentation.mp4. These files are used for the final
presentation and are documented in the Final Project Requirements page.
The final slide summarizes the project name, student name, Fab Lab, project image, assignments used, main features and a short description. The video shows the conception, construction and operation of Fab Train.
I also checked that these files are visible from the final project presentation documentation and that the file names match the required convention.
17. Final Project Requirements Mapping
The final project integrates the range of Fab Academy units covered during the program. This table explains how each major final project requirement is included in Fab Train.
| Requirement | Implementation in Fab Train |
|---|---|
| 2D design | Rail geometry, packaging graphics, box design and fabrication drawings. |
| 3D design | Train body, wagon, wheels, axles and station parts designed in 3D. |
| Additive fabrication | 3D printed train, wagon, wheels, axles and station components. |
| Subtractive fabrication | CNC-machined MDF rails and fabricated packaging structure. |
| Electronics design | Custom train PCB and custom station PCB designed for the project. |
| Electronics production | PCBs fabricated and soldered with through-hole and SMD components. |
| Embedded programming | Train and station programmed in Arduino IDE using XIAO ESP32-C6 boards. |
| Input devices | Sharp distance sensor and analog battery voltage reading. |
| Output devices | DC motor, LEDs and dashboard state indicators. |
| Networking and communication | WiFi communication between train, station and Blynk dashboard. |
| Interface and application programming | Blynk dashboard with widgets and datastreams. |
| System integration | Rails, train, station, electronics, dashboard and packaging work as a complete system. |
| Packaging | Final box design with adhesive vinyl artwork for a finished product appearance. |

18. Current Project Status
Fab Train is documented as a completed final project. The rail system, train, wagon, PCBs, station, WiFi communication, Blynk dashboard and packaging are part of the final integrated system.
The user can assemble the rail system according to the desired path, place the train on the rails, turn it on and monitor the system using Blynk. The internal electronics are protected and are not intended to be handled by children during normal use. The interaction is simple: the kit is assembled, the train is powered on, and the dashboard displays the state of the system.
The station currently works with an external 5 V power source connected to the XIAO 5 V pin to power the circuit. A future version could replace this with a rechargeable battery or a dedicated AC/DC power supply with the required voltage regulation. The train uses a 9 V battery, but a future improvement could be to replace it with a rechargeable battery system and include an integrated charging method.
19. Future Improvements
Although the project is complete, there are several possible improvements for future versions:
- Replace the 9 V battery with a rechargeable battery system.
- Design an integrated charging system for the train.
- Improve the power system of the station with a regulated AC/DC adapter or battery option.
- Test long-term battery autonomy during extended demonstrations.
- Add more stations and additional sensors to create more interactions.
- Add more track modules to increase the number of possible rail layouts.
- Improve the robustness of the train for repeated use by children.
- Create guided STEM activities for workshops or classroom use.
- Add more dashboard functions, such as lap counting or event history.
- Improve the packaging to include internal separators for each component.
20. Downloadable Files
The following files are included so the project can be studied, reproduced or modified. The files are organized by code, 3D printed parts, packaging, Gerber files and laser cut designs.
21. Reflection
- This assignment helped me organize the final project as a complete system, not only as separate mechanical, electronic and digital parts.
- I learned that answering the project development questions makes the final project easier to evaluate because each requirement becomes visible.
- Adding a clear reference to Adrián Torres' Fab Academy train project helped me position my work more fairly in relation to previous work and understand how my project differs in scope and educational purpose.
- Preparing an integrated Bill of Materials helped me understand the real cost of the prototype and clearly connect each component with its source and purpose.
- The rail system showed me the importance of designing physical parts with assembly and user interaction in mind.
- The train design required several iterations because the 3D printed parts had to fit the mechanical rail system and the internal electronics.
- Designing custom PCBs helped reduce the amount of loose wiring and made the project closer to a finished product.
- Using WiFi and Blynk made the system easier to understand because both the train and station could be monitored from a dashboard.
- The dashboard is useful not only for control, but also for debugging, because it shows battery, motor, LEDs and sensor values.
- The packaging was important because it changed the project from a prototype into something that looks more like an educational kit.
- I learned that a finished project must consider not only function, but also usability, safety, documentation, cost, assembly and presentation.
- The main technical challenge was integrating all systems together: rails, train, station, sensor, motor, PCBs, WiFi and dashboard.
- A future version should improve the power system by using rechargeable batteries and a safer charging strategy.
- Fab Train has potential as a STEM learning tool because it combines play, fabrication, electronics, programming, IoT and data visualization.