13. Mid Term Review
At the halfway point of Fab Academy 2026, this page summarises what I have documented so far (Weeks 1–12), where my final project JeLamp stands, and how I plan to finish the remaining weeks before the June 4 final presentation.
Assignment checklist
- Show progress in documenting the assignments
- Show progress on final project idea/s and planning
- Made a schedule for remaining tasks
- Meet with local and global instructor
1. Documentation Progress (Weeks 1–12)
All twelve topics from the first half of the course are documented on this site. Each row links to the corresponding weekly assignment page and summarises the main outcome.
| Topic | Week | Key outcome | Status |
|---|---|---|---|
| Principles & practices / Project management | Week 1 | Signed student agreement; set up GitLab Pages site, version control workflow, and initial final-project research on robotic arm lamps. | ✓ Documented |
| Computer-aided design | Week 2 | Compared 2D/3D CAD tools; built parametric models in Fusion 360 and Onshape; practised image/video compression. | ✓ Documented |
| Computer-controlled cutting | Week 3 | Characterised Thunder Laser Nova 51; cut press-fit and living-hinge parts; vinyl cutting workflow. | ✓ Documented |
| Embedded programming | Week 4 | Programmed Arduino Uno and ESP32; studied datasheets; built button + LED interaction and serial communication. | ✓ Documented |
| 3D scanning and printing | Week 5 | Designed a parametric hinged box in Fusion 360; 3D-printed it; scanned a chair with Polycam and processed the mesh. | ✓ Documented |
| Electronics design | Week 6 | Designed the XIAO ESP32-C3 development board in KiCad — schematic, ERC, footprint assignment, and PCB layout. | ✓ Documented |
| Computer-controlled machining | Week 7 | Designed and CNC-milled an interlocking round stool from 18 mm MDF — Fusion 360 parametric design, Mastercam CAM, Snapmaker milling. | ✓ Documented |
| Electronics production | Week 8 | Milled, soldered, and tested the Week 6 board on KEXU CNC; revised design with JLCPCB (pull-up fix). | ✓ Documented |
| Input devices | Week 9 | Added HC-SR04 ultrasonic distance sensing to the Week 8 board; measured pulse timing and serial readout. | ✓ Documented |
| Output devices | Week 10 | Drove an 8-LED WS2812B NeoPixel strip from the same board; distance input maps to a lit-LED bar graph; group power measurements. | ✓ Documented |
| Networking and communications | Week 11 | ESP-NOW between XIAO ESP32-C3 (ultrasonic) and XIAO ESP32-S3 (SG90 servo); group MQTT + LoRa experiments. | ✓ Documented |
| Mechanical design & machine design | Week 12 | Group XIAO vending machine; my contribution — STS3215 serial bus servo bring-up, ID assignment, gate tuning, and test firmware. | ✓ Documented |
2. Final Project — JeLamp Progress & Planning
JeLamp is a Luxo-inspired desk lamp with gesture-driven lighting, embedded vision, and a custom carrier PCB. The fixed arm uses STS3215 housings as joint connectors — the lamp responds through NeoPixel colour and pattern, not arm movement.
Full project documentation: Final Project page
Concept evolution
The idea started in Week 1 with research on existing robotic arm lamps. Through CAD weeks I modelled a giraffe-like 5-DOF structure in Fusion 360, studying open-source references such as LeLamp. Weekly assignments progressively built the subsystems that JeLamp needs:
- Electronics: Week 6–8 dev board → Week 18 JeLamp carrier PCB (power, NeoPixel, XIAO ESP32-S3 Sense)
- Sensing & output: Week 9–10 ultrasonic + NeoPixel bar → final lamp uses camera + STS3215 joint connectors + LED ring
- Communication: Week 11 ESP-NOW prototype → informs wireless control between lamp subsystems
- Mechanical joints: Week 12 STS3215 experience → horn geometry and mounting used as fixed connectors in JeLamp (not actuated)
Current status at mid-term
Mechanical design
Fusion 360 / Onshape concept models complete; Luxo-style silhouette with fixed arm pose. STS3215 connector pockets tested in print.
Electronics
JeLamp carrier PCB v1 designed in KiCad (15 components, ~50 × 40 mm). Schematic verified, layout routed, Gerbers ready for JLCPCB.
Firmware subsystems
ESP-NOW control, NeoPixel patterns, HC-SR04 input tested in weekly assignments. Gesture + LED integration pending.
Not yet complete
Full mechanical assembly, carrier PCB fabrication + population, cable routing, enclosure, and end-to-end behaviour demo.
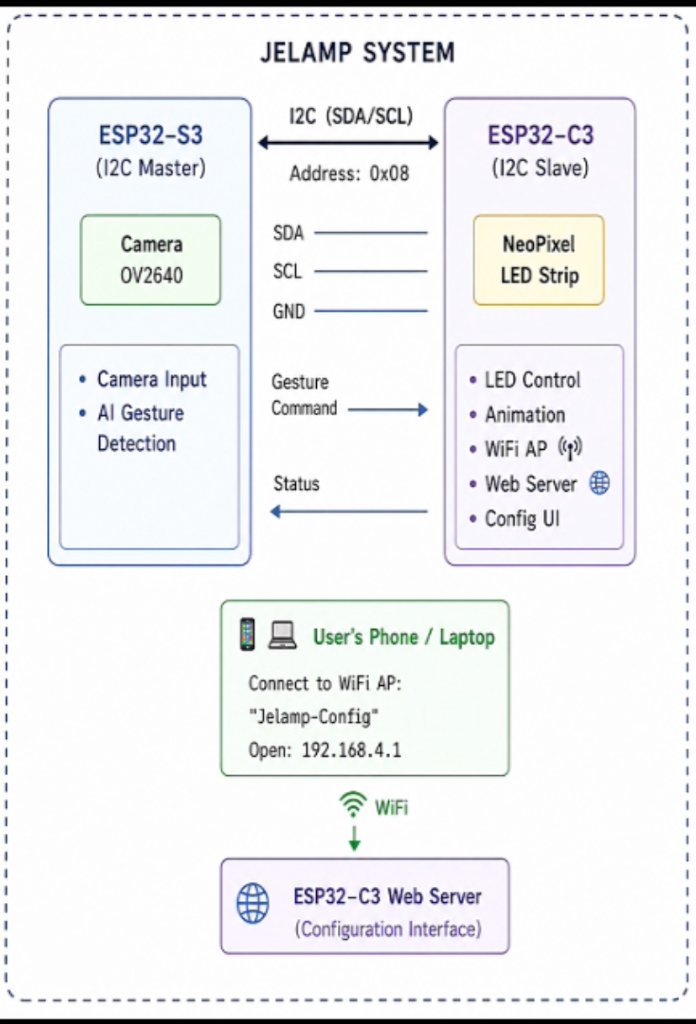
JeLamp system overview — XIAO ESP32-S3 Sense, carrier PCB, STS3215 joint connectors, NeoPixel lighting. See also Week 16 System Integration for the detailed assembly plan.
System architecture (target)
- Controller: XIAO ESP32-S3 Sense — Wi-Fi, camera, microphone, USB programming
- Custom PCB: JeLamp carrier board — 7–8 V input, buck to 5 V, NeoPixel output, expansion GPIOs
- Structure: Fixed arm — 3× STS3215 housings as joint connectors (base, arm, head); not powered
- Lighting: NeoPixel / LED ring for expressive colour feedback
- Structure: 3D-printed joints + laser-cut body panels
3. Schedule for Remaining Tasks (Weeks 13–20)
Working backward from the Fab Academy 2026 final presentation on June 4, 2026, this is my plan for the second half of the course.
| Week | Topic | Planned deliverable |
|---|---|---|
| 13 | Mid Term Review | This page — progress summary, project status, schedule, instructor check-in |
| 14 | Molding and casting | Badge or lamp-base mold; silicone casting; document safety and process |
| 15 | Interface and application programming | Web UI on ESP32 to control NeoPixel via HTTP over Wi-Fi |
| 16 | System integration | End-to-end JeLamp integration — gesture game demo, I2C between boards, assembly plan |
| 17 | Wildcard week | Machine vision — facial expression interaction using ESP32-S3 camera + Edge Impulse |
| 18 | Applications & implications | Final project plan, BOM, evaluation criteria, draft presentation slide and video |
| 19 | Invention, IP & income | CC BY-NC license, dissemination plan, business models, detailed fabrication schedule |
| 20 | Project presentations | June 4 — final demo: working JeLamp, presentation.png, presentation.mp4, complete documentation |
Fabrication sprint (May–June)
| When | Milestone | Deliverable |
|---|---|---|
| Weeks 14–15 | Mold/cast + web interface | Cast lamp base or badge; prototype HTTP control dashboard |
| Weeks 16–17 | Integration + wildcard ML | Assemble mechanical prototype; camera gesture / expression demo |
| May 24–26 | Mechanical fabrication sprint | Print remaining arm segments, lamp head, base enclosure |
| May 27–28 | PCB arrival + population | Solder carrier board; verify power and NeoPixel output |
| May 29–31 | Full assembly + integration | Assemble fixed arm with STS3215 connectors; route I2C cables; connect camera; run end-to-end gesture demo |
| Jun 1–2 | Debug + polish | Verify arm stability at fixed pose; finalise LED patterns |
| Jun 3 | Presentation media | Update presentation.png with build photos; record presentation.mp4 |
| Jun 4 | Final project due | Working demo at finalprojects.fabacademy.org |
4. Instructor Meetings
Fab Academy mid-term review includes check-ins with both the local lab instructor and the global instructor network. Here is what I covered in each meeting:
Local instructor — Chaihuo Makerspace
I met with the Chaihuo lab instructor during the Week 13 regional review session. We walked through this documentation site together and discussed:
- Whether all 12 first-half assignment pages are complete and linked from the index — confirmed yes.
- JeLamp scope: fixed Luxo-style arm with STS3215 housings as joint connectors (not actuated); gesture drives NeoPixel lighting only.
- PCB strategy: mill a prototype carrier board in the lab first, then order JLCPCB for the final assembly.
- Lab resources: confirmed access to Snapmaker CNC, laser cutter, 3D printers, and soldering station for the May fabrication sprint.
Global instructor — Fab Academy network
During the global mid-term review I walked through my documentation site week by week. The global instructor gave the following suggestions for improving earlier assignments:
Suggestion 1 — Week 1: add Cursor commit & push screenshots
My Week 1 page documents the Git workflow with terminal commands, but it does not yet show how to commit and push from Cursor step by step. The global instructor suggested adding screenshots that walk through the full process inside the editor:
- Open the Fab Academy repository folder in Cursor (File → Open Folder…)
- Use the Source Control panel (Git icon in the left sidebar) to review changed files
- Stage files, write a commit message, and click Commit
- Click Sync Changes / Push to publish the updated webpage to GitLab Pages
Planned fix: I will update Week 1 with a new subsection — "Commit and push from Cursor" — including screenshots of the Source Control panel, staged files, commit message box, and the push confirmation. This makes the documentation workflow clearer for other students who use Cursor rather than the terminal alone.
Suggestion 2 — Week 2 2D design: use parametric design
In Week 2 my 2D laser-cut Bumblebee model was drawn in Adobe Illustrator as fixed vector artwork. The global instructor noted that while the 3D section already uses parametric design in Fusion 360 and Onshape, the 2D design should also be parametric so dimensions are easier to change and update later — for example when adjusting kerf compensation, material thickness, or slot widths after a test cut.
- Define key dimensions (tab width, slot size, material thickness, kerf offset) as named variables rather than hard-coded values
- Use a parametric 2D workflow — e.g. Fusion 360 sketch parameters, Inkscape with linked dimensions, or Illustrator variables — so one change propagates across all parts
- Re-export cut files after changing a single parameter instead of redrawing every piece by hand
Planned fix: I will revisit the Week 2 Bumblebee layout using parametric constraints (likely in Fusion 360, which I already use for 3D and CNC work in later weeks) and update Week 2 with before/after screenshots showing how a dimension change updates the full cut layout automatically.
Mid-Term Reflection
Looking back at Weeks 1–12, the weekly assignments were not separate exercises — they were stepping stones toward JeLamp. The XIAO dev board from Week 6 became the platform for input/output and networking tests; the STS3215 work in Week 12 gave me the horn geometry and mounting pattern I reused as fixed joint connectors in the final lamp — the arm does not move.
The biggest gap at mid-term is integration: electronics, mechanics, and behaviour still exist as parallel tracks. The schedule above prioritises closing that gap in Weeks 14–17 so that Weeks 18–20 can focus on documentation polish, IP planning, and the final presentation.