My Final Project
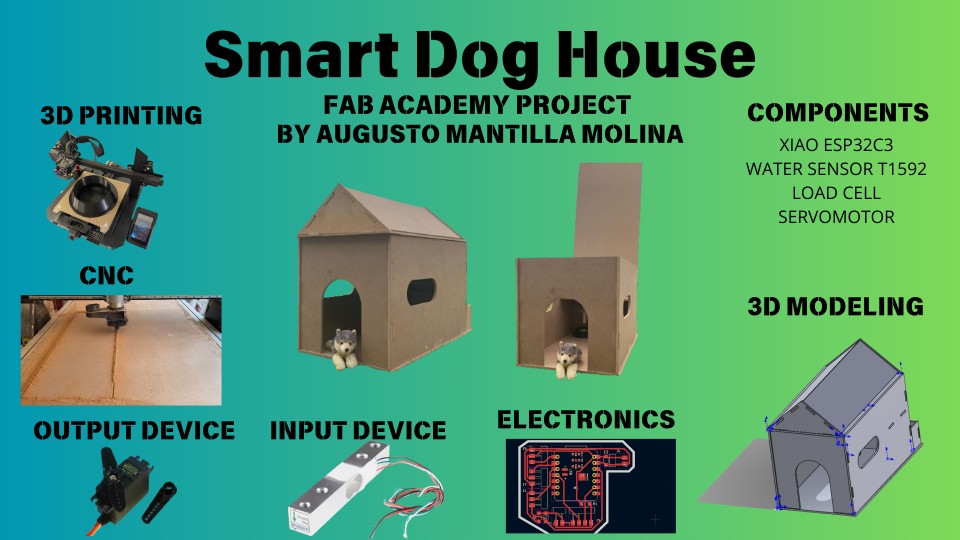
My final projects it's going to be smart dog house. I chose this project because there isn't a smart dog house in Mexico, and I believe it could be a good idea to create one where not only the pet can enter, but one where it feels comfortable, with a sufficiently spacious area so it doesn't feel confined. Additionally, addressing the issues of food and water won't be a problem since they will constantly refill when running low. Besides the pet's comfort, the owner will also be able to monitor them from inside the house with a strategically placed camera covering the entire interior. Furthermore, there will be a sensor at the entrance to detect whether the pet is inside or not.
This house will be very useful for any time when the owner has to go out and the pet is left alone. With this house the pet will have a safe place to sleep, food and water when the pet requires it along with a camera with which you can see if the pet is in the house.
Why for dogs?
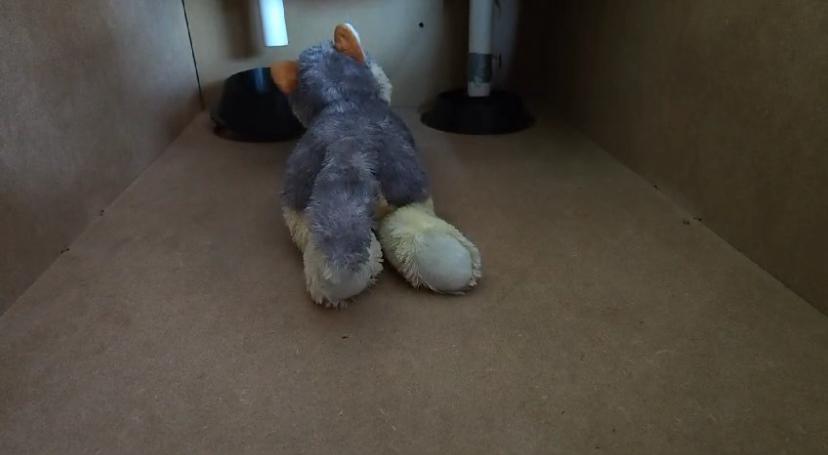
Because I have a dog named Nina aka "Gorda," and it would be interesting to see how she adapts to her new conditions in the smart house compared to a typical dog house sold at a veterinary clinic. Also, it's to assess its potential for improvement in the future.
She is Nina and me
.jpg)
.jpg)
Research
In 2017, Visual Communications Company (VCC) developed a product similar to the one I am working on, albeit with different features. One of these distinctions is that VCC's product offers temperature regulation, whereas it lacks an automatic system for refilling pet food and water when they are running low. Here you can read the description of the producto of VCC
What would I need to make this project?
To carry out this project, I will utilize 3D modeling, 3D printing, computer-controlled machine, laser cutting, embedded programming, various types of boards, and assorted electronic components. Here are some of them:
Components
| 2 | Servo motor |
| 1 | Water sensor |
| 4 | Load cell |
| 1 | XIAO ESP32C3 |
Sketch
This is a sketch of what my final project would be like.
 (1).jpg)
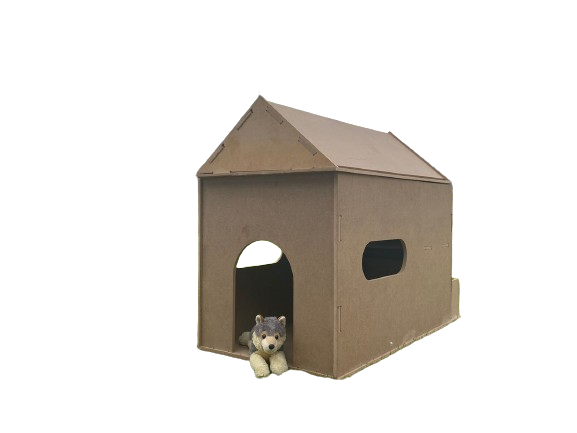
This is a prototype of the dog house
Fab Academy Calendar
Bill of Material (BOM)
| Component | Cost |
|---|---|
| XIAO ESP32 C3 | $9.90 |
| x3 15 MM MDF 1.22 X 2.44 M | $92.70 |
| 2 Servomotor | $14.99 |
| Water sensor t1592 | $0.72 |
| 4 Weight sensor XS-112 | $6.98 |
| Total | 125.29 |
PCB Creation
To design the electronic board for this project, I carefully considered how to integrate all the necessary components, including the servomotors, water sensor, load cell. I chose the XIAO ESP32C3 microcontroller because it offers the precise number of outputs required to accommodate all these elements, making it an ideal choice for this project.
I designed the electronic board using KICAD. If you want to learn more about how to use this program, click here. I decided to use KICAD because it's the program I've been using throughout the Fab Academy and I'm already familiar with it. Below, I will show the schematic design, the PCB layout, and the final result after soldering.
.jpg)
schematic design
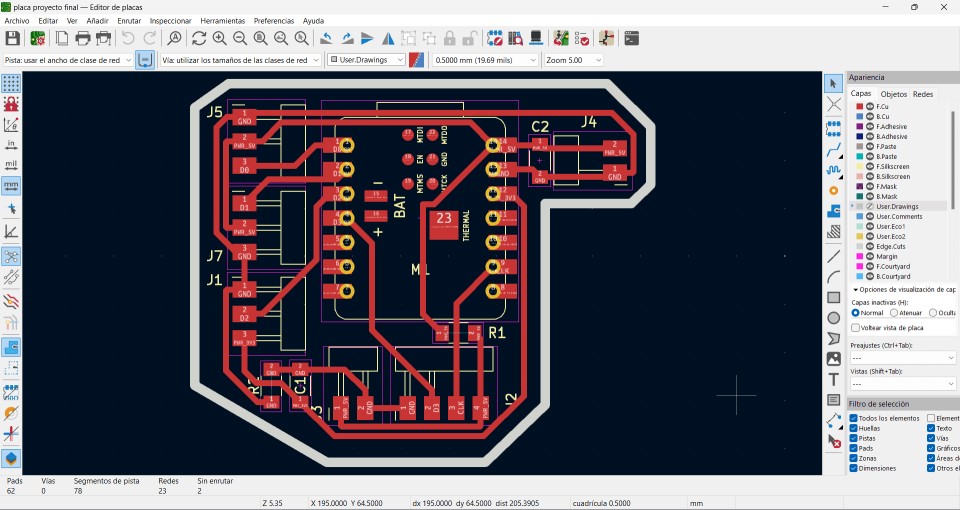
PCB layout
.jpg)
Board Solded
In the schematic design, I included output pins for the two servomotors, the load cell, the water sensor, and two additional pins for voltage and ground.
Components
Load cell
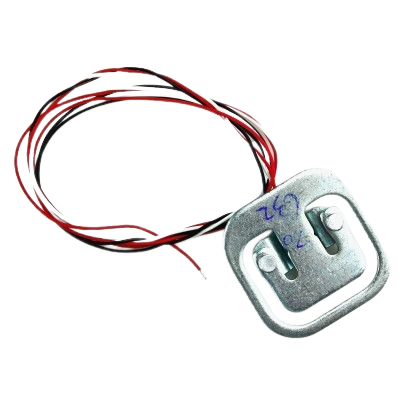
- Input Voltage: ≤5V
- Maximum Load Capacity: Supports up to 50 kg (110 lbs)
- Sensitivity: 1.0±0.1
- Material: Aluminum
- Operating Temperature: 0°C to 50°C
Load cells are commonly used in scales or balances to measure weight analogously. With the help of an HX711 module, these analog signals can be converted into digital signals, allowing us to obtain a value in grams (g). This is why I decided to use a load cell: I want it to measure the weight of the food in the dog's bowl and, when it reaches a certain weight, send a signal to the servomotor to refill the bowl with food.
Water sensor
- Sensor Type: Analog
- Minimum Supply Voltage: 3V
- Maximum Supply Voltage: 5V
- Working Current: Less than 20 mA
- Detection Area: 40mm x 16mm
- Production Process: Double-sided FR4 HASL
- Minimum Operating Temperature: 10°C
- Maximum Operating Temperature: 30°C
- Humidity: 10% - 90% non-condensing
- Dimensions: 65mm x 20mm x 8mm
Water sensors like the one I am showing are commonly used to measure water levels in specific locations. This is the main reason I will use this sensor. It will be attached to a tube through which water will flow. When the sensor detects a certain water level, it will send a signal to a servomotor to stop the water flow. Conversely, if the sensor does not detect the required water level, it will send a signal to the servomotor to open the water flow.
servomotors
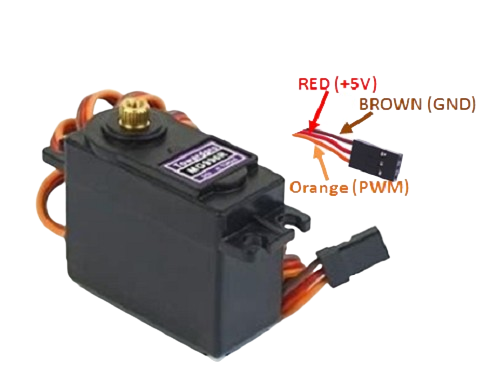
- Voltage range: 4.8V to 7.2V
- Rotation range: 180 degrees
- Temperature: -30°C to 60°C.
- Interface: Analog
I decided to use servomotors for this project because I only need them to move to 90° and return to their original position (0°) when activated by a signal from either the load cell or the water sensor. Additionally, their size and ease of programming make them a very viable option for creating the Smart Dog House.
Testing the components and programming them
Load cell
The code I am providing here is for zeroing the load cells with a known weight (that of my phone) to achieve a very accurate approximation with other weights. Additionally, I am integrating the servomotor so that it moves when the load cells detect a certain weight. In the following video, I demonstrate how these components work together with the servomotor.
Water level sensor
In the following code, the water sensor will detect the water level in a cup. Whenever the water level decreases, a servomotor will be activated to open the water flow. When the sensor detects that the water has reached a high level, it will send a signal to the servomotor to close the water flow.
This is all the codes working at the same time
CAD Design
Throughout the Fab Academy, I have had several ideas for the final design of the Smart Dog House. The first one was created during week 7, then I made a larger design, and finally, my current design combines elements from both previous designs, creating a perfect harmony between them. For each design, I will discuss the advantages and disadvantages of the dog house.
First desing
- Advantages: It is a classic dog house design. It doesn't require much MDF.
- disadvantages: It doesn't have all the necessary adaptations for the smart house. It is somewhat small. The door is small.
Second Design
- Advantages: It was equipped with all the necessary components. It has a modern design. The roof can be made retractable.
- Disadvantages: It uses too much wood. It is not very aesthetically pleasing.
Third design (Final)
- Advantages: It uses a moderate amount of wood. It has sufficient space. It is equipped for all necessary components.
- Disadvantages: It is not suitable for large dogs.
In addition to the house designs, I also modeled the design of the bowls, funnel, the component that the servo motor will move to open or close the water flow.
Bowls
Funnel
Servo part
3D Printing
For the 3D printing, I decided to use PLA PET filament to print the dog food and water bowls, as well as the piece that will move the servo to open or close the water flow depending on the servo motor's instruction.
 (1).jpg)
Furthermore, I conducted a test to determine how long PLA can remain in contact with water without leaking. For this test, I printed a scaled-down bowl to conserve material. The result showed that the PLA remained in contact with water for 5 days without any water leakage.
 (1).jpg)
Part that the servo will move
CNC Cutting and Assembly
This is a very important part of the project as it includes assembling the house and cutting its pieces for assembly. At the same time, during the assembly of the house, it is crucial to install the hinges needed for the retractable roof, allowing for easy cleaning and refilling of food containers. For these reasons, it is important that this step is done correctly.
 (1).jpg)
Here I was assembling the house
 (1).jpg)
Here are the installed hinges.
This is the whole house assembled
System Integration
The smart dog house has a rear compartment where all the components I used can be stored. Additionally, there is a space in the recessed areas where the bowls are placed, allowing the cables to pass through without being seen or chewed by the pet. This space is covered with a small MDF board that is 5mm thick. Similarly, the power cables for the servomotor run flush with the roof where the food containers are located, making them less noticeable to the pet. The following images provide a better view of how everything is integrated.
Here I'm placing the cables
 (1).jpg)
These are all the cables placed
Here you can see the wood wall hidding the cables
House working
The main functionality of the house lies in the automatic refilling of the bowls with food and ¿water when they are low. This is achieved through sensors, as explained earlier, which send a signal to the c orresponding servomotor to allow the flow of food or water. These sensors, upon detecting a certain weight or water level, will send another signal to the servo motor to stop the flow.
Each servomotor is mounted with a tube connected to a funnel positioned under the food/water containers. When the signal reaches the servomotor, it will move from 0° to 90° or vice versa, thereby "closing" or "opening" the flow of food or water.
This is a fast test
Here, both the food and water bowls are empty, which triggered the signal to open the flow of water to the servo motor. Once they reached a certain weight or water level, both sent the signal to close the flow of water.
Final results
 (1).jpg)
Food bowl
 (1).jpg)
Water bowl
If you want to download all the files, including the codes, preliminary and final designs of the house, and the 3D prints, click here.
Final thought
Throughout this Fab Academy, I have learned many things that are incredibly useful for both my future career and various other situations. Additionally, I have met fantastic people and made new friendships. Without a doubt, the Fab Academy has helped me improve and perfect some of the knowledge I already had and has introduced me to new concepts I wasn't familiar with.