Mechanical design & machine design
Throughout the tenth week, the team has several group tasks to complete. Firstly, we must design a machine that includes mechanisms, actuation, automation, and a specific application. Then, we need to build the mechanical parts of the machine and operate it manually to ensure proper functioning. Subsequently, it's crucial to document the entire group project. Once the machine is built, we must actuate and automate it as planned, and again document the process and the results obtained.
Group assignment week 10
In addition to these group tasks, each team member has an individual assignment: to document their contribution to the project. It's essential for each team member to clearly record their part in the project for an accurate and fair assessment of the work done.
We engineered a CNC sewing apparatus with the capability to embroider designs transmitted to its interface via a specified G code. Users can input their preferred design or pattern through the interface, which is subsequently translated into instructions using G code. These instructions are then carried out by the CNC sewing machine, ensuring accurate and precise embroidery in accordance with the provided design.
CNC Sewing Machine
The idea is to create a CNC sewing machine, where there is a movable bed controlled by a computer to embroider any image converted into code. The CNC sewing machine would essentially operate similarly to other CNC (Computer Numerical Control) machines, but instead of cutting or engraving materials, it would use a needle and thread to sew designs onto fabric. The computer would interpret digital images or designs and convert them into instructions (G-code) that the machine can understand, allowing it to precisely sew intricate patterns or designs onto fabric with high accuracy and consistency. This technology would offer a more automated and customizable approach to embroidery, enabling users to create detailed and complex designs with ease.
What was my contribution?
Design
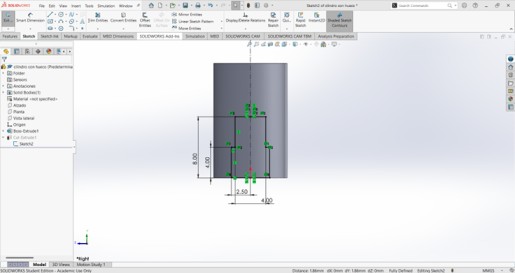
Utilizing SolidWorks CAD software, I designed two components to enable pedal automation. These components are as follows:
The part itself is quite straightforward; the crucial aspect is its adaptability to a specific part of the pedal, for which measurements were taken using a digital caliper to ensure maximum precision.
.jpg)
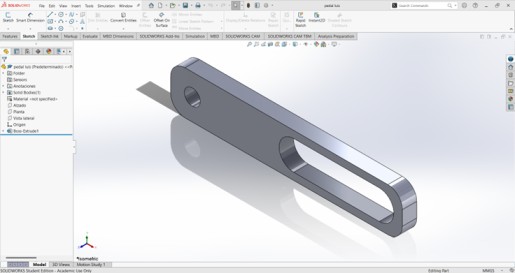
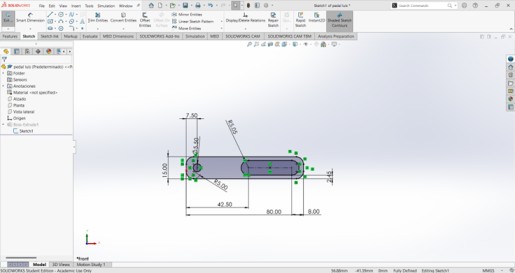
The second part I designed was also simple, just like the previous one it had to be properly measured to fit correctly.
3D Printing
In addition to designing the two aforementioned parts, I also 3D printed several parts for my team. Here are some of the prints I made:
.jpg)
.jpg)
.jpg)
.jpg)
.jpg)
This is me corroborating that the pieces embody perfection
This is how the parts assembly was to be able to make the pedal activate automatically
.jpg)
Software
UNIVERSAL G CODE SENDER (UGS)
Universal Gcode Sender (UGS) is a cross-platform CNC control software that allows users to control CNC (Computer Numerical Control) machines through a USB or serial connection. It's primarily used for sending G-code commands to CNC machines to execute various machining operations such as milling, cutting, drilling, etc.
For this CNC, we used GRBL. GRBL interprets G-code commands, the standard programming language used to control CNC machines, and converts them into precise motion commands. Knowing this, my colleagues and I began to do different tests to calibrate the number of steps that the motors had to take. Of the three motors we use, only one of them is different in terms of the number of steps you have to take, this motor is the one used to be able to operate the pedal. The main reason it is different is that it cannot take such big steps as the machine would go too fast and fail to sew correctly.
This is my partner Erick and I calibrating the step motors.
.jpg)
Here we are seeing in what sense the engines are moving to be able to place them correctly and avoid future mistakes.
After several tests already with the assembled machine and with the help of our colleague Manuel who is the most trained in the use of sewing machines in the equipment we were able to properly calibrate the motors and thus sew in the best way.
Now having already calibrated the machine well with the motors we started to create a code to see that it works correctly, the first thing we did was a code to make a small square and later a letter "F" because it is the initial of the Fab Academy. The code that we created is in the 3th and 4th slide:
This is our team
.jpg)