Input devices are essential components in any electronic system, allowing users to interact with devices and providing valuable data for processing and control. These devices come in various forms and utilize different principles to capture and transmit input information. Switches are one of the most basic input devices, ranging from simple buttons to more complex slide switches. They provide binary input signals and are often used for tasks like toggling power or triggering actions. Techniques such as debouncing ensure that the input signal is stable and reliable.
Sensors detect physical phenomena such as light, temperature, motion, and proximity, converting them into electrical signals that can be processed by the system. For example, temperature sensors like NTC thermistors or infrared (IR) sensors provide analog signals proportional to temperature, while proximity sensors like Hall effect sensors detect changes in magnetic fields. Potentiometers, also known as pots, are variable resistors that produce analog voltage signals based on the position of a wiper along a resistive track. They are commonly used for tasks like volume control or analog input adjustment.
Step response devices, such as touch-sensitive panels or load cells, measure changes in resistance, capacitance, or pressure to detect touch or pressure input. These devices often require techniques like averaging, filtering, or shielding to improve accuracy and reliability. Other input devices include those for measuring distance, orientation, sound, vibration, force, angle, pressure, and more. Each type of device serves specific purposes and can be integrated into electronic systems to enable a wide range of functionalities. Additionally, advancements in sensor technology continue to drive innovation in input devices, allowing for more precise and intuitive interaction with electronic systems.

This week's assignment is about understanding how to connect input devices to a Microcontroller board
For details on this assignment head to our Group assignment page
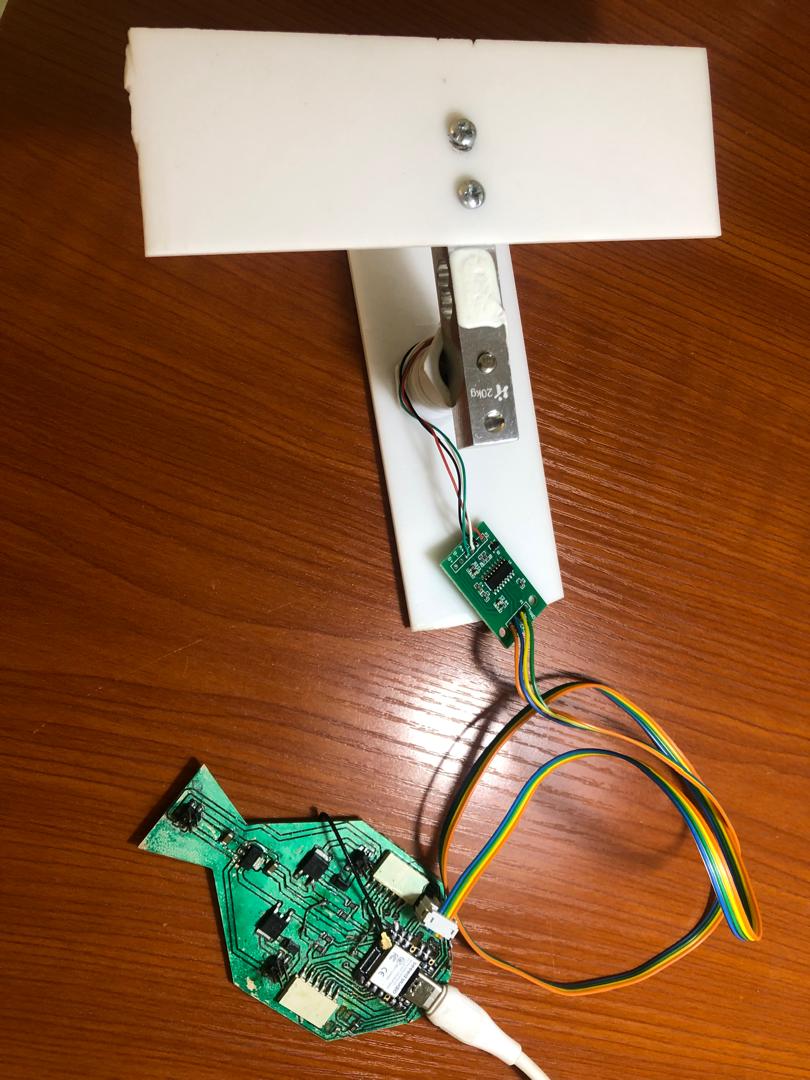
For this week's assignment, I am going to add a load cell weight sensor to my final project’s board that I developed in week 8: Electronics Design.I will be using the sensor for detecting if there is feed loaded onto the machine before initiating the dispense routine. Visit my final project page for more.
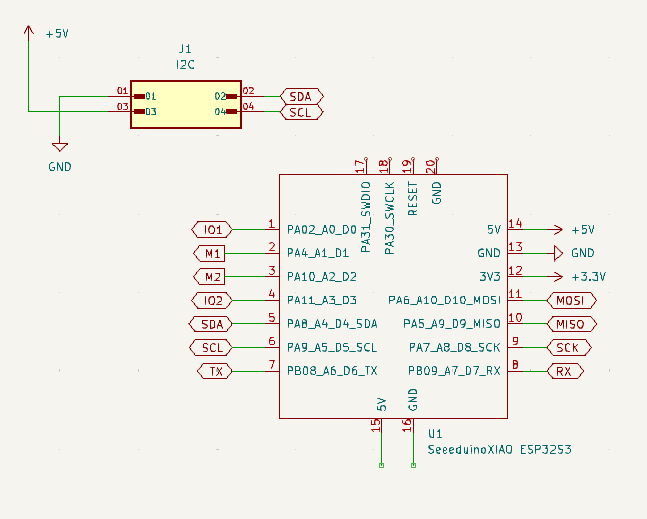
The circuit diagram below shows the connection between the load cell weight sensor and Xiao esp32s3. I used D4 and D5 pins of the Xiao

The load cell weight sensor can be found at Hub360. It is basically a strain gauge formed as a metal bar.

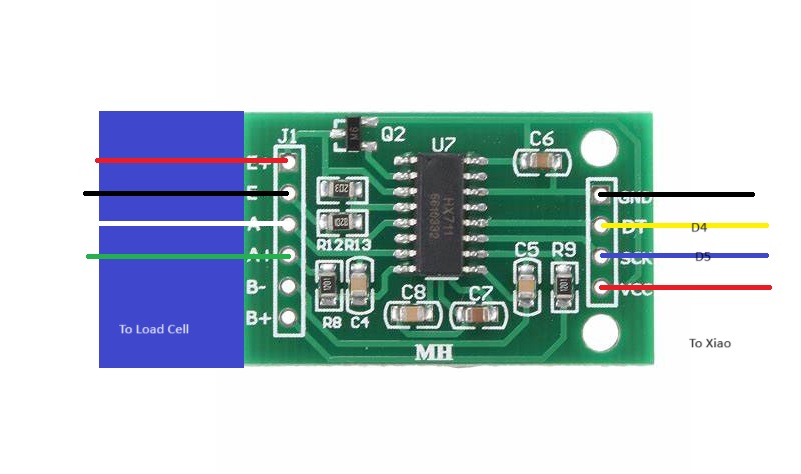
It comes with an amplifier and an Analog to Digital Converter (ADC) module consisting of an Hx711 chip. Bello is how to connect the module to the load cell and Xiao


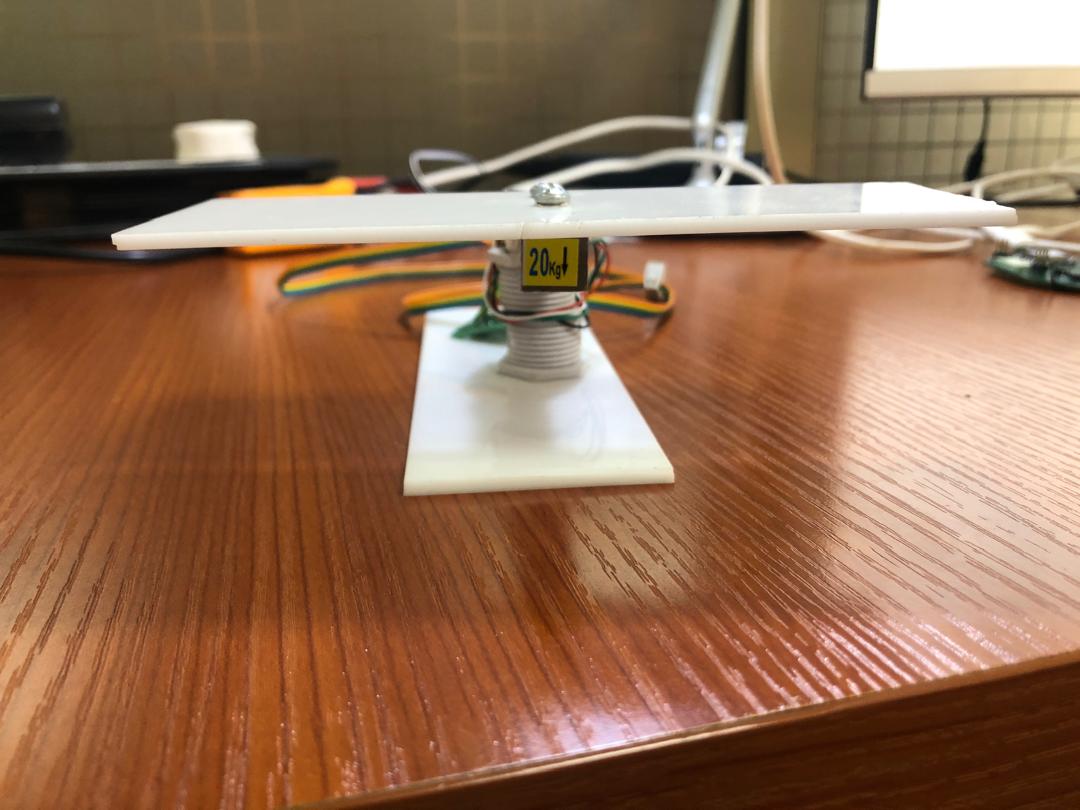
To use the load cell I fixed one end (via screws) to a base. While leaving the other end as a load bearer.


I used an IDC connector to connect the module to my board.

I followed this tutorial HX711 & Load Cell - How to Use (with examples) by DIY Engineers to test run the sensor using the following calibration example code:
/*
-------------------------------------------------------------------------------------
HX711_ADC
Arduino library for HX711 24-Bit Analog-to-Digital Converter for Weight Scales
Olav Kallhovd sept2017
-------------------------------------------------------------------------------------
*/


/*
This example file shows how to calibrate the load cell and optionally store the calibration
value in EEPROM, and also how to change the value manually.
The result value can then later be included in your project sketch or fetched from EEPROM.


To implement calibration in your project sketch the simplified procedure is as follow:
    LoadCell.tare();
    //place known mass
    LoadCell.refreshDataSet();
    float newCalibrationValue = LoadCell.getNewCalibration(known_mass);
*/


#include
#if defined(ESP8266)|| defined(ESP32) || defined(AVR)
#include
#endif


//pins:
const int HX711_dout = 5; //mcu > HX711 dout pin
const int HX711_sck = 6; //mcu > HX711 sck pin


//HX711 constructor:
HX711_ADC LoadCell(HX711_dout, HX711_sck);


const int calVal_eepromAdress = 0;
unsigned long t = 0;


void setup() {
Serial.begin(57600); delay(10);
Serial.println();
Serial.println("Starting...");


LoadCell.begin();
//LoadCell.setReverseOutput(); //uncomment to turn a negative output value to positive
unsigned long stabilizingtime = 2000; // preciscion right after power-up can be improved by adding a few seconds of stabilizing time
boolean _tare = true; //set this to false if you don't want tare to be performed in the next step
LoadCell.start(stabilizingtime, _tare);
if (LoadCell.getTareTimeoutFlag() || LoadCell.getSignalTimeoutFlag()) {
    Serial.println("Timeout, check MCU>HX711 wiring and pin designations");
    while (1);
}
else {
    LoadCell.setCalFactor(1.0); // user set calibration value (float), initial value 1.0 may be used for this sketch
    Serial.println("Startup is complete");
}
while (!LoadCell.update());
calibrate(); //start calibration procedure
}


void loop() {
static boolean newDataReady = 0;
const int serialPrintInterval = 100; //increase value to slow down serial print activity


// check for new data/start next conversion:
if (LoadCell.update()) newDataReady = true;


// get smoothed value from the dataset:
if (newDataReady) {
    if (millis() > t + serialPrintInterval) {
    float i = LoadCell.getData()/1000;
    Serial.print("Load_cell output val: ");
    Serial.print(i);
    Serial.print("g ");
    Serial.println(" ");
    newDataReady = 0;
    t = millis();
    }
}


// receive command from serial terminal
if (Serial.available() > 0) {
    char inByte = Serial.read();
    if (inByte == 't') LoadCell.tareNoDelay(); //tare
    else if (inByte == 'r') calibrate(); //calibrate
    else if (inByte == 'c') changeSavedCalFactor(); //edit calibration value manually
}


// check if last tare operation is complete
if (LoadCell.getTareStatus() == true) {
    Serial.println("Tare complete");
}


}


void calibrate() {
Serial.println("***");
Serial.println("Start calibration:");
Serial.println("Place the load cell an a level stable surface.");
Serial.println("Remove any load applied to the load cell.");
Serial.println("Send 't' from serial monitor to set the tare offset.");


boolean _resume = false;
while (_resume == false) {
    LoadCell.update();
    if (Serial.available() > 0) {
    if (Serial.available() > 0) {
        char inByte = Serial.read();
        if (inByte == 't') LoadCell.tareNoDelay();
    }
    }
    if (LoadCell.getTareStatus() == true) {
    Serial.println("Tare complete");
    _resume = true;
    }
}


Serial.println("Now, place your known mass on the loadcell.");
Serial.println("Then send the weight of this mass (i.e. 100.0) from serial monitor.");


float known_mass = 0;
_resume = false;
while (_resume == false) {
    LoadCell.update();
    if (Serial.available() > 0) {
    known_mass = Serial.parseFloat();
    if (known_mass != 0) {
        Serial.print("Known mass is: ");
        Serial.println(known_mass);
        _resume = true;
    }
    }
}


LoadCell.refreshDataSet(); //refresh the dataset to be sure that the known mass is measured correct
float newCalibrationValue = LoadCell.getNewCalibration(known_mass); //get the new calibration value


Serial.print("New calibration value has been set to: ");
Serial.print(newCalibrationValue);
Serial.println(", use this as calibration value (calFactor) in your project sketch.");
Serial.print("Save this value to EEPROM adress ");
Serial.print(calVal_eepromAdress);
Serial.println("? y/n");


_resume = false;
while (_resume == false) {
    if (Serial.available() > 0) {
    char inByte = Serial.read();
    if (inByte == 'y') {
#if defined(ESP8266)|| defined(ESP32)
        EEPROM.begin(512);
#endif
        EEPROM.put(calVal_eepromAdress, newCalibrationValue);
#if defined(ESP8266)|| defined(ESP32)
        EEPROM.commit();
#endif
        EEPROM.get(calVal_eepromAdress, newCalibrationValue);
        Serial.print("Value ");
        Serial.print(newCalibrationValue);
        Serial.print(" saved to EEPROM address: ");
        Serial.println(calVal_eepromAdress);
        _resume = true;


    }
    else if (inByte == 'n') {
        Serial.println("Value not saved to EEPROM");
        _resume = true;
    }
    }
}


Serial.println("End calibration");
Serial.println("***");
Serial.println("To re-calibrate, send 'r' from serial monitor.");
Serial.println("For manual edit of the calibration value, send 'c' from serial monitor.");
Serial.println("***");
}


void changeSavedCalFactor() {
float oldCalibrationValue = LoadCell.getCalFactor();
boolean _resume = false;
Serial.println("***");
Serial.print("Current value is: ");
Serial.println(oldCalibrationValue);
Serial.println("Now, send the new value from serial monitor, i.e. 696.0");
float newCalibrationValue;
while (_resume == false) {
    if (Serial.available() > 0) {
    newCalibrationValue = Serial.parseFloat();
    if (newCalibrationValue != 0) {
        Serial.print("New calibration value is: ");
        Serial.println(newCalibrationValue);
        LoadCell.setCalFactor(newCalibrationValue);
        _resume = true;
    }
    }
}
_resume = false;
Serial.print("Save this value to EEPROM adress ");
Serial.print(calVal_eepromAdress);
Serial.println("? y/n");
while (_resume == false) {
    if (Serial.available() > 0) {
    char inByte = Serial.read();
    if (inByte == 'y') {
#if defined(ESP8266)|| defined(ESP32)
        EEPROM.begin(512);
#endif
        EEPROM.put(calVal_eepromAdress, newCalibrationValue);
#if defined(ESP8266)|| defined(ESP32)
        EEPROM.commit();
#endif
        EEPROM.get(calVal_eepromAdress, newCalibrationValue);
        Serial.print("Value ");
        Serial.print(newCalibrationValue);
        Serial.print(" saved to EEPROM address: ");
        Serial.println(calVal_eepromAdress);
        _resume = true;
    }
    else if (inByte == 'n') {
        Serial.println("Value not saved to EEPROM");
        _resume = true;
    }
    }
}
Serial.println("End change calibration value");
Serial.println("***");
}
Output: