Principles and Practices, Project Management
Here, I'm starting my new journey as a FabAcademy student. Although everyone says it's challenging and exhausting, we should remember that great creativity often arises from overcoming obstacles. In this 6-month journey, topics will be covered weekly, along with assigned tasks to be completed. The assignments for the first week are:
-
- Plan and sketch a potential final project.
- Work through a git tutorial.
- Build a personal website describing me and my final project.
- Upload my work to the website.
I began learning the basics of websites and their components. Websites primarily rely on languages such as Markdown and HTML for building and CSS for customizing preferences. I was puzzled by how difficult it seemed to create a fully functional and editable website without prior knowledge. However, I soon realized that it depends on which language I will use. I chose to write my website in HTML, it's challenging for me, but I felt it was more flexible to edit the website.
I found that there are many helpful resources for learning HTML or CSS. One of them is W3schools, but before starting to build the website, there must be a place that contains my work (like a storage room), and in our case, it's called a repository, and we need tools to manage that storage.
Building a website is a similar case. I need a place that will be used to save all my work, and this will be GitLab, where the repository is located, by the way I guess this tutorial was helpful. And for sure wn need the tools to manage and control the work, and that is Git. Now before starting to use Git, I have made some research about Git, and it turned out to me that Git is a distributed version control system (DVCS) that allows developers to track changes in the source code of their software during development, manage versions, and collaborate with other team members.
With Git, developers can create local copies of a codebase (repositories), make changes, and then share them with other team members by committing and pushing them to a central remote repository. Git also allows multiple development branches, making it easy for developers to work on different features or bug fixes simultaneously. Additionally, Git's distributed nature allows for offline development and easy branching and merging, making collaboration and experimentation more efficient.
I'm starting this challenging journey by learning how to build my website to start documenting my work in this course so that it can be accessible to everyone who would like to visit and see it. I hope to make my family, who supported me, proud of what I have done.
Still, before downloading Git, there is something else to download, and that is the editor. The editor is a software application that provides a user-friendly interface for writing, editing, and debugging code. It is a fundamental tool for software development and helps to increase the productivity and efficiency of a developer. Examples of code editors include Visual Studio Code, Sublime Text, Atom, and Notepad++.
So, I have decided to choose Visual Studio Code, just downloaded from Microsoft Store.
Also there is an amazing tool I have used it to correct my spelling to make documenting easier install code spell checker.
Install & configure Git - GitLab
Now I had to download and install Git on my laptop, but I had to make sure that my system is 64bit to choose the right version.

Following the installation steps, I needed some clarifications about the best editor, so it depends on the person and what he used to do to write different commands.

Proceeding with the default installation steps, I had to run the program to check if everything was going right. I doubled click on Git Bash and then wrote (git --version) to see the version of Git; all is good.

To start the setup of Git and let Git know who I am, I used the following commands:
-
- Configure user name : git config --global user.name “YOUR_USERNAME”
- Configure email address : git config --global user.email your@mail.com

I had to make a new folder where I wanted to save my work, and I named it FAB23, then I had to generate the SSH key to make a secure connection between Git and GitLab by using the following commands:
-
- Generate SSH : ssh-keygen -t ed25519 -C "$your_email"
- Show the public key: cat ~/.ssh/id_ed25519
To write the commands, I opened the FAB23 folder and right-clicked on the mouse. I choose Git Bash.

I wrote the commands above, and I got the SSH key as shown below:

After that, I copied the SSH, pasted it on GitLab, and added it to the repository:

Now, to connect the local file and the repository on GitLab, I had to copy the SSH clone link and paste it into Git Bash using the command git clone as shown below:

Because I already did this process with our instructor Emma, Git Bash said that the file already exists.

Install the website template & edit it
Now it's the time to start building my website! I have chosen a free template from BootstrapMade.

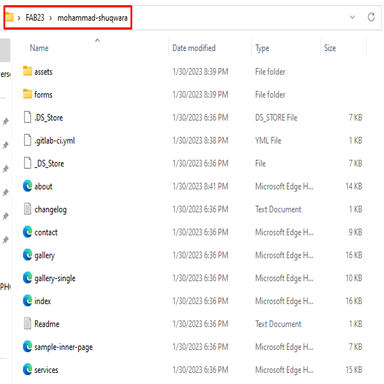
After installing, I will copy and paste all of the website files into the local repository(FAB23):

Then paste all files in the repository file:

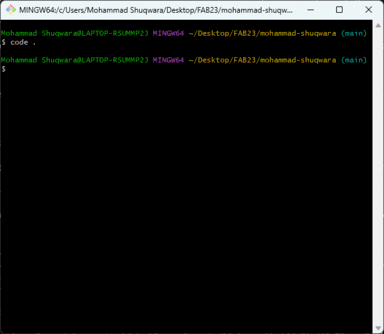
The question now is how to start editing the template cause I didn't have any experience in HTML; I found that the best way is to start understanding what the command lines mean, so from the template files, I clicked git bash, then I wrote the command below:
-
- code . : This command will open the local repository files in the editor.

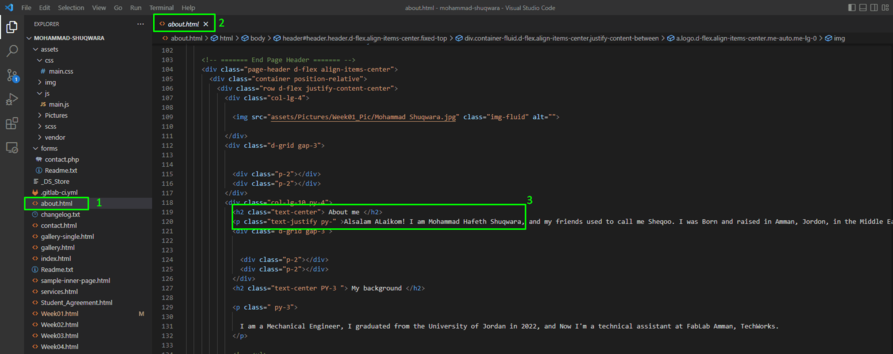
After that, it will open a window, as shown below. To start editing, first, I choose a page to edit. For example, if I want to edit About me, I choose it from the left, then it will open as number 2 shows. After that, I looked at where I could edit my name by making some research and watching some tutorials on HTML. For example, if I see P, that means it's a paragraph, and h means it's a heading, so I just removed the old text between the tags and wrote mine!

Also, I had to add some websites as a reference and some photos for sure; So I went to my HTML friend w3schools 😃 and I found out many helpful commands such as:
-
- To add a link : < a href="The link">"The word" < /a >
- To add a photo : < img src="pic name.jpg" alt="words appear when the image not showing" width="104" height="142" >
So I have copied the text and pasted it into the code using the editor, in addition I have changed the dimension of the pictures by changing the width&height values.
Upload to the repository
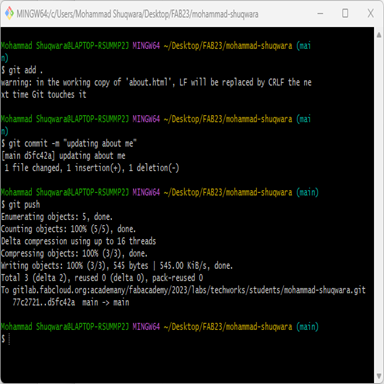
Now I'm ready to make my first push! (push means that let's upload all changes to the repository) So, I've righted-click as usual, then git bash and write the following commands in the terminal window:
-
- Git add . : adds everything I have changed to an index to prepare it for commit.
- Git commit -m "comment" : applies the changes only to the local directory with some explanatory comments about what I had changed.
- Git push : saves all changes to the remote repository.

Regarding the final project, I'm thinking to make a rotating scanning table, let's look here to figure out more about my idea!
All is done, let's begin the journey!
