14. Interface and application programming
This week, I had to:
Interpret and implement design and programming protocols to create a Graphic User Interface (GUI).
For this, I went to do my research on the Internet, because I didn’t know anything about it.
I found a usefull tutorial in Youtube about the User Interface
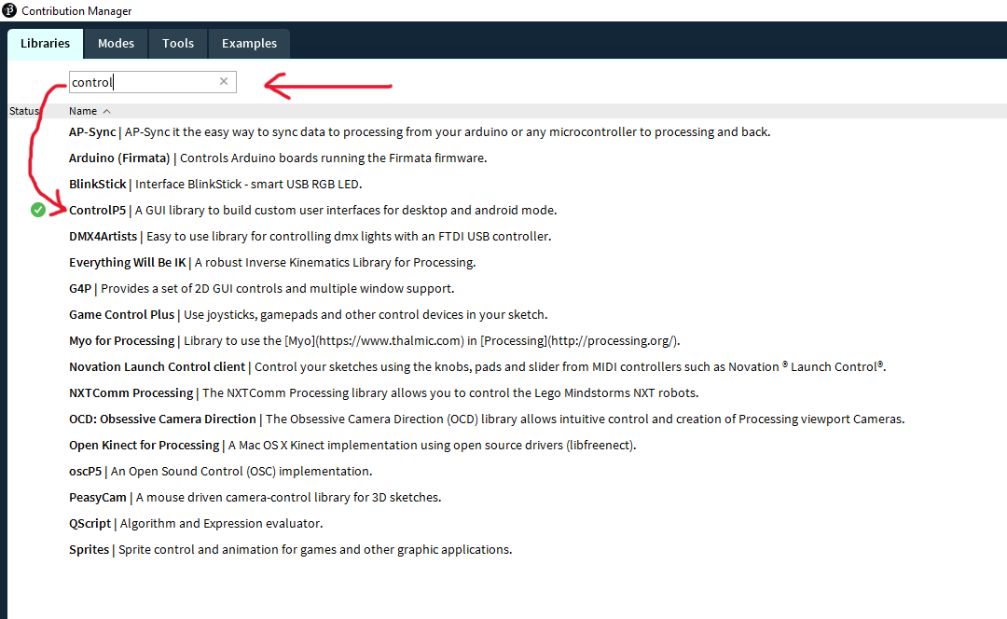
| Here, it recommend to go to Processing.org and go to “Libraries” and download ControlP5 from the website. |
|---|
 |
You need to download this and then Unzip and put the extracted controlP5 folder into the libraries folder of your processing sketches. Reference and examples are included in the controlP5 folder.
My recommendation for downloading it:
A better and easiest way is just to follow the this path:
| In the menu, go to “Sketch” and then “import library” and then “add library”. |
|---|
| (In my case is in Spanish, sorry for that) |
 |
| Here you just have to write the name of the library that you want and click on “install: |
|---|
 |
Group assignment:
For the group assignment, we participated in a meeting with Finland-Oulu, where the instructor Iván Sánchez Milara did an excellent guide through most of the interfaces.
We saw interfaces such as:
I learnt about the different GUIs that I can use for this week, such as Processing, as well as Sketchpad, MitAppInventor and Io.Adafruit
Python:
For this, I used Python.
I downloaded it and installed it:
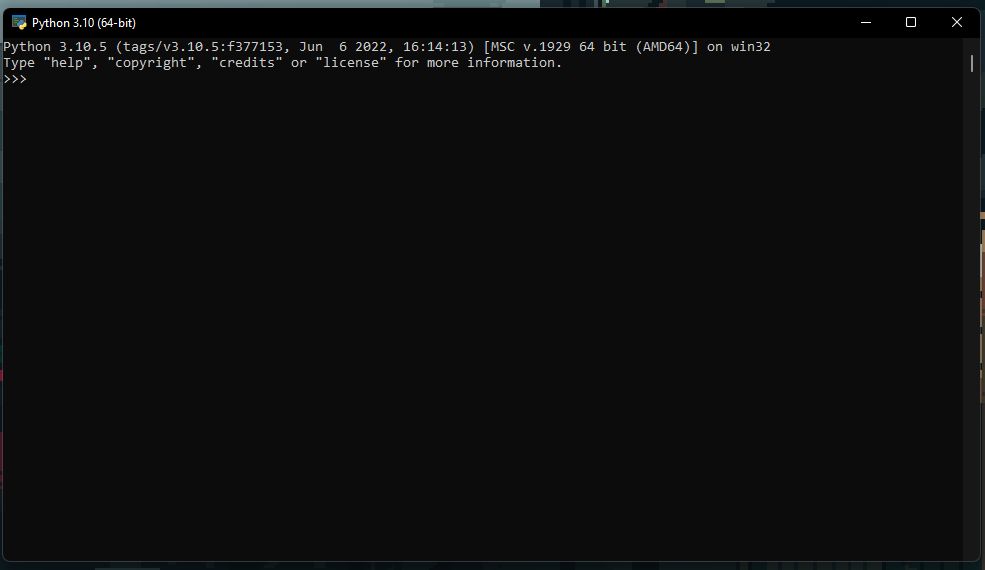
If you are looking for the correct program for coding in python, look for the software idle (Python 3.10 64-bit) (for me it’s 3.10 but for you, the version might change) in your operating system.
| It will open this other window: |
|---|
 |
More information about how to install python on Windows 11, here in this video:
Now, I made a research, I found this website, it is in Spanish though. But you can use google translate.
Here, the website talks about a counter for the age.
For example, the days, minutes and seconds that you have lived.
I have translated the code into English.
| My age, for example is 25 years old. So I need to type my age: |
|---|
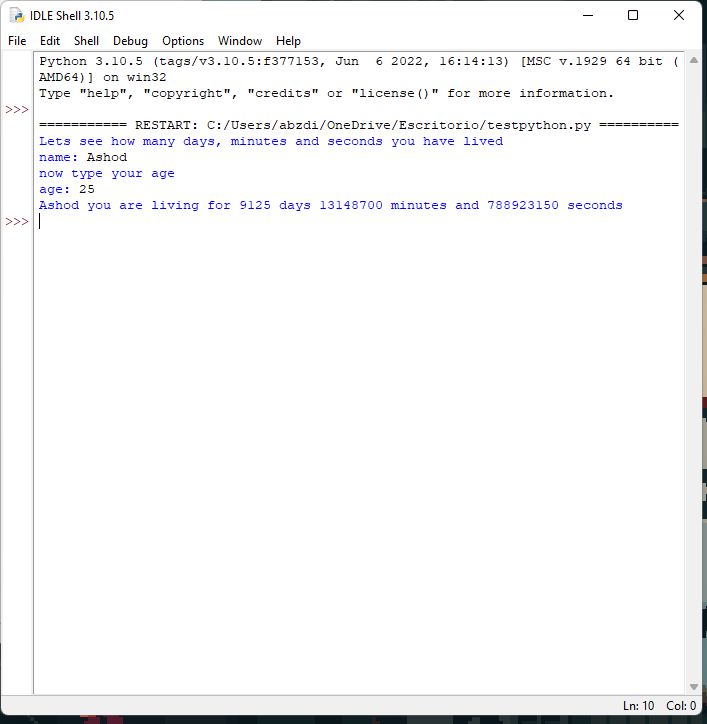 |
“Ashod you are living for 9125 days 13148700 minutes and 788923150 seconds“
That’s a lot of seconds!
Here is the code:
print("Lets see how many days, minutes and seconds you have lived")
name = input("name: ")

print("now type your age")
age = int(input("age: "))

days = age * 365
minutes = age * 525948
seconds = age * 31556926

print(name, "you are living for", days,"days", minutes, "minutes and", seconds, "seconds ")
As well I wanted to create a video game in python.
For this I made another research and I found this video, that again, is in Spanish. But I believe it has subtitles in English:
It is the legendary game of “Snake”.
In the video it mentioned that for this game is not necessary to know a lot of programming. Just functions and lines!
He explained that we are going to use the module “turtle”
In this video as well, I learnt about the loop in Python to avoid repetition. like the for i in range(0,4):
It is a serie of 8 videos that can teach you how to develop games in Python
Here is the code
import turtle
import time
import random

posponer = 0.1

#Marcador
score = 0
high_score = 0

#Configuracion de la ventana
wn = turtle.Screen()
wn.title("Snake Game 1.5.2")
wn.bgcolor("black")
wn.setup(width = 600, height = 600)
wn.tracer(0)

#Cabeza serpiente
cabeza = turtle.Turtle()
cabeza.speed(0)
cabeza.shape("square")
cabeza.color("white")
cabeza.penup()
cabeza.goto(0,0)
cabeza.direction = "stop"

#Comida
comida = turtle.Turtle()
comida.speed(0)
comida.shape("circle")
comida.color("red")
comida.penup()
comida.goto(0,100)

#Segmentos
segmentos = []

#Texto
texto = turtle.Turtle()
texto.speed(0)
texto.color("white")
texto.penup()
texto.hideturtle()
texto.goto(0,260)
texto.write("Score: 0     High Score: 0", align = "center", font =("Courier", 24, "normal"))

#Funciones
def arriba():
    cabeza.direction = "up"
def abajo():
    cabeza.direction = "down"
def izquierda():
    cabeza.direction = "left"
def derecha():
    cabeza.direction = "right"

def mov():
    if cabeza.direction == "up":
        y = cabeza.ycor()
        cabeza.sety(y + 20)

    if cabeza.direction == "down":
        y = cabeza.ycor()
        cabeza.sety(y - 20)

    if cabeza.direction == "left":
        x = cabeza.xcor()
        cabeza.setx(x - 20)

    if cabeza.direction == "right":
        x = cabeza.xcor()
        cabeza.setx(x + 20)

#Teclado
wn.listen()
wn.onkeypress(arriba, "Up")
wn.onkeypress(abajo, "Down")
wn.onkeypress(izquierda, "Left")
wn.onkeypress(derecha, "Right")

while True:
    wn.update()

    #Colisiones bordes
    if cabeza.xcor() > 280 or cabeza.xcor() < -280 or cabeza.ycor() > 280 or cabeza.ycor() < -280:
        time.sleep(1)
        cabeza.goto(0,0)
        cabeza.direction = "stop"

        #Esconder los segmentos
        for segmento in segmentos:
            segmento.goto(1000,1000)

        #Limpiar lista de segmentos
            segmento.clear()

        #Resetear marcador
        score = 0
        texto.clear()
        texto.write("Score: {}     High Score: {}".format(score, high_score),
                align = "center", font =("Courier", 24, "normal"))

    #Colisiones comida
    if cabeza.distance(comida) < 20:
        x = random.randint(-280,280)
        y = random.randint(-280,280)
        comida.goto(x,y)

        nuevo_segmento = turtle.Turtle()
        nuevo_segmento.speed(0)
        nuevo_segmento.shape("square")
        nuevo_segmento.color("gray")
        nuevo_segmento.penup()
        segmentos.append(nuevo_segmento)

        #Aumentar marcador
        score += 1

        if score > high_score:
           high_score = score

        texto.clear()
        texto.write("Score: {}    High Score: {}".format(score, high_score),
                align = "center", font =("Courier", 24, "normal"))

    #Mover el cuerpo de la serpiente
    totalSeg = len(segmentos)
    for index in range(totalSeg -1, 0, -1):
        x = segmentos[index - 1].xcor()
        y = segmentos[index - 1].ycor()
        segmentos[index].goto(x,y)

    if totalSeg > 0:
        x = cabeza.xcor()
        y = cabeza.ycor()
        segmentos[0].goto(x,y)

    mov()

    #Colisiones con el cuerpo
    for segmento in segmentos:
        if segmento.distance(cabeza) < 20:
            time.sleep
            cabeza.goto(0,0)
            cabeza.direction = "stop"

            #Esconder los segmentos
            for segmento in segmentos:
                segmento.goto(1000,1000)

            segmentos.clear()

            score = 0
            texto.clear()
            texto.write("Score: {}    High Score: {}".format(score, high_score),
                align = "center", font =("Courier", 24, "normal"))

    time.sleep(posponer)
And yes! It absolutely works.
I didn’t record or took screenshots because the first second of the video shows the game.
MIT_APP_INVENTOR
My next tool will be the mythic MIT_App_Inventor
This video showed me how to create a calculator:
The app is fantastic, it shows two different windows. The first one is Designer where you can basically design your app. All the fancy things and the esthetic goes here. For the code or “the brain” there is another window called Blocks.
These two windows are in the upper right corner next to each other.
| This is an example of what you can do with the Designer. I designed a pink calculator. |
|---|
| Yes, I know, very fancy. |
| The app has a plus(+) function, a minus(-) function, and a multiplication(*) function |
 |
| As well, this is the “behind-scenes” or the brain of the entire system. The Blocks |
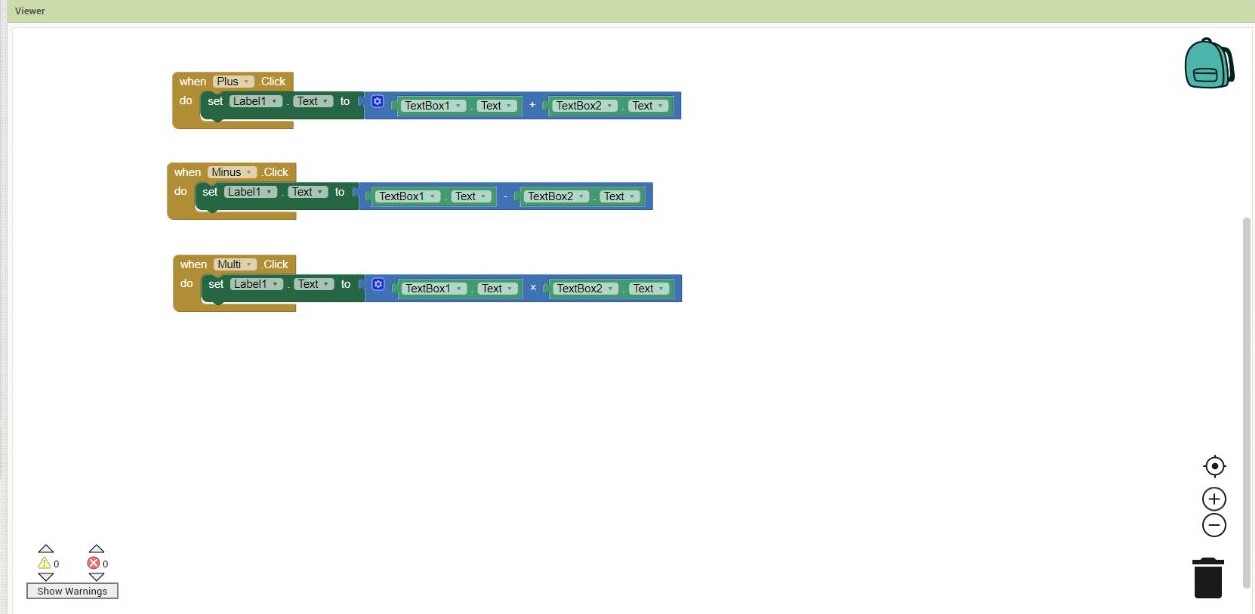 |
| A feature that really amazed me, was the possibility of connecting your app to your phone! |
 |
| Mit_App_Inventor is certainly an amazing program that you don’t even have to download |
| Everything is online, you have tons of possibilities there! |
How to install libraries in Processing?
Here is a video that explains it very good:
First the echo-hello button code
So, for having an idea how it might work the code, I programmed my PCB with the following code, just for testing wether the PCB will send something like a “message” with an actionable button
First I upload the code in my PCB:
And then I tested it the Arduino IDE software
Code for the Chi-le (echo.hello.button)
//
//
// hello.button.45.c
//
// button hello-world
//    9600 baud FTDI interface
//
// Neil Gershenfeld
// 10/31/10
//
// (c) Massachusetts Institute of Technology 2010
// This work may be reproduced, modified, distributed,
// performed, and displayed for any purpose. Copyright is
// retained and must be preserved. The work is provided
// as is; no warranty is provided, and users accept all
// liability.
//

#include <avr/io.h>
#include <util/delay.h>

#define output(directions,pin) (directions |= pin) // set port direction for output
#define input(directions,pin) (directions &= (~pin)) // set port direction for input
#define set(port,pin) (port |= pin) // set port pin
#define clear(port,pin) (port &= (~pin)) // clear port pin
#define pin_test(pins,pin) (pins & pin) // test for port pin
#define bit_test(byte,bit) (byte & (1 << bit)) // test for bit set
#define bit_delay_time 102 // bit delay for 9600 with overhead
#define bit_delay() _delay_us(bit_delay_time) // RS232 bit delay
#define half_bit_delay() _delay_us(bit_delay_time/2) // RS232 half bit delay

#define input_port PORTB
#define input_direction DDRB
#define input_pin (1 << PB4)
#define input_pins PINB
#define serial_port PORTB
#define serial_direction DDRB
#define serial_pin_out (1 << PB1)

void put_char(volatile unsigned char *port, unsigned char pin, char txchar) {
   //
   // send character in txchar on port pin
   //    assumes line driver (inverts bits)
   //
   // start bit
   //
   clear(*port,pin);
   bit_delay();
   //
   // unrolled loop to write data bits
   //
   if bit_test(txchar,0)
      set(*port,pin);
   else
      clear(*port,pin);
   bit_delay();
   if bit_test(txchar,1)
      set(*port,pin);
   else
      clear(*port,pin);
   bit_delay();
   if bit_test(txchar,2)
      set(*port,pin);
   else
      clear(*port,pin);
   bit_delay();
   if bit_test(txchar,3)
      set(*port,pin);
   else
      clear(*port,pin);
   bit_delay();
   if bit_test(txchar,4)
      set(*port,pin);
   else
      clear(*port,pin);
   bit_delay();
   if bit_test(txchar,5)
      set(*port,pin);
   else
      clear(*port,pin);
   bit_delay();
   if bit_test(txchar,6)
      set(*port,pin);
   else
      clear(*port,pin);
   bit_delay();
   if bit_test(txchar,7)
      set(*port,pin);
   else
      clear(*port,pin);
   bit_delay();
   //
   // stop bit
   //
   set(*port,pin);
   bit_delay();
   //
   // char delay
   //
   bit_delay();
   }
void put_string(volatile unsigned char *port, unsigned char pin, char *str) {
   //
   // print a null-terminated string
   //
   static int index;
   index = 0;
   do {
      put_char(port, pin, str[index]);
      ++index;
      } while (str[index] != 0);
   }
int main(void) {
   //
   // main
   //
   // set clock divider to /1
   //
   CLKPR = (1 << CLKPCE);
   CLKPR = (0 << CLKPS3) | (0 << CLKPS2) | (0 << CLKPS1) | (0 << CLKPS0);
   //
   // initialize pins
   //
   set(serial_port, serial_pin_out);
   output(serial_direction, serial_pin_out);
   set(input_port, input_pin); // turn on pull-up
   input(input_direction, input_pin);
   //
   // main loop
   //
   while (1) {
      //
      // wait for button down
      //
      while (0 != pin_test(input_pins,input_pin))
         ;
      put_string(&serial_port, serial_pin_out, "Chi");

      //
      // wait for button up
      //
      while (0 == pin_test(input_pins,input_pin))
         ;
      put_string(&serial_port, serial_pin_out, "le");
      }
   }
Step 1: Getting inspiration
I had a very bad moment with my creativity, so I started to browser on the Internet, when my connection got lost.
The typicall game of the Dinosaur of Google appeared
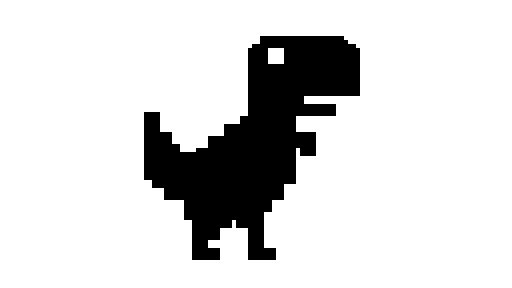
(Source: Pixilart
This is when my inspiration came.
I wanted to design something similar than this game.
Step 2: Getting the source:
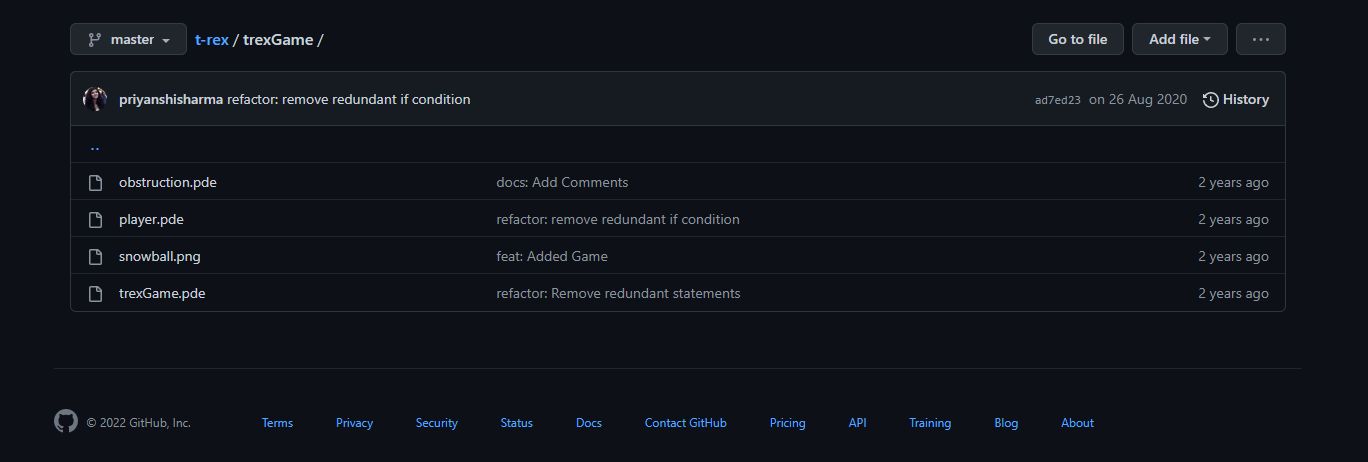
As I have zero knowledge about coding, I had to look in the internet a code to work with.
I did my research and I found this code on GitHub, that honestly, it was still hard for me to understand.
After reading it some time I had to edit some things from this code as I wanted to create a game where my instructor, Babken, is the hero.
Step 3: Editting the code:
So the code was hard but “readable”, so for editting it, it took a while.
First I wanted Babken to appear, so I editted this part of the code
pl = loadImage("snowball.png"); //Load the image in the variable
For this I had to add a new file to the “Sketch” in the software Processing.org
| There where it says “Añadir archivo” means “Add new file” in English |
|---|
| (I’m sorry, my language is Spanish) |
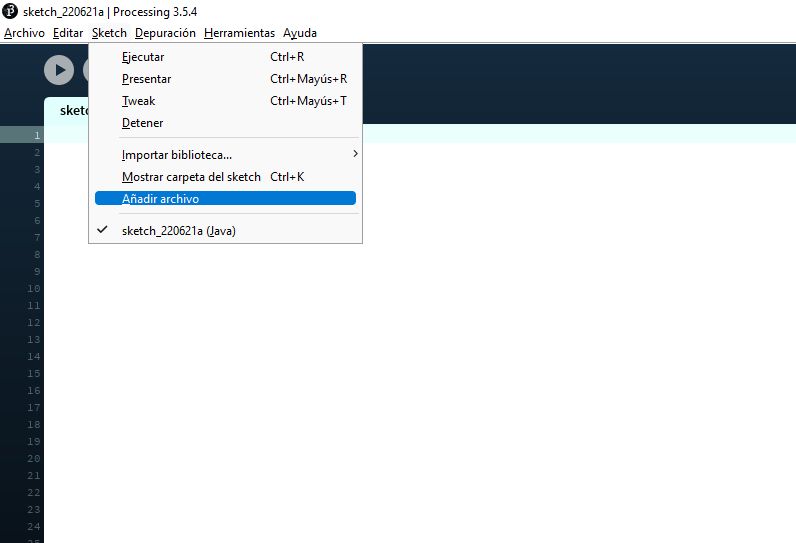 |
And I’m using the software from 2019 because for some reason, whenever I tried to download it, my antivirus jumped eliminating immeadiatly the .zip file, saying that it comes with a malware.
There I added Babken’s picture from Facebook on the folder of sketch:

I did some changes on the picture and in the code
pl = loadImage("babken.jpg"); //Load the image in the variable
Step 3.1: Getting fancier
I wanted to add some music in the game to make it op (in gamer language that means “Over Powered”).
For this I went to this tutorial on Youtube:
And after it I downloaded the library of sounds:

Next, in the website of processing, in the part of libraries, I found the Code for sounds
import processing.sound.*;
SoundFile file;

void setup() {
  size(640, 360);
  background(255);

  // Load a soundfile from the /data folder of the sketch and play it back
  file = new SoundFile(this, "sample.mp3");
  file.play();
}

void draw() {
}
Here (with my zero knowledge in programming), I modified, deleted the parts of the code that were unnecesary (like the size and background) and tried to match everything in the correct places.
For the music, I used the epic soundtrack of Kirby Dream Land

Adding the mp3 song in the “sketch” folder and changing this part of the code that says “sample.mp3” to “kirby.mp3”
file = new SoundFile(this, "kirby.mp3");
And DONE, I had the game “Babken’s Adventure” with music.
Step 4: Adding user interface
This part was a bit harder, but when I realise how to do it, it became very clear.
First of all, if you are using LINUX, you should start the program Processing by the terminal using the following:
sudo ./processing
This will allow you to start the programm as “administrator”.
For this part I based part of my code in Babken’s code and Ivan Matasovic’s code
The thing is I would have never complete this assignment if I would have never used both.
The reason is because in the part of Babken’s code,
// Example by Tom Igoe
import processing.serial.*; // imports serial library
Serial myPort; // The serial port
void setup() {
// Open the port you are using at the rate you want:
myPort = new Serial(this, Serial.list()[0], 4800);} // default baudrate is 9600 but FabFTDI supports up to 4800.
void draw() { // draw() loops forever, until stopped.
while (myPort.available() > 0) { // myPort.available() Returns the number of bytes available.
int inByte = myPort.read(); // myPort.read() Returns a number between 0 and 255 for the next byte that's waiting in the buffer.
println(inByte);}} // prints the value of inByte.
char inByte = myPort.readChar(); // Returns the next byte in the buffer as a char.
Step 4.1 Some problems that I had to overpass and the code:
there is a part that says “myPort = new Serial(this, Serial.list()[0], 4800);”
But for some reason it didn’t work for me......
Now the part of Ivan Matasovic’s code that helped me was this part:
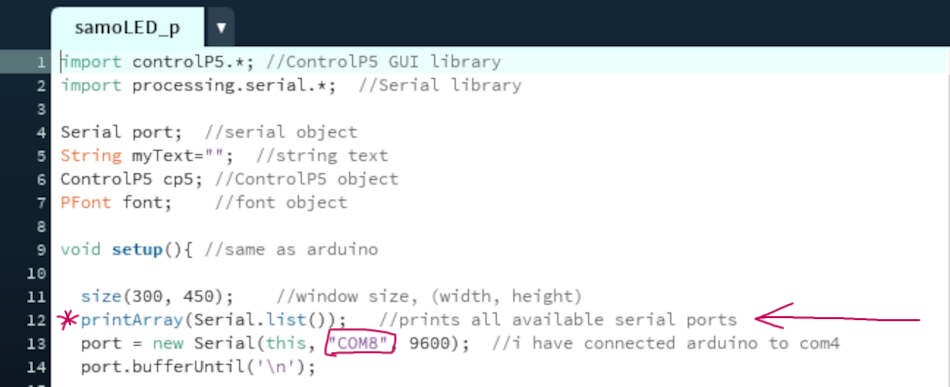
(Source: Ivan Matasovic)
And that for a reason, he was using “COM8 instead of “Serial.list()[0]” that Babken used, and this kept me thinking for a while.
So I added it to my code and it started to tell me that I was connected to “COM1”, which I change “Serial.list()[0]” in the code for “Serial.list()[1]” (This was when I was programming it in Linux, on Windows the port was “COM0”)
Now the other thing is that before, with Babken we were testing the PCB as an “Echo Hello” that for every click on the button it returns “Chi” and when you release it, it says “le”.
Basically the word Chile, the country where I come from.
And the problem was that for Babken’s code, he has that whenever he presses the button it says “b”.
This is part of Babken’s code:
char inByte = myPort.readChar();
println(inByte);
if (inByte == 'b' || keyPressed){
So instead of going the easy way and re-program the “Echo Hello” to say “b” (because I couldn’t change the ´char´ line into a ´string´. Don’t ask me why, I tried a lot), I started to found thing on Internet, and it seems that it doesn’t matter if the “Echo Hello” will say a string, if in the code, part of the string, appears as a ´char´. So in my case, I change the “b” for a capitalized “C”.
The code of the MCU and the code of Processing working together!
So, basically, the game (or processing software) detects that the MCU is sending a “”string”. In this case is “Chi”, but the only part that Processing cares about, is that in that string there is a capitalized “C”. So when it detects this “C” it will commit the action of “Jump”.
And this my result with my code:
Video and Code
Please turn on the volume to hear the epic song of Kirby
This code is the main
import controlP5.*;
import processing.serial.*;
Serial myPort;
Player b; //The object that jumps the barriers
PImage pl; //Image for the player object

int score=0; // keeps track of current game score
int highScore=0; //Keeps track of High Score
boolean safe=true; // Keeps track of whether the player hit an obstruction
boolean start=false; //Keeps track of whether the game is going on

PVector gravity = new PVector(0, 0.1); //Pushes the player down on the ground (when it jumps)
ArrayList<Barrier> barriers = new ArrayList<Barrier>(); //List of Obstructions
int wid = 1100; //The width of our screen

//music
import processing.sound.*;
SoundFile music;
// Load a soundfile from the /data folder of the sketch and play it back


void setup()
{
  size(1100,400); //Initialise a canvas
  b = new Player(); //initialise a player
  pl = loadImage("babken.png"); //Load the image in the variable
  music = new SoundFile(this, "data/kirby.mp3");
music.play();
printArray(Serial.list());
myPort = new Serial(this, Serial.list()[0], 9600);
}

void draw()
{
  while (myPort.available() > 0)
  { // myPort.available() Returns the number of bytes available.
    char inByte = myPort.readChar(); // myPort.read() Returns a number between 0 and 255 for the next byte that's waiting in the buffer.
    println(inByte);
    if(inByte == 'C' || keyPressed)
    {
      start = true; //Start the game on pressing the key
      if(b.pos.y == height-170) //Jump only if the player is already on the ground
        {
          PVector up = new PVector(0,-100); //Defining an appropriate upward force
          b.applyForce(up); //Applying the upward force just defined
        }

    }
  }

  if(start)
    {
      //Add barriers at random distances such that
      //minimum distance is 60 frames to make the
      //game playable only if th game is in progress.
      if(random(1)<0.5&&frameCount % 60 == 0)
        {
          barriers.add(new Barrier());
        }
    }


   background(255,255,102); //Set background to the yellow colour
   b.update(); //Update the player's position and speed
   b.show(); //Display the player

    //traverse and display the obstructions
    for(int i=barriers.size()-1; i>=0; i--)
    {
        Barrier p = barriers.get(i);
        p.update();

        if (p.hits(b))
          {
            p.show(true);
            safe=false;
          }
        else
          {
            p.show(false);
            safe=true;
          }

        //Remove the barriers that went out of frame
        if(p.x < -p.w)
          {
            barriers.remove(i);
          }
    }

  if(safe&&start) //Increment the score if game is going on smoothly
    {
      score++;
    }
  else
    {
      //Restart the game
      score=0;
      text("CLICK TO START",width/2-500,50);
      start=false;
    }

    fill(16,53,201); //fill the text with colour for score
    textSize(32); //Set size for the score

    //Display score
    text("Score",width/2-100,50);
    text(score,width/2,50);

    //Set and display high score
    if(highScore < score)
    {
      highScore = score;
    }

    text(highScore,width/2+310,50);
    text("High Score",width/2+300-170,50);

}
This is for the obstacles
class Barrier
{
  float bottom; //This contains height of barriers
  float w = 40; //This contains width of barriers
  float x; //This contains x location of the barrier
  float barrier_speed = 3; //This is the rate of change in position of barrier

  Barrier()
  {
    bottom = random(150, 160); //Set value of height of barrier
    x = wid + w; //Increase the x location by with
  }
  void update ()
  {
    //if the game is going on modify barrier x-locations if the game is going on
    if(start)
    {
      x -= barrier_speed;
    }
  }

  //Check for collision, if locations of the player and the pipe is overla
  boolean hits(Player b)
  {
    return ((b.pos.x > x) && (b.pos.x < (x + wid))) &&  (b.pos.y > (height - bottom - b.r));
  }
  void show(boolean hit)
  {

      if(start) //display barriers if game is in progress
      {
          if(hit)
          {
            //fill red if we hit the barrier
            fill(217,74,30,127);
          }
          else
          {
            //fill green normally
            fill(65,224,129,127);
          }
        stroke(0,0,0);
        strokeWeight(2);
        rect(x, height - bottom, w, bottom-110);

      }

  }
}
This is for the player
class Player{

  PVector pos; //This contains position of player
  PVector acc; //This contains acceleration of player
  PVector vel;  //This contains velocity of player

  float r=40; ////This contains radius of player object

  Player()
  {
    //initialise the player data members
    pos = new PVector(50,(height-200));
    vel = new PVector(0, 20);
    acc = new PVector();
  }


  void applyForce(PVector force)
  {
    acc.add(force);
  }

  void update()
  {
    applyForce(gravity); //applies downward gravity
    pos.add(vel); // in order to update pos wrt velocity
    if(pos.y >=height-170)
      {
          pos.y=height-170;
          vel.mult(0);
      }

    vel.add(acc); //in order to update the vel as per acc
    vel.limit(4); // in order to cap the vel for a smooth run

    acc.mult(0);
  }

  void show()
  {
    fill(255,0,34);
    stroke(0,0,0);
    strokeWeight(2);
    imageMode(CORNER);
    image(pl, pos.x,pos.y,r*2,r*2);

  }
}