Principles and Practices, Project Management
This week I worked on defining my final project idea and started getting used to the documentation process. This included:
Principles and Practices (part 1 of 2)
- Plan and sketch a potential final project
Project Management (part 2 of 2)
- Work through a git tutorial.
- Build a personal website describing you and your final project. Refer to the lecture material for examples.
- Upload parts 1 and 2, to the class archive.
Learning outcomes
- Communicate an initial project proposal
- Identify and utilise version control protocol(s)
- Explore and use website development tool(s)
Checklist
Planning: The planning up to the week was intense, but occurred over a 2 year period of time; I will cover that in a Prequel yet to be recorded :)
Materials: Using current laptop, internet connection, paper and pencil, as well as prior knowledge.
Problems: With my Induction into the Fab Lab Network and my Initiation into Fab Academy 2019 secured, by following the recommendation of Fab Academy Team, I had been looking through and watching some of last year’s classes, and tutorials, to make sure basic notions were acquired in advance. However, the first day in class was like the first day of learning to drive a car (without a windscreen ;) I did have attempted interruptions, but I was able to filter the effect.
Corrections: Now that I was certain of the interface and saw Fab Academy before my eyes, I relaxed and enjoyed the ride. Interruptions were filtered and addressed after the global lecture.
Workflow:
- I used BlueJeans as the interface on my laptop in the GOCAT Fab Lab with paper and pencil for notes.
- I had already previewed the presentation, so I could enjoy listening to Neil lecture with his brothers (what a wonderful surprise!).
- I took screenshots throughout the global lecture to capture the experience.
Success: I made it through the entire global lecture and got to say Bye! to the planet. I walked around, as if in outer space, for several hours :)
Read The Fab Charter:
- Read The Fab Charter:
What is a fab lab?
- Fab labs are a global network of local labs, enabling invention by providing access to tools for digital fabrication
What’s in a fab lab?
- Fab labs share an evolving inventory of core capabilities to make (almost) anything, allowing people and projects to be shared
What does the fab lab network provide?
- Operational, educational, technical, financial, and logistical assistance beyond what’s available within one lab
Who can use a fab lab?
- Fab labs are available as a community resource, offering open access for individuals as well as scheduled access for programs
What are your responsibilities?
- safety: not hurting people or machines
- operations: assisting with cleaning, maintaining, and improving the lab
- knowledge: contributing to documentation and instruction
Who owns fab lab inventions?
- Designs and processes developed in fab labs can be protected and sold however an inventor chooses, but should remain available for individuals to use and learn from
How can businesses use a fab lab?
- Commercial activities can be prototyped and incubated in a fab lab, but they must not conflict with other uses, they should grow beyond rather than within the lab, and they are expected to benefit the inventors, labs, and networks that contribute to their success
Sketched my final project idea/s
- Sketched your final project idea(s)
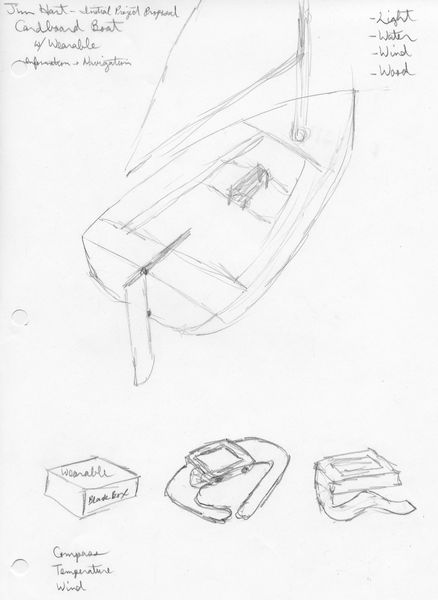
The greatest attraction that guided me to the Fab Academy was the desire to build a wooden sailboat; something that has been too lofty for my skill set. While this may be too ambitious for the timeframe allotted, a cardboard boat may be a more doable project.
Although a carboard boat would be feasible, it only produces the first 3 outcomes, without producing the fourth: “Demonstrate competence in design, fabrication and programming of my own fabbed microcontroller PCB, including an input & output device”. To produce the fourth outcome, I propose making a wearable information and navigation device; one that would keep a sailor informed while underway.
While most of the parts will be obtained from existing resources, new and reused, the goal to design and fabricate my own parts instead of buying off-the-shelf components will be accomplished in the wearable information device.
As this work progresses, the projects of each week will be explored while the results will be incorporated into this project; the refinement of the results will insure the development of the cardboard boat and wearable device.
Described briefly what it will do and who will use it
- Described briefly what it will do and who will use it
Original ideas
- Describe what it will do and who will use it: This boat will support me in the water and enable me to navigate and arrive safely at a beach different that the one I left. Once tested to be seaworthy, others may take her out. A display of heading, water temperature, and wind will be provided to the rider through sensors and a wearable.
Fab Academy 2021 Ideas
- Describe what it will do and who will use it: This boat will float in the water, enable me to remotely control it, and arrive safely back to the beach that it left. Additionally, a display of heading and water temperature will be provided to the remote pilot through sensors and a wearable. Once tested to be seaworthy, a full-size version, capable of transporting a sailor, will be designed and fabricated in future spiral developments. The image below is the result of the cardboard kayak I discovered through Instructables, dswaim who did an excellent job of documenting his work. I do not have a large format laser cutter, so I knew I would have to improvise. dswaim provided the CAD drawing as well as a pdf. I scaled the files to fit the size of laser cutter available.

Fab Academy 2022 Ideas
- Expanding on the ideas of Fab Academy 2021: This boat will be unmanned and will need propulsion in order to leave the beach and return. The idea is contained in this sketch of the propulsion pod.
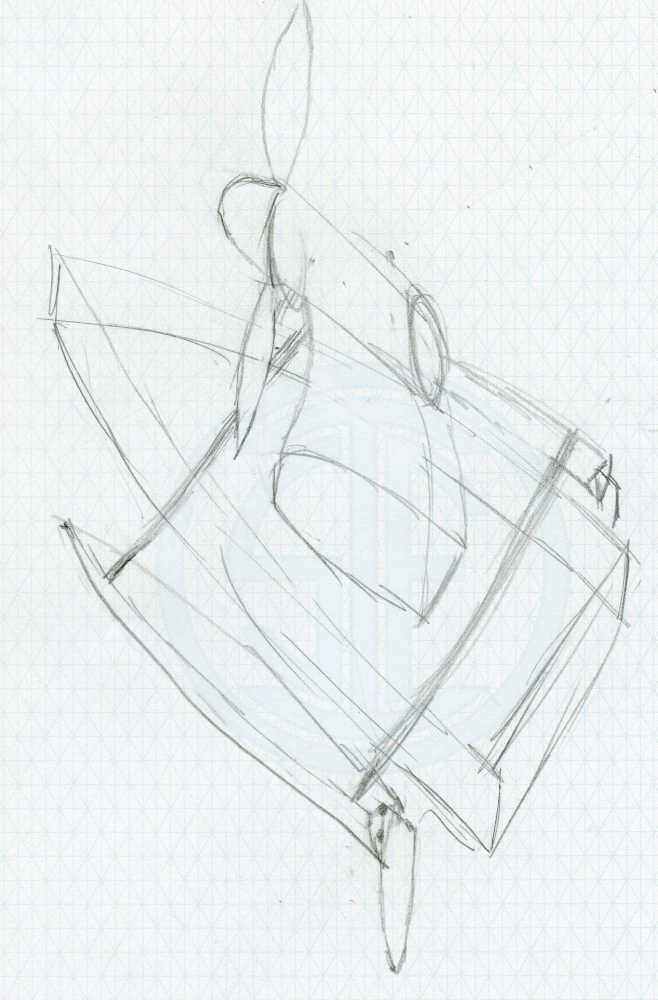
-
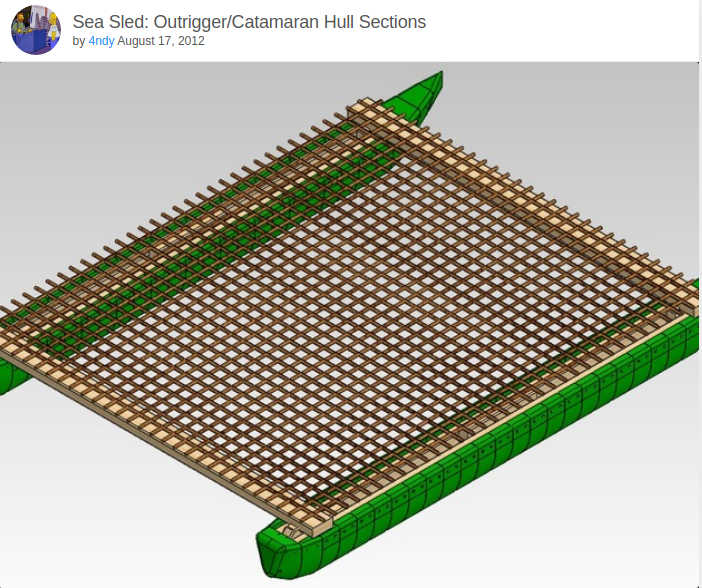
To assist in this development, I searched the ideas in thingiverse.com and found 2 possible helps to my idea: Livo 3 by lucaeale July 09, 2015 and Sea Sled: Outrigger/Catamaran Hull Sections by 4ndy August 17, 2012
-
Livo 3

- Sea Sled
Made a website and described how I did it:
-
Made a website and described how you did it:
-
Planning: I thought about using Drupal and Bootstrap as the platform for a personal site; although I have some experience in web development, I do not consider myself an expert. I am better at taking something that already exists and making changes. I quickly became intimidated by the volume of information, so I decided to take a shorter route and use the Markdown website that Fab Academy provided me. Although I have never used Markdown, I thought I could figure it out.
-
Materials: Using current laptop, internet connection, and prior knowledge. No additional cost.
-
Problems: My attempt to access my student Fab Academy site during our first lecture resulted in the following error message: “404 Not Found nginx”.
-
Corrections: When I received notification of my welcome to gitlab.fabcloud.org message from Academany IT, I logged in and began managing my account. I explored GitHub and completed the tutorial.
-
Workflow: By completing the tutorial, I became familiar with GitHub. With the newly acquired knowlege, I explored gitlab.fabcloud.org where I discovered the README.md in the Repo Files and followed the instructions. I decided to try my student site again and discovered a template with temporary information as placeholders; it is the mkdocs.yml file, so I began to update and Commit new content. I used web dev experience from the past to change my content. The last line of the instructions say, “If you want to start from scratch, you can delete everything in this repository and push any other static website”. That made me nervous, so I am sticking to Markdown and MkDocs. However, I really like Markdown because of it’s simplicity compared to HTML; additionally, having MkDocs installed on your computer allows you to preview it before Committing it to the Repo.
-
Content: The student website consists of the yml files need to generate the website and a docs folder that contains the following folders: about, assignments, files, images, and projects. It also has the index.md file that is the homepage.
-
Tips and Tricks: I learned how to change the size of the font as well as add checkboxes. There are also markdown_extensions in the mkdocs.yml that you can add to make your page more interesting. You probably noticed the checkmarks and highlighted text; that’s how I did that in a spiral. Here are some Markdown codes that I frequently use:
- This section is in gray to give it a code look and I do that by putting three tick ``` marks before and after the section. It can also be used to emphasize some points like this.
- Adding images can be done with this code:  You need to know where your file is located in your Repo. This just an example. Make sure you have an empty line before and after the code or it won't work :)
- Checkmarks or Checkboxes are shown by putting an 'x' between brackets '[x]' after a dash and space. The dash and the space make the line item a bullet, but adding the 'x' between brackets '[x]' makes it a checkmark. Normally, it is just gray, but with custom_checkbox: true under pymdownx.tasklist: in the mkdocs.yml markdown_extensions, it becomes a green circle with a white checkmark in it. The quotation marks are not put in the Markdown, they are there to emphasize the text.
- Highlighting is accomplished by putting '==' before and after the text you want highlighted.
- Bold and Italic is accomplished by using HTML tags like this: <strong><i>eccovi finalmente!!</i></strong>. Bold and Italic can be done in Markdown with *** before and after the word, but I use HTML to do both. Bold is two ** and Italic is one * before and after the word/text.
- Changing the size of the font for different headings is accomplished with the # symbol # H1 ## H2 ### H3, etc.
- I make links by putting brackets around the word and parenthesis around the URL like this [here](https://www.markdownguide.org/cheat-sheet/) Make sure there is no space between the bracket and parenthesis.
- If you do the same tips and tricks in every page, you can just copy and paste the code and make modifications to get what you want. Just experiment and learn more as you go.
There are many more tips, tricks, and cheat codes here
-
The best tip is here for the last. Use VSCode instead of a text editor and Command Line Interface (CLI). You can edit and see a preview all in one application; then you push your Repo to gitlab.fabcloud.org in the same application. For years, I have done it the hard way until I learned from Rico Kanthatham how to use VSCode for code and XnConvert to compress my images. I mention this at the bottom of the page.
-
Success: I was able to completely modify my student Fab Academy site just as Week 2 began. (Shortly after I watched the only Lunar Eclipse, Supermoon, Blood Moon in 2019 :)
Created a section about yourself on that website
-
Created a section about yourself on that website
-
Modified the information in the about folder index.md file to make it my own.
-
I have added to my “about” page by editing the index.md file and Commiting it to the Repo. Now I need to document this process of adding icons to my about page. I am using Flaticon.com as a resource. As a subscriber, I can use the content without references, but I must thank them for their contribution. The workflow is: bring them into Adobe Illustrator > Save them in .ai format for future use > Export them as .png format > Open them in GIMP > Scale Image to 1000 px > Export as .jpg with Quality at 50. This makes them clean, crisp, and small in file size.
Added a page with a sketch and description of your final project idea(s)
- Added a page with a sketch and description of your final project idea(s)
Documented steps for creating your Git repository and adding files to it:
-
Documented steps for creating your Git repository and adding files to it:
-
Installed Working Copy on my iPhone and used it to learn more about Pro Git by Scott Chacon @ https://git-scm.com/book/en/v2
-
Further Steps FabAcademy - Tutorials http://fabacademy.org/2018/docs/FabAcademy-Tutorials/ I learned how to contribute.
-
Created a github account with another email address to practice more
-
Forked the FabAcademy-Tutorials repository - Learned about Fork and forked the octocat/Spoon-Knife repository; went ahead and made a change; discovered that I needed to set up Git; downloaded Git; read the README.txt; had to allow the installer to run on the MacBook-Pro; checked the location of the install to ensure it went to /usr/bin; Generated a new SSH key; passphrase https://help.github.com/articles/working-with-ssh-key-passphrases/; Added my SSH key to the ssh-agent; https://help.github.com/articles/generating-a-new-ssh-key-and-adding-it-to-the-ssh-agent/; Added a new SSH key to my GitHub account; received an email informing me of the new public key; Set my Git username for every repository on my computer https://help.github.com/articles/setting-your-username-in-git/; Set my email address for every repository on my computer; https://help.github.com/articles/setting-your-commit-email-address-in-git/;
-
After becoming familiar with git on a Mac, I downloaded Git for Windows and setup a GitLab repo of my website on my Windows laptop. I wanted to see the markdown before I pushed the changes, so I installed MkDocs on the PC as well. I am still trying to make this work, but I have come a long way from never using git before.
-
This has been a tough time due to flu like illness, but due to the downtime I was able to carve out some time to make mkdocs work on the localhost. I happy to say that the words you are reading are being served on my Windows laptop as quickly as I can type and save.
-
I knew I needed MkDocs to serve the pages, so I downloaded and installed python and pip; you will see in the README.md instructions that they are required. After doing that, I created a new site according to the documentation and was able to serve it on the localhost. With excitement, I went to the jim-hart directory in my githive and started the server; I got an error about material not being install, but I couldn’t pursue the issue due to life happening. I put it on hold for another day :) Today! I also installed notepad++ for ease of editing; vim works and I can get around but wordwrap makes my world so much easier.
-
So, today, I tried again…I searched the MkDocs site for material and found that the configuration for the site is found in the mkdocs.yml; I knew that duh!? :) So I edited mkdocs.yml and found a comment by the nice folks who provided it see: https://squidfunk.github.io/mkdocs-material/getting-started/#color-palette (Thanks @fibasile :) I pasted that in a browser and I discover a new world; one that fixed mine. So, these are called themes, and MkDocs uses them, but you have to install them with your MkDocs; I used pip and it handled it beautifully. I went to the jim-hart directory in my githive and started the server: eccovi finalmente!! I am editing and serving on the localhost! When I get done I will push this to my GitLab.FabCloud…can’t wait.
Pushed to the class GitLab:
-
Pushed to the class GitLab repository
-
So, now I have to work out all of the kinks and get this git workflow moving to the point that “there is no spoon” :) Cya!
-
Sidebar: Just found this cool tool Lighthouse as a webpage checker
This is a continuation of the PM week in Fab Academy 2020
- I received the notice to clone and push my 2019 site to the 2020 archive. I cloned the 2020 repo and began making changes to each week. Although it was tedious, I was making progress by pushing changes to the new repo.
WP+jim555@DESKTOP-8M9KUP5 MINGW64 ~/githive/fab-academy-2020
$ git clone git@gitlab.fabcloud.org:academany/fabacademy/2020/labs/lccc/students/jim-hart.git
Cloning into 'jim-hart'...
Enter passphrase for key '/c/Users/jim555/.ssh/id_rsa':
remote: Enumerating objects: 230, done.
remote: Counting objects: 100% (230/230), done.
remote: Compressing objects: 100% (122/122), done.
remote: Total 230 (delta 120), reused 165 (delta 98), pack-reused 0
Receiving objects: 100% (230/230), 6.14 MiB | 335.00 KiB/s, done.
Resolving deltas: 100% (120/120), done.
-
I read through the Git Tutorial again and mustered up some courage and decided to delete the /docs folder and mv the old 2019 /docs folder in its place. Bad idea! My local archive was fine, but the remote push failed; even though my /docs folder was gone. I decided to build the /docs folder a piece at a time.
-
Note to self: If you forget your ssh-passphrase, you will have to generate another one by following these instructions. Make sure you also add the new key to gitlab.fabcloud by following these instructions.
WP+jim555@DESKTOP-8M9KUP5 MINGW64 ~/githive/fab-academy-2020/jim-hart (master)
$ git status
On branch master
Your branch is up to date with 'origin/master'.

Untracked files:
  (use "git add <file>..." to include in what will be committed)
        docs/

nothing added to commit but untracked files present (use "git add" to track)

WP+jim555@DESKTOP-8M9KUP5 MINGW64 ~/githive/fab-academy-2020/jim-hart (master)
$ git add docs/

WP+jim555@DESKTOP-8M9KUP5 MINGW64 ~/githive/fab-academy-2020/jim-hart (master)
$ git status
On branch master
Your branch is up to date with 'origin/master'.

Changes to be committed:
  (use "git restore --staged <file>..." to unstage)
        new file:   docs/index.md


WP+jim555@DESKTOP-8M9KUP5 MINGW64 ~/githive/fab-academy-2020/jim-hart (master)
$ git add docs/index.md

WP+jim555@DESKTOP-8M9KUP5 MINGW64 ~/githive/fab-academy-2020/jim-hart (master)
$ git status
On branch master
Your branch is up to date with 'origin/master'.

Changes to be committed:
  (use "git restore --staged <file>..." to unstage)
        new file:   docs/index.md


WP+jim555@DESKTOP-8M9KUP5 MINGW64 ~/githive/fab-academy-2020/jim-hart (master)
$ git commit -m "restoring docs"
[master ef07952] restoring docs
 1 file changed, 28 insertions(+)
 create mode 100644 docs/index.md

WP+jim555@DESKTOP-8M9KUP5 MINGW64 ~/githive/fab-academy-2020/jim-hart (master)
$ git push git@gitlab.fabcloud.org:academany/fabacademy/2020/labs/lccc/students/jim-hart.git
Enter passphrase for key '/c/Users/jim555/.ssh/id_rsa':
Enumerating objects: 5, done.
Counting objects: 100% (5/5), done.
Delta compression using up to 8 threads
Compressing objects: 100% (3/3), done.
Writing objects: 100% (4/4), 1.07 KiB | 1.07 MiB/s, done.
Total 4 (delta 1), reused 0 (delta 0)
To gitlab.fabcloud.org:academany/fabacademy/2020/labs/lccc/students/jim-hart.git
   eb99abd..ef07952  master -> master
-
SUCCESS!!!
-
Then I added each directory and its contents. However, I got greedy and started adding several directories of images and I got this:
WP+jim555@DESKTOP-8M9KUP5 MINGW64 ~/githive/fab-academy-2020/jim-hart/docs (master)
$ git push git@gitlab.fabcloud.org:academany/fabacademy/2020/labs/lccc/students/jim-hart.git
Enter passphrase for key '/c/Users/jim555/.ssh/id_rsa':
Enumerating objects: 45, done.
Counting objects: 100% (45/45), done.
Delta compression using up to 8 threads
Compressing objects: 100% (42/42), done.
Writing objects: 100% (42/42), 11.10 MiB | 260.00 KiB/s, done.
Total 42 (delta 1), reused 0 (delta 0)
remote: fatal: pack exceeds maximum allowed size
error: remote unpack failed: unpack-objects abnormal exit
To gitlab.fabcloud.org:academany/fabacademy/2020/labs/lccc/students/jim-hart.git
 ! [remote rejected] master -> master (unpacker error)
error: failed to push some refs to 'git@gitlab.fabcloud.org:academany/fabacademy/2020/labs/lccc/students/jim-hart.git'
-
It made such a mess that I ended up cloning the working repo again and adding the content slowly.
-
As I said earlier, I began making changes to the 2020 repo before I made the plunge. Well, when I made the plunge, I lost the changes that I made… Not to worry :) I went back through GitLab and recovered the changes so I didn’t have to type this again. That was so awesome :)
-
This was a great find! I have a little HTML experience, but I want to use the native protocol/tags of MkDocs. Below you will find my attempts and frustrations of learning this tool. I found the resource I needed to move along, so I will share it with you: It is called the Markdown Cheatsheet. I have found others, but the cheat was not what I needed; this one was :) I learned how to change the size of the font as well as add checkboxes. There are also markdown_extensions in the mkdocs.yml that you can add to make your page more interesting. You probably noticed the checkmarks and highlighted text; that’s how I did that in another spiral.
Identify and utilise version control protocols
Found this excellent resource for Git Protocols: Git Protocols
- You should read through the above reference.
Steps for uploading files to archive
My first experience was in the Windows environment, so I will list those:
- Step 1. I have a githive that contains all of my repos in a directory easy to get to, so I change directory to get there first
cd githive/fab-academy-2020/jim-hart/
- Step 2. I also like to monitor my changes in my site, so I start an instance of the mkdocs server and surf my site as I build at http://127.0.0.1:8000/
mkdocs serve
-
Step 3. With a view of my site, I begin to make changes using Notepad++. As I save the changes, I can see the results before I git-add
-
Step 4. I do a git status to see my changed files
~/githive/fab-academy-2020/jim-hart (master)
$ git status
On branch master
Your branch is ahead of 'origin/master' by 37 commits.
  (use "git push" to publish your local commits)

Changes not staged for commit:
  (use "git add <file>..." to update what will be committed)
  (use "git restore <file>..." to discard changes in working directory)
        modified:   docs/assignments/week02.md

no changes added to commit (use "git add" and/or "git commit -a")
- Step 5. I see there is a changed file, so I must add this file.
~/githive/fab-academy-2020/jim-hart (master)
$ git add  docs/assignments/week02.md
- Step 6. I do a git-status to make sure all is well
~/githive/fab-academy-2020/jim-hart (master)
$ git status
On branch master
Your branch is ahead of 'origin/master' by 37 commits.
  (use "git push" to publish your local commits)

Changes to be committed:
  (use "git restore --staged <file>..." to unstage)
        modified:   docs/assignments/week02.md\
- Step 7. I find my modified file and know that I must commit this file before pushing.
~/githive/fab-academy-2020/jim-hart (master)
$ git commit -m "modified the week02 file to demonstrate steps for uploading files to archive"
- Step 8. I receive confirmation that my file change is ready to push.
~/githive/fab-academy-2020/jim-hart (master)
$ git commit -m "modified the week02 file to demonstrate steps for uploading files to archive"
[master 0556a43] modified the week02 file to demonstrate steps for uploading files to archive
 1 file changed, 35 insertions(+)
- Step 9. I push my changes to the remote repo.
 ~/githive/fab-academy-2020/jim-hart (master)
$ git push git@gitlab.fabcloud.org:academany/fabacademy/2020/labs/lccc/students/jim-hart.git
- Step 10. I receive a prompt for my passphrase:
Enter passphrase for key '/c/Users/jim555/.ssh/id_rsa':
- Step 11. Entering the correct passphrase and pressing Enter, results in the following:
~/githive/fab-academy-2020/jim-hart (master)
$ git push git@gitlab.fabcloud.org:academany/fabacademy/2020/labs/lccc/students/jim-hart.git
Enter passphrase for key '/c/Users/jim555/.ssh/id_rsa':
Enumerating objects: 9, done.
Counting objects: 100% (9/9), done.
Delta compression using up to 8 threads
Compressing objects: 100% (5/5), done.
Writing objects: 100% (5/5), 1.01 KiB | 516.00 KiB/s, done.
Total 5 (delta 4), reused 0 (delta 0)
To gitlab.fabcloud.org:academany/fabacademy/2020/labs/lccc/students/jim-hart.git
   2d3b54e..0556a43  master -> master
- Step 11. At https://gitlab.fabcloud.org/academany/fabacademy/2020/labs/lccc/students/jim-hart we find that the change has been uploaded to the remote repo
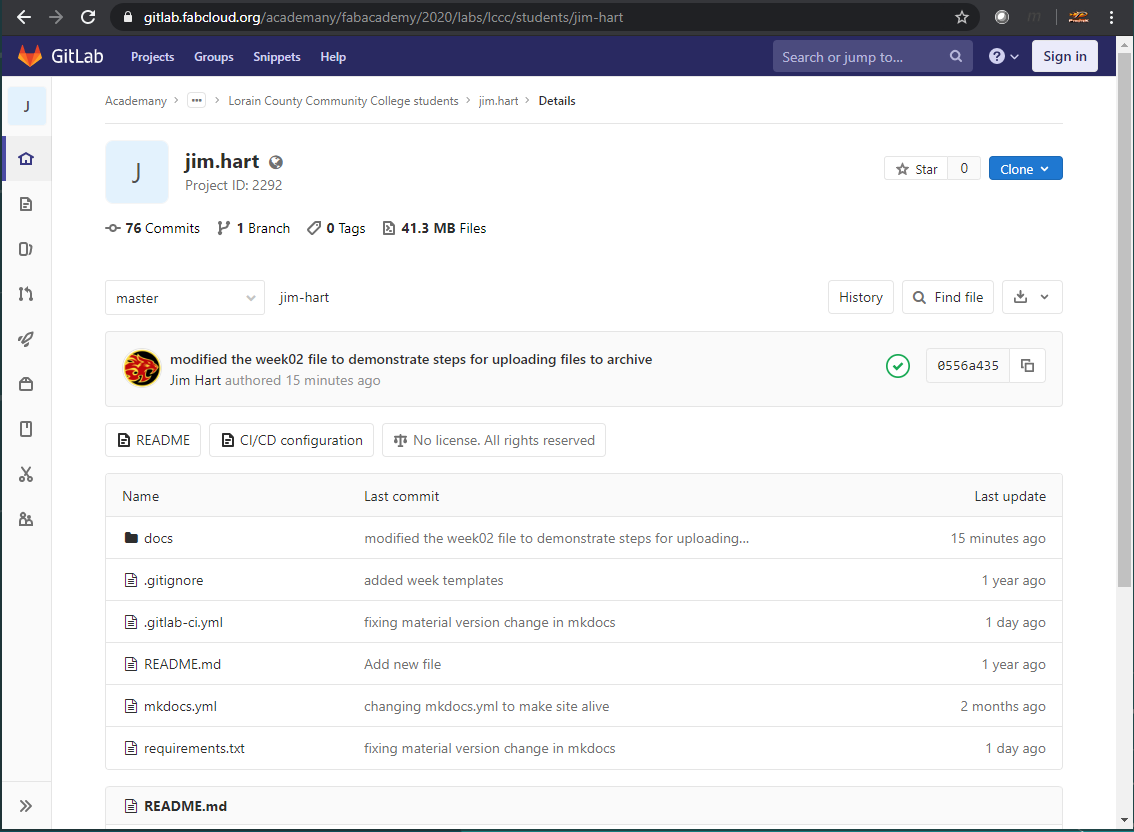
- Step 12. I must iterate through this process again to record what was just described :)
~/githive/fab-academy-2020/jim-hart (master)
$ git commit -m "adding the image and changes"
[master f850555] adding the image and changes
 2 files changed, 61 insertions(+)
 create mode 100644 docs/images/week02/pmchange.png

~/githive/fab-academy-2020/jim-hart (master)
$ git push git@gitlab.fabcloud.org:academany/fabacademy/2020/labs/lccc/students/jim-hart.git
Enter passphrase for key '/c/Users/jim555/.ssh/id_rsa':
Enumerating objects: 13, done.
Counting objects: 100% (13/13), done.
Delta compression using up to 8 threads
Compressing objects: 100% (7/7), done.
Writing objects: 100% (8/8), 58.61 KiB | 7.33 MiB/s, done.
Total 8 (delta 4), reused 0 (delta 0)
To gitlab.fabcloud.org:academany/fabacademy/2020/labs/lccc/students/jim-hart.git
   0556a43..f850555  master -> master
Note To Self: I guess I figured it out; although I have a lot more to learn. I read many references about this situation and none of them were identical to my situation. So, I went back to the basics… http://pub.fabcloud.io/tutorials/week01_principles_practices_project_management/git_simple.html This lead me to the tutorial post by @krisjanis.rijnieks on Migrating Git Repository http://pub.fabcloud.io/tutorials/week01_principles_practices_project_management/git_migrating_repo.html The single most influential line was “git push origin master” First, I admit that I have not read this; thanks to @krisjanis.rijnieks I finally read it and thought I would give it a try. Lo, and behold, my problem was fixed. I have always git pushed with “git push git@gitlab.fabcloud.org:academany/fabacademy/2020/labs/lccc/students/jim-hart.git” because I thought that was the way to do it. I didn’t know there was an easier way :slightly_smiling_face: Thank you for reaching out @adrian.torres You’re the best! And thank you @krisjanis.rijnieks for writing the tutorial. I will continue to study and learn more about git. I need an interface similar to Matrix so I can learn more, faster, better :slightly_smiling_face:
This is a continuation of the PM week in Fab Academy 2021
-
My name has been added to the list of Fab Lab Lorain County Community College students for Fab Academy 2021.
-
The link for my name points back to my Fab Academy 2020 repo, so my workflow is identical to the last cycle. WooHoo! 😁🙌
-
I changed the year on the home page and added this new section to the PM page.
-
I am using Working Copy on my iPhone and mingw-w64 on my Windows 10 laptop. I will also be using xubuntu on a linux desktop.
Signed and uploaded Student Agreement
-
Revised the Student Agreement to reflect the latest changes for Fab Academy 2021
-
It is so good to be back in the Fab Academy! 😎
This is a continuation of the PM week in Fab Academy 2022
-
My name has been added to the list of Fab Lab Lorain County Community College students for Fab Academy 2022 .
-
The link for my name points back to my Fab Academy 2020 repo, so my workflow is identical to the last cycle. WooHoo! 😁🙌
-
I changed the year on the home page and added this new section to the PM page.
-
To manage my repo, I am using Working Copy on my iPhone; git, GitExtensions, and VS Code on a Raspberry Pi 4 with 8GB of RAM. I will be using Raspberry Pi OS Bullseye (Debian 11) 32 bit and 64 bit as well as Raspberry Pi OS Buster (Debian 10) 32 bit and 64 bit.
Signed and uploaded Student Agreement
-
Signed and uploaded Student Agreement:
-
Revised the Student Agreement to reflect the latest changes for Fab Academy 2022
-
It is so good to be back in the Fab Academy! Best year yet! 😎
Project Management Upgrade
-
Used a template to develop Trello into a project management tool for FA 2022. I also have the Trello app on my iPhone, so this allows me to document on whichever device I am using.
-
Using Adrian’s schedule idea from student bootcamp
-
Working with @abby.aresty to finish group assignments in advance. We communicate through MatterMost and Zoom.
-
Went to Global Open Time on Saturday. What a wonderful reunion; biggest gathering yet! Adrian invited me to introduce myself, which I did, and enjoyed remembering the beginning of Fab Academy in my life. Thank you Adrian! Pablo recommended that I document the experiences with Fab Academy and building/rebuilding of a Fab Lab. What a great idea! Thanks Pablo! I must get busy :)
This is a continuation of the PM week in Fab Academy 2023
-
My name has been added to the list of Fab Lab Lorain County Community College students for Fab Academy 2023 .
-
The link for my name points back to my Fab Academy 2020 repo, so my workflow is identical to the last cycle. WooHoo! 😁🙌
-
I changed the year on the home page and added this new section to the PM page.
-
To manage my repo, I am using Working Copy on my iPhone; git, GitExtensions, and VS Code on a Raspberry Pi 4 with 8GB of RAM and an Intel(R) Celeron(R) J4125 CPU @ 2.00GHz, 2001 Mhz, 4 Core Processor with 12GB of RAM. I will be using Raspberry Pi OS Bullseye (Debian 11) 64 bit as well as the Kamrui Single-board computer running Windows 10 64 bit.
Signed and uploaded Student Agreement
-
Signed and uploaded Student Agreement:
-
Revised the Student Agreement to reflect the latest changes for Fab Academy 2023
-
It is so good to be back in the Fab Academy! Gets better every year! 😎
Project Management Upgrade
-
Used a template to develop Trello into a project management tool for FA 2023. I also have the Trello app on my iPhone, so this allows me to document on whichever device I am using. The Trello template has major improvements to guide me through this cycle.
-
Using Adrian’s schedule idea from student bootcamp
-
Working with @jayson-brown, @barry-harvey, and @abby.aresty this cycle. We communicate through MatterMost and Zoom.
-
Went to Global Open Time on Saturday. What a wonderful reunion; biggest gathering yet! Adrian invited me to introduce myself, which I did, and enjoyed meeting everyone. Thank you Adrian!
This is a continuation of the PM week in Fab Academy 2024
-
So glad to be back in Fab Academy! I had to put last year’s cycle on hold due to some personal matters, but all is well and it is time to get back to work.
-
Due to changes at LCCC, I needed to transfer to an Active Node to continue my journey with Fab Academy. I am happy to announce that Fab Lab Leon is willing to take me on as a remote continuing student with Pablo Nunez and Adrian Torres as my Instructors. Thank you!!
-
After watching Rico Kanthatham demonstrate VSCode using Git for Windows, I thought I would try it out. Being able to clone my repo by selecting that option in GitLab.FabCloud made it very convenient. The first attempt failed :( but it was due to not having an SSH key setup on my new computer. Once I setup the SSH Key locally and adding it to GitLab.FabCloud, it was smooth sailing 😎 Oh, except that I forgot to add my email and name to git. Git was kind enough to remind me with the required code:
git config --global user.email "you@example.com"
git config --global user.name "Your Name"
-
Once I updated the user info in Git, all worked fine and I pushed to GitLab.FabCloud :)
-
Now that I have VSCode working for me, I decided to remove the numbers from the titles of each page. The order of the directories was based on the order of the units we covered in 2019; this is usually different for each cycle, so I thought the numbers would be confusing to visitors. To be safe, I first cloned my repo into a new directory and tried it on the first week. Additionally, week 1 and week 2 are now combined into a single unit per the Assessment and I wanted to make my website as close to the Assessment layout as possible.
-
Long story short, it works out that the order of the navigation is based on the alpha-numerical order of the names of the files in the assignments directory, i.e. week01.md, week02.md, week03.md, etc. It does not depend on the content of the page as I previously suspected; that’s why I didn’t change it before. But VSCode makes it so easy, that I thought I would give it a try. I combined the content of week02.md into the week01.md content and deleted week02.md. Worked like a charm! I continued the editing in a live repo and pushed the changes in small increments; changing 4 pages at a time. As you can see now, it is as I hoped and makes more sense as well as reflects the layout of the Assessment.
Signed and uploaded Student Agreement
-
Signed and uploaded Student Agreement:
-
Verified the Student Agreement reflected the latest changes for Fab Academy 2024.
-
It is so good to be back in the Fab Academy! This year will be completed in my Personal Fab Lab and the best year ever! 😎