
Week 8 - computer-controlled machining (Mar 18)
Assignment
This weeks task was to make something big using the ShopBot 3-axis CNC machine.
Constraints
- Capable of being made from one 8'x4' sheet of plywood.
- Fixing points for sheet to ShopBot bed,
- Use as much of material as possible in the design
- No glue! Joint should be press fit, living hinges or the like
My MacBookPro broke again and went back for repair for the third time! Luckily FabLab Manchester was able to lend me a laptop, so time to remember Windows short cuts.
Initial design thoughts
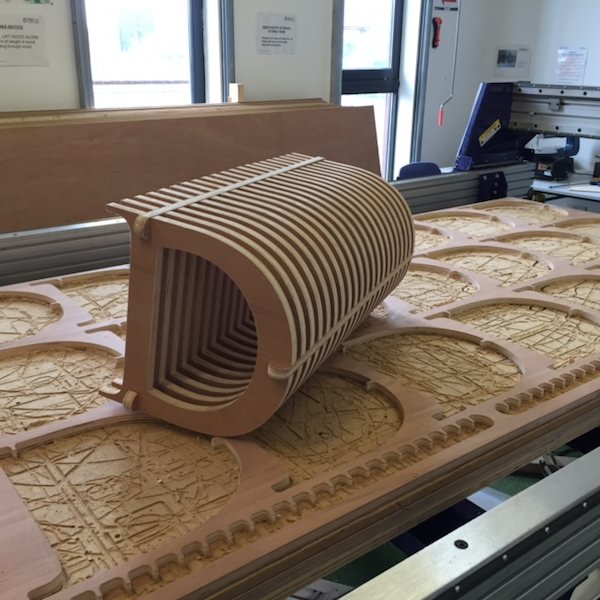
I was interested in making a piece of furntiture. While researhing I came across a bench called the "infinity bench" designed by Carl Fredrik Svenstedt. The design appealed to me being both organic in form, like a ribcage and capable of being made from 2 dimensional pieces.
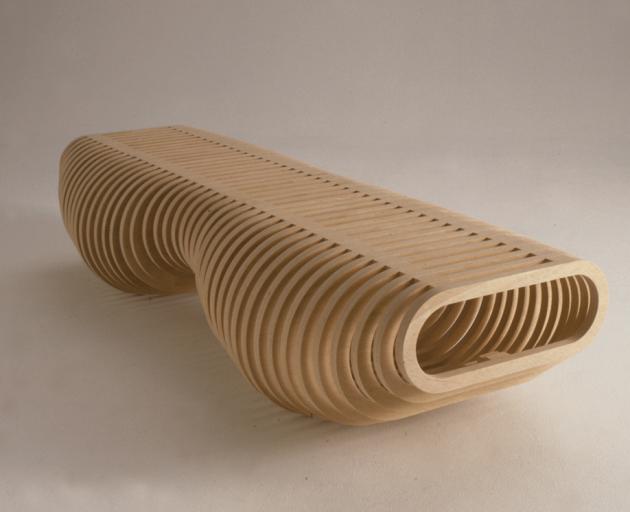
I scaled the dimensions of the drawing for a bench 60" wide and calculated the number of 8'x4' sheets required - oops! 4 in total, so broke my first constraint. This was due to the number of hoops (42 in total) and only being able to nest a limited number of smaller hoops inside larger ones. I decided to reduce the size of the bench and number of hoops in order to fit on one sheet of plywood and use 18mm thickness plywood as this hopefully would be sufficiently strong for a person to sit on the bench.
I started to design the bench using Inkscape with push fit joints to join the hoops with cross spars.
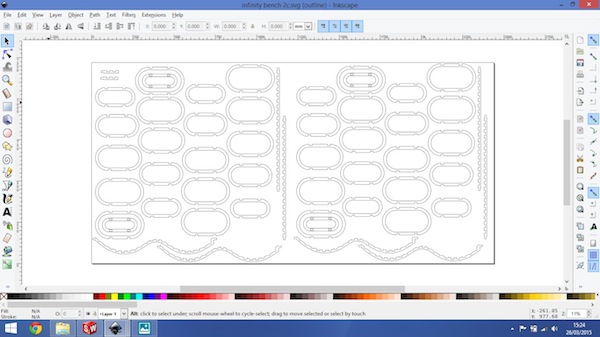
The design didn't look robust enough. So I made a scale model using the laser cutter from a scaled down drawing.

The bottom curved spars broke easily around where the tabs cuts had reduced the amount of material.

Inkscape 0.91 bug
When using the latest version of Inkscape 0.91 there is a problem saving a SVG as a PDF for laser cutting as some of the lines don't appear in the PDF. A work around is to save the SVG file and open in an older version of Inkscape 0.48 and save as a PDF.

PartWorks 3.5
I decided to abandon my original design in favour of more robust component parts. As I was last to use the ShopBot I didn't have much time to complete this assignment. So I did a revised design using PartWorks. PartWorks is CAD friendlier than Inkscape and enabled me do do a quick redesign of the bench.
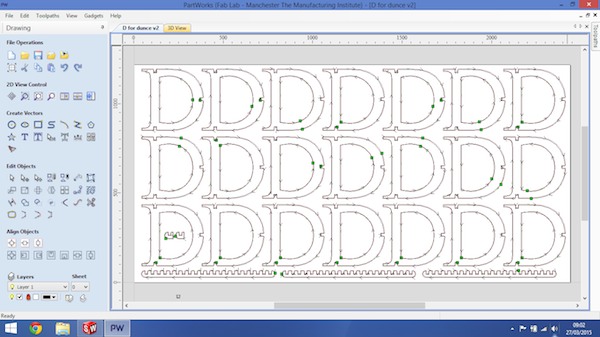
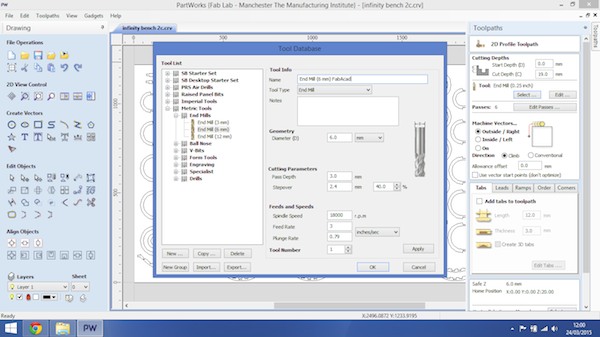
PartWorks has a tool database with prepopulated parameters. I selected a ⌀6mm down cut End Mill and with tutor guidance modified the Feeds and Speeds for cutting 18mm ply.
I came across a CBA tutorial on router basics packed full of useful information Router Bit Basics
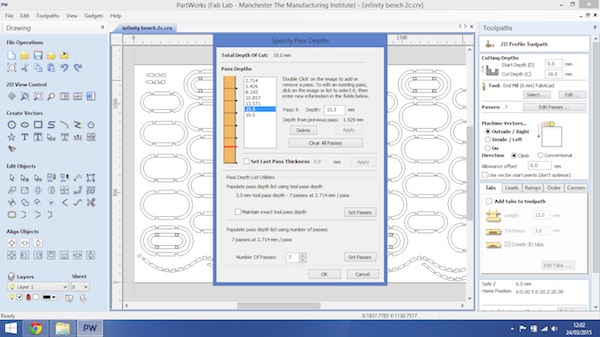
The next stage is to set up the tool paths in PartWorks. The cut depth is an important parameter to set. It needs to be greater than the matertial thickness, but not too great as to go through the sacrificial bed. I was using 18mm nominal thickness ply, measuring at a number of points along the sheet with callipers gave a range of thicknesses from 17.25mm to 17.40mm. I decided on a cut depth of 19mm cutting a minimum of 1.6mm into the sacrifical layer. Another factor comes into play and that is the flatness of the material. My 8'x4' plywood sheet had a warp. The warp can be mitigated by flattening the sheet when screwing down onto the bed with the appropriate number of screws.
>The toolpath calculations specified 7 passes at 2.714mm depths. I adjusted the 6th pass from 16.284mm to 15.5mm as not to leave a small thickness of sheet in that cut, as using a down cutter the chip exhaust is down and not up resulting in a poor bottom edge finish and risk of splintering.
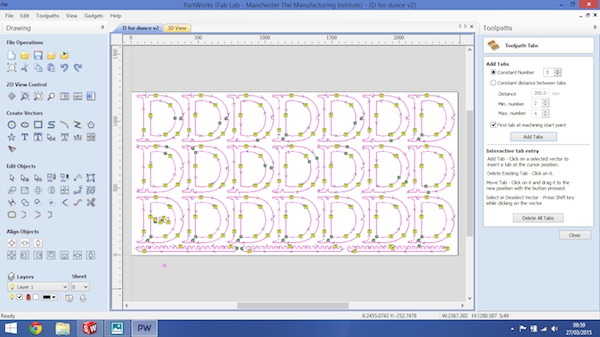
The next stage in the tool paths is to specify the tabs and ramps. The tab tool can autopopulate the toolpaths with tabs by specifying the number of tabs per path. However the auto tab can place tabs in sub-optimals locations such as on cut outs or small gaps between pieces so manually placing tabs using the interactive tab entry can be quicker and better in the long run.
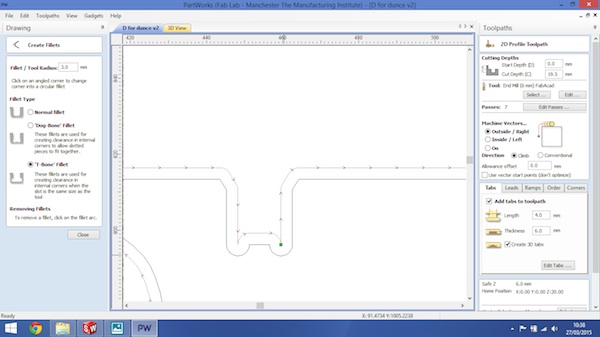
As I was using push joints I made the joints the average of the material thickness 17.3mm and added a chamfer to make joints easier to align.
Dog-Bone v T-Bone Fillets
In the PartWorks drawing tools there is a tool for adding fillets to allow joints to fit correctly and take into account the radius of the tool. You can use dog-bone or t-bone fillets (the names come from the resulting shapes). I chose to use t-bone fillets as they are hidden when the joints come together.
NOTE: It's always worth checking there are no open vectors otherwise the parts will still be connectected to the sheet. Use the Join Vectors drawing tool to fix any open vectors.
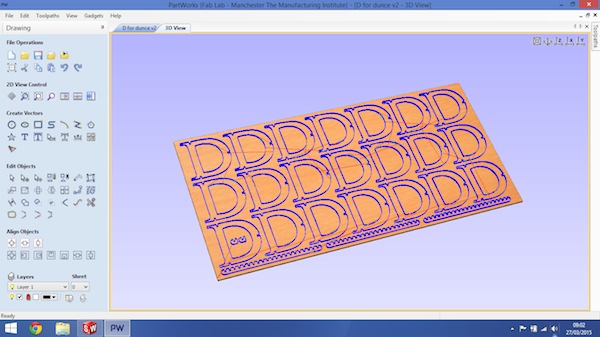
PartWorks has a 3D view of the toolpaths, this is useful to review before fixing the material to the bed to check on screw fixings holes.
Save the PartWorks file and the toolpath file with a descriptive name e.g. test_cut_6mmdown_18mm_ply.sbp
ShopBot Operation
The ShopBot can be a dangerous machine with fast rotating spindles, moving gantry, chip extraction and high power electical supply. Safe working practices are essential, on Monday morning the students were given a 2 hour instruction into safe practice in using the ShopBot.
- Ensure fire escape access open and clear
- Inspect and clean bed
- Select 8'x4' sheet and use 2 people to move and lift onto bed
- Align sheet to bottom left origin of bed
- Drill and fit appropriate number of screws to bed for thickness of material. Work from left hand side up and right to 'push out' any warps. Choose screw length to go sufficent depth into sacrificial layer to ensure sheet held securely. I was using 18mm sheet so chose 40mm screws. I measured the diameter as ⌀3.8mm, so chose a ⌀4mm diameter drill to give a clearance hole for the screw.
- Make sure screw holes are well clear of 1/2 the diameter of the mill away from the toolpath (end mills cost £30-40 and the student would have to replace a broken one!)
- Choose size of end mill, stock sizes are ⌀3mm, ⌀6mm and ⌀12mm diameter. Small tools are exponentially slower than larger tools (due to slower feed rates and plunge rate relating to chip volume)
- Examine tool - down cutter flutes start from the left, up cutter flutes start from the right.
- Select a suitable sizes collet for the end mill. When inserting the collet into the spindle ensure the end mill shank is snug and grip as much of the spindle as possible. When tightening the spindle use black spanner on the right and silver spanner on the left. Push away to tighten and pull towards to release
- Zero the x, y and z axis. The x and y are done using the left, right, up and down arrows or keys. The z axis use the croc clip and plate to set the datum accurately.
- Use goggles and ear defenders cutting. If there is a lot of dust then a mask is advisable as well.
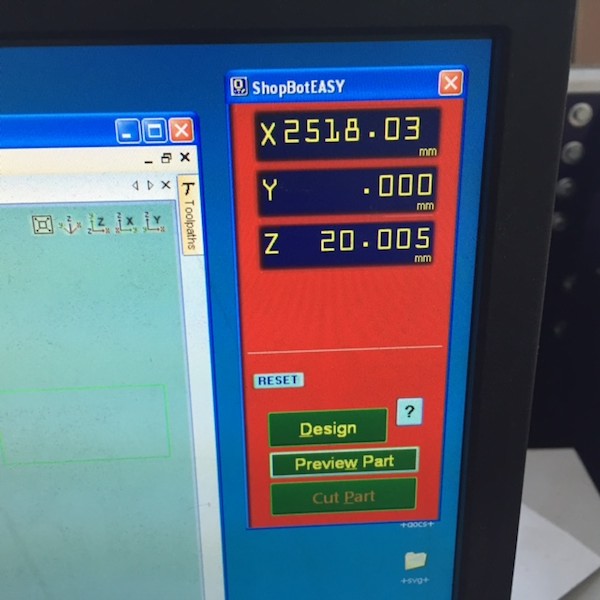
- Steps to switch ShopBot on, switch on main power switch, switch on chip extraction, turn key switch on side of bed (1/4 turn), set spindle speed using control panel on side of ShopBot bed. Press Cut Part on the ShopBot control panel.
- Ensure the emergency pause is within easy access as well as the mouse (which is locked while cutting to pause)
- Cut test piece first to check cutting parameters and also quality of joints. Adjust design and cutting parameters if necessary.
- Let the job run, paying attention to the sound of the end mill, any abrupt changes in pitch pause the job and check if there any problems.
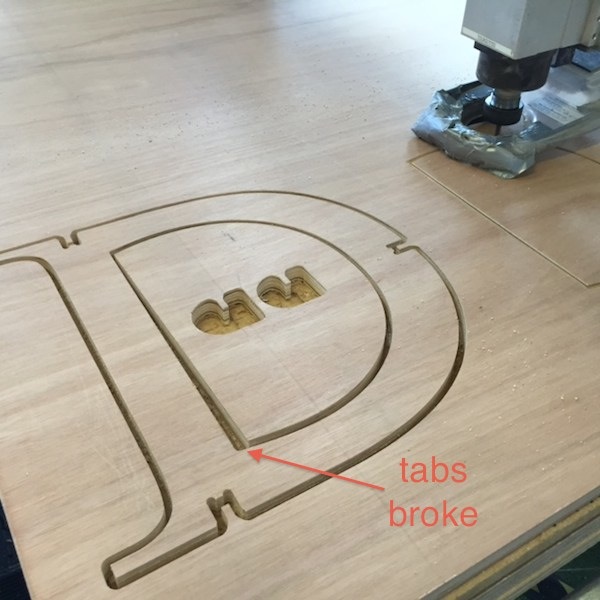
I cut the test piece first (which was saved as a seperate toolpath) to check the cutting parameters and the quality of the joint.
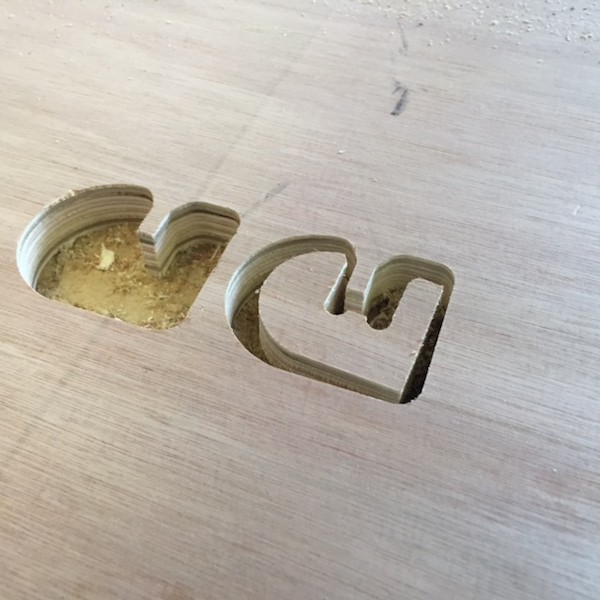
On cutting the test piece it was apparent that even though the tabs were being cut (the end mill went up and down on the z-axis around the tabs on the tool path), they were not strong enough to hold the piece to the sheet. This could be a major problem with pieces coming loose and flying off (hence the safety glasses).
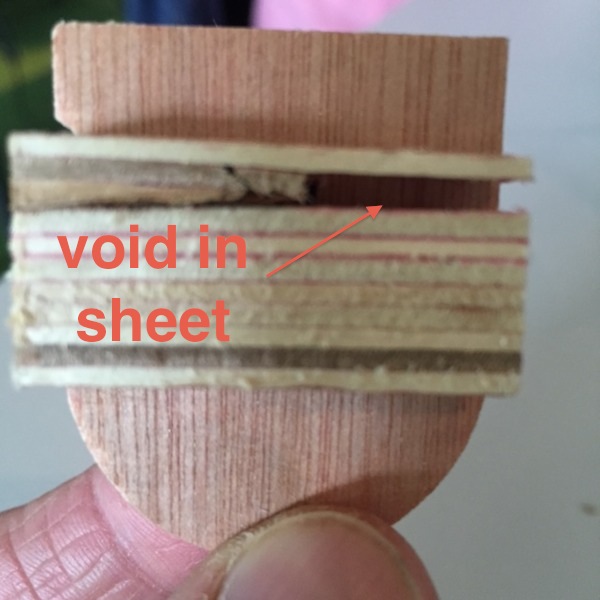
When inspecting the test pieces I found a void in the plywood layers, this would cause the variation in sheet thickness. Better grade birch plywood shouldn't have such voids.
The test push fit joint fitted well together so there was no need to adjust the joint dimensions on the design.
On with cutting the main toolpath. Despite the tabs breaking on the test piece I decided to continue and found a benefit of the tabs breaking - the parts came away from the sheet without the need of cutting or snipping. As I was pushed for time this helped me completed the assembly while the job was running
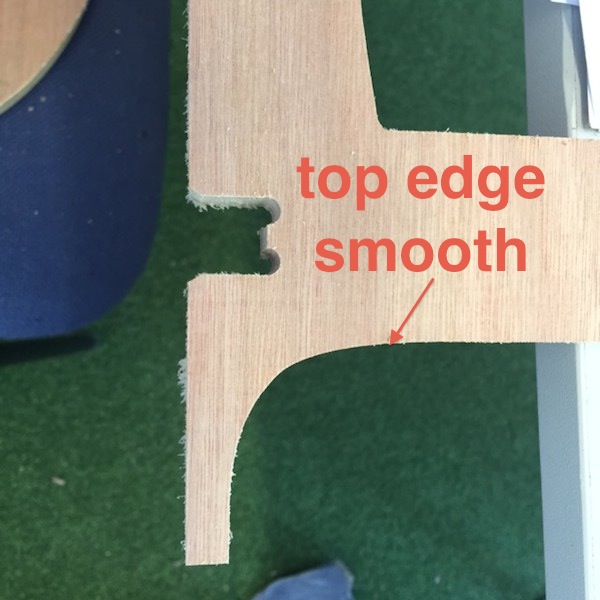
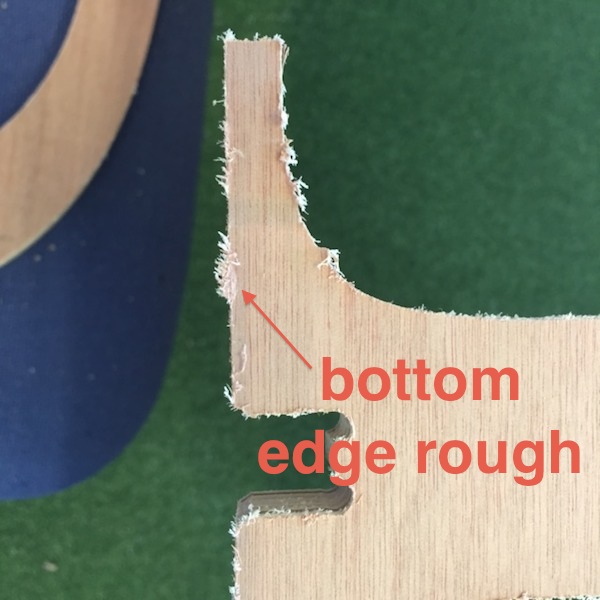
Comparison of top and bottom surfaces
Using a down cutting end mill was going to produce different quality of cuts on the top and bottom surfaces. From the pictures below the top sufrace is a good clean cut, while the bottom needs finishing to remove the burrs.
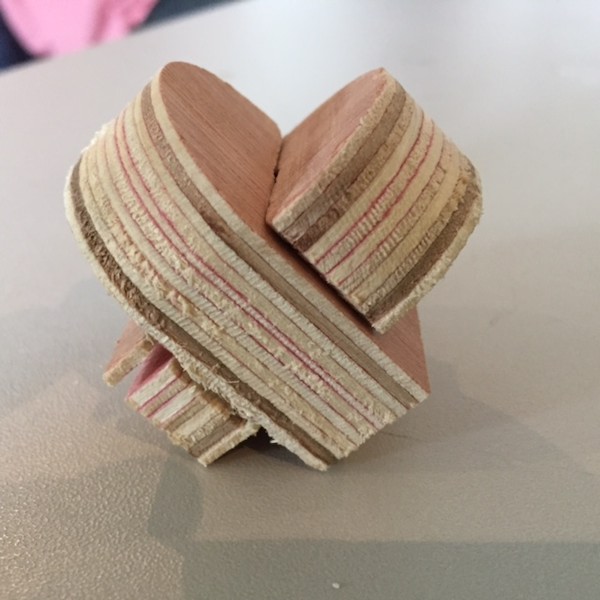
Made something (almost) big
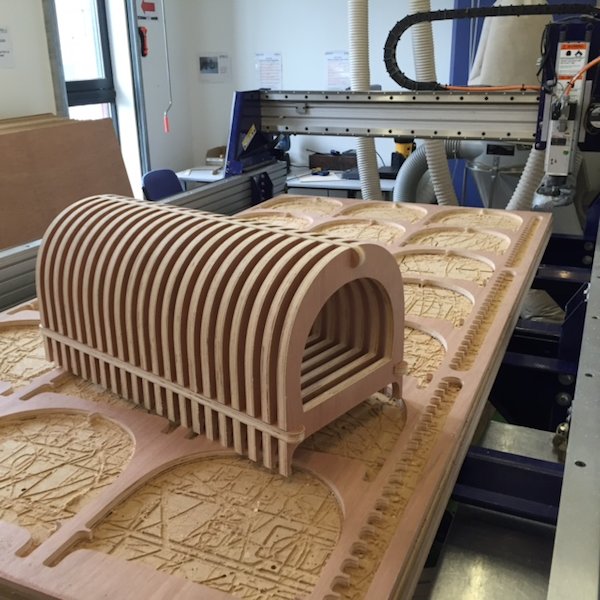
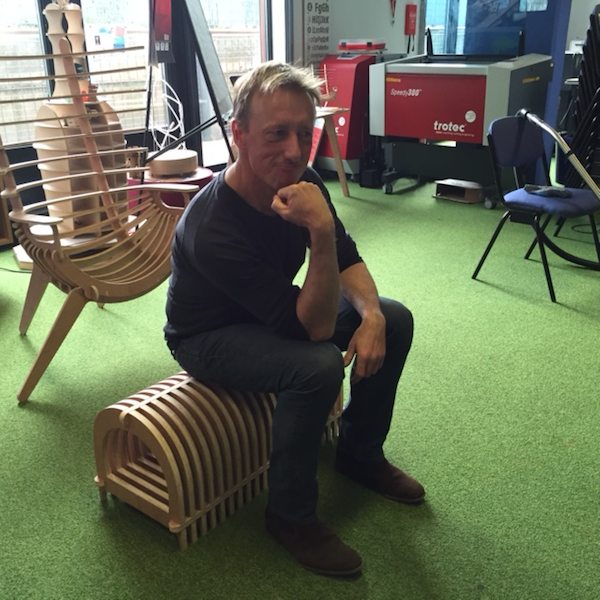
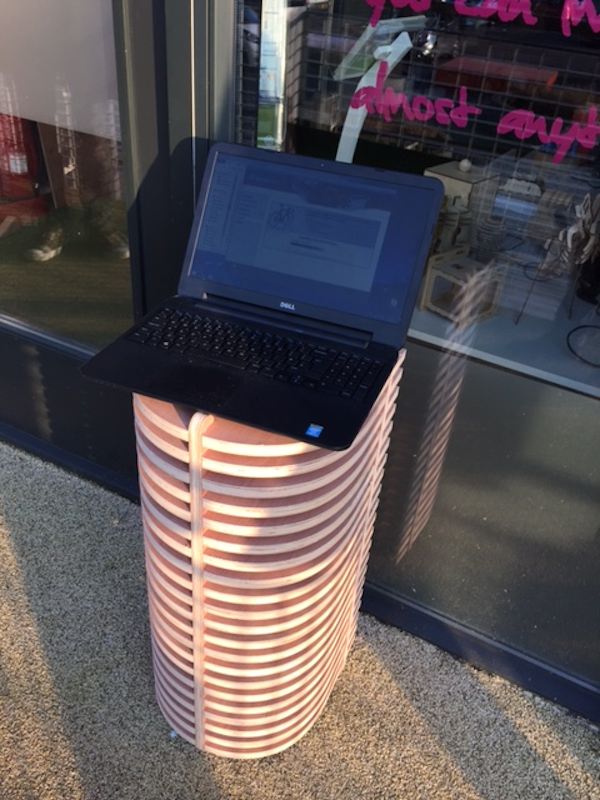
I managed to finish the job with 10 minutes to spare before the Wednesday video conference and was pleased with the end result. Although my thought was to have the 'D' shaped bench the centre of gravity meant it rocked on the bottom edge. Flipping it over it was more staple and had a variety of uses as well as a seat . . . excercise bench, laptop stand.
Material and tools
Material used: 18mm plywood (1 off 8'x4' sheet)
Tool used: ⌀6mm downcuter End Mill
Lessons learnt
This week has been a challenge again without my own computer, so I was playing catchup all the time. I was frustrated at the amount of time I spent tyring to perfect the Inkscape design for the infinity bench only to abandon it late in the day. I was pleased with how easy it was to design natively in PartWorks and seeing the job completed.
Like most weeks there is an awful lot to learn to get to a basic proficiency (with a big help from our tutor Michael). I feel more confident that I could make something more sophisticated on the ShopBot and hopefully avoid some of the beginner pitfalls I made this week.
Files for download
The files from this week's assignment can be downloaded from a Dropbox folder by clicking on the following link to download.
Downloadable design files
infinity bench 2c laser 2.pdf
infinity bench 2c.pdf
Inkscape infinity bench 2c.svg