Week 3 - computer-controlled cutting (Feb 11)
The two design tools I used this week were Inkscape and FreeCAD, as Antimony crashes on my MacBookPro and I'm still learning to use Solidworks having access to a server license.
Neil stressed the importance of making the press fit construction designs parametric as the most common problem with the task is joints that don't fit together well. Using a parametric design, makes it a relatively simple task to tweak dimesions and alter slots and tabs to improve fit.
Last week I had (and still have) a steep learning curve to go up on 3D design tools so hopefully 2D will be simpler!
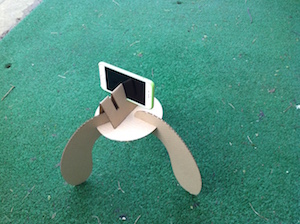
My goals this week are to make a press fit iPhone tripod and learn to use the laser and vinyl cutters. The tripod will be helpful for my final project idea and allow video recording of running styles and to calibratie with the footpod. I’d also like to have a go at using the vinyl cutter to make a vinyl logo.
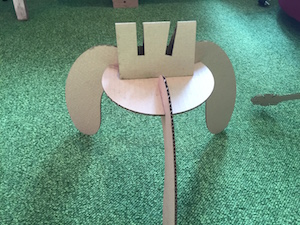
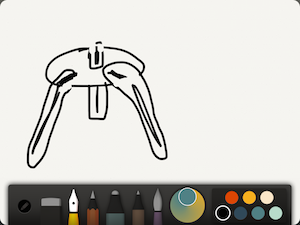 My inital idea was to replicate a camera tripod, and used Paper by 53 on an iPad to do a basic sketch of the idea.
Inkscape
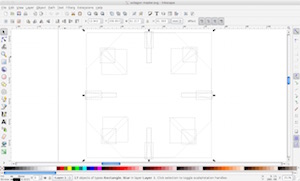

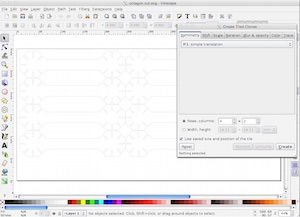
I found Inkscape easy to start with but soon hit problems when I wanted guides at 120° and 240° on a circle so I could position slots for the tripod legs equally. Inkscape is good aligning objects horzontally and vertically, but I haven't found how to do it on an arc. A good feature of Inkscape is it allows parametic design with the cloning command. This is useful when globally changing slot sizes and replicating a finished shape by using the Create Tiled Clones command.
FreeCAD
I found FreeCAD more difficult to build 2D shapes as there doesn’t seem to be an align function like Inkscape. Although constructing shapes with constraints is more straightforward than in in Inkscape. I haven’t found a way to merge/subtract objects (like Inkscape does) as this make slots and tabs easy to add to an object
Test Laser Cut
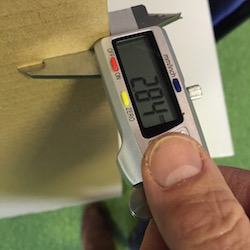 I started by measuring the thickness of the stock cardboad, nominally 3mm with digital calipers. The actual measurement was 2.84mm and varied depending on the pressure of the calipers on the carboard. The press fit joint parameters will depend on the thickness of the cardboard as well as its compressibility.
Stages in using the Epilog laser cutter.
- Make sure all safety instrutions are followed, power on and exhaust fans on
- Save design as PDF file, ensure line thickness is 0.01mm (recognised as vector cut and not raster engrave)
- Print PDF and adjust speed, power and frequency parameters to suit carboard cutting
- Manually adjust focus of laser by using guide, helpful when using cardboard if sheet is slightly warped
- Send job to be go and on Epliog press Go button
- Wait for 15 seconds after job has finished to cool down
- Remove pieces and clean bed
Test piece fabrication
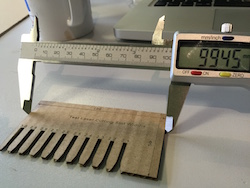
- Used Inkscape to draw a test 100x50mm rectangle with 10 chamfered slots varying from 3.0mm down to 2.1mm widths in 0.1mm steps
- Also used the raster setting on the laser cutter to engrave text on the cardboard
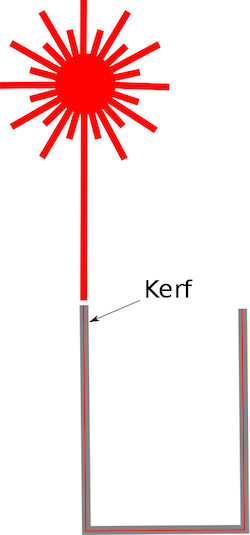
- The test piece served two purposes, firstly to measure Kerf and secondly to find the ideal slot thickness for the joints. Kerf is the amount of material ablated by the laser and needs to be taken into consideration when designing parts. The 100 mm dimension measured 99.45mm (0.55mm difference)(the 50mm measure 49.59mm, 0.41mm difference). As there are two cuts divide the differences by 2 to get the kerf for a single cut. The Kerf for 3mm cardboard using the standard (power, speed and frequency settings) was 0.2-.3mm.
- Good practice is to measure a test piece each time especially if different settings and materials are used. This highlight the benefit of parametric design if the designs have to be adjusted for different kerf thicknesses
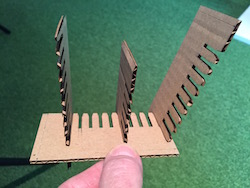
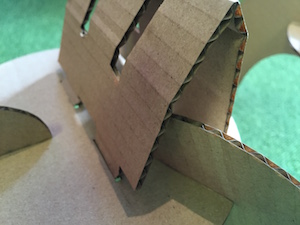
- A number of test pieces were cut and different slot thickness tested. On the right side of the picture is nominal slot width 3.0mm (actual 3.5mm), middle 2.5mm (actual 3.0mm), left side 2.1mm (actual 2.6mm)
- The most secure fit was the 2.1mm nominal (actual 2.6mm) which compressed the cardboard and created a strong joint which would fall apart easily unless pulled with some force
- Use 2.1mm nominal width (2.6mm actual width) as the default joint width for press-fit construction kit
Downloadable file test1.pdf