|
Week 8: Embedded programming
This week assignment was to program the board that we had already made in week 6. I started this week with going though the ATtiny 44 datasheet. When I was searching on the net, I found the explanations about AVR c programming basics useful and very clear
Programming the board
After reading the datasheet I followed the Tutorial for embedded programming. One part of the tutorial is about providing support for ATtiny 44 in Arduino environment. For that, there is a need to download the files linked in the tutorial, unzip them go to Arduino Sketchbook folder, make a folder called hardware and put the files there. Be sure that under hardware you make folder like ATtiny and put the files in that. Otherwise when you go to Tools > boards, you can't not see the boards you created support for.
In Arduino environment I used the Button sketch in File > Examples > Digital > Button. After changing the buttonPin in the sketch from 2 to 3 and ledpin from 13 to 7, I upload the sketch to my board. I got the Led glowing. It is because in the sketch buttonPin is being read, If it is high the Led will be turned on. In week 6 we had our switch in a way that it is connect to HIGH with a pull up resistor and when it is pushed, it will connect to LOW. That is why originally the LED is glowing and pushing the button turns the LED off. Simply changing the if (buttonState == HIGH) to if (buttonState == LOW), the LED is off at the start and will be on upon pushing the button.
Also using the delay() function it is possible to make the LED blink when pushing the button. As an example the following could makes the LED blink (1 second on and 1 second off)
if (buttonState == LOW){
digitalWrite(ledPin, HIGH);
delay(1000);
digitalWrite(ledPin, LOW);
delay(1000);}
Programming the board
Programming from the command line
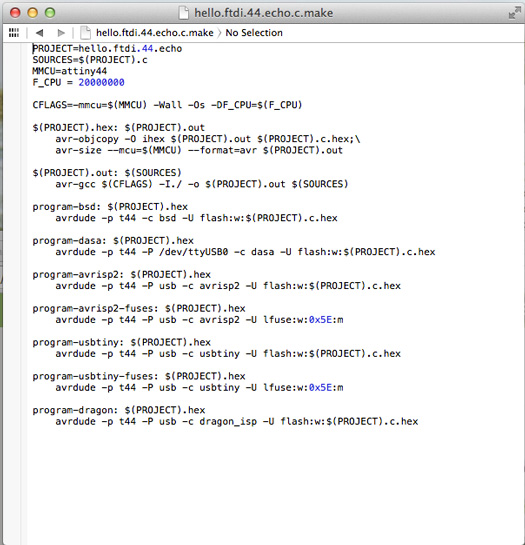
I downloaded the example file hello.ftdi.44.echo.c (which is a c file) and also hello.ftdi.44.echo.c.make (which is a makefile) from Neil's week8 keynotes. The .c code can be openned in Xcode if you are a mac user. The changes in the code there can be done and the file can be saved.
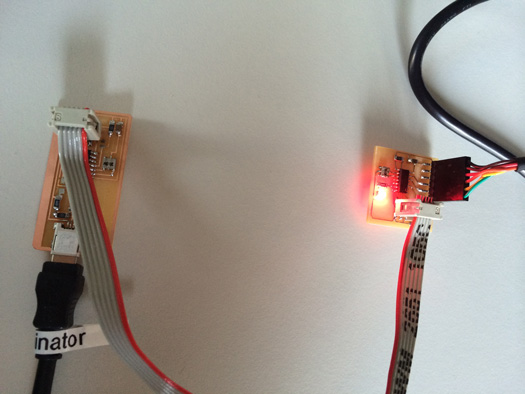
hello.ftdi.44.echo.c.make is used at the time of compiling the source (.c) file in order to create .hex and .out files. Installing the Crosspack on Mac, when the command "sudo make -f hello.ftdi.44.echo.c.make program-usbtiny-fuses" for setting the fuse bits, is executed (you should be in the directory where hello.ftdi.44.echo.c.make is located) the related .hex and .out files will be created. Also .hex file will be uploaded to the ATtiny. Samely, after executing the "sudo make -f hello.ftdi.44.echo.c.make program-usbtiny" the related .hex and .out files will be created and .hex file will be uploaded to the microcontroller.
Looking at the top part of the make file, in the first line there is the PROJECT, which the project name is written there without any extension. In the second line there is the SOURCE, which identifies the file type. For example if the code is written in c, we put .c there. If the code is written in assembly, there should be .asm there. The third line shows the microcontroller. In this example the microcontroller is attiny44. In the forth line there is the frequency of resonator. In this example our resonator is 20 Mhz. There are also other make files when you write the code in assembly or if you are using atmega328p instead of attiny that can be downloaded from Neil's keynote on embedded programming. They can be modified based on the needs.
Makefile
Making a Fabduino
I made a Fabduino based on the tutorial mentioned above, I soldered all the components, but I did not have a 8 MHz resonator to burn the boot loader.
Code
 const int ledPin = 7;   //   LED is connected to pin number 6 of attiny.
                         //   The corresponding Arduino pin for that is pin 7.
 const int buttonPin=3;  //   button pin is connected to pin number 10 of attiny.
                         //   The corresponding Arduino pin for that is pin 3.

 int buttonState= HIGH;       // defining a variable for keeping the state of button.

void setup() {

 pinMode(ledPin, OUTPUT); // ledPin is an output pin.
 pinMode(buttoPin,INPUT);   // button pin is an input pin.
}

void loop() {

if (buttonState==LOW)
{
   digitalWrite(ledPin, HIGH);
   delay(1000);
   digitalWrite(ledPin, LOW);
   delay(1000);
}

}
|
 Fab Academy Class 2014