
Input – bending of the cover
Liron made pressure sensor, I connected the flexible button under the lid of the end unit, programming mapping the range of values of the volume term Hsansor every message is from 0 to -127
Basically, I based on the 10 week assignment which discussed abut input devices, the only thing that has changed is the sensor
אינפוט -כיפוף של המכסה
לירון הכינה חיישן לחץ, אני חיברתי את הלחצן מתחת למכסה הגמיש של יחידת הקצה, בתכנות מיפיתי בין טווח הערכים של הסאנסור לטווח הווליום של הודעת מידי שהוא בין 0 ל-127
בעצם התבססתי על המטלה של שיעור 10 שבו עסקנו באינפוטים, הדבר היחיד שהשתנה הוא החיישן

If the movie does not cost you try this link
במידה והסרט לא עולה תנסה את הלינק
http://www.youtube.com/watch?
Final file:
:קובץ סופי
Outfot – LED Lighting
We use a RGB LED serif 12 V, programming was based on existing code that plays with shades of the LED. Each end unit received its own game
אטפוט – הדלקת נורת הלד
השתמשתי בסריפ לאדים של 12 וולט, בתכנות התבססתי על קוד קיים שמשחק עם הגוונים של הלאדים. כל יחידה קיבלת משחק משלה
Wiring:
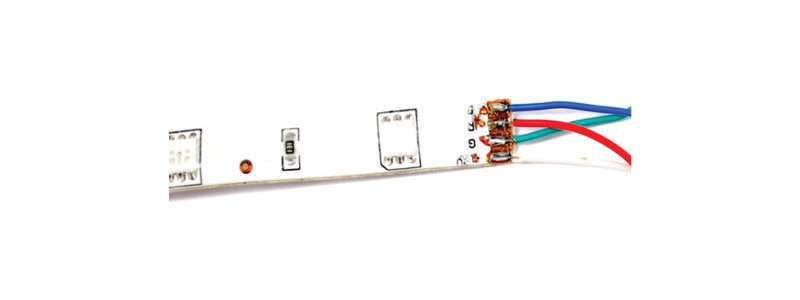
The LED Streep is 5 meters long and the scope of our end-units is on average 1 meter. So I had to cut the strip and wire.
Connecting up to the strip is fairly easy, you need to solder four wires to the copper tabs. We’ll use white for +12V, then red, green and blue wires for the corresponding LED colors.
:חיווט
סטריפ הלד מגיע באורך של 5 מטר והיקף של יחידות הקצה שלנו הוא בממוצע מטר. לכן נאלצתי לחתוך את הסטריפ ולחווט
.חיבור לרצועה הוא קל למדי, צריך ארבעה חוטי הלחמה לכרטיסיות נחושת. אנו נשתמש לבנים ל12 וואט , ואז חוטים אדומים, ירוק וכחול לצבעי לד המקבילים
Because these LED strips are very simple, we can easily use them with any microcontroller.
Since each ‘LED’ pin may end up requiring an Amp or more to sink to ground, power transistors are required! Don’t try to connect the pins directly to your everyday microcontroller, they will burn out and/or not work.
I used…
בגלל רצועות לד האלה הן מאוד פשוט, אנחנו יכולים בקלות להשתמש בם עם כל מיקרו-בקר
מכיוון שכל סיכת לד דורשת מגבר או יותר ליציאה לבסיס, טרנזיסטורים חשמל נדרשים! אל תנסה לחבר את הפינים ישירות למייקרו-בקר , הם יוכלו לשרוף ו/או לא יעבדו
…אני השתמשתי ב
TIP120 Power Darlington Transistors

Base is pin 1, Collector is pin 2 and Emitter is pin 3. we have 100-220 ohm resistors between the PWM output pin and the base.
PWMבסיס הוא 1 סיכה, הנציב הוא הפינים 2 ופולט הוא סיכה 3. יש לנו נגדים של 100-220 אוהם בין הבסיס ואאוטפוט-סיכת
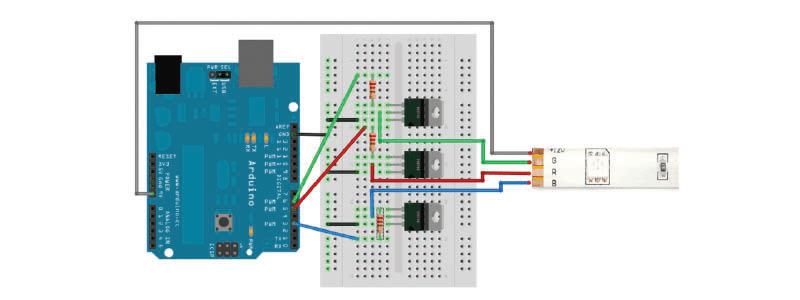
Connect a 9-12V power supply to the Arduino so that Vin supplies the high voltage to the LED strip. You can also just use a separate wire that connects to a power supply that provides about +12V. Make sure to connect the ground of that supply to the ground of the Arduino
חבר 9-12 וולט אספקת חשמל לארדואינו כך שיהיה מספק מתח לרצועת לד. אתה יכול גם פשוט להשתמש בחוט נפרד המתחבר לאספקת חשמל המספקת כ – 12 וולט. הקפד לחבר את הקרקע של אספקה שעל הקרקע של ארדואינו

Programming:
:תכנות

If the movie does not cost you try this link
במידה והסרט לא עולה תנסה את הלינק
Final file:
:קובץ סופי
That’s all … Now Liron merger between my programming with her’s and we programmed each unit separately
וזהו…עכשיו לירון איחדה בין התכנותים שלי לשלה ותכנתנו כל יחידה בנפרד