This week's fun assignment was:
Group assignment:
- Send a message between two projects
- Document your work to the group work page and reflect on your individual page what you learned
Individual assignment:
- Design, build, and connect wired or wireless node(s) with network or bus addresses

Networking and communications
What I did this week
Asking via Bluetooth from an Android Tablet for a ATtiny1614 with a HC-06 Bluetooth module to play the Super Mario Brother theme with a piezo buzzer and light a LED up while returning a message to the Tablet informing that it's playing the song.

Connecting two XIAO ESP32 via Bluetooth Low Energy. One of the XIAO's acts as server and sends the measured value of a Force Sensitive Resistor while the other acts as a client and interprets the values, displaying the result on an OLED display.
Group assignment
- Send a message between two projects
- Document your work to the group work page and reflect on your individual page what you learned
Individual assignment
- Design, build, and connect wired or wireless node(s) with network or bus addresses
This week's group and individual assignment are documented together as there was no point in separating them.
Connect a Tablet/Mobile Phone to an ATtiny1614 with a bluetooth HC-06 module.
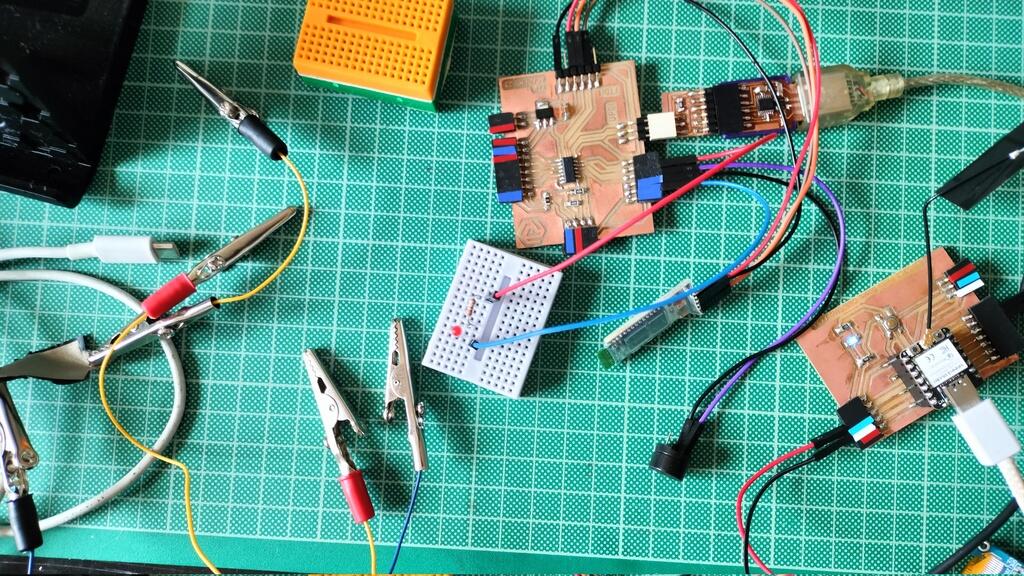
For these tests I will be using the board I designed a few weeks back and that is based on the Adrianino.
I will be adding a HC-06 Bluetooth module for wireless network communications.
For fun, I will be adding a piezo buzzer and a LED and make the ATtiny 1614 play the Super Mario Bros Theme song.
So, let's get to it...
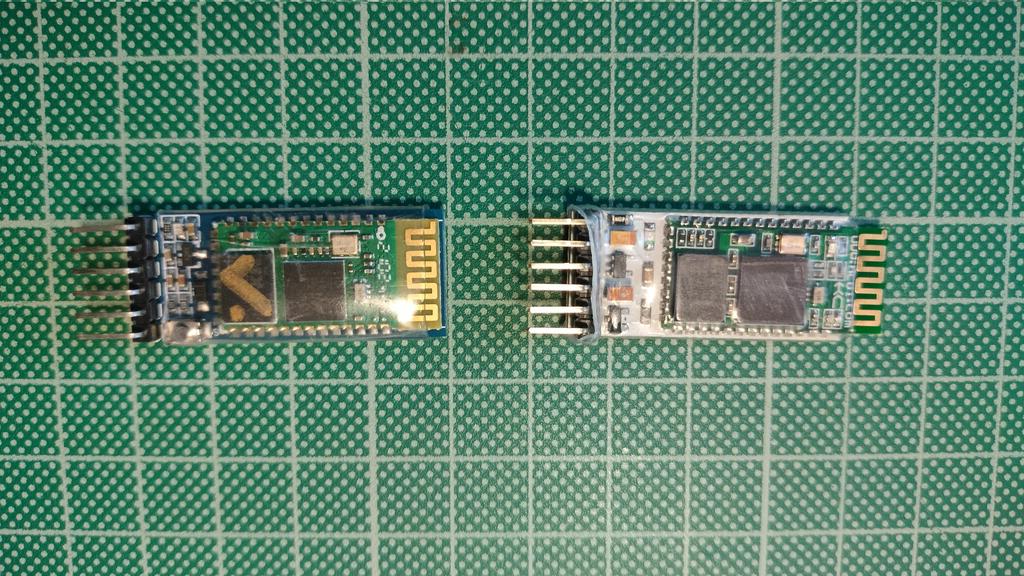
So what's a HC-06 Bluetooth module?
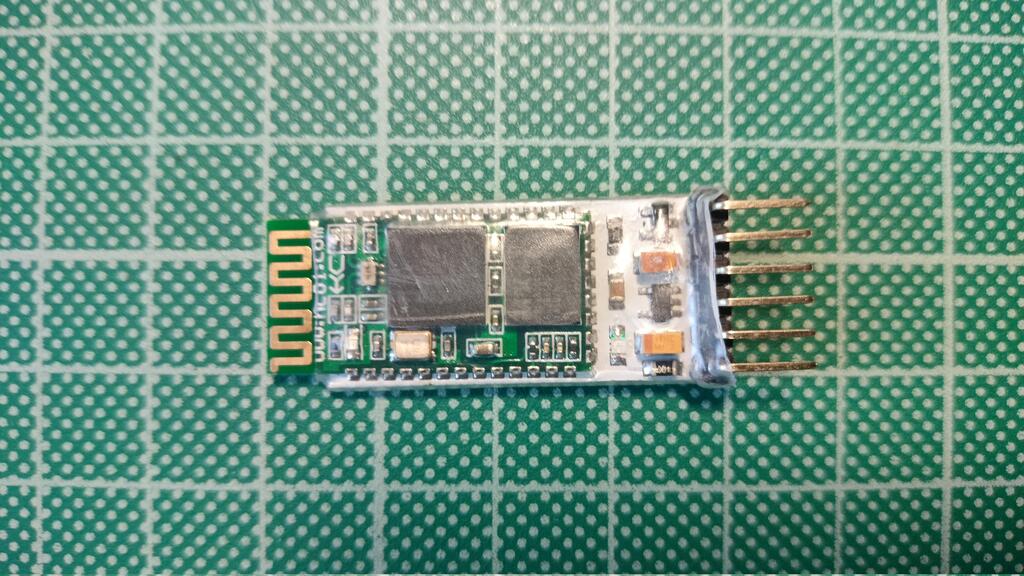
Just like the Bluetooth name implies it's a device to communicate with another device over a wireless network.
The HC-06 bluetooth module is a worker bluetooth module. A worker module means that it can receive serial data when serial data is sent out from a Controller bluetooth device, that is a device able to send serial data through.
When the HC-06 receives the data, the data is sent via the serial interface exactly at is received.
One example of a Controller bluetooth device would be the HC-05 bluetooth module.
I'm going to be using an app on an old tablet and on my mobile phone to send an input to the module which will receive it and then transfer these commands to the ATtiny1614.
The sending and receiving of data can be achieved over a distance of 10 meters.
The HC-06 has a standard 2 pin UART connection (Tx & Rx) which makes it very easy to connect to a microcontroller.
The module can be powered by 3.3V or 5V.
On the Adrián Torres Fab Academy site there is some documentation on the HC-05 module.
Here is a comparison:
| HC-05 | HC-06 |
|---|---|
| Low operating voltage: 3.3~6V (Typically +5V) | Low operating voltage: 3.3~6V (Typically +5V) |
| Frequency: 2.45 GHz | Frequency: 2.45 GHz |
| Built-in antenna | Built-in antenna |
| Range: 100m | Range: 100m |
| Operating Current: 30mA | Operating Current: 30mA |
| Follows IEEE 802.15.1 standardized protocol | Uses Frequency-Hopping Spread Spectrum (FHSS) |
| Can operate in Controller, worker, or Controller/worker mode | Can only operate in worker mode |
| Default baud rate: 9600 | Default baud rate: 9600 |
| HC-05 module can either be a master or slave | HC-06 module can only be a slave |
| It has a push button | It does not have a push button |
The basic difference between the modules is that the HC-05 can be configured in Controller, worker and Loopback modes, and the HC-06 only in worker mode.
Controller Mode: The module can connect to other bluetooth devices.
worker Mode: The module only receives connections from other bluetooth devices.
Setting up the HC-06
To use the HC-06 we first need to configure it and there are multiple ways to do it.
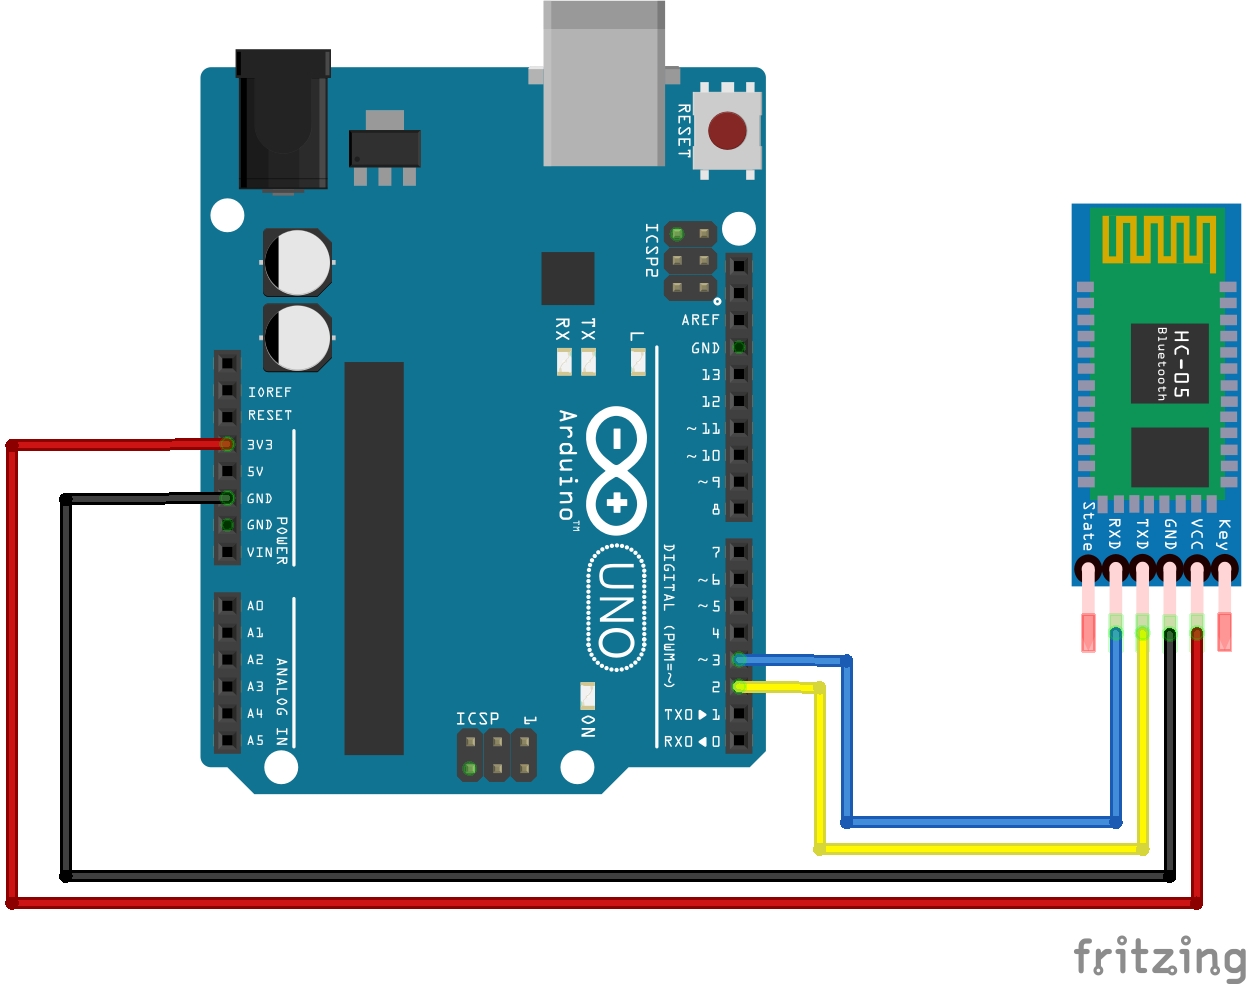
I will be using an Arduino Uno Board to do it.

It would be more difficult to do it with the ATtiny1614 board because I would need to use the FTDI pins to Power up and receive responses, and but it would be difficult to connect the Bluetooth module.
The connection is simple: 5V to Vcc, GND to GND, Pin 2 to TXD and Pin 3 to RX
The Arduino needs a sketch to communicate with the bluetooth module:
#include <SoftwareSerial.h>

SoftwareSerial hc06(2,3);

void setup(){
    //Initialize Serial Monitor
    Serial.begin(9600);
    Serial.println("ENTER AT Commands:");
    //Initialize Bluetooth Serial Port
    hc06.begin(9600);
}

void loop(){
    //Write data from HC06 to Serial Monitor
    if (hc06.available()){
    Serial.write(hc06.read());
    }

    //Write from Serial Monitor to HC06
    if (Serial.available()){
    hc06.write(Serial.read());
    }
}
Now I opened the Arduino IDE and its serial monitor, selected "Both NL and CR" so that I could send commands to the HC-06 module.
The AT commands mode is used to change the default settings of the HC-06 bluetooth module.
I can change parameters like the module name, password, baud rate.
The commands are the following:
AT+NAME -> Name for the module/device
AT+PSWD -> Password
AT+UART -> Communication speed.
Because I'm using the HC-06 module, I can only use the AT+NAME and AT+PSWD commands.
When finishing the configuration, one last command is needed, the RESET command.
Now we can connect it to our ATtiny 1614 board.
I will also connect the Buzzer and the LED.
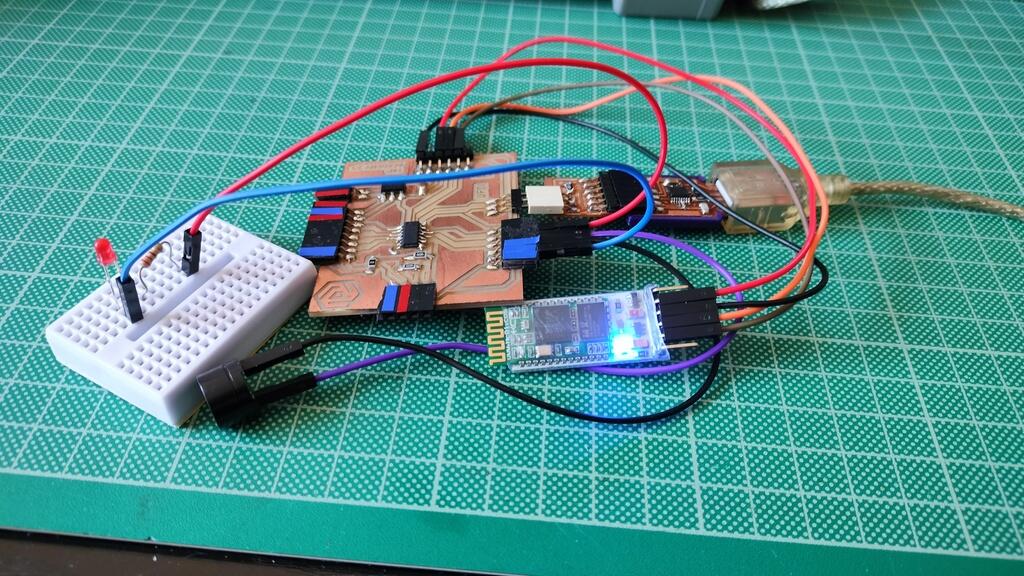
The bluetooth model connects to the FTDI pins. The buzzer to pin 8 and the LED to pin 9.
We will be powering the board via the UPDI pins.
Here is the connection schematics:

And here is the code I will be using:
/*
Bluetooth Melody
*/
#include "pitches.h"
#define BUZZER_PIN 8
#define LED 9

int melody[] = {
NOTE_E5, NOTE_E5, REST, NOTE_E5, REST, NOTE_C5, NOTE_E5,
NOTE_G5, REST, NOTE_G4, REST,
NOTE_C5, NOTE_G4, REST, NOTE_E4,
NOTE_A4, NOTE_B4, NOTE_AS4, NOTE_A4,
NOTE_G4, NOTE_E5, NOTE_G5, NOTE_A5, NOTE_F5, NOTE_G5,
REST, NOTE_E5,NOTE_C5, NOTE_D5, NOTE_B4,
NOTE_C5, NOTE_G4, REST, NOTE_E4,
NOTE_A4, NOTE_B4, NOTE_AS4, NOTE_A4,
NOTE_G4, NOTE_E5, NOTE_G5, NOTE_A5, NOTE_F5, NOTE_G5,
REST, NOTE_E5,NOTE_C5, NOTE_D5, NOTE_B4,

// Game over sound
NOTE_C5, NOTE_G4, NOTE_E4,
NOTE_A4, NOTE_B4, NOTE_A4, NOTE_GS4, NOTE_AS4, NOTE_GS4,
NOTE_G4, NOTE_D4, NOTE_E4
};

int durations[] = {
8, 8, 8, 8, 8, 8, 8,
4, 4, 8, 4,
4, 8, 4, 4,
4, 4, 8, 4,
8, 8, 8, 4, 8, 8,
8, 4,8, 8, 4,
4, 8, 4, 4,
4, 4, 8, 4,
8, 8, 8, 4, 8, 8,
8, 4,8, 8, 4,

//game over sound
4, 4, 4,
8, 8, 8, 8, 8, 8,
8, 8, 2
};

int option;

void setup(){
    Serial.begin(9600);
    pinMode(BUZZER_PIN, OUTPUT);
    pinMode(LED, OUTPUT);
}


void loop() {
    if (Serial.available()>0){
        char option = Serial.read();
        Serial.println("Playing Super Mario");
        if ((option = '1')) {
            int size = sizeof(durations) / sizeof(int);
            digitalWrite(LED, HIGH);
            delay(100);
            for (int note = 0; note < size; note++) {
                int duration = 1000 / durations[note];
                tone(BUZZER_PIN, melody[note], duration);
                int pauseBetweenNotes = duration * 1.30;
                delay(pauseBetweenNotes);
                noTone(BUZZER_PIN);
                digitalWrite(LED, LOW);
            }
        }
    }
}
After uploading the code the board will wait for a connection.
If a connection is established and the controller device sends a 1, the board will start playing the Super Mario Theme and reply via Serial.print with a "Playing Super Mario"
I will be using a tablet with the app Bluetooth Terminal HC-05 to connect to the bluetooth module and board:
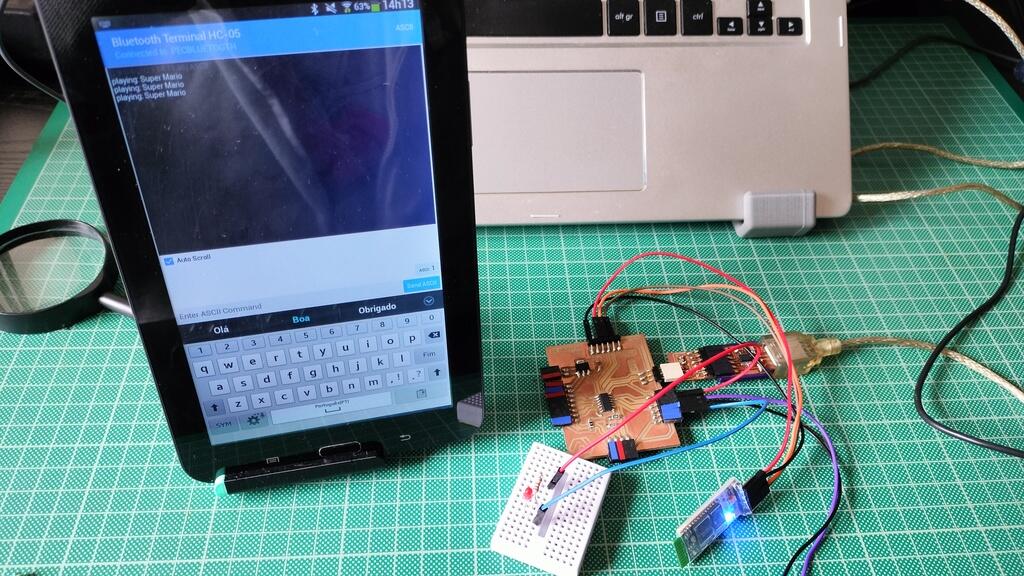
Here is a short video showing the connection and messages:
XIAO ESP32-C3 BLE network:
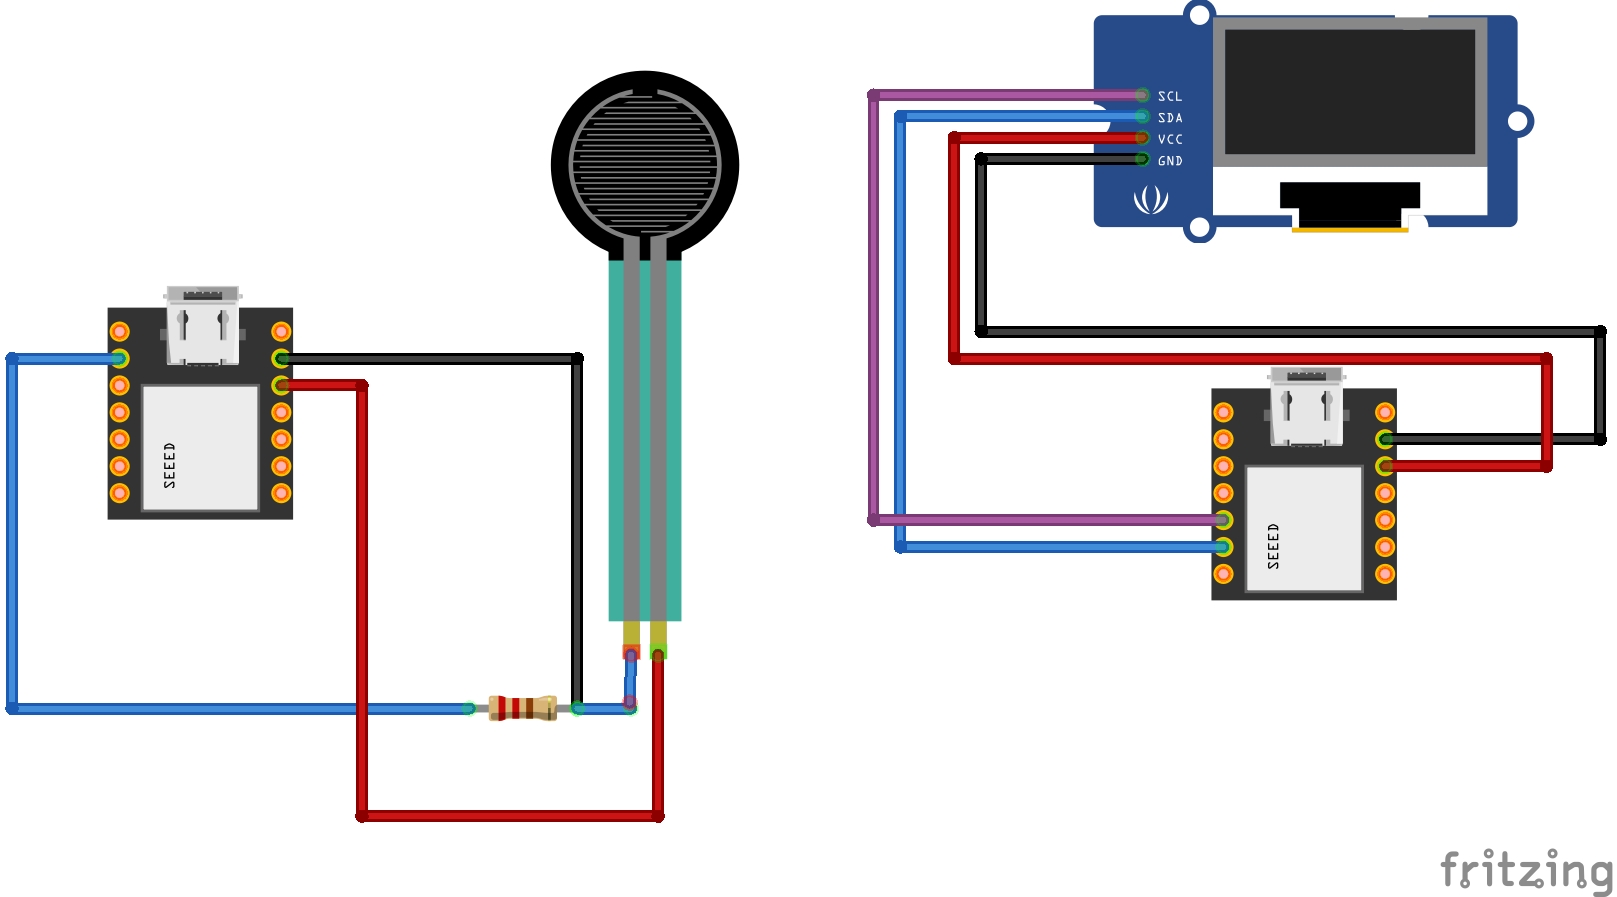
Next I will connect two XIAO ESP32-C3 via Bluetooth Low Energy.
One will act as a server and have Force Sensitive Sensor connected. The other will act as a client and have an OLED display connected.
When it comes to ESP32-C3 BLE, communication data is structured using a profile known as GATT (Generic Attributes).
Two crucial protocols for BLE device communication are GAP and GATT. GAP, which stands for Generic Access Profile, is responsible for managing connections and advertising (making a device visible and available for connection) in Bluetooth. On the other hand, GATT, which stands for Generic Attribute Profile, outlines how two Bluetooth Low Energy devices exchange data, utilizing concepts such as Services and Characteristics.
Here is the connection schematic:
First I'll make a XIAO ESP32 Scan for other devices:
#include <BLEDevice.h>
#include <BLEUtils.h>
#include <BLEScan.h>
#include <BLEAdvertisedDevice.h>

int scanTime = 5; //In seconds
BLEScan* pBLEScan;

class MyAdvertisedDeviceCallbacks: public BLEAdvertisedDeviceCallbacks {
    void onResult(BLEAdvertisedDevice advertisedDevice) {
        Serial.printf("Advertised Device: %s \n", advertisedDevice.toString().c_str());
    }
};

void setup() {
    Serial.begin(115200);
    Serial.println("Scanning...");

    BLEDevice::init("");
    pBLEScan = BLEDevice::getScan(); //create new scan
    pBLEScan->setAdvertisedDeviceCallbacks(new MyAdvertisedDeviceCallbacks());
    pBLEScan->setActiveScan(true); //active scan uses more power, but get results faster
    pBLEScan->setInterval(100);
    pBLEScan->setWindow(99);  // less or equal setInterval value
}

void loop() {
    // put your main code here, to run repeatedly:
    BLEScanResults foundDevices = pBLEScan->start(scanTime, false);
    Serial.print("Devices found: ");
    Serial.println(foundDevices.getCount());
    Serial.println("Scan done!");
    pBLEScan->clearResults();   // delete results fromBLEScan buffer to release memory
    delay(2000);
}
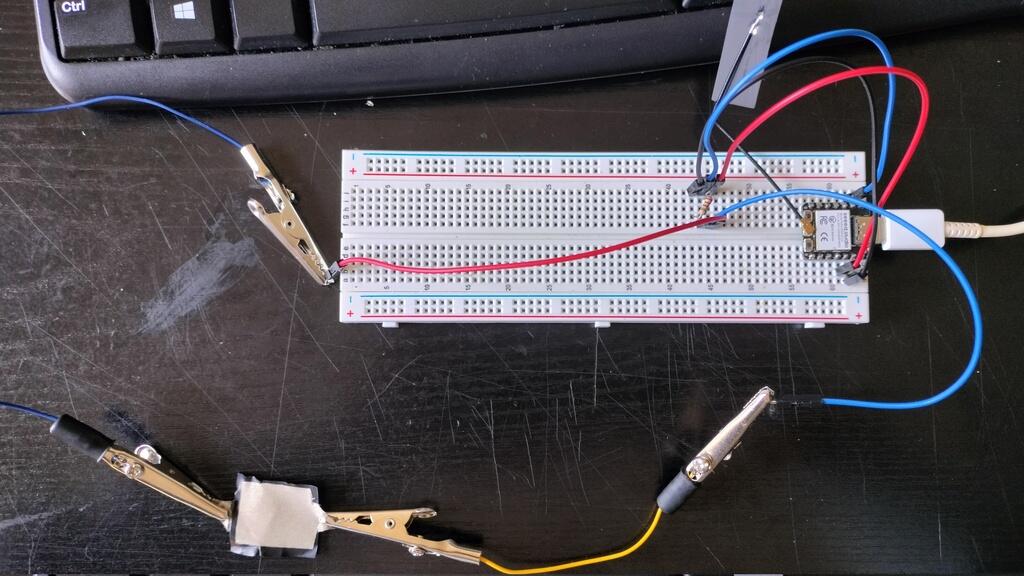
So that worked fine, so the next step was to make a velostat sensor by placing a sheet of velostat between two flexible conductive materials:

I also isolated the sensor with tape:
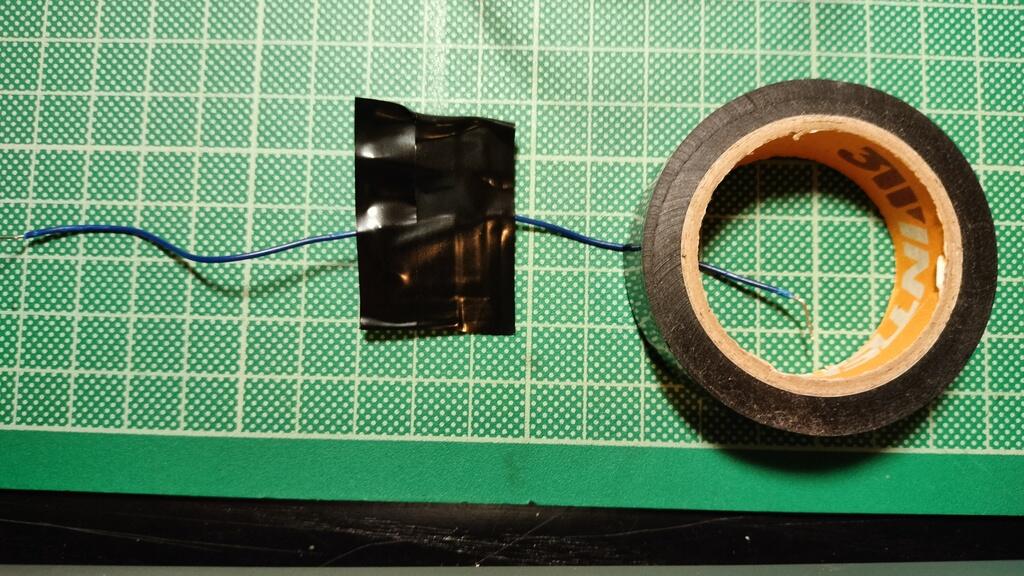
Lastly, using a couple of crocodile connectors:
Now the code for the server:
/*********
Pedro Candeias - Force. temperature, humidity sensor board.
Based on Rui Santos Sketch and taken from  https://RandomNerdTutorials.com/esp32-ble-server-client/
*********/

#include <BLEDevice.h>
#include <BLEServer.h>
#include <BLEUtils.h>
#include <BLE2902.h>

//BLE server name
#define bleServerName "FTH Sensor"


// Force Sensitive Sensor
int fsPinFront = 3;
int fsReadingFront;

// Timer variables
unsigned long lastTime = 0;
unsigned long timerDelay = 10000;

bool deviceConnected = false;

// Get UUID's from https://www.uuidgenerator.net/
#define SERVICE_UUID "91bad492-b950-4226-aa2b-4ede9fa42f59"

// Force Front Characteristic and Descriptor
BLECharacteristic fthForceFrontCharacteristics("78354994-85b4-4fd9-8111-041dcda92e01", BLECharacteristic::PROPERTY_NOTIFY);
BLEDescriptor fthForceFrontDescriptor(BLEUUID((uint16_t)0x2902));

//Setup callbacks onConnect and onDisconnect
class MyServerCallbacks: public BLEServerCallbacks {
    void onConnect(BLEServer* pServer) {
    deviceConnected = true;
    };
    void onDisconnect(BLEServer* pServer) {
    deviceConnected = false;
    }
};


void setup() {
    // Start serial communication
    Serial.begin(115200);

    // Init BME Sensor
    // initBME();

    // Create the BLE Device
    BLEDevice::init(bleServerName);

    // Create the BLE Server
    BLEServer *pServer = BLEDevice::createServer();
    pServer->setCallbacks(new MyServerCallbacks());

    // Create the BLE Service
    BLEService *fthService = pServer->createService(SERVICE_UUID);

    // Create BLE Characteristics and Create a BLE Descriptor

    // Force
    fthService->addCharacteristic(&fthForceFrontCharacteristics);
    fthForceFrontDescriptor.setValue("Force");
    fthForceFrontCharacteristics.addDescriptor(&fthForceFrontDescriptor);

    // Start the service
    fthService->start();

    // Start advertising
    BLEAdvertising *pAdvertising = BLEDevice::getAdvertising();
    pAdvertising->addServiceUUID(SERVICE_UUID);
    pServer->getAdvertising()->start();
    Serial.println("Waiting a client connection to notify...");
}

void loop() {
    if (deviceConnected) {

        if ((millis() - lastTime) > timerDelay) {

            fsReadingFront = analogRead(fsPinFront);

            //Set Force Front Characteristic value and notify connected client
            static char forceFrontChar[2];
            dtostrf(fsReadingFront, 2, 0, forceFrontChar);
            fthForceFrontCharacteristics.setValue(forceFrontChar);
            fthForceFrontCharacteristics.notify();
            Serial.print("normal output:");
            Serial.println(fsReadingFront);
            Serial.print("char output:");
            Serial.println(forceFrontChar);

            lastTime = millis();
        }
    }
}
So what the code does is create services and advertise them.
After a connection to the device is detected, it notifies the client of the values.
It's pretty straight forward. I have two "serial.prints" that I'm using as a control to verify that the value is the same. I will delete this part if the code is moved to production.
Now here is the code for the client:
/*********
Pedro Candeias
Based on a sketch by Rui Santos from https://RandomNerdTutorials.com/esp32-ble-server-client/
*********/

#include "BLEDevice.h"
#include <Wire.h>
#include <Adafruit_SSD1306.h>
#include <Adafruit_GFX.h>

//BLE Server name (the other ESP32 name running the server sketch)
#define bleServerName "FTH Sensor"

/* UUID's of the service, characteristic that we want to read*/
// BLE Service
static BLEUUID fthServiceUUID("91bad492-b950-4226-aa2b-4ede9fa42f59");

// BLE Characteristics

// Force Characteristic
static BLEUUID forceFrontCharacteristicUUID("78354994-85b4-4fd9-8111-041dcda92e01");

//Flags stating if should begin connecting and if the connection is up
static boolean doConnect = false;
static boolean connected = false;

//Address of the peripheral device. Address will be found during scanning...
static BLEAddress *pServerAddress;

//Characteristicd that we want to read
static BLERemoteCharacteristic* forceFrontCharacteristic;

//Activate notify
const uint8_t notificationOn[] = {0x1, 0x0};
const uint8_t notificationOff[] = {0x0, 0x0};

#define SCREEN_WIDTH 128 // OLED display width, in pixels
#define SCREEN_HEIGHT 64 // OLED display height, in pixels

//Declaration for an SSD1306 display connected to I2C (SDA, SCL pins)
Adafruit_SSD1306 display(SCREEN_WIDTH, SCREEN_HEIGHT, &Wire, -1);
#define bitmap_height   128
#define bitmap_width    64
static const unsigned char PROGMEM bitmap[] =
0xf8, 0x00, 0x00, 0x00, 0x00, 0x00, 0x00, 0x0f, 0xf0, 0x00, 0x00, 0x00, 0x00, 0x00, 0x00, 0x0f,
{ 0xf8, 0x00, 0x00, 0x00, 0x00, 0x00, 0x00, 0x03, 0xe0, 0x00, 0x00, 0x00, 0x00, 0x00, 0x00, 0x0f,
    0xf8, 0x00, 0x00, 0x00, 0x00, 0x00, 0x3f, 0x0f, 0xf8, 0x7c, 0x00, 0x00, 0x00, 0x00, 0x00, 0x0f,
    0xf8, 0x00, 0x00, 0x00, 0x00, 0x00, 0x7f, 0x9f, 0xfc, 0xfe, 0x00, 0x00, 0x00, 0x00, 0x00, 0x0f,
    0xf8, 0x00, 0x00, 0x00, 0x00, 0x00, 0xff, 0xdf, 0xfd, 0xff, 0x00, 0x00, 0x00, 0x00, 0x00, 0x0f,
    0xf8, 0x00, 0x00, 0x00, 0x00, 0x00, 0xff, 0x9f, 0xfd, 0xff, 0x00, 0x00, 0x00, 0x00, 0x00, 0x0f,
    0xf8, 0x00, 0x00, 0x00, 0x00, 0x00, 0xff, 0xdf, 0xfd, 0xff, 0x00, 0x00, 0x00, 0x00, 0x00, 0x0f,
    0xf8, 0x00, 0x00, 0x00, 0x00, 0x7c, 0x7f, 0xdf, 0xfd, 0xff, 0x08, 0x00, 0x00, 0x00, 0x00, 0x0f,
    0xf8, 0x00, 0x00, 0x00, 0x00, 0xfe, 0x7f, 0xdf, 0xf9, 0xff, 0x3e, 0x00, 0x00, 0x00, 0x00, 0x0f,
    0xf8, 0x00, 0x00, 0x00, 0x00, 0xff, 0x7f, 0xcf, 0xf9, 0xfe, 0x7f, 0x00, 0x00, 0x00, 0x00, 0x0f,
    0xf8, 0x00, 0x00, 0x00, 0x00, 0xff, 0x3f, 0xcf, 0xf9, 0xfe, 0x7f, 0x80, 0x00, 0x00, 0x00, 0x0f,
    0xf8, 0x00, 0x00, 0x00, 0x00, 0xff, 0xbf, 0xef, 0xf9, 0xfe, 0xff, 0x80, 0x00, 0x00, 0x00, 0x0f,
    0xf8, 0x00, 0x00, 0x00, 0x00, 0xff, 0x9f, 0xef, 0xfb, 0xfc, 0xff, 0x80, 0x00, 0x00, 0x00, 0x0f,
    0xf8, 0x00, 0x00, 0x00, 0x00, 0xff, 0xdf, 0xef, 0xfb, 0xfd, 0xff, 0x00, 0x00, 0x00, 0x00, 0x0f,
    0xf8, 0x00, 0x00, 0x00, 0x04, 0x7f, 0xcf, 0xef, 0xfb, 0xf9, 0xff, 0x00, 0x00, 0x00, 0x00, 0x0f,
    0xf8, 0x00, 0x00, 0x00, 0x1f, 0x3f, 0xef, 0xe7, 0xf3, 0xfb, 0xfe, 0x78, 0x00, 0x00, 0x00, 0x0f,
    0xf8, 0x00, 0x00, 0x00, 0x1f, 0x9f, 0xef, 0xe7, 0xf3, 0xf3, 0xfc, 0xf8, 0x00, 0x00, 0x00, 0x0f,
    0xf8, 0x00, 0x00, 0x00, 0x3f, 0xdf, 0xe7, 0xf7, 0xf3, 0xf7, 0xfd, 0xf8, 0x00, 0x00, 0x00, 0x0f,
    0xf8, 0x00, 0x00, 0x00, 0x3f, 0xcf, 0xf7, 0xf7, 0xf7, 0xf7, 0xfb, 0xf8, 0x00, 0x00, 0x00, 0x0f,
    0xf8, 0x00, 0x00, 0x00, 0x1f, 0xe7, 0xf3, 0xf7, 0xf7, 0xe7, 0xf7, 0xf8, 0x00, 0x00, 0x00, 0x0f,
    0xf8, 0x00, 0x00, 0x00, 0x0f, 0xf3, 0xfb, 0xf7, 0xf7, 0xef, 0xe7, 0xf0, 0x00, 0x00, 0x00, 0x0f,
    0xf8, 0x00, 0x00, 0x00, 0x07, 0xfb, 0xf9, 0xf7, 0xf7, 0xcf, 0xcf, 0xe0, 0x00, 0x00, 0x00, 0x0f,
    0xf8, 0x00, 0x00, 0x00, 0x03, 0xfd, 0xfd, 0xf3, 0xe7, 0xdf, 0xdf, 0xc0, 0x00, 0x00, 0x00, 0x0f,
    0xf8, 0x00, 0x00, 0x00, 0x01, 0xfc, 0xfd, 0xfb, 0xef, 0x9f, 0xbf, 0x00, 0x00, 0x00, 0x00, 0x0f,
    0xf8, 0x00, 0x00, 0x00, 0x00, 0x7e, 0x7e, 0xfb, 0xef, 0xbf, 0x3e, 0x00, 0x00, 0x00, 0x00, 0x0f,
    0xf8, 0x00, 0x00, 0x00, 0x00, 0x3f, 0x3e, 0xfb, 0xef, 0x3e, 0x7c, 0x00, 0x00, 0x00, 0x00, 0x0f,
    0xf8, 0x00, 0x00, 0x00, 0x00, 0x1f, 0xbf, 0x7b, 0xef, 0x7e, 0xf8, 0x00, 0x00, 0x00, 0x00, 0x0f,
    0xf8, 0x00, 0x00, 0x00, 0x00, 0x0f, 0xdf, 0x7b, 0xef, 0x7d, 0xf0, 0x00, 0x00, 0x00, 0x00, 0x0f,
    0xf8, 0x00, 0x00, 0x00, 0x00, 0x07, 0xcf, 0x3b, 0xee, 0x7b, 0xe0, 0x00, 0x00, 0x00, 0x00, 0x0f,
    0xf8, 0x00, 0x00, 0x00, 0x00, 0x03, 0xe7, 0xb9, 0xde, 0xf3, 0xc0, 0x00, 0x00, 0x00, 0x00, 0x0f,
    0xf8, 0x00, 0x00, 0x00, 0x00, 0x01, 0xf7, 0xb9, 0x5c, 0xf7, 0x00, 0x00, 0x00, 0x00, 0x00, 0x0f,
    0xf8, 0x00, 0x00, 0x00, 0x00, 0x00, 0x7b, 0xd0, 0x0d, 0xee, 0x00, 0x00, 0x00, 0x00, 0x00, 0x0f,
    0xf8, 0x00, 0x00, 0x00, 0x00, 0x00, 0x39, 0xc7, 0xf1, 0xdc, 0x00, 0x00, 0x00, 0x00, 0x00, 0x0f,
    0xf8, 0x00, 0x00, 0x00, 0x00, 0x00, 0x1c, 0x9f, 0xfd, 0xb8, 0x00, 0x00, 0x00, 0x00, 0x00, 0x0f,
    0xf8, 0x00, 0x00, 0x00, 0x00, 0x00, 0x0e, 0x3f, 0xfe, 0x30, 0x00, 0x00, 0x00, 0x00, 0x00, 0x0f,
    0xf8, 0x00, 0x00, 0x00, 0x00, 0x00, 0x07, 0x3f, 0xfe, 0x60, 0x00, 0x00, 0x00, 0x00, 0x00, 0x0f,
    0xf8, 0x00, 0x00, 0x00, 0x00, 0x00, 0x0b, 0x7f, 0xff, 0x10, 0x00, 0x00, 0x00, 0x00, 0x00, 0x0f,
    0xf8, 0x00, 0x00, 0x00, 0x00, 0x00, 0x0c, 0x7f, 0xff, 0x30, 0x00, 0x00, 0x00, 0x00, 0x00, 0x0f,
    0xf8, 0x00, 0x00, 0x00, 0x00, 0x00, 0x06, 0x7f, 0xfe, 0x60, 0x00, 0x00, 0x00, 0x00, 0x00, 0x0f,
    0xf8, 0x00, 0x00, 0x00, 0x00, 0x00, 0x07, 0x3f, 0xfc, 0xe0, 0x00, 0x00, 0x00, 0x00, 0x00, 0x0f,
    0xf8, 0x00, 0x00, 0x00, 0x00, 0x00, 0x03, 0x9f, 0xf9, 0xc0, 0x00, 0x00, 0x00, 0x00, 0x00, 0x0f,
    0xf8, 0x00, 0x00, 0x00, 0x00, 0x00, 0x00, 0x4f, 0xf2, 0x00, 0x00, 0x00, 0x00, 0x00, 0x00, 0x0f,
    0xf8, 0x00, 0x00, 0x00, 0x00, 0x00, 0x00, 0x07, 0xc0, 0x00, 0x00, 0x00, 0x00, 0x00, 0x00, 0x0f,
    0xf8, 0x00, 0x00, 0x00, 0x00, 0x00, 0x00, 0x01, 0x80, 0x00, 0x00, 0x00, 0x00, 0x00, 0x00, 0x0f,
    0xf8, 0x00, 0x00, 0x00, 0x00, 0x00, 0x00, 0x00, 0x00, 0x00, 0x00, 0x00, 0x00, 0x00, 0x00, 0x0f,
    0xf8, 0x00, 0x00, 0x00, 0x00, 0x00, 0x00, 0x00, 0x00, 0x00, 0x00, 0x00, 0x00, 0x00, 0x00, 0x0f,
    0xff, 0xf3, 0x0c, 0x6f, 0xc0, 0xc0, 0x60, 0x63, 0x0c, 0x19, 0x80, 0x7c, 0xc0, 0xc6, 0x18, 0x3f,
    0xff, 0xf3, 0x8c, 0xcf, 0xc0, 0xe0, 0x66, 0x63, 0x8c, 0x1b, 0x80, 0x7e, 0xcc, 0xc7, 0x18, 0x3f,
    0xf9, 0x87, 0x8d, 0x8c, 0x00, 0xa0, 0x66, 0x67, 0x8c, 0x1f, 0x00, 0x66, 0xcc, 0xcf, 0x18, 0x3f,
    0xf9, 0x86, 0x8f, 0x0f, 0x81, 0xb0, 0x67, 0x66, 0xcc, 0x1e, 0x00, 0x66, 0xce, 0xcd, 0x98, 0x3f,
    0xf9, 0x8c, 0xcf, 0x0f, 0x81, 0x30, 0x2f, 0x44, 0xcc, 0x1e, 0x00, 0x7e, 0x7e, 0x89, 0x98, 0x3f,
    0xf9, 0x8f, 0xcd, 0x8c, 0x03, 0xf8, 0x39, 0xcf, 0xcc, 0x1f, 0x00, 0x78, 0x73, 0x9f, 0x98, 0x3f,
    0xf9, 0x8f, 0xec, 0xcc, 0x03, 0xf8, 0x39, 0xcf, 0xec, 0x1b, 0x80, 0x60, 0x73, 0x9f, 0xd8, 0x2f,
    0xf9, 0x98, 0x6c, 0x6f, 0xc3, 0x18, 0x19, 0x98, 0x6f, 0xd9, 0x98, 0x60, 0x33, 0x90, 0xdf, 0xbf,
    0xf8, 0x00, 0x00, 0x00, 0x00, 0x00, 0x00, 0x00, 0x00, 0x00, 0x18, 0x00, 0x00, 0x00, 0x00, 0x0f,
    0xf8, 0x00, 0x00, 0x00, 0x00, 0x00, 0x00, 0x00, 0x00, 0x00, 0x10, 0x00, 0x00, 0x00, 0x00, 0x0f,
    0xf8, 0x04, 0x00, 0x00, 0x03, 0x00, 0x10, 0x00, 0x00, 0x00, 0x00, 0x00, 0x50, 0x80, 0x00, 0x0f,
    0xf8, 0x0a, 0x00, 0x00, 0x04, 0x20, 0x00, 0x20, 0x40, 0x00, 0x00, 0x40, 0x44, 0x00, 0x08, 0x0f,
    0xf8, 0x08, 0x6b, 0xa4, 0x77, 0x21, 0xd7, 0x38, 0x4c, 0xf8, 0xcc, 0x43, 0xd6, 0x9d, 0xe8, 0x0f,
    0xf8, 0x09, 0x68, 0xa0, 0x94, 0x18, 0x54, 0xa0, 0x42, 0xa5, 0x20, 0x7a, 0x54, 0xa5, 0x20, 0x0f,
    0xf8, 0x09, 0x8a, 0x88, 0x94, 0x05, 0x54, 0xa0, 0x5a, 0x85, 0xc4, 0x42, 0x54, 0xa1, 0x20, 0x0f,
    0xf8, 0x09, 0x92, 0x98, 0x94, 0x04, 0x54, 0xa0, 0x52, 0x85, 0x00, 0x42, 0x54, 0x85, 0x28, 0x0f,
    0xf8, 0x08, 0x00, 0x10, 0x00, 0x10, 0x00, 0x00, 0x80, 0x00, 0x00, 0x00, 0x00, 0x00, 0x08, 0x0f,
    0xf8, 0x04, 0x00, 0x30, 0x00, 0x00, 0x00, 0x00, 0x00, 0x00, 0x00, 0x00, 0x00, 0x00, 0x10, 0x0f
};

char* forceFrontChar;

//Flags to check whether new temperature and humidity readings are available
boolean newForceFront = false;

//Connect to the BLE Server that has the name, Service, and Characteristics
bool connectToServer(BLEAddress pAddress) {
BLEClient* pClient = BLEDevice::createClient();

// Connect to the remove BLE Server.
pClient->connect(pAddress);
Serial.println(" - Connected to server");

// Obtain a reference to the service we are after in the remote BLE server.
BLERemoteService* pRemoteService = pClient->getService(fthServiceUUID);
if (pRemoteService == nullptr) {
    Serial.print("Failed to find our service UUID: ");
    Serial.println(fthServiceUUID.toString().c_str());
    return (false);
}

// Obtain a reference to the characteristics in the service of the remote BLE server.
forceFrontCharacteristic = pRemoteService->getCharacteristic(forceFrontCharacteristicUUID);

if ( forceFrontCharacteristic == nullptr) {
    Serial.print("Failed to find characteristic UUID");
    return false;
}
Serial.println(" - Found characteristics");

//Assign callback functions for the Characteristics
forceFrontCharacteristic->registerForNotify(forceFrontNotifyCallback);

return true;
}

//Callback function that gets called, when another device's advertisement has been received
class fthAdvertisedDeviceCallbacks: public BLEAdvertisedDeviceCallbacks {
    void onResult(BLEAdvertisedDevice advertisedDevice) {
        if (advertisedDevice.getName() == bleServerName) { //Check if the name of the advertiser matches
            advertisedDevice.getScan()->stop(); //Scan can be stopped, we found what we are looking for
            pServerAddress = new BLEAddress(advertisedDevice.getAddress()); //Address of advertiser is the one we need
            doConnect = true; //Set indicator, stating that we are ready to connect
            Serial.println("Device found. Connecting!");
        }
    }
};

// BLE Server sends a new Force Front reading with the notify property
static void forceFrontNotifyCallback(BLERemoteCharacteristic* pBLERemoteCharacteristic, uint8_t* pData, size_t length, bool isNotify) {
    //store Force Front value
    forceFrontChar = (char*)pData;
    newForceFront = true;
}

//function that prints the latest sensor readings in the OLED display
void printReadings(){

    display.clearDisplay();

    // display Force Front
    display.setTextSize(1);
    char* forceFrontChar;

    //Flags to check whether new temperature and humidity readings are available
    boolean newForceFront = false;

    //Connect to the BLE Server that has the name, Service, and Characteristics
    bool connectToServer(BLEAddress pAddress) {
    BLEClient* pClient = BLEDevice::createClient();

    // Connect to the remove BLE Server.
    pClient->connect(pAddress);
    Serial.println(" - Connected to server");

    // Obtain a reference to the service we are after in the remote BLE server.
    BLERemoteService* pRemoteService = pClient->getService(fthServiceUUID);
    if (pRemoteService == nullptr) {
        Serial.print("Failed to find our service UUID: ");
        Serial.println(fthServiceUUID.toString().c_str());
        return (false);
    }

    // Obtain a reference to the characteristics in the service of the remote BLE server.
    forceFrontCharacteristic = pRemoteService->getCharacteristic(forceFrontCharacteristicUUID);

    if ( forceFrontCharacteristic == nullptr) {
        Serial.print("Failed to find characteristic UUID");
        return false;
    }
    Serial.println(" - Found characteristics");

    //Assign callback functions for the Characteristics
    forceFrontCharacteristic->registerForNotify(forceFrontNotifyCallback);

    return true
    display.setCursor(0,0);
    display.print("Force Front: ");
    display.setTextSize(1);
    display.setCursor(80,0);
    display.print(forceFrontChar);
    display.setTextSize(2);
        display.setCursor(0,10);
    if (atoi(forceFrontChar) <= 100){
        display.print("Hard");
    } else if (atoi(forceFrontChar) < 400) {
        display.print("High");
    } else if (atoi(forceFrontChar) < 500) {
        display.print("Normal");
    } else if (atoi(forceFrontChar) < 800) {
        display.print("Light" );
    } else {
        display.print("No pressure");
    }
    display.display();
    Serial.print("Force Front:");
    Serial.println(forceFrontChar);
}

void setup() {
    //OLED display setup
    // SSD1306_SWITCHCAPVCC = generate display voltage from 3.3V internally
    if(!display.begin(SSD1306_SWITCHCAPVCC, 0x3C)) { // Address 0x3C for 128x32
        Serial.println(F("SSD1306 allocation failed"));
        for(;;); // Don't proceed, loop forever
    }
    display.clearDisplay();
    display.drawBitmap(0, 0, bitmap, bitmap_height, bitmap_width, WHITE);
    display.display();
    delay(2000);
    display.clearDisplay();
    display.setTextSize(2);
    display.setTextColor(WHITE,0);
    display.setCursor(0,25);
    display.print("Connecting ...");
    display.display();
    //Start serial communication
    Serial.begin(115200);
    Serial.println("Starting BLE Client application...");

    //Init BLE device
    BLEDevice::init("");

    // Retrieve a Scanner and set the callback we want to use to be informed when we
    // have detected a new device.  Specify that we want active scanning and start the
    // scan to run for 30 seconds.
    BLEScan* pBLEScan = BLEDevice::getScan();
    pBLEScan->setAdvertisedDeviceCallbacks(new fthAdvertisedDeviceCallbacks());
    pBLEScan->setActiveScan(true);
    pBLEScan->start(30);
}

void loop() {
    // If the flag "doConnect" is true then we have scanned for and found the desired
    // BLE Server with which we wish to connect.  Now we connect to it.  Once we are
    // connected we set the connected flag to be true.
    if (doConnect == true) {
        if (connectToServer(*pServerAddress)) {
        Serial.println("We are now connected to the BLE Server.");
        //Activate the Notify property of each Characteristic
        forceFrontCharacteristic->getDescriptor(BLEUUID((uint16_t)0x2902))->writeValue((uint8_t*)notificationOn, 2, true);
        connected = true;
        } else {
        Serial.println("We have failed to connect to the server; Restart your device to scan for nearby BLE server again.");
        }
        doConnect = false;
    }

    //if new force or temperature readings are available, print in the OLED
    if (newForceFront){
        newForceFront = false;
        printReadings();
    }
    delay(1000); // Delay a second between loops.
}
This code is also pretty straightforward.
I get the values from the notify service and evaluate them to determine what type of force is applied.
As the values are in pointer, I use the atoi function.
In the following video we can see the client connecting to the server and receiving values from the Force Sensitive Resistor Sensor:
And finally, the both XIAO ESP32 communicating and displaying data:
For the final project
Using a velostat made sensor and displaying the measured value on an OLED display is going to be part of my final project.
Files
Learned this week (in no special order)
- How to connect two ESP32 via BLE;
- How to create a bitmap image for the display;
- How to configure and use a HC-06 Bluetooth module;
- That it is not very easy to connect more than 1 ESP32 server to a ESP32 client.
Notes and Thoughts
Low energy bluetooth connections are very useful to distribute sensors and outputs by various microcontrollers;
Still have to try to find a way to range of values of the FSR;
Got to check out ESP-Now;
Links
- Linux hint
- ESP32 BLE client connect to multiple servers
- GATT Multiconnect
- GATT Multiconnect tutorial
- Display data on an OLED display
- Image 2 Code
- ESP32 Now
- LoRa Off-Grid Mesh Communication: Meshtastic (ESP32, BLE, GPS)
- ESP32 Server and Client
- ESP32 Bluetooh
Glossary:
- GATT: Generic Attribute
- BLE: Bluetooth low energy
- UUID: Universally Unique Identifier
- Velostat: Velostat, also known as Linqstat, is a packaging material made of a polymeric foil (polyolefins) impregnated with carbon black to make it somewhat electrically conductive.
- Bluetooth: Bluetooth is a short-range wireless technology standard that is used for exchanging data between fixed and mobile devices over short distances and building personal area networks.
- ESP-NOW:ESP-NOW is a kind of connectionless Wi-Fi communication protocol that is defined by Espressif. In ESP-NOW, application data is encapsulated in a vendor-specific action frame and then transmitted from one Wi-Fi device to another without connection. CTR with CBC-MAC Protocol(CCMP) is used to protect the action frame for security. ESP-NOW is widely used in smart light, remote controlling, sensor, etc.
Some of these definitions were generated by AI using ChatGTP.