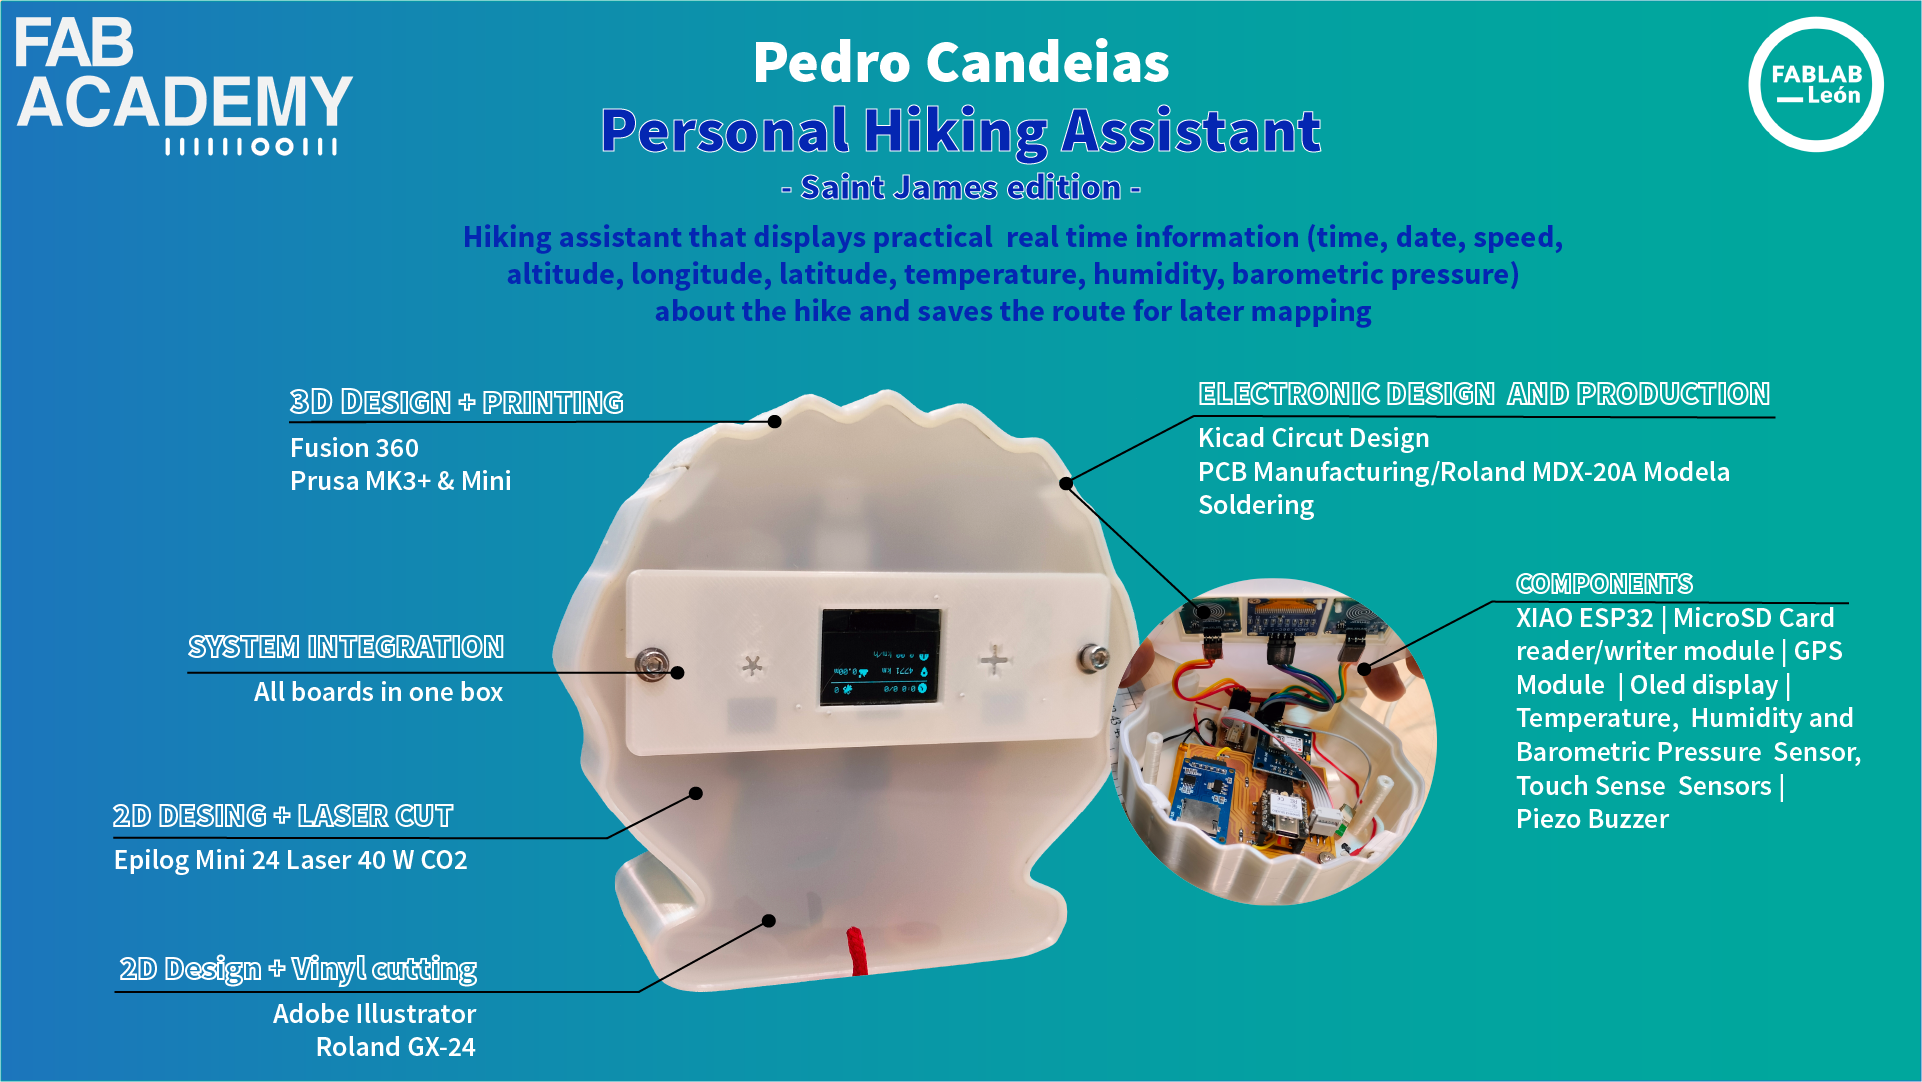
The Personal Hiking Assistant
The device is intended to enhance the pilgrimage experience of the Way of Saint James by providing essential information to the pilgrims.
It's form is of Scallop shell witch has both practical and symbolic purposes along the Camino/Caminho.
Displays real time data:
- Temperature;
- Humidity;
- Atmospheric pressure;
- Altitude;
- Distance to Santiago;
- Date and Time;
- Speed;
- Longitude;
- Latitude;
- Number os sattelites locked;
The device also includes:
- Stopwatch with pause and reset function;
- Plays a Zelda theme song when arriving in Santiago as the quest is complete;
- A GPS coordinates logger for latter mapping;
What does it do?
My invention is a handheld gadget meant to assist those on the Way of Saint James pilgrimage.
Its multifunctional attributes include displaying current time, date, GPS specifics such as satellite connection, distance to Santiago, elevation, and walking pace, and environmental information like temperature, humidity, and barometric pressure.
Additionally, it has a stopwatch feature.
The device aims to augment the pilgrimage experience by supplying pilgrims with critical data and ease of use. Furthermore, it documents the route on an SD card for subsequent mapping.
Who's done what beforehand?
There have been previous attempts to develop wearable tech and tools for hikers, trekkers, and pilgrims. Yet, the specific integration of elements and capabilities in this device could be a first of its kind in my design.
What did you design?
I've constructed a small device that blends a Xiao ESP32-C3 microcontroller, a Neo6 GPS module, a micro SD reader/writer module, a BME280 sensor, and an OLED screen. The casing is 3D printed using PLA, and to finalize the design, an acrylic component is laser cut.
Moreover, I used KiCad to mill the PCB, and soldered additional components such as pins and resistors onto it, as well as laser-cut a translucent acrylic cover.
What materials and components were used? Where did they come from? How much did they cost?
A diverse range of materials and components were employed in this design:
| # | Part | Description | Supplier | Quantity | Price | Available |
|---|---|---|---|---|---|---|
| 1 | XIAO ESP32-C3 | IoT mini development board | Mauser | 1 | 5.52€ | |
| 2 | GY-NEO6MV2 | u-blox NEO-6M GPS module with antenna and built-in EEPROM | Amazon ES | 1 | 8€ | |
| 4 | OLED 0.96" | Display 0.96", 128x64px with I2C | Mauser | 1 | 4,79€ | |
| 5 | BME280 | Barométric pressure, temperature and humidty sensor | Amazon ES | 1 | 9.14€ | |
| 6 | HW-125 | Micro SD Storage Board TF Card Reader Memory Shield Module SPI | Amazon ES | 1 | 1,70€ | |
| 7 | Piezo buzzer | -- | Fab Lab León | 1 | 0 | |
| 8 | 3D printer filament | PLA Blend Pearl White | Prusa | 1KG | 29.99€ | |
| 9 | PCB | Fab Lab León | 1 | 0 | ||
| 10 | Battery | 3.7v | Aquário | 1 | 8.80€ | |
| 11 | Switch | Adrián Torres | 1 | 0 | ||
| 12 | MicroSD Card | Amazon ES | 1 | 4.56€ | ||
| 13 | Resistors 0K Ohm | Fab Lab León | 6 | 0,10€ | ||
| 14 | Ribbon IDC 6 pins female | Fab Lab León | 1 | 0,80€ | ||
| 15 | Ribbon IDC male 6 pins connector | Fab Lab León | 2 | 0,35€ | ||
| 16 | Dupon cables female to male | Fab Lab León | 10 | 1€ | ||
| 17 | female pin connector 1x3 | Fab Lab León | 2 | 0,10€ (2x0,10€) | ||
| 18 | Touch sense | Amazon ES | 2 | 2x1,58€ | ||
| 19 | Acrylic 3mm | Fab Lab León | 1 | 0.50€ |
The total cost of materials and components was 75.50€.
What parts and systems were made? What processes were used?
In this design, several parts and systems were created:
Several components and systems were produced for this design:
Electronic system:
The main control unit is the Xiao ESP32 microcontroller board. The Neo6 GPS module provides GPS positioning and satellite lock data, while the micro SD reader/writer module allows for data reading and writing on a micro SD card. The BME280 sensor measures temperature, humidity, and barometric pressure, and the OLED screen displays pertinent information to the user.
Mechanical system:
A compact and protective housing for the device is provided by the 3D-printed enclosure, manufactured using PLA filament.
The laser-cut acrylic part enhances the enclosure with a professional and visually pleasing touch.
To create the PCB, I employed KiCad software for circuit layout design, followed by milling with a Roland MDX-20A Modela.
I used soldering techniques to attach pins, resistors, headers, to the PCB.
What questions were answered?
- How to connect a GPS and how to record the data;
- More spirals are needed to reduce the size;
- How to connect a micro SD card;
- How to connect a BME280 sensor;
- How to connect an OLED screen;
- How to connect a battery;
- How to connect a switch;
- How to make a PCB;
- How to solder;
- How to use a laser cutter;
- How to use a 3D printer;
- How to use a CNC milling machine;
- Better choice of components;
- Soldering of modules in board instead of using pins;
What worked? What didn't?
The amount of work completed represents only a portion of the total work I aspired to accomplish.
My initial plan did not pan out as expected. I had many ideas to explore post completion of the first spirals, but I ran short of time.
Gaining a better understanding of the components to be used will be beneficial for future projects.
How was it evaluated?
The device underwent rudimentary testing for assessment.
Feedback was also sought from family, friends, and pilgrims on the Way of Saint James to evaluate the idea.
What are the implications?
The device offers pilgrims on the Way of Saint James a handy tool that provides critical data such as time, date, GPS data, and environmental factors.
The custom PCB, 3D-printed enclosure, and laser-cut acrylic part demonstrate an element of customization and detail.
Moreover, the project offers invaluable insights into electronics, PCB fabrication, 3D printing, and laser cutting.
The compact and mobile design of the device has the potential to enrich the pilgrimage experience, equipping pilgrims with crucial information and functionality throughout their journey.
What tasks have been completed, and what tasks remain?
Completed tasks include the design and assembly of the device, which involved connecting various components such as a GPS module, micro SD card, BME280 sensor, OLED screen, battery, and switch.
Additional accomplishments include the fabrication of a PCB, soldering components onto it, and the creation of a 3D-printed enclosure and a laser-cut acrylic part.
A detailed list of complete tasks can be found in the final project development page.
Remaining tasks involve refining the device based on the testing feedback, addressing any functional issues discovered during testing, and potentially expanding the feature set of the device based on future ideas that couldn't be implemented due to time constraints.
What's working? What's not?
The device appears to be functioning as intended, providing a range of features such as GPS information, environmental data, and a stopwatch function.
However, the initial plan did not pan out as expected due to time constraints. Therefore, some ideas and features could not be implemented within the available timeframe.
What questions need to be resolved?
- How can the device's design and functionality be refined based on testing feedback?
- How can the desired additional features be implemented effectively?
- What strategies can improve time management and planning for future development phases?
What will happen when?
The timeline for future tasks depends on specific goals and availability of resources.
- Period of reassessment and planning;
- Implementation of the changes and additional features;
- Device's refinement and further testing;
- Final testing and evaluation;
What have you learned?
From this project, I've gained valuable knowledge in various domains, such as:
- How to connect various electronic components like a GPS module, micro SD card, BME280 sensor, and OLED screen;
- The fabrication of a PCB using KiCad and a CNC milling machine;
- Techniques in soldering components onto a PCB;
- Utilizing a laser cutter and 3D printer for creating parts of the device's enclosure;
- The importance of effective project planning and time management;
- The process of testing and refining a device based on feedback;
License:

You are free to:
Share — copy and redistribute the material in any medium or format.
The licensor cannot revoke these freedoms as long as you follow the license terms:
- Attribution — You must give appropriate credit, provide a link to the license, and indicate if changes were made. You may do so in any reasonable manner, but not in any way that suggests the licensor endorses you or your use.
- NonCommercial — You may not use the material for commercial purposes.
- NoDerivatives — If you remix, transform, or build upon the material, you may not distribute the modified material.