
The List of machines and softwares that are used:
- Machines:
- Laser Cutting (CO2): Trotec Speedy 400 flex
- Laser Cutting (CO2): Universal Laser System
- Vinyl Cutting: Roland CAMM-1 GS-24
- Sticker Cutting: Roland VG-640
- Softwares:
- Autodesk Fusion 360
- Corel Draw 2017
- Roland Cut Studio
- Roland VersaWorks
- Laser Cutting: Universal Laser System
- Laser Cutting: Trotec
- Adobe Illustrator
Group Assignment
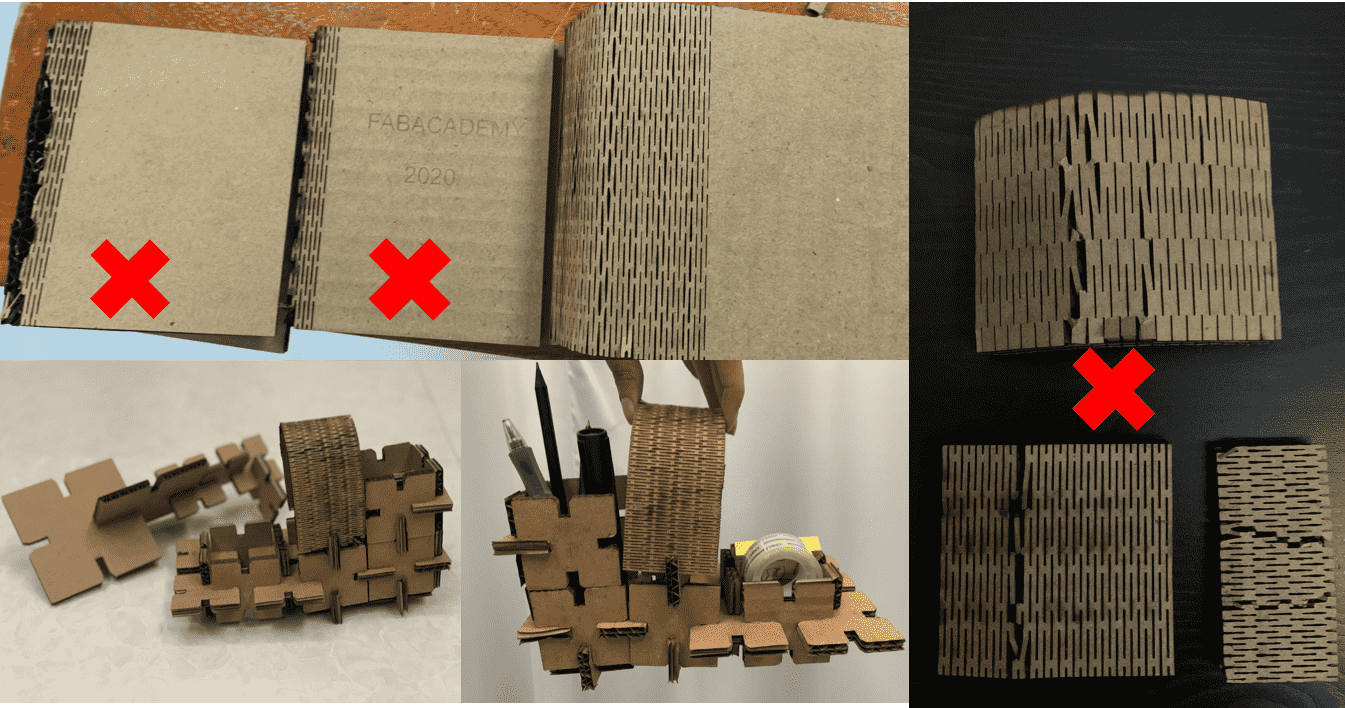
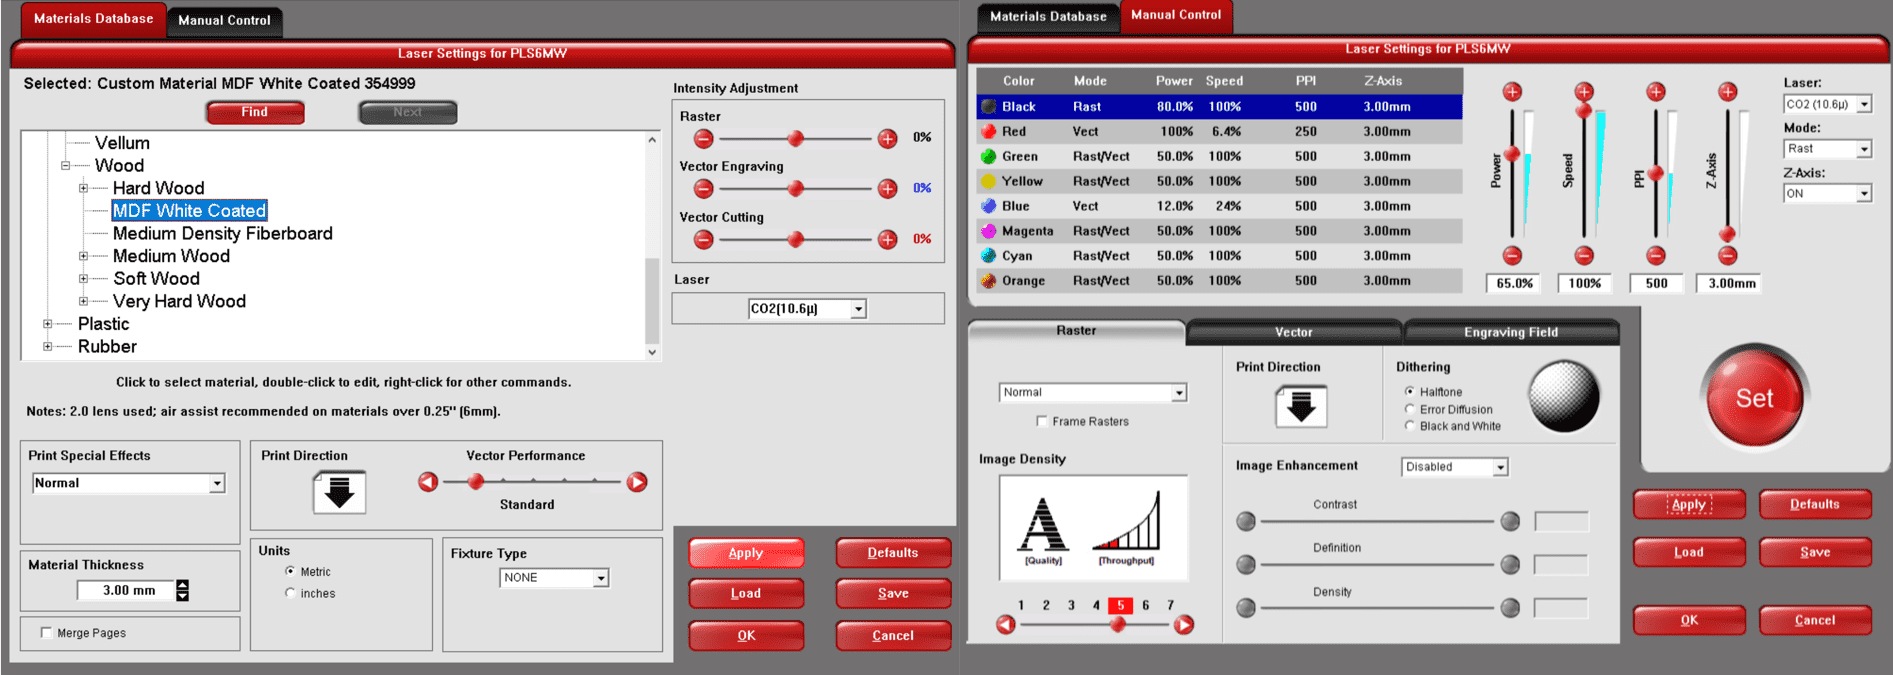
The group assignment is made to familiarize the members with the settings of the CO2 machines (Trotec and Universal Laser System) that are used in the lab, and can be later used for future reference while using the machine to complete the other projects. We did face a bit of trouble since during the trials, the settings didn't seem to work after confirming them last time. So we had to work with different parameters, we found out later though that the lens was cleaned which affected output. We mainly focus on Speed, Power, PPI Pulse Per Inch, Material, Depth. Those parameters change if the target is cutting or engraving, which is found out during this group assignment. After that we measured the Kerf for the material used, Kerf is defined as the width of material that is removed by a cutting process. It is measured by simply finding the difference of the theoratical dimensions (sketch done on software) and what is actually cut. The reason that it is measure is to reach accurate size by incorporating the kerf in the theoratical dimensions. More details about the group assignment is found here.
Parametric Pressfit Kit
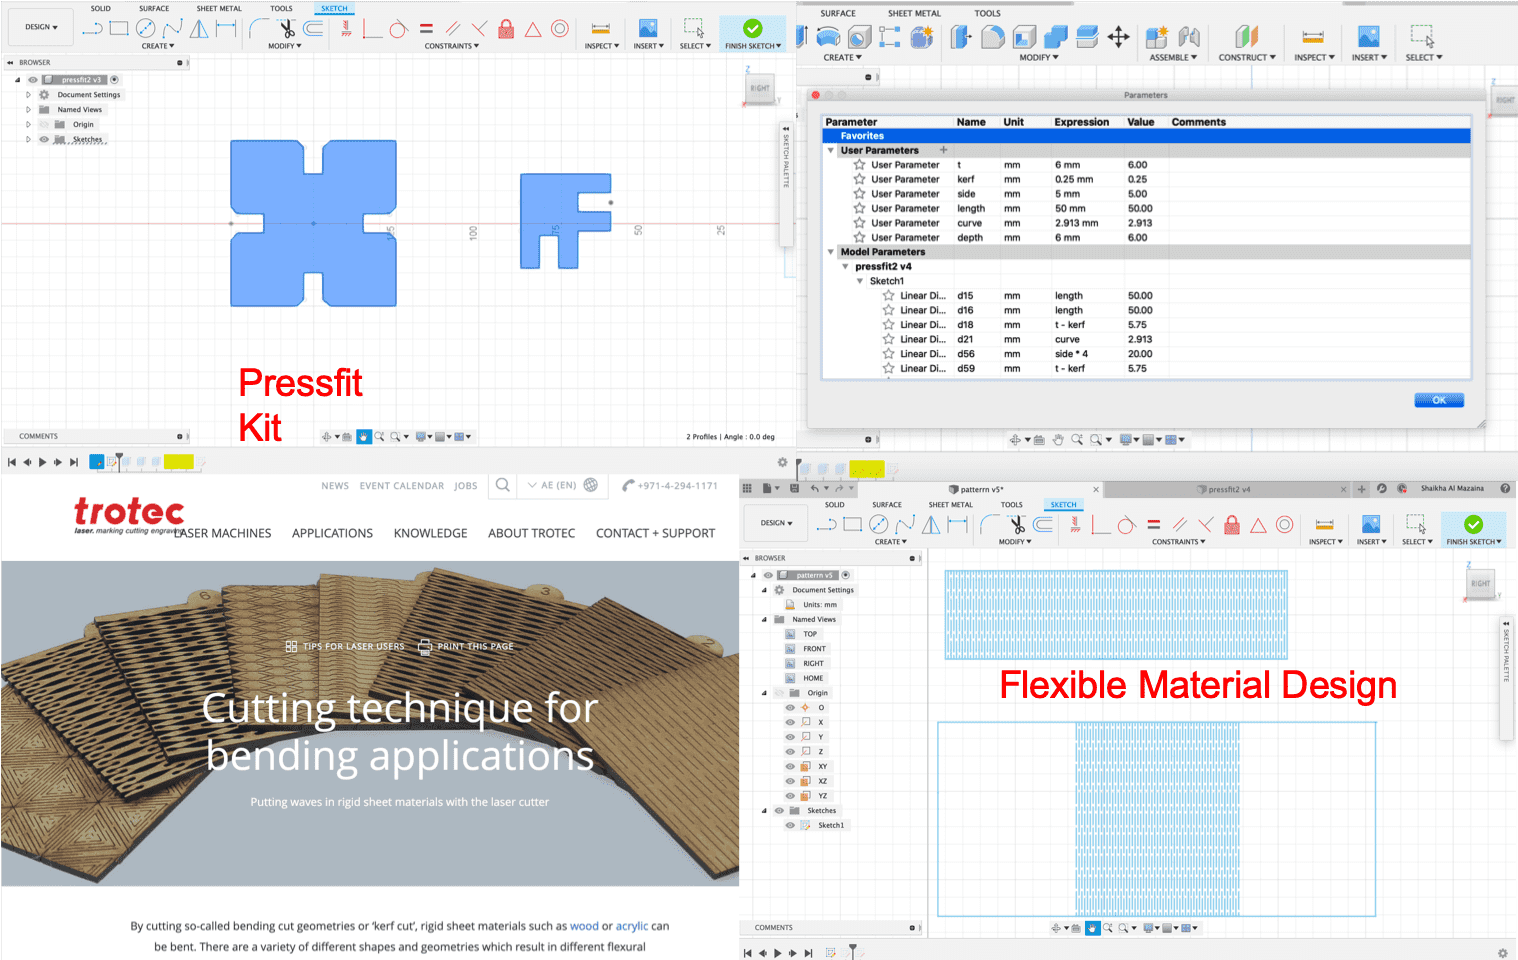
Sketching
Downloads
Cutting and Assembling
- In trotec machine, we introduce the blue color and use it along the red color for cutting in CorelDraw and that is to indicate which part will be cut first. Then we print it to TROTEC software and from there we can choose the material type and the parameters for cutting (power,speed,PPI). Before cutting the manual focus must be done which is simply by placing the piece of metal on the nozzle and raising the platform until the metal falls.Filter is automatically opened when the cutting process starts.
- In the Universal Laser Machine, before exporting the sketch to the cutting software we choose the preferences in the print tab to specify the material and the parameters for cutting and engraving. Then we export it to the software and cut directly after specifying the start point. This machine doesn't require a manual focus but requires turning the filter on before starting.
| Power | Speed | Frequency |
|---|---|---|
| 80% | 7% | 300 |
Engraving
| Power | Speed | Frequency |
|---|---|---|
| 9% | 100% | 500 |

Vinyl Cutting
- I first chose the design that i wanted to cut, which was a circuit schematic from VectorStock.
- Then, I opened CorelDraw and inserted the picture.
- Using the quick trace option, i was able to trace the picture and then turn it to white and right click on the red color to get an outline and the path for the cutter, making sure the Hairline option is chosen for the line.
- After that, i exported it to Roland CutStudio software by clicking on the Roland icon.
- The roll is then fixed to the machine.
- In Roland CutStudio, the width of the cutting area is modified based on the width that the machine reads. It is then ready to cut.
- After cutting, i removed the unwanted areas and applied an Application Tape on top to remove it safely and place it onto the surface of my iPad.
Sticker
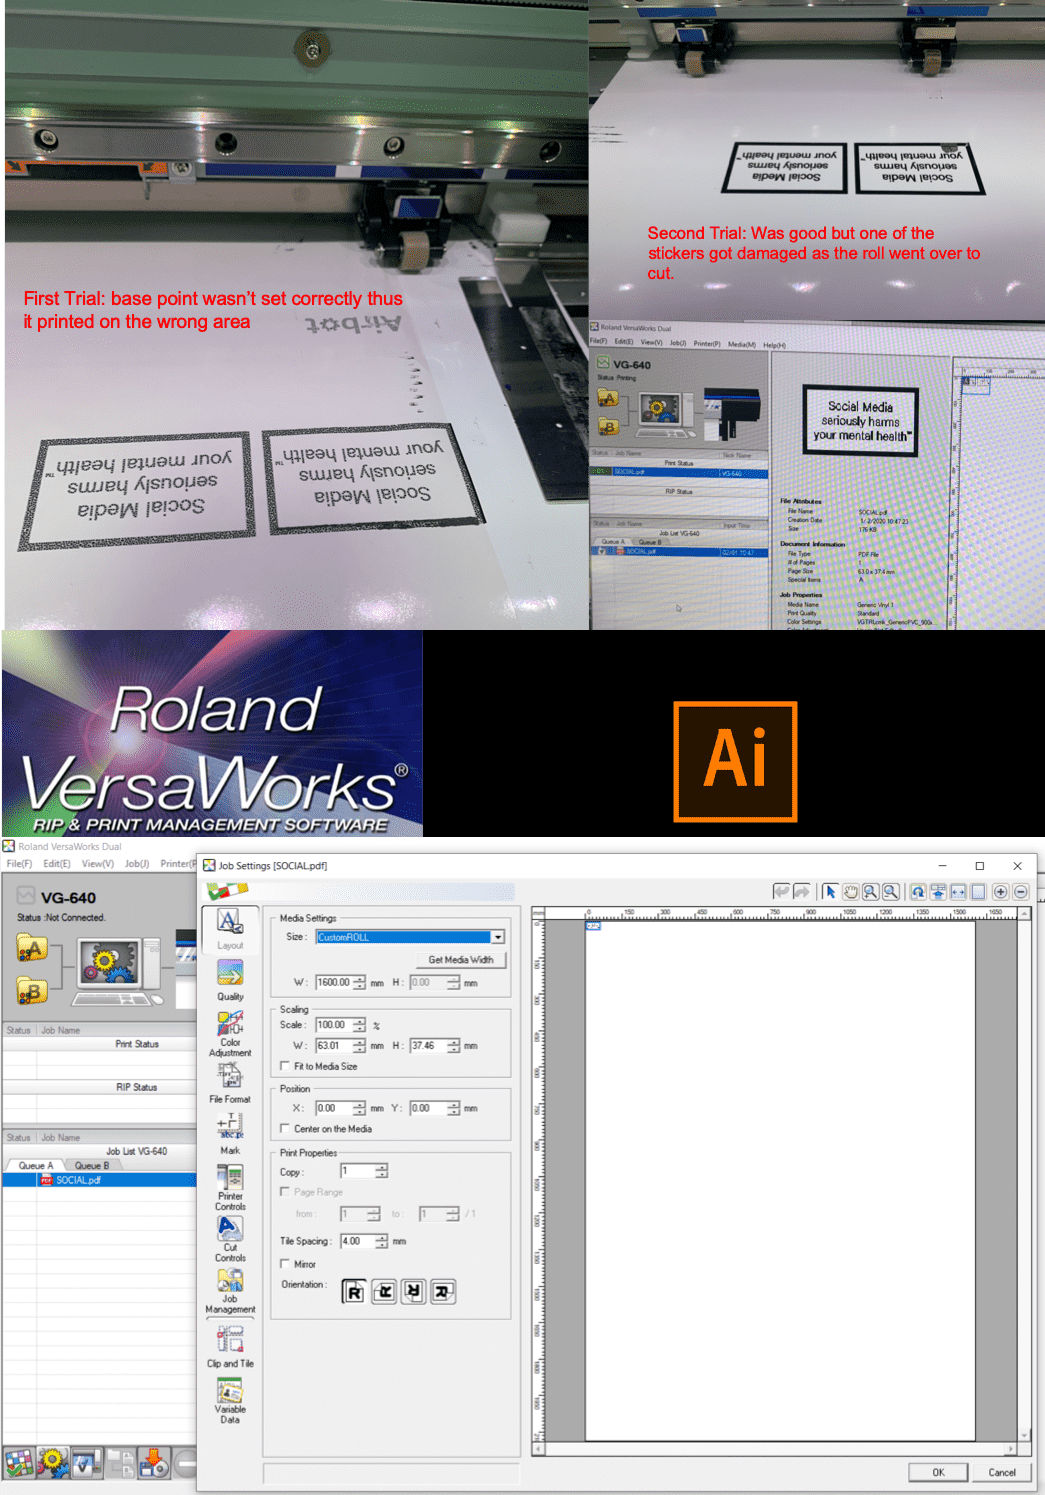
- I inserted the design in Adobe illustrator and then using the swatch library (to be installed) i chose the pink color to determine the cutting path for the machine, width of it to be 0.01 (hairline).
- The work is then exported as PDF and inserted in the Software Roland Versa Works, adding the job to Queue A.
- To cut the image boundary, Cut Control option is chosen.
- Clip & tile option is chosen to preview the work before printing.
- On the machine, base point must be indicated before printing to ensure that the sticker is printed on an unused area.
- Then in the software, we right click on the job and print, and then Sticker is ready to be used!
Experience
This was a very interesting week since i had the chance to create things i didn't know that i could do. At the beginning, it was hard to master all the machines and softwares, but since getting to the correct result requires several trials, i got used to it and now i can say i'm familiar with those machines.