6. 3D Scanning and printing
This week assignments
Group assignment: - test the design rules for your 3D printer(s)
Individual assignment:
-
design and 3D print an object (small, few cm3, limited by printer time) that could not be made subtractively
-
3D scan an object (and optionally print it)
Machine
Softwares
-
Slicing software: Ultimaker Cura
Safety rules
The machine reach high temperature especially Nozzle and the heat bed, andit has some moved parts!

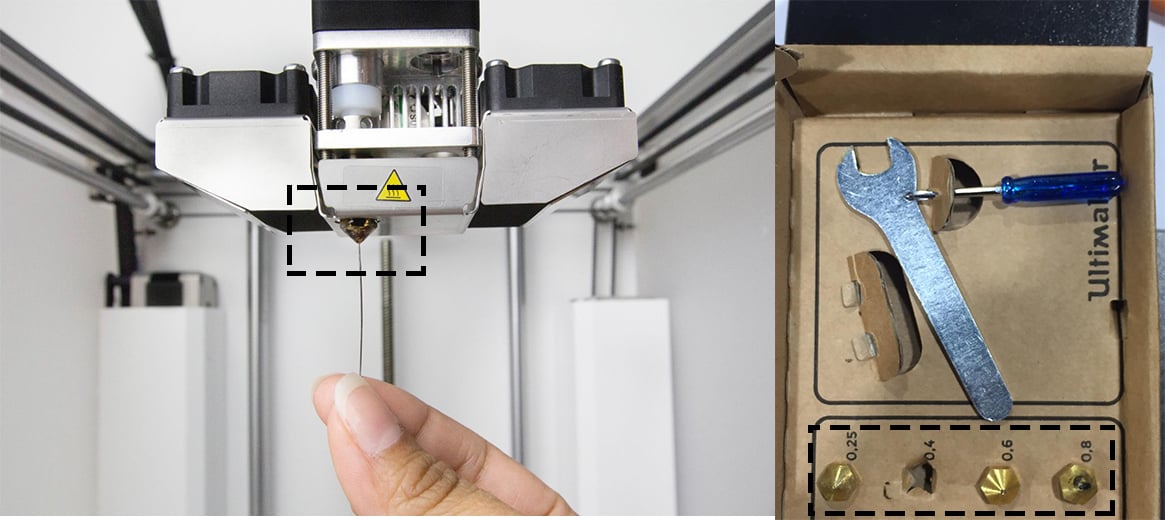
For the group assignment we have tested Ultimaker 2+, the machine is a Fused Deposition Modelling (FDM) and it works with many Nozzel diameters such as (0.25,0.4,0.6,0.8).
Ultimaker 2+ dimensions: X,Y,Z (22.3 cm × 22.3 cm × 20.5 cm), which means it is only works with small scale prints.
Materials
Polylactic Acid (PLA) is different than most thermoplastic polymers in that it is derived from renewable resources like corn starch or sugar cane. Most plastics, by contrast, are derived from the distillation and polymerization of nonrenewable petroleum reserves. Plastics that are derived from biomass (e.g. PLA) are known as “bioplastics.”
Design Rules
3d printing process has a many challenges to get a quality of printing so here is some of the rules you should follow in the design :
Files

Group assignment
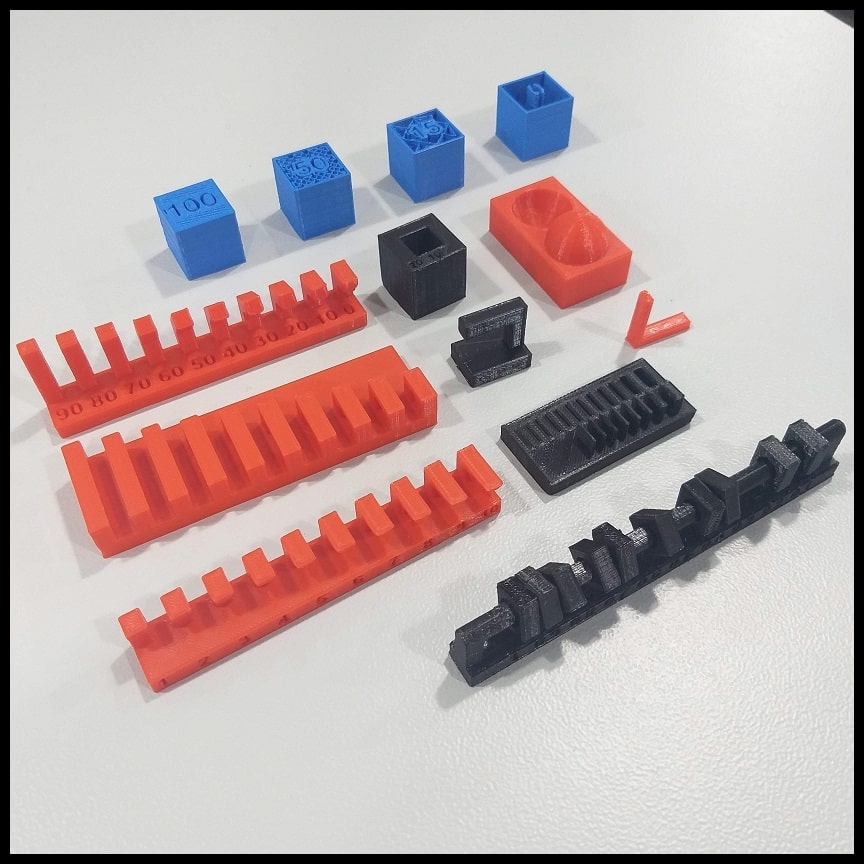
Testing different designs and forms to get into the machine design rules and get some conclusions:
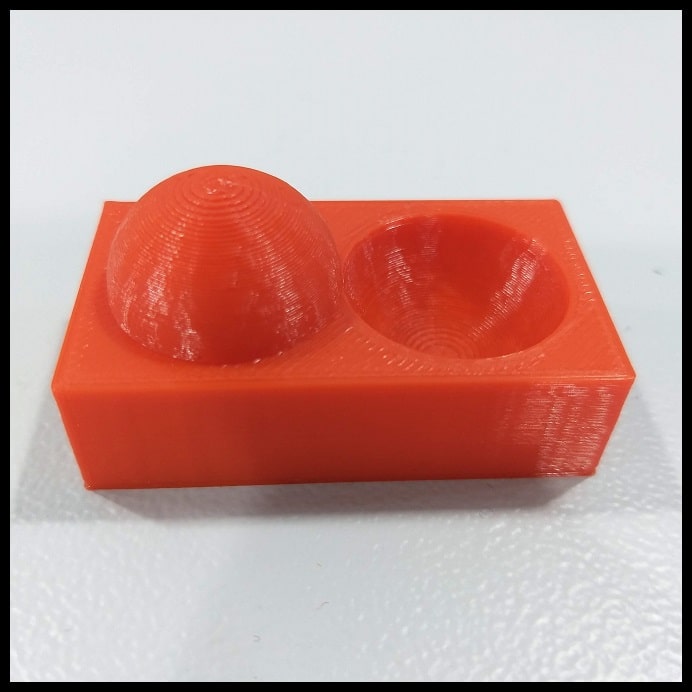
Test 1:
Supported Overhangs and Clearance.
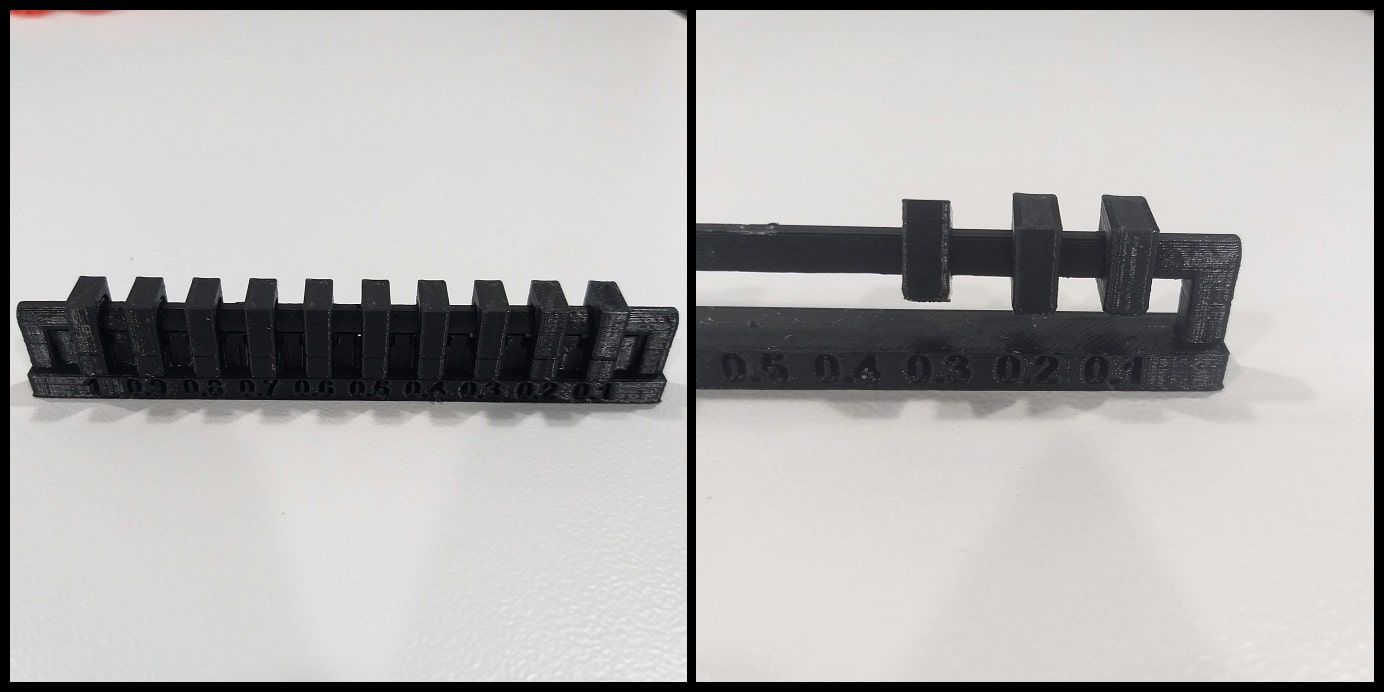
This print consists of two STL files. The point is to test the quality of supported overhang and clearance between moving parts.
Step 1: Download the files “Supported overhang” and “Supported clearance” STL files then export it to Gcode.
Step 2: Click on source 1” settings and from “Material” drop menu select “Ultimaker > PLA” if you are using Ultimaker filaments. From “Nozzle” drop menu select 0.4 mm.
Step 3: reset the setting to a custom below settings for the first test:
     Quality
    Layer Height: 0.20 mm
    Line Width: 0.35 mm

    Shell
    Wall Thickness: 0.7 mm
    Top/Bottom Thickness: 0.6 mm

    Infill
    Infill Density: 20%
    Infill Pattern]: Grid

    Material
    Printing Temperature: 200 °C
    Build Plate Temperature: 60 °C

    Speed
    Print Speed: 45 mm/s

    Travel
    Enable Retraction: Yes

    Cooling
    Enable Print Cooling: Yes
    Fan Speed: 100%

    Support
    Generate Support: Check
    Support Placement: Everywhere
    Support Overhang Angel: 50°
    Support Pattern: ZigZag

    Build Plate Adhesion
    Build Plate Adhesion Type: Skirt
Conclusions :
Supported overhang shows good quality after support removal.
Supported clearance shows a good clearance at 0.3 mm. Clearance less than 0.3 mm (0.1 mm and 0.2 mm) is not enough to make object move.
Test 2: Unsupported Overhangs, Bridging and Angle: This print consists of three STL files. The point is to test the quality of unsupported overhangs, bridging and angles.
Step 1: Download the files “Unsupported overhang”, “Unsupported bridging” and “Unsupported angle” STL files. If you are using Ultimaker 2+ you can download the associated gcode files and print.
Step 2: Use the following printing settings.
    Quality
    Layer Height: 0.20 mm
    Line Width: 0.35 mm

    Shell
    Wall Thickness: 0.7 mm
    Top/Bottom Thickness: 0.6 mm

    Infill
    Infill Density: 20%
    Infill Pattern]: Grid

    Material Printing Temperature: 200 °C
    Build Plate Temperature: 60 °C

    Speed
    Print Speed: 45 mm/s

    Travel
    Enable Retraction: Yes

    Cooling
    Enable Print Cooling: Yes
    Fan Speed: 100%

    Support
    Generate Support: Uncheck

    Build Plate Adhesion
    Build Plate Adhesion Type: Skirt

              Quality
      Layer Height: 0.20 mm
      Line Width: 0.35 mm

      Shell
      Wall Thickness: 0.7 mm
      Top/Bottom Thickness: 0.6 mm

      Infill
      Infill Density: 20%
      Infill Pattern]: Grid

      Material Printing Temperature: 200 °C
      Build Plate Temperature: 60 °C

      Speed
      Print Speed: 45 mm/s

      Travel
      Enable Retraction: Yes

      Cooling
      Enable Print Cooling: Yes
      Fan Speed: 100%

      Support
      Generate Support: Uncheck

      Build Plate Adhesion
      Build Plate Adhesion Type: Skirt
Conclusions :
Unsupported bridging seems to work fine over all lengths.
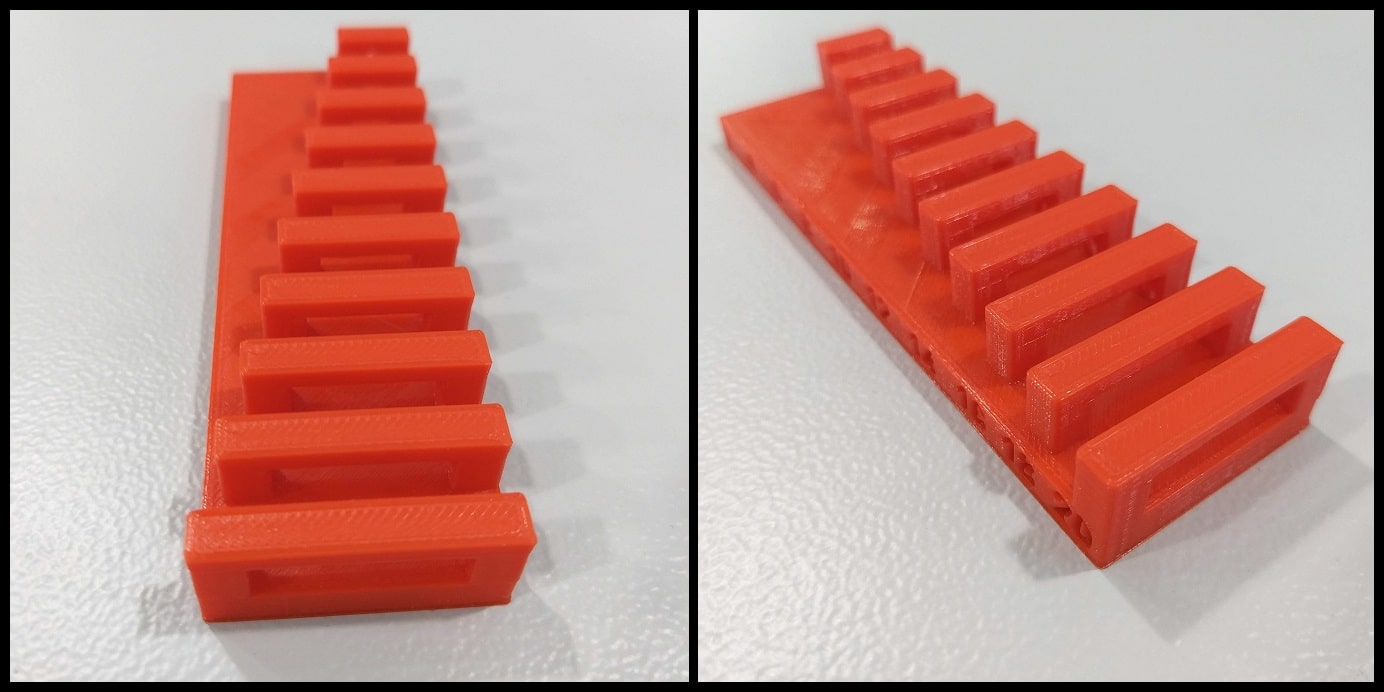
Unsupported overhangs show bad quality from the shortest length (1 mm).
Unsupported angles show good quality at angles >= 50 Deg.
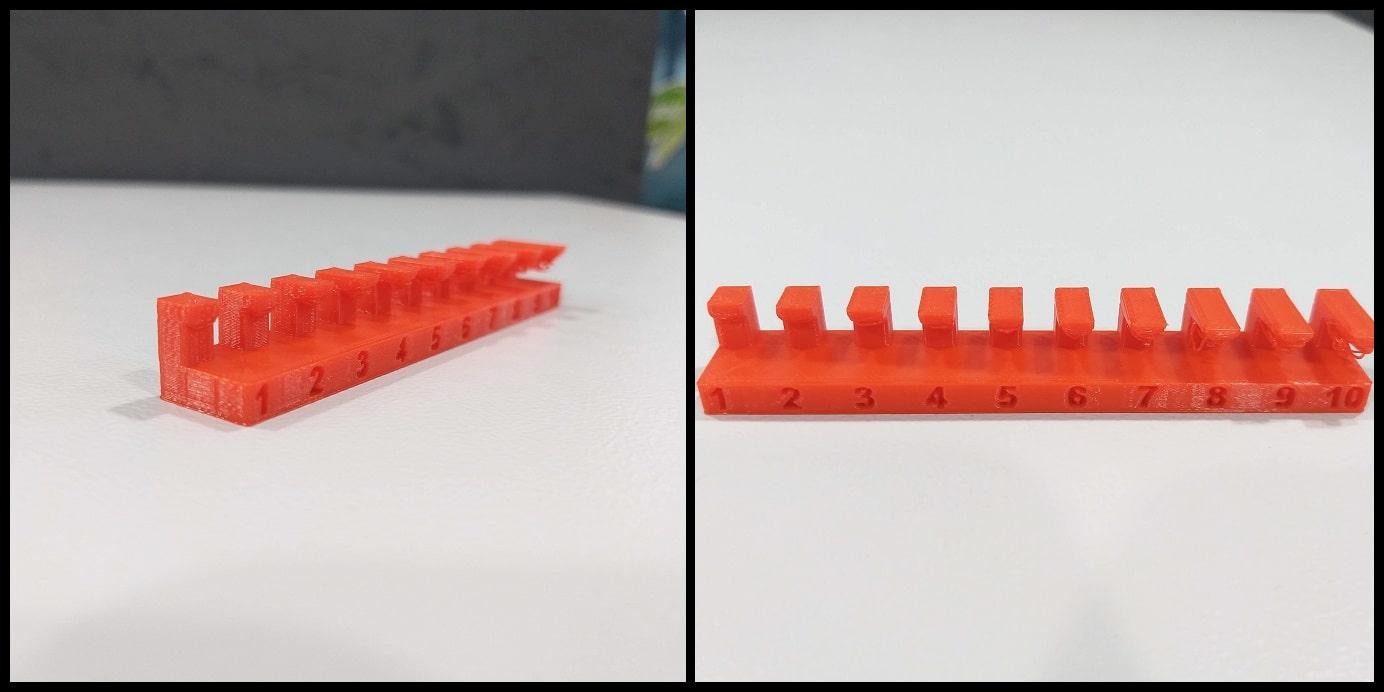
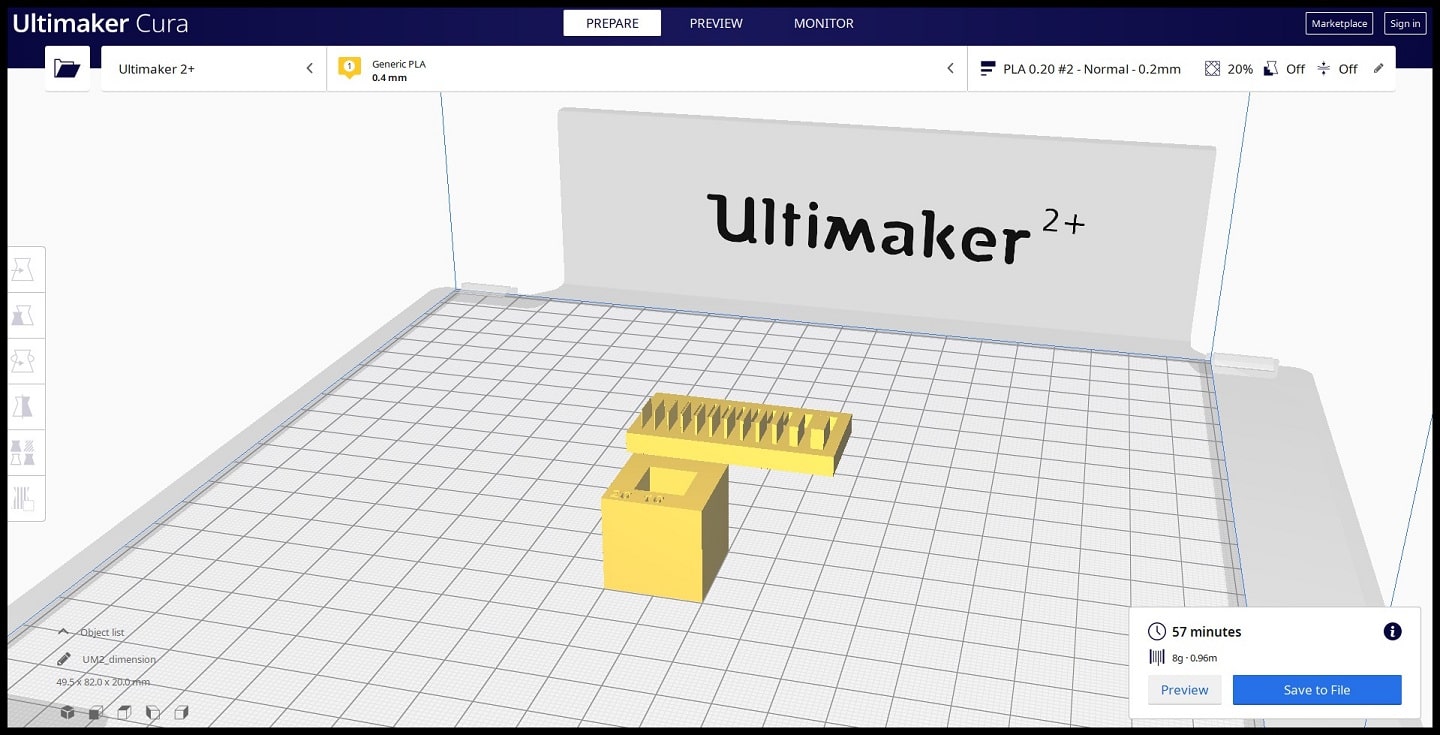
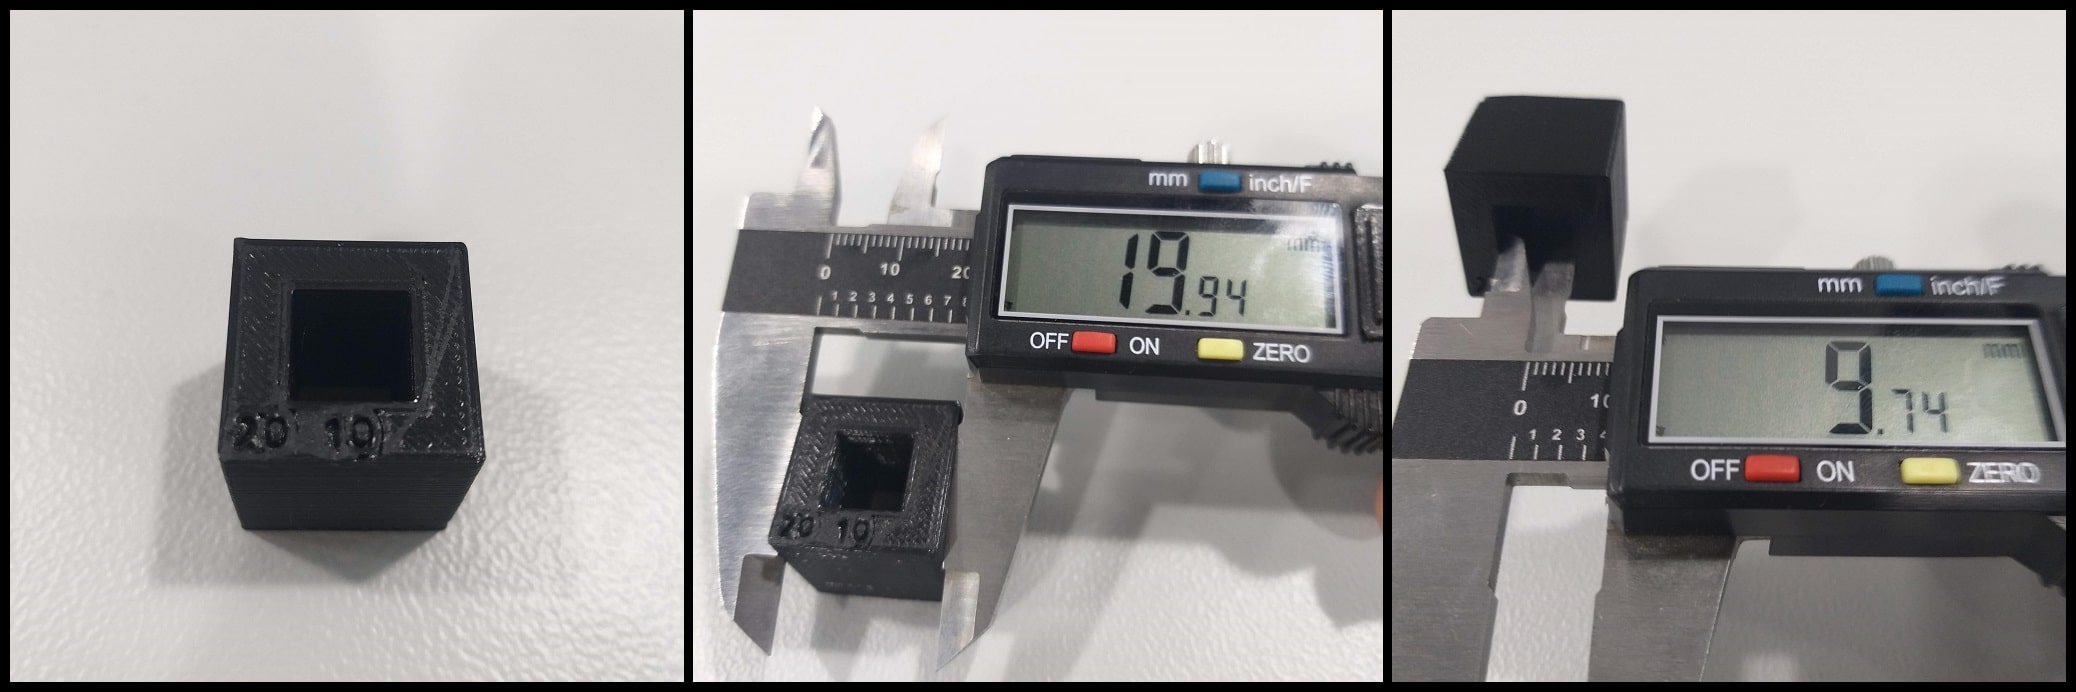
Test 3: Wall Thickness and Dimension: This print consists of two STL files. The point is to test the quality of wall thickness and dimensions.
Step 1: Download the files “Wall thickness” and “Dimensions” STL files. If you are using Ultimaker 2+ you can download the associated gcode files and print.
Step 2: Use the following printing settings.
      Quality
      Layer Height: 0.20 mm
      Line Width: 0.35 mm

      Shell
      Wall Thickness: 0.7 mm
      Top/Bottom Thickness: 0.6 mm

      Infill
      Infill Density: 20%
      Infill Pattern]: Grid

      Material Printing Temperature: 200 °C
      Build Plate Temperature: 60 °C

      Speed
      Print Speed: 45 mm/s

      Travel
      Enable Retraction: Yes

      Cooling
      Enable Print Cooling: Yes
      Fan Speed: 100%

      Support
      Generate Support: Uncheck

      Build Plate Adhesion
      Build Plate Adhesion Type: Skirt
Conclusions :
Wall thickness less than 0.5 mm were not printed. Slots thickness over 0.1 mm seem to be printed fine.
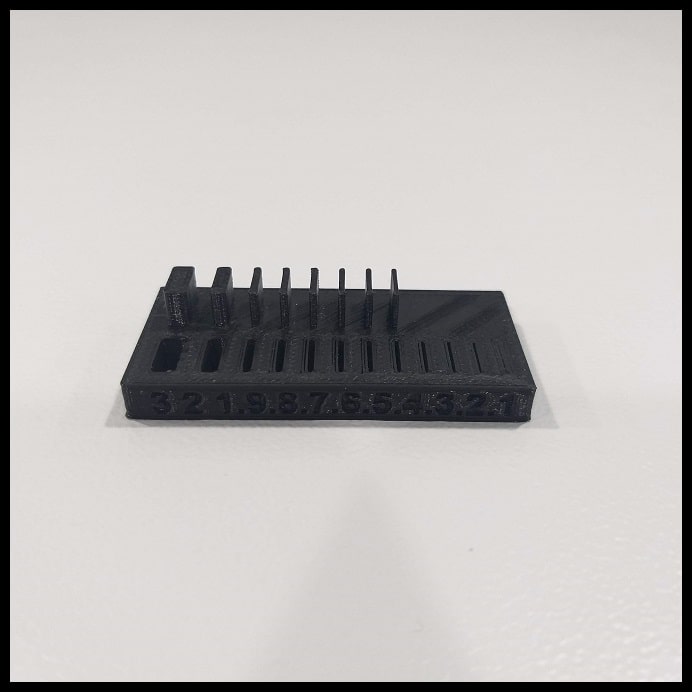
Dimensions There are dimensional errors in printed item. For the outs dimensions error is -0.06 mm, and for inner dimension error is -0.26 mm.
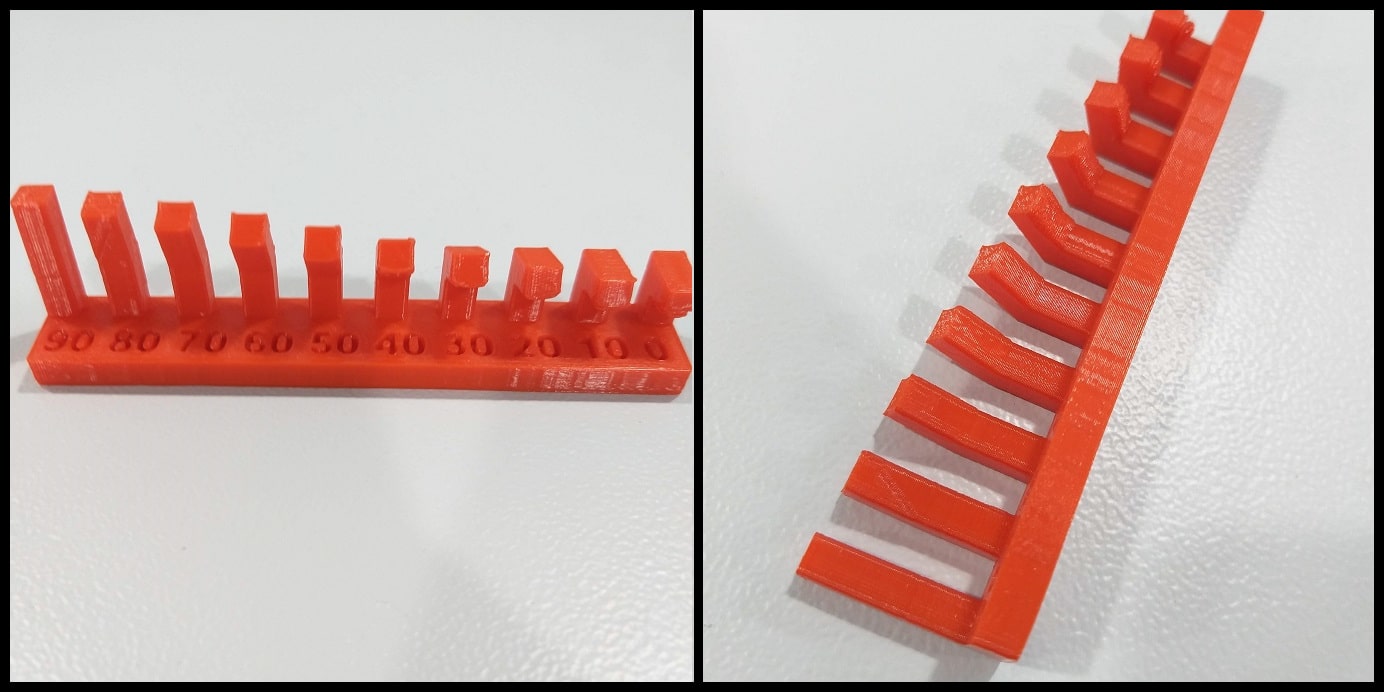
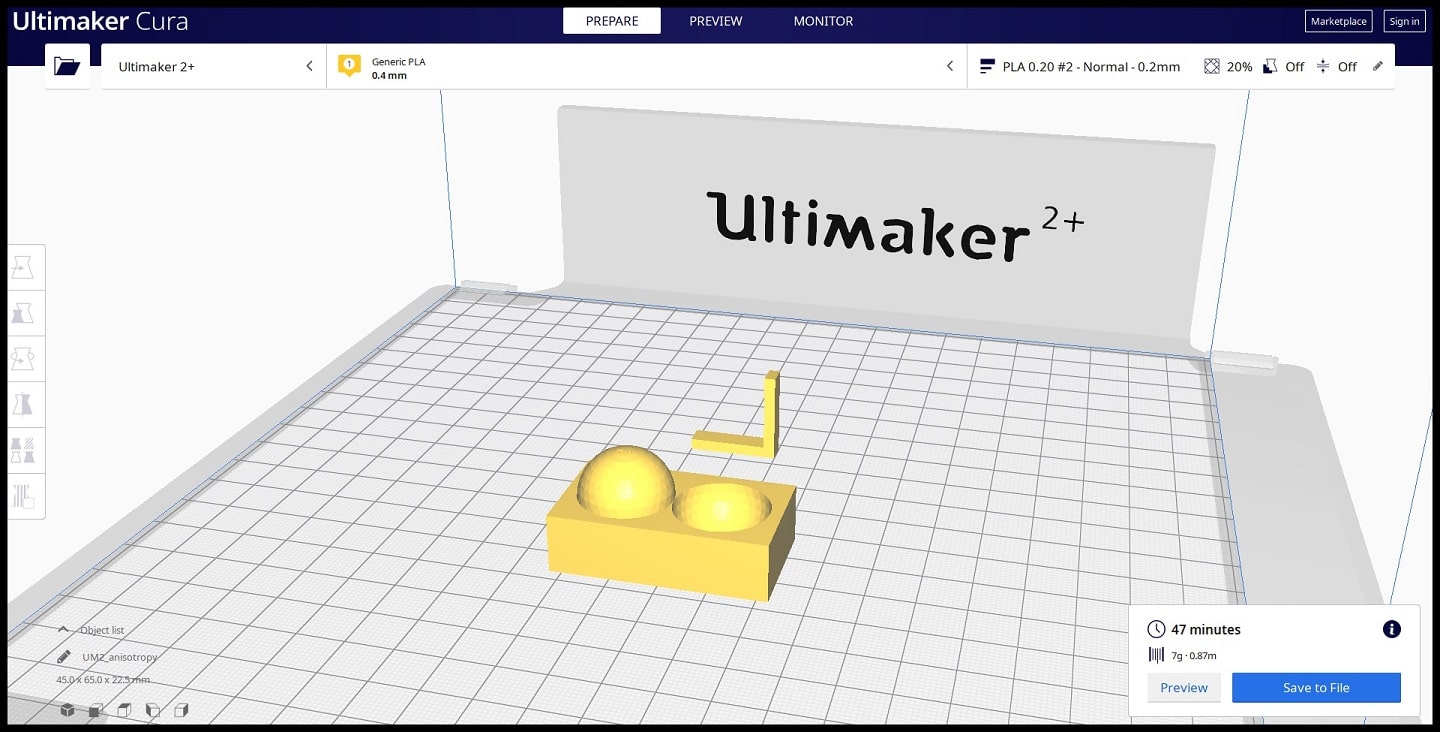
Test 4: Anisotropy and Surface Finish: This print consists of two STL files. The point is to test the quality of anisotropy and surface finish.
Step 1: Download the files “Anisotropy” and “Surface finish” STL files. If you are using Ultimaker 2+ you can download the associated gcode files and print.
Step 2: Use the following printing settings.
    Quality
    Layer Height: 0.20 mm
    Line Width: 0.35 mm

    Shell
    Wall Thickness: 0.7 mm
    Top/Bottom Thickness: 0.6 mm

    Infill
    Infill Density: 20%
    Infill Pattern]: Grid

    Material Printing Temperature: 200 °C
    Build Plate Temperature: 60 °C

    Speed
    Print Speed: 45 mm/s

    Travel
    Enable Retraction: Yes

    Cooling
    Enable Print Cooling: Yes
    Fan Speed: 100%

    Support
    Generate Support: Uncheck

    Build Plate Adhesion
    Build Plate Adhesion Type: Skirt
Conclusions :
Surface Finish at 0.2 mm layer height shows good quality.
Anisotropy is having physical properties that vary with respect to direction. Item seems to show good quality and low variations.

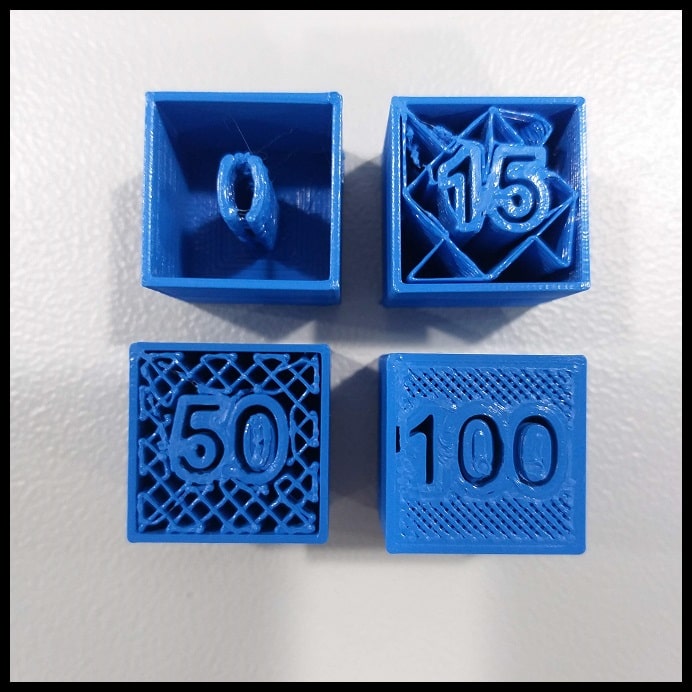
Test 5: Infill: This print consists of four STL files. The point is to test the infill of 3D printing.
Step 1: Download the files “Infill 0%”, “Infill 15%”, “Infill 50%” and “Infill 100%” STL files. If you are using Ultimaker 2+ you can download the associated gcode files and print.
Step 2: Use the following printing settings. Note that there are four prints in this parts and infill percentage should be changed for each file in each print.
    Quality
    Layer Height: 0.20 mm
    Line Width: 0.35 mm

    Shell
    Wall Thickness: 0.7 mm
    Top/Bottom Thickness: 0.6 mm

    Infill
    Infill Density: 0%, 15%, 50%, 100%
    Infill Pattern]: Grid

    Material Printing Temperature: 200 °C
    Build Plate Temperature: 60 °C

    Speed
    Print Speed: 45 mm/s

    Travel
    Enable Retraction: Yes

    Cooling
    Enable Print Cooling: Yes
    Fan Speed: 100%

    Support
    Generate Support: Uncheck

    Build Plate Adhesion
    Build Plate Adhesion Type: Skirt
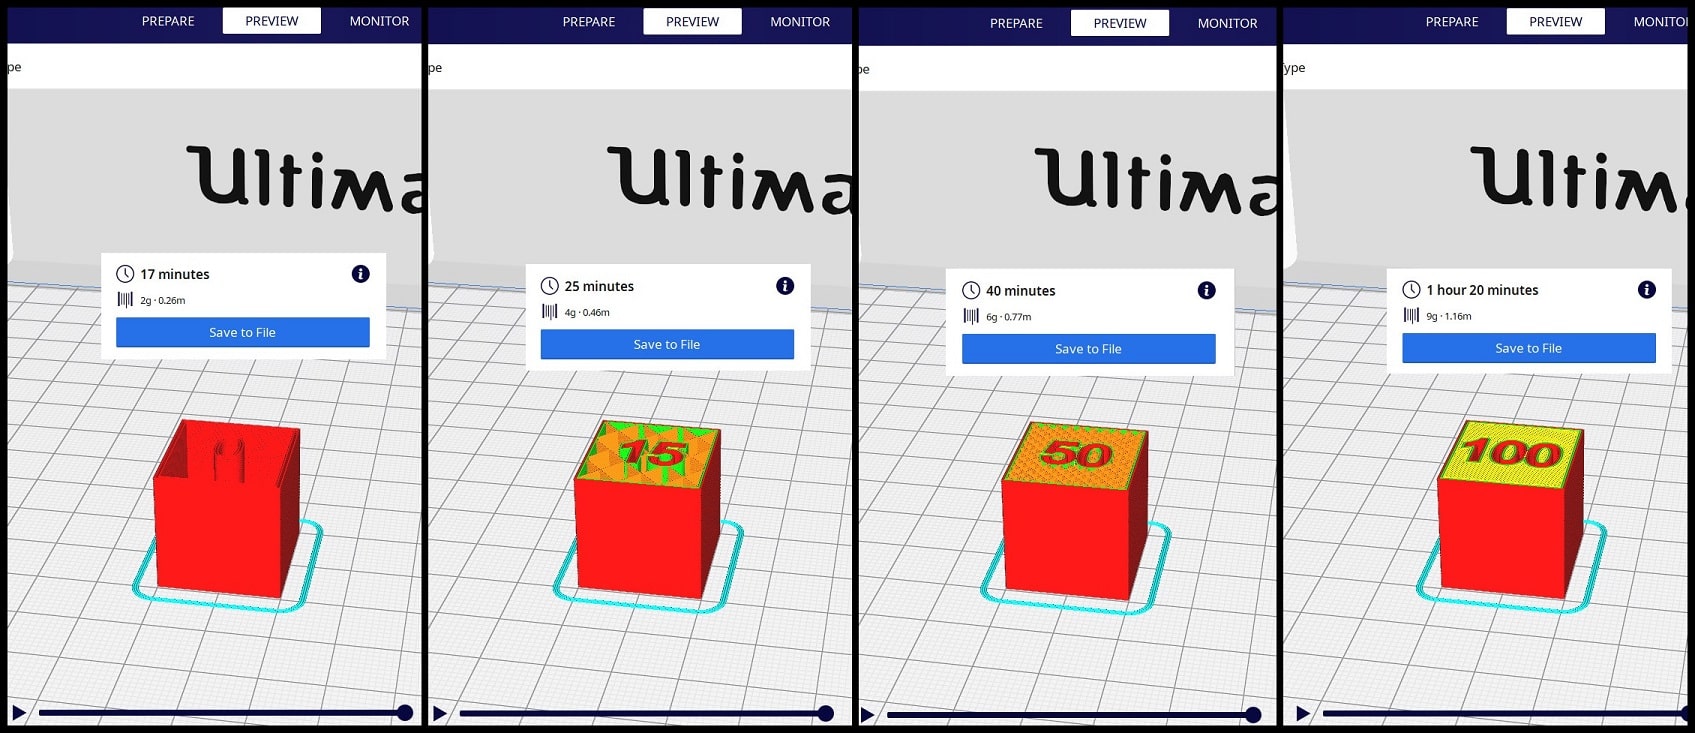
Conclusions :
Image below shows printing at 0%, 15%, 50% and 100% infill. Note how printing time changes as infill density increases.
Tests:
Individual assignment
-
Design and 3D print an object (small, few cm3, limited by printer time) that could not be made subtractively.
-
3D scan an object (and optionally print it).
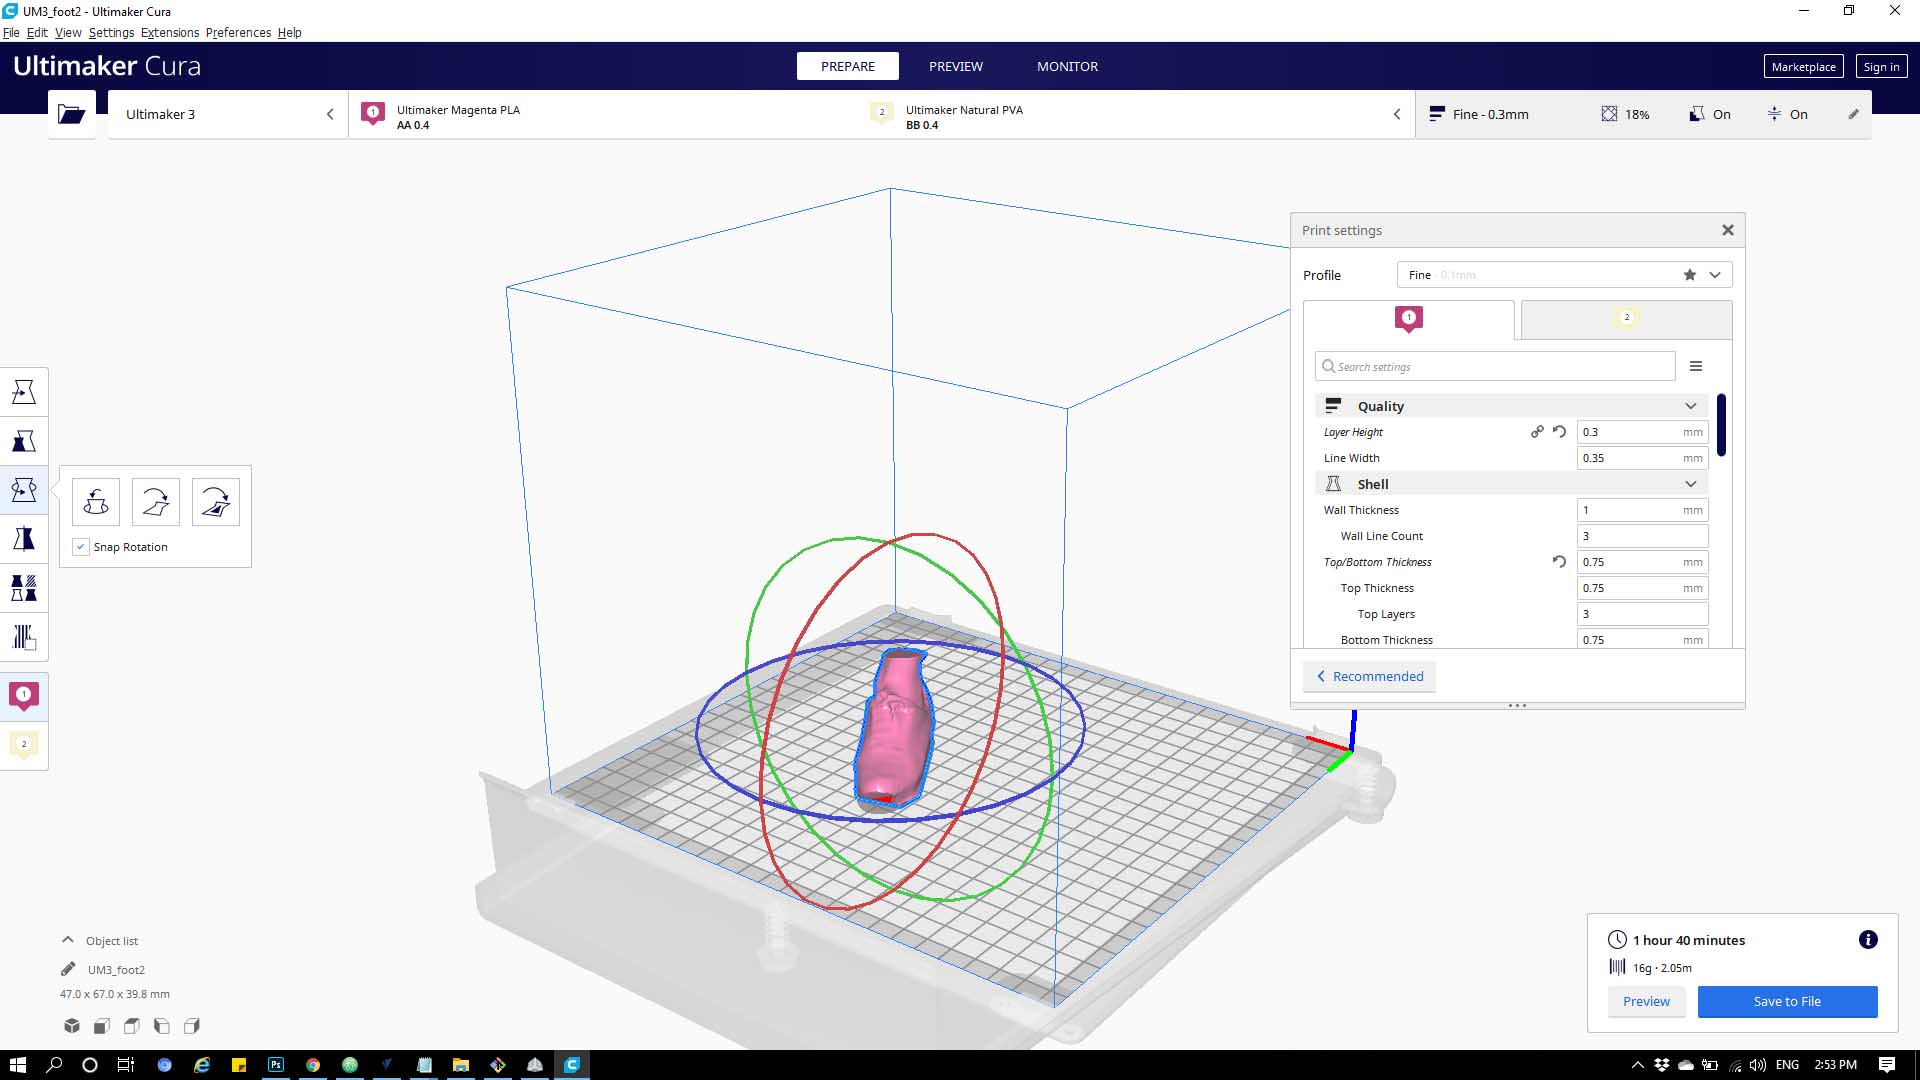
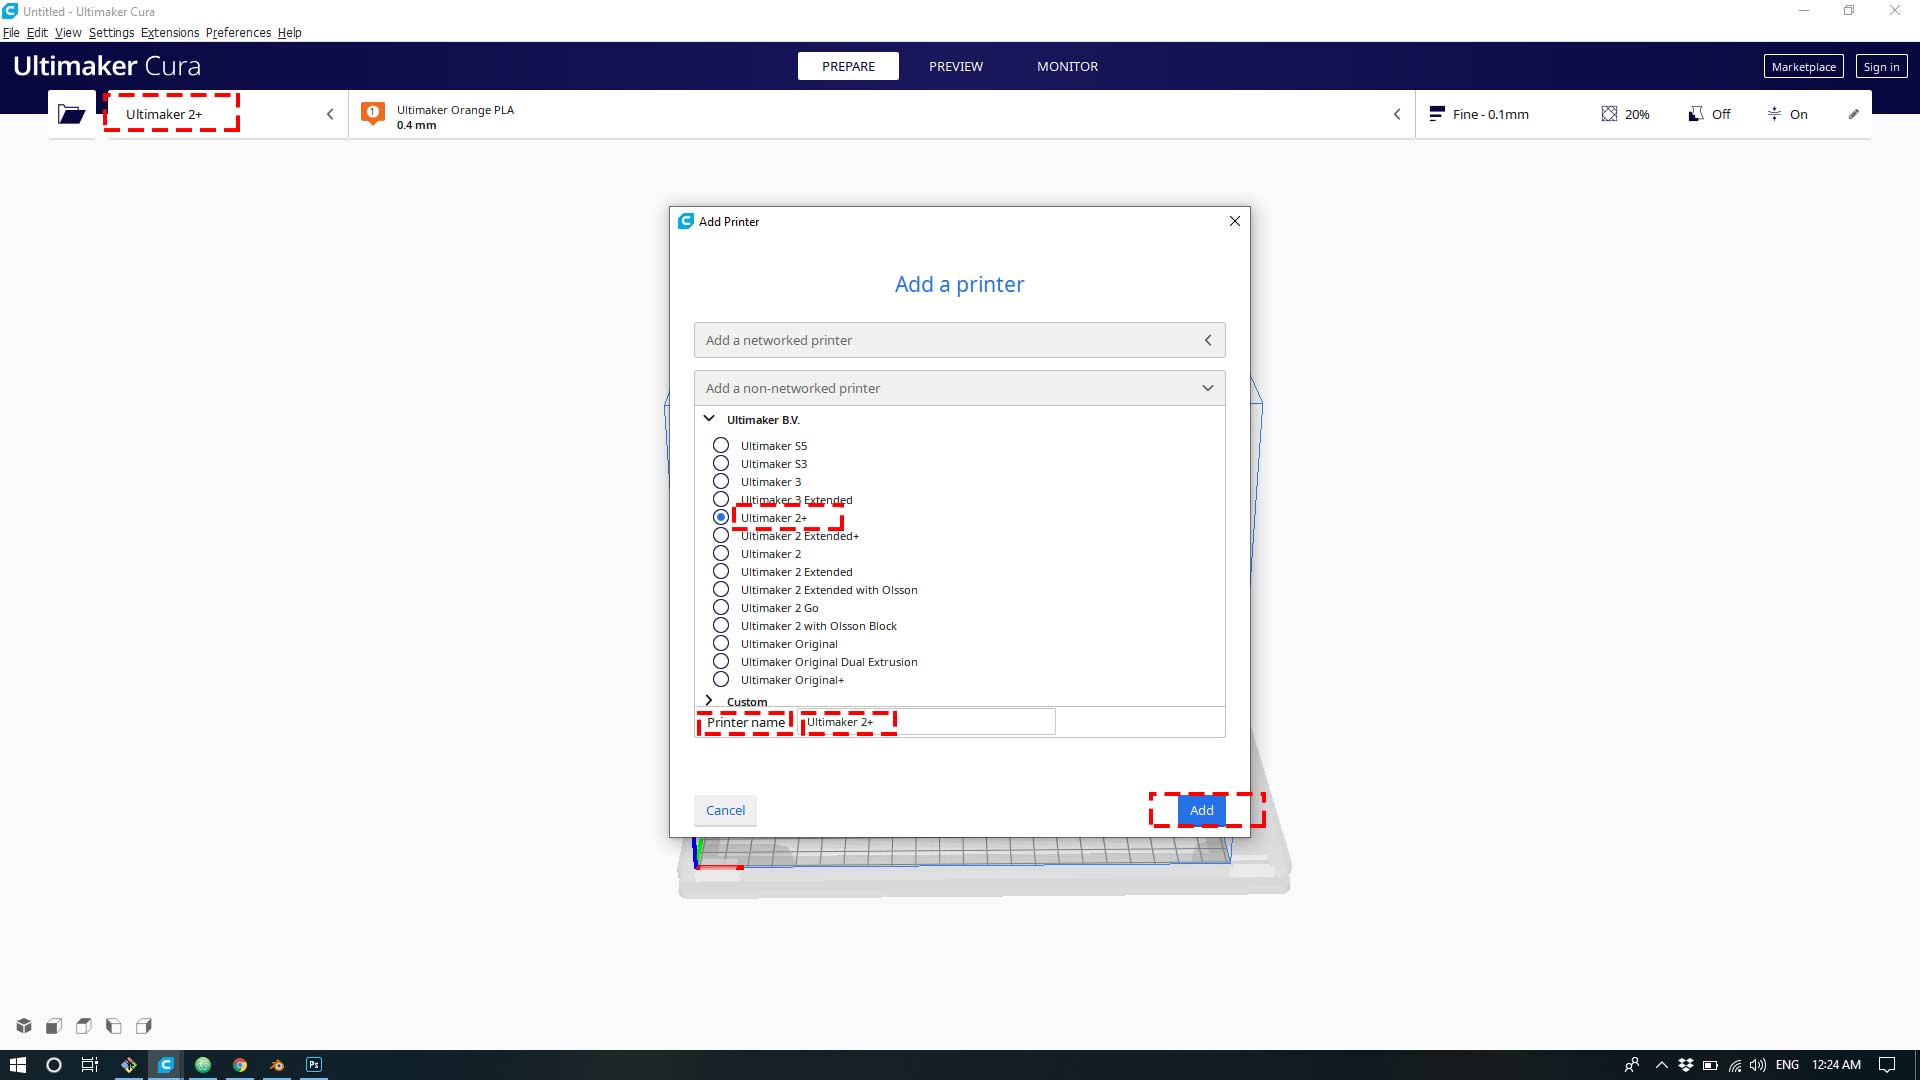
Ultimaker 3
Files: donut
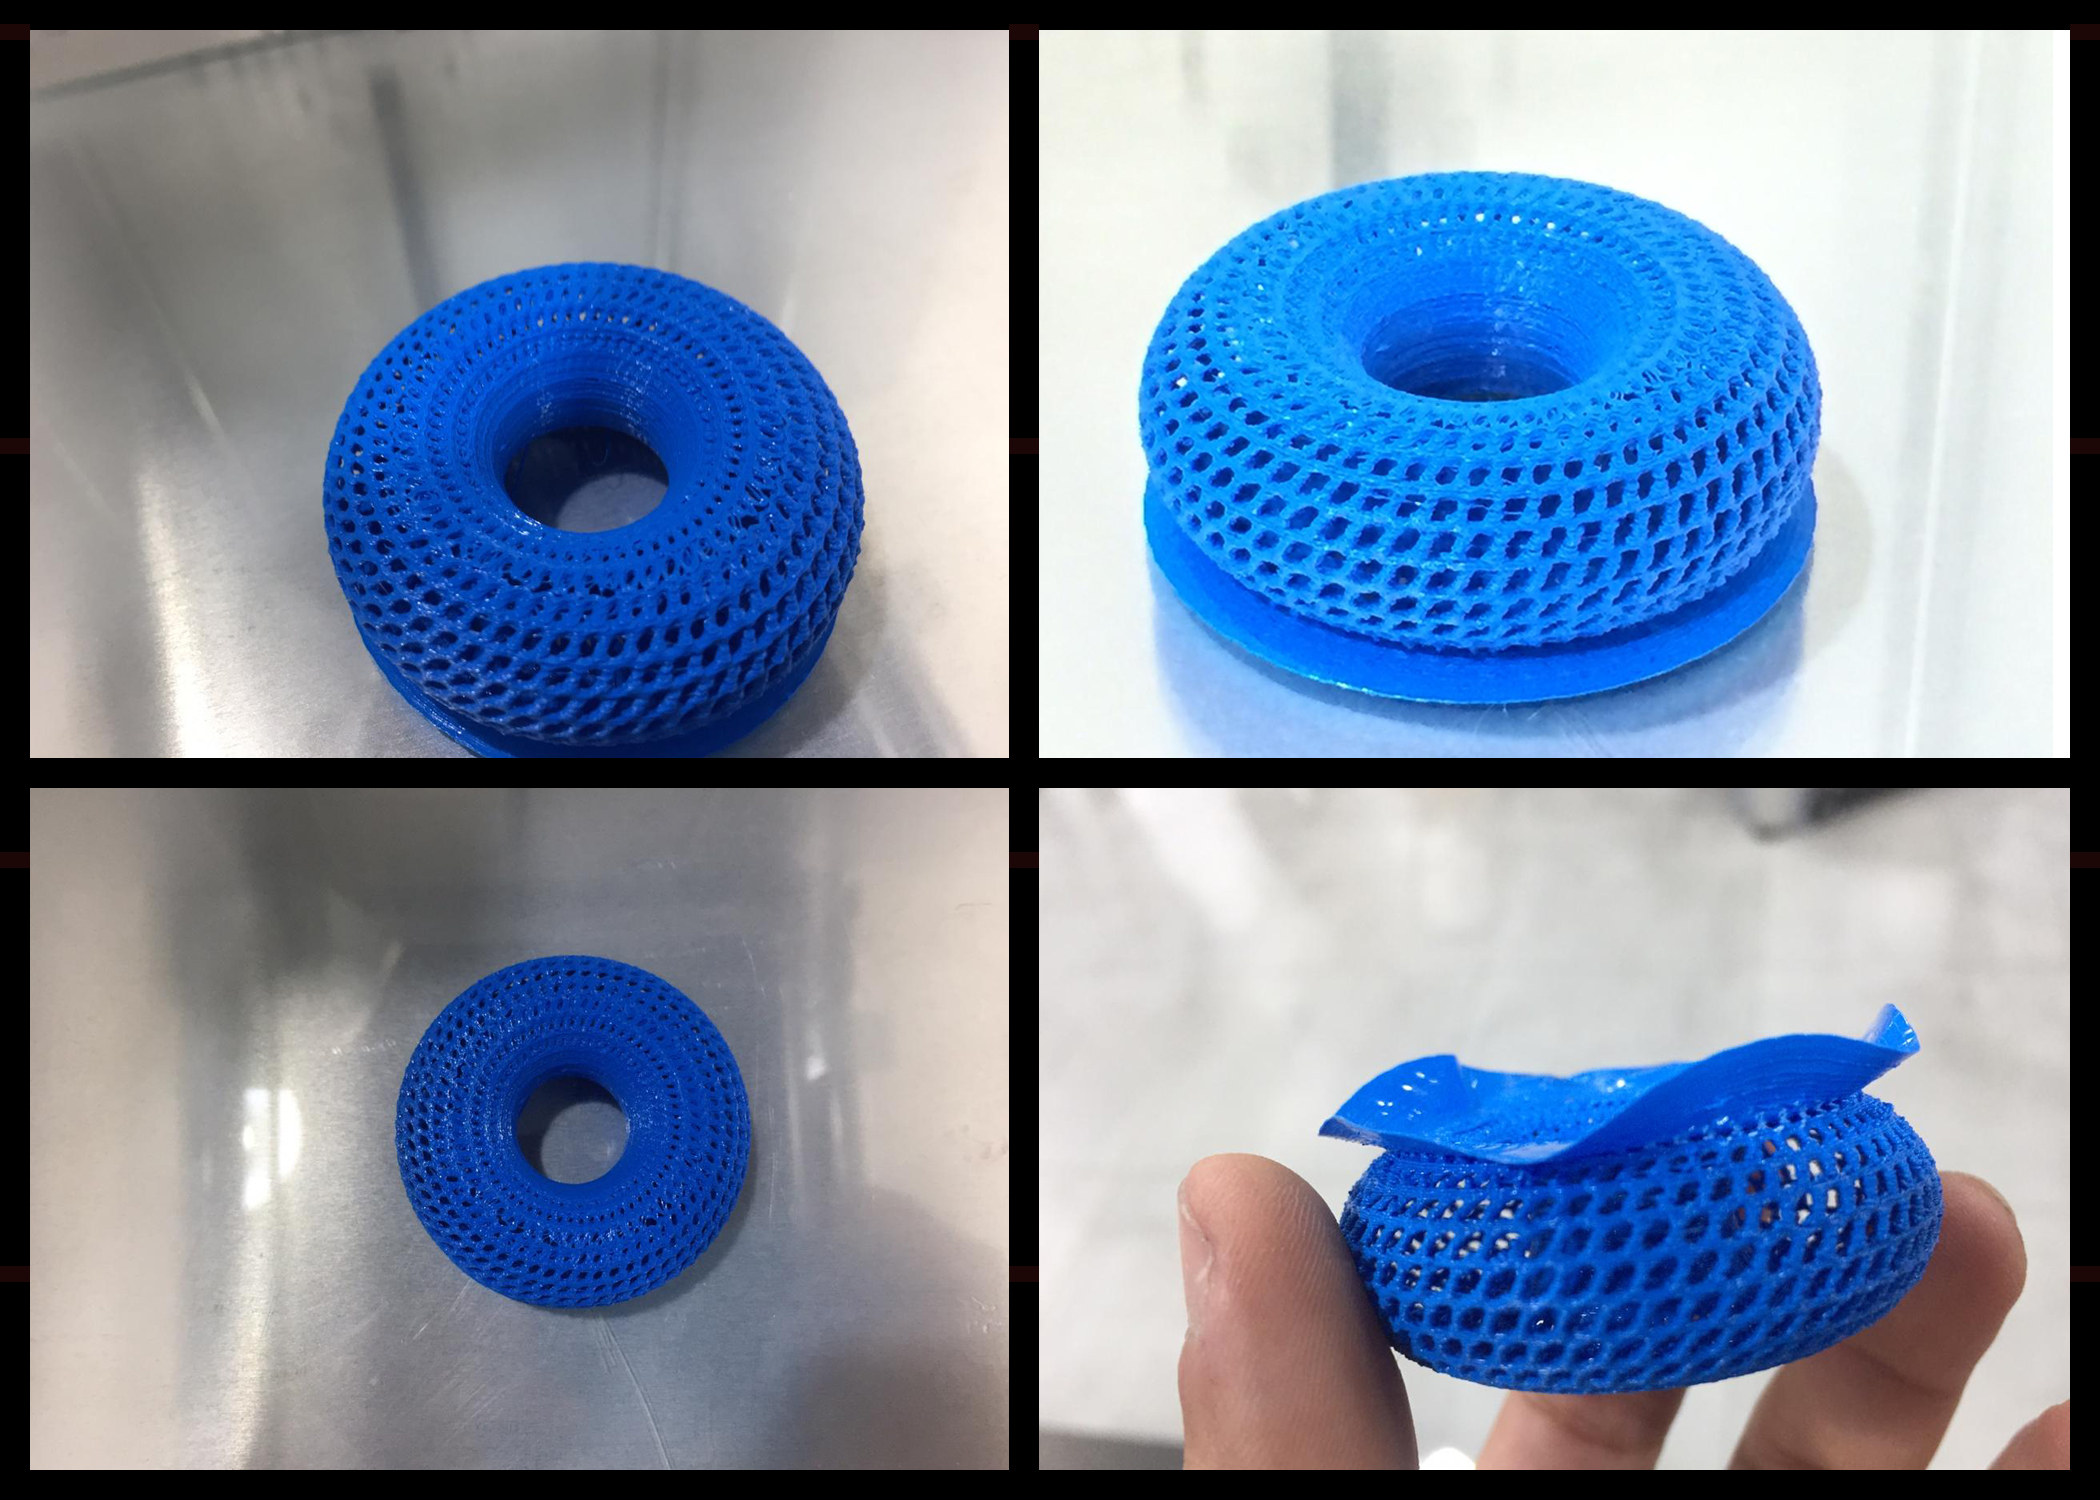
For This week design i have used Blender and meshmixer (source up) to get a form that can be done only by 3D printer, I have modeled the body of the print using Blender then i added some patterns on mishmixer.
Step 1: you add a default body as shown below by clicking (shift+A) then you choose (torus).
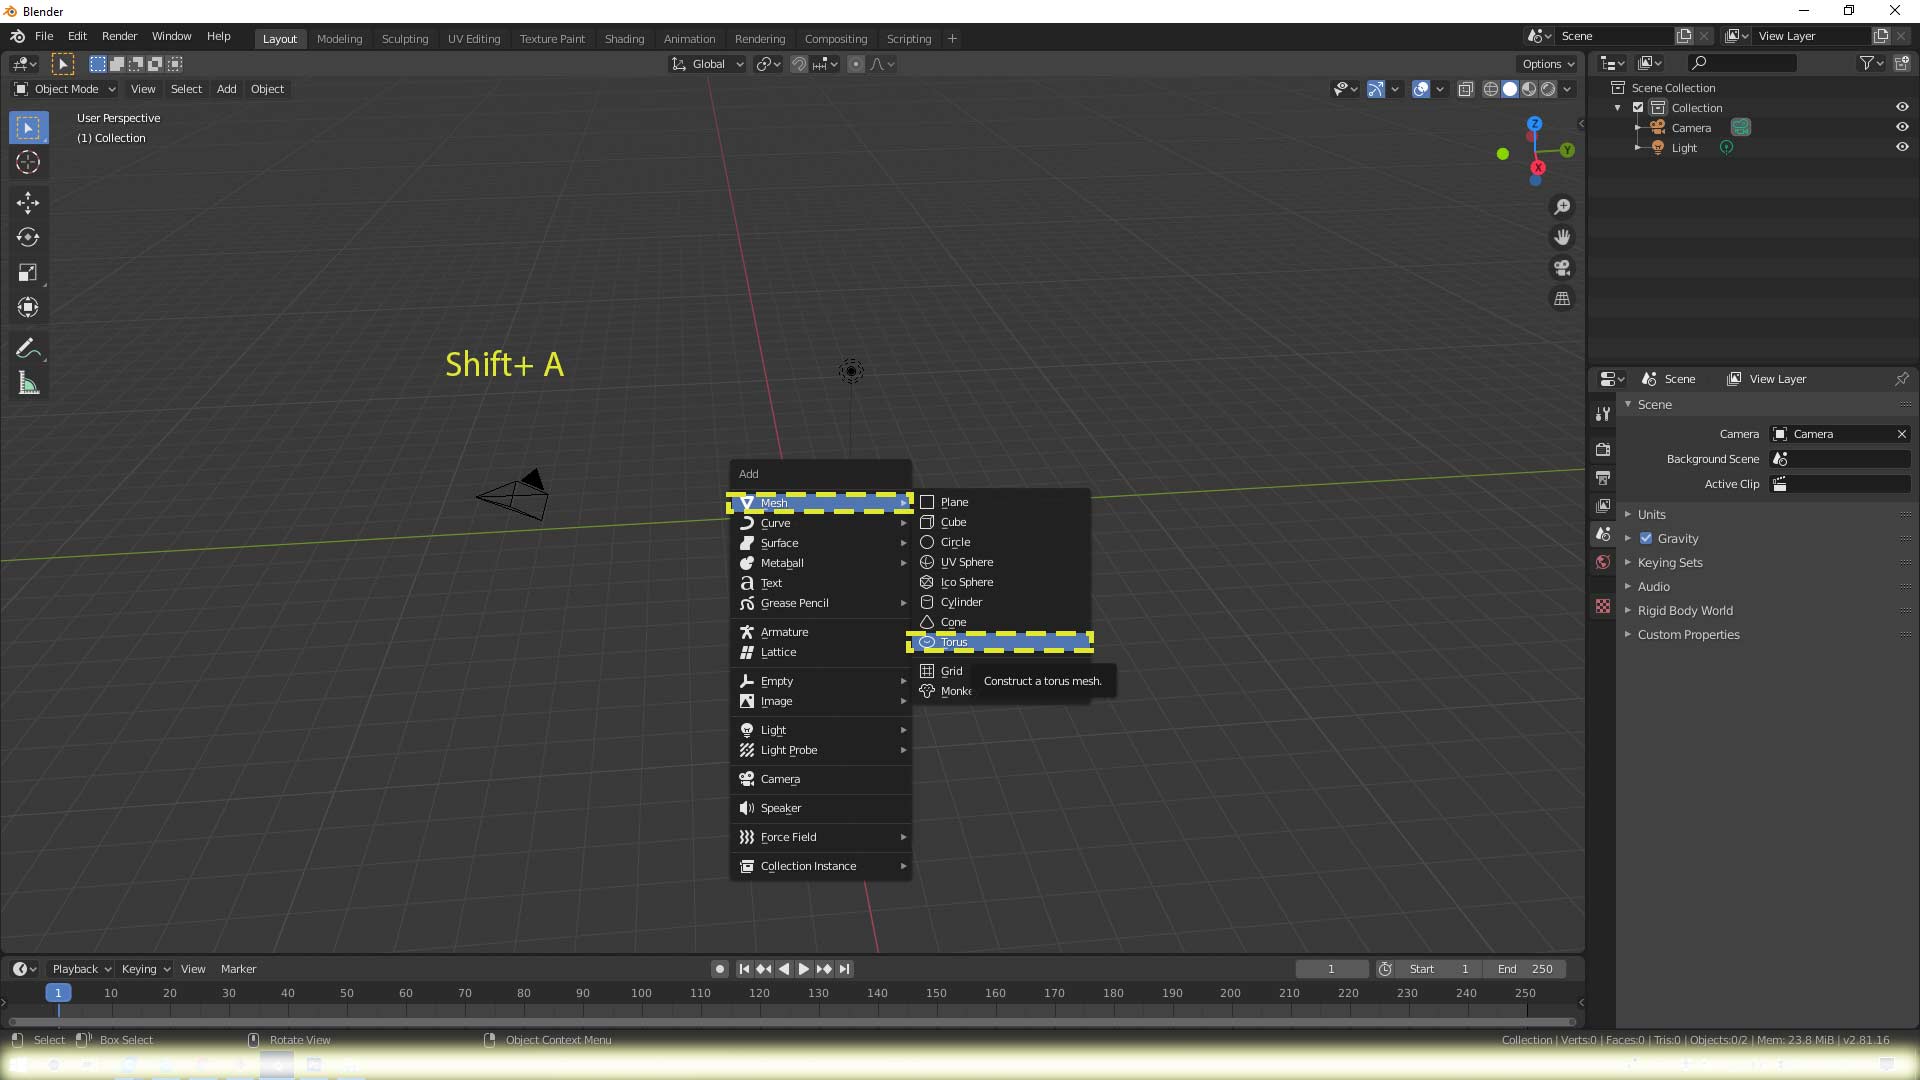
Step 2: After clicking on (Totus) you will get o body to modify it’s parameters,
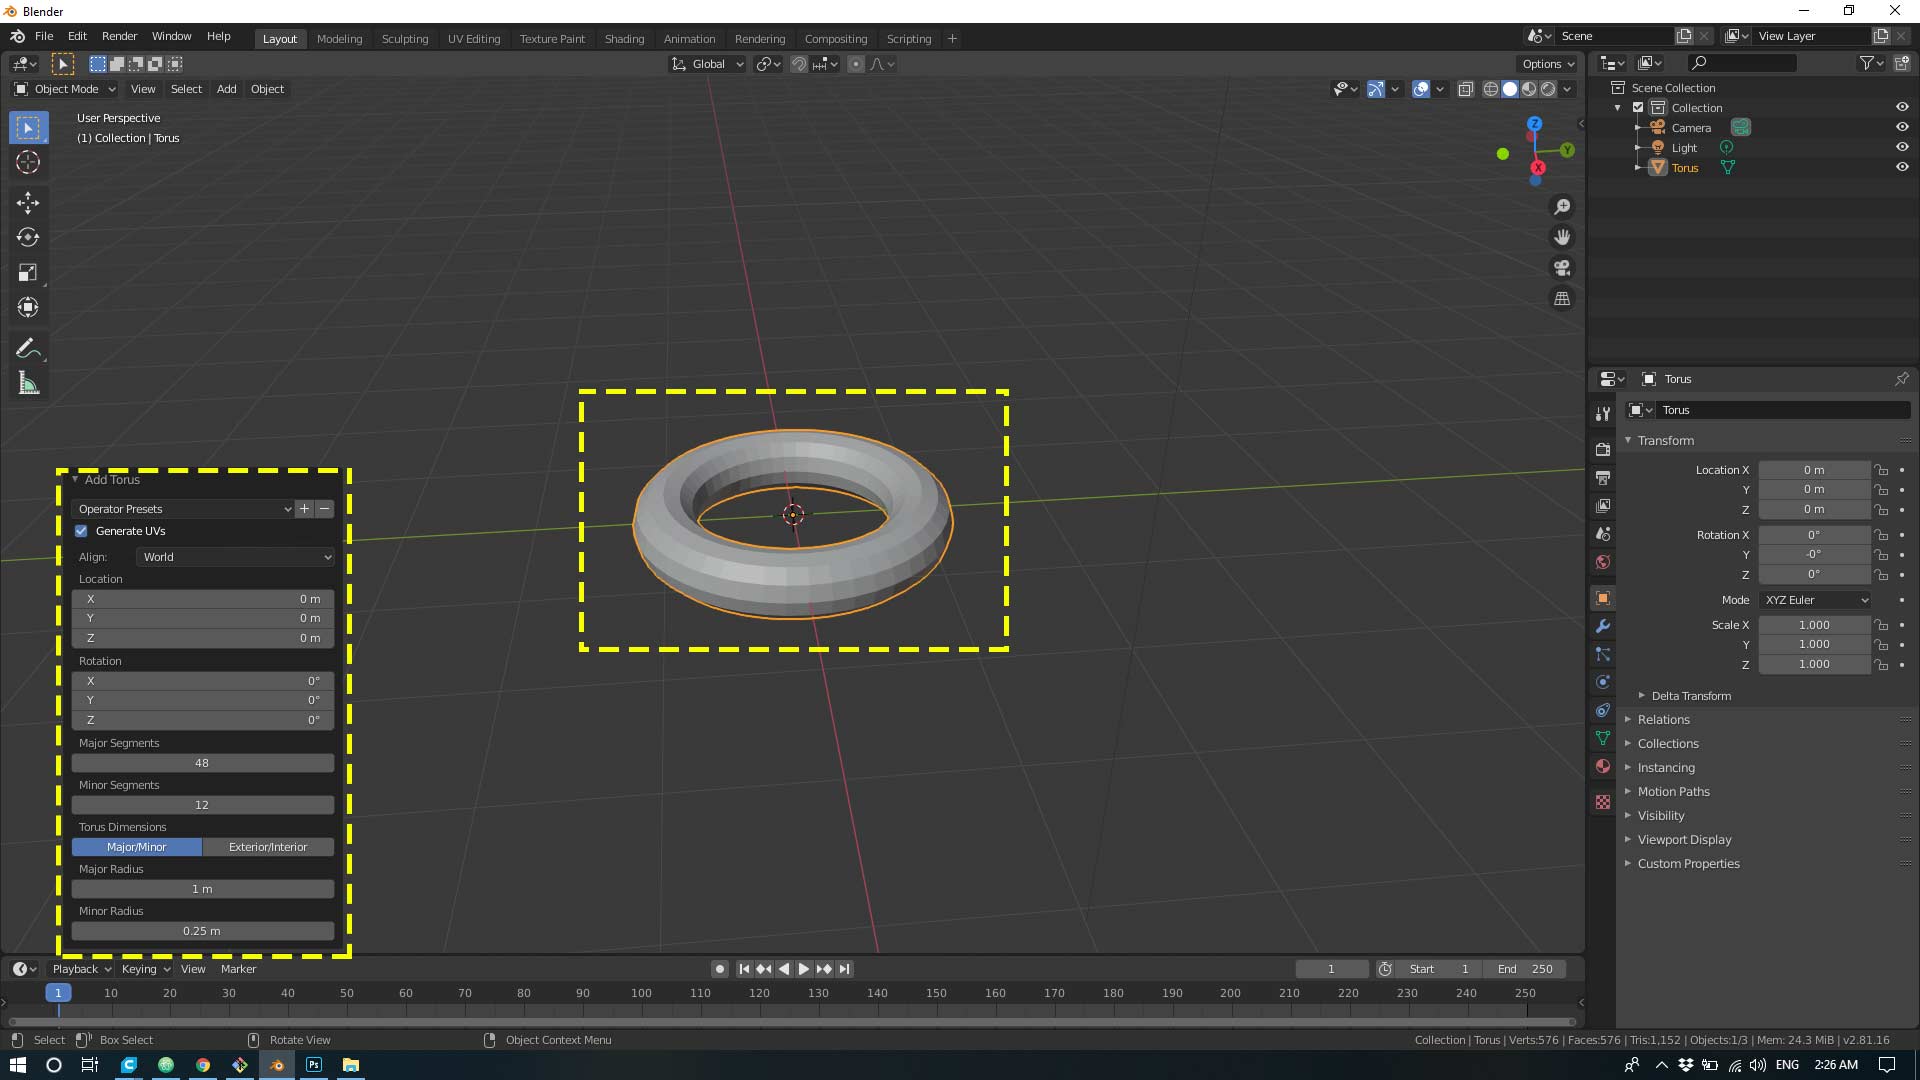
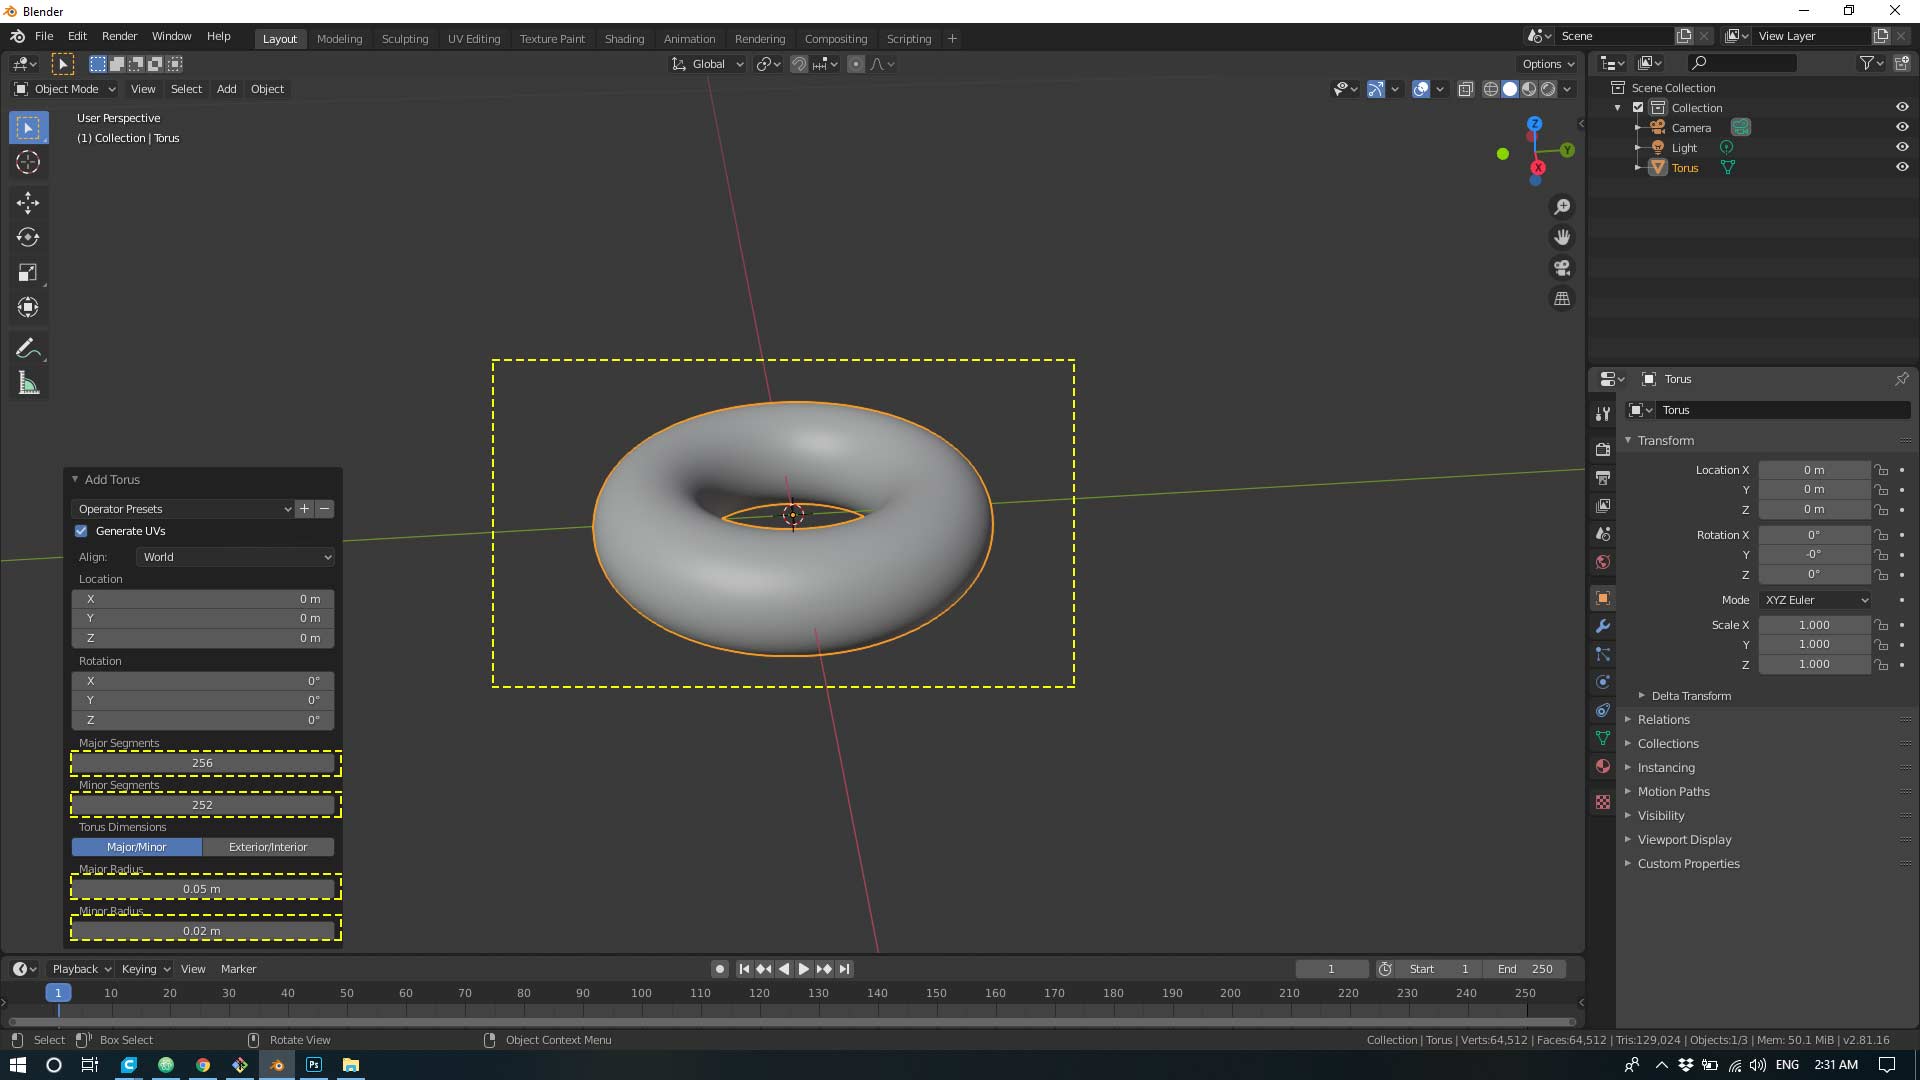
Step 3: Then you edit the parameters as shown on the left to get the same body ( once you finish with editing the drop menu will never exists anymore),
Step 4: Then from file you choose Export and click on “stl” extension to be able to import it on another software such on my case.
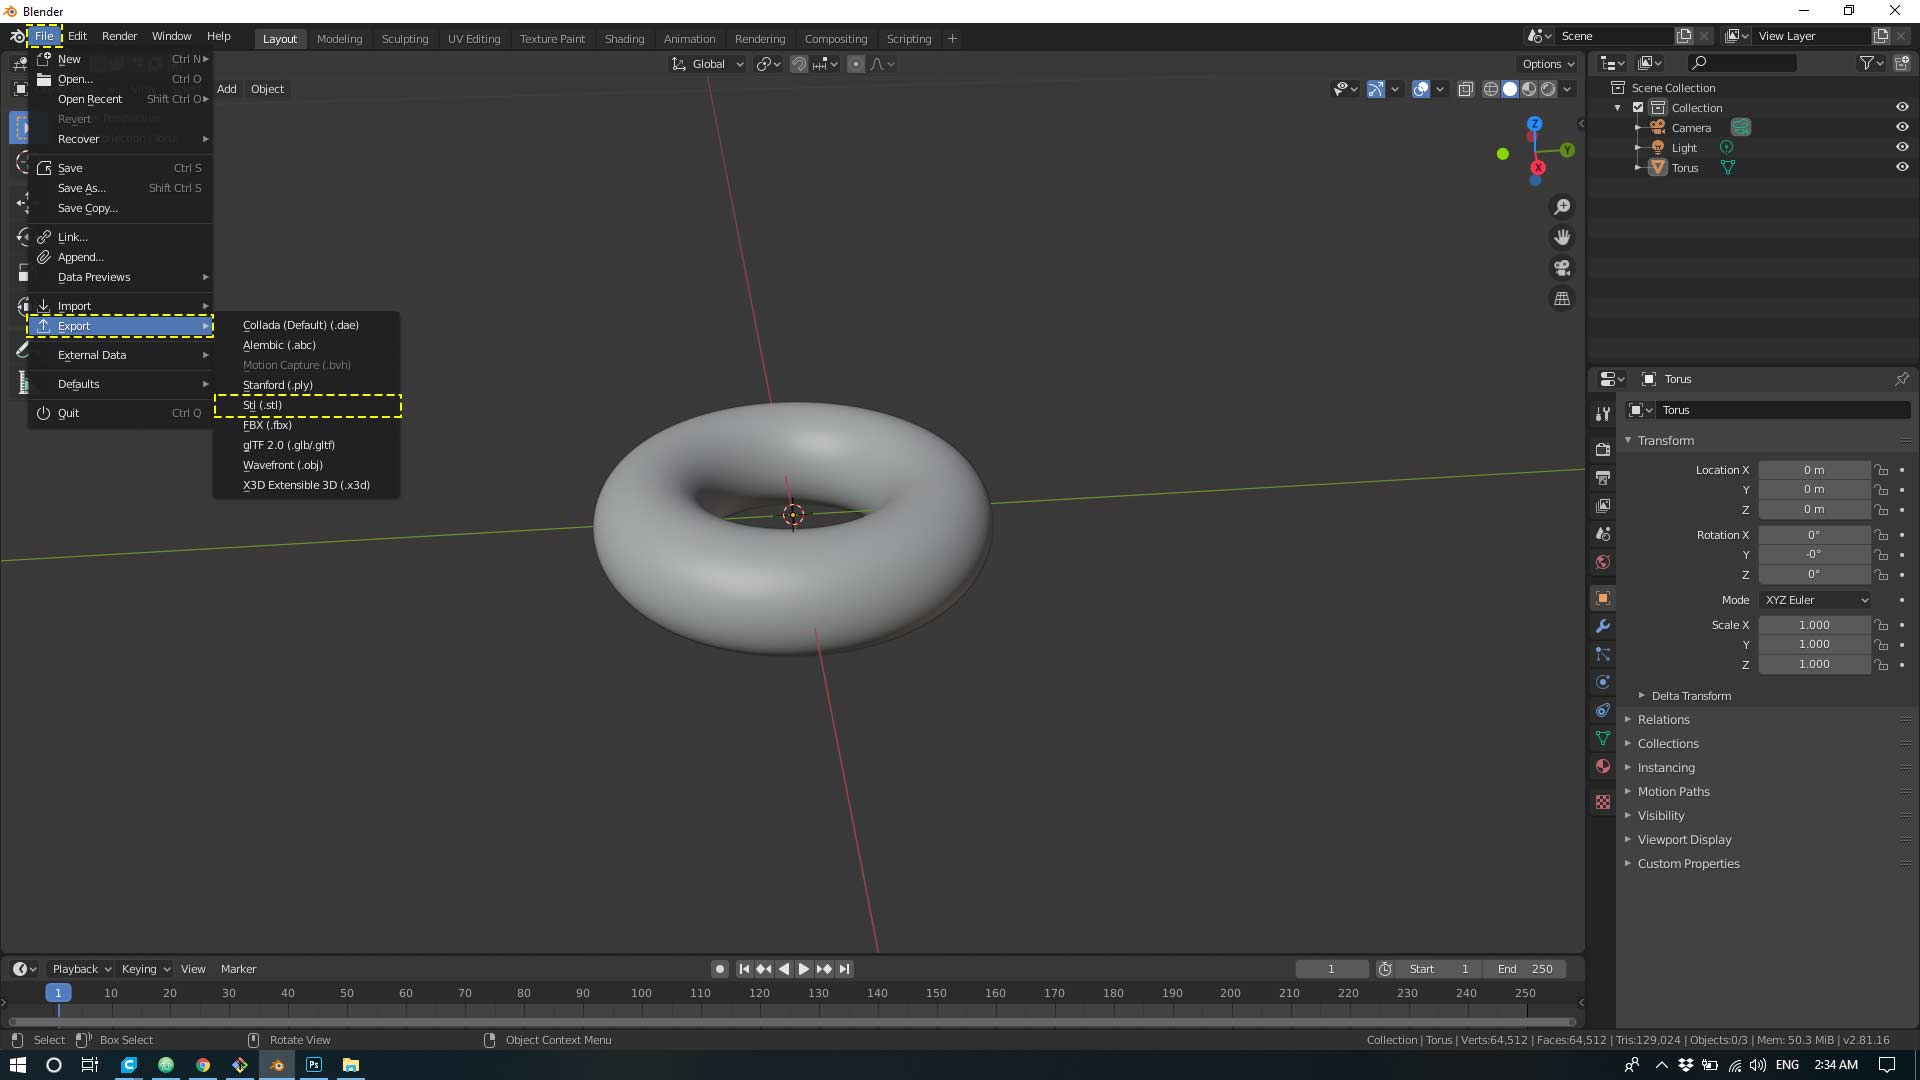
Then you will get your file ready to import it.
Step 5: open Mishmixer to modify the model and make a pattern as following.
Step 6: Click “Import” then choose the blender file.
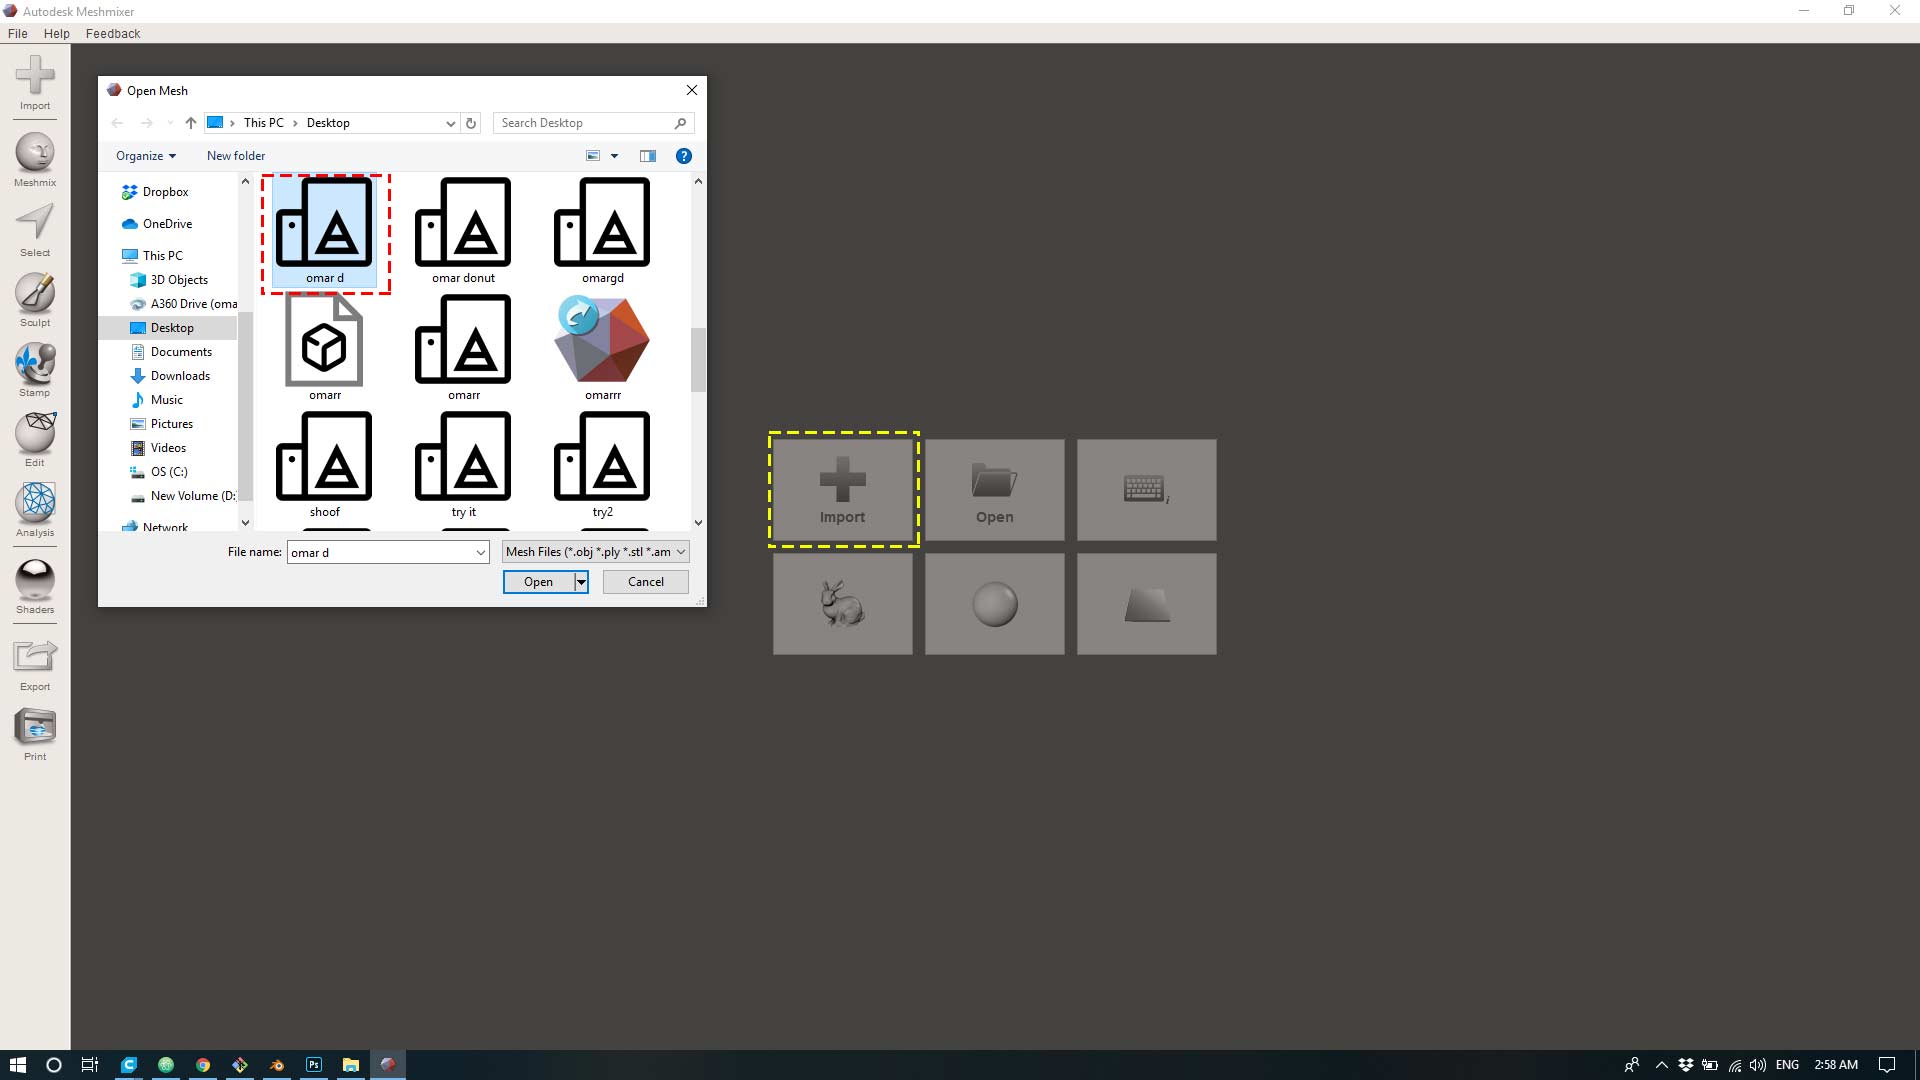
Step 7: Click on Edit then click on “make pattern”.
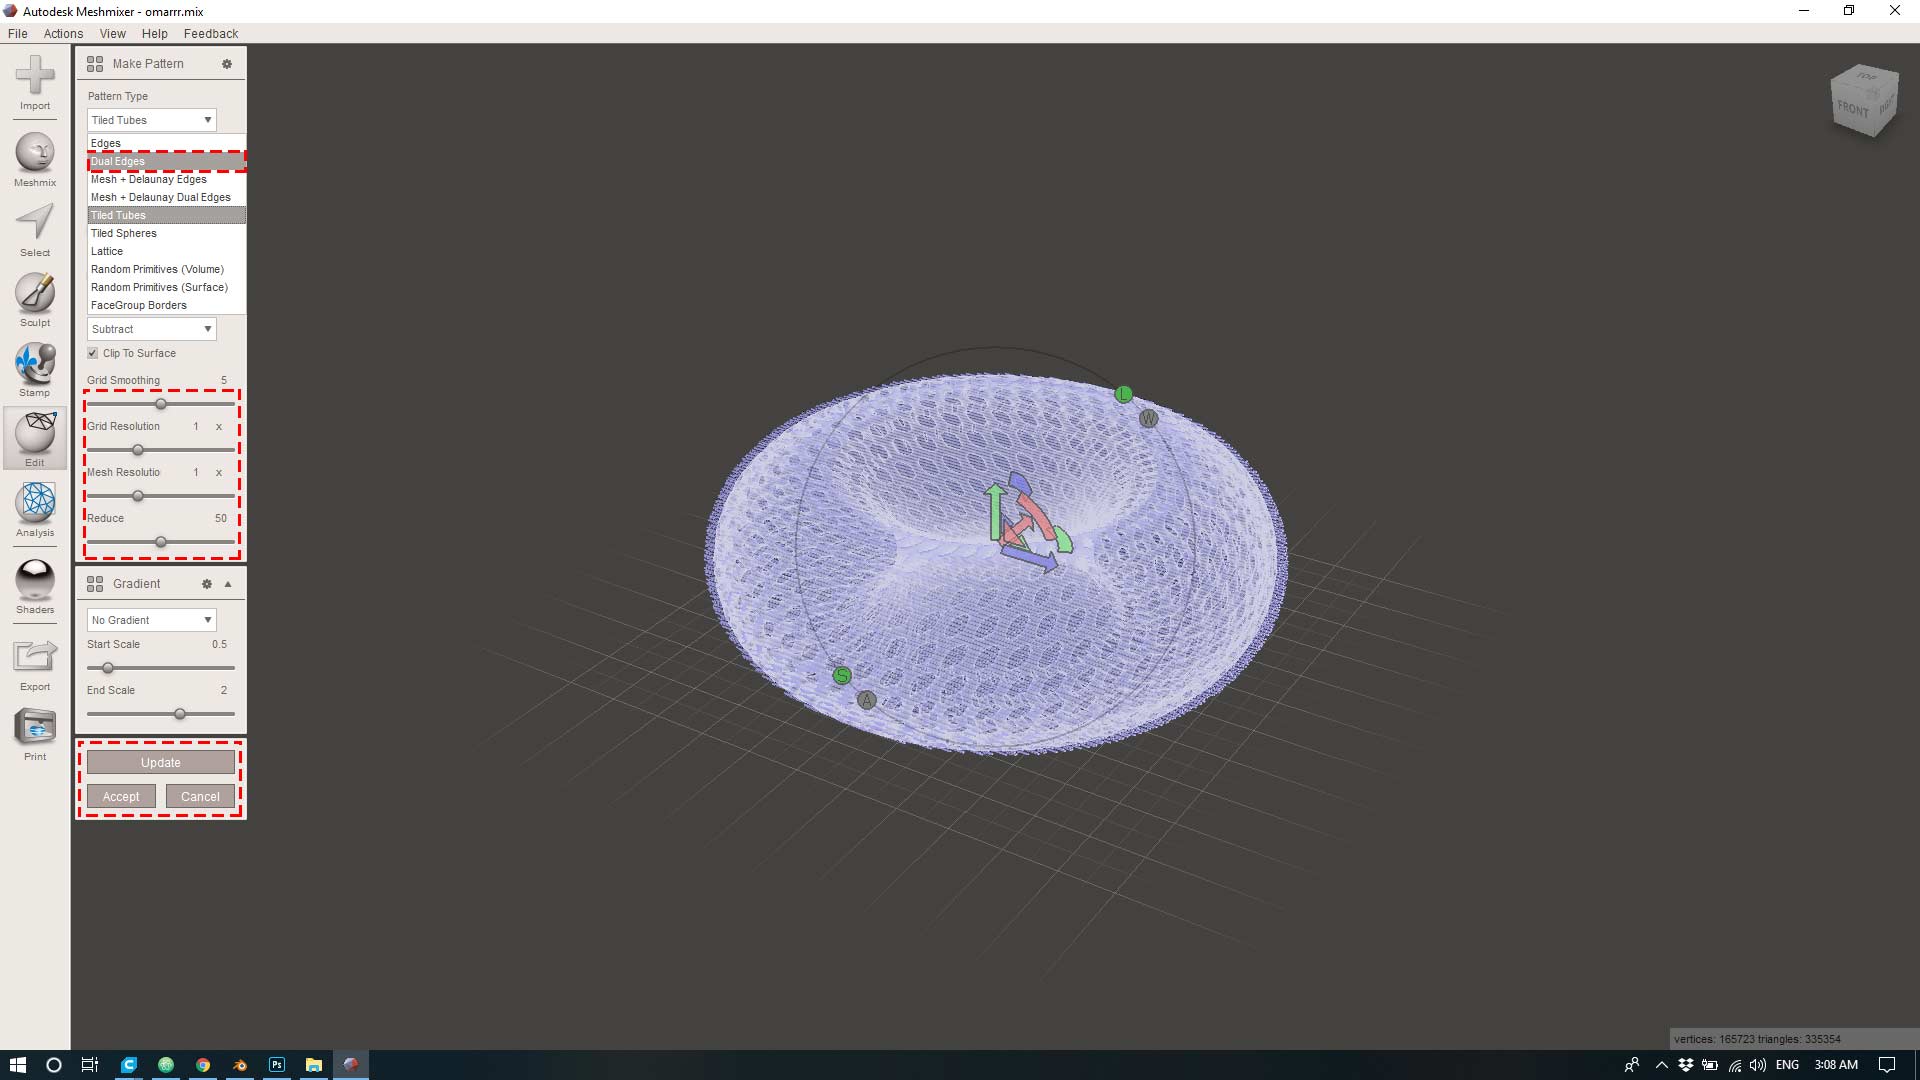
step 8: after you get your model patterned you export the file to “stl”, in order to be ready to import it to Cura ultimaker as following.
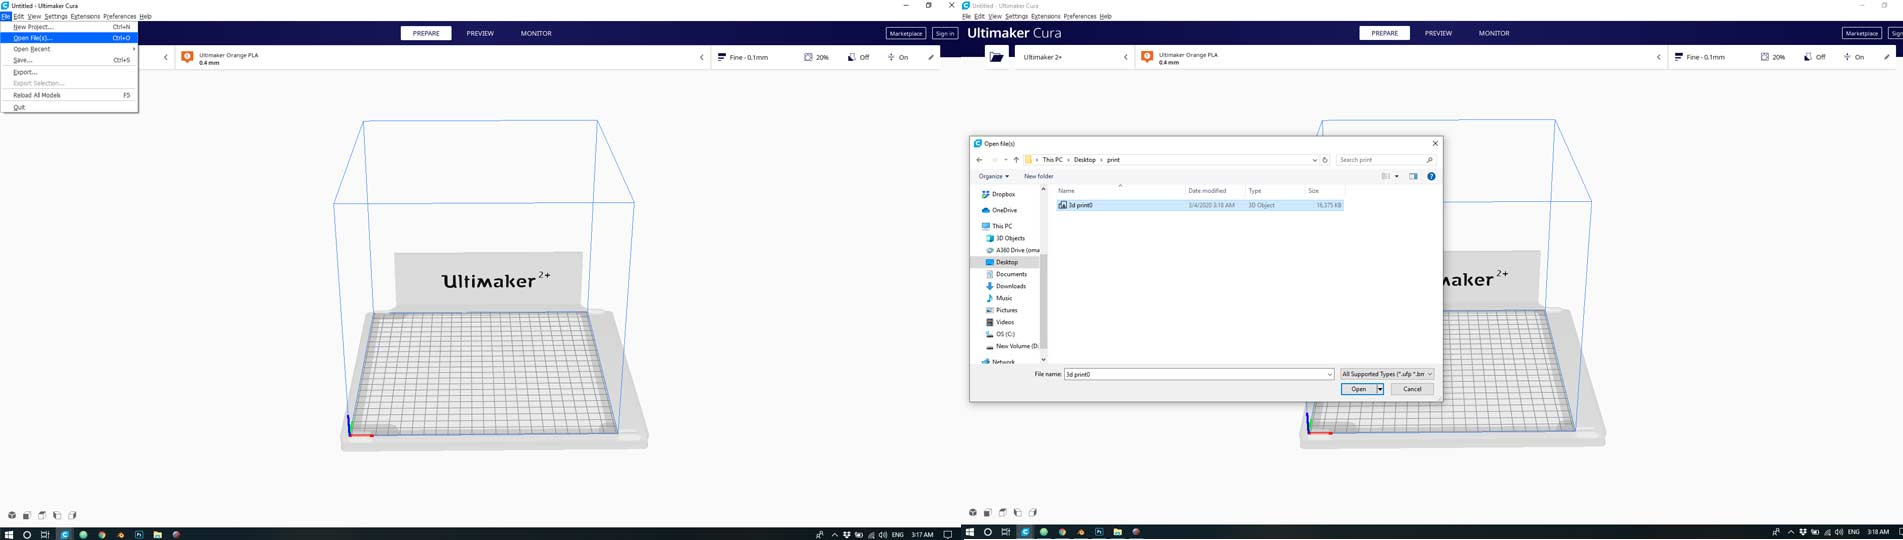
Step 9 : once the stl got imported to Cura it can bs modified as shown on the left, after this click on slice to get the model ready for printing and transformed to gcode.

Step 10: After slicing the model you will get the estimated time for print, the needed material and the weight of the print, then you click on preview to see how many layer the printer is going to print as shown in the right, then you export the file to gcode.
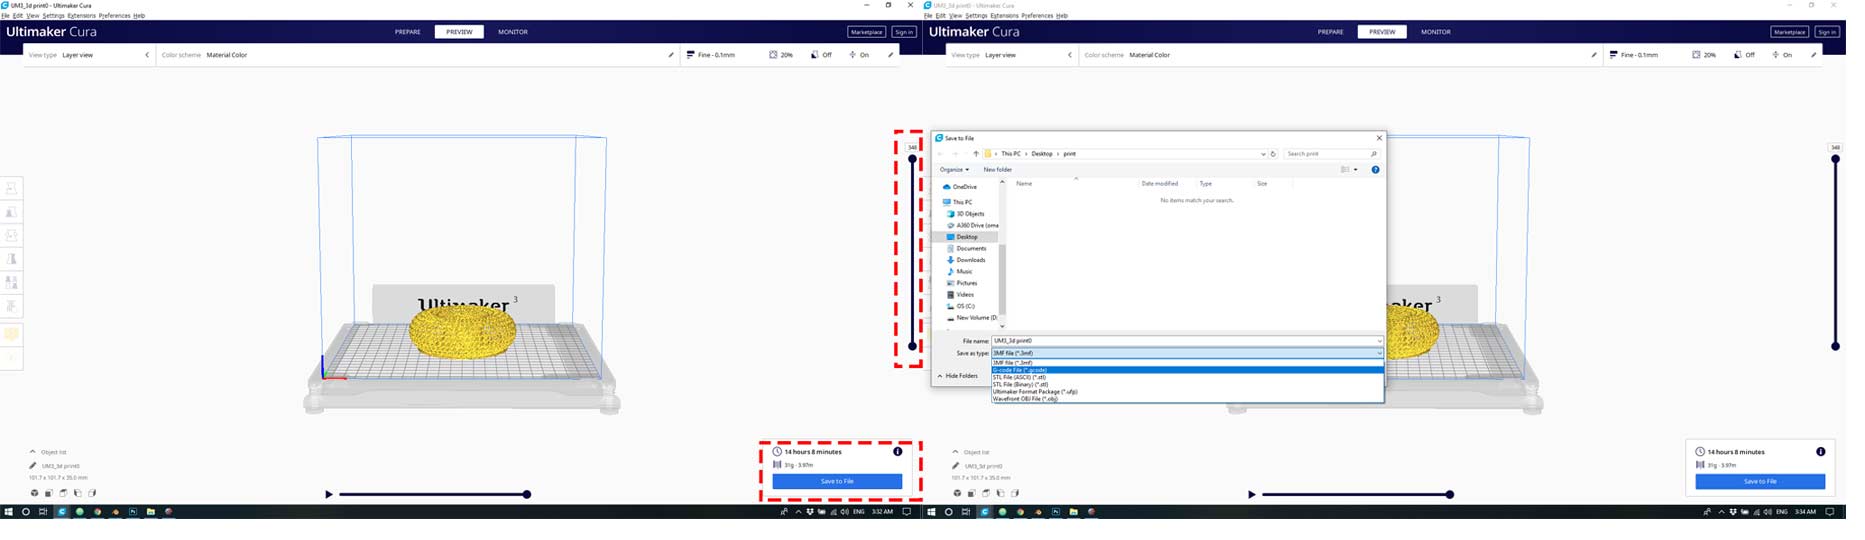
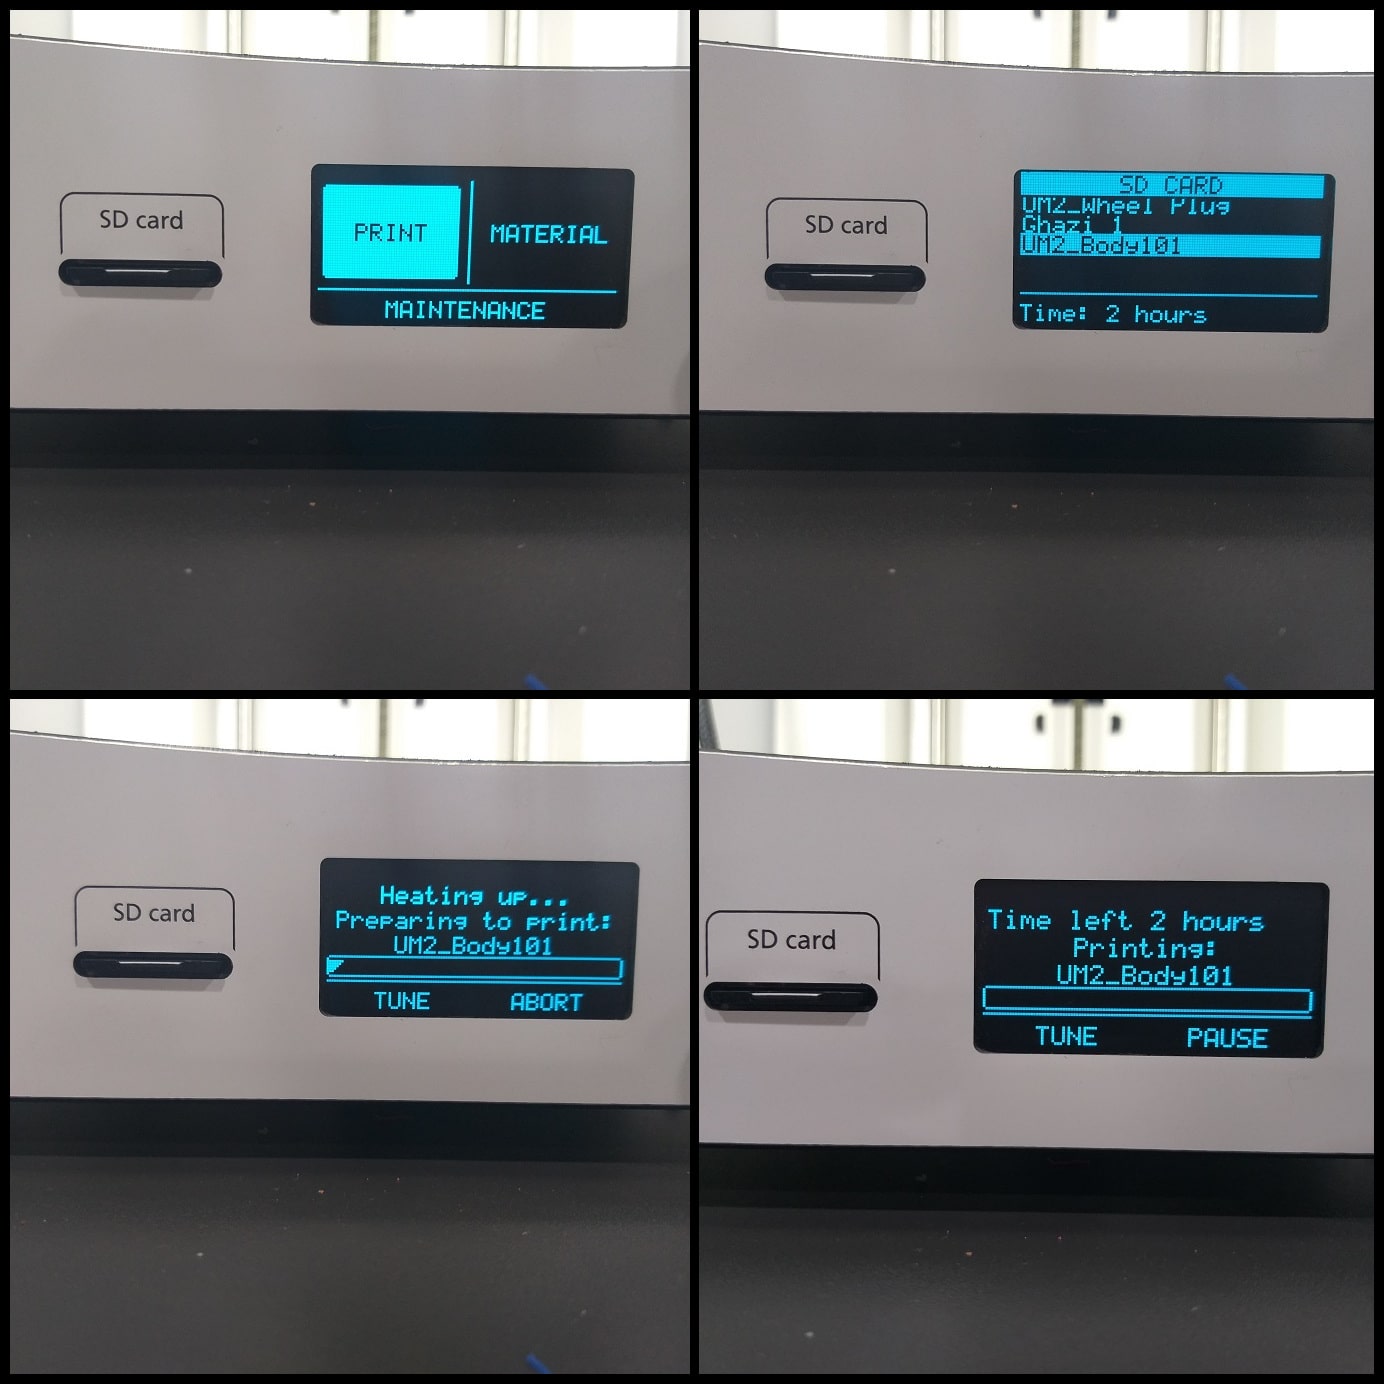
Step 11: Click on “Save to File” and save the gcode file to printer storage media. Make sure that the correct material (PLA 2.85 mm) and nozzle (0.4 mm) are used on the printer. Click on “Print” then find your model and press on the knob to select it and start printing. Printing will start heating up. When it is done printer will start printing and show remaining time.
Use the following printing settings.
    Quality
    Layer Height: 0.15 mm
    Line Width: 0.35 mm

    Shell
    Wall Thickness: 0.7 mm
    Top/Bottom Thickness: 0.6 mm

    Infill
    Infill Density: 50%
    Infill Pattern]: Grid

    Material Printing Temperature: 200 °C
    Build Plate Temperature: 60 °C

    Speed
    Print Speed: 45 mm/s

    Travel
    Enable Retraction: Yes

    Cooling
    Enable Print Cooling: Yes
    Fan Speed: 100%

    Support
    Generate Support: Uncheck

    Build Plate Adhesion
    Build Plate Adhesion Type: Brim
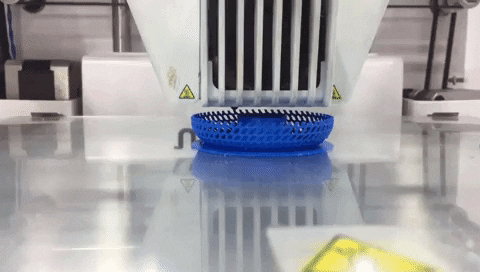
Hero SHOTS
3D Scanning
Software :
Object :
I have scanned my foot !
First you follow the steps below :
1- Open the software.
2- choose from the options the object size you willing to scan .
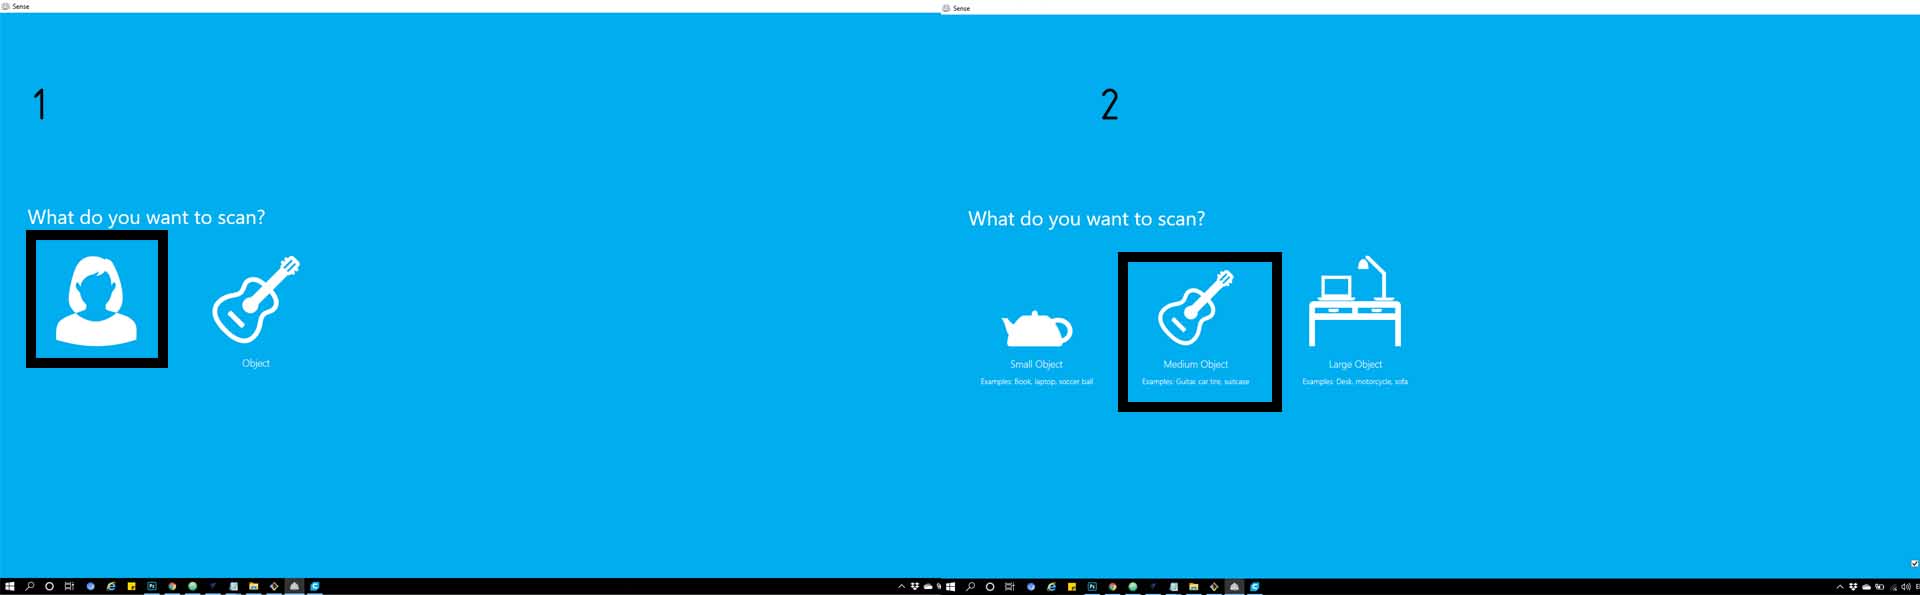
3- Turn 360 around the object.
4- then export the final scan.
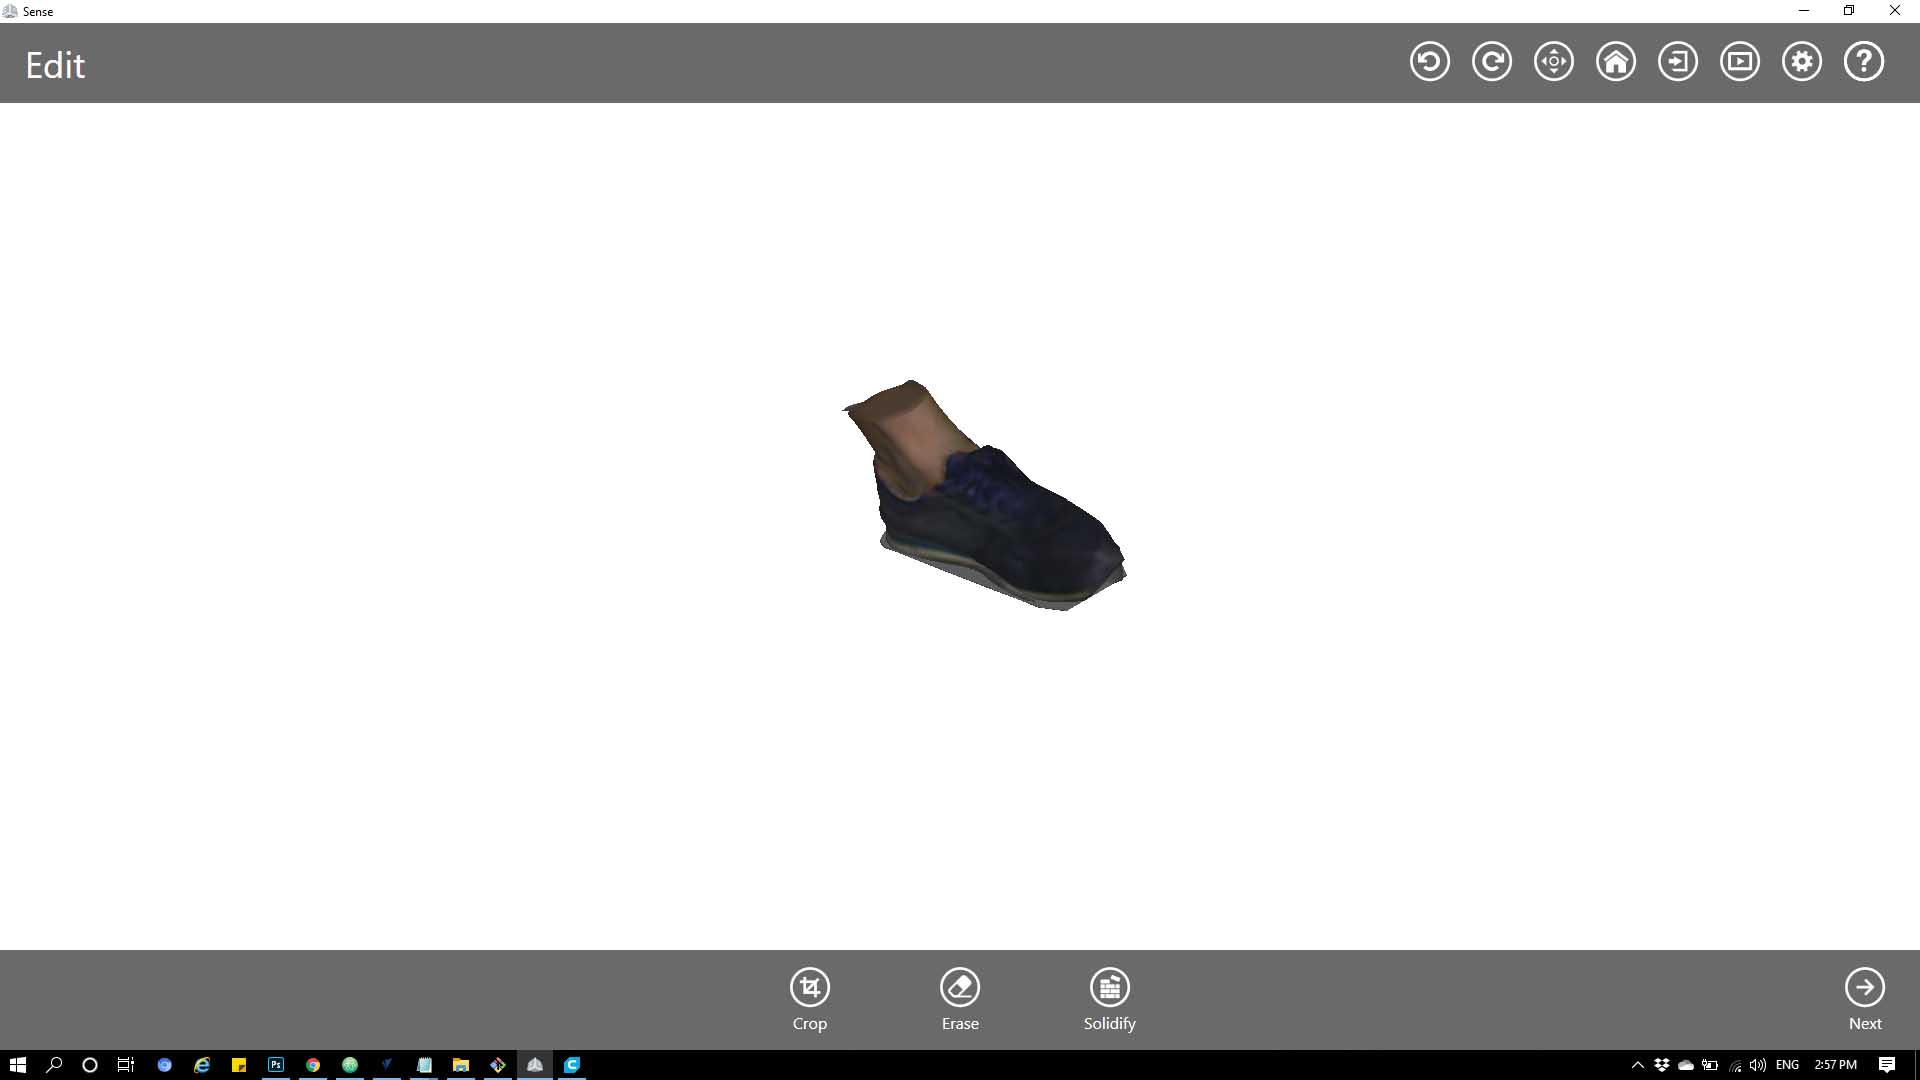
Hero shot
Preparing for 3D print
Files :