Week 20 – Final Project
Fab Academy – Week (1-20)
Date range: 21 Jan - 10 June
Instructor: Neil Gershenfeld
📌 Project Presentation
Slide:
Video:
🛠️ Project Overview
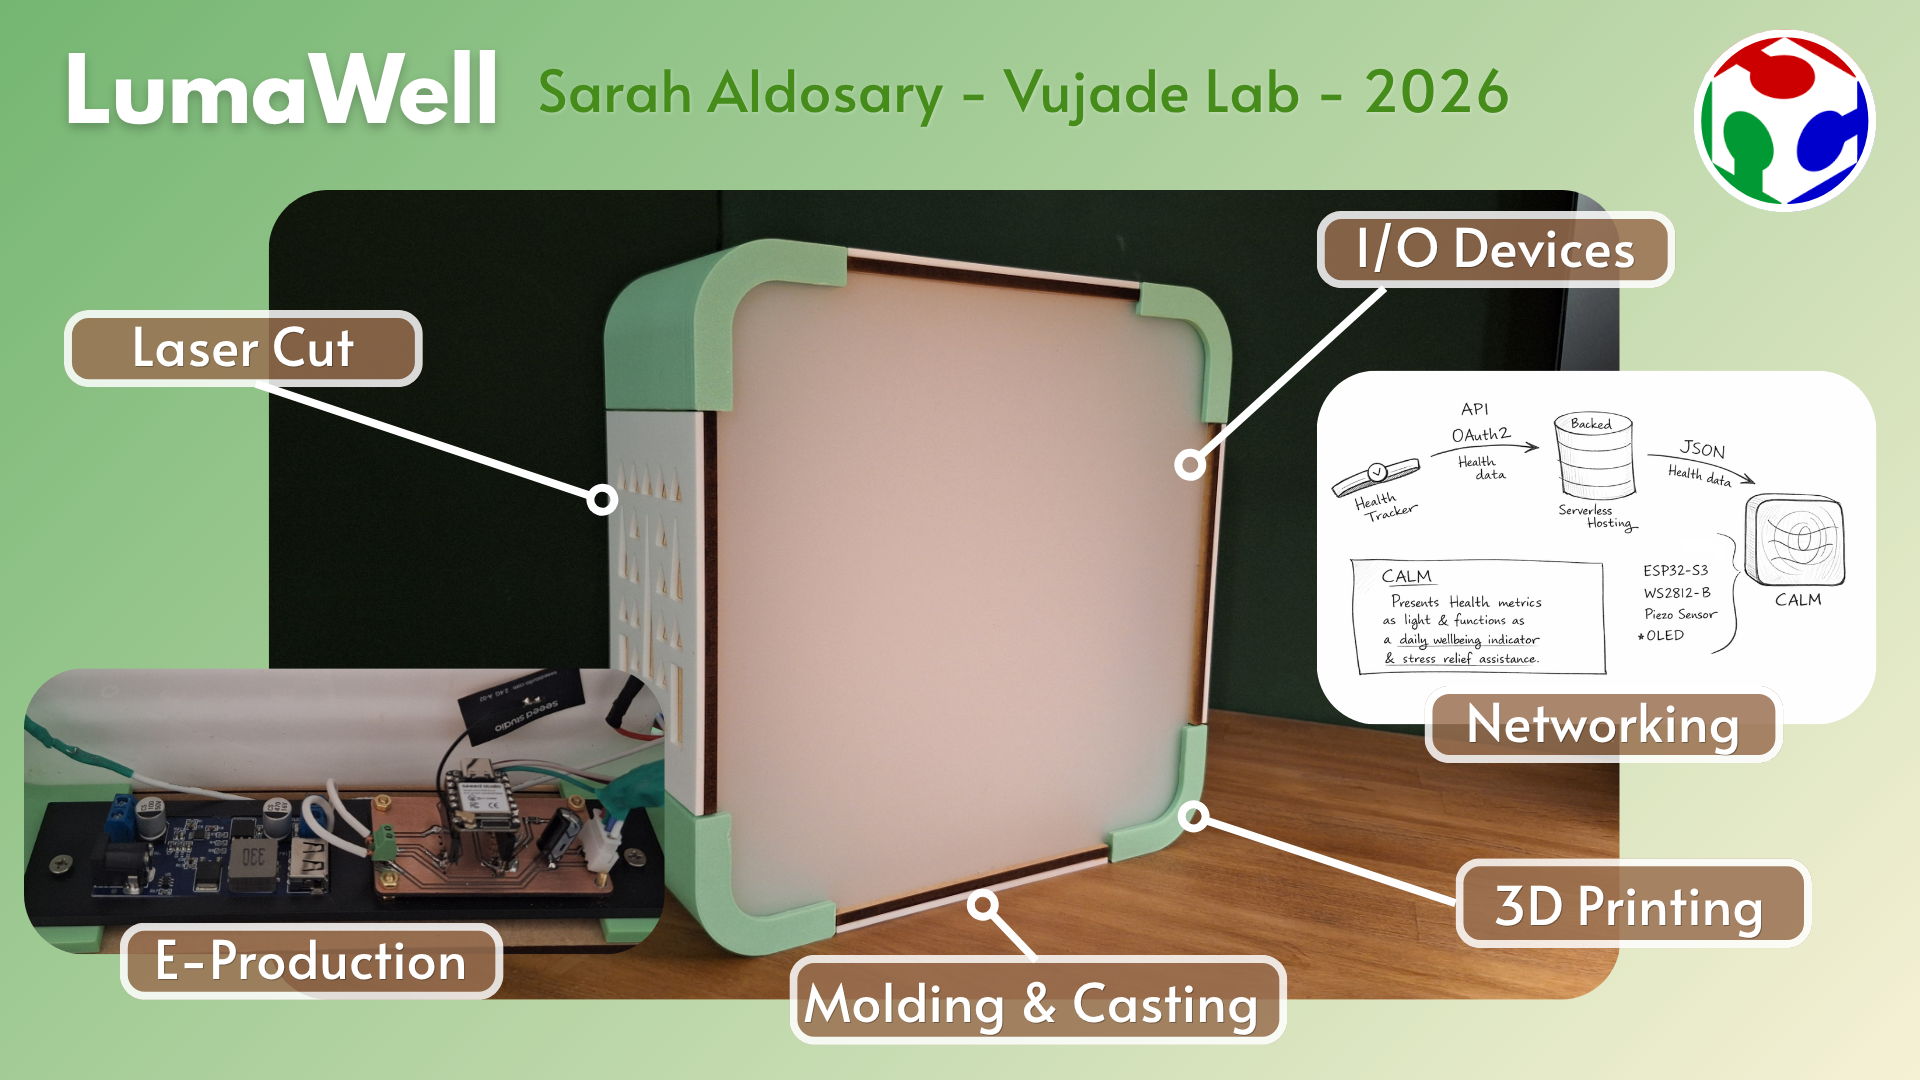
Project name: LumaWell (name suggested by ChatGPT) /Previously CALM
Vision:
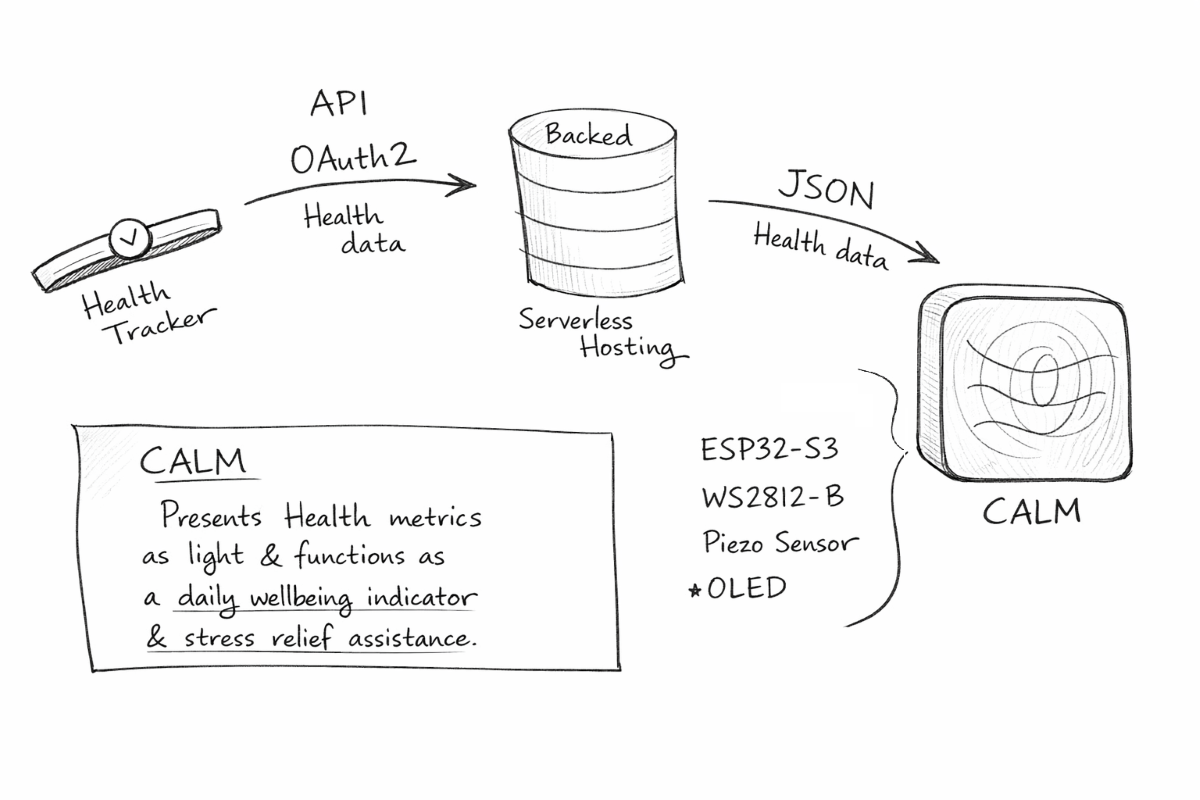
An ambient display unit that visualizes personal wellness data in real-time (or near real-time) using lights. It serves as a gentle reminder about daily health trends and encourages better habits.
This project explores how personal wellness data can move beyond dashboards and notifications and become part of the physical environment.
Instead of reading recovery, sleep, and strain as numbers on a phone, this device translates them into light behavior. It acts as an ambient bedside object that reflects daily wellbeing through color, rhythm, and intensity. The light remains subtle and atmospheric most of the time.
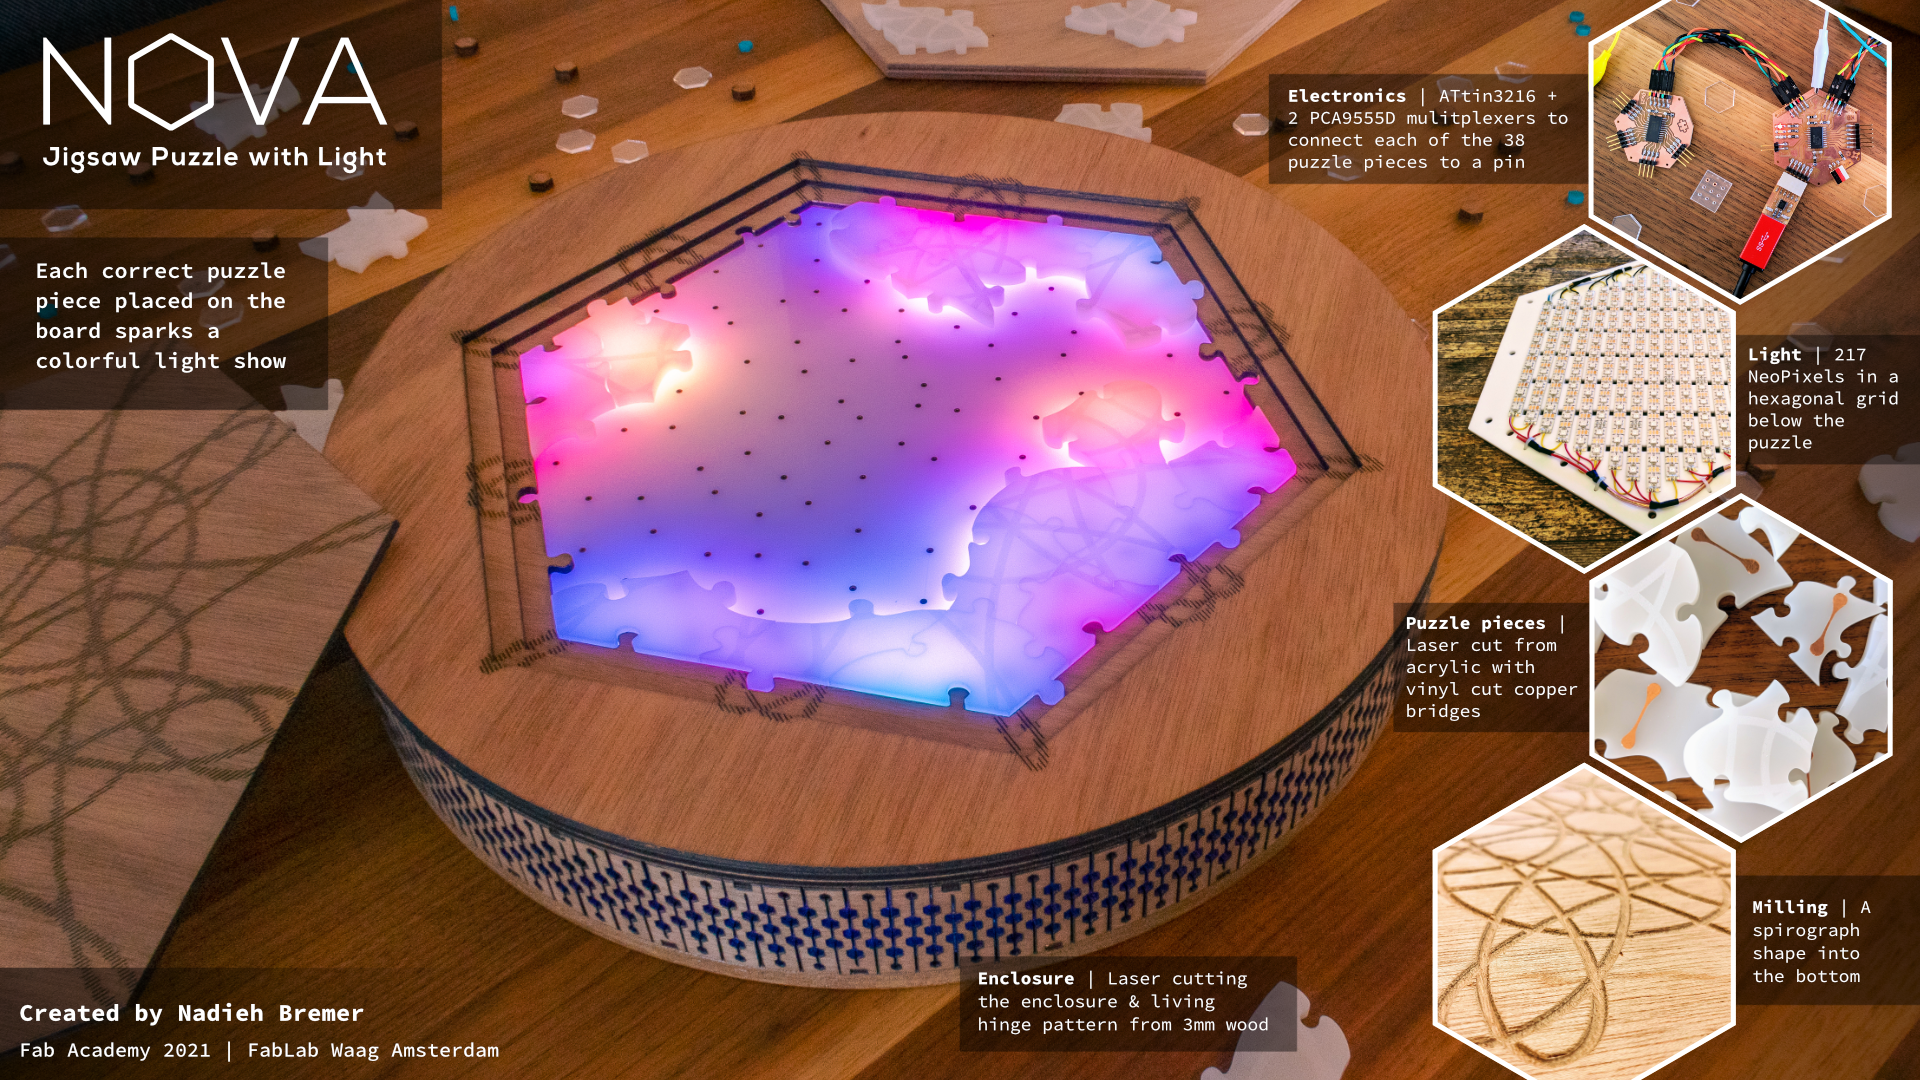
When I was browsing past Fab Academy projects, one project caught my eye: Nadieh's Jigsaw Puzzle. It was beautifully developed and incorporated lights in a very creative way. I love working with lights and exploring how they can communicate different ideas and emotions. I kept her project page open and found myself returning to it several times throughout the program.
Primary function:
To pull health data (e.g., sleep quality, recovery, daily activity) from a wearable app (Whoop) and display that data on a custom hardware unit using light patterns, and serves as guided-breathing coach and night lamp as well.
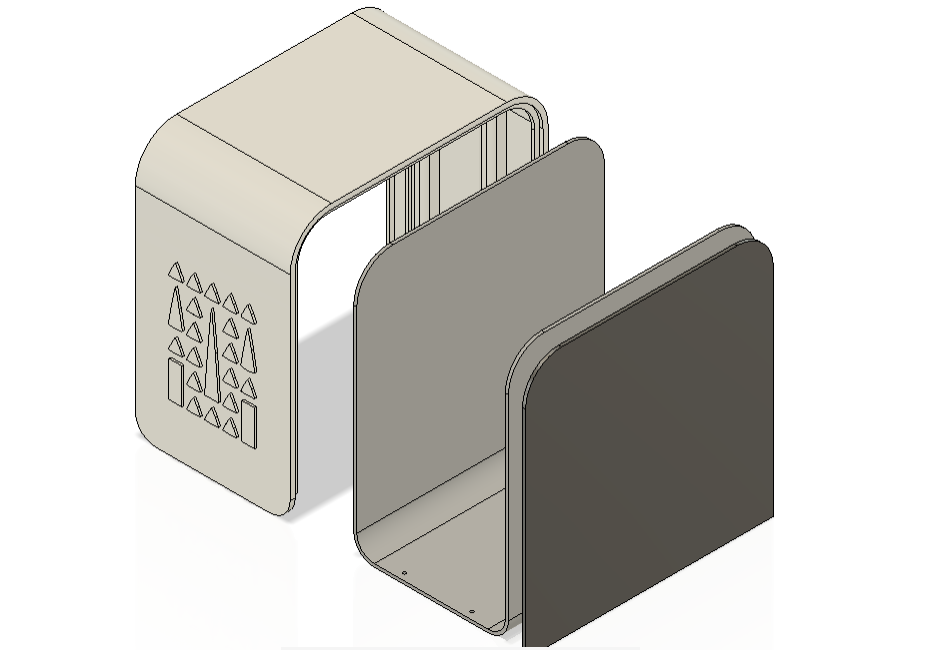
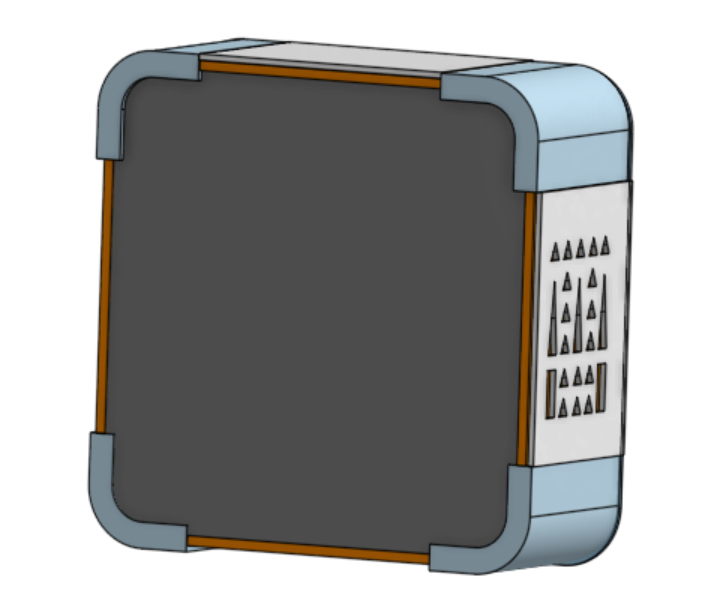
Design
I wanted the device to resemble a TV more than a night lamp because its purpose was to display light patterns that could be observed and interpreted, much like watching information being presented on a screen.
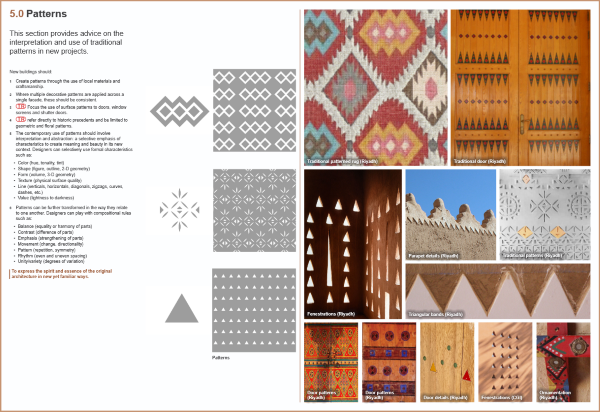
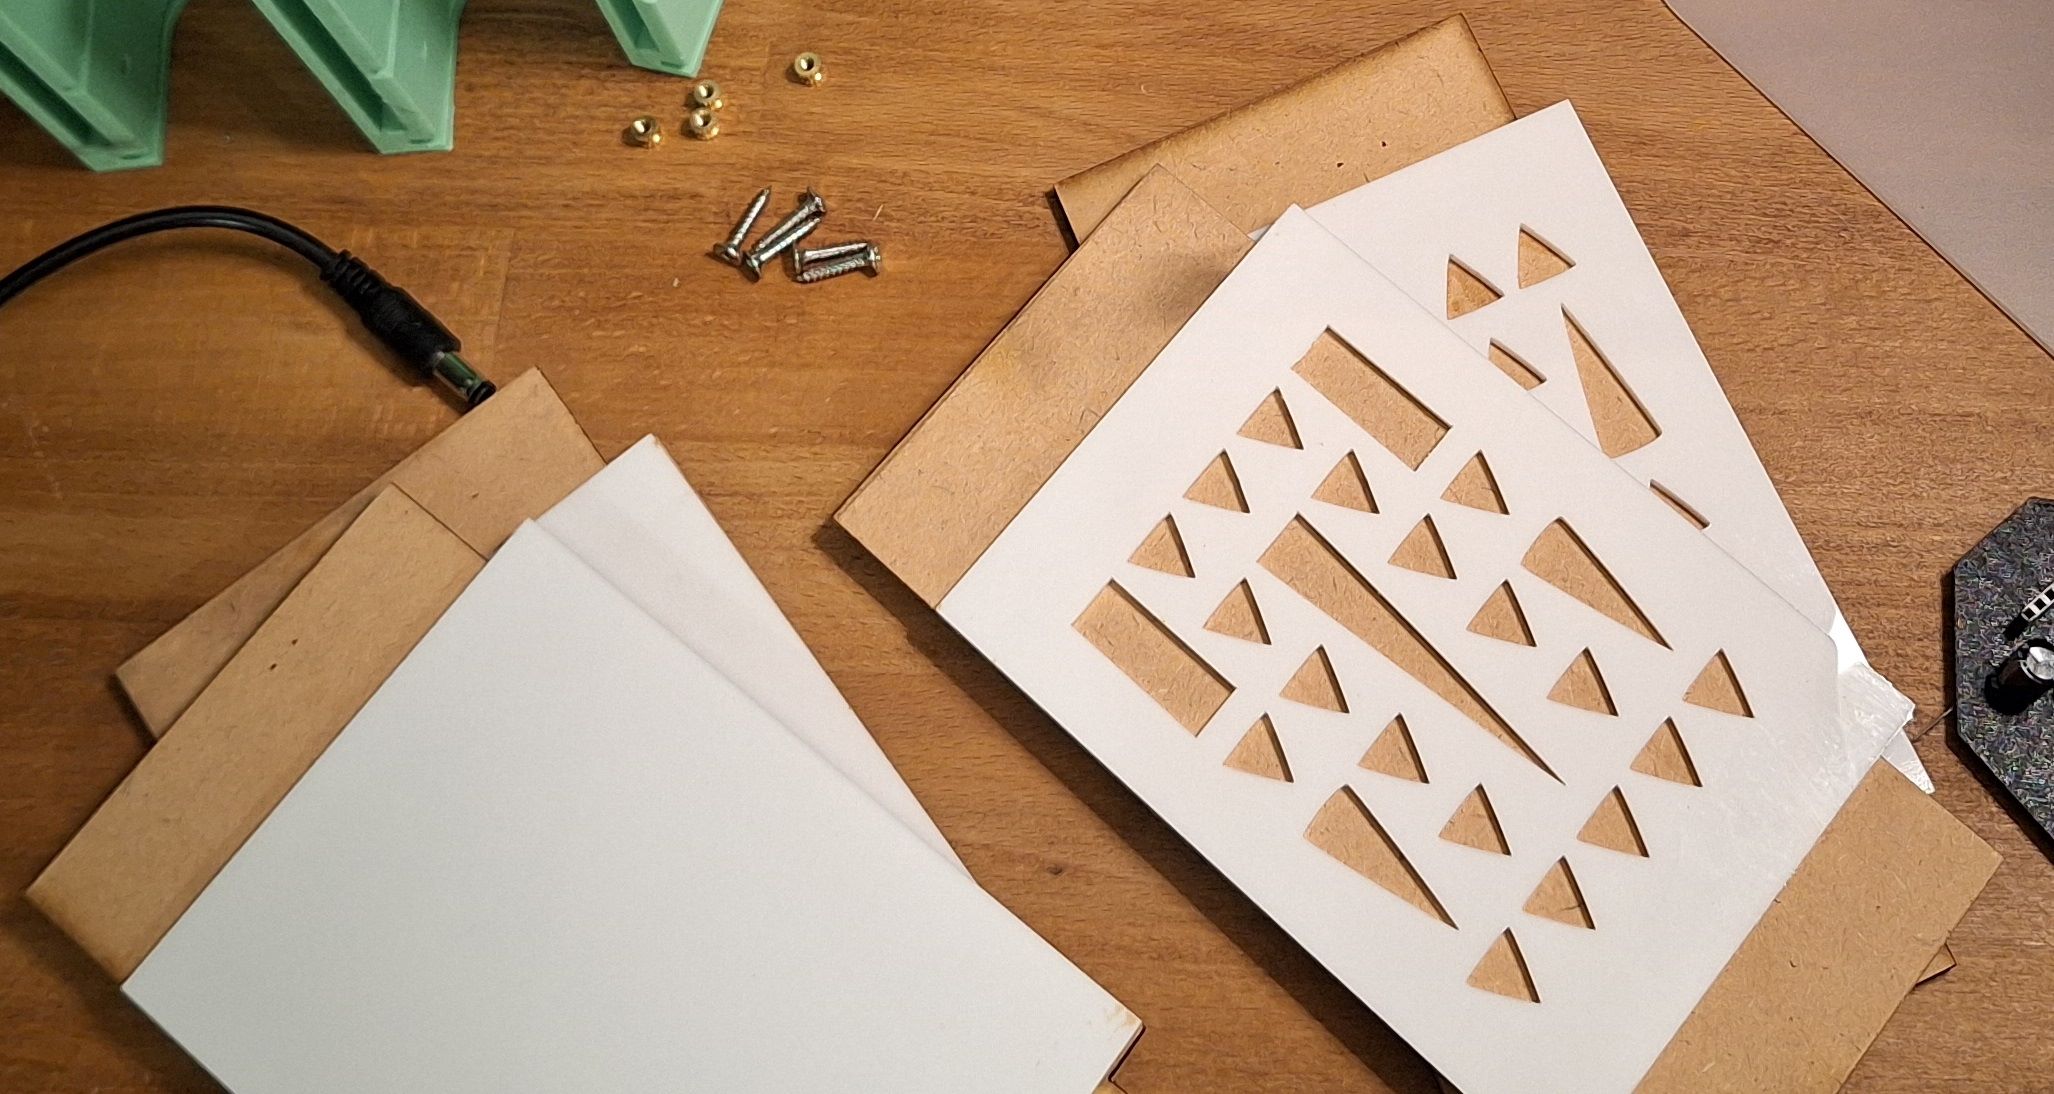
To make it more personal, I added laser-cut side panels inspired by Najdi design. These panels can be easily replaced or customized, allowing the device's appearance to be adapted to different preferences and styles.
Project Architecture
Functional Requirements
Ambient Mode (Default)
- The LED surface visualizes overall wellbeing through:
- Color (mapped to recovery and strain)
- Animation speed (mapped to stress)
- Transitions between states are smooth and gradual.
- The light is diffused to create a soft glow.
!(Ambient Mode)[20260605_153531.jpg]{ width="500"}
Breathing Mode (Interaction)
- A tap input triggers guided breathing mode.
- The LED surface visualizes breathing sequence.
- After the session is comlete (4 minutes), the device returns to ambient mode.
Sleep Announcement Mode
- Based on the recommended bedtime provided by Whoop, the lights gradually shift to a soft orange glow.
- This serves as a bedtime cue, while the warm color creates a low-energy atmosphere that reminds me to reduce screen time and turn off blue-light sources.
!(Sleep Mode)[20260605_153536.jpg]{ width="500"}
Bill of Materials (BOM)
| Item | Description | Qty | Price (USD) | Links | Notes |
|---|---|---|---|---|---|
| Enclosure | The enclosure described in the Structural Module | 1 | $13.33 | Includes 3D-printed and laser-cut parts | |
| MCU | Seeed Studio XIAO ESP32S3 | 1 | $12.00 | Amazon.sa | Compact, works well with WS2813 |
| LED Strip | WS2813 LED Strip 60 LEDs/m | 1 | $6.20 | AliExpress | 121 LEDs arranged in an 11×11 grid |
| Tap Sensor | Piezo Module | 1 | $2.67 | Amazon.sa | |
| Power Supply | 5V 3A regulated power brick | 1 | $10.67 | Amazon.sa | |
| Power Regulator | 5V buck converter | 1 | $2.67 | Amazon.sa | DC-DC buck converter |
| Data Resistor | 330 Ω resistor | 1 | $0.27 | Amazon.sa | Placed near strip DIN |
| Bulk Capacitor | 1000 µF, 10V electrolytic capacitor | 1 | $0.53 | Amazon.sa | Across strip +5V/GND |
| Wire (Power) | 20 AWG silicone wire | As needed | $2.67 | Amazon.sa | For 5V/GND runs |
| Wire (Data) | 24 AWG wire | As needed | $1.33 | Amazon.sa | Keep as short as possible |
| Connectors | JST PH 2.0 mm connectors (3-pin and 4-pin) | 2 | $2.00 | Amazon.sa | For LED strip and piezo sensor |
| Connectors | 2-pin screw terminal | 1 | $0.53 | Amazon.sa | For PCB power input |
| Connectors | DC barrel mount | 1 | $1.33 | Amazon Bazaar | For external power supply |
| Fitting | Threaded inserts | 20 | $2.00 | Amazon Bazaar | Used with screws |
| Total | ~$60.20 | Estimated cost |
🧪 Design & Fabrication Processes
CAD
I modelled multiple deigns in Fusion 360 and Onshape, each one has its limitations in fabrication, or advantages. Both designs have 3D printed parts and laser cut or CNC machined parts. Iteration 1 Design (Fusion360):
I was excited to start fabricating this design, the top cover was meant to be 3D printed and the bottom part laser cut acrylic then bent with heat. I wasn't sure how to ben the acrylic to make an exact specific radius, plus 3D printing would take a lot of time. So I decided to go with the second iteration deisgn, since I already tried printing some parts of it during the 3D printing week.
for more details on the process go to week 2 page.
3D Printing
During the 3D printing week I wanted to test one of my 3D designs and print it to see how it looks and feels. I chose to print the design from onShape for the enclosure, which was only the corners where I'll attach CNC-machined or laser cut panels to later. However, later I realized that the corners design didn't consider the led panels. I had already printed the 4 corners, so I thought I might be able to design something that could hold the led panel, and attach it to the corners. But it was just easier to fix the design and 3D print it again.
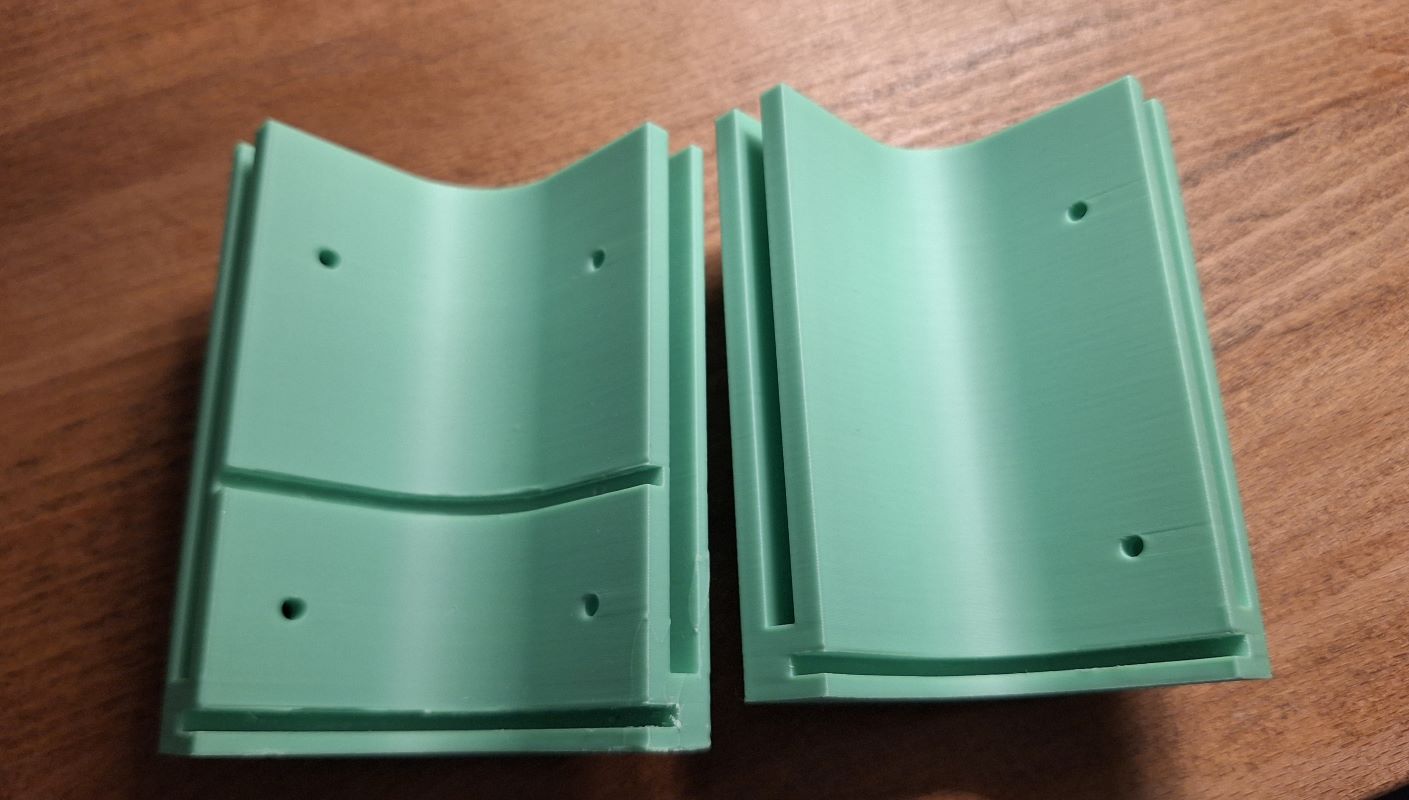
Computer Controlled cutting and machining
At first I was planning on CNC machining the side panels as one part, where I would mill the sides so they would slide into the corners. But I realized it would be a nightmare to align the parts correctly as they need to be milled on both sides.
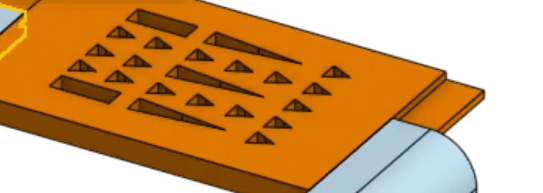
So, instead I decided to go with double layer laser cut side panels. And extra feature here, is that the top part can be omitted or customized to any design or pattern.
Electronic Design and fabrication
Electronic Design and Fabrication was the most challenging part in fab academy for me, as I had a little knowledge with electronic production, I had to learn and experiment a lot. The PCB for the final project was an a basic one but it was an accumulation of the past weeks, its input, output and MCU was the same for all the past electronics weeks. But it took me a lot of time and iteration to get a clean and good PCB.
🧪 Embedded Programming
- Microcontroller used
- Code snippet & explanation On this week we were supposed to do some embedded programming, and since I don’t have all the parts yet, and the concept is not finalized yet, I tried simulating programming the LED strip in TinkerCAD, more on this page of week 4
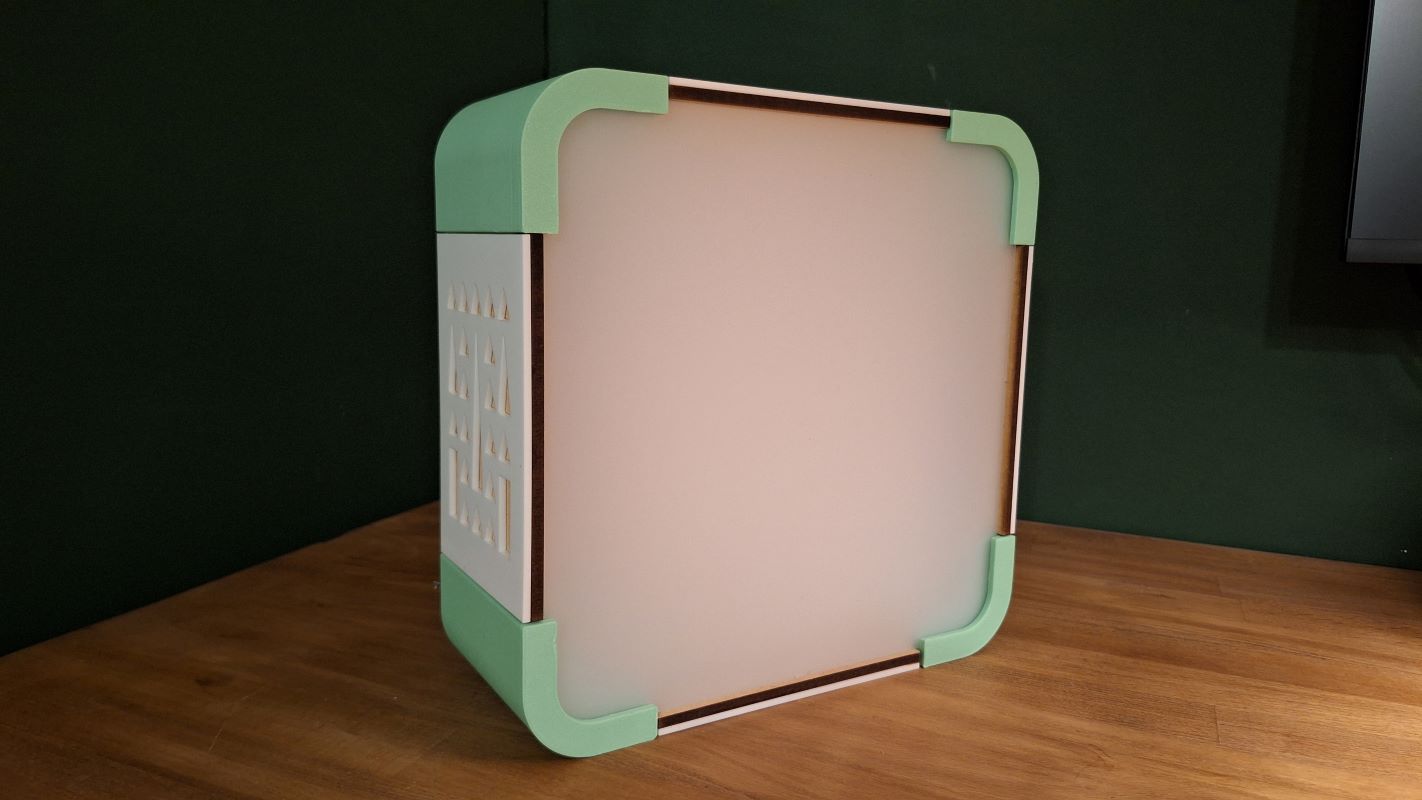
System Integration
During this week the final product became alive. I combined all the fabricated the parts and assembled them.
Here is a picture:
Results, & Conclusion
- What Worked
During the early stages of development, I experimented with a WS2813 addressable LED strip using a XIAO SAMD21. Initially, I was unable to control the LEDs because the microcontroller outputs 3.3 V logic, while the WS2813 strip is powered at 5 V and typically expects a higher logic-high threshold. As a temporary workaround, I powered the LED strip from the SAMD21's 3.3 V output, which allowed communication to work reliably.
For the final project, I initially assumed that a logic level shifter would be required to convert the ESP32-S3's 3.3 V signal to 5 V. However, after further research and testing, I found that the system works reliably without a level shifter as long as the data line between the ESP32-S3 and the first LED is kept very short and the strip is powered from a stable external 5 V supply. Since the first LED regenerates the signal for the rest of the strip, communication remains stable throughout the chain.
- What Didn't Work
The tap detection did not perform reliably during testing. Initially, the issue was suspected to be related to the placement of the piezo sensor inside the enclosure, but I tried reading the values and the threshold was clearly a little bit over 100. However, further debugging showed that the sensor was generating valid signals, but the pulses were often too brief for the ESP32-S3 to consistently detect while simultaneously updating the 121-LED display.
Because the microcontroller spends a significant amount of time refreshing LED patterns, some tap events were missed, resulting in inconsistent behavior. This revealed a limitation in the signal conditioning and event detection design rather than in the mechanical mounting of the sensor.
As a temporary solution, the issue was partially mitigated in software by modifying the detection logic to better capture short-duration pulses. However, a hardware-based solution is needed to provide more reliable performance in future iterations.
- What's Next
For the next development phase, I plan to improve the tap detection circuit by adding hardware signal conditioning between the piezo sensor and the ESP32-S3. The current design relies on detecting short analog voltage spikes directly in software, which can lead to missed events while the microcontroller is busy updating the LED array. To address this, I will investigate implementing a peak-detection circuit using a diode, capacitor, and discharge resistor. This circuit would hold the piezo signal for a longer duration, allowing the microcontroller to detect taps more reliably and reducing dependence on software timing. Initial software modifications have improved performance, but a hardware-based solution is expected to provide more consistent results..
🧩 Files
- Design files
- Code
- Downloads
Future Work: Phase 2
I began prototyping a second iteration of this project to explore additional capabilities. During Wildcard Week, I experimented with mechanical movements designed to feel calming and mimic the rhythm of breathing. This is the second iteration, mounted on the device:
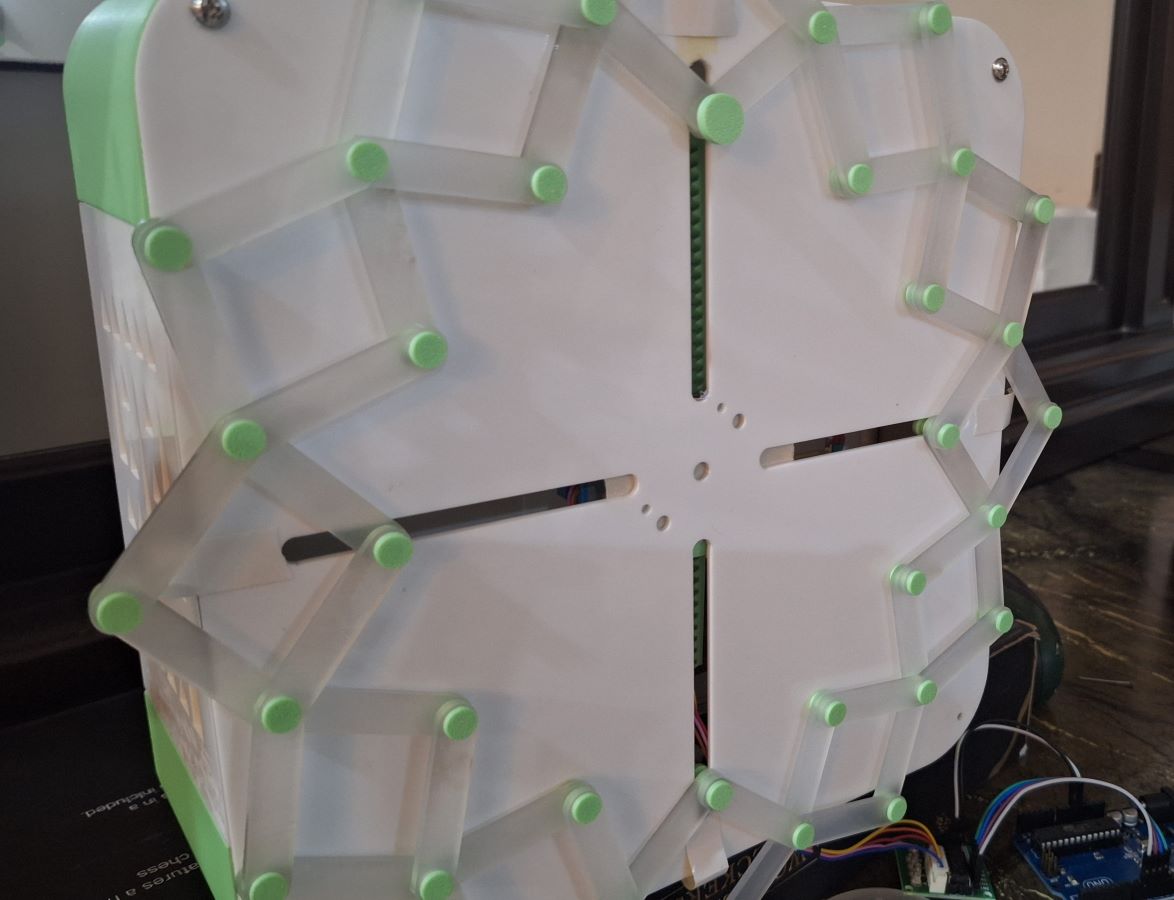
- Phase 2 is intended to introduce an additional layer of complexity to the project and make it feel more alive and responsive.
- I plan to cover the moving parts with washi paper or another lightweight material to create the impression of a chest expanding and filling with air during breathing.