Week 11 – Networking and Communications
Fab Academy – Week 11
Date range: 1 - 7 April
Instructor:
🧠 Learning Objectives
- Demonstrate workflows used in network design
- Implement and interpret networking protocols and/or communication protocols
📋 Assignments
Individual Assignment
- design, build and connect wired or wireless node(s) with network or bus addresses and a local input and/or output device(s)
Group Assignment
- Send a message between two projects
- Document your work to the group work page and reflect on your individual page what you learned
🛠️ Tools & Materials
- Software (GitHub, Vercel, Whoop Developer, Google Gemini for generating code and debugging)
- Machines
- Materials
👥 Group Assignment
🧪 Process & Workflow - Individual Assignments
For this week, I am building a "bridge." My WHOOP (fitness tracker) has my health data in the cloud. My ESP32-S3 (microcontroller) is the brain of my project. To get the data from the cloud to the chip, I need a middleman. I am using Vercel to build that bridge. To fulfill the rest of the assignment I will connect ESP32-S3 with an ESP32-C3 via a wired network to make a buzzer sound every time the data is updated. Summary of the Network Hierarchy for this week
- Level 1 (Cloud): WHOOP API (The Data Source).
- Level 2 (Middleware): Vercel Serverless Function (The Translator/Bridge).
- Level 3 (Local Network): ESP32-S3 (The Client/Fetcher).
- Level 4 (Physical Bus): Serial connection to ESP32-C3 (The Output).
Step 1 – The Bridge
For this week, I am building a "bridge." My WHOOP (fitness tracker) has my health data in the cloud. My ESP32-S3 (microcontroller) is the brain of my project. To get the data from the cloud to the chip, I need a middleman. I am using Vercel to build that bridge.
- Step 1: The WHOOP "ID Card" (Developer Portal)
Before I can touch my data, I had to ask WHOOP for permission. I went to their Developer Portal and created an "App" called CALM. This gave me a Client ID (like a username for my project) and a Client Secret (like a password). I picked my project "Scopes": I selected all the opions.
- Step 2: Building the Bridge (Vercel & GitHub)
I want to keep communication clean and simple and avoid making ESP32 handle a complicated login screen with a "Sign In" button. That’s why I’m using Vercel as the backend for this project.
A little bit about Vercel:
Vercel is Serverless Middleware Layer.
For this project, I am utilizing Vercel's hobby license as a Cloud Platform as a Service (PaaS). In my project's context, Vercel serves as my Backend-as-a-Service (BaaS), acting as the critical link between the WHOOP Cloud API and my local hardware. It's for:
1. Serverless Functions (Middleware)
My project uses Serverless Architecture. Instead of running a full server 24/7, I have deployed a "Function" (whoop.js). This code only executes when my ESP32-S3 makes a request. This is a professional standard for "Lightweight IoT" backends, as it reduces resource consumption and cost.
2. API Orchestration & Security
The WHOOP API uses OAuth 2.0, a complex security protocol involving browser redirects and encrypted handshakes. Microcontrollers (like the ESP32-S3) struggle with the memory-heavy task of handling browser-based OAuth redirects. So Vercel performs the "API Orchestration." It manages the secret handshake with WHOOP, handles the Token Exchange, and then strips away the complexity—handing the ESP32-S3 only the raw data it needs (like a simple number for "Recovery").
3. CI/CD Pipeline (Continuous Deployment)
I have established a CI/CD (Continuous Integration/Continuous Deployment) workflow by linking Vercel to my GitHub repository (from my research it cannot integrate with self-hosted GitLabs like fabcloud).
4. Environment Secret Management
Security is a major component of professional networking. Vercel allows for Encrypted Environment Variables. I store my WHOOP_CLIENT_SECRET here so that it is never hard-coded into my script. This ensures that even if my GitHub repository were to become public, my private health data credentials remain protected.
I started by creating a repository to house my backend logic. Using a private repository ensures my project structure remains secure while I develop the API.
- I created a new private repository on GitHub named
calm-backend. -
I initialized the repository with a standard directory structure:
-
api/: A folder dedicated to Serverless Functions.whoop.js: The JavaScript file containing the logic for the WHOOP API handshake.
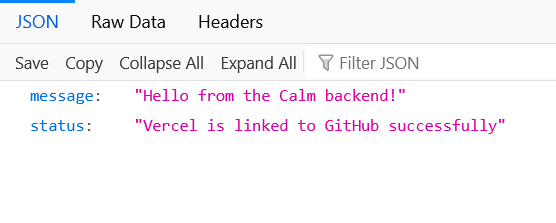
cpp export default function handler(request, response) { response.status(200).json({ message: "Hello from the Calm backend!", status: "Vercel is linked to GitHub successfully" }); } -
package.json: The manifest file that tells the cloud environment how to handle the project dependencies.
cpp { "name": "calm-backend", "version": "1.0.0", "description": "Bridge between WHOOP API and ESP32", "main": "api/whoop.js", "engines": { "node": "24.x" } } -
Once my code was in GitHub, I linked it to Vercel to turn my script into a live, globally accessible URL.
- From Vercel I created a new project and imported the
calm-backendrepository by linking to my GitHub repo. - For Framework Preset: I selected "Other" because I am building a lightweight API rather than a full frontend website.
- Root Directory: Set to
./(the top level of my repository).
- Root Directory: Set to
- Environment Variables (Security): This is a critical step for secure networking. I added my
WHOOP_CLIENT_ID,WHOOP_CLIENT_SECRETandWHOOP_REDIRECT_URISecret Environment Variables. This is to prevent sensitive credentials from being hard-coded in my script, protecting my private data. - I clicked Deploy, and Vercel automatically built a "Serverless" environment for my code.
With the site live, I performed a final "Handshake" check:
- I navigated to
https://[my-project-url].vercel.app/api/whoop. - The browser successfully displayed my JSON message. This proved that my Cloud Bridge was active and ready to communicate with both the WHOOP API and my ESP32-S3 hardware.
Step 2 – Verification
I successfully verified the end-to-end communication between the WHOOP API and my Vercel middleware.
I updated the whoop.js with code Generated by Gemini
export default async function handler(req, res) {
  const { code } = req.query;
  const REDIRECT_URI = "https://[my-project-url].vercel.app/api/whoop";

  // A secure, 10-character state string to satisfy WHOOP's security requirements
  const SECURE_STATE = "##random8charactersasakey##";

  // 1. Redirect to WHOOP if no code is present
  if (!code) {
    const authUrl = `https://api.prod.whoop.com/oauth/oauth2/auth?response_type=code&client_id=${process.env.WHOOP_CLIENT_ID}&redirect_uri=${encodeURIComponent(REDIRECT_URI)}&scope=read:recovery%20read:cycles&state=${SECURE_STATE}`;
    return res.redirect(authUrl);
  }

  try {
    // 2. Exchange code for Access Token
    const tokenResponse = await fetch('https://api.prod.whoop.com/oauth/oauth2/token', {
      method: 'POST',
      headers: { 'Content-Type': 'application/x-www-form-urlencoded' },
      body: new URLSearchParams({
        grant_type: 'authorization_code',
        code: code,
        client_id: process.env.WHOOP_CLIENT_ID,
        client_secret: process.env.WHOOP_CLIENT_SECRET,
        redirect_uri: REDIRECT_URI,
      }),
    });

    const tokenData = await tokenResponse.json();
    if (!tokenData.access_token) {
       return res.status(400).json({ error: "Auth failed", details: tokenData });
    }

    // 3. Fetch the latest Recovery score using the V2 API
    const recRes = await fetch('https://api.prod.whoop.com/developer/v2/recovery', {
      headers: { 'Authorization': `Bearer ${tokenData.access_token}` }
    });
    const recData = await recRes.json();

    // 4. Return the data
    const score = recData.records?.[0]?.score?.recovery_score ?? "Waiting for sync";

    res.status(200).json({
      recovery: score,
      status: "Success",
      timestamp: new Date().toISOString()
    });

  } catch (error) {
    res.status(500).json({ error: "Server error", message: error.message });
  }
}
If authentication works well, I’ll be redirected to whoop login page and have to give my app an authorization over my whoop data.

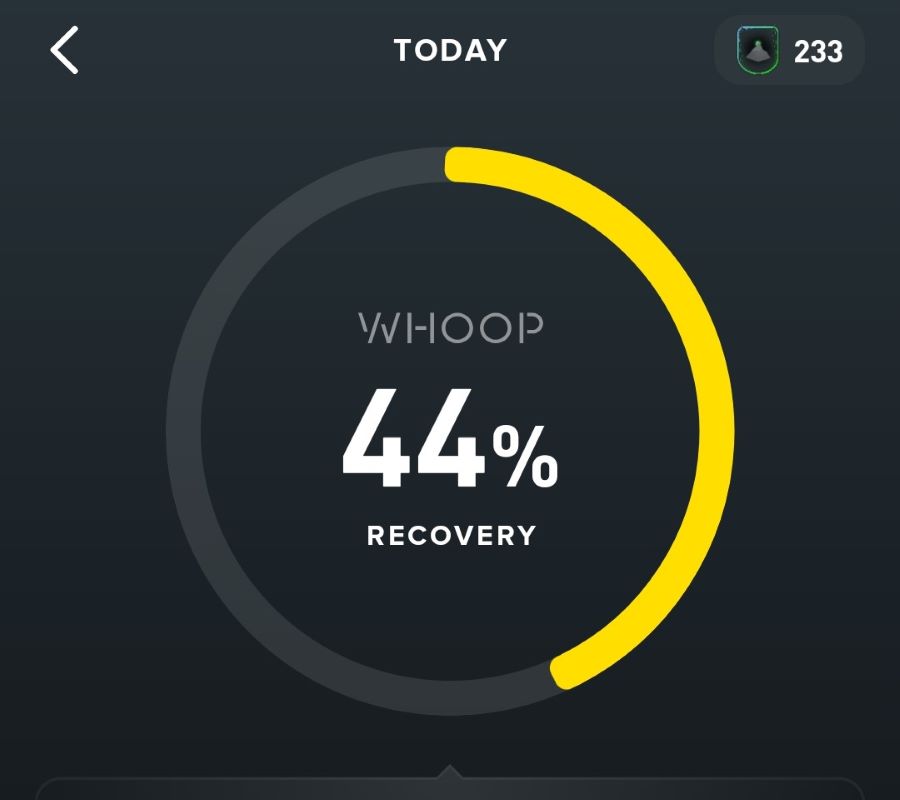
By navigating to my endpoint, https://[my-project-url].vercel.app/api/whoopI received a JSON object containing my real-time data
Here’s the fetched data:
{
  "recovery": 44,
  "status": "Success",
  "timestamp": "2026-04-08T11:42:22.067Z"
}
Which is my current “fab academy” recovery score
Step 3 – The IoT
Now that the Vercel Bridge is serving that JSON data perfectly, we need to turn the ESP32-S3 into a client that can fetch it. This is called JSON Parsing. The ESP32-S3 will download the text from the endpoint URL and "extract" the number 44 from the middle of it.
First I need to setup the required libraries in my Arduino IDE
There are 3 main libraries to make the communications:
- WiFi.h: Built-in for ESP32.
- HTTPClient.h: Built-in for ESP32.
- ArduinoJson: must be installed via the Library Manager (Tools -> Manage Libraries). Search for "ArduinoJson" by Benoit Blanchon and install the latest version.
This code connects to my Wi-Fi, pings my Vercel endpoint URL, and prints my Recovery score to the Serial Monitor in the IDE.
Before uploading In the Arduino IDE, go to Tools > USB CDC On Boot. Make sure it is set to "Enabled".
The following code generated by Gemini
#include <WiFi.h>
#include <HTTPClient.h>
#include <ArduinoJson.h>

// 1. WiFi Credentials
const char* ssid = "WIFI_NAME";
const char* password = "WIFI_PASSWORD";

// 2. Your Vercel Endpoint
const char* serverName = "https://[my-project-url].vercel.app/api/whoop?code=fabacademy2026";

void setup() {
  Serial.begin(115200);

  // Connect to WiFi
  WiFi.begin(ssid, password);
  Serial.println("Connecting to WiFi...");
  while (WiFi.status() != WL_CONNECTED) {
    delay(500);
    Serial.print(".");
  }
  Serial.println("\nConnected to WiFi!");
}

void loop() {
  if (WiFi.status() == WL_CONNECTED) {
    HTTPClient http;

    // Start the request
    http.begin(serverName);
    int httpResponseCode = http.GET();

    if (httpResponseCode > 0) {
      Serial.print("HTTP Response code: ");
      Serial.println(httpResponseCode);

      // Read the response string
      String payload = http.getString();
      Serial.println("Received Payload: " + payload);

      // 3. Parse JSON
      StaticJsonDocument<200> doc;
      DeserializationError error = deserializeJson(doc, payload);

      if (!error) {
        int recovery = doc["recovery"];
        Serial.print("SUCCESS! Recovery Score: ");
        Serial.println(recovery);

        // Logic for your light box
        if (recovery < 34) Serial.println("Color: RED");
        else if (recovery < 67) Serial.println("Color: YELLOW");
        else Serial.println("Color: GREEN");

      } else {
        Serial.print("JSON Parsing failed: ");
        Serial.println(error.f_str());
      }
    } else {
      Serial.print("Error code: ");
      Serial.println(httpResponseCode);
    }

    http.end();
  }

  // Wait 1 minute before checking again (don't spam the API!)
  delay(60000);
}
I can see in the serial monitor that everything was successful except authorization:
Received Payload: {"error":"Auth failed","details":{"error":"invalid_grant","error_description":"The provided authorization grant (e.g., authorization code, resource owner credentials) or refresh token is invalid, expired, revoked, does not match the redirection URI used in the authorization request, or was issued to another client","status_code":400}}
In the world of APIs, an Authorization Code is like a movie ticket: it only works once.
- When I visited the link in my browser earlier, the code was "used up" to get the recovery score of 44.
- When the ESP32 tries to use that same code again, WHOOP says: "Nope, that ticket has already been redeemed!" and gives you the
invalid_granterror.
To fix this it will require a fresh mind, so for now I’m just going to bypass this error and ask the API to send the last known recovery score, updating the page with the fix is pending.
Troubleshooting: SSL/TLS Handshake Errors
Upon attempting to fetch data again from the Vercel endpoint, the ESP32-S3 returned a -1 error code, indicating a failed SSL handshake. This occurs because the microcontroller lacks the root certificates required to validate Vercel's HTTPS certificate. To resolve this for the prototyping phase, I implemented this in my code, I will post the full code when updating the documentation for my final project:
client.setInsecure() and
WiFiClientSecure
- WiFiClientSecure: The standard
HTTPClientcan be lazy with HTTPS. By usingWiFiClientSecure, we are manually telling the ESP32's hardware: "Prepare for an encrypted conversation." - The Pointer (
new): The SP32-S3 can sometimes run out of stack memory if you declare too many secure objects. Creating it and thendeleteing it at the end of the loop is the professional way to ensure the board doesn't crash after 10 minutes.
The transition from HTTP to HTTPS required a shift in the Arduino implementation. Standard HTTPClient calls were insufficient for Vercel's mandatory TLS/SSL requirements. I implemented WiFiClientSecure with the setInsecure() method to bypass certificate chain validation, allowing for a successful handshake with the cloud server
Here’s my ESP32-S3 finally reading from my API:

Step 4 - Wired communication
Upon successful fetch of data from my API, I will send a message to another board, an ESP32-C3 to blink an led.
I added the following code to the ESP32-S3’s IoT code, the following code generated by Gemini:
// On the S3: Sending the number to the C3
Serial1.begin(9600, SERIAL_8N1, 44, 43);//the intrenal GPIO pin numbers for TX and RX
Serial1.println(recovery);
Serial.print("Sent to C3: ");
Serial.println(recovery);
Explaining the code:
Serial1
Most ESP32 chips have multiple Serial "ports."
Serial: Usually reserved for communication with computer via the USB cable (the Serial Monitor).Serial1: A second, independent hardware port used to talk to other microcontrollers (like the C3) or sensors.
9600 (The Baud Rate)
This is the speed of the conversation.
- It stands for 9600 bits per second.
- Crucial Rule: Both the S3 and the C3 must be set to the same number. If the S3 speaks at 9600 and the C3 listens at 115200, the data will look like gibberish symbols (
⸮⸮⸮).
SERIAL_8N1 (The Protocol Config)
This defines the "shape" of the data packets. It is the industry standard for almost all hobbyist electronics:
- 8: 8 bits of data (one byte).
- N: No parity bit (no error checking).
- 1: 1 stop bit (a signal that the packet is finished).
44, 43 (The GPIO Pins)
This is the most powerful part of the ESP32. Unlike a standard Arduino where Serial pins are fixed, the ESP32 has a "GPIO Matrix" that allows to assign Serial to almost any pins.
44(RX): This is the pin that receives data. (21 for ESP32-C3)43(TX): This is the pin that transmits data (20 for ESP32-C3)
Before Uploading the following code to ESP32-C3 enable the USB CDC on Boot:
#include <Arduino.h>

const int ledPin = 2; // D0 on the XIAO C3

void setup() {
  // 1. USB Serial for your laptop
  Serial.begin(115200);
  while (!Serial) { delay(10); }

  // 2. Wired Serial for the S3 (RX=20, TX=21)
  Serial1.begin(9600, SERIAL_8N1, 20, 21);

  pinMode(ledPin, OUTPUT);

  // Quick test: Blink 3 times to show C3 is alive
  for(int i=0; i<3; i++) {
    digitalWrite(ledPin, HIGH); delay(100);
    digitalWrite(ledPin, LOW); delay(100);
  }
  Serial.println("C3 Ready. Waiting for S3 data...");
}

void loop() {
  if (Serial1.available()) {
    String input = Serial1.readStringUntil('\n');
    int score = input.toInt();

    if (score > 0) {
      Serial.print("C3 Received Score: ");
      Serial.println(score);

      // Visual Feedback
      digitalWrite(ledPin, HIGH); // Turn LED ON
      delay(1000);                // Keep it on for 1 second
      digitalWrite(ledPin, LOW);  // Turn LED OFF
    }
  }
}
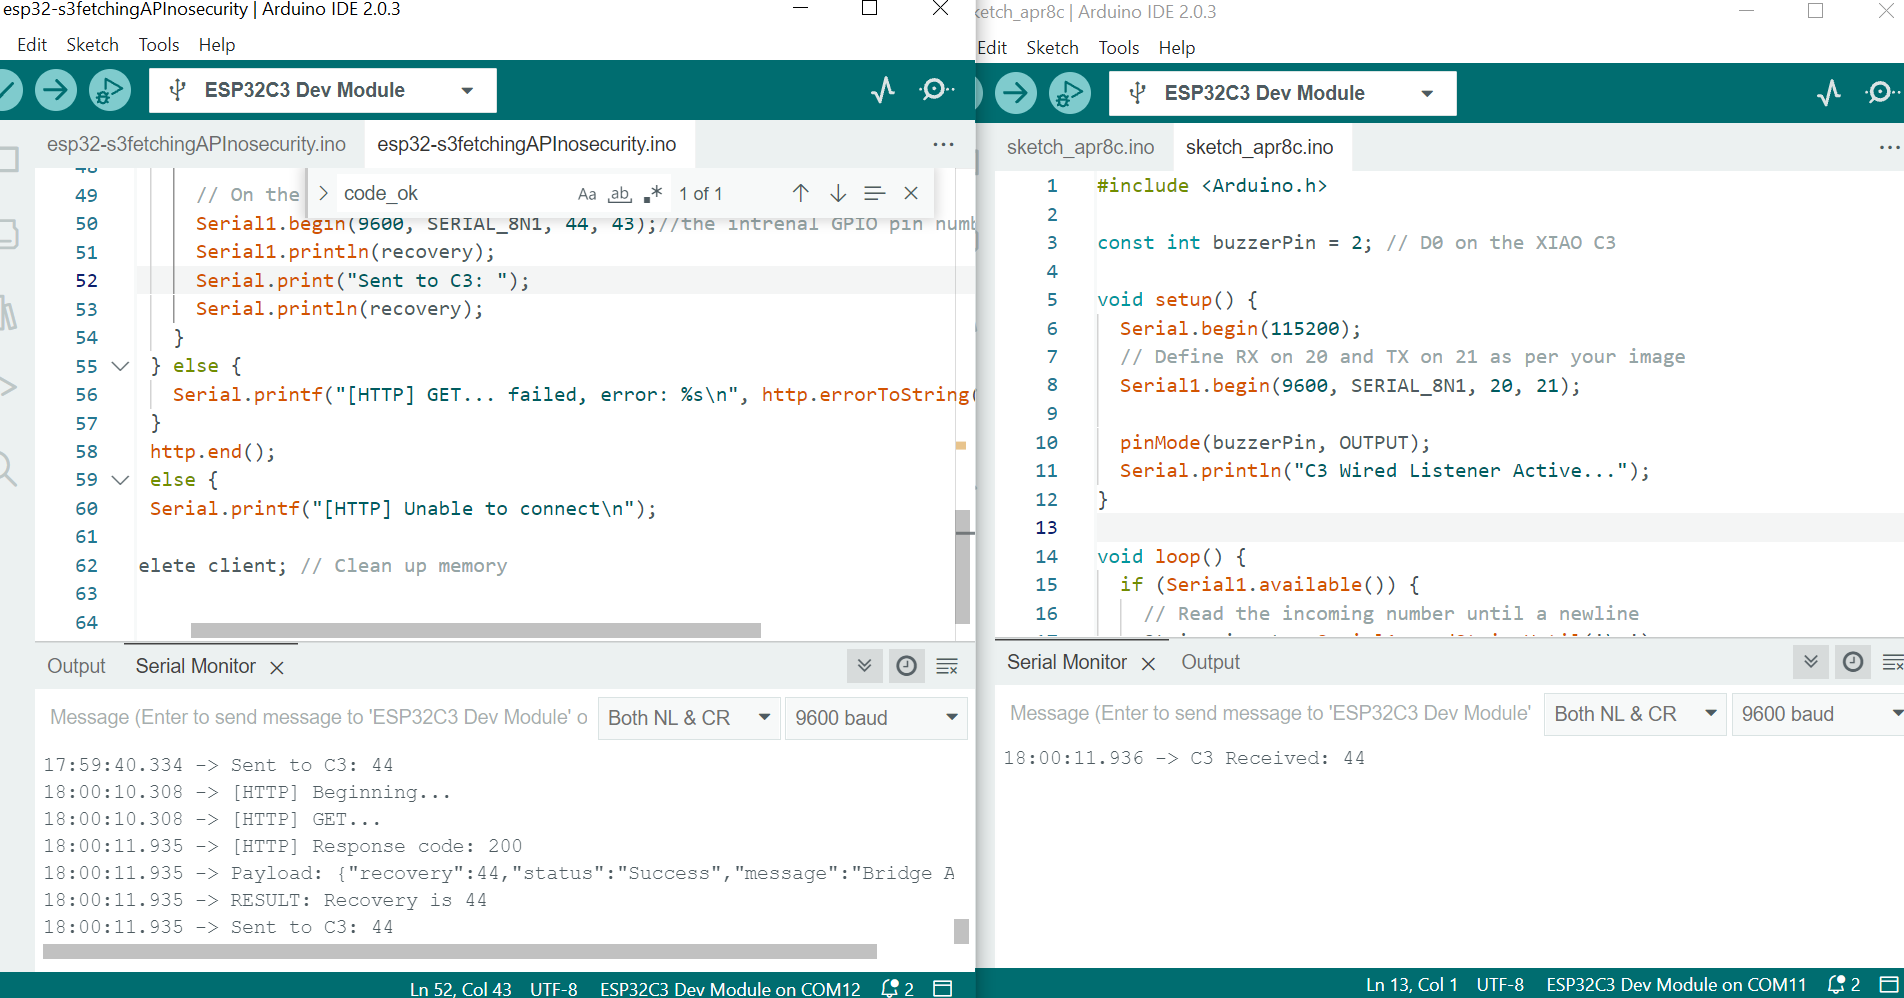
Serial Telemetry Verification (Successful Message Exchange)
To confirm that the hardware serial bridge successfully established two-way board-to-board communication, I isolated and monitored both microcontroller serial buses simultaneously via distinct terminal instances.
1. Transmitting Node Log (ESP32-S3 Server Feed)
When the S3 pulls down the encrypted JSON package from the Vercel API, it strips the cloud formatting, updates its internal loop, and pipes the string across the physical TX pin (GPIO 43) to the receiver:
Connecting to WiFi...
..
Connected to WiFi!
HTTP Response code: 200
Received Payload: {"recovery":44,"status":"Success","timestamp":"2026-04-08T11:42:22.067Z"}
SUCCESS! Recovery Score: 44
Color: YELLOW
Sent to C3: 44
2. Receiving Node Log (ESP32-C3 Client Feed)
On the opposite side of the physical bus, the C3 listens continuously on its hardware UART port (Serial1 at pins 20/21). The log shows the initial setup check followed by immediate, real-time message capture:
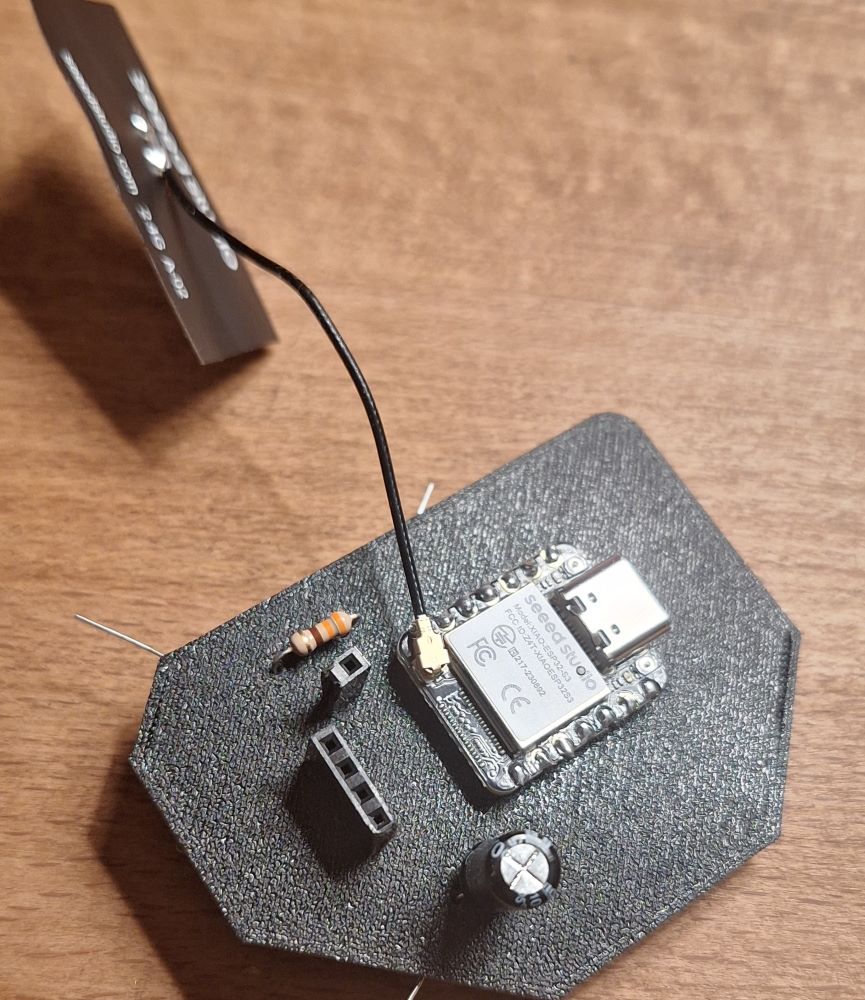
Serial communication
Here’s the connection:
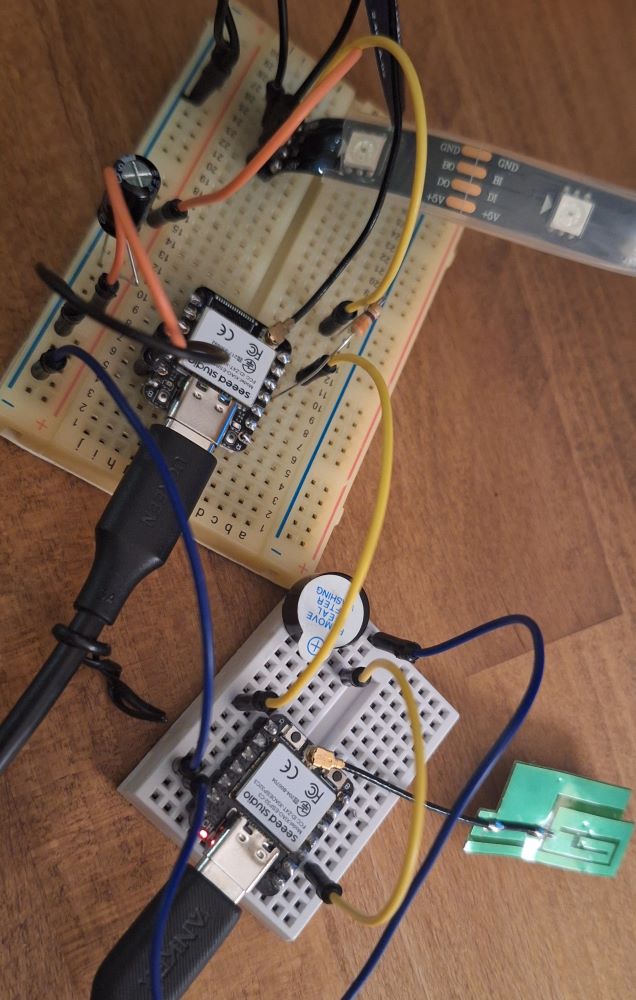
And recieving the packet in action. When the score is received from esp32-S3, the esp32-C3 lights up the LED and sound a buzzer, and showing the result on the serial monitor:
Used 3D Printing for the board.
⚠️ Problems & Solutions
- Remaining issues, the authorization with Whoop is needed with every request, which means I need to go in and type my username and password and grant my app access to Whoop account, there need to be a generated token that I need to place in my code to bypass this, more on this issue later.