Week 5 : 3D Scanning & Printing
In Week 5, I learned about 3D scanning and printing technologies. I explored how to use 3D scanners to capture real-world objects and convert them into digital models. I also learned about different 3D printing techniques and materials, and how to prepare models for printing.
Group Assignment
For our group assignment, we were tasked with testing the design rules for our 3D printer. We created a test model that included various features such as overhangs, bridges, and different wall thicknesses. We printed the model and analyzed the results to determine the optimal settings for our printer.
You can see the full documentation here: Group Assignment Documentation
3D Scanning
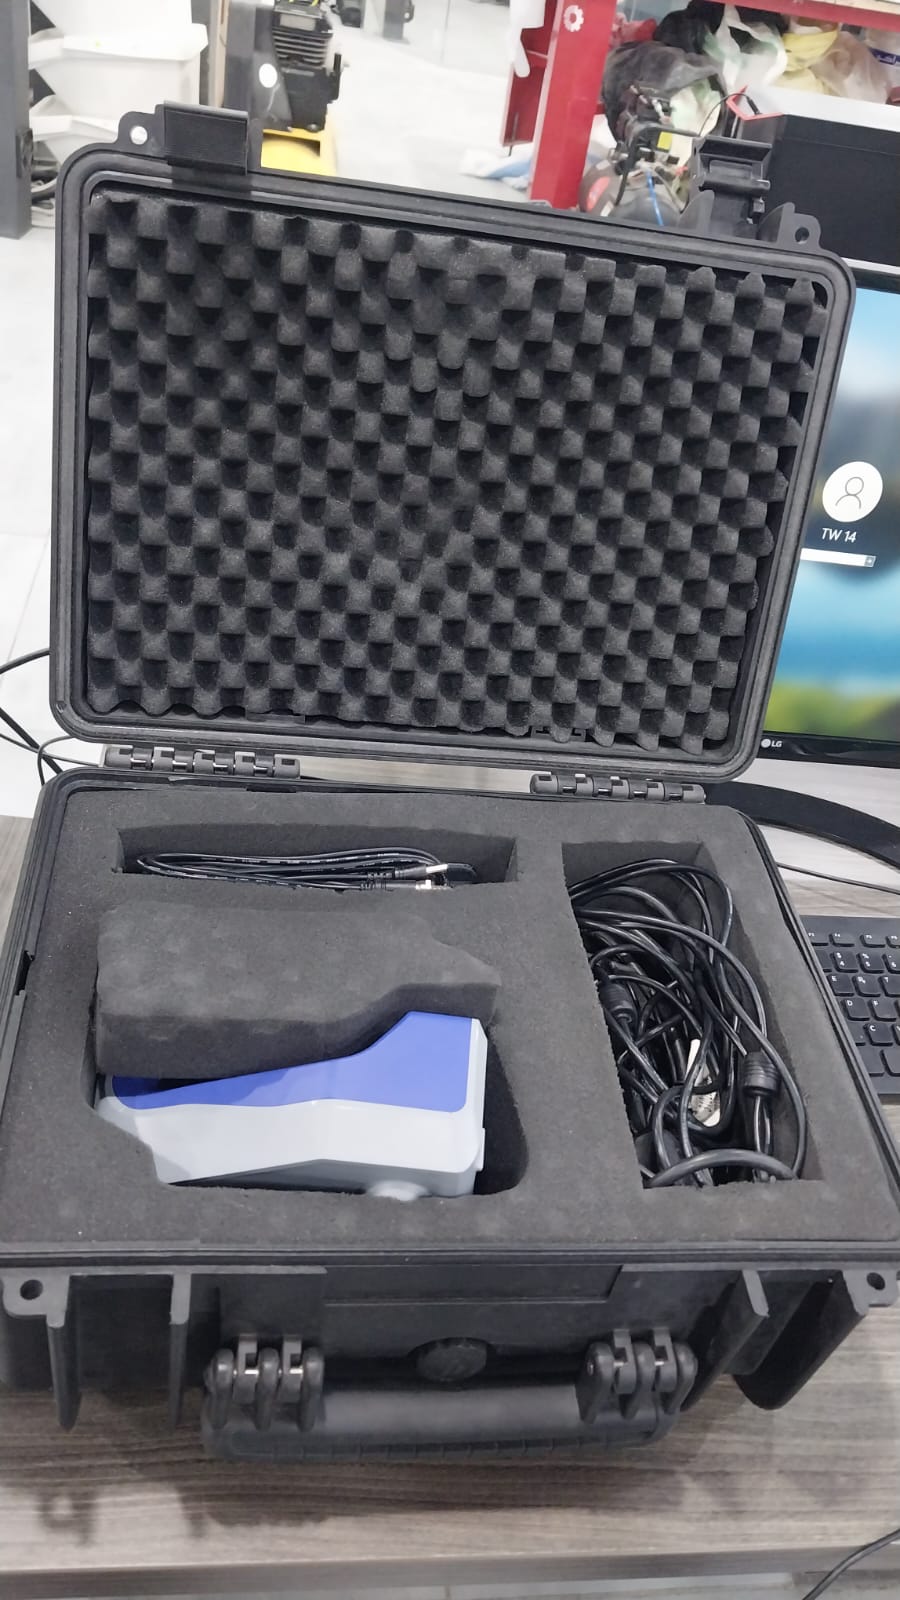
In our lab, we have the Spider from Artec 3D, a professional handheld 3D scanner.
I learned how to use the scanner to capture objects and process the scanned data in software like Artec Studio. Here are some scans we took under our instructor's supervision:
💡 Note: We couldn't scan some objects because of their reflective surfaces or complex geometries.
I also scanned my hand. It was a bit difficult because of hand movement, but I managed to do it. Here is the scanned hand file: Artec Studio file
3D Printing
Work Process
First, our instructor, Naim Alhajali, gave us a full overview of 3D printing concepts and techniques, which included:
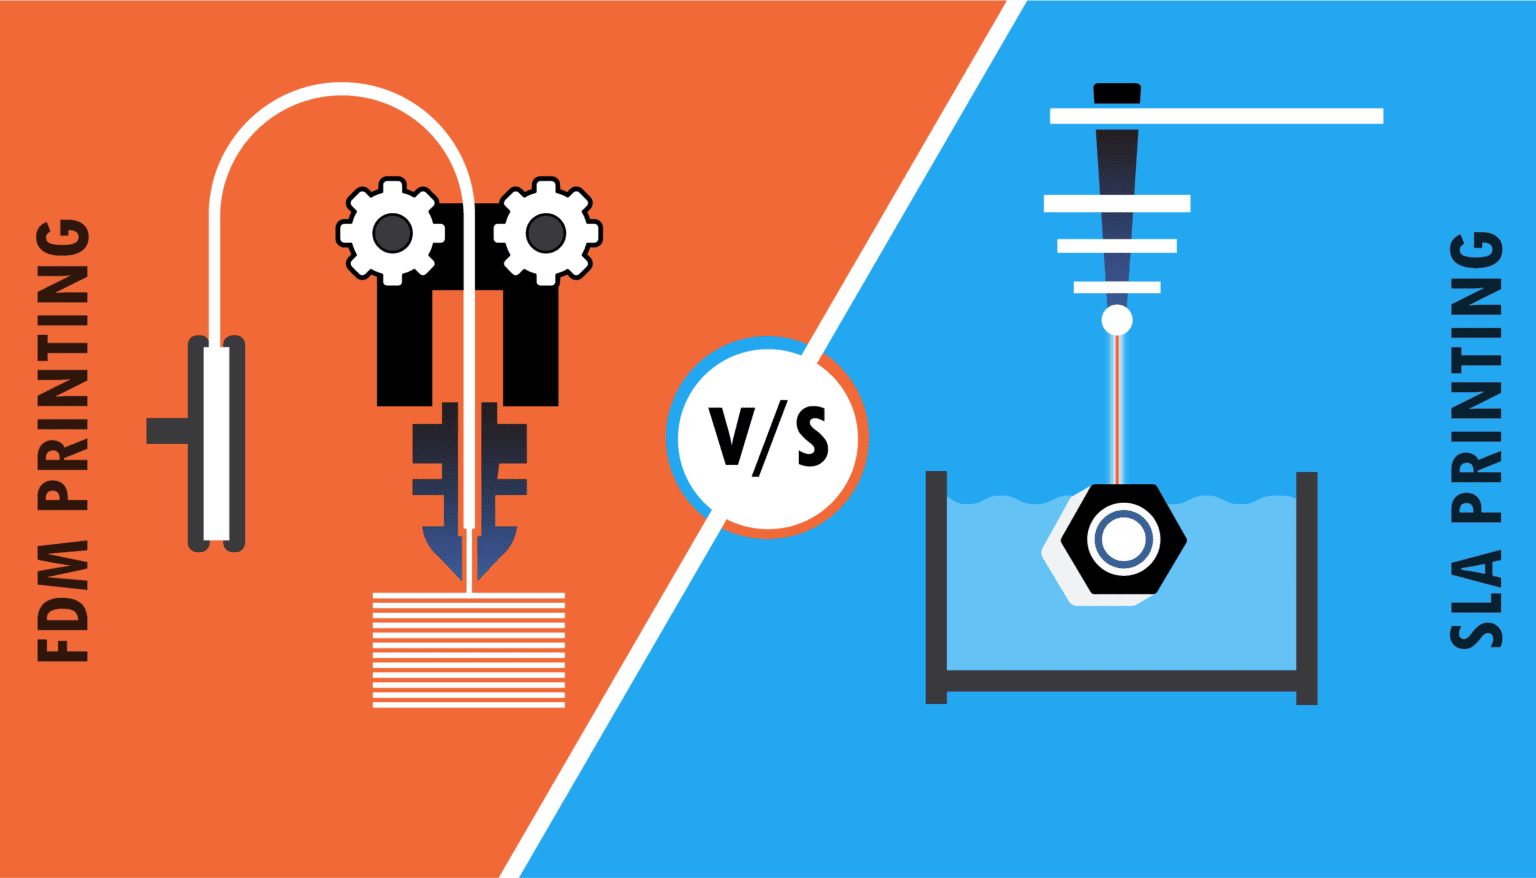
- Types of 3D printing technologies (FDM, SLA, SLS, etc.)
In my assignments, I focused on FDM (Fused Deposition Modeling) and SLA (Stereolithography).
 💡 Note: Our lab has FDM printers from Ultimaker, so I based my documentation on these printers.
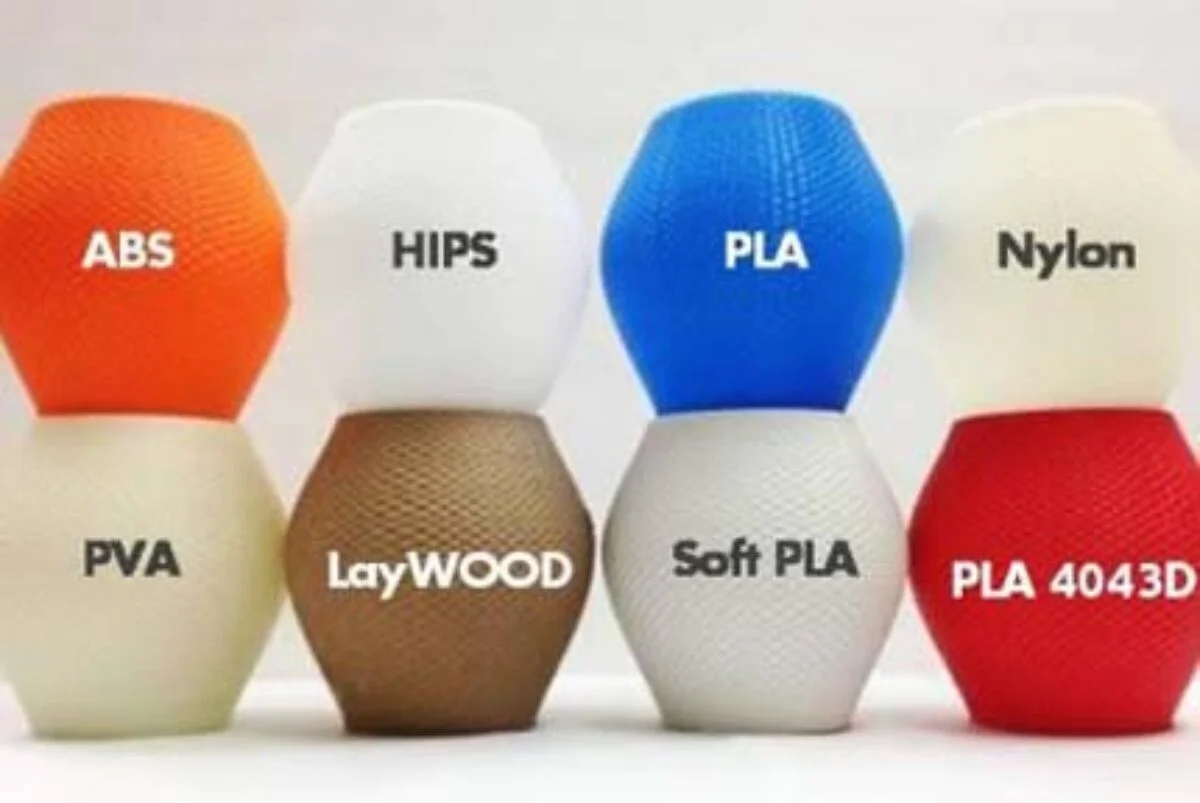
- Materials used in 3D printing (plastics, resins, metals, etc.)
I used PLA (Polylactic Acid) filament for my FDM prints and resin for my SLA prints. Here is a good resource.
- How to prepare printers for printing (calibration, material feeding, etc.)
- The Ultimaker printers have a user-friendly interface that guides you through the setup process, including bed leveling and filament loading.
Here is a video that shows how to change the filament:
- We also learned how to choose the correct core.
Here is a good reference for choosing the right core: Ultimaker Core Selection Guide
- Design considerations for 3D printing (overhangs, supports, resolution, etc.)
Next, I decided which designs I wanted to print:
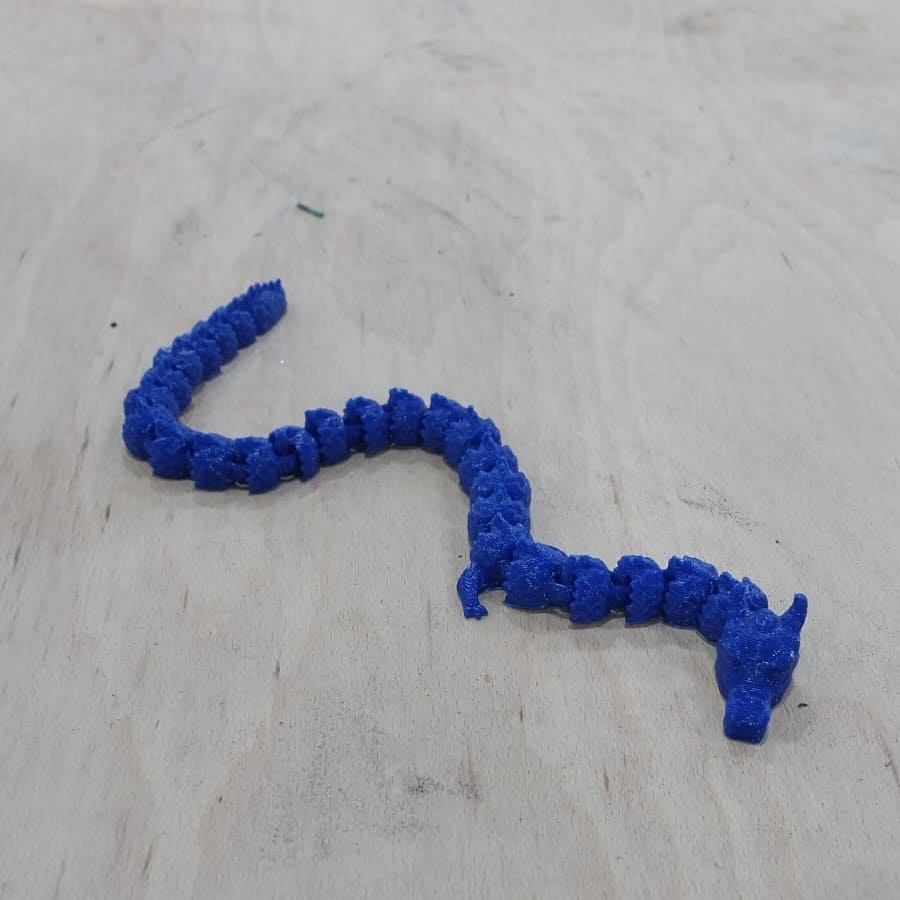
- I chose to print a simple design using the in-place technique, which is difficult to produce with CNC: a small dragon.
- After printing a prepared model, now it is time for me to design and print my own in-place technique model: a leaf.
- I also wanted to print a small Ramadan statue to try different colors, inspired by this photo I found on Instagram.

- I also wanted to print a pen holder by scanning my hand, inspired by this photo.
- Lastly, I wanted to print a small butterfly using SLA.
Then, I prepared the models for printing using Ultimaker Cura and other 3D software.
Finally, I printed the models and documented the results.
First Piece : Dragon
In this model, I tried to highlight the advantages and capabilities of additive design over subtractive manufacturing by printing a dragon in one piece using the in-place technique.
I downloaded the model from Cults:
Here is the link to view and download the model: Cults Dragon Model
I prepared the model for printing using Ultimaker Cura. I used the default settings for PLA material.
Here is a video that shows the printing process using the in-place technique and the result:
Here is the final result:
This dragon showed me that 3D printing is a powerful tool for creating complex and intricate designs that would be difficult or impossible to produce using traditional manufacturing methods.
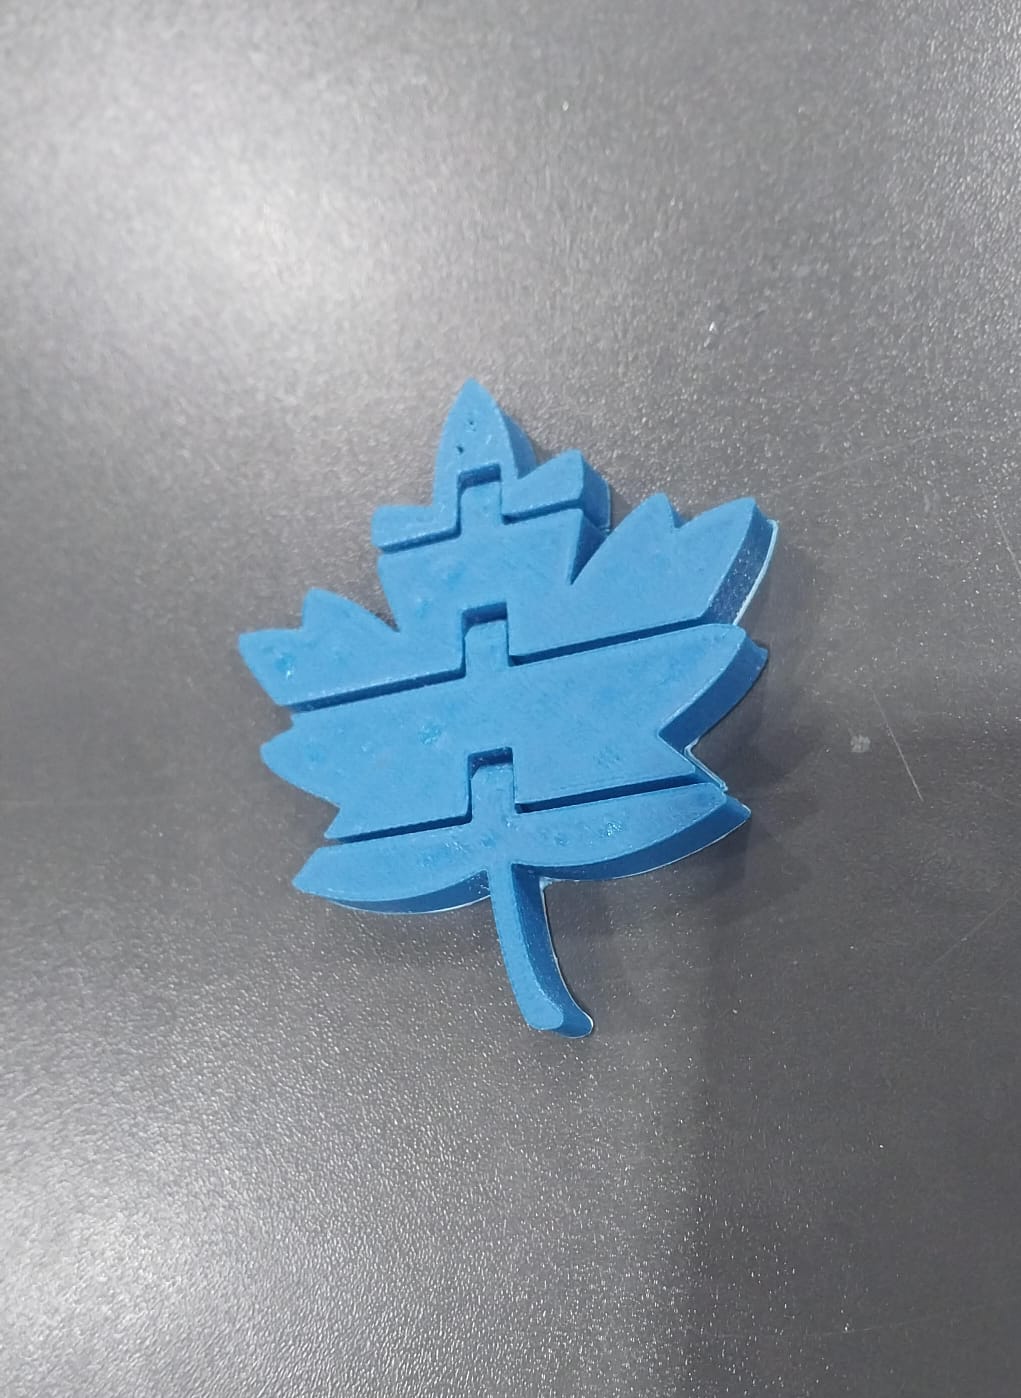
Second Piece : Leaf
For this piece, I wanted to create a simple leaf model using the in-place technique. I designed the leaf in Fusion 360 and follow this tutorial which was very helpful.
Here is the .svg file that I used:Download SVG
Here are the model files:
I prepared the model for printing using Ultimaker Cura. I used the default settings for PLA material.
Here is the final result:
Third Piece : Ramadan Statue
For this piece, I wanted to create a decorative statue that celebrates the spirit of Ramadan. I designed a simple lantern-shaped statue with intricate patterns inspired by Islamic art. I used a combination of black and white PLA filaments to create a visually striking piece.
I chose this piece to try printing with two different filaments in the same layer.
I took my inspiration from this photo:
I uploaded my design to Inkscape to trace the base design and convert it to vectors so I could import it into Fusion 360 as an SVG file and extrude it into a 3D model.
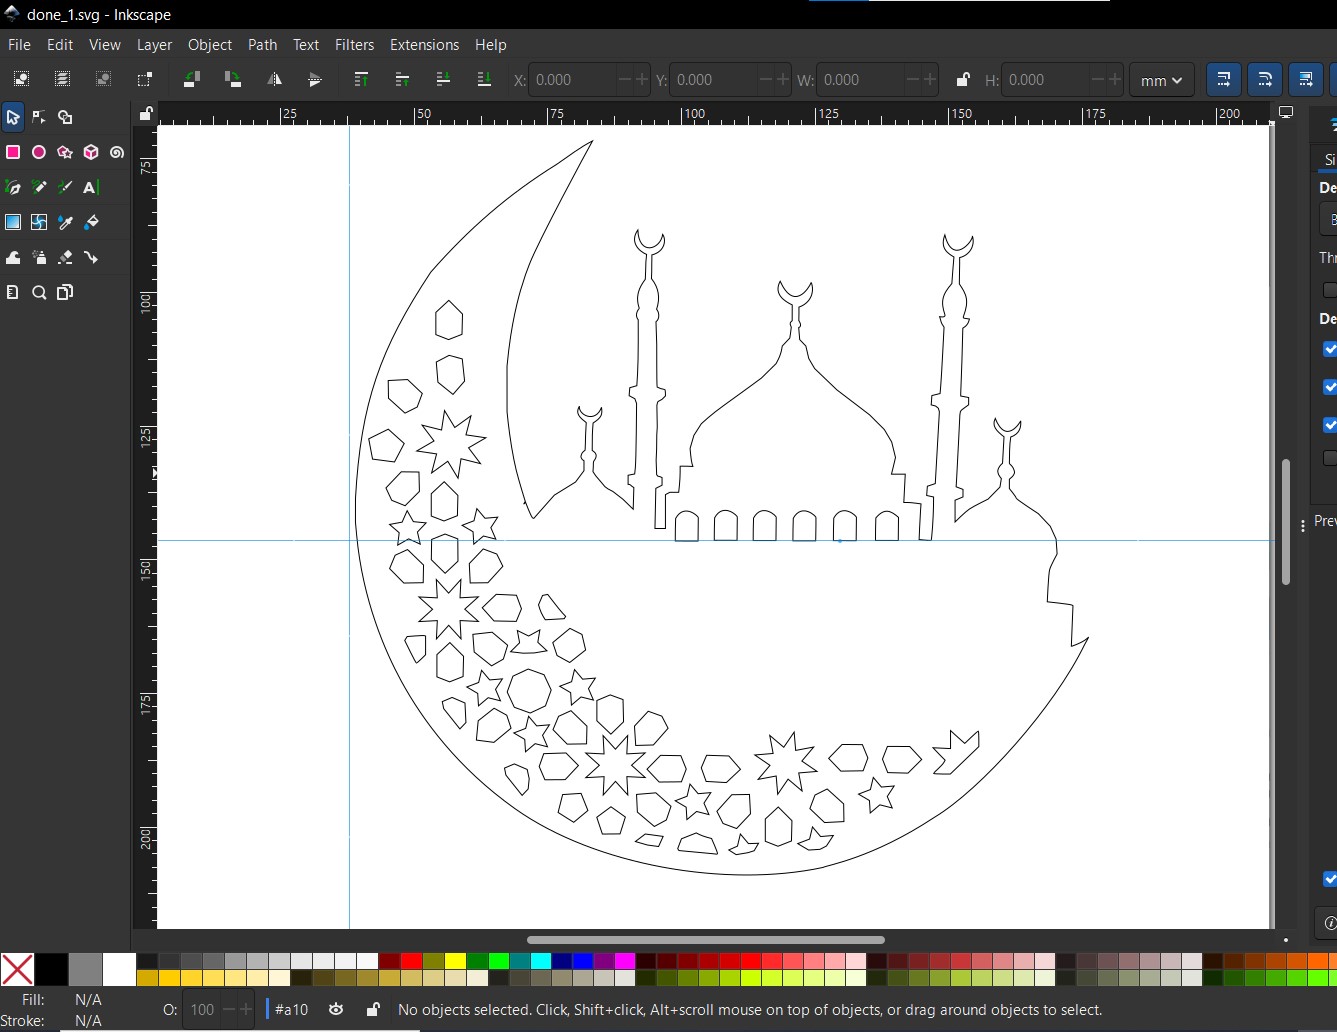 💡 Note: I converted the image to vectors using: Path -> Trace Bitmap -> Apply.
💡 Note: I had to make some manual adjustments to the design in Inkscape to make it suitable for 3D printing, such as simplifying some details and ensuring that all parts were properly connected.
💡 Note: I converted the image to vectors using: Path -> Trace Bitmap -> Apply.
💡 Note: I had to make some manual adjustments to the design in Inkscape to make it suitable for 3D printing, such as simplifying some details and ensuring that all parts were properly connected.
Then I edited the model in Fusion 360 to add some details and make it more suitable for 3D printing.
Here is the Fusion 360 model: Fusion 360 Model
After preparing the model in Ultimaker Cura, I set it up for dual-extrusion printing by following these steps:
- First, I added the second core to the printer and made sure it matched the first one.
- Then I calibrated the printer by following the instructions in the printer's guide at this link.
- First, I started the calibration process on the Ultimaker.
- Then it printed the test pattern.
- After the test pattern was printed, I checked the alignment of the first filament with the second one using this sheet as a reference.
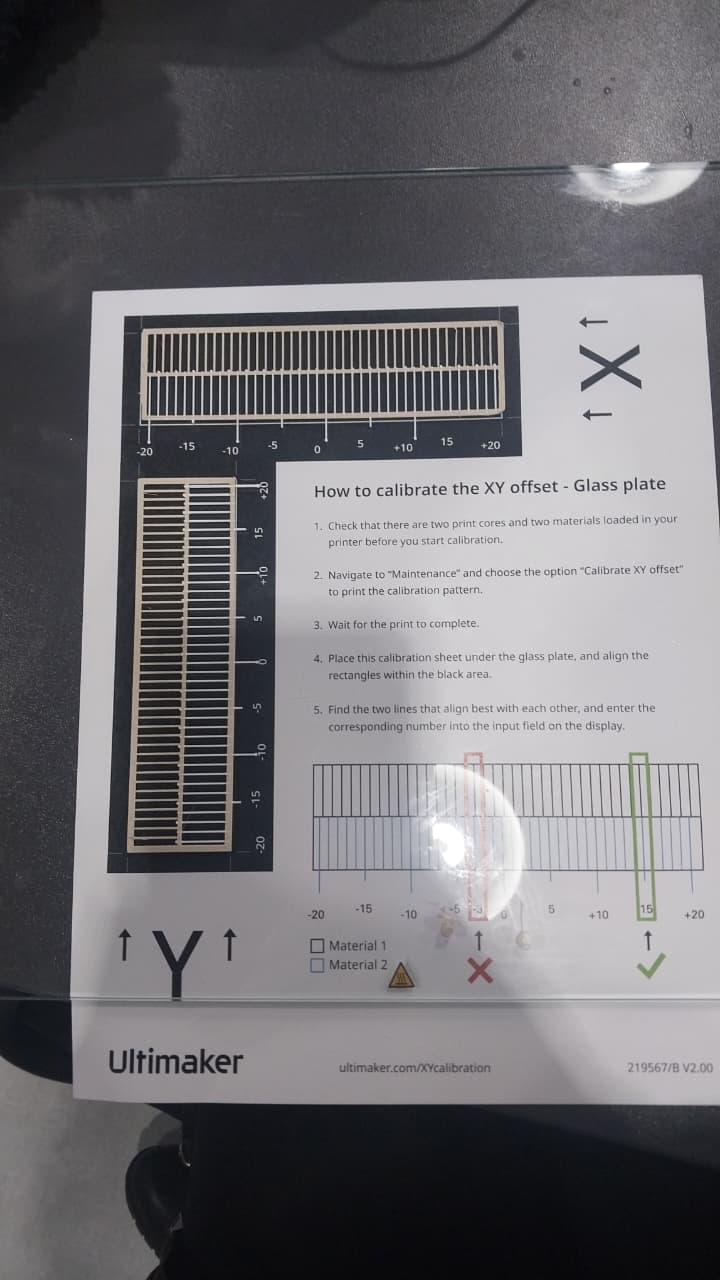
- From this sheet, I chose Y at -1.5 and X at 1.5.
- After calibration, I prepared the model for printing in Ultimaker Cura by assigning different parts of the model to different extruders based on the colors I wanted to use.
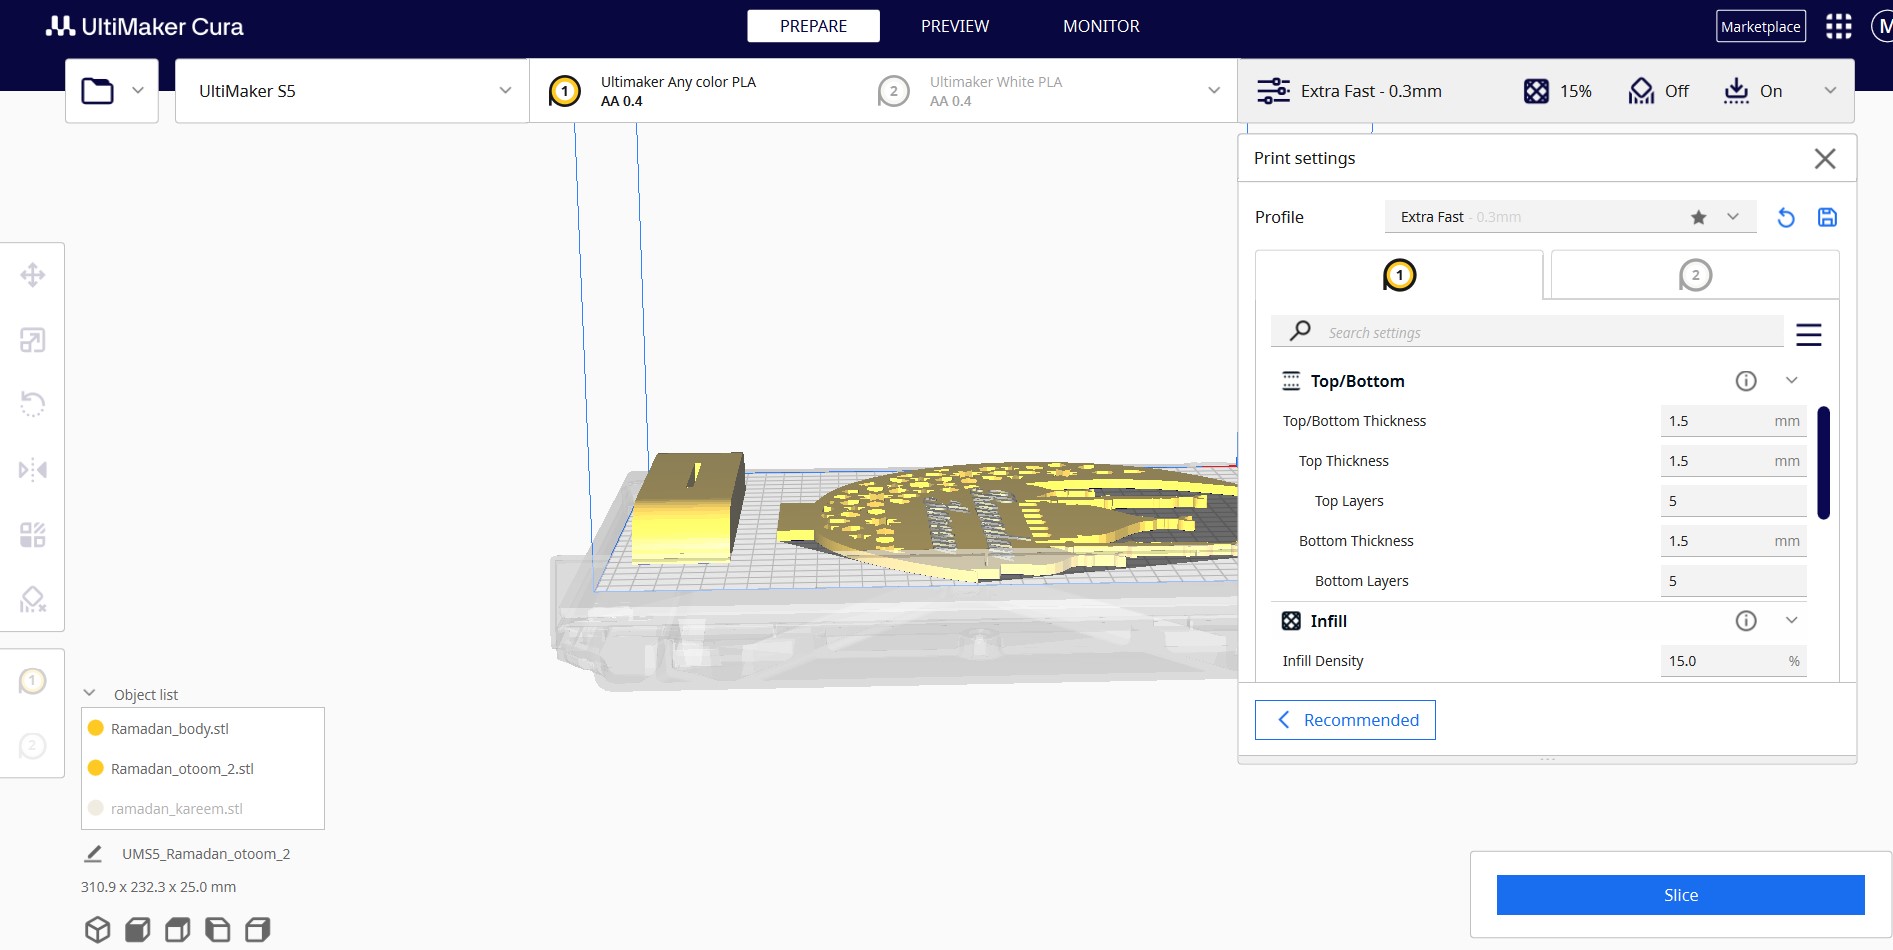 💡 Note: To do multi-color printing in Cura, you should import each component separately. You cannot select part of a single body to use one filament and another part to use a different filament. I did this by hiding all parts and components in Fusion 360 except the one I wanted to export, then exporting it as an .stl file and importing it into Cura.
💡 Note: I tried to use WoodFill at first, but it did not work, so I switched to PLA for both cores I thin becoase I used an old one which I find in the lab.
💡 Note: To do multi-color printing in Cura, you should import each component separately. You cannot select part of a single body to use one filament and another part to use a different filament. I did this by hiding all parts and components in Fusion 360 except the one I wanted to export, then exporting it as an .stl file and importing it into Cura.
💡 Note: I tried to use WoodFill at first, but it did not work, so I switched to PLA for both cores I thin becoase I used an old one which I find in the lab.
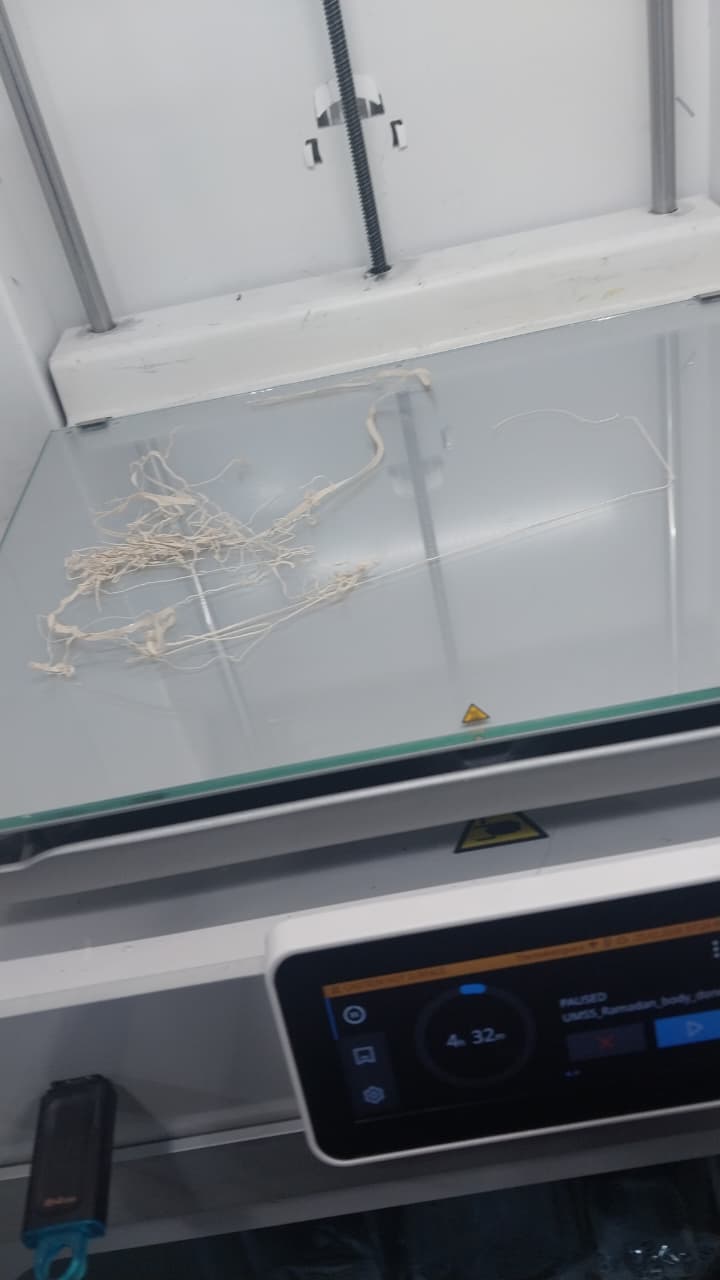
- Finally, I printed the model, and here is the process:
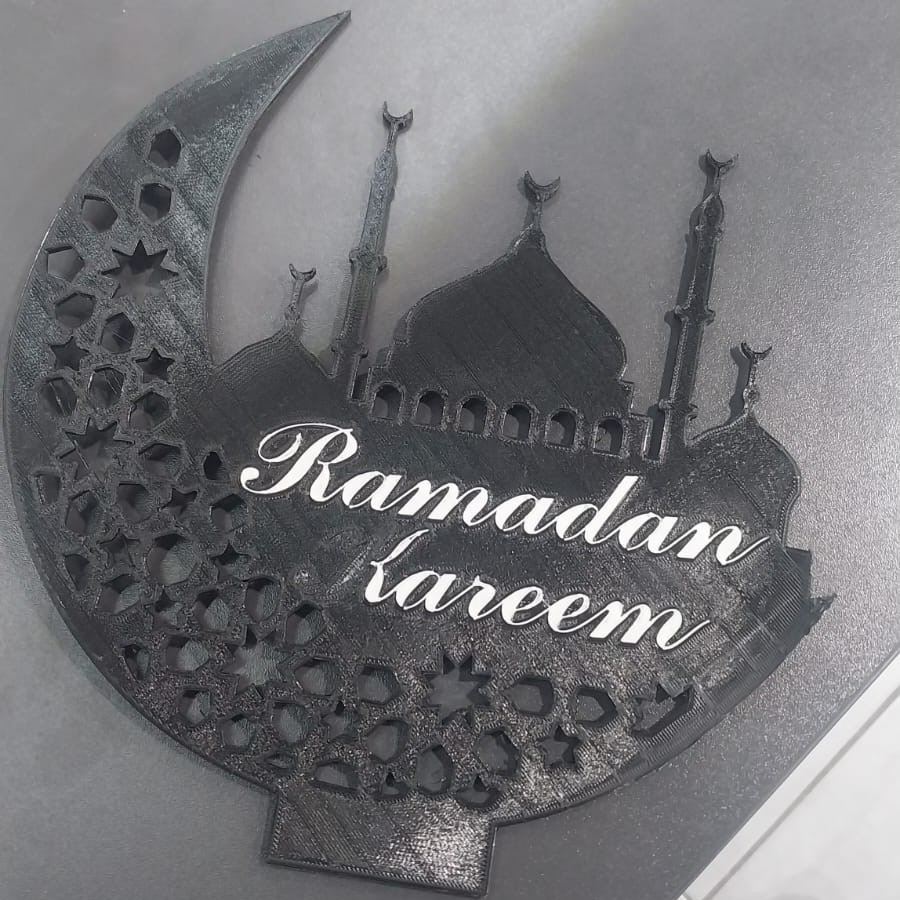
And here is the final result:
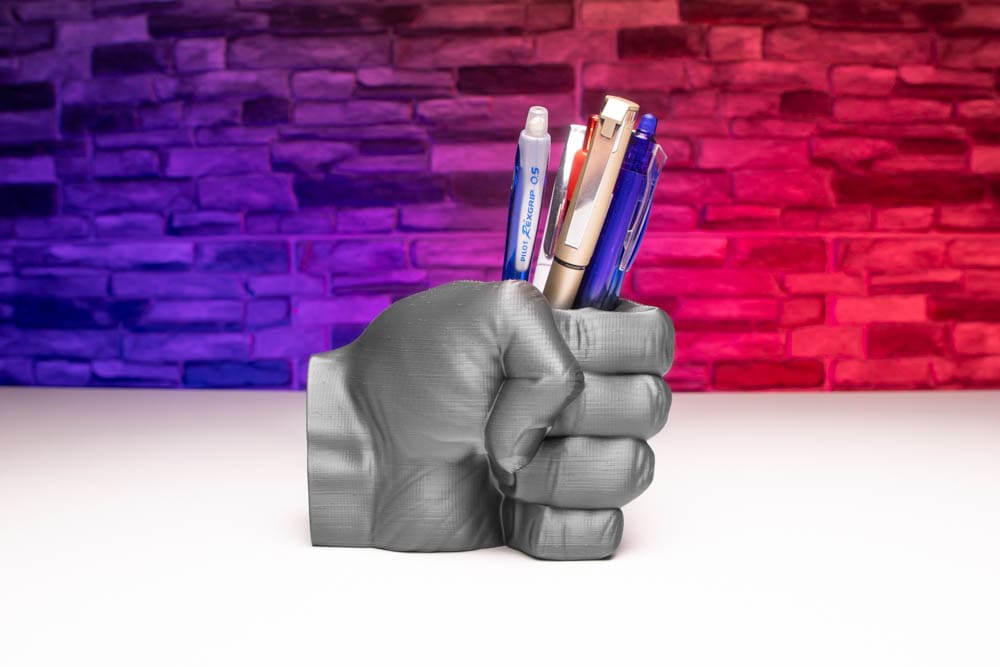
Fourth Piece : Pen Holder
I decided to make this piece for two main reasons:
- First, I wanted to try using the 3D scan of my hand to create a functional object. I thought it would be interesting to see how the scanned data could be used to create a custom-fit pen holder.
- Second, I wanted to understand the purpose of making designs without supports, because I thought supports would make the process easier.
To work with the scan file, I downloaded Meshmixer from this link. The Artec software exports three files:
- .obj
- .mtl
- .png
You can download the files from here.
I could not work with the files exported from Artec Studio directly in Fusion.
Here is a useful video tutorial on how to use Meshmixer: link
Here is the process that I followed to fix the scanned hand file and prepare it for printing:
- I imported the .obj file into Meshmixer.
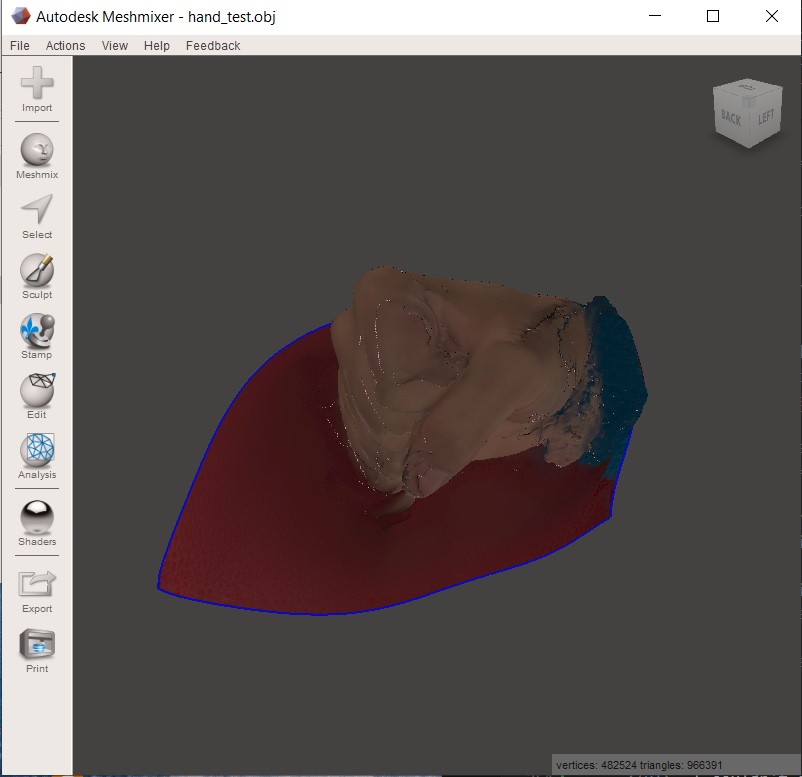
- Then I fixed the object using Meshmixer tools.
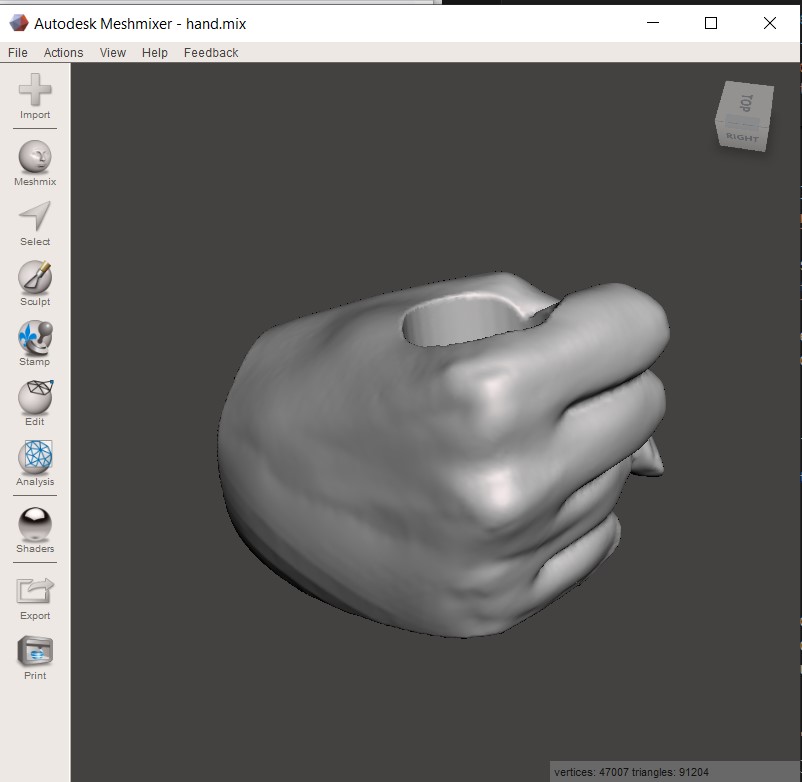
- Here is the final result:
- Finally, I exported the fixed model as an .stl file to print it.
You can download the file from here.
Then I added the .stl file to Cura for printing and enabled tree supports.
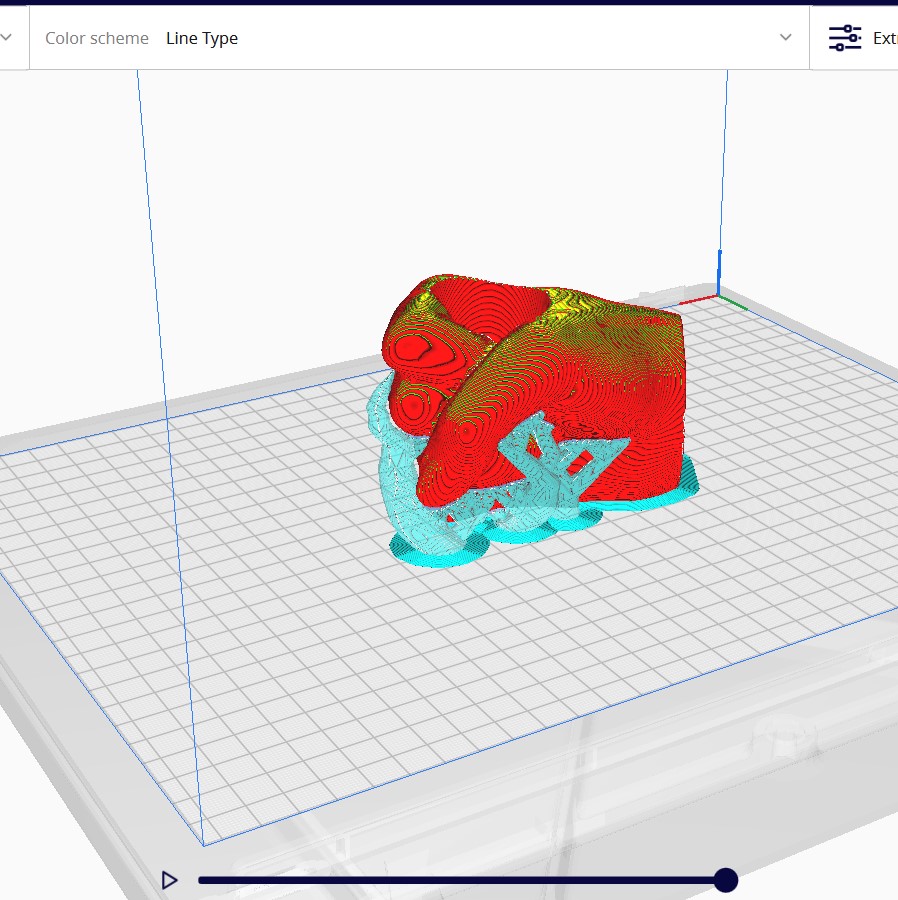
Here is the printing process:
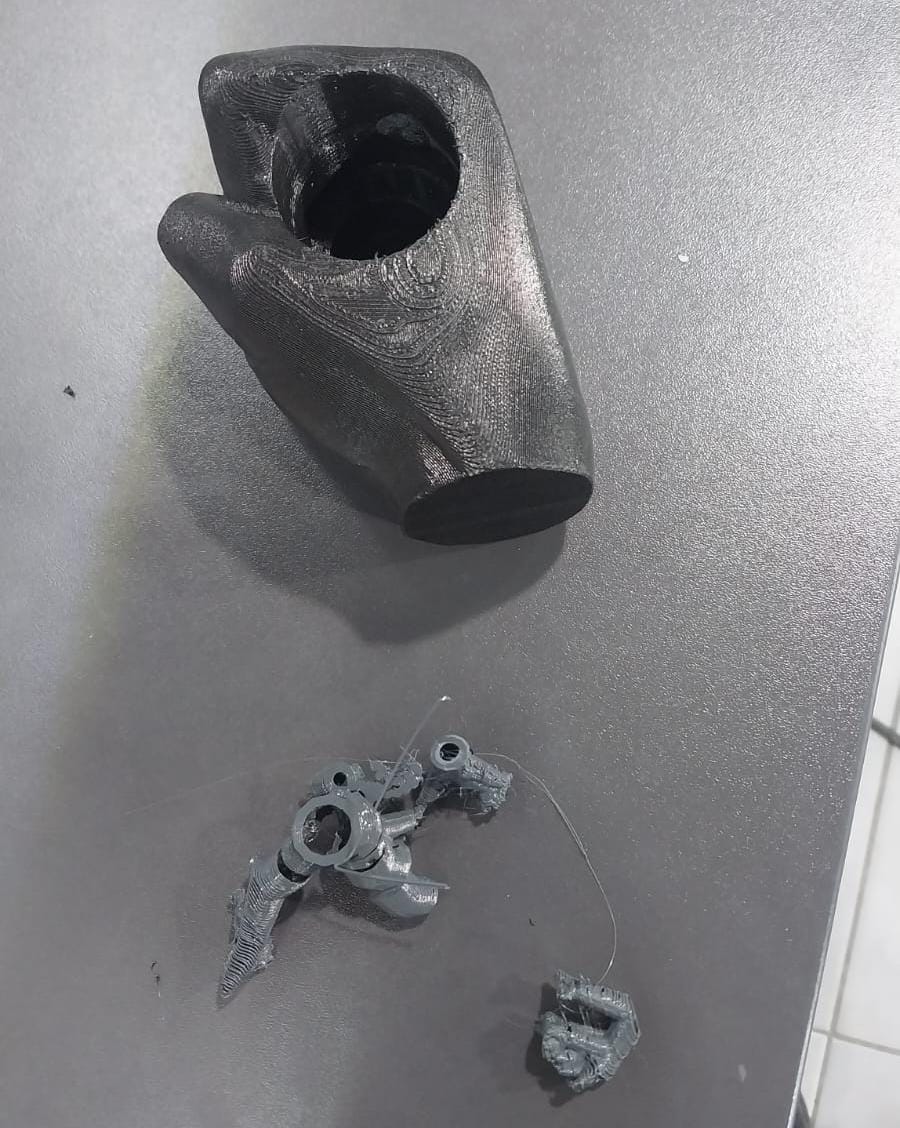
And here is the final result:
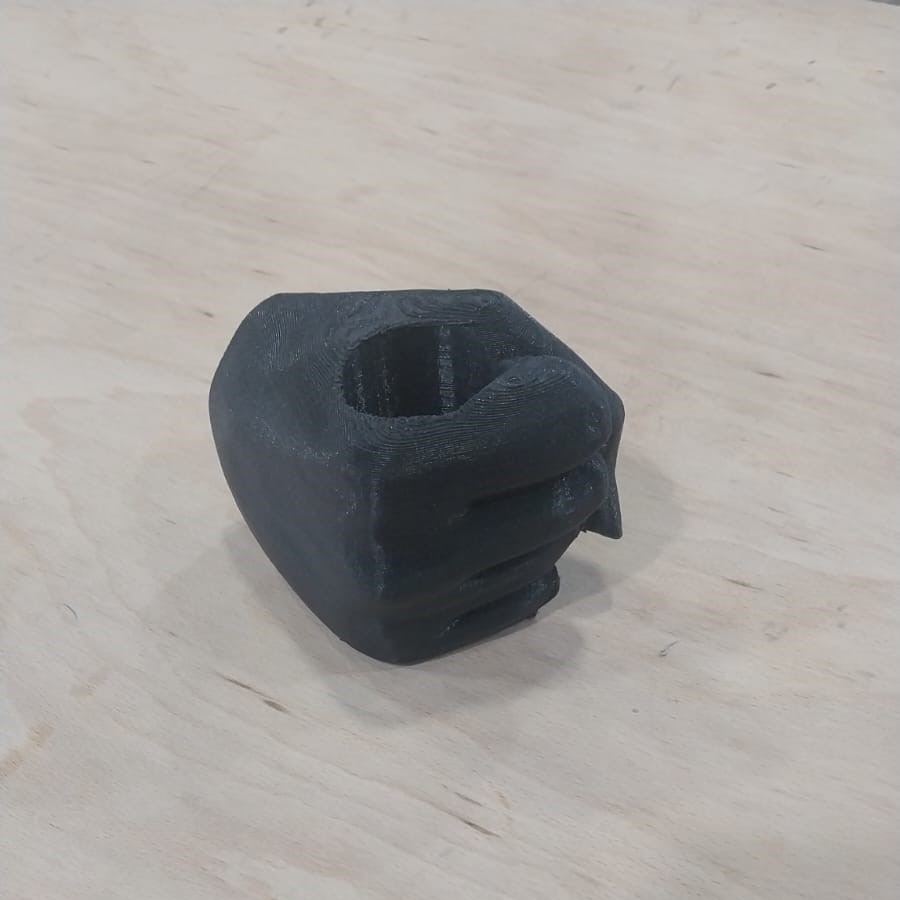
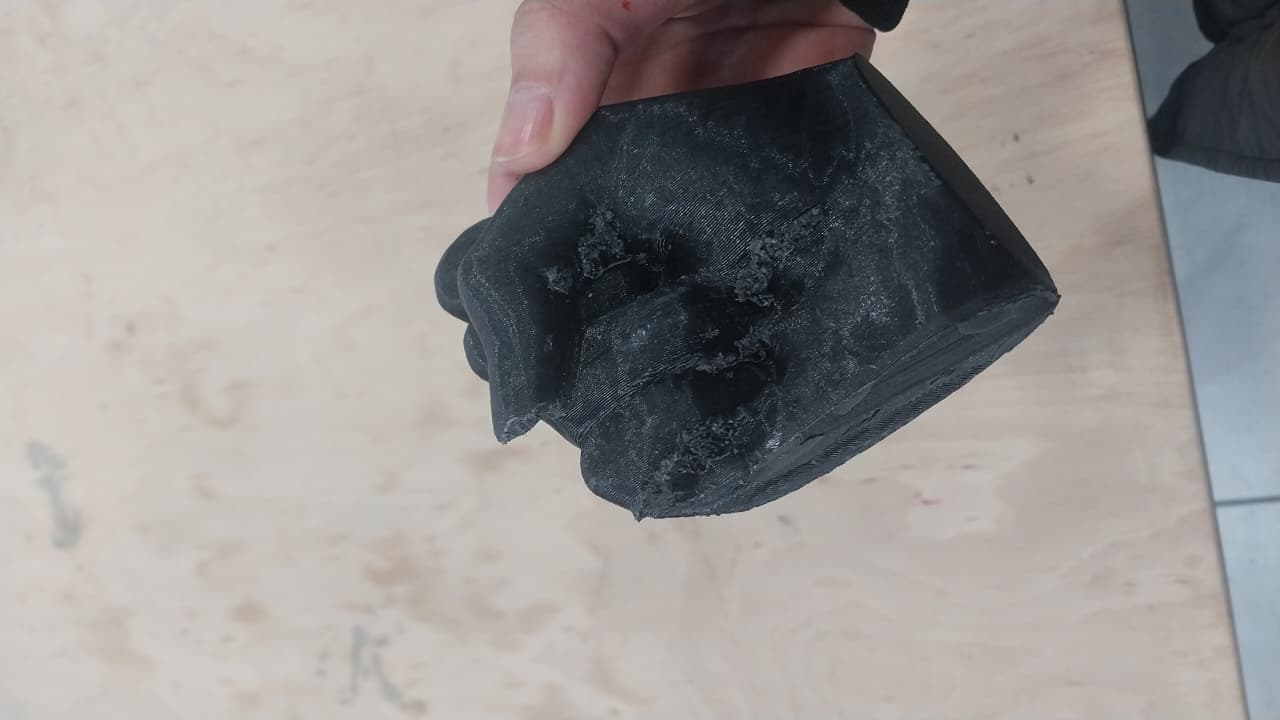 💡 Note: As you can see, the surface finish is poor after I removed the supports, so I had to find a different approach that gives a better finish.
PLA and PETG
The approach that I tried was combining PLA with PETG as a support material since these two materials don't stick to each other.
Here is a video that shows the printing process:
When I tried to remove the supports, they were removed easily.
And here is the final result after removing the supports:
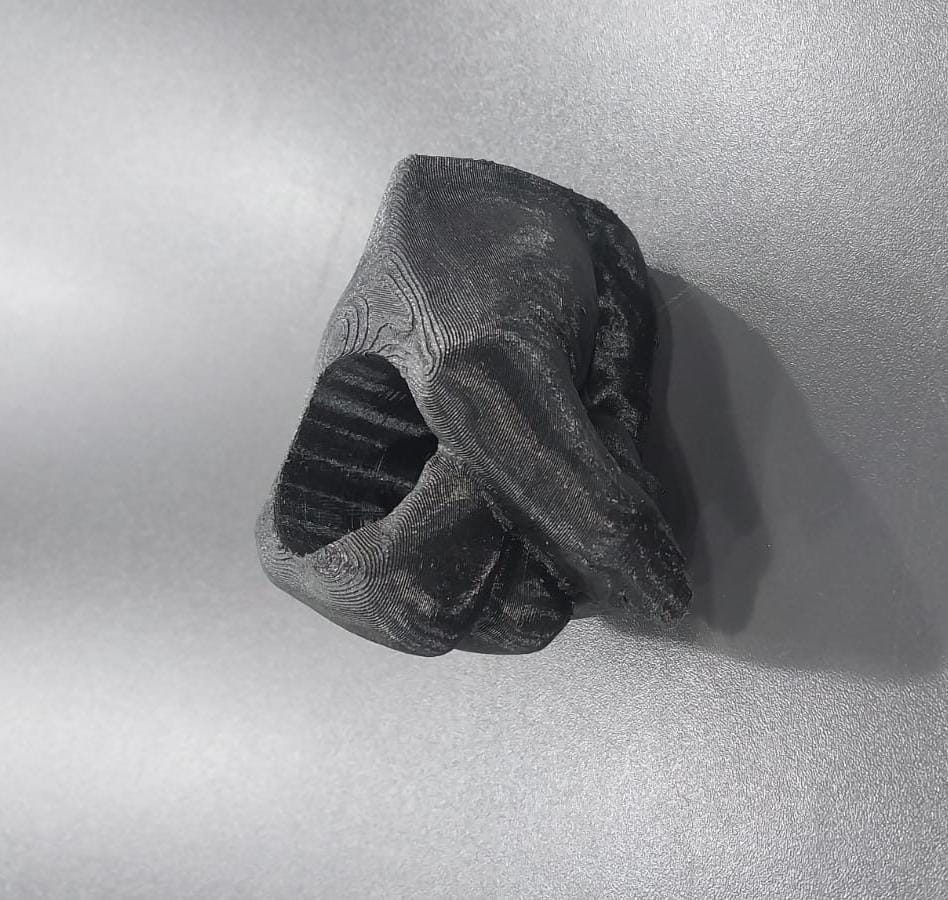
 💡 Note: There are multiple approaches to achieve a good finish; you shouldn't stick to this one.
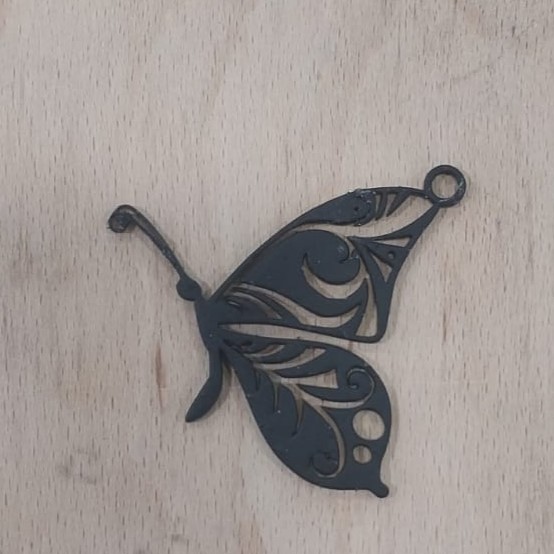
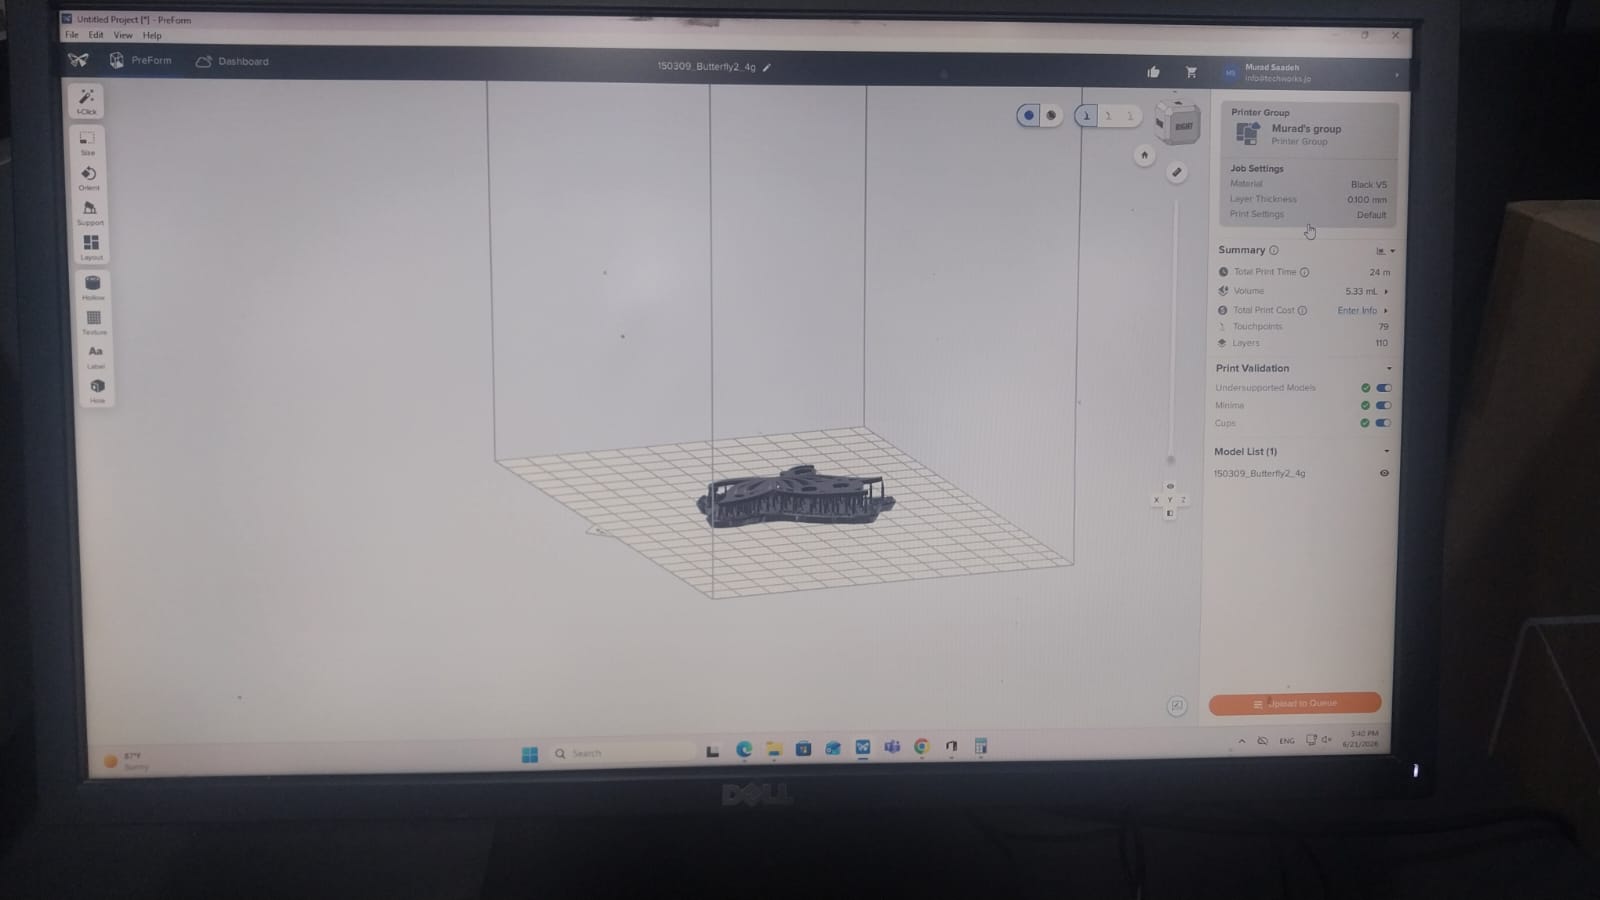
Fifth Piece : Butterfly
For this piece, I wanted to try printing with SLA technology to see the difference in surface finish and detail compared to FDM printing. I designed a small butterfly model with intricate wing patterns to take advantage of the high resolution of SLA printing.
I downloaded this model from this link.
💡 Note: SLA materials are much more expensive than FDM materials, but they provide more detailed results, so they are widely used in jewelry and medical applications.
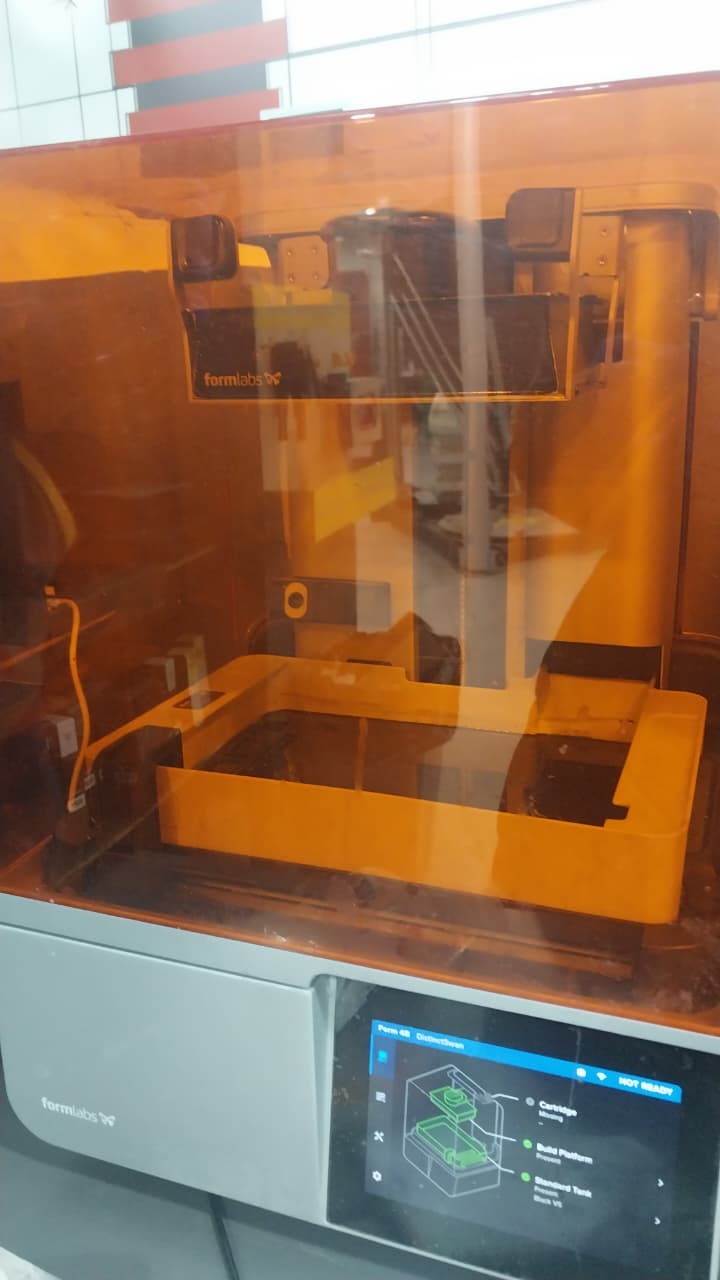
In our lab, we have SLA printers from Formlabs, so I prepared the model for printing using Formlabs PreForm software. I used the default settings for standard resin.
Here is the material I used:
 💡 Note: Before printing, we should ensure that the tank, bed, and cartridge are installed correctly. We can verify this by checking the printer screen; when we see three correct signs, it means everything is ready.
I imported the model into PreForm software to slice it.
 💡 Note: In SLA, since the model is printed upside down, we should add supports.
Here is the printing process:
And here is the final result:
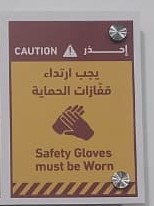
 💡 Note: When dealing with resin, we should wear gloves because some people may be allergic to it, and gloves also help keep our hands clean.
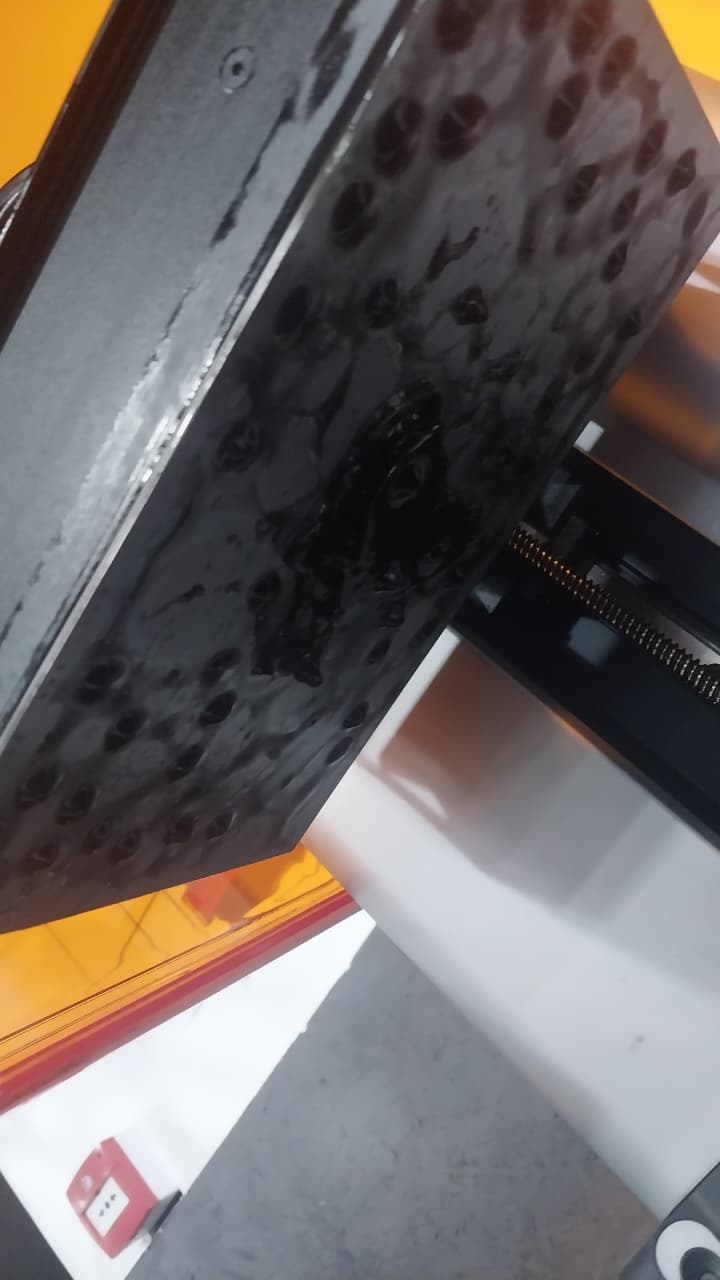
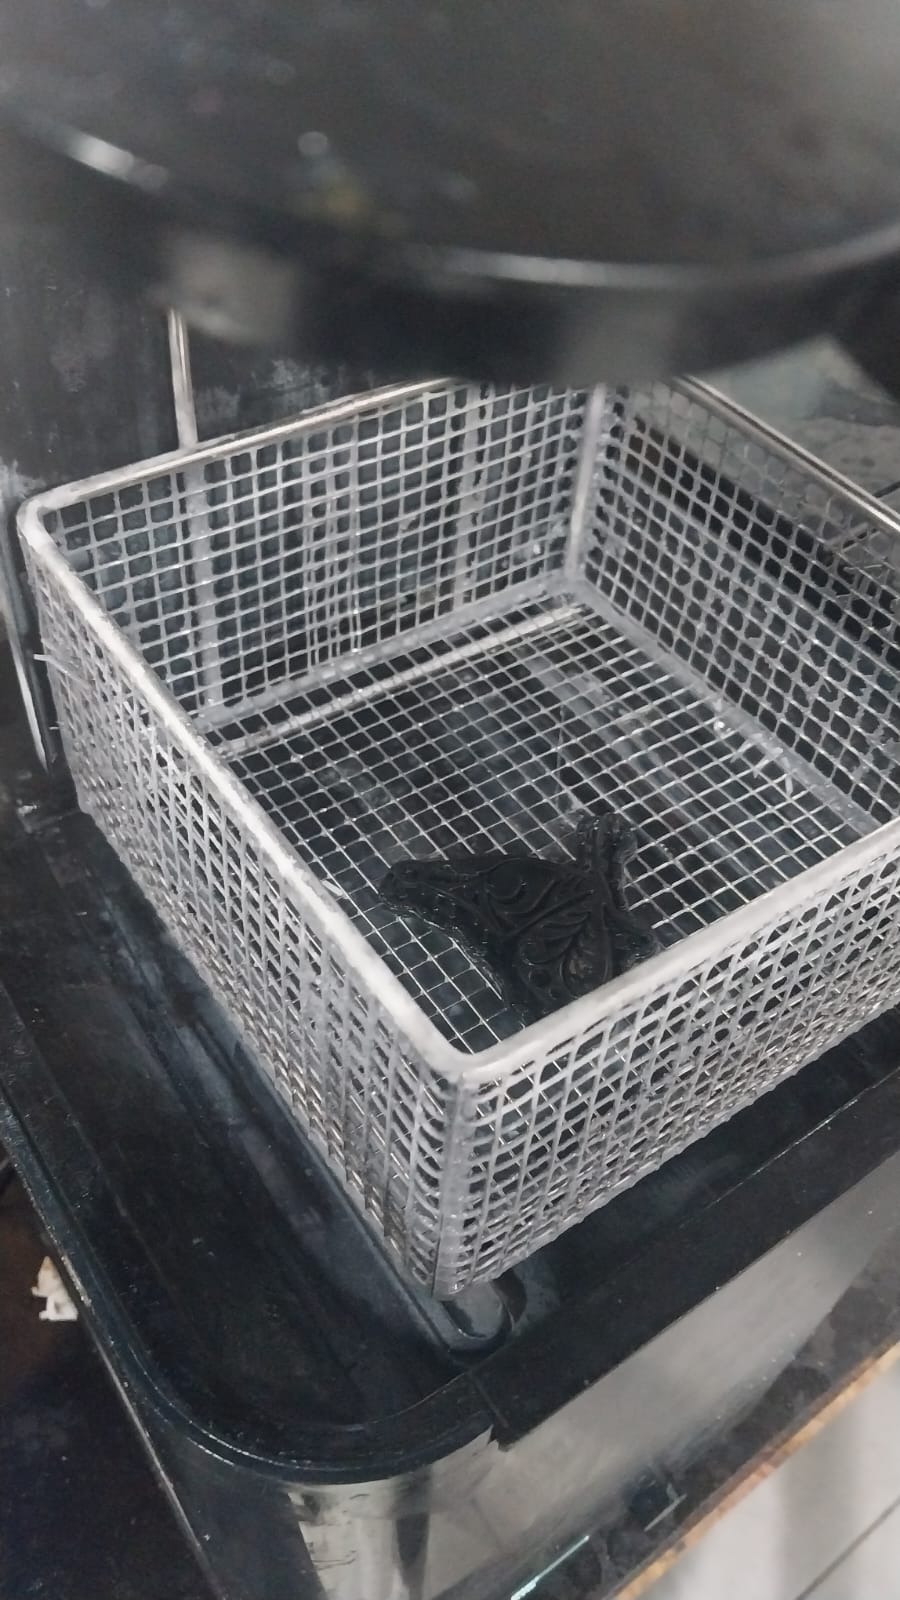
Then, we have to wash the printed piece in isopropyl alcohol (IPA) to remove any residual resin.
💡 Note: According to the instructions, I should wash the piece for 5 minutes and then cure it for another 5 minutes.

After washing and curing, I removed the supports:
💡 Note: Removing supports from SLA prints is easier than from FDM prints because the supports are thinner and less dense. It is easier if you remove the supports after washing and before curing.
Here is the final result after removing the supports:
💡 Note: As you can see, the surface finish is much better than FDM, and the details are more visible.
3D Scanning
In our lab, we have the Spider from Artec 3D, a professional handheld 3D scanner.
I learned how to use the scanner to capture objects and process the scanned data in software like Artec Studio. Here are some scans we took under our instructor's supervision:
💡 Note: We couldn't scan some objects because of their reflective surfaces or complex geometries.
I also scanned my hand. It was a bit difficult because of hand movement, but I managed to do it. Here is the scanned hand file: Artec Studio file
3D Printing
Work Process
First, our instructor, Naim Alhajali, gave us a full overview of 3D printing concepts and techniques, which included:
- Types of 3D printing technologies (FDM, SLA, SLS, etc.)
- Materials used in 3D printing (plastics, resins, metals, etc.)
- How to prepare printers for printing (calibration, material feeding, etc.)
- The Ultimaker printers have a user-friendly interface that guides you through the setup process, including bed leveling and filament loading.
- We also learned how to choose the correct core.
- Design considerations for 3D printing (overhangs, supports, resolution, etc.)
In my assignments, I focused on FDM (Fused Deposition Modeling) and SLA (Stereolithography).
💡 Note: Our lab has FDM printers from Ultimaker, so I based my documentation on these printers.I used PLA (Polylactic Acid) filament for my FDM prints and resin for my SLA prints. Here is a good resource.
Here is a video that shows how to change the filament:
Here is a good reference for choosing the right core: Ultimaker Core Selection Guide
Next, I decided which designs I wanted to print:
- I chose to print a simple design using the in-place technique, which is difficult to produce with CNC: a small dragon.
- After printing a prepared model, now it is time for me to design and print my own in-place technique model: a leaf.
- I also wanted to print a small Ramadan statue to try different colors, inspired by this photo I found on Instagram.
- I also wanted to print a pen holder by scanning my hand, inspired by this photo.
- Lastly, I wanted to print a small butterfly using SLA.
Then, I prepared the models for printing using Ultimaker Cura and other 3D software.
Finally, I printed the models and documented the results.
- First, I added the second core to the printer and made sure it matched the first one.
- Then I calibrated the printer by following the instructions in the printer's guide at this link.
- First, I started the calibration process on the Ultimaker.
- Then it printed the test pattern.
- After the test pattern was printed, I checked the alignment of the first filament with the second one using this sheet as a reference.
- From this sheet, I chose Y at -1.5 and X at 1.5.
- After calibration, I prepared the model for printing in Ultimaker Cura by assigning different parts of the model to different extruders based on the colors I wanted to use.
- Finally, I printed the model, and here is the process:
- First, I wanted to try using the 3D scan of my hand to create a functional object. I thought it would be interesting to see how the scanned data could be used to create a custom-fit pen holder.
- Second, I wanted to understand the purpose of making designs without supports, because I thought supports would make the process easier.
- .obj
- .mtl
- .png
- I imported the .obj file into Meshmixer.
- Then I fixed the object using Meshmixer tools.
- Here is the final result:
- Finally, I exported the fixed model as an .stl file to print it.
💡 Note: I used the default parameters in Cura and PreForm software. I didn't change any of these parameters.
First Piece : Dragon
In this model, I tried to highlight the advantages and capabilities of additive design over subtractive manufacturing by printing a dragon in one piece using the in-place technique.
I downloaded the model from Cults:
Here is the link to view and download the model: Cults Dragon Model
I prepared the model for printing using Ultimaker Cura. I used the default settings for PLA material.
Here is a video that shows the printing process using the in-place technique and the result:
Here is the final result:
This dragon showed me that 3D printing is a powerful tool for creating complex and intricate designs that would be difficult or impossible to produce using traditional manufacturing methods.
Second Piece : Leaf
For this piece, I wanted to create a simple leaf model using the in-place technique. I designed the leaf in Fusion 360 and follow this tutorial which was very helpful.
Here is the .svg file that I used:Download SVG
Here are the model files:
I prepared the model for printing using Ultimaker Cura. I used the default settings for PLA material.
Here is the final result:
Third Piece : Ramadan Statue
For this piece, I wanted to create a decorative statue that celebrates the spirit of Ramadan. I designed a simple lantern-shaped statue with intricate patterns inspired by Islamic art. I used a combination of black and white PLA filaments to create a visually striking piece.
I chose this piece to try printing with two different filaments in the same layer.
I took my inspiration from this photo:
I uploaded my design to Inkscape to trace the base design and convert it to vectors so I could import it into Fusion 360 as an SVG file and extrude it into a 3D model.
💡 Note: I converted the image to vectors using: Path -> Trace Bitmap -> Apply.
💡 Note: I had to make some manual adjustments to the design in Inkscape to make it suitable for 3D printing, such as simplifying some details and ensuring that all parts were properly connected.
Then I edited the model in Fusion 360 to add some details and make it more suitable for 3D printing.
Here is the Fusion 360 model: Fusion 360 Model
After preparing the model in Ultimaker Cura, I set it up for dual-extrusion printing by following these steps:
💡 Note: To do multi-color printing in Cura, you should import each component separately. You cannot select part of a single body to use one filament and another part to use a different filament. I did this by hiding all parts and components in Fusion 360 except the one I wanted to export, then exporting it as an .stl file and importing it into Cura.
💡 Note: I tried to use WoodFill at first, but it did not work, so I switched to PLA for both cores I thin becoase I used an old one which I find in the lab.
And here is the final result:
Fourth Piece : Pen Holder
I decided to make this piece for two main reasons:
To work with the scan file, I downloaded Meshmixer from this link. The Artec software exports three files:
You can download the files from here.
I could not work with the files exported from Artec Studio directly in Fusion.
Here is a useful video tutorial on how to use Meshmixer: link
Here is the process that I followed to fix the scanned hand file and prepare it for printing:
You can download the file from here.
Then I added the .stl file to Cura for printing and enabled tree supports.
Here is the printing process:
And here is the final result:
💡 Note: As you can see, the surface finish is poor after I removed the supports, so I had to find a different approach that gives a better finish.
PLA and PETG
The approach that I tried was combining PLA with PETG as a support material since these two materials don't stick to each other.
Here is a video that shows the printing process:
When I tried to remove the supports, they were removed easily.
And here is the final result after removing the supports:
💡 Note: There are multiple approaches to achieve a good finish; you shouldn't stick to this one.
Fifth Piece : Butterfly
For this piece, I wanted to try printing with SLA technology to see the difference in surface finish and detail compared to FDM printing. I designed a small butterfly model with intricate wing patterns to take advantage of the high resolution of SLA printing.
I downloaded this model from this link.
💡 Note: SLA materials are much more expensive than FDM materials, but they provide more detailed results, so they are widely used in jewelry and medical applications.
In our lab, we have SLA printers from Formlabs, so I prepared the model for printing using Formlabs PreForm software. I used the default settings for standard resin.
Here is the material I used:
💡 Note: Before printing, we should ensure that the tank, bed, and cartridge are installed correctly. We can verify this by checking the printer screen; when we see three correct signs, it means everything is ready.
I imported the model into PreForm software to slice it.
💡 Note: In SLA, since the model is printed upside down, we should add supports.
Here is the printing process:
And here is the final result:
💡 Note: When dealing with resin, we should wear gloves because some people may be allergic to it, and gloves also help keep our hands clean.
Then, we have to wash the printed piece in isopropyl alcohol (IPA) to remove any residual resin.
💡 Note: According to the instructions, I should wash the piece for 5 minutes and then cure it for another 5 minutes.
After washing and curing, I removed the supports:
💡 Note: Removing supports from SLA prints is easier than from FDM prints because the supports are thinner and less dense. It is easier if you remove the supports after washing and before curing.
Here is the final result after removing the supports:
💡 Note: As you can see, the surface finish is much better than FDM, and the details are more visible.