Week 17 : Wildcard Week (Machine Learning)
An AI recitation was conducted during Week 6; however, there was no opportunity to practically create a project on it. Therefore, this week is used to explore the integration of AI with physical objects and embedded system. Cursor was used as a collaborative AI assistant to accelerate the development process and support rapid prototyping of the embedded system workflow explored during this week.
Week 17 assignment could be categorized as follows :
- Project concept and objective
- Workflow and development process
- Results
Basics of AI
Artifical intelligence (AI) means systems that behave as if they use human-like intelligence (e.g. recognizing patterns, making decisions or generating outputs from data)
- Classification :
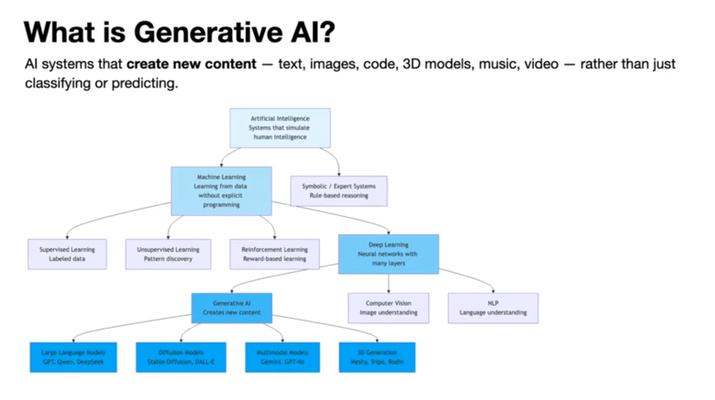
- Foundation of the model
- A large neural network is trained on a massive dataset to learn statistical relationships by adjusting its weights and parameters.
- For example, in the equation y=mx+c, the values m and c are parameters that determine the output. Similarly, neural networks learn the best parameter values during training.
- Training is primarily done using backpropagation:
- The network makes a prediction (forward pass).
- The prediction is compared with the correct output to calculate the error (loss).
- The algorithm works backward to determine how the weights should be adjusted.
- The weights are updated using gradient descent.
- This process is repeated over many examples and epochs (training process) until the error is minimized.
- Model landscape :
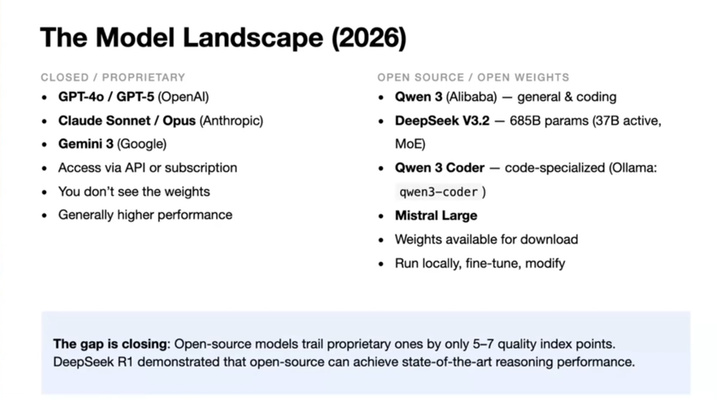
- Local model initiation :
- Open-source models could be run locally. No cloud API key required
- Interface :
- Ollama - CLI
- LM studio - Desktop GUI and run models from HuggingFace
- Open WebUI - Connects to Ollama but feels like ChatGPT
- Pinokio - One-click installer for many generative AI apps (ComfyUI, Stable Diffusion, Whisper, etc). More notes on these apps below. Analogous to app store for local AI tools.
- Interface :
- Open-source models could be run locally. No cloud API key required
- Model training method : Use output from large language models (e.g. GPT, etc) as training data to fine-tune much smaller models (e.g. Qwen 3, etc) so they could replicate the same workflows locally or on edge.
- Important notes :
- Industry is running low on fresh, high-quality training data. Once training finishes, the weights are static and so there is a cutoff on knowledge and could lead to hallucination
- Retrieval-Augmented-Generation (connection to external knowledge bases) and manual fine-tuning (subject expertise is encoded) is needed
- Local model initiation :
- Model context protocol (MCP) : Provides a standardized way to connect LLMs with APIs and databases, file systems, web browsers, and physical machines (e.g. LLM and blender)
- Edge AI : Model that runs on the device (e.g. ESP32, Pi, etc). TinyML is basically edge AI on tiny MCUs.
- Runs based on inference or exported model running on the board.
- Toolchains :
- SenseCraft AI
- Edge Impulse
- Roboflow
Source: Cursor by Anthropic, May 2026
Project concept
Summer is here, and maintaining adequate hydration becomes increasingly important as temperatures rise. Therefore, this project explores the application of machine vision to support the aforementioned issue. The system consists of a tripod-mounted assistant built around the XIAO ESP32-S3 Sense. In its intended form, the device monitors whether specific person is present and provides a brief audio reminder through a MAX9375A + speaker after a certain interval. For the purposes of this test, the focus is more on the former - and so the system only performs person-presence detection.
Seeed’s XIAO Sense TinyML wikis appears to frequently use Edge Impulse for collect, label, train, and Arduino library export. This toolchain is therefore used.
Hardware setup & board settings
This section provides a detailed overview of the hardware configuration used in the project - mainly focusing on the XIAO ESP32-S3 sense and the speaker that has not been covered extensively in previous documentation.
Note: The board shown in the video repeatedly reboots, which is indicated by the periodic beeping sound. This behavior suggests that the system is exceeding its available memory, as the Wi-Fi stack, livestream/web server, and machine learning model are all active simultaneously and compete for the limited RAM resources.
These technical terms will befurther discussed in the next sections.
XIAO ESP32-S3 sense
Two Arduino IDE (tool tab) settings are essential on the XIAO ESP32-S3 Sense to ensure the system works properly :
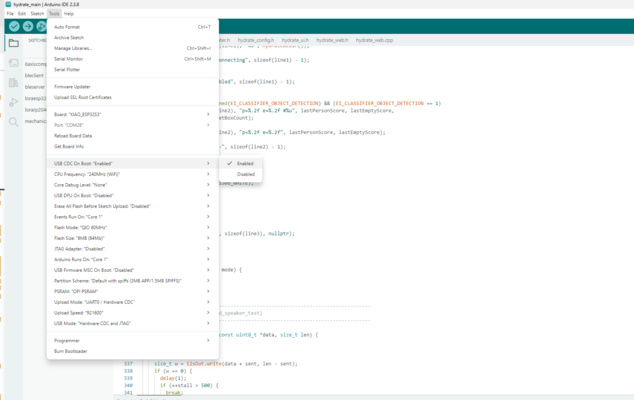
USB CDC On Boot : Enabled — makes the board present a USB serial port immediately at boot, so the Serial Monitor (and inference logs) work over the single USB-C connection. Without this setting, serial output may not be available or may require additional configuration to access.
PSRAM : OPI PSRAM — must be enabled so the camera frame buffer and the model have enough working memory. Typically MCUs have only a few hundred kilobytes of internal SRAM available for user applications - this is not enough for running heavier tasks such as AI modles, camera image buffering, etc. Enabling the onboard 8 MB Octal PSRAM (OPI PSRAM) significantly expands the available working memory
MAX9375A + speaker
The XIAO ESP32-S3 Sense generates audio data in the form of an I2S digital signal, which cannot be connected directly to a speaker. It requires an analog voltage and sufficient power to move its diaphragm and produce audible sound. Thus, the Max93357A acts as a digital-to-analog converter and booster of the voltage and current for this project.
Workflow and development process
The general workflow at Edge Impulse is as follows:
- Project creation — choose the task type (image classification or object detection) at the labeling method section. In this case the image classification is chosen.
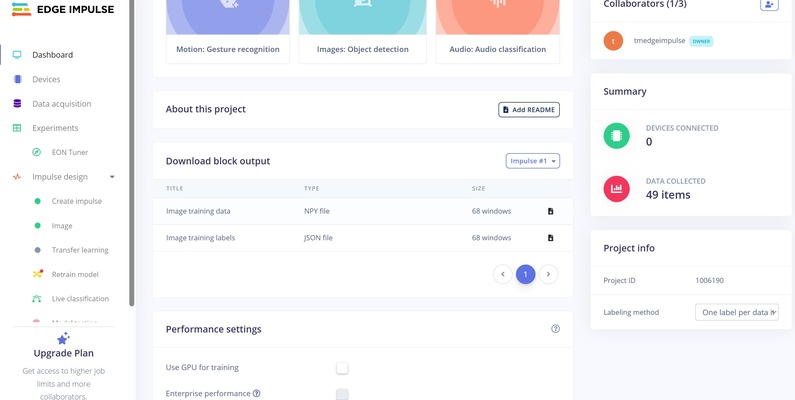
Image classification vs object detection
- Image classification assigns one label to the entire image — e.g. “this whole frame is
empty” or “this whole frame ispeople.” The model is usually smaller than for object detection. Works best when the camera framing is fixed. - Object detection finds where things are. For each object it returns a bounding box (rectangle) and a label — e.g. a box around a person at coordinates (x, y, width, height). User must draw rectangles on every training image.
-
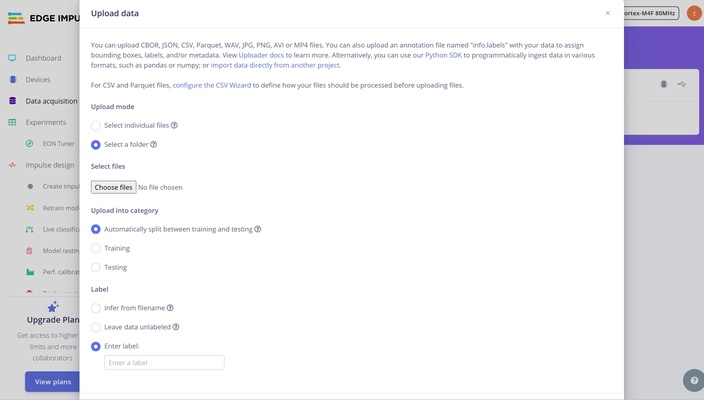
Data acquisition — capture photos then upload to the portal; post-processing depends on the task type.
- Image classification — assign one label per whole image (
people); no bounding boxes. Since labelling based on folder name could be done, the pictures could be sorted first before the upload to make workflow simpler.
- Image classification — assign one label per whole image (
- **Object detection** — draw a tight bounding box around each object on every training image
Object detection labeling
Draw each box as tight as possible around the target object. Avoid including excessive background.
Delete existing samples from the dataset before uploading new ones should there be any. Otherwise, previous images remain in the project and may be included in training, causing duplicate or outdated data that can hurt model performance.
-
Create impulse — define the ML pipeline that will run on the ESP32. For vision, the processing block is usually Image (resize to e.g. 96×96, normalize pixels). The learning block depends on the project type:
- Image classification : MobileNetV2 or Transfer learning (Images)
- Object detection : FOMO
These are pretrained model that already recognizes general edge, texture and shape features. Only the last layer weights is readjusted for the user's test case.

-
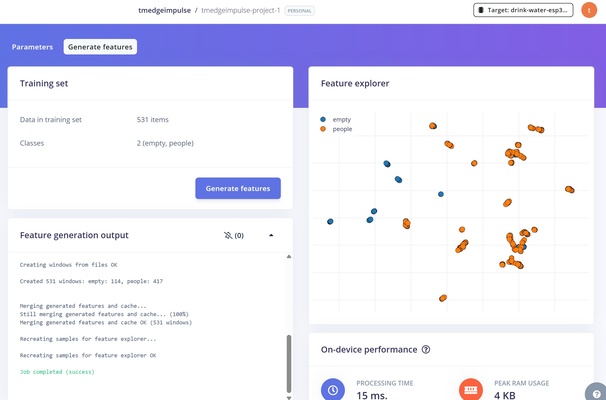
Generate features — run the processing block defined at the aforementioned step and inspect clusters in the Feature explorer. Ideally, different classes form distinct clusters and this suggests the model is able to separate it cleanly.
The image below is only a reference and shows an example of a dataset with poor class separation.
- Train model — run the learning block on the training split; review loss and the confusion matrix.
- Model deployment — export and flash firmware (see Edge Impulse Arduino deployment).
The concept of the train model and model deployment feature is further explored below.
Train model
Run the learning block on the training split. Edge Impulse updates weights via backpropagation i.e. another weighting iteration, then shows a confusion matrix and other metrics.
Training metrics
Epoch — one full pass through the training dataset. Training runs for many epochs (e.g. 30–100). Early epochs change weights quickly; later epochs make smaller refinements. Too many epochs on a small dataset can overfit.
Simple analogy : training = studying with worked examples; validation = practice quizzes used to adjust study; test = the final exam
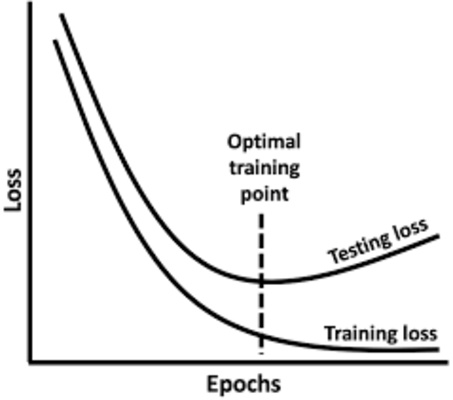
Loss — measures how wrong the model’s predictions are compared to the true labels. Training loss should generally decrease over epochs. Validation loss (if shown) tracks held-out data during training; if training loss keeps falling but validation loss rises, the model is likely overfitting.
Confusion matrix — table of predicted vs actual labels. Rows = true class; columns = predicted class. Large numbers on the diagonal are correct; off-diagonal cells are confusions (e.g. true empty predicted as people).
Source: Cursor by Anthropic, May 2026
Training vs validation vs test set
Three different splits, each with a distinct job:
- Training set — the data the model actually learns from. Its weights are updated on these samples via backpropagation.
- Validation set — held out during training to check generalization after each epoch. The model does not learn its weights from it, but it is used to monitor overfitting and to choose settings such as how many epochs to run / when to stop. In Edge Impulse, the Training data is automatically split again into a train portion and a validation portion for this purpose.
- Test set — kept completely separate until the very end and scored only once, after training is finished, to give an unbiased estimate of real-world performance. It is never used to train or tune the model.
Source: Cursor by Anthropic, May 2026
It is important to note that a high accuracy (e.g. 90% or above) does not necessarily indicate a good model especially on small models (in contrast to large, diverse, and properly separated dataset). In some cases, it can be a warning sign of overfitting, particularly when the training and test images share very similar conditions such as lighting, background, or viewpoint. In such scenarios, the model may simply be memorizing visual patterns rather than learning meaningful features and cannot generalize well to other scenarios. It could be that a 85% accuracy from a varied dataset is more trustworthy and could be more than enough for a non-critical cases.
Model deployment
Follow the official steps for Arduino export: Edge Impulse — Run Arduino 2.0. In short, the platform packages the trained model as an Arduino library and could then be used in the user's project.
The first compile of the exported library takes a long time — on the order of 30 minutes to 1 hour — because the entire TensorFlow Lite Micro (the tiny inference engine that actually executes the model at the MCU) runtime plus the model is being built from scratch. Subsequent compiles re-use the cached build and are much faster
Results
Several approaches were tried:
| Attempt | Data source | Task type | Result |
|---|---|---|---|
| 1 | Phone camera photos | Image classification | Failed on device |
| 2 | Phone camera photos | Object detection (FOMO) | Failed on device |
| 3 | ESP32-S3 Sense camera (mounted angle) | Image classification | Successful |
The third approach proved to be successful and two key lessons were learned from this experiment, namely orientation and camera source. The failure of attempt 2 was most likely also due to the latter and not the model itself.
Yes, the video is approximately 3 minutes long and is used to showcase the system’s results. A short delay of a few seconds has been intentionally added in the firmware. This ensures that the system reliably confirms the presence of a person before triggering the response.
Lessons learned : Orientation
The OV2640 can be accessed with the standard ESP32 camera example (the CameraWebServer sketch from the ESP32 board package) and a live feed to a browser over Wi-Fi would then be enabled. Pictures could be captured from here without having extra SD card
A small image model does not "understand" a person abstractly and depends heavily on the statistical pattern of pixels in the training framing - therefore there are several possible combinations that can lead to system failure :
- ✔ input data / ✖ output orientation
- ✖ input data / ✔ output orientation
- ✖ input data / ✖ output orientation
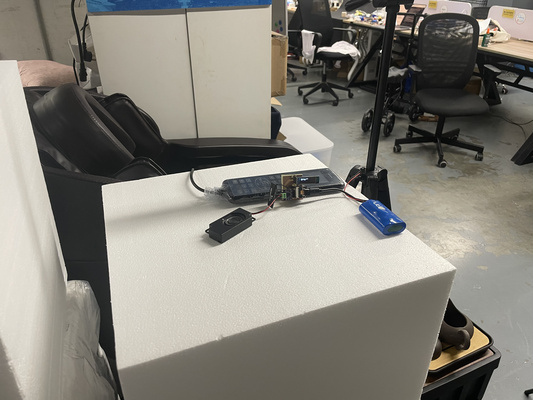
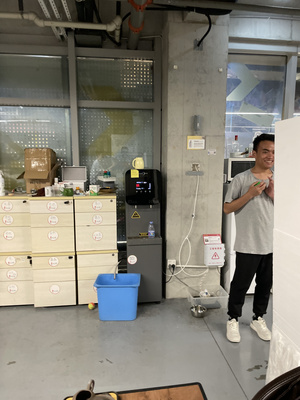
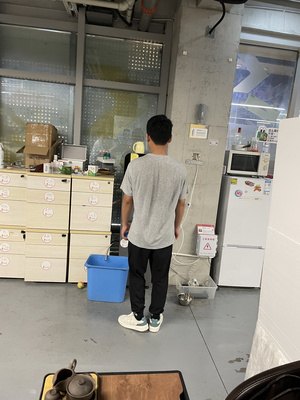
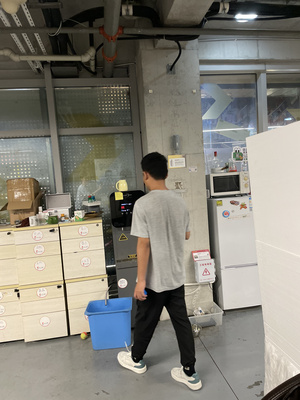
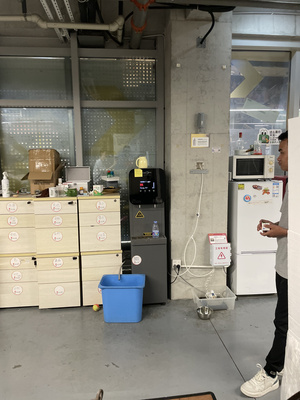
If the deployed camera (output orientation) sits lower/higher or at a different angle than the training photos, the pixel patterns no longer match. The following picture shows the wrong camera position to the original that is attached to a fixed tripod (compare to the video above).
Furthermore, a selection of images captured using an iPhone without a fixed camera setup (corresponding to Attempt 1) is shown below to highlight the inconsistent input data orientation.

Lessons learned : Camera source
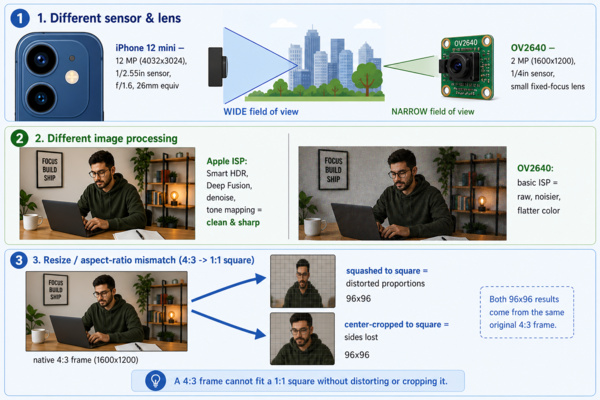
Difference between the image acquisition system can significantly affect performance of the machine learning models. The table below summarizes the key differences between the iPhone camera and the OV2640 camera used on the XIAO ESP32-S3 Sense.
| Factor | Impact on the Model |
|---|---|
| Different sensor and lens | The iPhone uses a much higher-resolution sensor with a different field of view and focal length. As a result, the framing, perspective, and level of detail differ significantly from those produced by the OV2640 camera. |
| Different image processing | iPhones apply extensive computational photography techniques such as HDR, denoising, sharpening, and automatic colour correction. In contrast, OV2640 images are generally noisier, less processed, and have different colour characteristics, leading to different pixel statistics. |
| Resize and aspect-ratio mismatch | Images captured at different aspect ratios are resized differently when converted to the model's 96 × 96 input size. This can distort features and further alter the patterns seen by the model. |
The images below shows a comparison between frames captured using the OV2640 camera and those taken with an iPhone (the 2nd position from the previous section is shown again for reference). No edit is intentionally done to illustrate the difference.