Week 15 : Interface & Application Programming
Cursor was used as a collaborative AI assistant to rapidly prototype and validate the core connections between the various software components that form the architecture tested in this week. Further optimisation and refinement of it will be explored in the future.
Week 15 assignment could be categorized as follows:
-
Group assignment
- Interface & application programming tools comparison
-
Individual assignment
- Interface & application integration (to designed embedded microcontroller system)
Additional details beyond those presented in this document can be found in the Chaihuo's 2026 Week 15 group documentation.
Basics of interface & application programming
-
- The “Hello World” program is a tradition used to show how different programming languages print a simple message.
-
With codes :
- Javascript (turns static websites into interactive apps)
- V8 engine : compiles Javascript into machine code (analogous to GCC x C/C++)
- Node.js : allows Javascript to run outside the browser (e.g. APIs). Backend of Javascript
- Python (used for AI/machine learning, datascience, automation scripts, etc)
- Javascript (turns static websites into interactive apps)
Languages :
- Low-code/No-code tools (systems that use blocks or flows instead of typing code)
- Scratch
- MIT App Inventor
- Node-RED
-
Device interfaces (how machines talk to each other)
- MQTT (a communication protocol)
- Needs a broker (middleman) for example Mosquitto
- MQTT (a communication protocol)
- Data interfaces (how data is structured and stored)
- Data structure :
- JSON
- TOML
- Database :
- MySQL : Data stored in tables like excel and so fixed structure
- MongoDB : Data stored as documents (JSON-like) and so dynamic structure
- Data structure :
- User interfaces (how humans interact with software)
- No graphics :
- Ncurses : built UI inside the terminal
- With graphics:
- Desktop application
- Tkinter : built in python
- wxPython : More advanced than Tkinter, looks more like native OS apps
- Browser-based
- dat.GUI
- Bootstrap
- FlatUI
- Desktop application
- Cross-platform UI system (works across web, mobile, etc)
- Example : Blynk
- Difficult to implement because each devices behaves differently e.g. tiny screens, touch screens, performance limits, etc
- Graphics layer (how it looks visually)
- 2D :
- Canvas (pixel)
- SVG (vector) -3D :
- Three.js : 3D engine built on WebGL (harder version)
- WebGPU : successor to WebGL. More complicated than Three.js
- 2D :
- No graphics :
- Game engines :
- Unity :
- Most popular game engine
- Uses C#
- Unreal engine :
- uses C++ + visual scripting
- Godot :
- opensource
- Unity :
- Audio system
- On desktop :
- SDL/Pygame
- Python wrapper over SDL. Used for simple games, sound effects, basic animation
- OpenFrameworks
- SDL/Pygame
- On web :
- Web audio API
- WebRTC (real time communication)
- On desktop :
- VR/AR/XR :
- Virtual reality (VR) : User inside a fully digital world
- Augmented reality (AR) : Digital objects placed on real world. Uses camera + sensors (e.g. Pokemon Go)
- Extended reality (XR) : Combination of VR + AR.
- Three.js ecosystem could be used
-
Performance optimisation :
- Python itself is generally slow for heavy computation loops (i.e. many lines of code). Numpy faster. Numba is even faster
- Webworkers : Javascript normally runs on one thread. Web Workers allow parallel CPU usage
-
Machine learning (system that learns patterns from data instead of being explicitly programmed) :
- Frameworks :
- PyTorch : easiest to use
- TensorFlow
- JAX : fastest
- Model sharing ecosystem :
- Hugging Face
- Frameworks :
-
Cloud platforms (renting computers over the internet):
- Could run ML models, could store data
- AWS, Google CLoud, Microsoft Azure
Interface & application programming tools comparison
This section provides an overview of the tools and technologies used throughout the development process. Primary objective is to establish a communication between a web browser to an MCU that controlls the processing of a system. Events are expected to be saved in database as well. Where relevant, brief comparisons with similar tools are also included to justify the selection and highlight their respective advantages. Steps might vary depending on context and so please refer to available online resources for alternative detailed steps.
For detailed walkthrough of the interface & application integration, please refer to the next section.
System overview
The following components are used for the experiment. For further details please refer to the final project overview:
- Raspberry pi : local server. Hosts core backend service. To be further explained below
- XIAO ESP32/ESP32 Devkit : primary embedded controller. The "brain" of the solar PV system. Manages hardware-level operations.
The system is further divided into two primary communication paths:
- Command Path — used to send instructions to the ESP32 device.
- Telemetry Path — used to receive status and measurement data from the ESP32 device.
Telemetry vs command
Telemetry refers to automated measurement and status data transmitted from a remote device to another system, allowing the hardware state to be monitored without direct physical access. In contrast, command is defined as instruction to a device to perform a certain action
These two paths together create a complete bidirectional communication system between the user interface and the embedded hardware.
HTTP vs MQTT
HTTP and MQTT are both communication protocols used to transfer data between systems. However, HTTP is for web-to-web interaction, while MQTT is for messaging between devices.
-
Common HTTP Methods
- GET → Retrieve data (read-only request)
- POST → Send data or trigger an action (create/execute)
- PUT → Update existing data
- DELETE → Remove data
The end-to-end path is shown below. Commands travel from the browser through Vercel to Node-RED and then over MQTT to the device. Telemetry travels from the device to the broker, through Node-RED, and can be read back via Vercel. Historical data is written to MongoDB when an event is sent. Further explanations (table format) could be found below this chart.
flowchart TB
  subgraph OP["Operator"]
    BR[Web browser]
  end

  subgraph VC["Vercel"]
    UI["Web UI client pages"]
    API["Server API routes"]
    UI <-->|HTTPS JSON| API
  end

  BR <-->|HTTPS UI session| UI

  EDGE["Cloudflare tunnel edge"]
  AGT["cloudflared connector"]
  MDB[("MongoDB Atlas")]

  subgraph PI["Raspberry Pi LAN"]
    NR[Node-RED]
    MQ[Mosquitto broker]
    NR <-->|"publish subscribe"| MQ
  end

  MCU["ESP32 embedded controller"]
  MQ <-->|MQTT cmd telemetry| MCU

  API <-->|"commands and GET status request plus response"| EDGE
  EDGE <-->|encrypted tunnel| AGT
  AGT <-->|HTTP localhost request plus response| NR

  NR -->|"direct HTTPS POST api events"| API
  API -->|event documents| MDB
| Component | Location | Purpose |
|---|---|---|
| Vercel | Cloud (Vercel — Next.js / React) | Provides a browser-based interface so the system can be controlled and monitored remotely. |
| Cloudflare Tunnel | Edge (cloudflare's global server) + Raspberry Pi (cloudflared on Pi) | Creates a secure encrypted connection from the public internet to the private Raspberry Pi network, allowing access to Node-RED without sharing router ports. |
| Node-RED | Raspberry Pi | Acts as the central logic layer: converts HTTP requests into MQTT messages, processes telemetry, and stores the latest device state in memory for fast access. |
| Mosquitto Broker | Raspberry Pi | Provides MQTT publish/subscribe messaging so that devices and services can communicate efficiently within the local network. |
| MongoDB Atlas | Cloud (MongoDB Atlas cluster) | Stores telemetry logs and events for debugging, visualization, and long-term data analysis. |
Steps to achieve this toolchain is described in the next sections.
MQTT broker (Embedded + LAN messaging)
Note : These steps were completed in week 11 : networking & communications and are therefore not documented in detail here.
- Run an MQTT broker (e.g. Mosquitto) on a machine that devices can reach on the LAN.
- Flash firmware so the MCU connects to Wi‑Fi, connects to the broker, subscribes to a command topic, and publishes to a telemetry topic.
- Test with mosquitto_pub / mosquitto_sub or Node-RED debug nodes.

Node-RED (the application layer)
This section describes the installation process of Node-RED at the Raspberry Pi and also some set of commonly used commands.
Installation and startup/stop
- Install Node-RED on the Raspberry Pi by running the official installation script:
- Start Node-RED using the following commands or
- Once Node-RED is running, open a web browser on a device within the same local network and navigate to
- Stop Node-RED :
Commonly used commands
The nodes described below are commonly used in this project. Additional documentation and examples are widely available in the official Node-RED documentation and online community resources.
| Node | Purpose | Output | Key Notes / Typical Use |
|---|---|---|---|
| http in | Creates an HTTP endpoint inside Node-RED | msg.req (request metadata, needed by http response), msg.payload (parsed body if configured i.e. JSON) |
Acts as the entry point for web requests. Almost always paired with http response or the request will hang. |
| function | Runs custom JavaScript logic inside a flow | Modified msg object (e.g. msg.payload, msg.topic). Creates msg.statusCode, msg.headers (optional, but good practice to detail out) |
Has lifecycle tabs: On Message (main processing), On Start (when system starts e.g. printing "ready" logs), On Stop (when system is shutting down e.g. logging shutdown actions). |
| mqtt out | Publishes messages to an MQTT broker (e.g. Mosquitto) | Sends msg.payload to MQTT topic |
Used to send commands/updates to devices. |
| http response | Sends a response back to the HTTP client | HTTP response (status code + body) | Must be used to complete an http in request. Without it, the client will timeout (i.e. client stops waiting for a response because server doidn't reply in time). Typically returns JSON like {"ok": true}. |
| mqtt in | Subscribes to MQTT topics and listens for messages | msg.topic, msg.payload |
Used to receive telemetry from devices. Often paired with function nodes for parsing or forwarding data. |
Cloudflare (tunneling to internet)
Cloudflare refers to the global edge network and cloud platform that handles external internet traffic, security, routing, and public access to locally hosted services. It acts as the intermediary layer between external users and the local infrastructure, allowing requests from the internet to securely reach applications running inside the local network.Cloudflared on the other hand is the installation program that should be installed at the local machine.
A public tunnel URL can expose whatever Node-RED serves at that port
- Check OS and CPU architecture
- Install cloudflared based on the OS
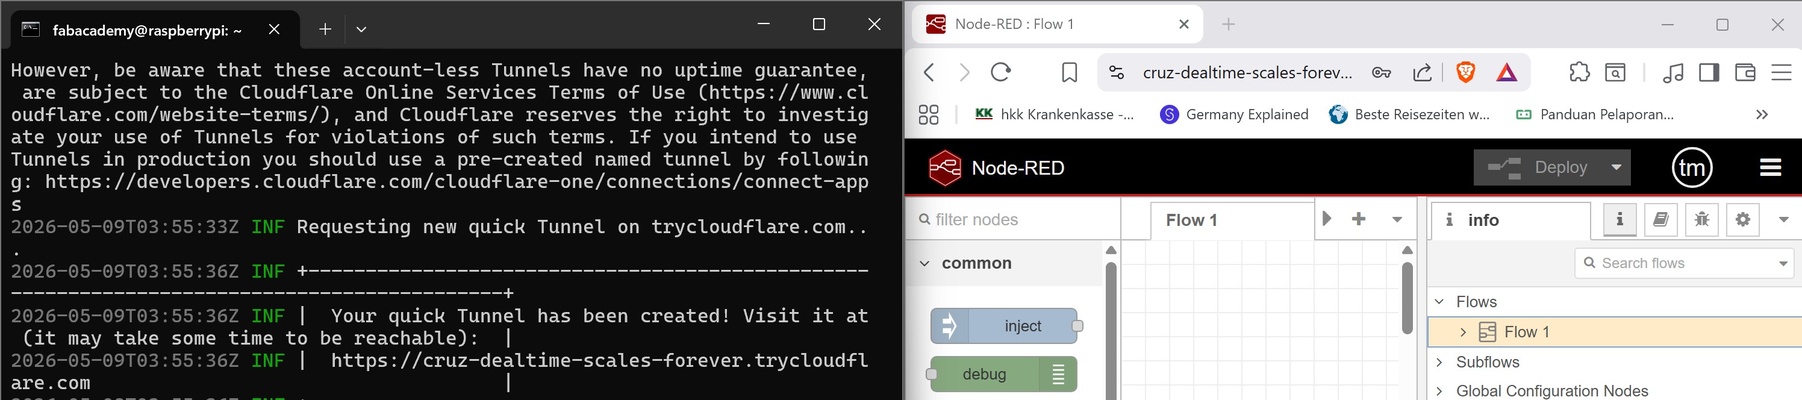
- Create a "TryCloudflare" tunnel (no domain, dynamic hostname). For paid domains, please see the admonition below.
Dynamic names on quick tunnels
If a fixed Cloudflare hostname (named tunnel + domain) is not configured, Cloudflare's "TryCloudflare" tunnel will give a new random subdomain when cloudflared is restarted or when the quick tunnel session ends. Therefore, any hard-coded URL needs to be adjusted in any depending platforms. A purchased domain (e.g. from Squarespace) allows applications to have a stable public hostname
Now, applications running within the local network can now be connected to internet-facing services through the configured tunnel. This enables communication between locally hosted applications and external clients over the internet.
A public tunnel URL may expose the application running on that port to the public internet — appropriate security measures and access controls should therefore be applied.
MongoDB (data storage at cloud)
MongoDB was selected because IoT events are typically represented in JSON format, making it well-suited for storing and handling device telemetry and application data. It also integrates naturally with Next.js applications, where both the frontend interface and backend API handlers can operate within a single codebase (e.g. deployments on Vercel).
Compared to relational databases such as MySQL, MongoDB provides a more flexible schema design. MySQL generally requires predefined table structures and consistent column definitions throughout the development process, whereas MongoDB allows document structures to evolve more easily. Since this project is currently in the prototyping stage and the data model may continue to change, MongoDB was considered the more practical choice for rapid development and experimentation.
- Create a MongoDB Atlas account
- Create a cluster (i.e. create a MongoDB database server)
- Choose a free tier (often labeled as M0)
- Choose a cloud provider region reasonably close to the intender users of the application
- Create a database user.
- Open database access
- Add new database user
- Add password.
- Allow inbound connections (i.e. from Vercel)
- Open network access
- Add IP address. Typically 0.0.0.0/0 (allow anywhere). Vercel generally use changing outbound IPs
- Get a connection string ('MONGODB_URI)
- Open database, connect.
- Choose drivers
- Copy the connection string template. Some placeholders need to be changed accordingly.
Some networks block or mishandle SRV DNS lookups (a DNS record used as a service locator). In that case Atlas often provides a non-SRV connection option using standard mongodb:// hostnames and ports.
MONGODB_URI is equivalent to password - treat it carefully
Relational database solutions such as MySQL may still be explored in future iterations of the project if stricter schema validation, relational consistency, or more complex querying requirements become necessary.
Vercel (main interface with user i.e. through browser)
Vercel was selected as the hosting platform for the user interface due to its strong integration and optimization for Next.js applications. Compared to more general-purpose cloud platforms such as AWS, Google Cloud, or Microsoft Azure, Vercel provides a simpler deployment workflow and is so suitable for rapid prototyping rather than large-scale infrastructure management.
- Prerequisites :
- Code is already pushed to Github
- Folder should contain package.json (equivalent to mkdocs.yaml, different ecosystem)
- MongoDB Atlas variables are available (MONGODB_URI, MONGODB_DB) from the MongoDB setup page
- Cloudflare tunnel base URL is vailable
- Login to Vercel.com
- Add new -> project
- Select root directory. Folder with package.json
-
Add environment variables
- MongoDB related :
- MONGODB_URI
- MONGODB_DB
- NODE-RED related :
- COMMAND_TUNNEL_URL
- Login to user's vercel hosted website related :
- SITE_PASSWORD : login gate for user
- AUTH_SECRET : to stay logged in
Environment variables (Env Vars) act as configurable “knobs” for operational settings and system tuning without requiring modifications to the application source code
- Deploy
- MongoDB related :
Interface & application integration
The concepts and technologies discussed in the previous sections were integrated into a framework suitable for the solar PV system prototype - for detailed context, please refer to the final project overview. A demo is shown in the next video.
User actions performed through the web interface are transmitted through the configured cloud tunnel to the local Node-RED instance, which then forwards commands to devices using MQTT topics. Devices respond accordingly while continuously publishing telemetry data back through the MQTT broker. Commands and system events are logged and stored in MongoDB for monitoring. The three command records generated during the demonstration can be seen below.
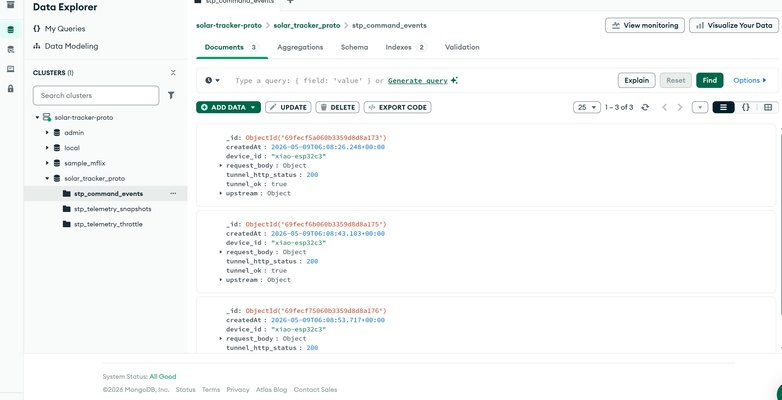
The system also supports timed control operations, where a duration value can be sent alongside a command to define how long a device should remain active before automatically returning to its default state. Telemetry data received from devices is displayed within the dashboard interface to provide near real-time system monitoring and feedback.
Overall system breakdown and communication flow are outlined in the next sections.
On the XIAO ESP32C3 x OLED
The working code for the XIAO ESP32C3 x OLED could be seen at the admonition below - in which it :
- Connects to Wi-Fi and to the MQTT broker. Subscribes to a command topic.
- Parses command JSON on the topic. Accepts boolean true/false or strings "on"/"off"
- Optional timed “ON” window: if the command includes duration_sec or validFor (seconds), the device turns ON and automatically turns OFF when that time elapses. Alternatively validUntil (Unix time) can end the window at an absolute time
- Publishes telemetry periodically (about every 10 s) to a telemetry topic, including ON/OFF status, uptime, free heap, and fields that describe any active timed window.
XIAO ESP32C3 x OLED x MQTT
/*
* Solar Tracker Proto — Seeed XIAO ESP32-C3 + 0.96" OLED (SSD1306 I2C)
*
* Output for this experiment: OLED text (ON/OFF + WiFi/MQTT + countdown when timed ON).
*
* Cmd:  devices/<DEVICE_ID>/cmd  JSON { "state": true|false OR "on"|"off", optional validFor / duration_sec }
* Tel:  devices/<DEVICE_ID>/telemetry  JSON includes "status":"on"|"off"
*
* Libraries (Library Manager): Adafruit SSD1306, Adafruit GFX, ArduinoJson v6, PubSubClient
*
* Wiring (typical 4-pin I2C OLED): VCC→3V3, GND→GND, SDA→D4 (GPIO6), SCL→D5 (GPIO7)
*/
#include <ArduinoJson.h>
#include <WiFi.h>
#include <WiFiClient.h>
#include <PubSubClient.h>
#include <Wire.h>
#include <Adafruit_GFX.h>
#include <Adafruit_SSD1306.h>
#include <esp_wifi.h>
#include <time.h>

const char *WIFI_SSID = "X.factory2.4G";
const char *WIFI_PASS = "make0314";

static const IPAddress MQTT_IP(192, 168, 100, 50);
const uint16_t MQTT_PORT = 1883;

/** Must match Node-RED / Vercel device_id */
const char *DEVICE_ID = "xiao-esp32c3";

/** XIAO ESP32-C3: D4 = GPIO6 (SDA), D5 = GPIO7 (SCL) — change if you wired differently */
static const uint8_t OLED_SDA = 6;
static const uint8_t OLED_SCL = 7;
static const uint8_t OLED_ADDR = 0x3C;

#define SCREEN_W 128
#define SCREEN_H 64
#define OLED_RESET -1
Adafruit_SSD1306 display(SCREEN_W, SCREEN_H, &Wire, OLED_RESET);

const unsigned long TELEMETRY_MS = 10000;
const int WIFI_POST_CONNECT_DELAY_MS = 1000;
const int MQTT_TCP_TRIES = 8;
const int MQTT_SESSION_TRIES = 8;

WiFiClient wifiClient;
PubSubClient mqtt(wifiClient);

char topicTelemetry[64];
char topicCmd[64];

bool relayOn = false;
unsigned long paidUntilMillis = 0;
time_t paidUntilUnix = 0;
unsigned long lastPub = 0;

static bool parseStateFromJson(JsonVariantConst v, bool *onOut) {
if (v.isNull())
    return false;
if (v.is<bool>()) {
    *onOut = v.as<bool>();
    return true;
}
if (v.is<const char *>()) {
    const char *st = v.as<const char *>();
    if (!strcmp(st, "off")) {
    *onOut = false;
    return true;
    }
    if (!strcmp(st, "on")) {
    *onOut = true;
    return true;
    }
}
return false;
}

/** Remaining seconds for active timer, or 0 if none / expired edge. */
static unsigned long remainingTimerSeconds() {
if (!relayOn)
    return 0;
if (paidUntilMillis != 0) {
    long r = (long)(paidUntilMillis - millis());
    if (r <= 0)
    return 0;
    return (unsigned long)(r / 1000UL);
}
if (paidUntilUnix != 0) {
    time_t now = time(nullptr);
    if (now > 1700000000 && (time_t)paidUntilUnix > now)
    return (unsigned long)((time_t)paidUntilUnix - now);
}
return 0;
}

void refreshOled() {
display.clearDisplay();
display.setTextColor(SSD1306_WHITE);
display.setTextSize(1);
display.setCursor(0, 0);
display.println(F("Solar Tracker Proto"));

display.print(F("ID "));
display.println(DEVICE_ID);

const bool wifiOk = (WiFi.status() == WL_CONNECTED);
const bool mqttOk = mqtt.connected();
display.print(F("WiFi "));
display.print(wifiOk ? F("OK") : F("--"));
display.print(F("  MQTT "));
display.println(mqttOk ? F("OK") : F("--"));

display.drawLine(0, 24, SCREEN_W, 24, SSD1306_WHITE);

display.setTextSize(2);
display.setCursor(0, 28);
display.println(relayOn ? F("ON") : F("OFF"));

display.setTextSize(1);
display.setCursor(0, 48);

const unsigned long rem = remainingTimerSeconds();
const bool timed = relayOn && rem > 0 &&
                    (paidUntilMillis != 0 || paidUntilUnix != 0);
if (timed) {
    unsigned long h = rem / 3600UL;
    unsigned long m = (rem % 3600UL) / 60UL;
    unsigned long s = rem % 60UL;
    char line[22];
    if (h > 0)
    snprintf(line, sizeof(line), "Left %lu:%02lu:%02lu", h, m, s);
    else
    snprintf(line, sizeof(line), "Left %lu:%02lu", m, s);
    display.print(line);
} else if (relayOn) {
    display.print(F("No timer"));
}

display.display();
}

void applyRelay(bool on) {
relayOn = on;
if (!on) {
    paidUntilMillis = 0;
    paidUntilUnix = 0;
}
Serial.printf("Output (OLED) %s\n", on ? "ON" : "OFF");
refreshOled();
}

void enforcePaidWindow() {
bool expire = false;
if (relayOn && paidUntilMillis != 0 && (long)(millis() - paidUntilMillis) >= 0)
    expire = true;
if (relayOn && paidUntilUnix != 0) {
    time_t now = time(nullptr);
    if (now > 1700000000 && now > paidUntilUnix)
    expire = true;
}
if (expire) {
    applyRelay(false);
    Serial.println(F("Timed window expired -> OFF"));
}
}

void handleCmdJson(const char *json) {
StaticJsonDocument<384> doc;
DeserializationError err = deserializeJson(doc, json);
if (err) {
    Serial.printf("cmd JSON error: %s\n", err.c_str());
    return;
}

bool wantOn = false;
if (!parseStateFromJson(doc["state"], &wantOn)) {
    Serial.println(F("cmd: no state (need bool or \"on\"/\"off\")"));
    return;
}

if (!wantOn) {
    applyRelay(false);
    return;
}

applyRelay(true);
paidUntilMillis = 0;
paidUntilUnix = 0;

unsigned long windowSec = 0;
if (!doc["validFor"].isNull())
    windowSec = doc["validFor"].as<unsigned long>();
else if (!doc["duration_sec"].isNull())
    windowSec = doc["duration_sec"].as<unsigned long>();
if (windowSec != 0) {
    paidUntilMillis = millis() + windowSec * 1000UL;
    Serial.printf("Timed window %lu s\n", windowSec);
}

if (!doc["validUntil"].isNull()) {
    paidUntilUnix = (time_t)doc["validUntil"].as<long>();
    Serial.printf("Window validUntil unix %ld\n", (long)paidUntilUnix);
}
}

char cmdBuf[512];

void mqttCallback(char *topic, byte *payload, unsigned int length) {
(void)topic;
if (length >= sizeof(cmdBuf))
    length = sizeof(cmdBuf) - 1;
memcpy(cmdBuf, payload, length);
cmdBuf[length] = '\0';
handleCmdJson(cmdBuf);
}

void buildTopics() {
snprintf(topicTelemetry, sizeof(topicTelemetry), "devices/%s/telemetry", DEVICE_ID);
snprintf(topicCmd, sizeof(topicCmd), "devices/%s/cmd", DEVICE_ID);
}

bool tcpProbe(const IPAddress &ip, uint16_t port) {
WiFiClient c;
c.setTimeout(5000);
bool ok = c.connect(ip, port);
if (ok)
    c.stop();
return ok;
}

bool tcpProbeWithRetries() {
for (int i = 0; i < MQTT_TCP_TRIES; i++) {
    Serial.printf("TCP probe MQTT (%d/%d)... ", i + 1, MQTT_TCP_TRIES);
    if (tcpProbe(MQTT_IP, MQTT_PORT)) {
    Serial.println(F("OK"));
    return true;
    }
    Serial.println(F("FAIL"));
    delay(500 + (unsigned)i * 200);
    yield();
}
return false;
}

void startSntp() {
configTime(0, 0, "pool.ntp.org", "time.google.com");
Serial.print(F("SNTP "));
for (int i = 0; i < 40; i++) {
    time_t now = time(nullptr);
    if (now > 1700000000) {
    Serial.printf("synced (%ld)\n", (long)now);
    return;
    }
    delay(250);
    yield();
}
Serial.println(F("no sync yet"));
}

bool connectWifi() {
WiFi.mode(WIFI_STA);
WiFi.setSleep(false);
esp_wifi_set_ps(WIFI_PS_NONE);
WiFi.begin(WIFI_SSID, WIFI_PASS);

Serial.print(F("WiFi"));
unsigned long start = millis();
while (WiFi.status() != WL_CONNECTED) {
    if (millis() - start > 60000UL) {
    Serial.println(F(" timeout"));
    refreshOled();
    return false;
    }
    delay(300);
    yield();
    Serial.print(F("."));
}
Serial.println();
Serial.printf("IP: %s\n", WiFi.localIP().toString().c_str());

delay(WIFI_POST_CONNECT_DELAY_MS);
startSntp();
refreshOled();
return true;
}

void reconnectMqtt() {
wifiClient.setTimeout(8000);
mqtt.setServer(MQTT_IP, MQTT_PORT);
mqtt.setBufferSize(1024);
mqtt.setCallback(mqttCallback);

for (int attempt = 0; attempt < MQTT_SESSION_TRIES && WiFi.status() == WL_CONNECTED &&
                    !mqtt.connected();
    attempt++) {

    if (!tcpProbeWithRetries()) {
    Serial.println(F("TCP probes exhausted"));
    delay(2000);
    yield();
    continue;
    }

    uint8_t mac[6];
    WiFi.macAddress(mac);
    char clientId[28];
    snprintf(clientId, sizeof(clientId), "xiao-%02x%02x%02x%02x%02x%02x", mac[0], mac[1], mac[2],
            mac[3], mac[4], mac[5]);

    Serial.printf("MQTT connect (%d/%d)... ", attempt + 1, MQTT_SESSION_TRIES);
    if (mqtt.connect(clientId)) {
    Serial.println(F("OK"));
    if (mqtt.subscribe(topicCmd))
        Serial.printf("Subscribed %s\n", topicCmd);
    else
        Serial.println(F("Subscribe failed"));
    refreshOled();
    return;
    }

    Serial.printf("fail rc=%d\n", mqtt.state());
    delay(1000 + attempt * 400);
    yield();
}
refreshOled();
}

void setup() {
Serial.begin(115200);
delay(400);

Wire.begin(OLED_SDA, OLED_SCL);
if (!display.begin(SSD1306_SWITCHCAPVCC, OLED_ADDR)) {
    Serial.println(F("SSD1306 allocation/init failed — check I2C wiring & address"));
    for (;;)
    delay(1000);
}
display.clearDisplay();
display.display();

applyRelay(false);
buildTopics();

if (!connectWifi())
    return;

reconnectMqtt();
}

void loop() {
if (WiFi.status() != WL_CONNECTED) {
    Serial.println(F("WiFi lost"));
    refreshOled();
    delay(1000);
    yield();
    paidUntilMillis = 0;
    paidUntilUnix = 0;
    connectWifi();
    reconnectMqtt();
    return;
}

if (!mqtt.connected())
    reconnectMqtt();

mqtt.loop();
enforcePaidWindow();

unsigned long now = millis();

/* Update OLED ~1 Hz while a relative/unix window is counting down */
static unsigned long lastOledMs = 0;
if (relayOn && (paidUntilMillis != 0 || paidUntilUnix != 0)) {
    if (now - lastOledMs >= 1000UL) {
    lastOledMs = now;
    refreshOled();
    }
}

if (now - lastPub < TELEMETRY_MS)
    return;
lastPub = now;

unsigned long relRemain = 0;
if (relayOn && paidUntilMillis != 0) {
    long r = (long)(paidUntilMillis - millis());
    if (r > 0)
    relRemain = (unsigned long)r;
}

char payload[280];
snprintf(payload, sizeof(payload),
        "{\"device\":\"%s\",\"status\":\"%s\",\"uptime_ms\":%lu,\"heap_free\":%u,"
        "\"paid_rel_ms\":%lu,\"paid_until_unix\":%ld}",
        DEVICE_ID, relayOn ? "on" : "off", now, (unsigned)ESP.getFreeHeap(), relRemain,
        (long)(paidUntilUnix ? paidUntilUnix : 0));

if (!mqtt.publish(topicTelemetry, payload, false))
    Serial.println(F("telemetry publish failed"));

refreshOled();
}
On the Raspberry Pi (MQTT x Node-RED x Cloudflared)
MQTT
- Installation and initiation of the Mosquitto MQTT broker
-
Config file creation
The following configuration script is copied into the file :- Test of MQTT communication locally on Raspberry Pi with two terminals (publish and subscribe)# LAN prototype configuration # Copy to: # /etc/mosquitto/conf.d/99-lan-prototype.conf # # Restart Mosquitto after saving: # sudo systemctl restart mosquitto # # Mosquitto listens on port 1883 on all network interfaces. # Anonymous access is enabled for testing on a trusted local network only. # # Before exposing to the internet, add: # - username/password authentication # - TLS encryption # - secure listener (e.g. port 8883) listener 1883 0.0.0.0 allow_anonymous true
Node-RED
- From PC/laptop browser, open http://
:1880. Replace with the Raspberry Pi's IP address -
Breakdown of the configuration is further explained below based on each function streams.
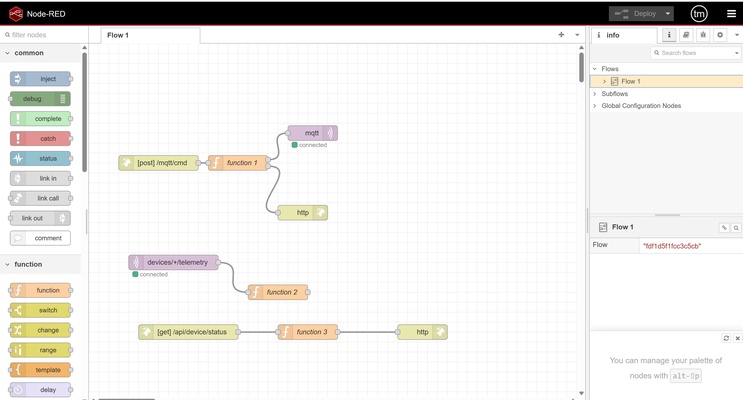
-
Cloud → device command (HTTP POST → MQTT)
-
Vercel app via cloudfare sends JSON like message. Node-RED does not forward that JSON unchanged to MQTT : it maps HTTP fields to the topic and payload shape the firmware expects.
-
HTTP Request Body (from the application)
-
Node-RED to MQTT
- Topic: devices/xiao-esp32c3/cmd The segment cmd is only a naming convention: this topic carries commands to the device, not telemetry (telemetry uses …/telemetry).
- MQTT payload (JSON):
- So duration_sec from the HTTP API becomes validFor on MQTT, which matches the Arduino handler (duration_sec / validFor both set the timed ON window).
-
Function deep dive :
Node-RED (HTTP POST-MQTT) function
const incoming = msg.payload; let body = incoming; if (typeof body === 'string') { try { body = JSON.parse(body); } catch (e) { const r = { payload: { ok: false, error: 'invalid JSON' }, statusCode: 400, req: msg.req }; return [null, r]; } } const id = body.device_id; const st = body.state; if (!id || typeof st === 'undefined' || st === null) { return [null, { req: msg.req, statusCode: 400, payload: { ok: false, error: 'device_id and state required' } }]; } const mqttPayload = { state: st }; if (body.duration_sec != null) mqttPayload.validFor = Number(body.duration_sec); if (body.validFor != null) mqttPayload.validFor = Number(body.validFor); if (body.validUntil != null) mqttPayload.validUntil = Number(body.validUntil); const topic = 'devices/' + id + '/cmd'; const toBroker = { topic, payload: mqttPayload }; const toHttp = { req: msg.req, statusCode: 200, headers: { 'Content-Type': 'application/json' }, payload: { ok: true, topic, forwarded: mqttPayload } }; return [toBroker, toHttp];-
Normalizes the body — If msg.payload arrived as a string, it tries JSON.parse. On failure it sends only the second output: HTTP 400 and { ok: false, error: 'invalid JSON' }, and sends nothing to MQTT (null on the first output). Ok here is a simple success flag for the client reading JSON and the error indicates the reasoning of the status.
-
Validates required fields — It reads device_id and state. If either is missing (with state allowing false for OFF), it returns HTTP 400 and does not publish to MQTT.
-
Builds the MQTT message — It copies state into the payload sent to the device. If duration_sec, validFor, or validUntil are present, it adds validFor / validUntil to the MQTT JSON so the firmware can run the timed window.
-
Chooses the MQTT topic — devices/ + device_id + /cmd.
-
Splits into two messages :
- Output 1 → mqtt out: sets msg.topic and msg.payload for the broker (topic left blank in the node so it uses msg.topic per request).
- Output 2 → http response: sets msg.req (from the original request), msg.statusCode 200, Content-Type, and msg.payload with { ok: true, topic, forwarded: … } so the app gets a clear confirmation. This will be visible at the UI app.
-
-
-
Device → cloud status (MQTT subscribe → HTTP GET)
-
MQTT publish (from device)
- Topic: devices/xiao-esp32c3/telemetry The segment telemetry is only a naming convention: this topic carries sensor/state snapshots, not commands (commands use …/cmd).
- Node-RED to HTTP{ "device": "xiao-esp32c3", "status": "on", "uptime_ms": 669343, "heap_free": 199460, "paid_rel_ms": 0, "paid_until_unix": 0 }- parses msg.topic to recover device_id, normalizes msg.payload to a JSON string, and saves:
global.devstatus_
= { payload: " ", received: " " } so that it could be read by the next function - reads global.devstatus_
, JSON.parses payload back into an object for the response, and returns:
-
-
Function deep dive :
Node-RED (MQTT Subscribe - HTTP GET) telemetry function
```
const parts = msg.topic.split('/');
const id = parts.length > 1 ? parts[1] : '';

let raw = msg.payload;
if (typeof raw === 'object' && raw !== null) {
raw = JSON.stringify(raw);
} else if (typeof raw !== 'string') {
raw = String(raw);
}

global.set('devstatus_' + id, {
payload: raw,
received: new Date().toISOString(),
});
return null;
```
Node-RED (MQTT Subscribe - HTTP GET) get function
``` const id = msg.req.query.device_id; if (!id) { msg.statusCode = 400; msg.payload = { ok: false, error: 'device_id query required' }; return msg; } const row = global.get('devstatus_' + id); let telemetry = null; if (!row) { msg.statusCode = 404; msg.payload = { ok: false, error: 'no telemetry yet for ' + id }; return msg; } if (row.payload) { try { telemetry = JSON.parse(row.payload); } catch (e) { telemetry = { raw: row.payload }; } } msg.statusCode = 200; msg.headers = { 'Content-Type': 'application/json' }; msg.payload = { ok: true, device_id: id, last_received: row.received || null, telemetry: telemetry, }; return msg; ```- Telemetry function runs each time a message arrives on devices/+/telemetry → it writes the latest snapshot to global.
- Status GET function runs each time the app calls /api/device/status → it reads the same global entry and formats an HTTP JSON response.
- Example :
- 12:00:00 — Device publishes telemetry → function 2 saves devstatus_xiao-esp32c3 (payload + timestamp).
- 12:00:10 — Another telemetry → cache updated again.
- 12:00:23 — User opens the site → Vercel calls GET /api/device/status?device_id=xiao-esp32c3 → function - 3 reads whatever was last saved (from 12:00:10), returns JSON immediately.
- No MQTT needs to fire at 12:00:23 for the GET to succeed.
-
Cloudflared (tunnel to Vercel)
- Run tunnel with temporary URL
- Set COMMAND_TUNNEL_URL with the temporary URL at Vercel
On the cloud (MongoDB Atlas x Vercel)
MongoDB Atlas
- Connect to cluster, select driver, and copy SRV (i.e. MONGODB_URI).
- Set MONGODB_URI at Vercel
Vercel
The web application was developed using Cursor as a Next.js project. The project source code is maintained in a GitHub repository, meaning any changes made locally must be committed and pushed to the remote repository. It is also connected to Vercel and therefore a new build is triggered and deployed whenever updates are pushed.
-
Environment variable keys configured based on the above. Including :
- SITE_PASSWORD : normal user login code
- AUTH_SECRET : code to stay logged in
per the env.local file at the Next.Js project folder.
- MONGO_EVENT_TTL_SEC : TTL = time to live (i.e. when to delete documents)
- MONGO_LOG_TELEMETRY_INTERVAL_SEC : snapshots between telemetry per device
.env.local and Vercel
Having .env.local on your laptop does not automatically populate Vercel.
.env.localis only for local runs (next dev, local builds). It stays locally and must stay out of Git (via.gitignore).- Vercel builds and runs the app in its own environment. It only sees variables configured under Project → Settings → Environment Variables.
If Git fails to push or synchronize changes, it may be because the project is currently opened or locked by Vercel during deployment or build processes. Close the Vercel browser tab if necessary.