Song of the Sea
What we built
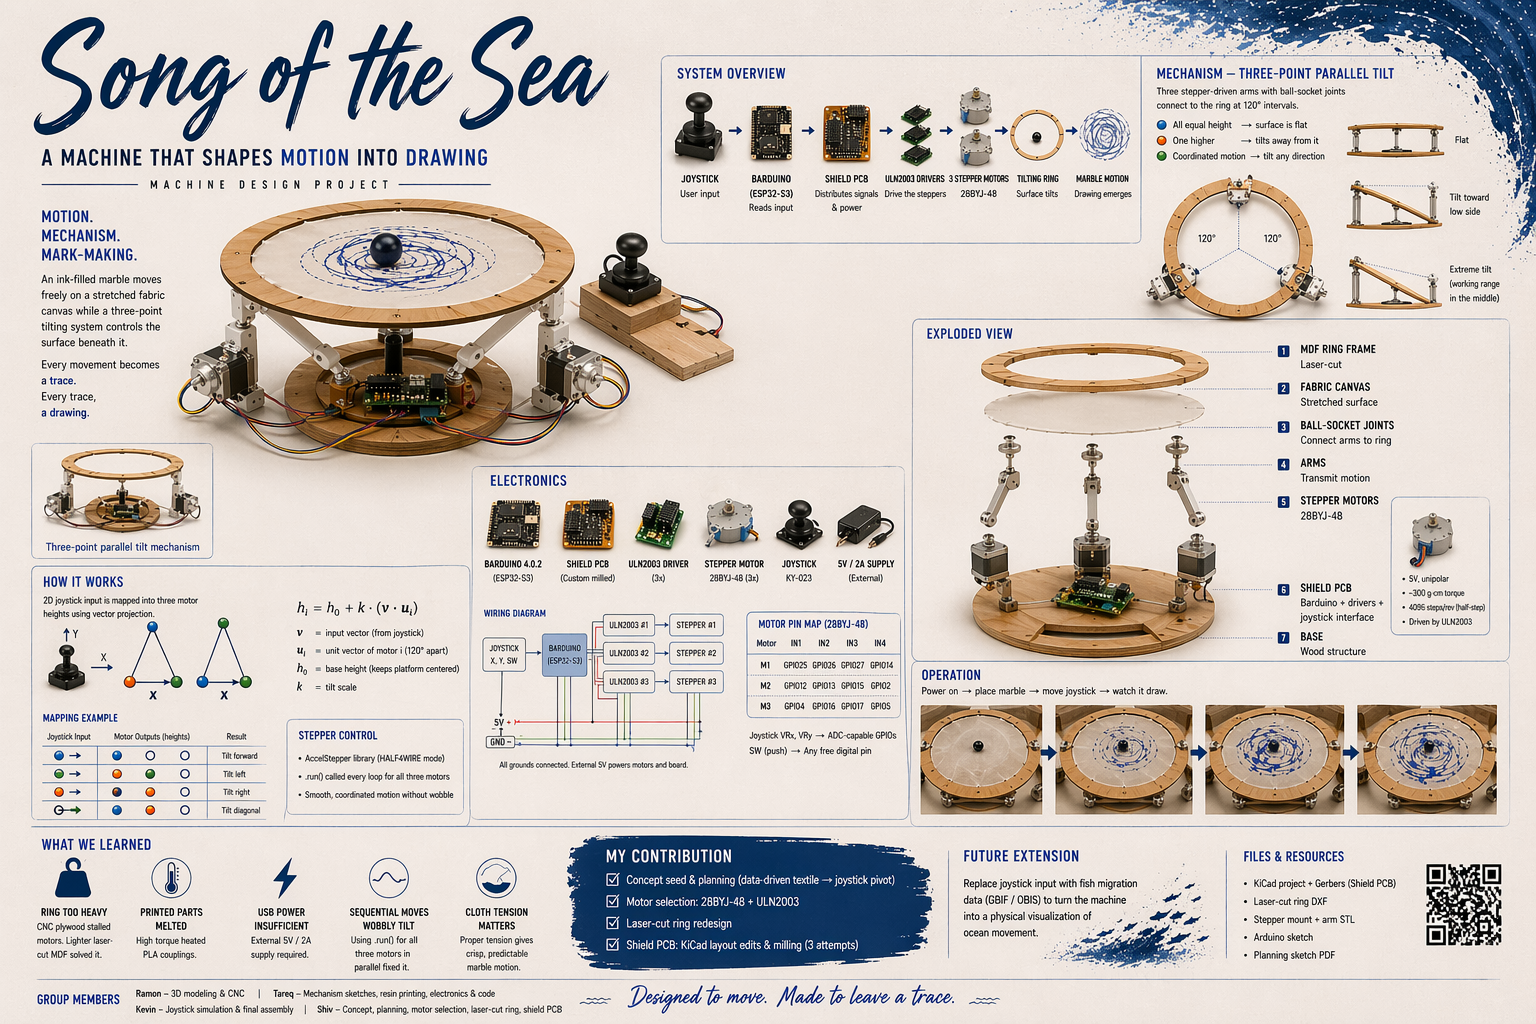
A joystick-controlled tilting platform — a laser-cut ring held up by three stepper-driven arms meeting the ring through ball-socket joints. Stretch a cloth across the ring, drop a marble on top, and steer the marble around by tilting the surface with a joystick.
Mechanically it is a three-motor parallel manipulator — a close cousin of a Stewart platform or a delta robot, running on stepper motors instead of servos.
Concept origin
The starting idea was a data-driven kinetic cloth — three motors mapped to depth, speed, and heading of fish migration tracks pulled from GBIF and OBIS, producing a ripple through fabric. For this week's brief we needed a machine that can be operated manually, so we pivoted to a user-controlled version first — joystick instead of CSV. The data-driven mode is a future extension, and most of the hardware stack carries over unchanged.
System overview
Signal path. Joystick → Barduino (ESP32-S3) mounted on a custom milled shield PCB → three ULN2003 driver boards → three 28BYJ-48 stepper motors → three arms ending in ball sockets → ring.
Mechanism. Three motors arranged at 120° around the base. When all three arms sit at the same height, the ring is flat. Lifting one arm more than the others rotates the ring's normal vector — the ring tilts away from the tall corner. Coordinated motion across all three motors lets the tilt point in any direction, and a marble on the cloth rolls toward the low side.
Hardware
| Component | Qty | Notes |
|---|---|---|
| 28BYJ-48 stepper | 3 | 5V unipolar, ~300 g·cm, 4096 steps/rev in half-step |
| ULN2003 driver | 3 | One per motor, ships pre-paired with the 28BYJ-48 |
| Barduino 4.0.2 | 1 | ESP32-S3, Fab Lab Barcelona board |
| KY-023 joystick | 1 | 2-axis analog plus push-button |
| External supply | 1 | 5V / 2A bench, shared GND with the Barduino |
| Custom shield PCB | 1 | Single-sided, milled on Roland SRM-20 |
| Laser-cut ring | 1 | MDF, replaces a failed CNC version |
| 3D-printed arms | 3 | Contact parts reprinted in resin after PLA melted |
| Cloth + binder clips | 1 | Cotton stripe cloth, clipped evenly around the ring |
Process
1. Planning and architecture
Started with a hand sketch of the full system — three steppers, three driver boards, central Barduino shield, external supply, and the laser-cut holder that would hold them all together. This settled the 120° layout and the decision to treat the Barduino as the logical centre with everything else fanning out from it.
2. Motor selection
The 28BYJ-48 / ULN2003 combo was chosen for availability in Fab Lab stock, the pre-paired driver that needs no trimmer calibration, the smooth 4096 steps per revolution in half-step mode, and the shared 5V supply with the Barduino. Torque is modest (~300 g·cm) — enough for a light ring, but it forced a ring redesign (see failures below).
3. Shield board — KiCad to milled PCB
Rather than breadboard twelve GPIOs plus joystick plus power, we designed a shield-style PCB that sits on top of the Barduino as the common point for every connection in the machine.
Workflow: KiCad schematic → Gerbers → gerber2img (Quentin Bolsée's tool) to convert Gerbers into traces/outline PNGs → Mods for toolpath generation → SRM-20 for milling.
It took three milling attempts before we had a usable board. Main lessons: widen trace widths and clearances past the Fab Lab defaults before the first mill, and do a test coupon first to catch endmill and toolpath issues in five minutes rather than three attempts.
4. Ring — from CNC to laser
The first ring was CNC-milled plywood. Structurally beautiful and too heavy for the motors to lift — they stalled immediately. Redesigned as a laser-cut MDF ring with the same outer diameter and mounting pattern, but drastically lighter. The motors could then actuate it reliably with headroom left for the cloth and marble.
Lesson: torque budget first, geometry second.
5. Arms, mounts, and ball sockets
Each of the three arms terminates in a ball-socket joint that connects to the underside of the ring. The arms are 3D-printed, and the motor-side coupling parts were reprinted in resin after the originals melted under load (see failures below).
6. Electronics and code — building up from components
Rather than writing the full control loop up front, we built up understanding one component at a time.
Step 1: Joystick debug. A simple sketch that reads X, Y, and button and prints them to serial, just to confirm the sensor is alive and see its output range. ESP32 analogue pins are 12-bit (0–4095), centre resting around 2048.
const int joyX = 1;
const int joyY = 2;
const int joySW = 3;

void setup() {
  Serial.begin(115200);
  analogReadResolution(12);
  pinMode(joySW, INPUT_PULLUP);
}

void loop() {
  int xValue = analogRead(joyX);
  int yValue = analogRead(joyY);
  int buttonState = digitalRead(joySW);

  Serial.print("X: "); Serial.print(xValue);
  Serial.print(" | Y: "); Serial.print(yValue);
  Serial.print(" | Button: ");
  Serial.println(buttonState == LOW ? "Pressed" : "Not Pressed");

  delay(200);
}
Sample output:
X: 2048 | Y: 1987 | Button: Not Pressed
X: 4095 | Y: 2100 | Button: Not Pressed
X: 100  | Y: 3900 | Button: Pressed
Step 2: Virtual platform — one tilting plane. Before trusting hardware, we built a Processing visualiser: joystick values stream over serial, Processing draws a rectangle that tilts according to X and Y. The Barduino normalises the joystick range to -1..+1 and sends CSV over serial; Processing receives, maps to rotation angles, and draws.
Arduino side — normalise and stream:
const int joyX = 4;
const int joyY = 5;
const int joySW = 6;

int centerX = 2048;
int centerY = 2048;

void setup() {
  Serial.begin(115200);
  delay(2000);
  pinMode(joySW, INPUT_PULLUP);
}

void loop() {
  int xRaw = analogRead(joyX);
  int yRaw = analogRead(joyY);
  int button = digitalRead(joySW);

  if (button == LOW) { centerX = xRaw; centerY = yRaw; }

  float x = (xRaw - centerX) / 2048.0;
  float y = (yRaw - centerY) / 2048.0;

  Serial.print(x, 3);
  Serial.print(",");
  Serial.println(y, 3);
  delay(20);
}
Processing side — tilting plane:
import processing.serial.*;
Serial myPort;
float x = 0, y = 0;

void setup() {
  size(600, 600, P3D);
  myPort = new Serial(this, Serial.list()[0], 115200);
  myPort.bufferUntil('\n');
}

void draw() {
  background(30); lights();
  translate(width/2, height/2);

  float tiltX = y * PI/6;
  float tiltY = x * PI/6;

  pushMatrix();
  rotateX(tiltX); rotateY(tiltY);
  fill(100, 200, 255); stroke(255);
  rectMode(CENTER); rect(0, 0, 300, 300);
  popMatrix();
}

void serialEvent(Serial p) {
  String data = p.readStringUntil('\n');
  if (data != null) {
    data = trim(data);
    String[] values = split(data, ',');
    if (values.length == 2) { x = float(values[0]); y = float(values[1]); }
  }
}
Step 3: Three-point visualiser. Evolved the Processing sketch from one tilting plane to three columns at the corners of a triangle — each column representing a motor's extension. The joystick X and Y values project onto each motor's 2D position to compute its height. This is the core math that later moves to the real machine.
// Equilateral triangle with three motor positions
m1_pos = new PVector(-L/2,  L/sqrt(3));
m2_pos = new PVector( L/2,  L/sqrt(3));
m3_pos = new PVector( 0,   -2*L/sqrt(3));

// Per frame, compute each motor's height
h1 = a * m1_pos.x + b * m1_pos.y;
h2 = a * m2_pos.x + b * m2_pos.y;
h3 = a * m3_pos.x + b * m3_pos.y;
Step 4: Single stepper — back-and-forth. Basic library test with the Stepper library. 2048 steps per revolution in full-step mode. Crucial detail: the pin order is IN1, IN3, IN2, IN4, not IN1, IN2, IN3, IN4 — getting the coil order wrong makes the motor vibrate without turning.
#include <Stepper.h>
const int stepsPerRevolution = 2048;
Stepper myStepper(stepsPerRevolution, 8, 10, 9, 11);

void setup() { myStepper.setSpeed(10); }

void loop() {
  myStepper.step(stepsPerRevolution);
  delay(1000);
  myStepper.step(-stepsPerRevolution);
  delay(2000);
}
Step 5: Three motors, shared target. Moved to AccelStepper for smoother acceleration curves, added two more motor instances, and set all three to the same target position. This confirmed we could drive all three simultaneously without interference — as long as motor1.run(), motor2.run(), motor3.run() are all called every loop iteration.
Step 6: Homing. Rather than adding limit switches, we used the machine's own weight as a reference: at startup the ring naturally rests flat, so the button zeroes all three motors at once. Pressing the joystick button at any point re-sets the home position.
if (button == LOW) {
  motor1.setCurrentPosition(0);
  motor2.setCurrentPosition(0);
  motor3.setCurrentPosition(0);
  target = 0;
  motor1.moveTo(0); motor2.moveTo(0); motor3.moveTo(0);
}
Step 7: Final mapping — three motors, independent targets. The Processing math from step 3 ported to the real machine. X and Y drive each motor to a different position using an additive formula — motor 1 responds mainly to Y, motors 2 and 3 respond to combinations of X and Y. A deadzone of 0.03 at the centre keeps the motors quiet when the joystick is near-centred.
float x = (xRaw - centerX) / 2048.0;
float y = (yRaw - centerY) / 2048.0;

if (abs(x) < 0.03) x = 0;
if (abs(y) < 0.03) y = 0;

// Each motor gets a different combination of X and Y
float m1 = 162.5 + (y * 325.0);
float m2 = 162.5 + (-x * 325.0 + -y * 325.0);
float m3 = 162.5 + ( x * 325.0 + -y * 325.0);

int t1 = constrain(m1, 0, 325);
int t2 = constrain(m2, 0, 325);
int t3 = constrain(m3, 0, 325);

motor1.moveTo(t1);
motor2.moveTo(t2);
motor3.moveTo(t3);
Key subtlety: .run() must be called every loop for all three motors simultaneously, not sequentially with blocking moves — otherwise the motors step one after the other and the ring wobbles its way to the target instead of gliding.
7. Verifying the signal — logic analyser
Before hanging anything off the motors, the four IN pins of one driver were probed with a 24 MHz 8-channel logic analyser into Saleae Logic 2 to confirm the half-step sequence was firing cleanly. Four channels clipped to IN1–IN4, GND to common, running the HALF4WIRE test sketch. The captured pattern matched the textbook 8-state sequence (1000, 1100, 0100, 0110, 0010, 0011, 0001, 1001), which confirmed both the wiring and the library coil order.
Wiring map
| Motor | IN1 | IN2 | IN3 | IN4 |
|---|---|---|---|---|
| M1 | GPIO 8 | GPIO 10 | GPIO 9 | GPIO 11 |
| M2 | GPIO 12 | GPIO 14 | GPIO 13 | GPIO 15 |
| M3 | GPIO 16 | GPIO 18 | GPIO 17 | GPIO 21 |
Joystick: X on GPIO 4, Y on GPIO 5, button on GPIO 6. All three ULN2003 boards share the external 5V / GND rail, and the Barduino GND ties to that same rail so the logic reference is consistent.
What failed, what we learned
- CNC ring too heavy. First attempt stalled the motors. Redesigned as laser-cut MDF, same mounting pattern, much lighter. Torque budget first, geometry second.
- 3D-printed motor couplings melted under high torque. The contact parts between the motor shaft and the arm were PLA. Under sustained high-current holds the motors heated enough to soften the plastic. The parts were reprinted in resin and the software tuned to avoid holding the motors under load unnecessarily.
- USB power was not enough for three motors. The Barduino brownout-reset the first time we tried to drive all three steppers off USB. External 5V / 2A supply solved it; common ground with the Barduino is non-negotiable.
- Coil pin order matters. Wiring the 28BYJ-48 as
IN1, IN2, IN3, IN4made the motor buzz and vibrate. The correct library order isIN1, IN3, IN2, IN4. - Sequential blocking moves gave a wobbly tilt. Switching to per-loop
.run()on all three steppers in parallel produced smooth coordinated motion. - Cloth tension matters more than we expected. Loose cloth absorbs too much of the tilt as sag; tight cloth makes the marble trajectory crisp. Binder clips at even spacing gave consistent tension.
Group members
- Ramon — 3D modelling and CNC.
- Tareq — mechanism sketches, resin printing, contributed to electronics and code.
- Kevin — electronics and code, joystick simulation, final assembly.
- Shiv — concept and planning, motor selection, laser-cut ring, shield board.
Work was spread around in pairs — the list above is who drove what, not who touched it alone.
Special credits to ChatGPT and Claude for code and electronics assistance throughout the week.
Files
- Kicad File
- Step File