FINAL PROJECT
FINAL PRESENTATION
INTRODUCTION
Ensuring that students are physically present and accounted for during examinations is a critical component of maintaining academic integrity. However, our school (University of Botswana) still rely on manual processes,such as paper based sign-in sheets that are both inefficient, time consuming and prone to human error. These outdated methods make it easier for impersonation to occur, especially in large exam settings where invigilators cannot feasibly verify every student's identity. As educational standards and exam security protocols evolve, there is a growing need for a reliable, automated solution to monitor and confirm student presence accurately and efficiently.
To address these challenges, the development of a smart exam presence/attendance verification system has become essential. Such a system would leverage modern technologies such as secure authentication (student cards), and real-time monitoring to automate attendance tracking while enhancing exam security. By reducing the dependency on manual input, we can save time, minimize administrative burdens, and ensure that only the rightful candidates are participating in the examination process.It would also serve as a deterrent against malpractice, improving the overall fairness and credibility of the assessment process.
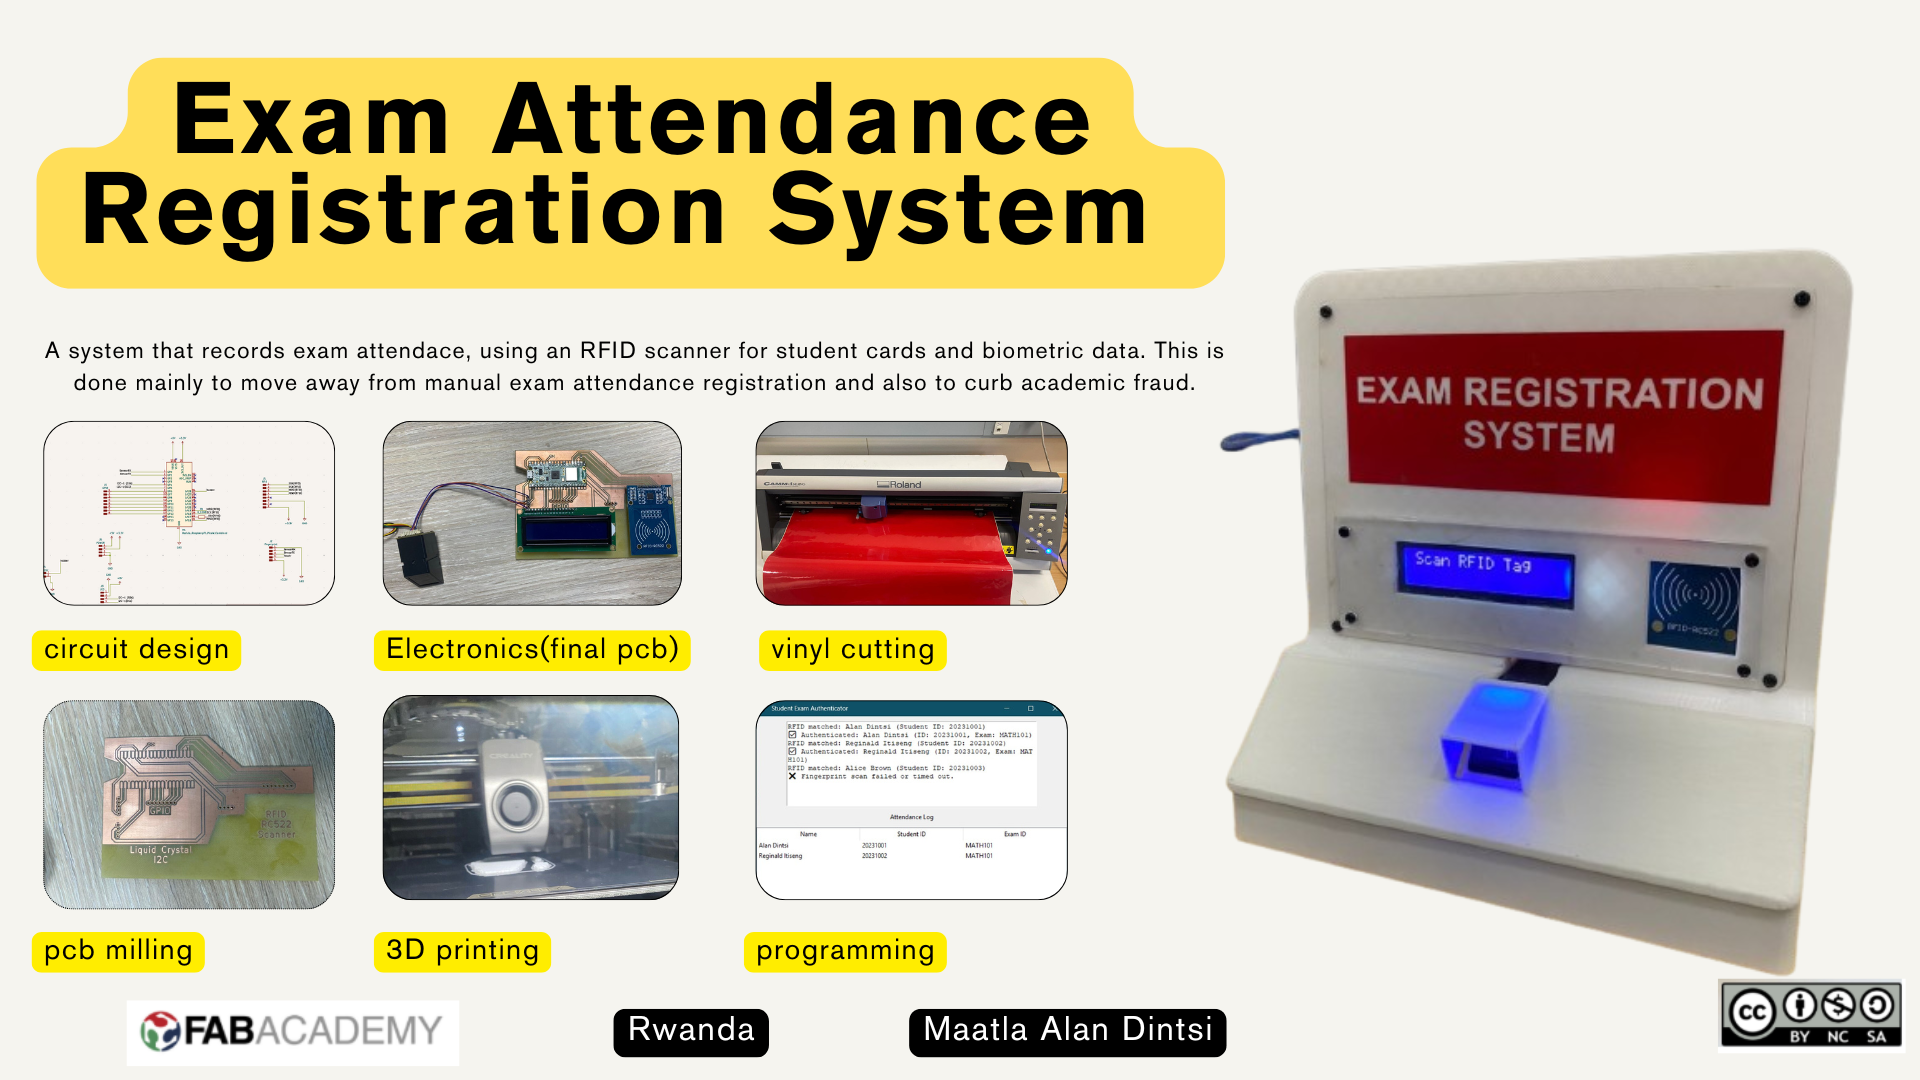
For my final project, I propose to develop a Student Exam Attendance Verification System. The system will be designed to streamline and digitize the process of recording student attendance during examinations. Each student will be required to bring their student ID card to the exam venue and swipe it using a card reader upon entry. This action will automatically register their presence in a class/course database, recording essential details such as the student's ID, time of arrival, and the specific exam session. This approach ensures a fast, accurate, and tamper-proof method of verifying attendance, reducing the workload for invigilators and minimizing the risk of impersonation or errors associated with manual attendance recording.
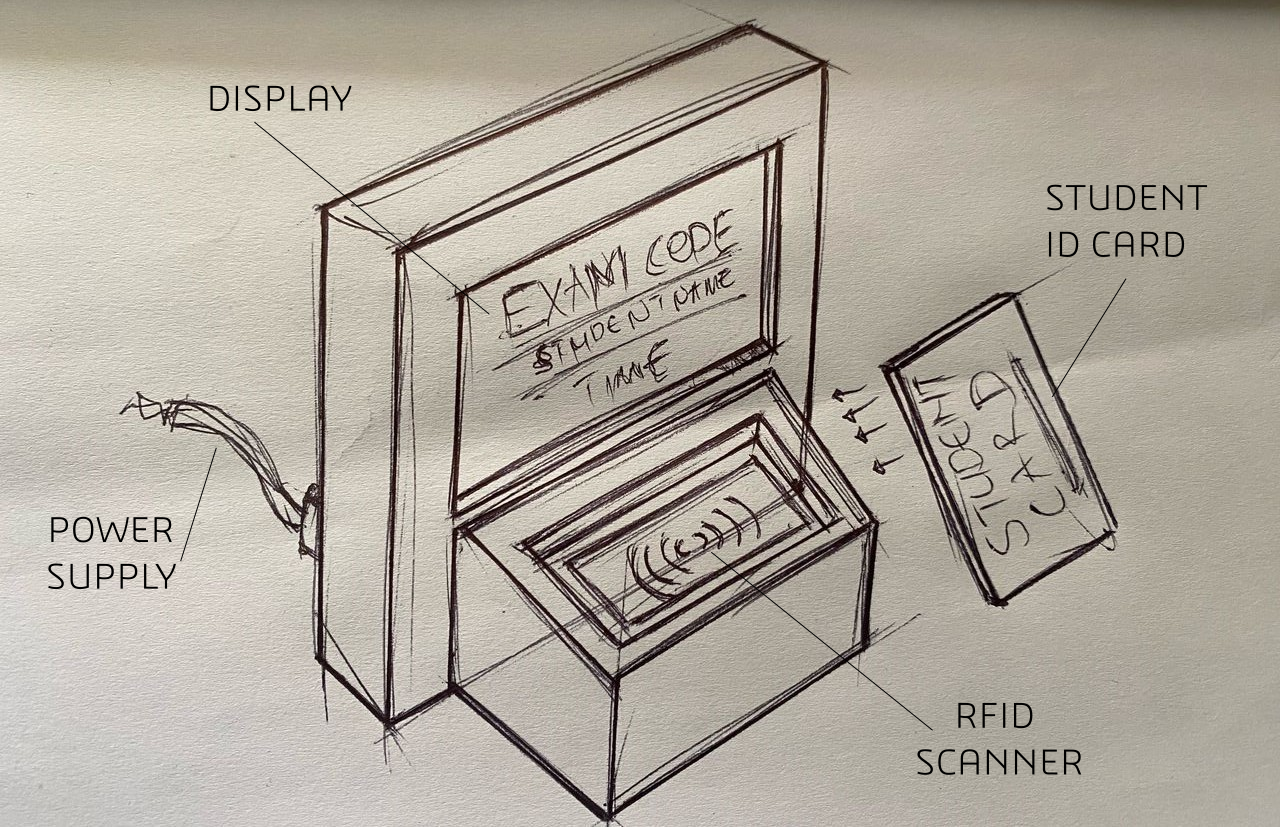
INITIAL SKETCH OF THE PROPOSED IDEA
PRODUCT CASING
For the design of the product casing refer to System integration page HERE
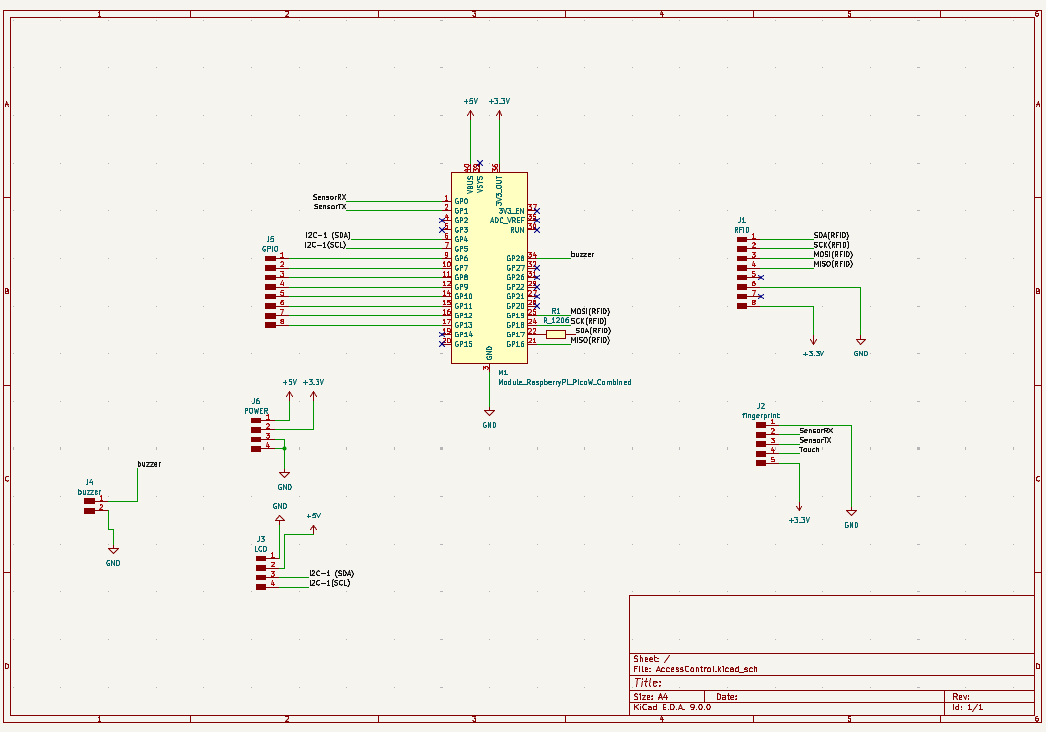
SCHEMATIC DESIGN AND PCB DESIGN
I used Kicad to design the circuit schematic and the circuit board. The images are shown below.
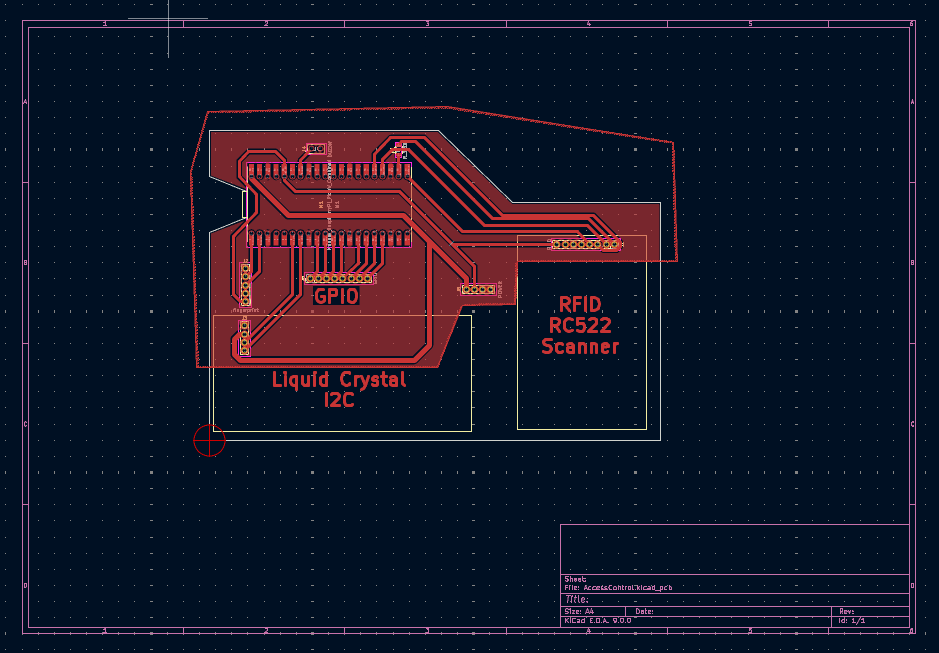
PCB DESIGN
I then routed and finalized the design of my circuit board.The image of the final design is below.
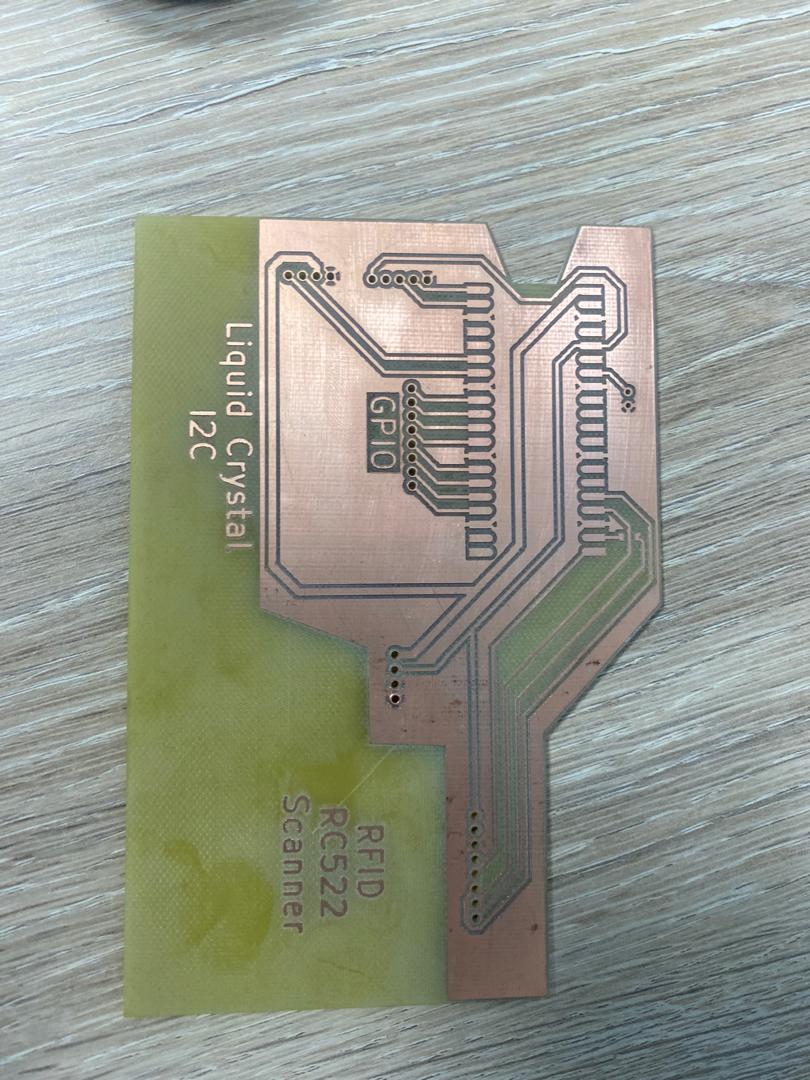
MILLING THE BOARD
I started off by opening the gerber files from Kicad on Coppercam software to create g-codes that will be read by the machine.

I then openned the gcodes made from the coppercam into the routepro3000, a software used to run the milling maching.
I then went on to mill my pcb using the Bungard CCD/2 Eco milling machine.
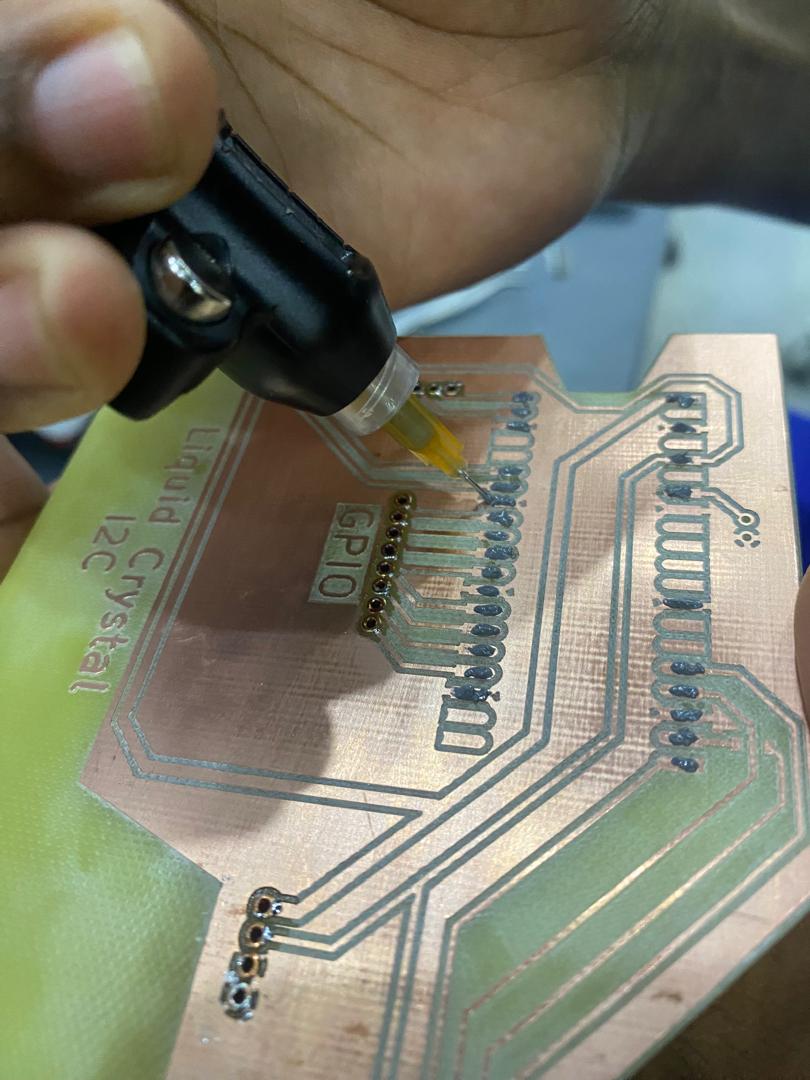
SOLDERING
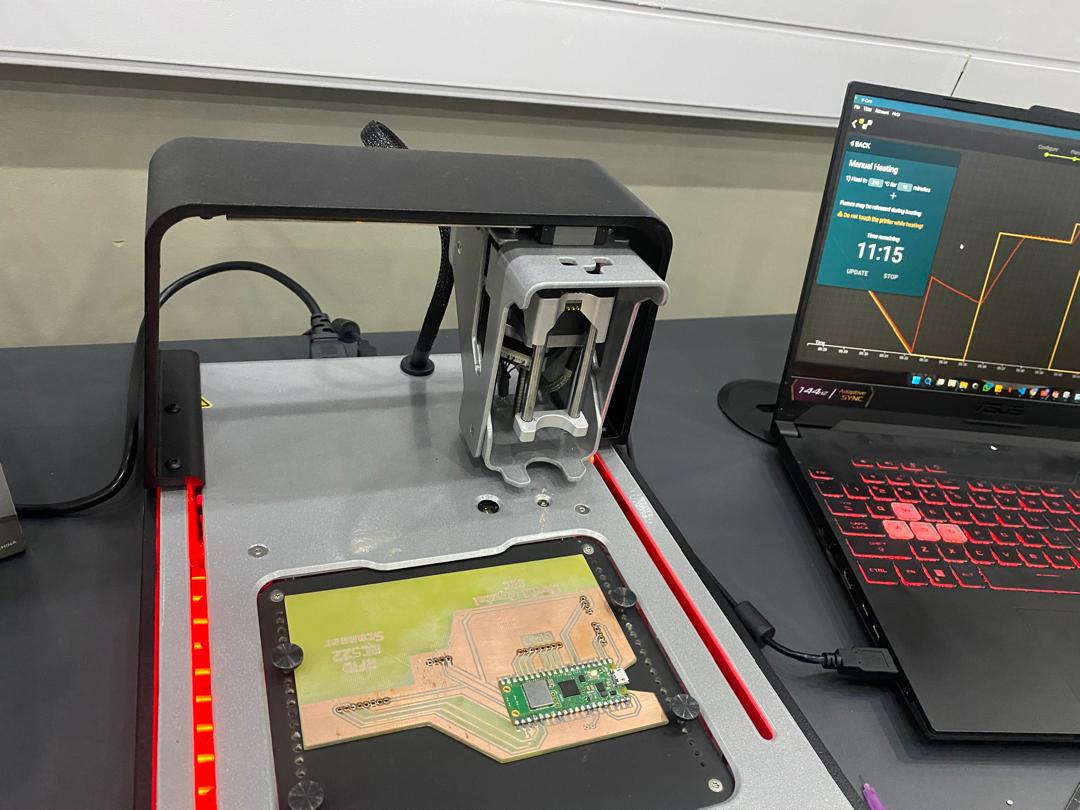
I applied solder paste manually using Voltera PCB printer paste dispenser. I did this manually because the paste did not come nicely when i wasnt using it manually. I then positioned the microcontroller along the tracks where paste was applied. I then placed them on a Voltera heating bed then heated for the microcontroller to be soldered.
Placing it on the Voltera machine heating bed.
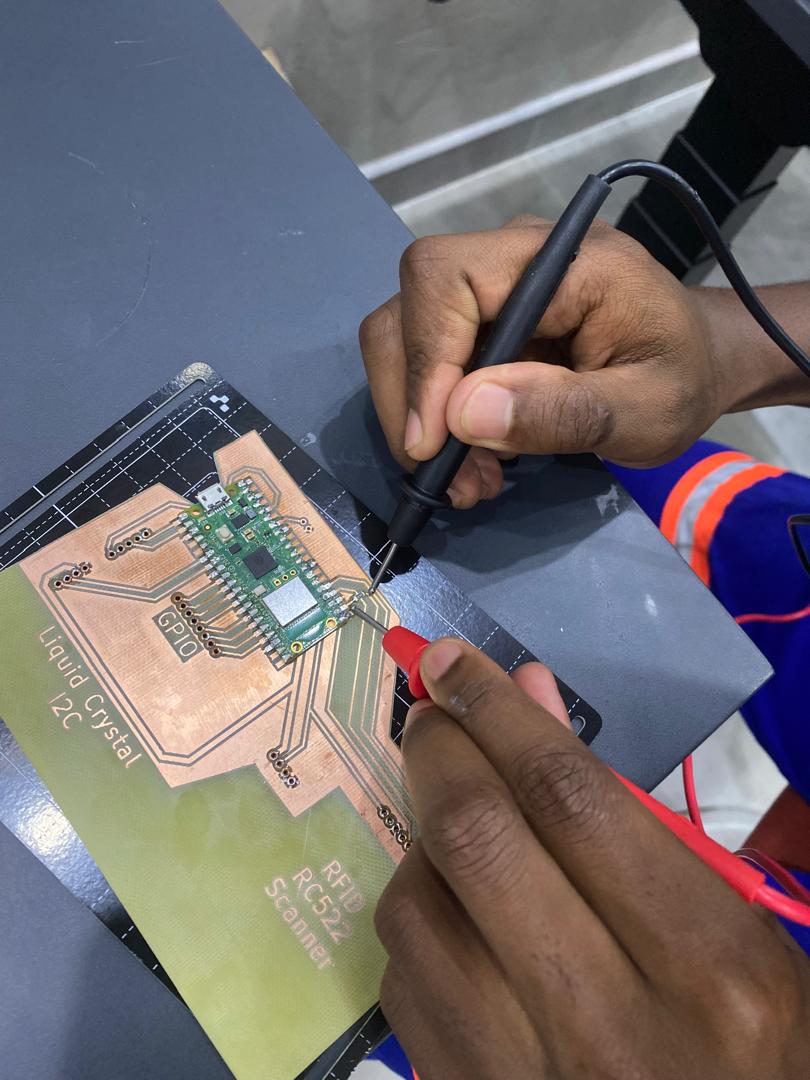
Testing if all the pins are properly soldered with a multimeter.
For other components I used manual soldering to solder them.
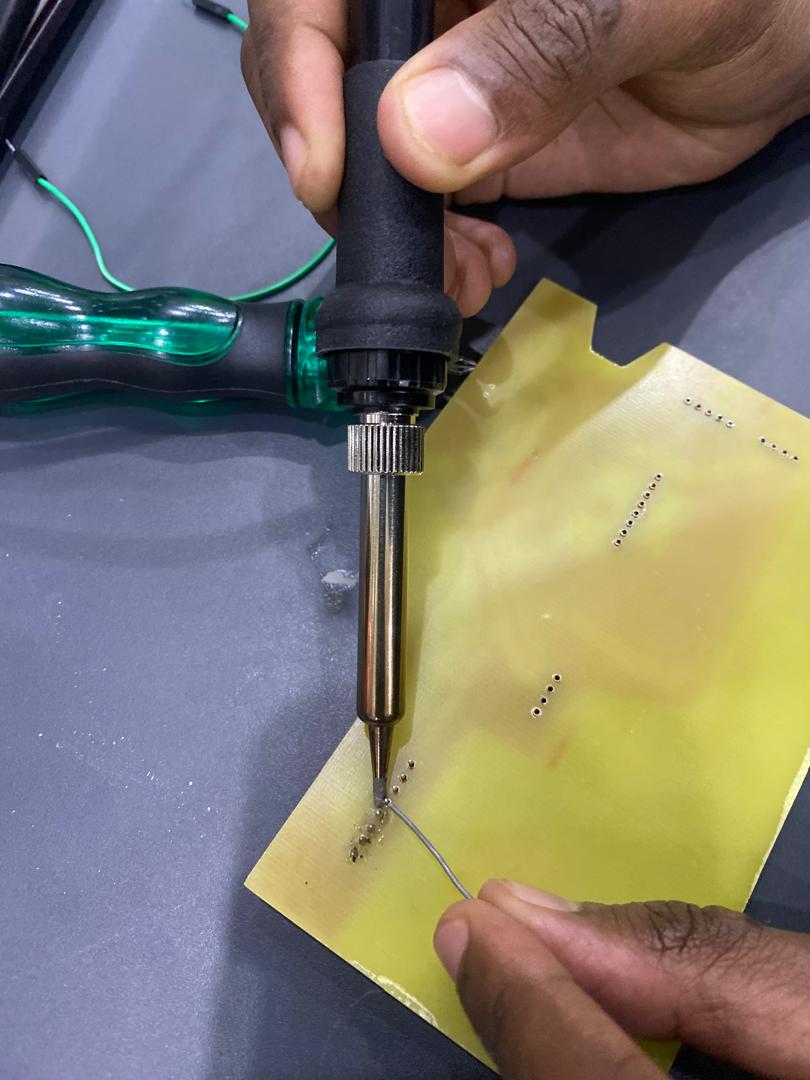
Soldered board
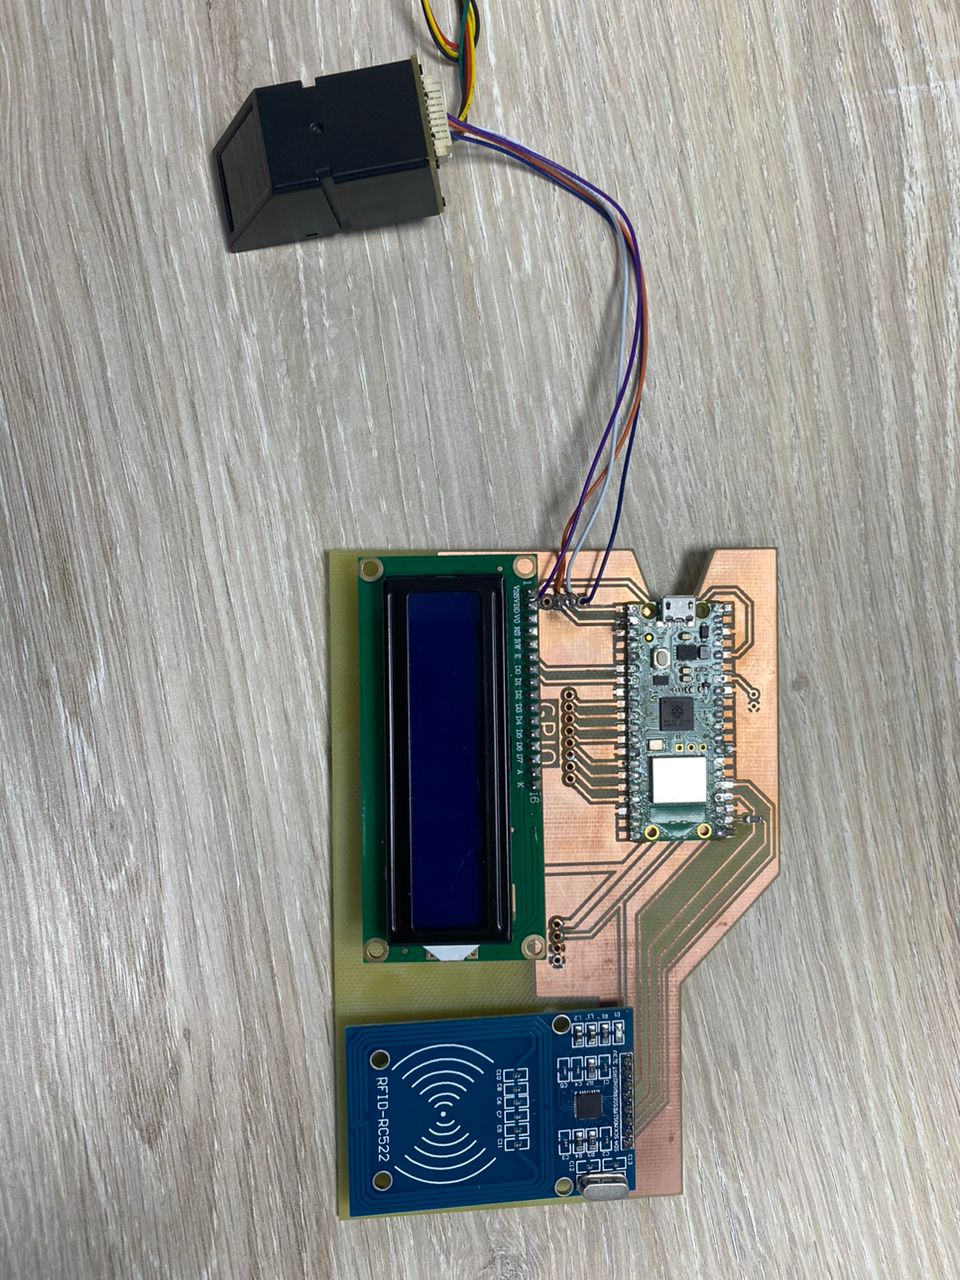
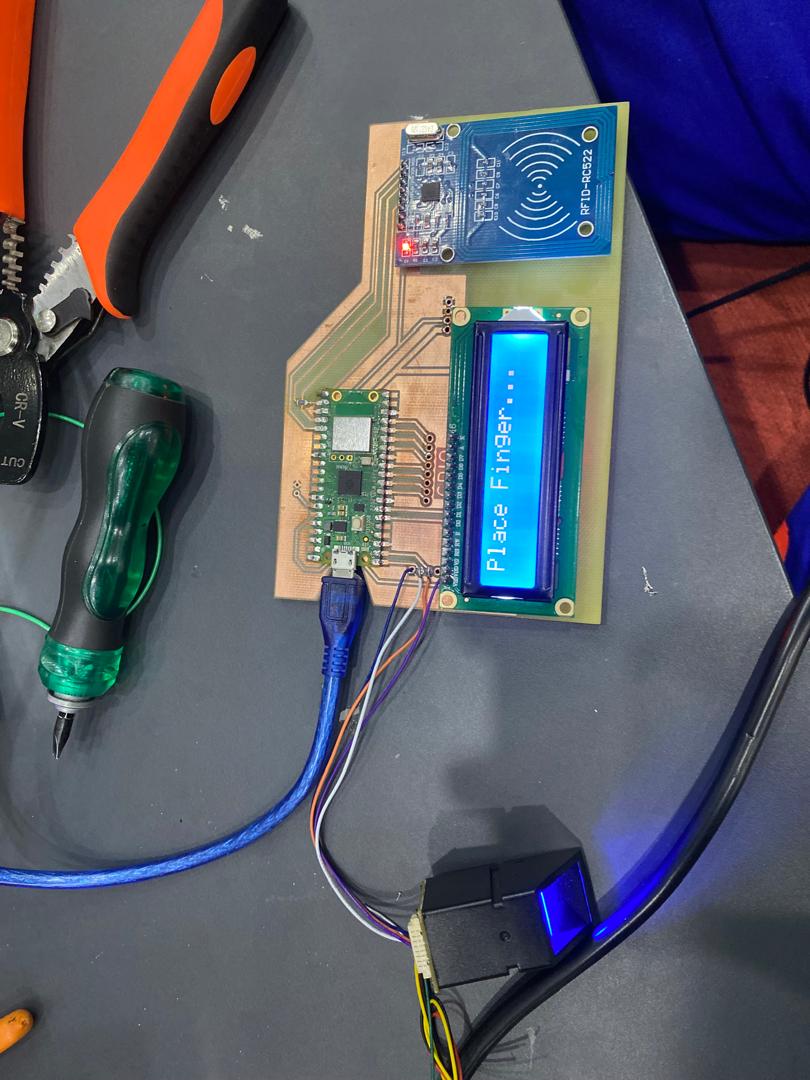
Tested if it works
PRODUCT CASING
Solidworks was used to design the casing of the project. The designes are shown here.
3D PRINTING
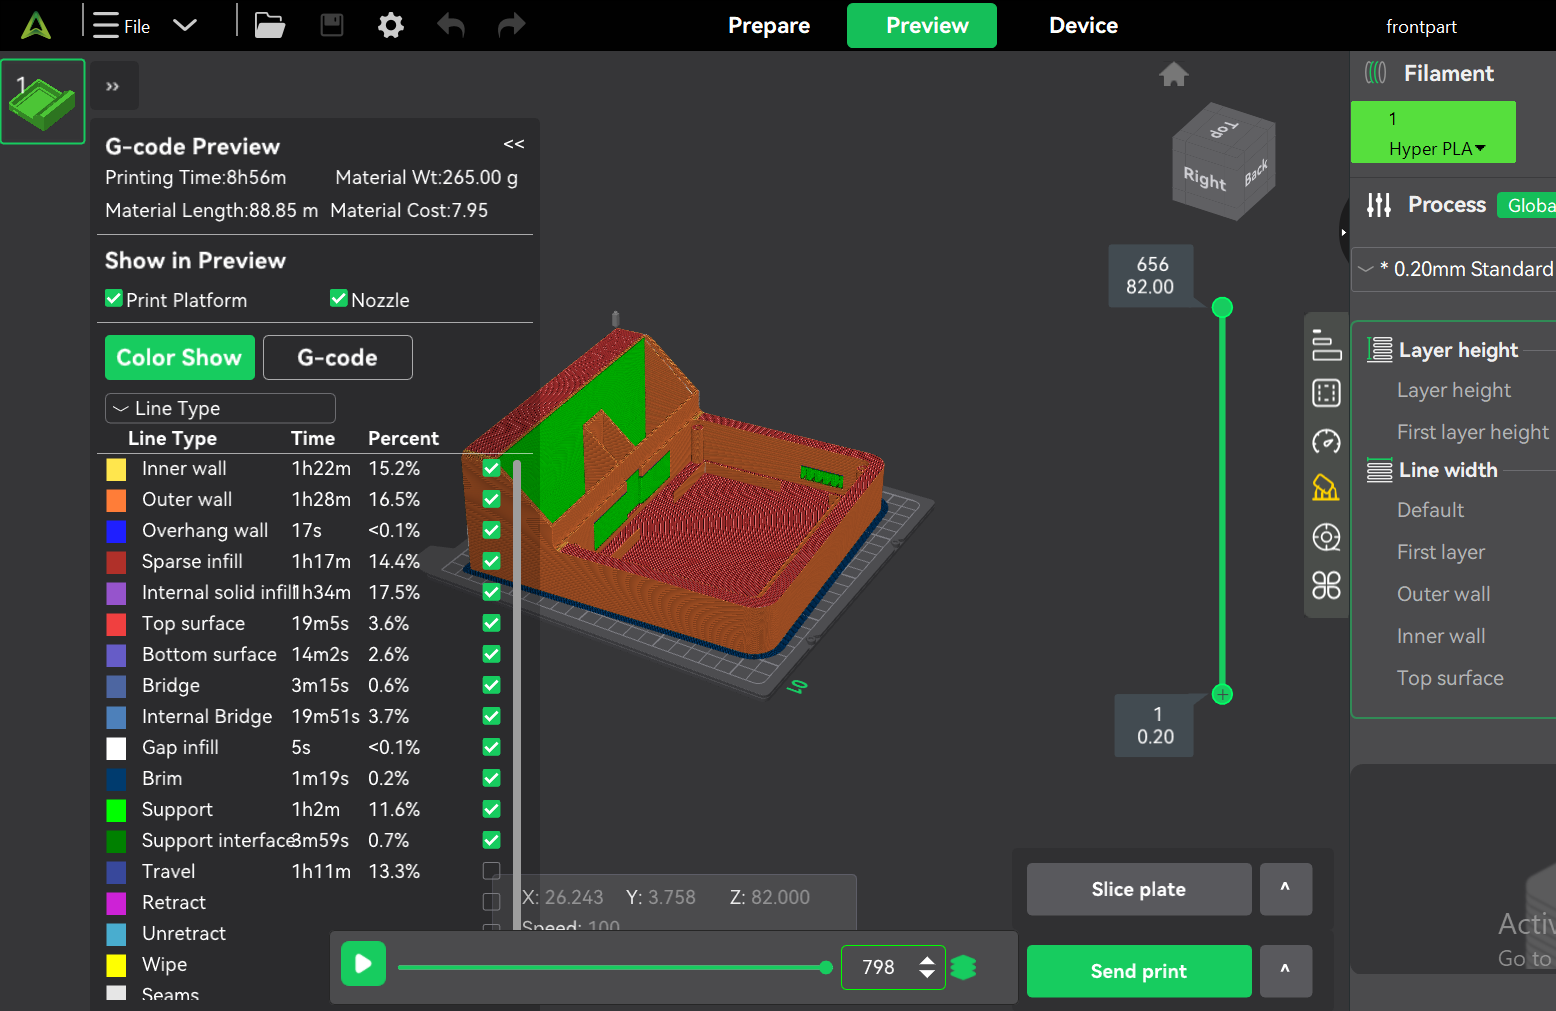
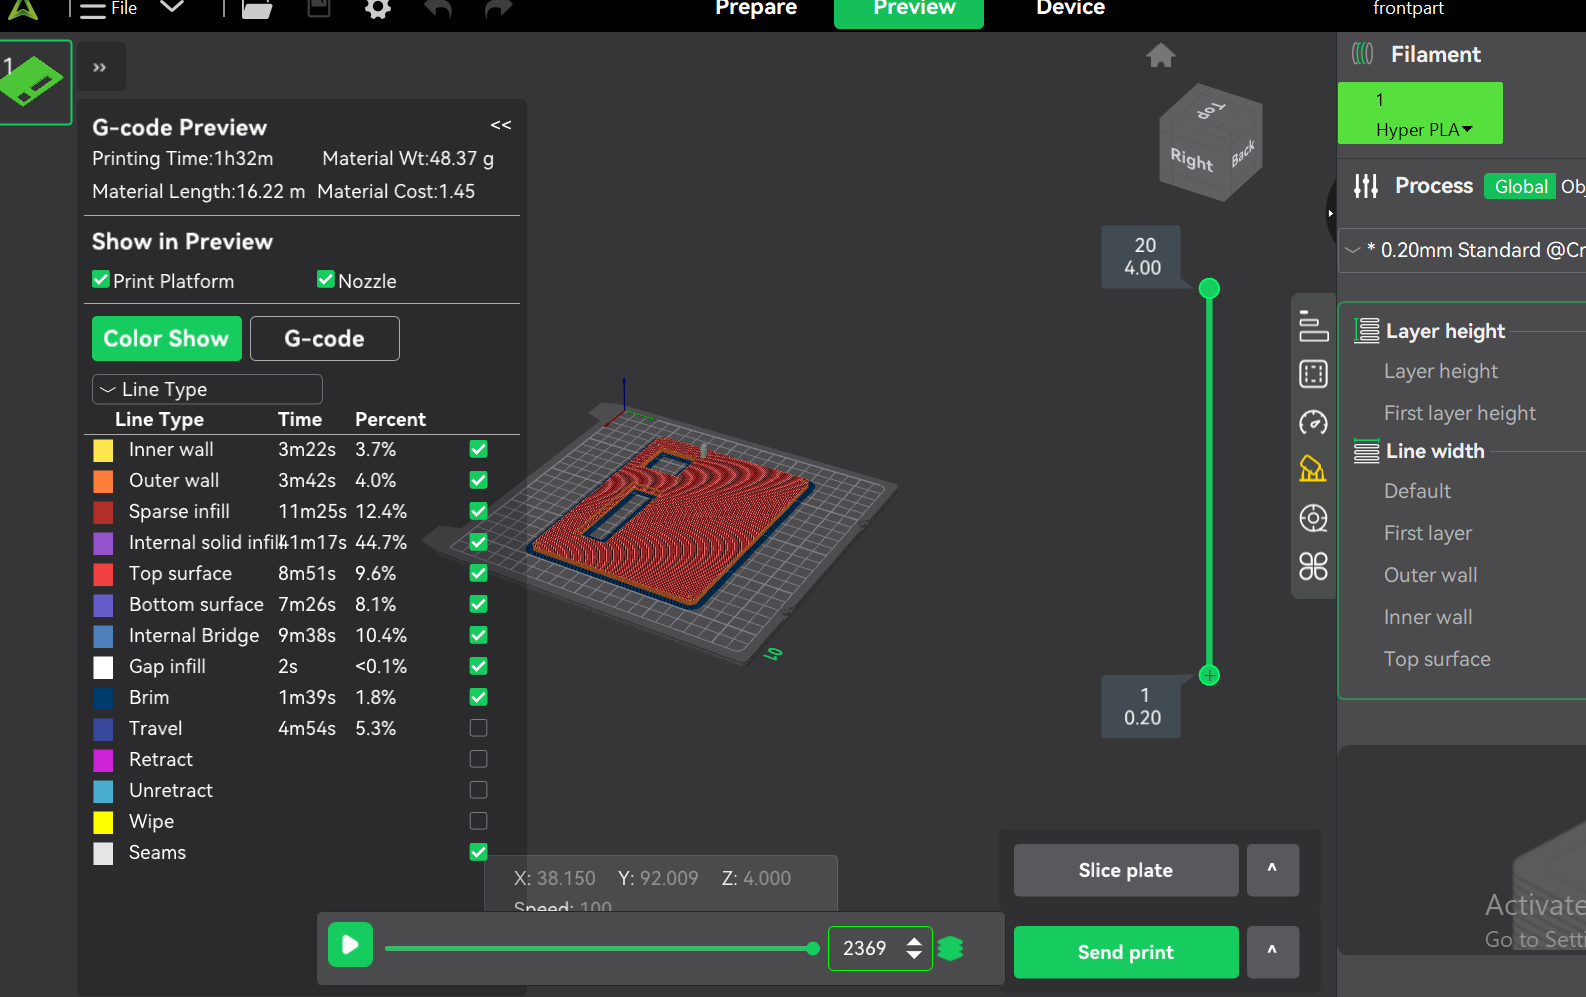
Almost 90% of the product case was produced with a 3D printer. The files are shown below.

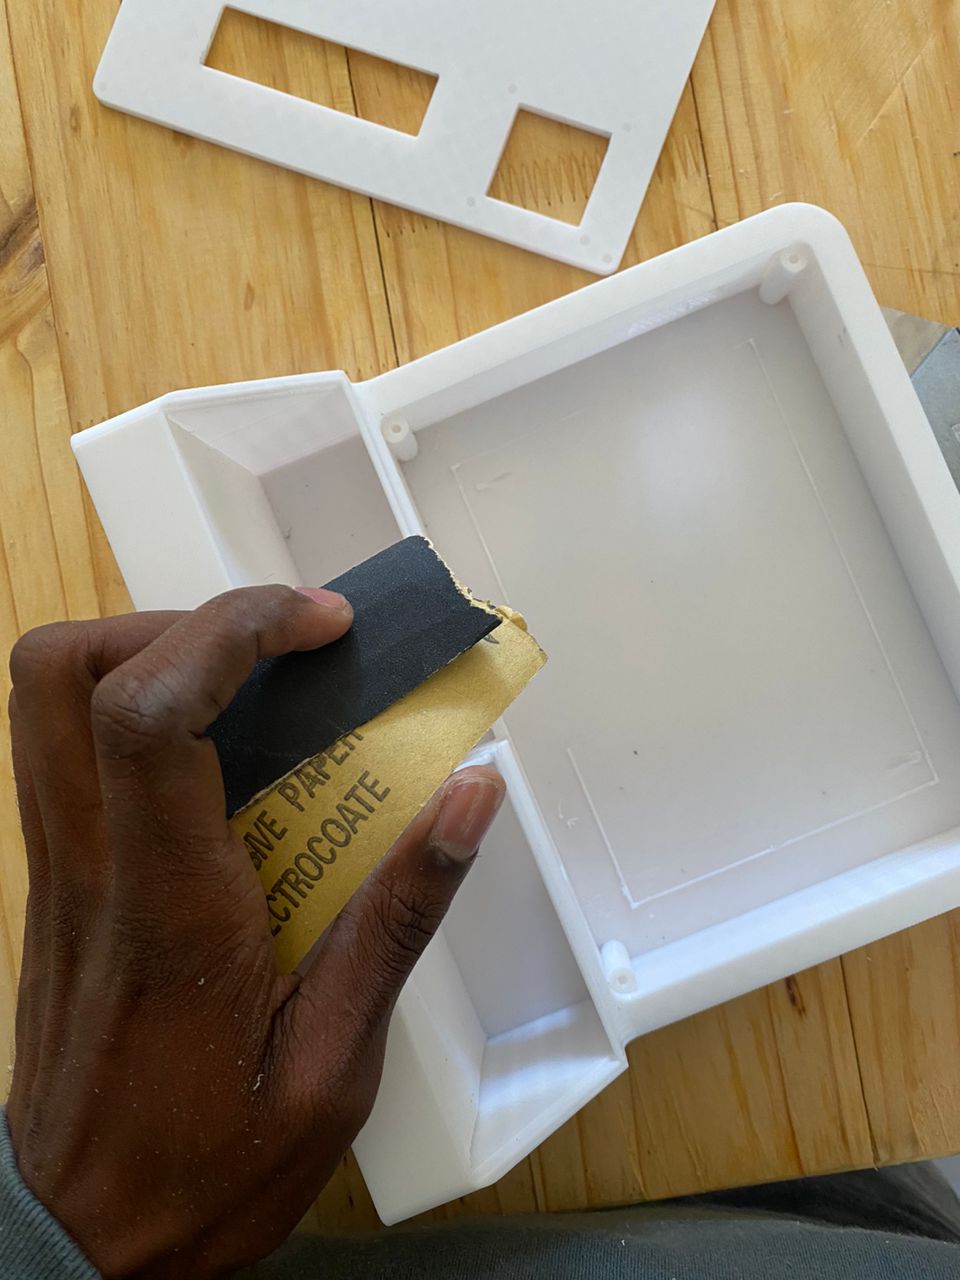
I then printed and sanded the printed the model to smoothen its surface.
2D DESIGN
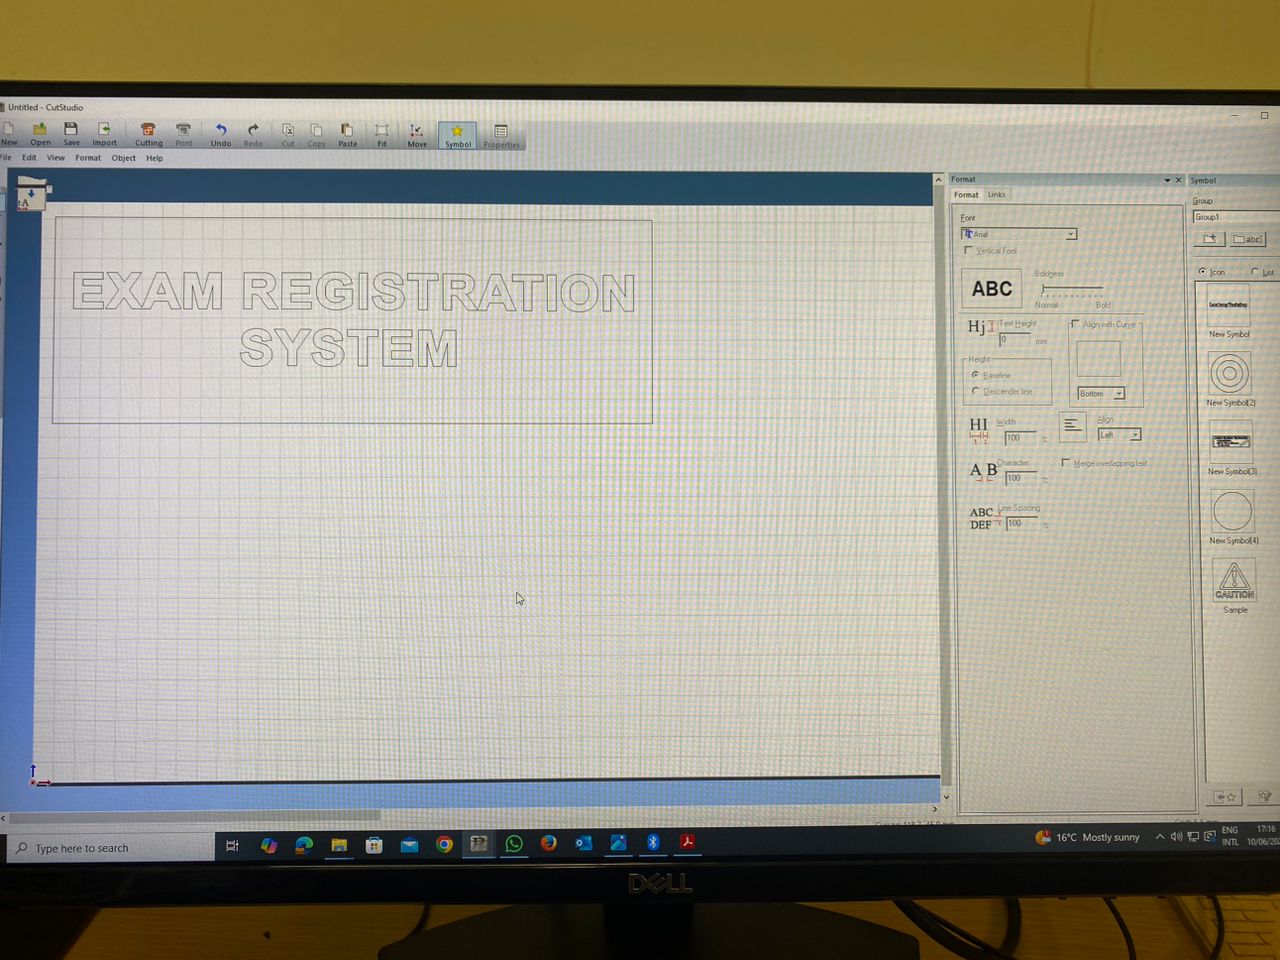
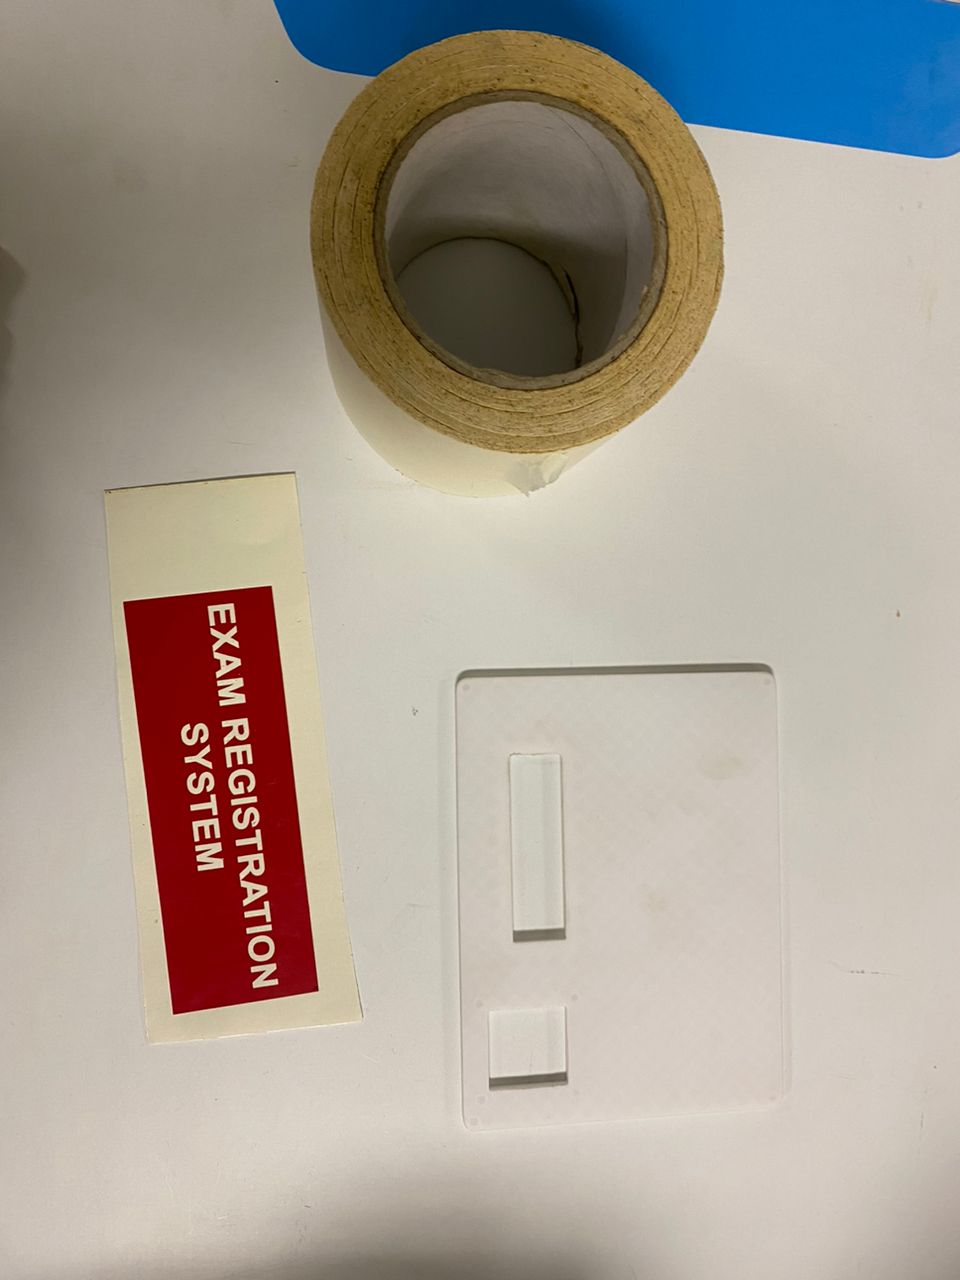
I used CutStudio to design and print the labelling/ branding of my product on the Vinyl.
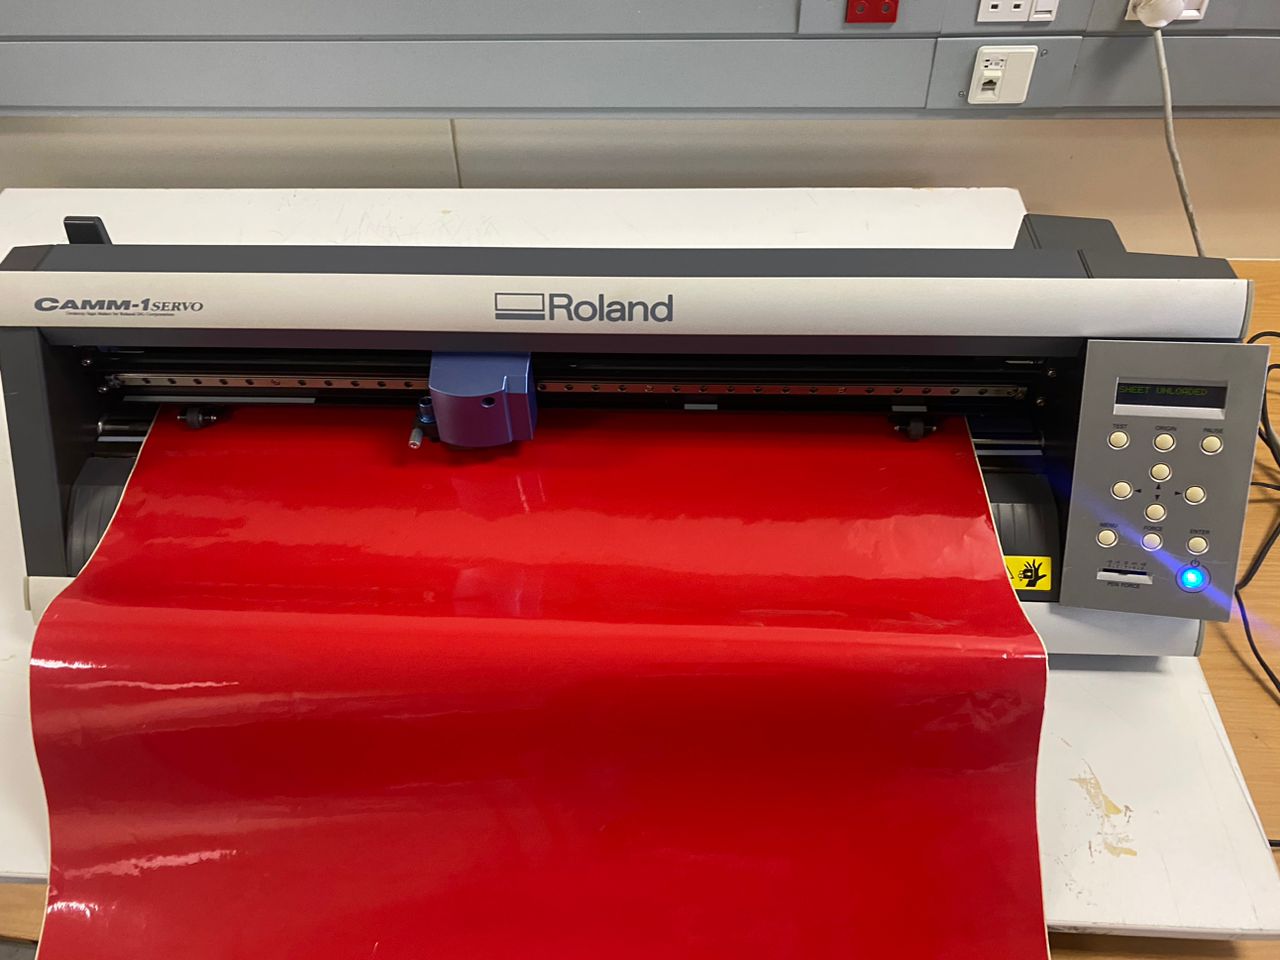
Vinyl Cutting
I used Roland CAMM1-Servo to cut my vinyl and then transferred it into the 3D printed front cover.
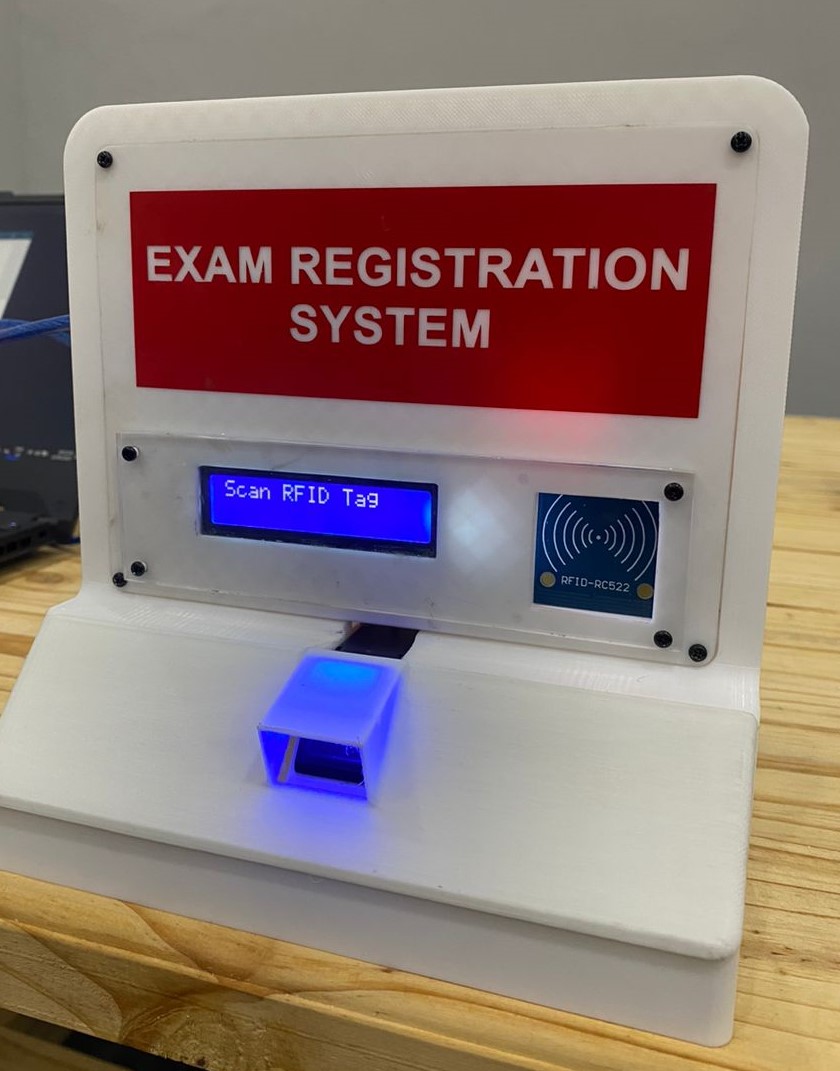
ASSEMBLING
I assembled the product after all the components are done and it looked like this:
PROGRAMMING
Arduino IDE was then used to programme the Raspberry Pi Pico W to enable the RFID scanner and the Fingerprint scanner to read the cards and biometric data of the registered students (students authorized to seat for the exam.) But first the database was created and students were first enrolled, whereby their students cards and fingerprints were linked and stored that database.
The code for enrolling students is shown below.
#include < Adafruit_Fingerprint.h>


// Fingerprint setup on hardware UART1
#define FP_TX 0  // TX to sensor's RX
#define FP_RX 1  // RX to sensor's TX
Adafruit_Fingerprint finger(&Serial1);

uint8_t id;

void setup()
{
  Serial.begin(9600);
  while (!Serial);  // For Yun/Leo/Micro/Zero/...
  delay(100);
  Serial.println("\n\nAdafruit Fingerprint sensor enrollment");

  // Init Fingerprint sensor
  Serial1.setTX(FP_TX);
  Serial1.setRX(FP_RX);
  Serial1.begin(57600);
  // set the data rate for the sensor serial port
  finger.begin(57600);

  if (finger.verifyPassword()) {
    Serial.println("Found fingerprint sensor!");
  } else {
    Serial.println("Did not find fingerprint sensor :(");
    while (1) { delay(1); }
  }

  Serial.println(F("Reading sensor parameters"));
  finger.getParameters();
  Serial.print(F("Status: 0x")); Serial.println(finger.status_reg, HEX);
  Serial.print(F("Sys ID: 0x")); Serial.println(finger.system_id, HEX);
  Serial.print(F("Capacity: ")); Serial.println(finger.capacity);
  Serial.print(F("Security level: ")); Serial.println(finger.security_level);
  Serial.print(F("Device address: ")); Serial.println(finger.device_addr, HEX);
  Serial.print(F("Packet len: ")); Serial.println(finger.packet_len);
  Serial.print(F("Baud rate: ")); Serial.println(finger.baud_rate);
}

uint8_t readnumber(void) {
  uint8_t num = 0;

  while (num == 0) {
    while (! Serial.available());
    num = Serial.parseInt();
  }
  return num;
}

void loop()                     // run over and over again
{
  Serial.println("Ready to enroll a fingerprint!");
  Serial.println("Please type in the ID # (from 1 to 127) you want to save this finger as...");
  id = readnumber();
  if (id == 0) {// ID #0 not allowed, try again!
     return;
  }
  Serial.print("Enrolling ID #");
  Serial.println(id);

  while (! getFingerprintEnroll() );
}

uint8_t getFingerprintEnroll() {

  int p = -1;
  Serial.print("Waiting for valid finger to enroll as #"); Serial.println(id);
  while (p != FINGERPRINT_OK) {
    p = finger.getImage();
    switch (p) {
    case FINGERPRINT_OK:
      Serial.println("Image taken");
      break;
    case FINGERPRINT_NOFINGER:
      Serial.print(".");
      break;
    case FINGERPRINT_PACKETRECIEVEERR:
      Serial.println("Communication error");
      break;
    case FINGERPRINT_IMAGEFAIL:
      Serial.println("Imaging error");
      break;
    default:
      Serial.println("Unknown error");
      break;
    }
  }

  // OK success!

  p = finger.image2Tz(1);
  switch (p) {
    case FINGERPRINT_OK:
      Serial.println("Image converted");
      break;
    case FINGERPRINT_IMAGEMESS:
      Serial.println("Image too messy");
      return p;
    case FINGERPRINT_PACKETRECIEVEERR:
      Serial.println("Communication error");
      return p;
    case FINGERPRINT_FEATUREFAIL:
      Serial.println("Could not find fingerprint features");
      return p;
    case FINGERPRINT_INVALIDIMAGE:
      Serial.println("Could not find fingerprint features");
      return p;
    default:
      Serial.println("Unknown error");
      return p;
  }

  Serial.println("Remove finger");
  delay(2000);
  p = 0;
  while (p != FINGERPRINT_NOFINGER) {
    p = finger.getImage();
  }
  Serial.print("ID "); Serial.println(id);
  p = -1;
  Serial.println("Place same finger again");
  while (p != FINGERPRINT_OK) {
    p = finger.getImage();
    switch (p) {
    case FINGERPRINT_OK:
      Serial.println("Image taken");
      break;
    case FINGERPRINT_NOFINGER:
      Serial.print(".");
      break;
    case FINGERPRINT_PACKETRECIEVEERR:
      Serial.println("Communication error");
      break;
    case FINGERPRINT_IMAGEFAIL:
      Serial.println("Imaging error");
      break;
    default:
      Serial.println("Unknown error");
      break;
    }
  }

  // OK success!

  p = finger.image2Tz(2);
  switch (p) {
    case FINGERPRINT_OK:
      Serial.println("Image converted");
      break;
    case FINGERPRINT_IMAGEMESS:
      Serial.println("Image too messy");
      return p;
    case FINGERPRINT_PACKETRECIEVEERR:
      Serial.println("Communication error");
      return p;
    case FINGERPRINT_FEATUREFAIL:
      Serial.println("Could not find fingerprint features");
      return p;
    case FINGERPRINT_INVALIDIMAGE:
      Serial.println("Could not find fingerprint features");
      return p;
    default:
      Serial.println("Unknown error");
      return p;
  }

  // OK converted!
  Serial.print("Creating model for #");  Serial.println(id);

  p = finger.createModel();
  if (p == FINGERPRINT_OK) {
    Serial.println("Prints matched!");
  } else if (p == FINGERPRINT_PACKETRECIEVEERR) {
    Serial.println("Communication error");
    return p;
  } else if (p == FINGERPRINT_ENROLLMISMATCH) {
    Serial.println("Fingerprints did not match");
    return p;
  } else {
    Serial.println("Unknown error");
    return p;
  }

  Serial.print("ID "); Serial.println(id);
  p = finger.storeModel(id);
  if (p == FINGERPRINT_OK) {
    Serial.println("Stored!");
  } else if (p == FINGERPRINT_PACKETRECIEVEERR) {
    Serial.println("Communication error");
    return p;
  } else if (p == FINGERPRINT_BADLOCATION) {
    Serial.println("Could not store in that location");
    return p;
  } else if (p == FINGERPRINT_FLASHERR) {
    Serial.println("Error writing to flash");
    return p;
  } else {
    Serial.println("Unknown error");
    return p;
  }

  return true;
}
Then I coded for the RFID and Fingerprint to scan the student id and the biometric data and then record their presence if they are authorized to write the exam. The code is shown below:
	#include
#include < MFRC522.h>
#include < Wire.h>
#include < LiquidCrystal_I2C.h>
#include < Adafruit_Fingerprint.h>

// RFID setup
#define SS_PIN    17
#define RST_PIN   22
MFRC522 mfrc522(SS_PIN, RST_PIN);

// LCD setup
LiquidCrystal_I2C lcd(0x27, 16, 2);  // I2C addr 0x27, 16 chars, 2 lines

// Fingerprint setup (UART1)
#define FP_TX 0
#define FP_RX 1
Adafruit_Fingerprint finger(&Serial1);

void setup() {
  Serial.begin(115200);  // USB Serial to Python

  lcd.init();
  lcd.backlight();

  while (!Serial){
    lcd.clear();
    lcd.print("Database Error.");
    delay(100);
  }
  lcd.clear();

  lcd.print("Scan RFID Tag");

  SPI.setRX(16);
  SPI.setTX(19);
  SPI.setSCK(18);
  SPI.begin();
  mfrc522.PCD_Init();

  Serial1.setTX(FP_TX);
  Serial1.setRX(FP_RX);
  Serial1.begin(57600);

  finger.begin(57600);
  if (finger.verifyPassword()) {
    Serial.println("Fingerprint sensor OK");
  } else {
    Serial.println("Fingerprint sensor error");
    lcd.clear();
    lcd.print("FP not found");
    while (1);  // halt
  }
}

void loop() {
  // Check if Python GUI sent a command
  if (Serial.available()) {
    String cmd = Serial.readStringUntil('\n');
    cmd.trim();
    if (cmd == "FP_SCAN") {
      lcd.clear();
      lcd.setCursor(0, 0);
      lcd.print("Place Finger...");

      int fpID = getFingerprintIDWithTimeout(10000);  // 10 seconds timeout

      if (fpID != -1) {
        Serial.print("FP_ID:");
        Serial.println(fpID);
      } else {
        Serial.println("FP_ID:FAIL");
      }

      lcd.clear();
      lcd.print("Scan RFID Tag");
      return;
    }

    if(cmd == "DENIED"){
      lcd.clear();
      lcd.setCursor(0, 0);
      lcd.print("Unknown Card!");
      delay(2000);
      lcd.clear();
      lcd.setCursor(0, 0);
      lcd.print("Scan RFID Tag");

    }


  }

  // RFID card detection
  if (!mfrc522.PICC_IsNewCardPresent() || !mfrc522.PICC_ReadCardSerial()) {
    return;
  }

  String uid = "";
  for (byte i = 0; i < mfrc522.uid.size; i++) {
    uid += String(mfrc522.uid.uidByte[i], HEX);
  }
  uid.toUpperCase();

  lcd.clear();
  lcd.setCursor(0, 0);
  lcd.print("RFID Tag:");
  lcd.setCursor(0, 1);
  lcd.print(uid);

  Serial.print("RFID:");
  Serial.println(uid);

  delay(2000);
  mfrc522.PICC_HaltA();
  mfrc522.PCD_StopCrypto1();
}

// Waits for a fingerprint scan up to timeoutMs milliseconds
int getFingerprintIDWithTimeout(unsigned long timeoutMs) {
  unsigned long start = millis();
  while (millis() - start < timeoutMs) {
    uint8_t result = finger.getImage();
    if (result == FINGERPRINT_OK) {
      if (finger.image2Tz() != FINGERPRINT_OK) continue;
      if (finger.fingerSearch() != FINGERPRINT_OK) continue;
      return finger.fingerID;
    } else if (result == FINGERPRINT_NOFINGER) {
      delay(200);  // wait before next try
    }
  }
  return -1;  // timeout
}
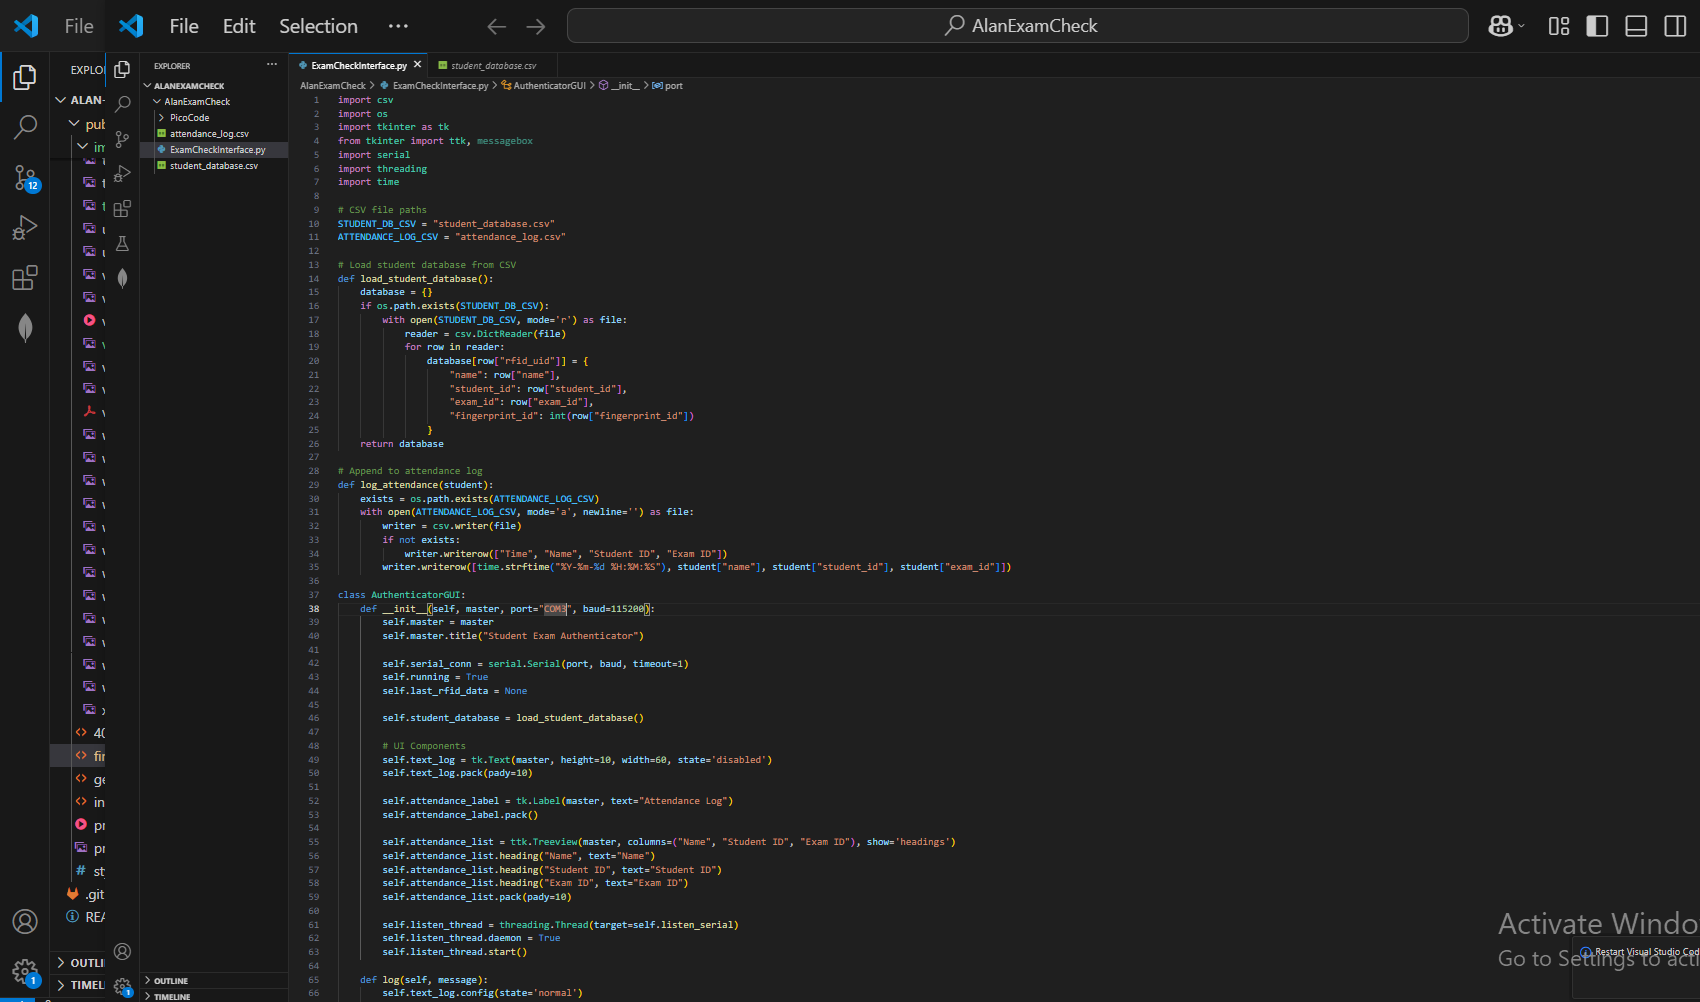
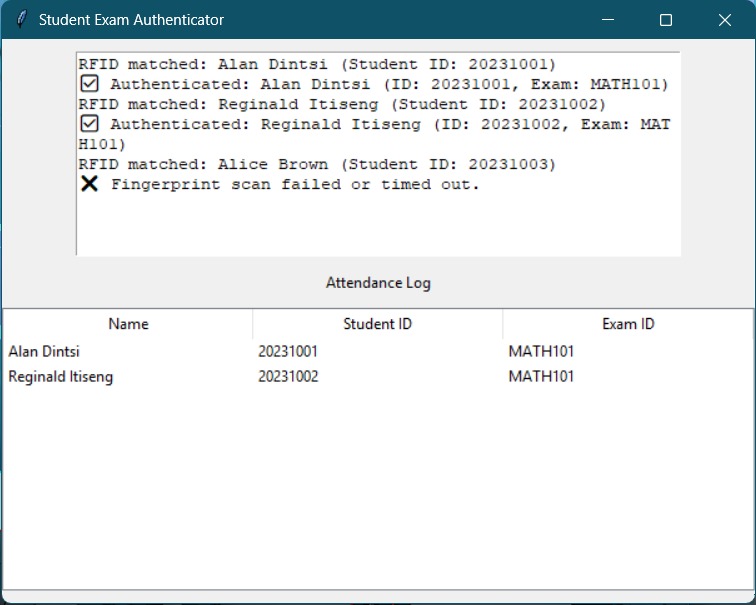
Then the interface was created using Vscode. This interface records everytime the student swipes and scans their fingerprint. It shows a list of all thosewho attended the examand then also shows those who tried to access the exam but unauthorized. The code is shwn below:
TESTING
After all these I then performed a test which the results shown exactly what I wanted to achieve in this project.
How the interface looks like
FILES