Week 1
Documentation Workflow
In the first week, we were introduced to the importance of documenting our progress and uploading every task related to FabAcademy to our personal website in English. This structured approach ensures an organized and accessible respository* or repo is a storage space for code, files, and version history, used to track changes and collaborate! of our work.
The documentation task is straightforward: each week, we need to document our progress and experiments with each learning unit. To facilitate this, we were assigned a webpage that we modify regularly by updating its repository. This setup allows us to maintain a version-controlled history of our files, making it easy to track changes and revert to previous versions if needed.
Version Control with Git
We learned how to manage our documentation using Git, a version control system, through Bash, a command-line interface that allows us to interact with our system efficiently.
Basic Bash Commands
cd <dir>- Move into a specified directory (e.g.,cd Desktop).cd ..- Move up one directory.open <file>- Open a file with the default application.mkdir <filename>- Create a new directory.pwd- Print the current working directory.ls -a- List all files, including hidden ones.ls -l- Show files in long listing format.mv <source> <target>- Move or rename a file.cat <file>- Display the contents of a file.
Setting Up SSH Key for GitLab
To manage my Git repository securely, I needed to create an SSH key and link it to GitLab. Here’s how I did it:
1. Generate a New SSH Key
I opened my terminal and executed the following command, replacing your_email@example.com with my actual email address:
ssh-keygen -t rsa -C "your_email@example.com"
This command generates a new RSA SSH key pair. When prompted, I pressed Enter to accept the default file location and chose a passphrase for added security.
2. Start the SSH Agent and Add the Key
Next, I started the SSH agent and added my newly created SSH key:
 eval "$(ssh-agent -s)"
ssh-add ~/.ssh/id_rsa
These commands ensure that the SSH agent is running and that my private key is added for authentication.
3. Copy the Public SSH Key
I then copied the contents of my public SSH key to add it to GitLab:
cat ~/.ssh/id_rsa.pub
This command displays the public key in the terminal, which I copied to my clipboard.
4. Add the SSH Key to GitLab
I logged into my GitLab account and navigated to User Settings > SSH Keys. In the "Key" field, I pasted the public key I had copied and provided a descriptive title. After saving, my SSH key was associated with my GitLab account.
5. Test the SSH Connection
To verify that everything was set up correctly, I tested the SSH connection to GitLab:
ssh -T git@gitlab.com
A successful connection returned a "Welcome" message, confirming that my SSH key was properly configured.
Git Workflow
Cloning a Repository
To create a local copy of a remote repository:
git clone
Checking Repository Status
To check the current status of your repository:
git status
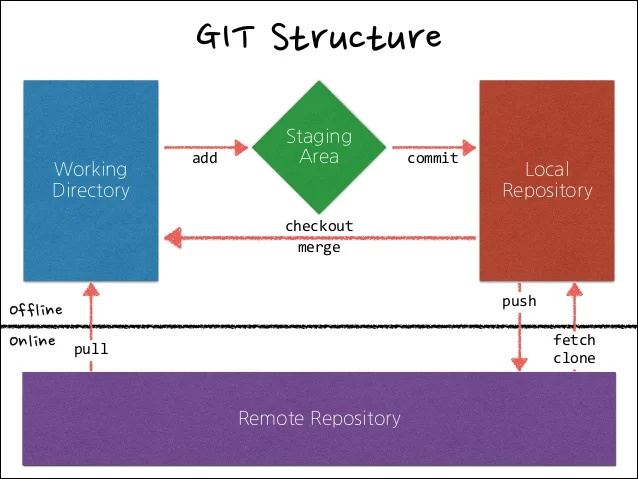
Basic* PULL-ADD-COMMIT-PUSH Git Workflow
Pull the latest changes: git pull
Add new files and changes: git add .
Commit the changes: git commit -m "COMMIT MESSAGE*
be clear on this one
"
Push the changes: git push
꩜꩜꩜ Getting to the Website ꩜꩜꩜
I was familiar with HTML and CSS, but here’s what I learned:
- HTML is used to structure content on a webpage (like headings, paragraphs, and links).
- CSS controls the design and layout of a webpage (like colors, fonts, and spacing).
- JavaScript adds interactivity to websites (like animations and form handling).
Luckily, there's an easier way to create content for websites called Markdown. Markdown is a simple way to format text without needing to know complex code. Instead of using tags like in HTML, you can just use special characters to make things bold, add links, or create lists. It’s like writing in plain text but with a few shortcuts to make the content look nice on a website.
Homebrew vs Pip
Homebrew is a package manager for macOS that helps install system tools and libraries, but it’s not ideal for Python packages.
Pip is the best way to install Python libraries, as it works directly with Python to ensure compatibility and smooth management.
I needed MkDocs to help me build and manage my documentation website. MkDocs is a static site generator specifically designed for project documentation. It makes it easier to organize and display Markdown files on a clean, well-structured site. Without it, I’d have to manually code an entire site for my documentation, which would be very time-consuming. For this, I had to get familiar with Markdown syntax to structure my content effectively. The ones I use most often are:
#for headings (e.g.,# This is a Heading)*or-for bullet points (e.g.,* Itemor- Item)[link text](url)for creating links (e.g.,[Google](https://www.google.com))**text**for bold (e.g.,**Bold text**)*text*for italic (e.g.,*Italic text*)
To make this process easier, I used Visual Studio Code (VS Code), which is a popular code editor that helps you write and edit your documentation. It has useful features like syntax highlighting, file management, and extensions for working with Markdown.
To see the changes happening in real time, instead of adding, committing, and pushing my corrections each time, I use a trick where I run mkdocs serve in my terminal. This command allows me to view my site locally, seeing the "rendering" of the website before making public changes. This way, I can check my edits and make sure everything looks good before sharing it online.
And That’s It For Now
It’s a lot of information to process, but I’ll be using it constantly. Hopefully, I’ll internalize it better and not have to keep checking Google and ChatGPT to learn more about how I’m building my virtual portal. It's actually pretty fun! And thankfully we have the FabAcademy Tutorials which are public for every student.
For my website, I’m using the MkDocs Terminal Theme, which gives it that cool, clean, and minimalistic look. I’ve also added a bit of my own custom CSS to give it some personal flair.
The rest is me experimenting with code while documenting my weekly progress. More next week :)
꩜꩜꩜