Networking & Communications
Group Assignment
The group assignment this week was about setting up communication between two projects using the Xiao ESP32-C3 microcontroller. We decided to use Bluetooth as our communication method due to its reliability and widespread compatibility. The Xiao ESP32-C3 was programmed to send and receive messages over Bluetooth.
For Node 1, which is the Xiao ESP32-C3, we wrote code to initialize Bluetooth Low Energy (BLE), create a server, and handle incoming messages. We also set up a characteristic that allows reading and writing messages. The code was designed to print received messages to the serial monitor.
Node 2 represents a mobile device, such as a smartphone, paired with Node 1 over Bluetooth. We provided instructions for testing the communication, which involved uploading the code to the Xiao ESP32-C3, connecting the mobile device to the ESP32, and using a Bluetooth app to send messages.
The result was successful, as demonstrated in a video showing the transmission of messages between Node 1 and Node 2. Overall, this assignment provided valuable hands-on experience with Bluetooth communication using the ESP32-C3 microcontroller.
Individual Assignment
Controlling a Servo Motor with Seeed XIAO ESP32C3, LightBlue App, and Custom PCB
Introduction
In this project, I used a Seeed XIAO ESP32C3, a servo motor, the LightBlue app, and a custom PCB board to control the servo motor wirelessly. This documentation outlines the steps I took to set up and use these components together.
Components Used
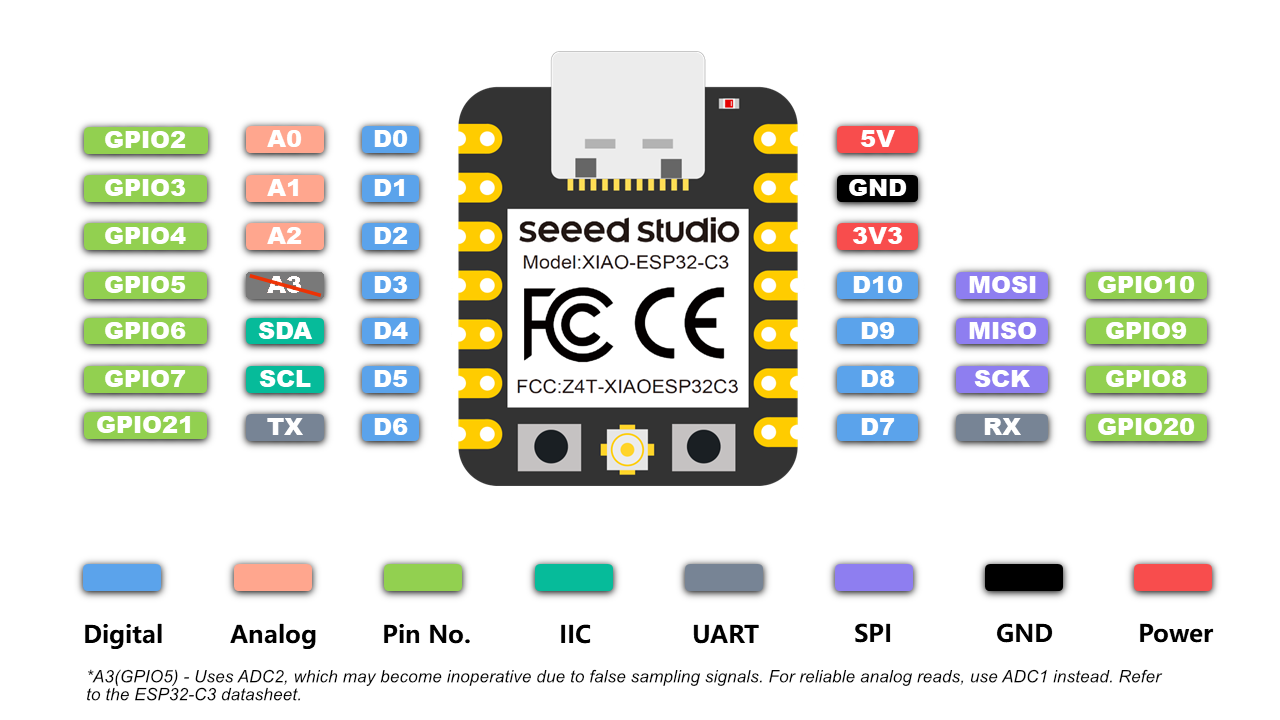
- Seeed XIAO ESP32C3
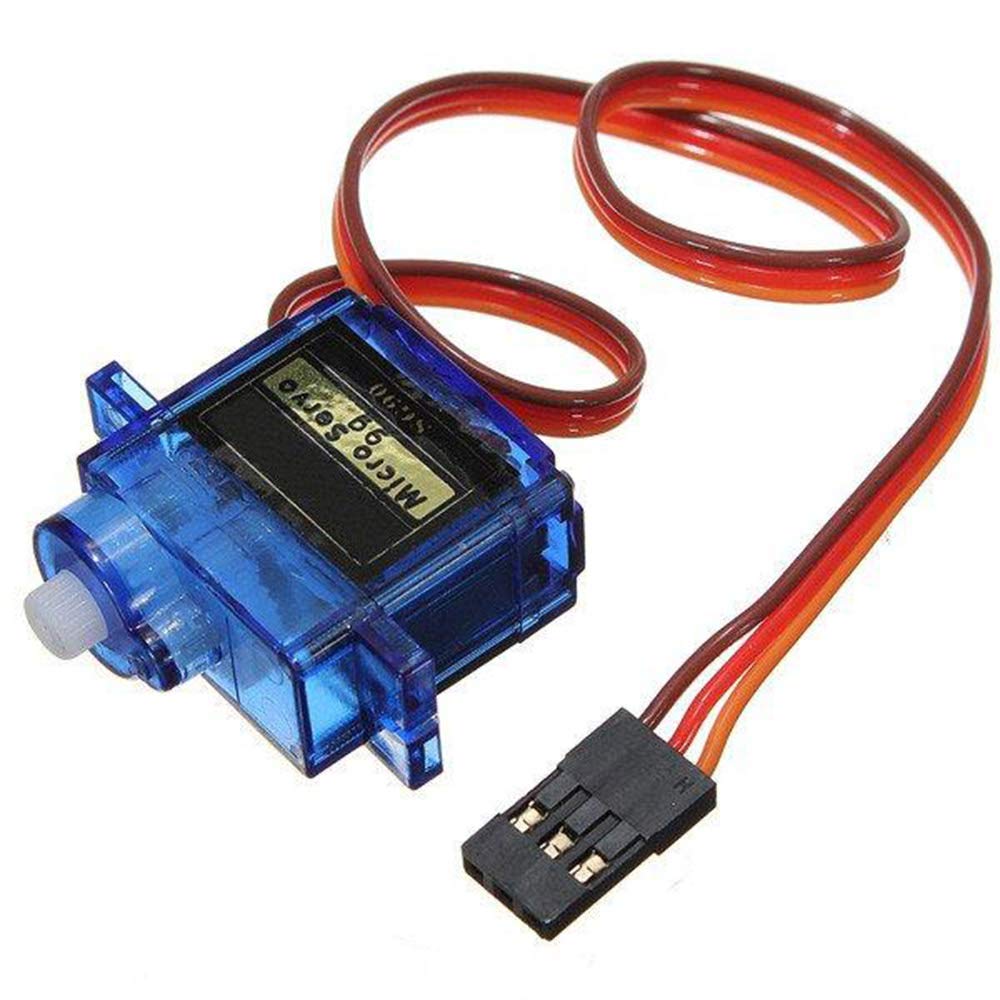
- SG90 Servo Motor
- Custom PCB Board that I designed it in Electronis design week.
- Connecting wires
- Power supply (3.3V or 5V depending on the servo motor)
- LightBlue app (available on iOS and Android)
Hardware Setup
Connecting the Servo Motor to the Seeed XIAO ESP32C3
- Signal (control) wire of the servo to GPIO pin 2 on the Seeed XIAO ESP32C3.
- Power (Vcc) wire of the servo to the 3.3V or 5V power supply (depending on your servo's requirements).
- Ground (GND) wire of the servo to the ground pin (GND) on the Seeed XIAO ESP32C3.
Using the Custom PCB Board
I designed a custom PCB to neatly arrange the connections and provide a robust platform for the ESP32C3 and servo motor. The PCB included headers for the ESP32C3, power lines, and connections for the servo motor.
Software Setup
Installing Necessary Libraries
- I opened the Arduino IDE and went to Sketch > Include Library > Manage Libraries.
- I searched for and installed the
ESP32Servolibrary by Kevin Harrington. - I ensured the ESP32 board package was installed in the Arduino IDE by adding
https://dl.espressif.com/dl/package_esp32_index.jsonto the Additional Board Manager URLs and then installing the ESP32 board package via Tools > Board > Board Manager.
Writing the Code
Here is the code I used to control the servo motor:
cpp#include <BLEDevice.h>
#include <BLEUtils.h>
#include <BLEServer.h>
#include <ESP32Servo.h> // Include the ESP32Servo library
#define SERVICE_UUID "4fafc201-1fb5-459e-8fcc-c5c9c331914b"
#define CHARACTERISTIC_UUID "beb5483e-36e1-4688-b7f5-ea07361b26a8"
Servo myServo; // Create a Servo object to control the servo
const int servoPin = 26; // Define the pin to which the servo is connected
class MyCallbacks: public BLECharacteristicCallbacks {
void onWrite(BLECharacteristic *pCharacteristic) {
std::string value = pCharacteristic->getValue();
if (value.length() > 0) {
Serial.println("*********");
Serial.print("New value: ");
for (int i = 0; i < value.length(); i++)
Serial.print(value[i]);
Serial.println();
Serial.println("*********");
// Convert the received value to an integer and set the servo angle
int angle = atoi(value.c_str());
if (angle >= 0 && angle <= 180) {
myServo.write(angle);
Serial.print("Servo angle set to: ");
Serial.println(angle);
} else {
Serial.println("Invalid angle received");
}
}
}
};
void setup() {
Serial.begin(115200);
myServo.attach(servoPin); // Attach the servo to the specified pin
BLEDevice::init("MyESP32");
BLEServer *pServer = BLEDevice::createServer();
BLEService *pService = pServer->createService(SERVICE_UUID);
BLECharacteristic *pCharacteristic = pService->createCharacteristic(
CHARACTERISTIC_UUID,
BLECharacteristic::PROPERTY_READ |
BLECharacteristic::PROPERTY_WRITE
);
pCharacteristic->setCallbacks(new MyCallbacks());
pCharacteristic->setValue("Hello World");
pService->start();
BLEAdvertising *pAdvertising = pServer->getAdvertising();
pAdvertising->start();
}
void loop() {
delay(2000);
}
Programming the Seeed XIAO ESP32C3
- I connected the Seeed XIAO ESP32C3 to my computer using a USB cable.
- In the Arduino IDE, I selected the appropriate board and port:
- Board: XIAO_ESP32C3
- Port: (Select the port corresponding to your ESP32C3)
- I uploaded the code to the ESP32C3.
Using the LightBlue App
Connecting to My ESP32 Device:
- I opened the LightBlue app on my smartphone.
- I scanned for Bluetooth devices and connected to my ESP32 device, which appeared as "MyESP32".
Finding the Service and Characteristic:
- Once connected, I browsed the services and characteristics.
- I found the service with UUID
4fafc201-1fb5-459e-8fcc-c5c9c331914b. - Within this service, I found the characteristic with UUID
beb5483e-36e1-4688-b7f5-ea07361b26a8.
Writing a Value to the Characteristic:
- I selected the characteristic and chose the option to write a value.
- I entered a numeric value (e.g., 90) as a string. This value represented the angle I wanted the servo to move to.
Testing the Setup
Power Up:
- I ensured my servo and ESP32C3 were powered appropriately.
- The ESP32C3 started advertising as "MyESP32".
Controlling the Servo:
- I used the LightBlue app to connect to "MyESP32".
- I wrote a desired angle value to the characteristic.
- The servo moved to the specified angle.
Troubleshooting
Servo Not Moving:
- I ensured the servo was connected correctly and receiving adequate power.
- I verified that the ESP32C3 was powered and running the code correctly.
- I checked the serial monitor for any error messages.
Bluetooth Connection Issues:
- I ensured the ESP32C3 was advertising as "MyESP32".
- I restarted the LightBlue app and tried reconnecting.
By following these steps, I was able to control a servo motor using the Seeed XIAO ESP32C3, the LightBlue app, and a custom PCB. This setup allows for wireless control of the servo, enabling various applications such as robotics, remote control systems, and more.