Group Assignment
Safety Steps that we follow before and after process
- Personal Protective Equipment (PPE): Wear appropriate personal protective equipment, such as gloves and goggles, to protect your skin and eyes from any potential contact with the liquid rubber. Choose gloves made of chemical-resistant material and goggles that provide adequate eye protection.
- Ventilation: Ensure that the working area is well-ventilated to maintain a safe environment. This will help to minimize the concentration of fumes or vapors that may be emitted by the liquid rubber. If working indoors, consider using exhaust fans or opening windows to improve air circulation.
- Read the Safety Data Sheet (SDS): Familiarize yourself with the safety precautions, handling instructions, and emergency procedures provided in the Safety Data Sheet (SDS) for the specific brand or type of liquid rubber you are using. The SDS contains essential information about the potential hazards and recommended safety measures.
- Avoid Skin Contact: Prevent direct contact between the liquid rubber and your skin. In case of accidental contact, promptly wash the affected area with soap and water. If skin irritation or allergic reactions occur, seek medical attention.
- Eye Protection: Wear safety goggles or a face shield to protect your eyes from splashes or spills of the liquid rubber. In case of eye exposure, immediately flush the eyes with clean water for at least 15 minutes and seek medical assistance.
- Working in a Controlled Environment: Work in a controlled environment to minimize the risk of accidents or spills. Use a designated workbench or area that is stable and free from clutter to ensure proper handling and prevent unnecessary accidents.
- Proper Storage: Store the liquid rubber in a well-ventilated and designated storage area, away from sources of heat, open flames, or incompatible materials. Follow the manufacturer's instructions for storage conditions, including temperature and shelf life limitations.
- Disposal: Dispose of any waste or unused liquid rubber according to local regulations and guidelines. Do not pour it down the drain or dispose of it in regular trash bins. Follow proper waste disposal procedures, which may involve contacting local authorities or waste management facilities for guidance.
During our group assignment, we focused on designing a basic shape, specifically half a sphere so we design a half sphere on fusion 360 and make the mold. To explore different material options, we mixed various samples in small cups using the materials available in the lab.
We also prioritized safety measures during the molding and casting process. It was crucial to cover the working surface adequately and ensure the use of gloves and aprons to protect our hands and clothes.
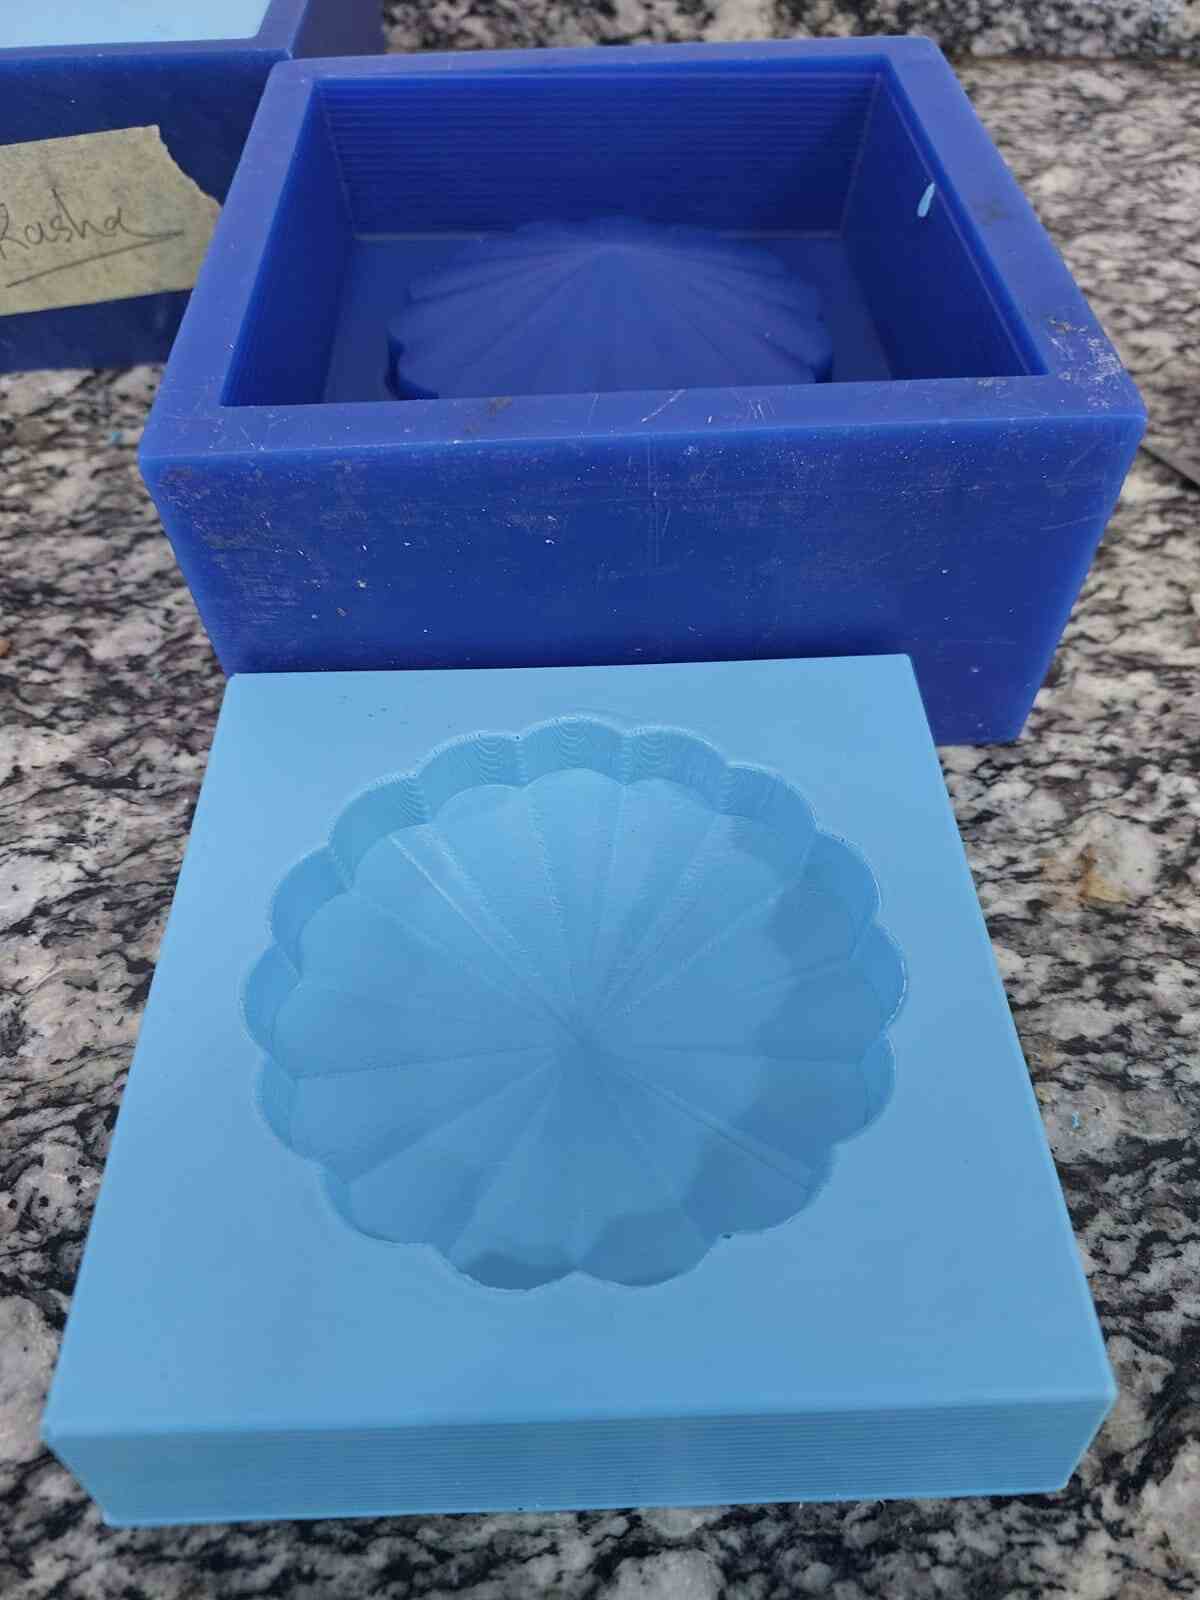
For the molding process, we used Oomoo 25 silicone rubber as our chosen material. Its reliable properties and ease of use made it an ideal choice for creating our molds.
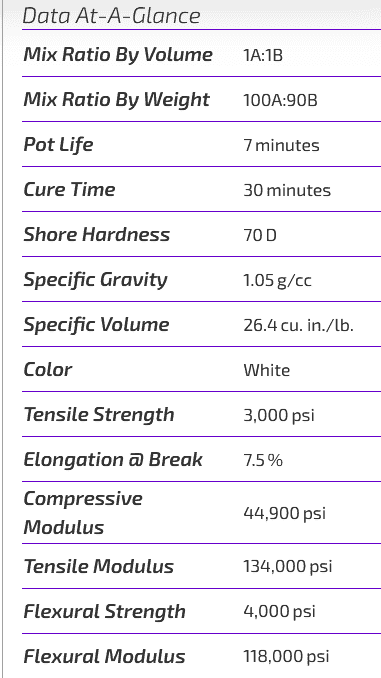
As for the casting material, we opted for Smooth-Cast™ 305 liquid plastic (its ratio 0.01% - 3% of the total mix weight ). Its high-quality performance and efficient curing time allowed us to create solid and durable pieces. Additionally, we incorporated SO-Strong™ liquid urethane colorants to add vibrant colors to our creations, resulting in a variety of shapes with distinct hues.

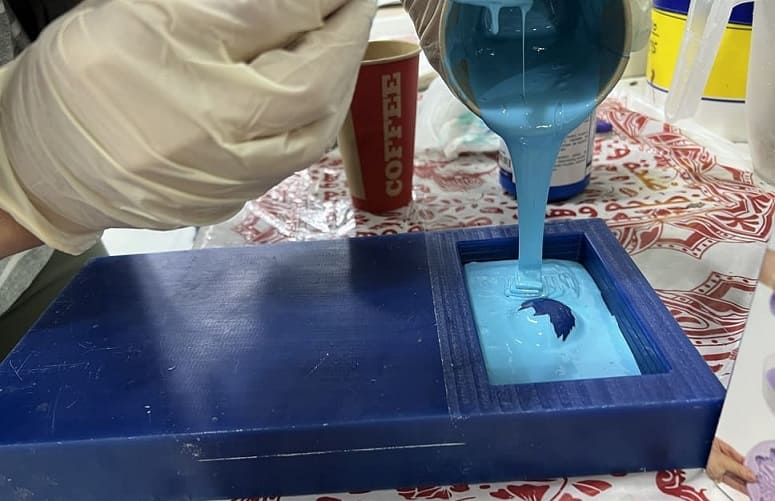
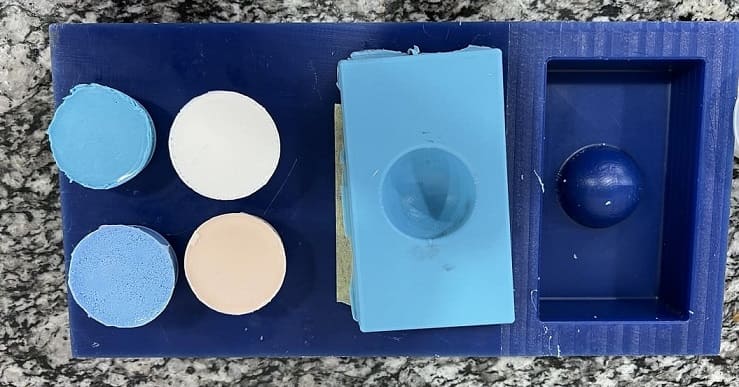
Below is an image of the resin material we tested with and the sample we compared to other tests.

Conclusion
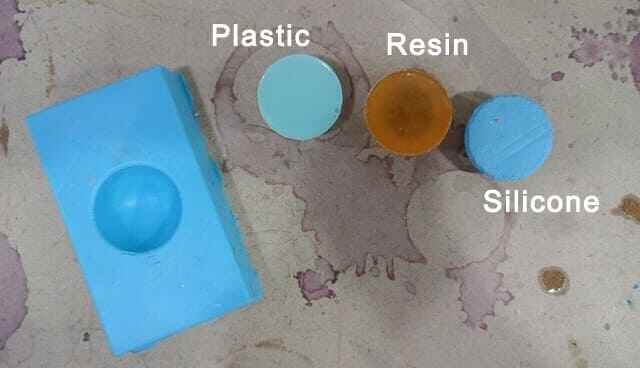
Material consistency: liquid Plastic & Resin are both firm material, while Silicone is a rubber material.
Density: Silicone sample had the highest density, resin sample was the second highest density and plastic sample had lowest density. we concluded this from material weight since density is weight of material per unit volume.
Scratch resistance: it is easier to scratch resin surface than scratching plastic or silicone.
Week Molding & casting
what is molding and casting ?
Molding and casting are manufacturing processes used to create replicas of an object. The process involves creating a negative impression, or mold, of the original object, and then using that mold to create a positive replica, or cast.
The molding process typically involves making a mold of the original object using a flexible material, such as silicone or rubber. The mold is made by pouring the flexible material over the object, allowing it to harden, and then removing the original object to reveal the mold.
Once the mold is created, the casting process begins by pouring a liquid material, such as resin or plaster, into the mold. The liquid material is allowed to harden or cure, and then the mold is removed to reveal the positive replica of the original object.
Molding and casting are commonly used in manufacturing, prototyping, and art and design. The process allows for the creation of multiple identical replicas of a single object, which can be useful for mass production or creating intricate designs that are difficult to create by other means.
Lets design the mold of our piece
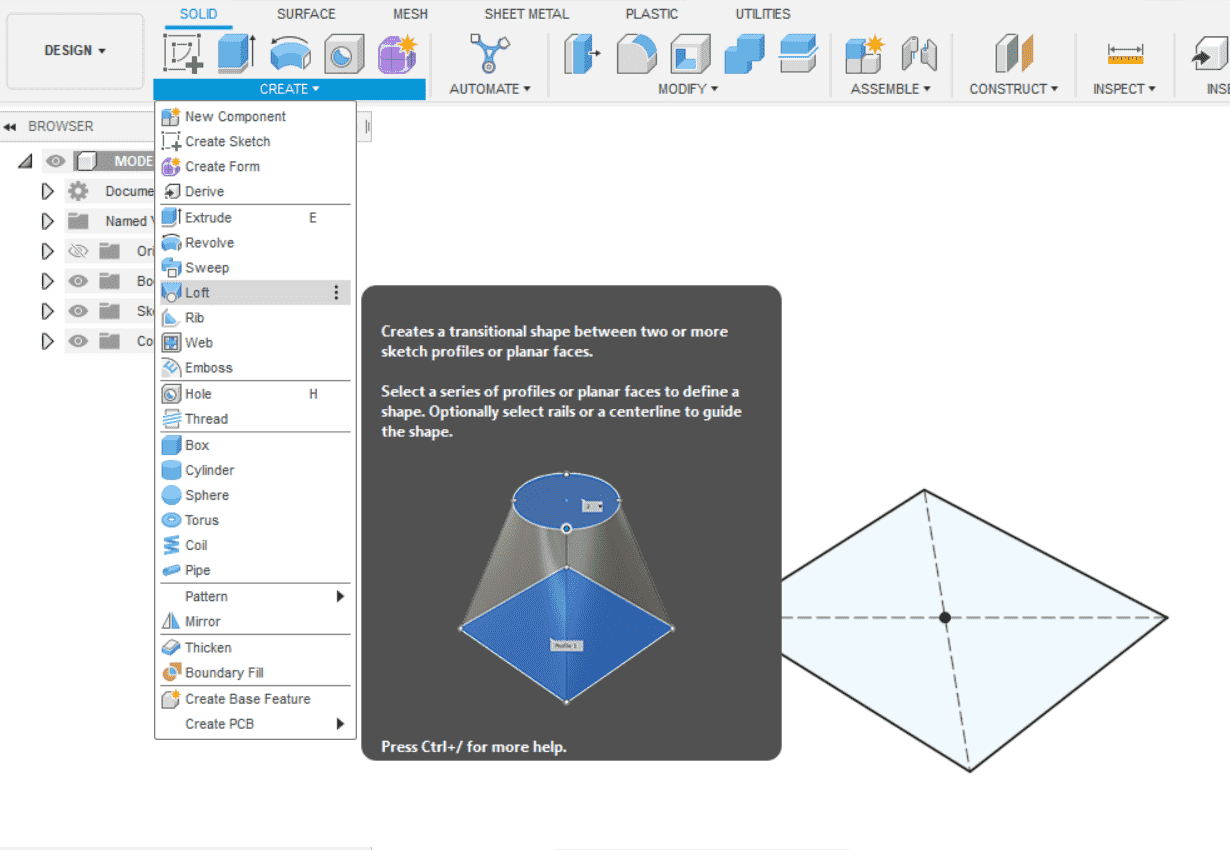
To create the mold, I utilized Fusion 360, which offers a range of powerful design tools. One particularly useful tool is the "loft" feature, which enabled me to seamlessly connect two designs on different planes. This functionality was especially handy when crafting flower-shaped molds, so I draw the flower shape in plane and on another plane I draw the circle and that is the result.
When designing the mold, it's important to consider the sharp edges. To address this, I utilized the "fillet" tool, which helped me round off any sharp corners and edges, I intentionally incorporated rounded edges for two main reasons. Firstly, rounded edges facilitate the cutting process, especially when using a router. Sharp edges can be challenging for the router to handle accurately, but rounded edges allow for smoother and more precise cuts, resulting in a cleaner mold design. Secondly, rounded edges play a crucial role in ensuring easy mold release. When the mold is ready to be separated from the casted material, the rounded edges assist in releasing the mold smoothly without causing any damage or distortion to the final product. This helps preserve the integrity of the casted item and makes the demolding process more efficient.
.png)
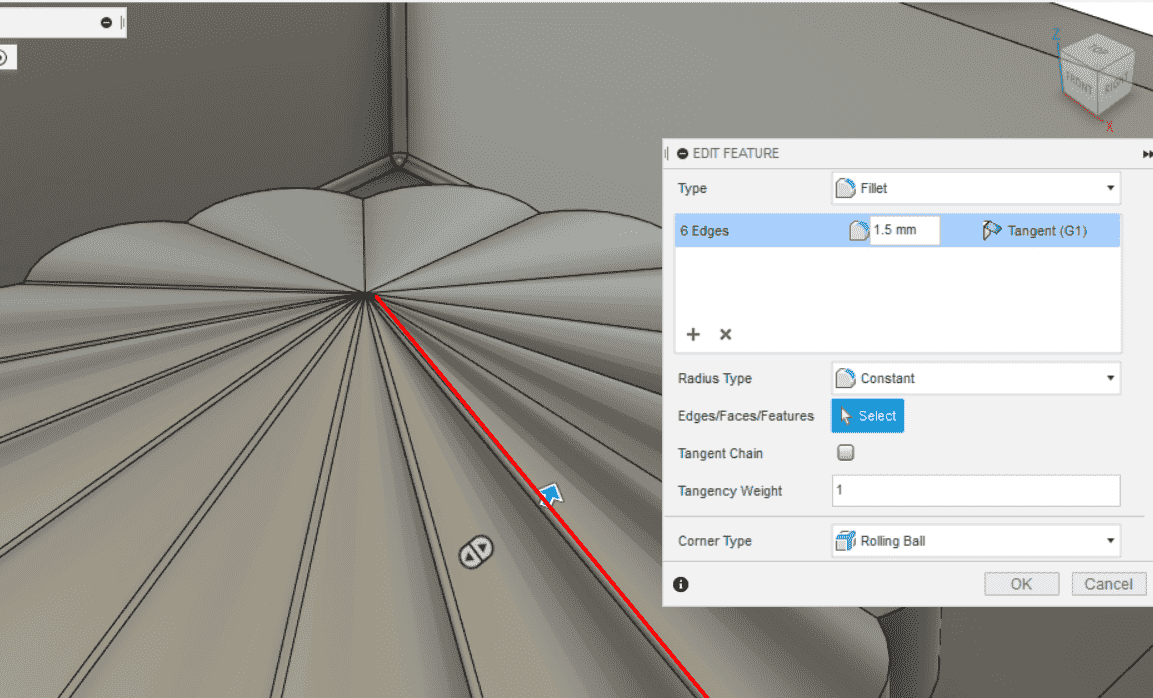
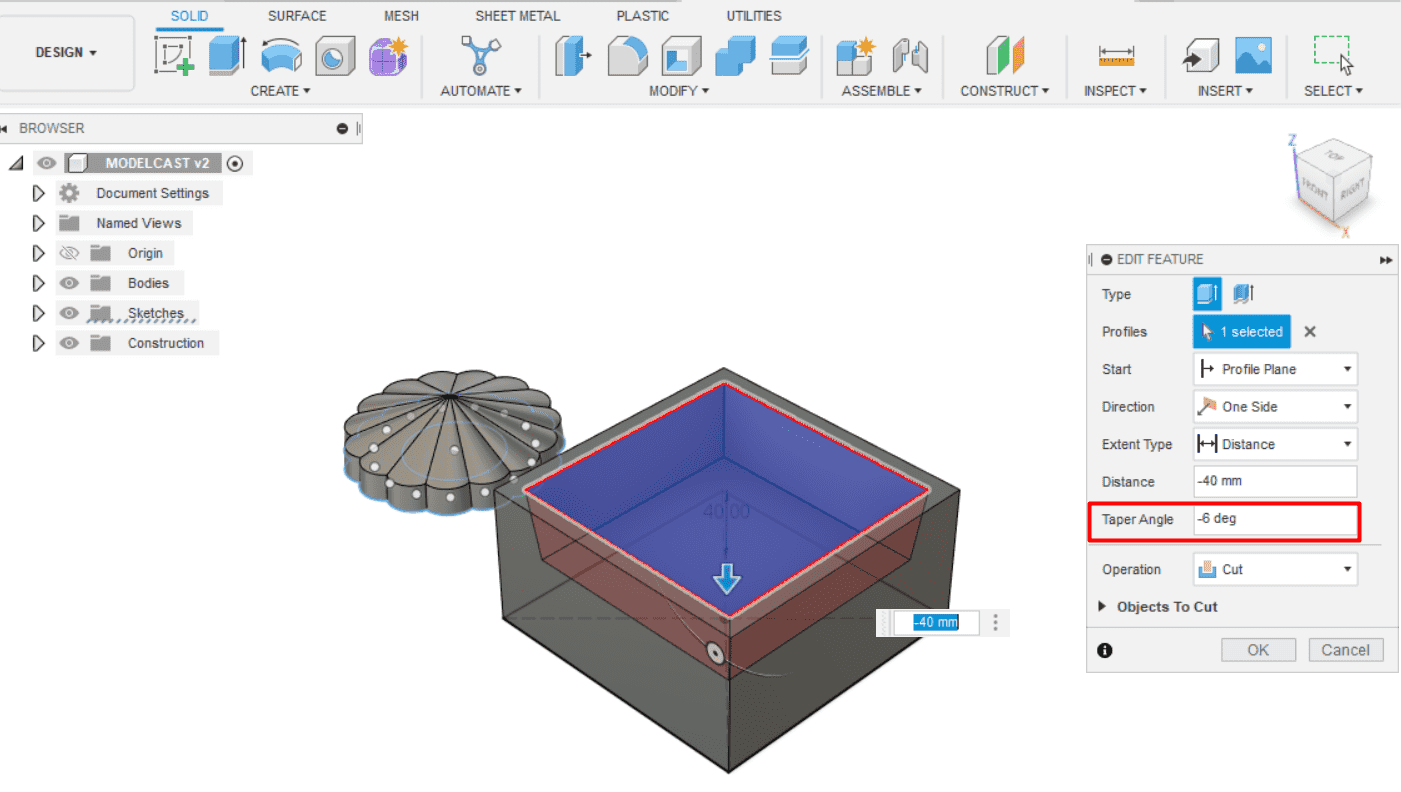
Another crucial aspect of mold design is incorporating inclined tapered walls. This feature enables the easy release of the casted mold. Leveraging the "tapered angle" feature within the "extrude" tool, I was able to incorporate these inclined walls into my mold design.
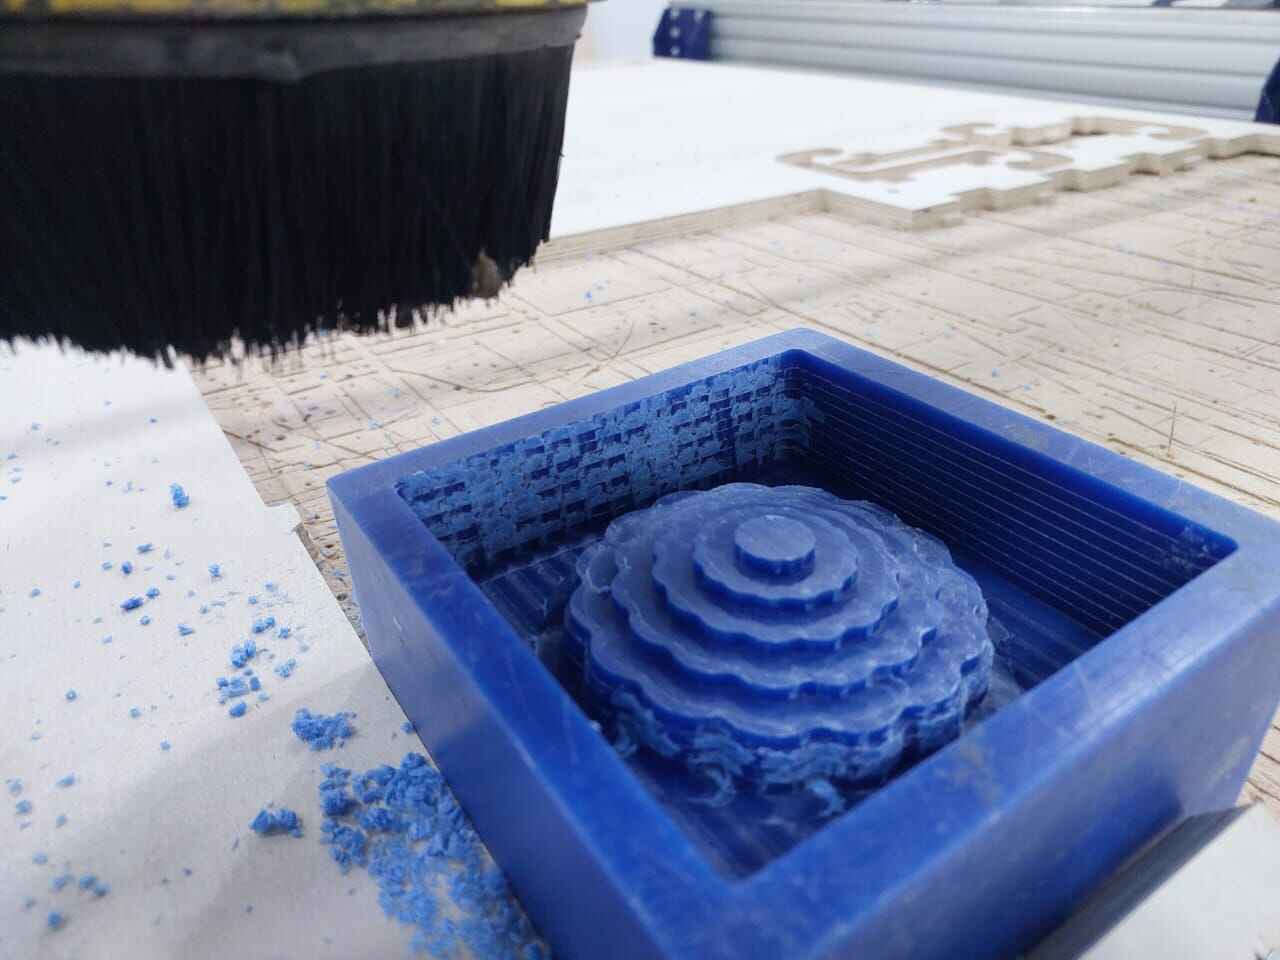
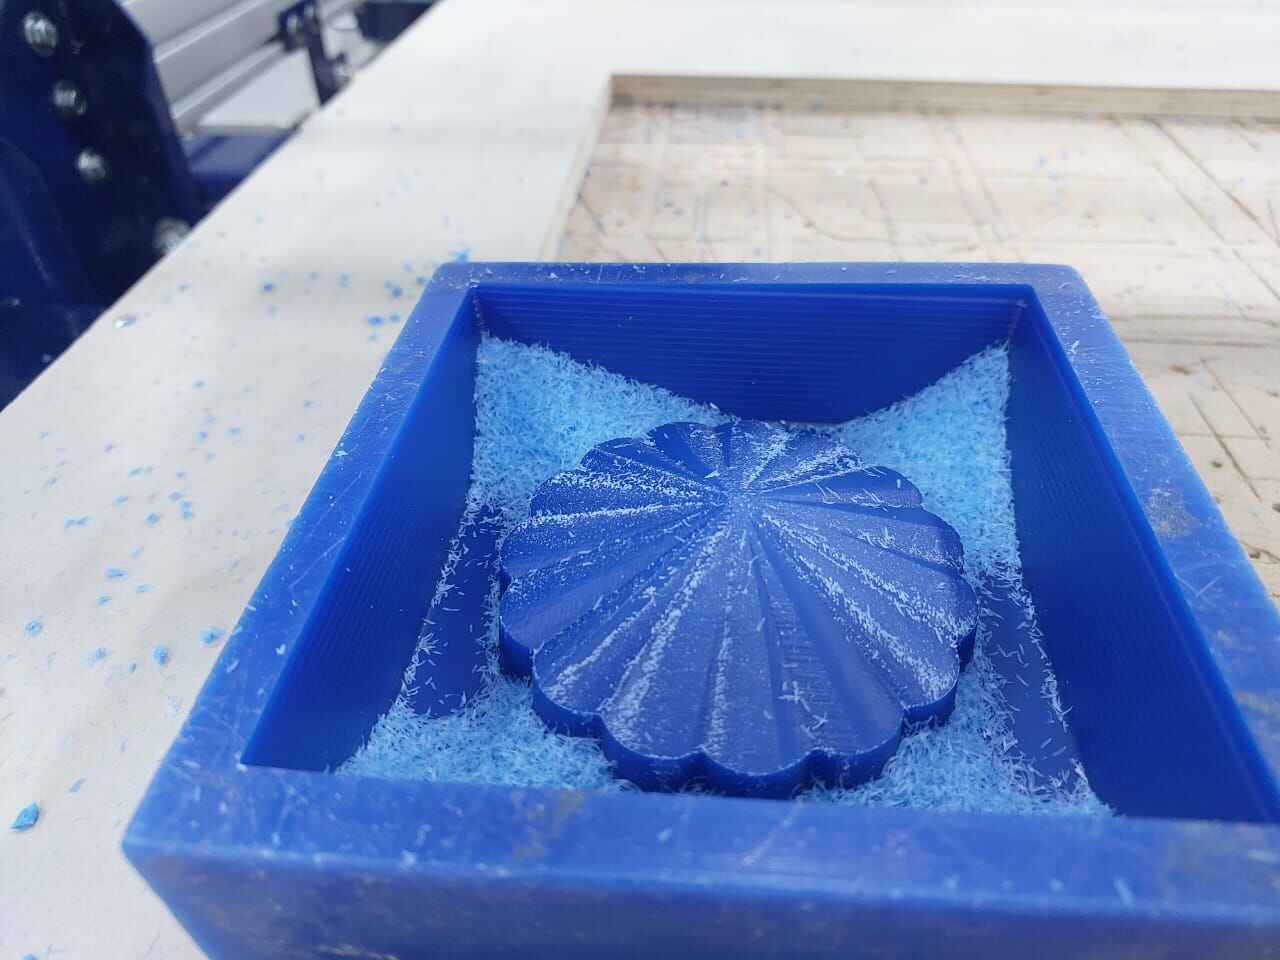
For the CAM process, I utilized Vcarve software in conjunction with a Shoppot router to create the mold. Vcarve offers several features tailored for 3D shapes, allowing for efficient simulation of the manufacturing process. The first step in the CAM process is 3D roughing toolpath. This toolpath removes the bulk of the material, creating a rough shape that closely resembles the final mold design. By specifying the appropriate cutting parameters such as tool selection, stepover, and depth of cut, I achieved an efficient roughing process that minimized machining time while maintaining the desired accuracy. Once the roughing toolpath was completed, I proceeded to the 3D finishing toolpath. This stage involved using a finer cutting tool to precisely carve the mold's surface and achieve the desired level of detail and smoothness. The finishing toolpath carefully removed any remaining material, resulting in a refined mold design with the desired contours and finish. By leveraging Vcarve software's simulation capabilities and utilizing the 3D roughing and finishing toolpaths, I successfully translated my mold design into machine instructions for the Shoppot router. This CAM process enabled me to accurately manufacture the mold, ensuring compatibility with the casting process.
so, I imported the STL file into Vcarve software, which allowed me to seamlessly transition from the 3D design phase to the CAM phase. Vcarve supports the import of STL files, ensuring that the intricate details and dimensions of the mold design were accurately preserved. Once the STL file was successfully imported into Vcarve,I could proceed with the CAM process
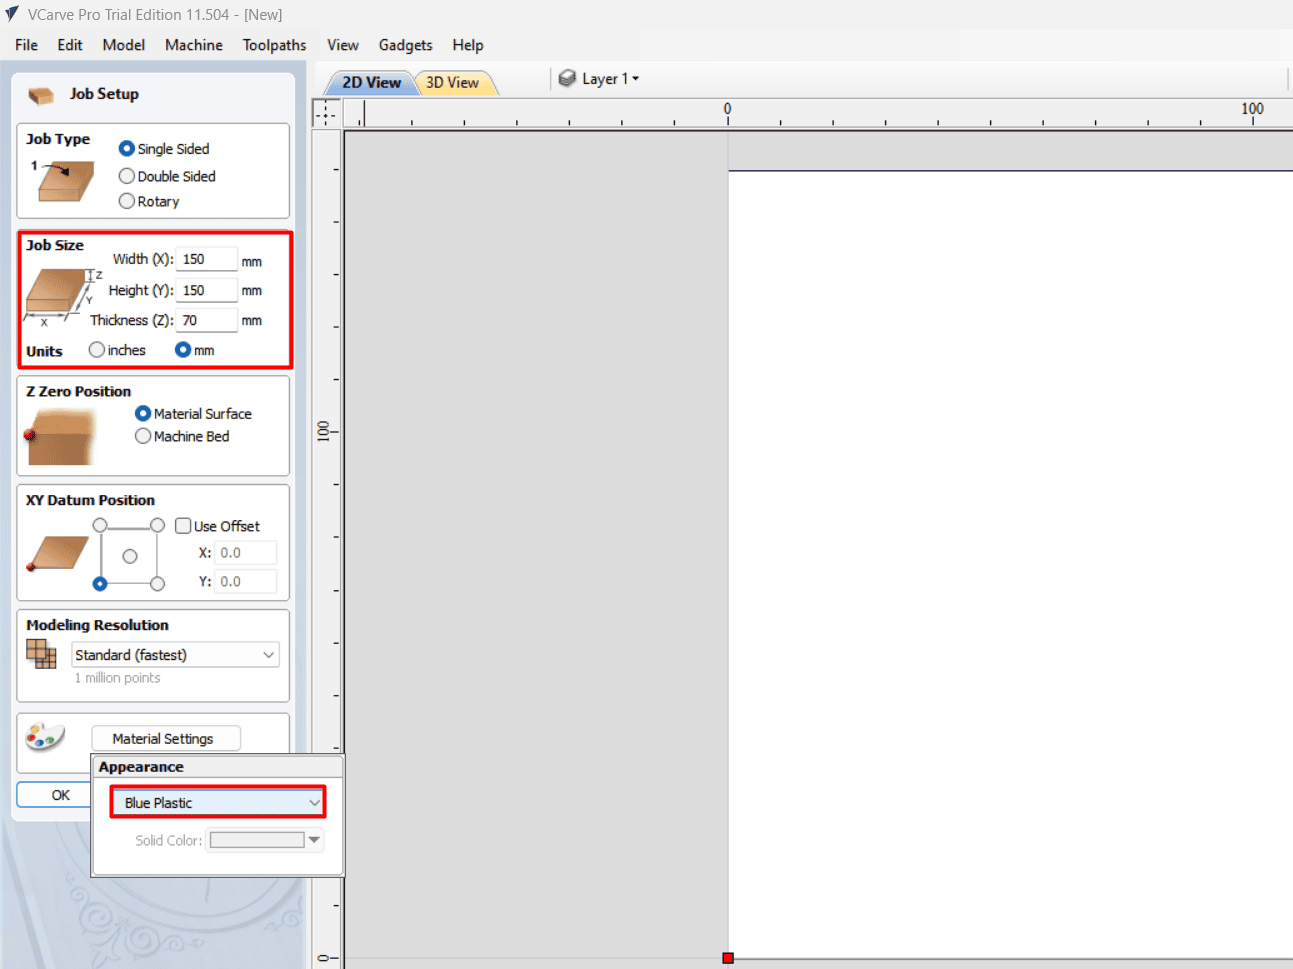
add the job setup for the piece that I will make the mold with ,dimension and material type
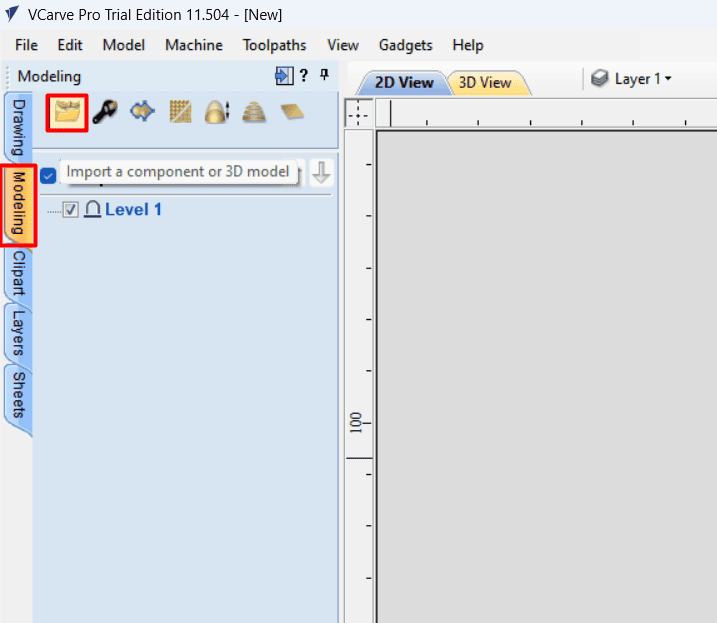
import stl model
position the model inside the cutting piece
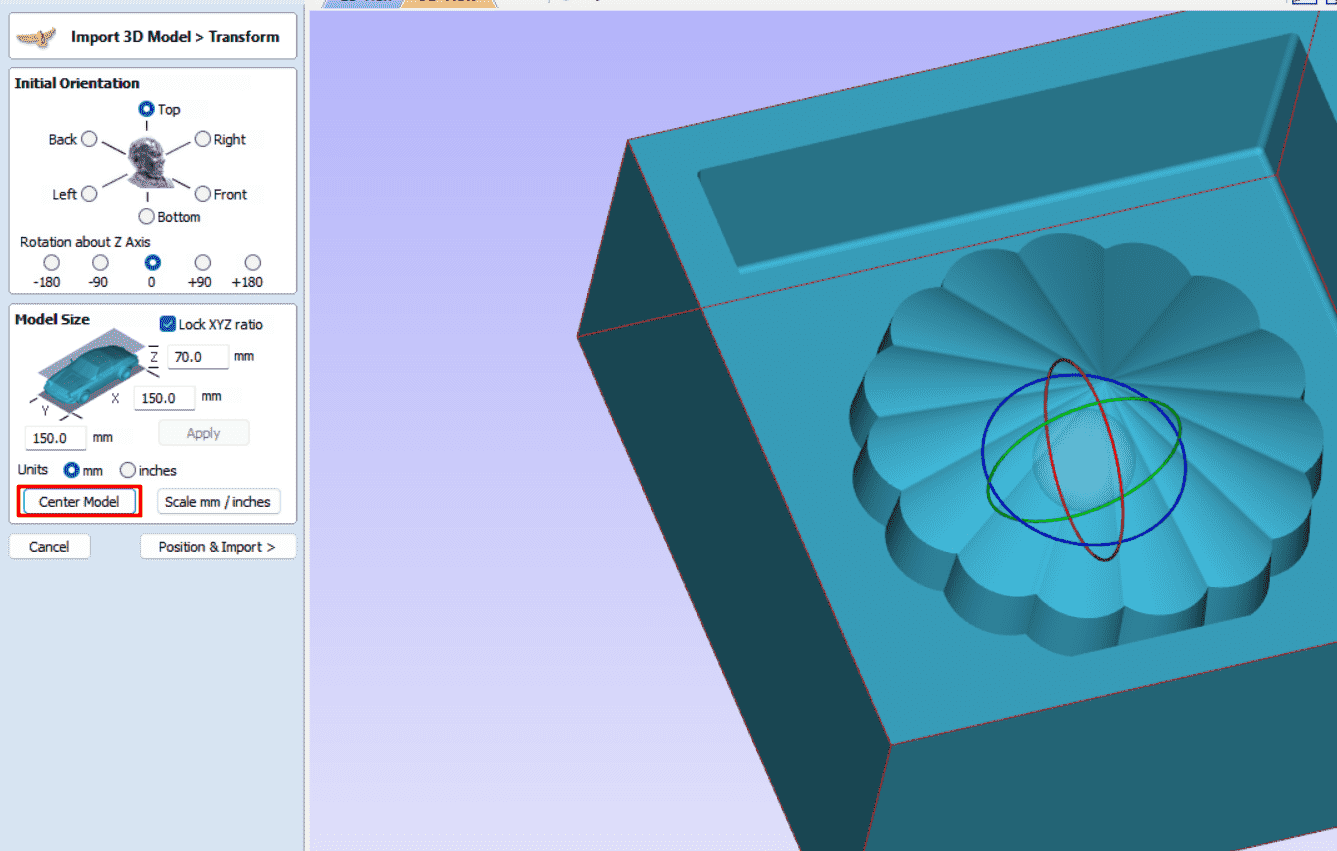
put model at the center then import
.png)
now for the roughing and finishing setup
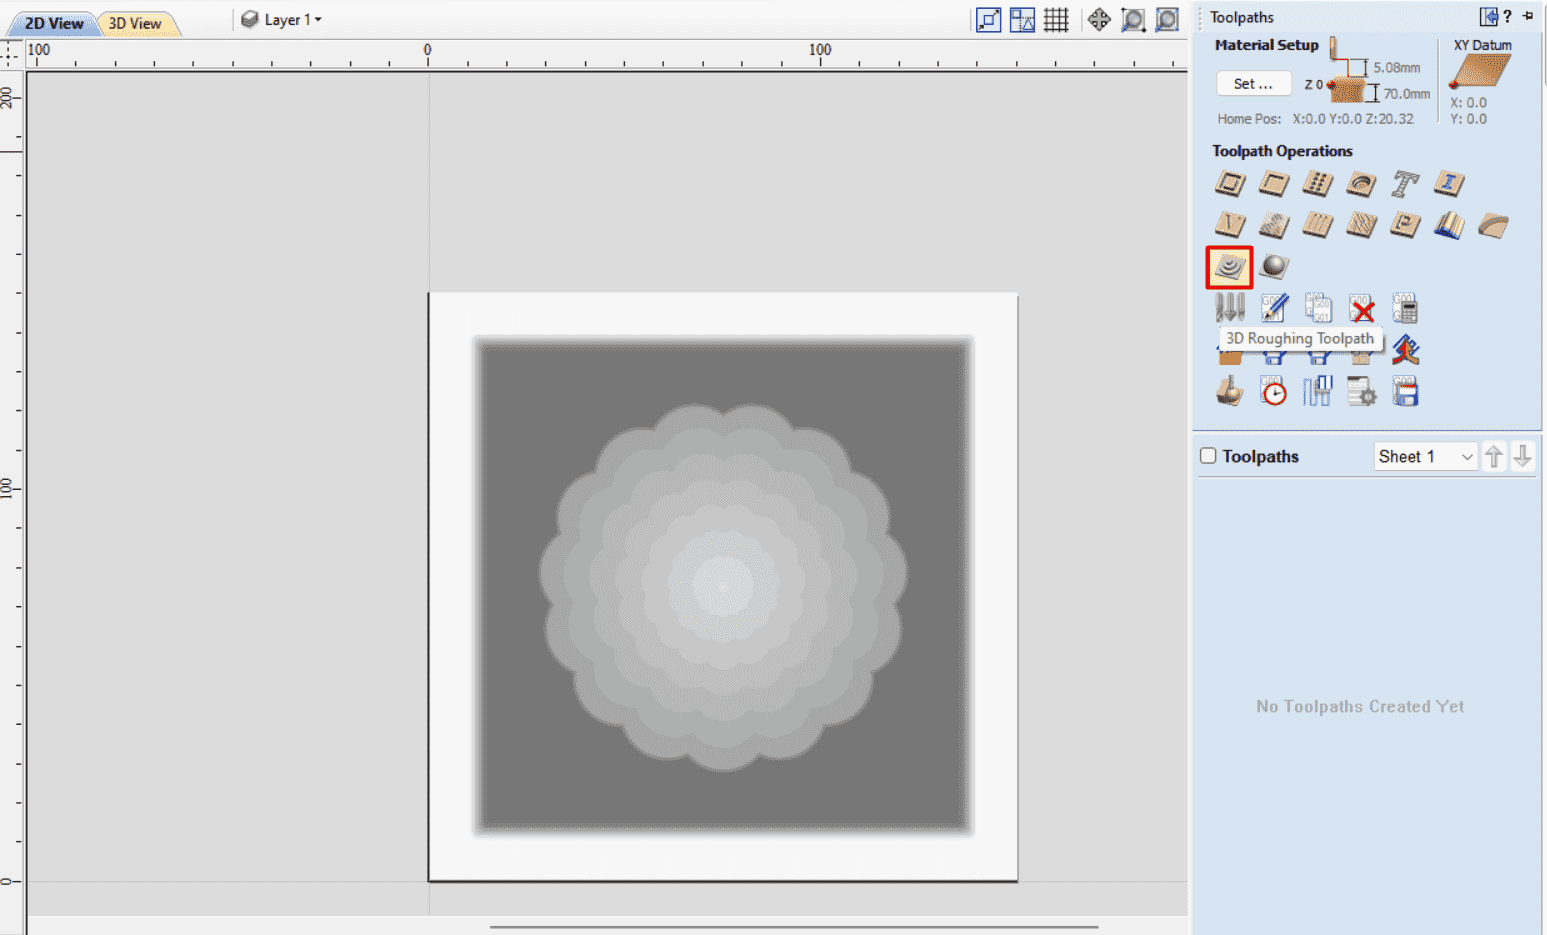
For the roughing cutting tool setup, I used a flat endmill with a 6 mm diameter. To control the cutting speed, I set the feed rate to approximately 0.8 inches per second. This ensured a steady and accurate machining process. In the roughing toolpath, I added clearance around the mold shape. This extra space allowed the finishing tool to work effectively and create a smooth surface. The stepover was set to 40%, determining how much overlap there was between each pass of the tool.
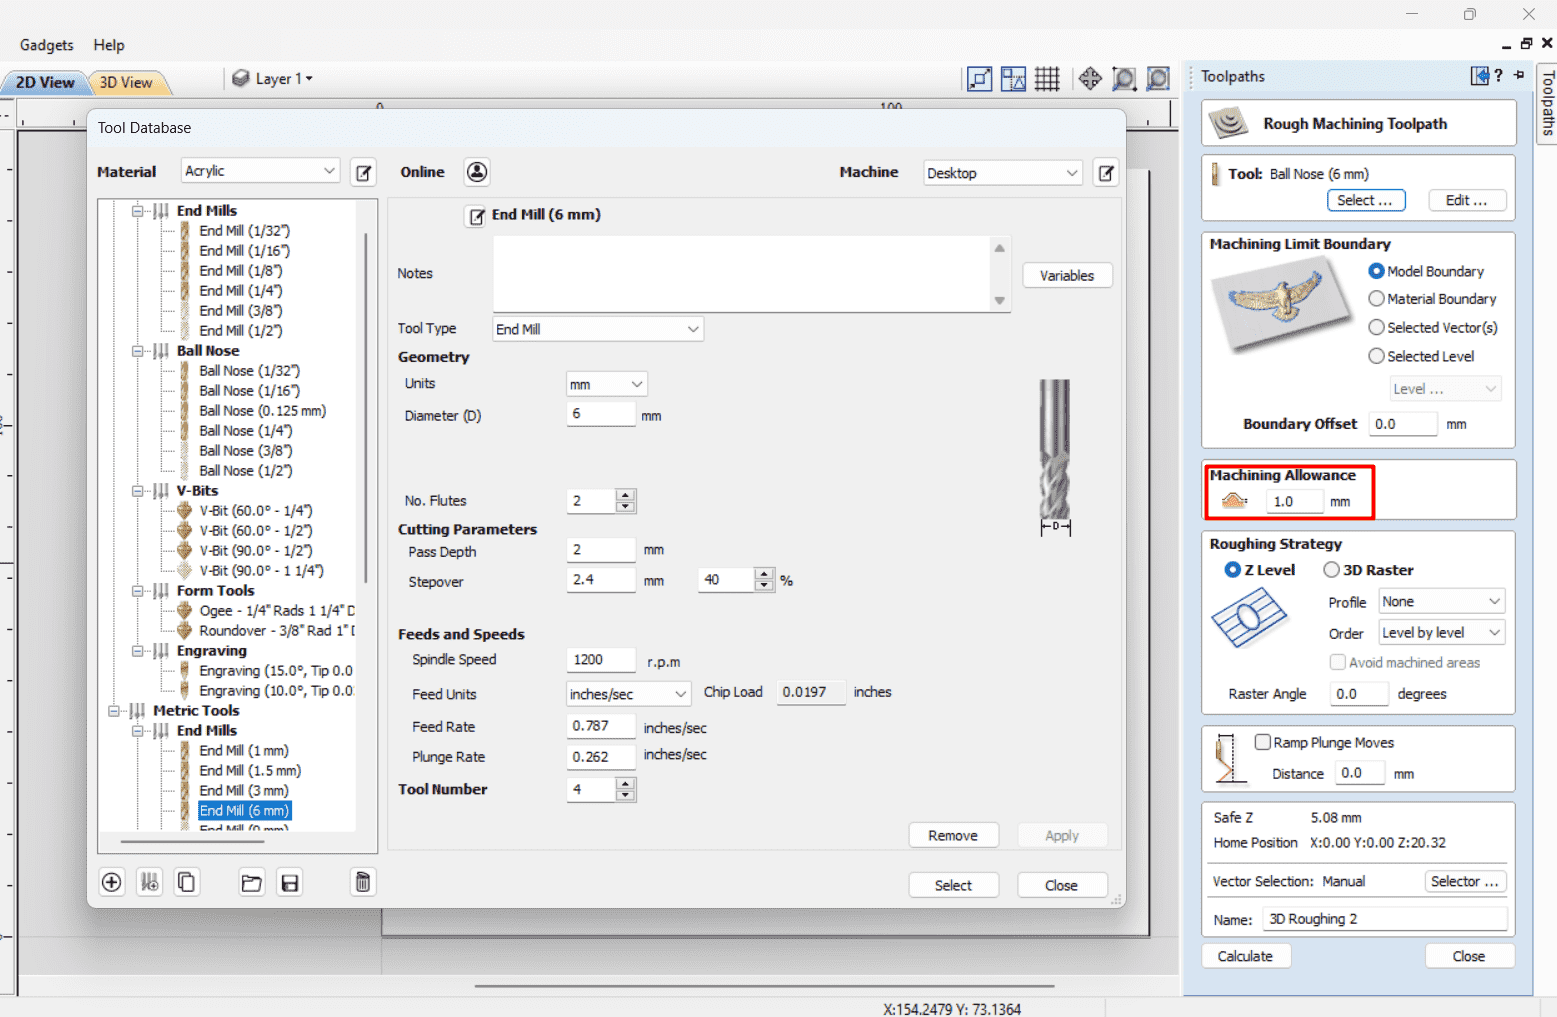
faltendmill tool
.png)
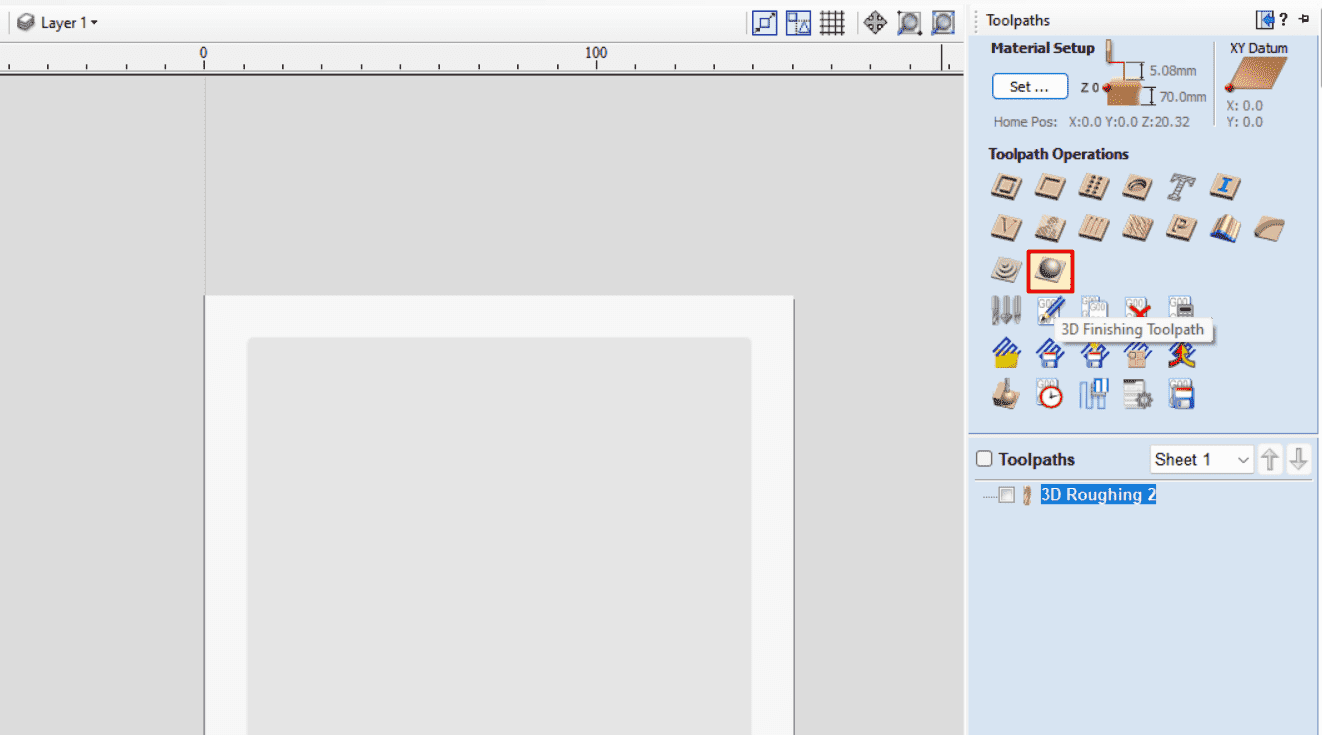
For the roughing cutting tool setup,I use tapperd tool, The tapered shape of the tool allowed for intricate details and contours to be accurately machined. The feed rate and plunge rate were set at approximately 1.8 inches per second ,it should be the same in order to maintain a consistent cutting speed during both horizontal and vertical movements. This ensured a smooth and uniform machining process. Additionally, I chose a stepover of 20%, which determined the amount of overlap between each tool path pass. This parameter influenced the balance between material removal and surface finish.
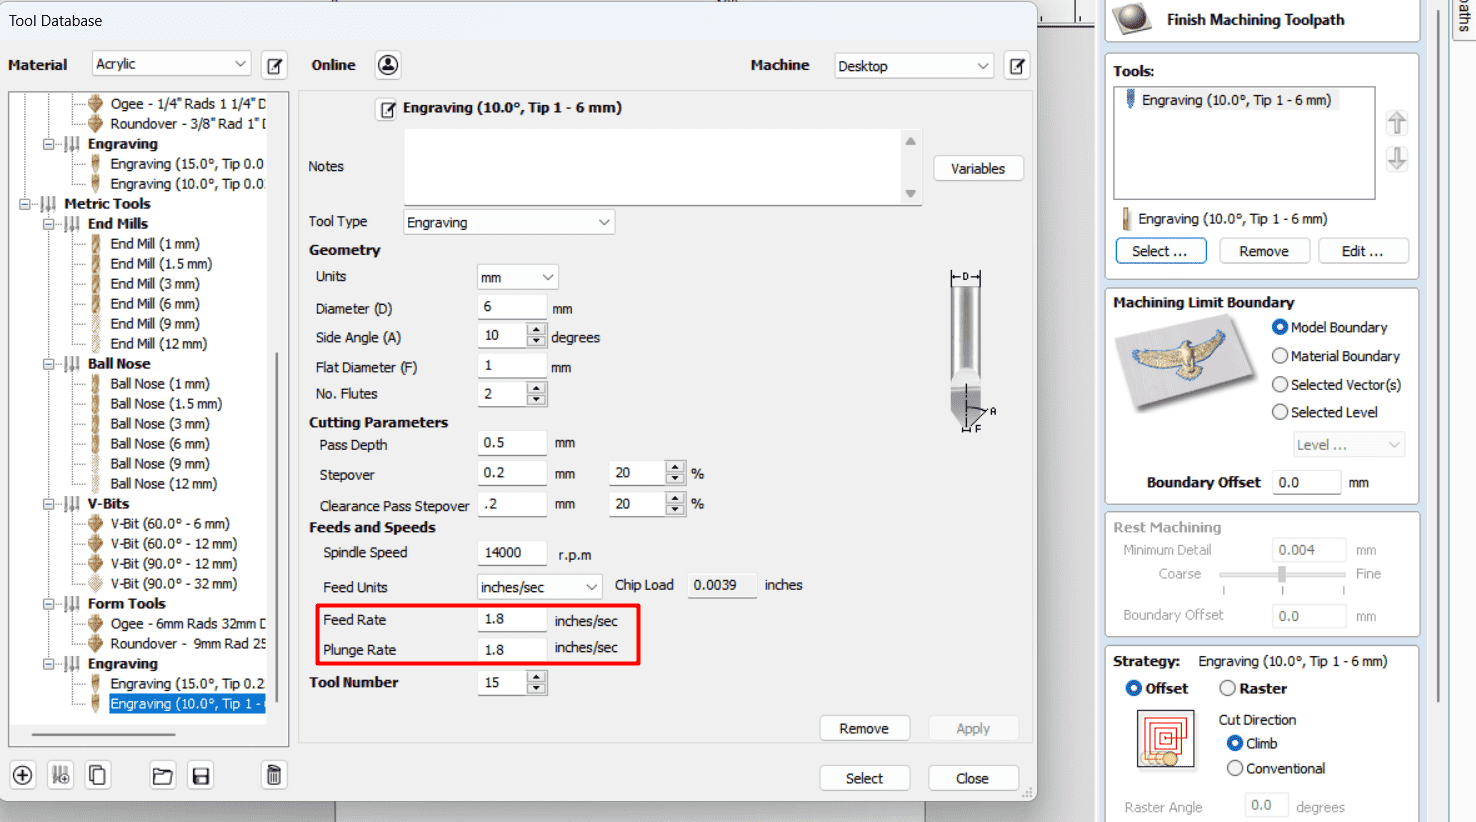
tappered tool
.png)
simulate tool paths and this is the result
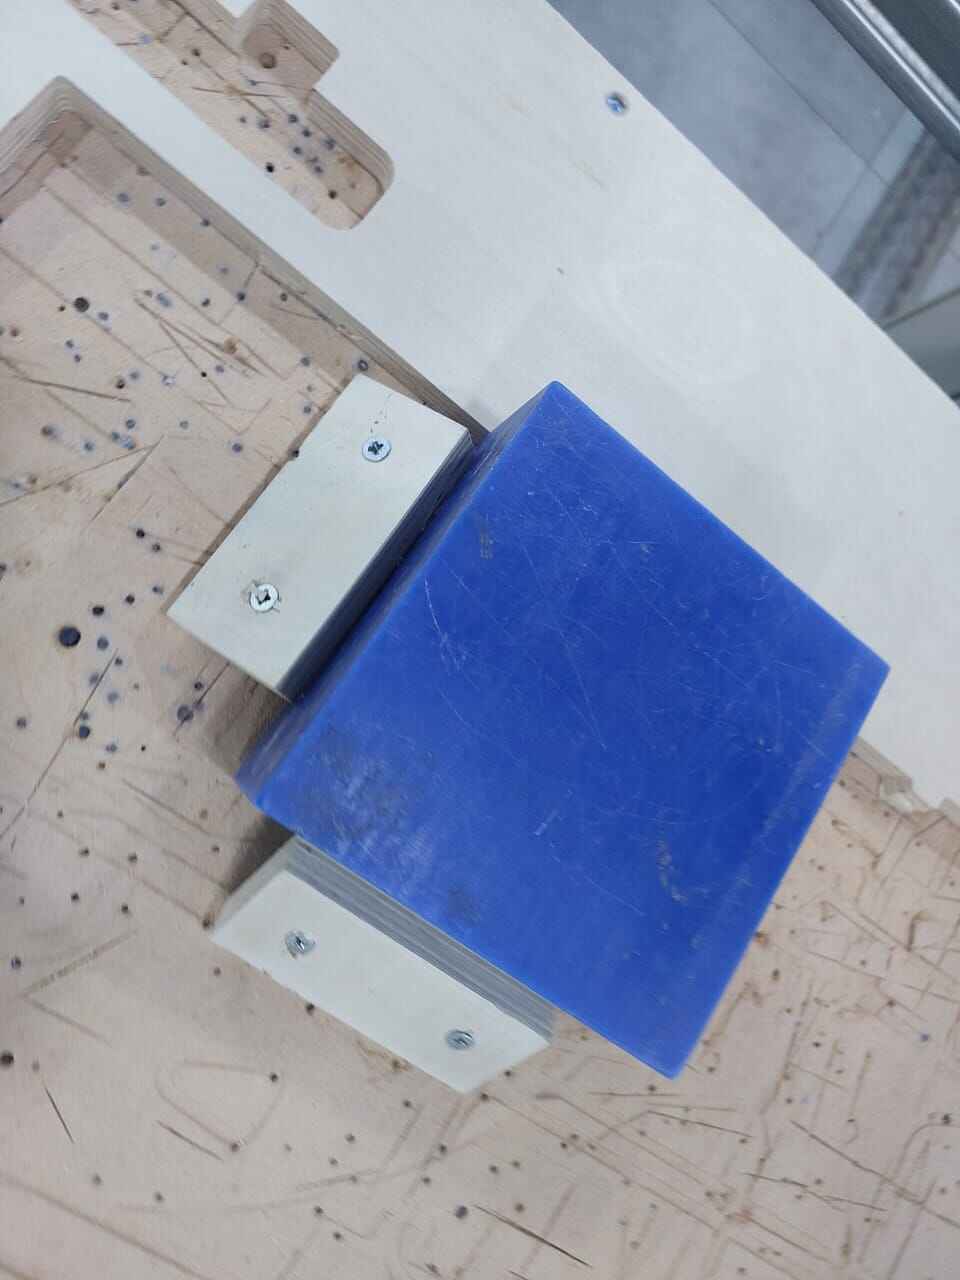
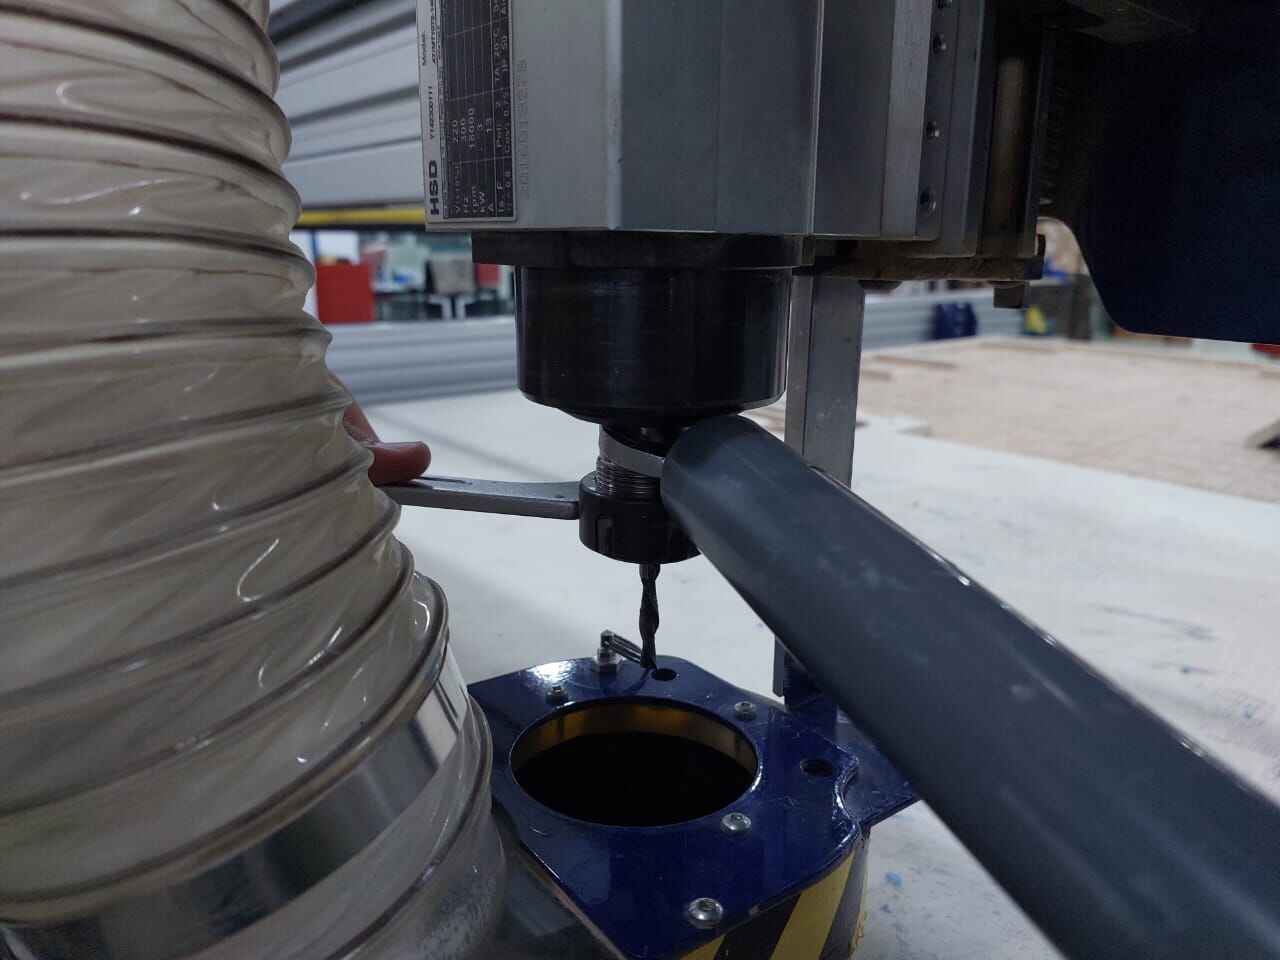
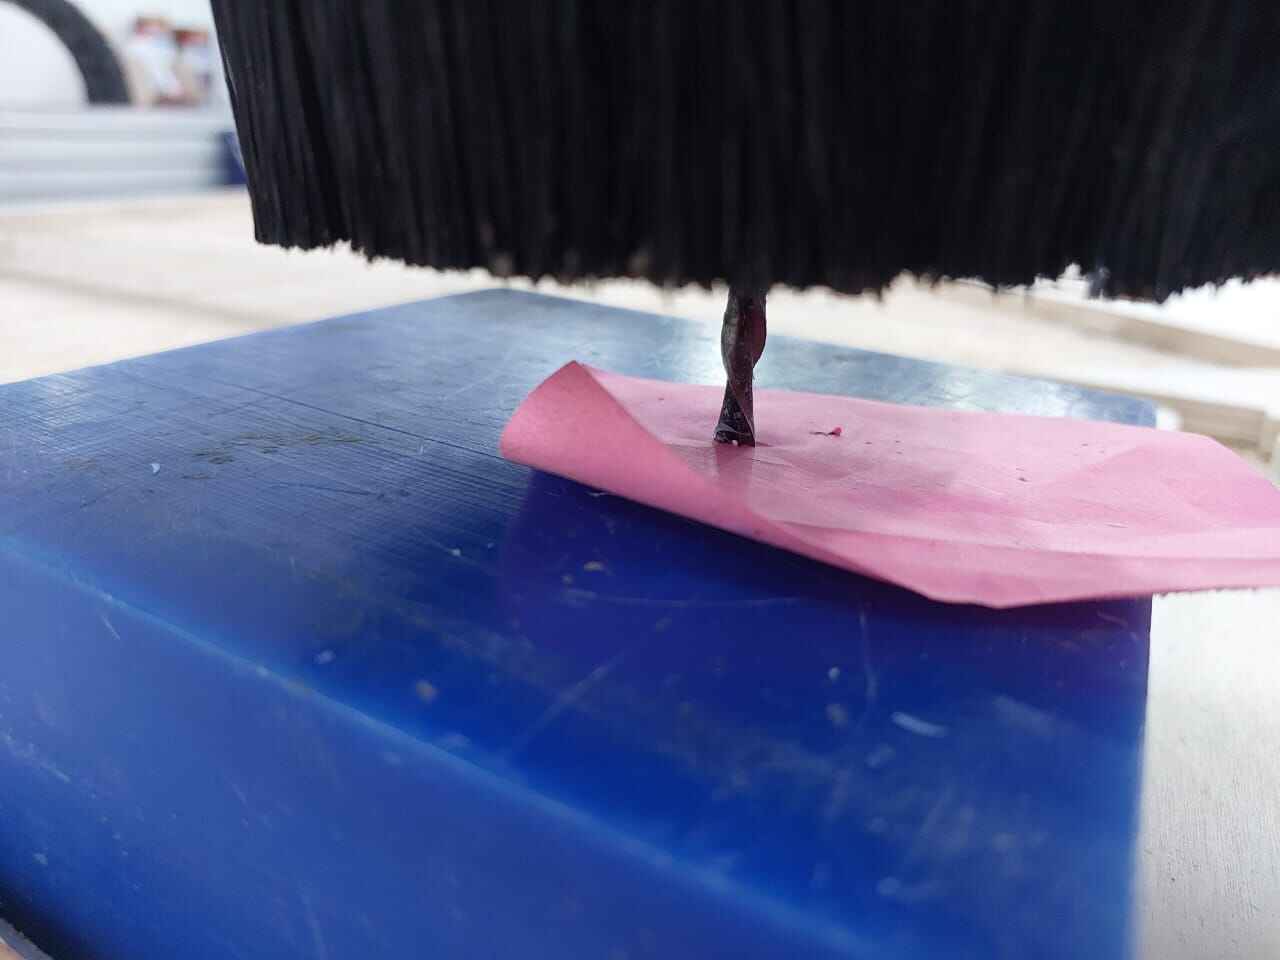
To secure the mold block, I used two inclined pieces of wood on the router bed. I switched the router tool to a 6 mm endmill and set the Z zero position from the mold block. Using Chopbot software, I ran the toolpath code to guide the router in cutting the mold.
fix the mold block at the router bed
change the tool
find the z zero
run the toolpath on choppot software
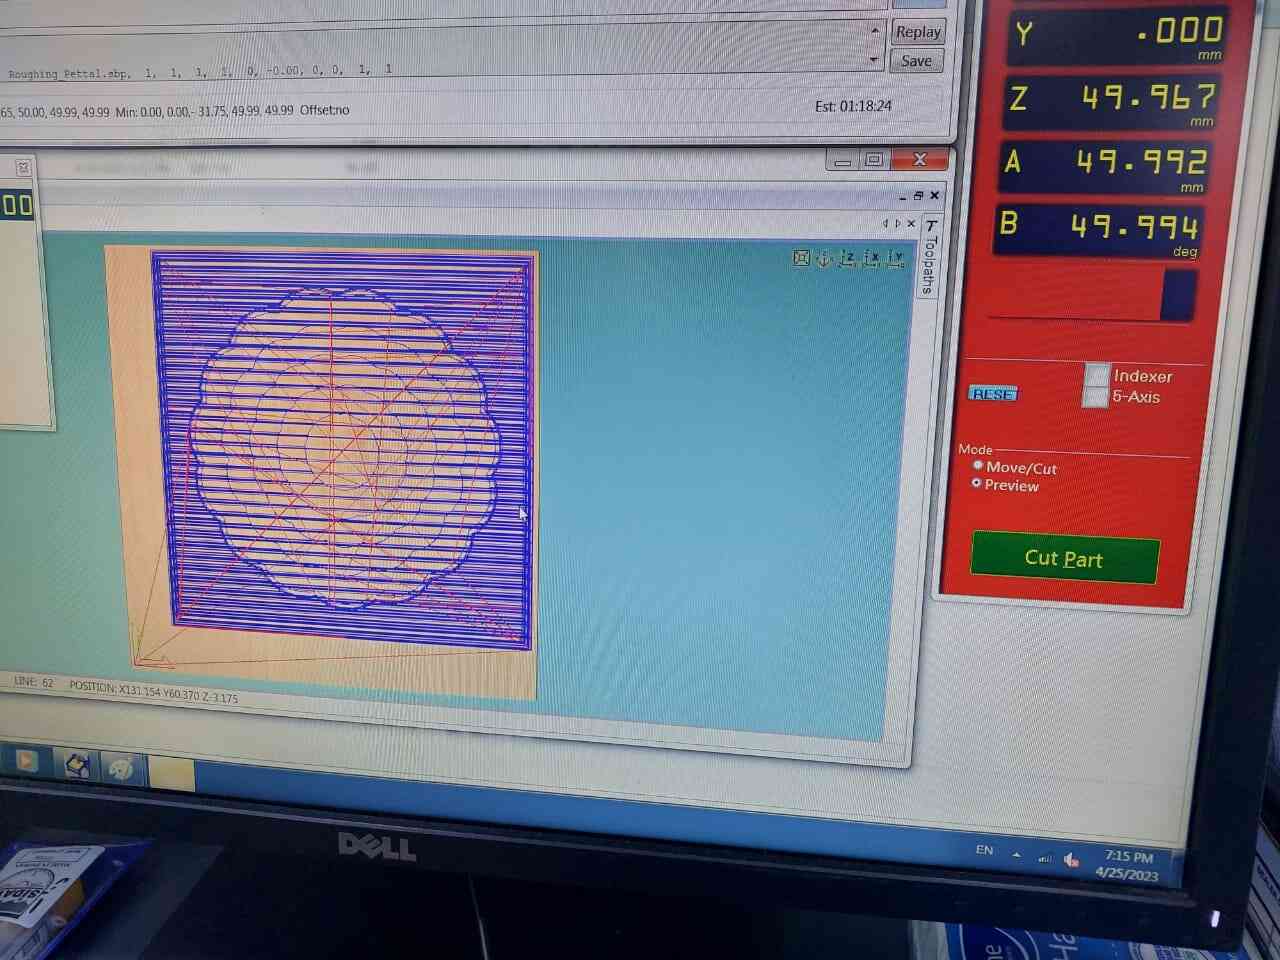
roughing result
finishing result
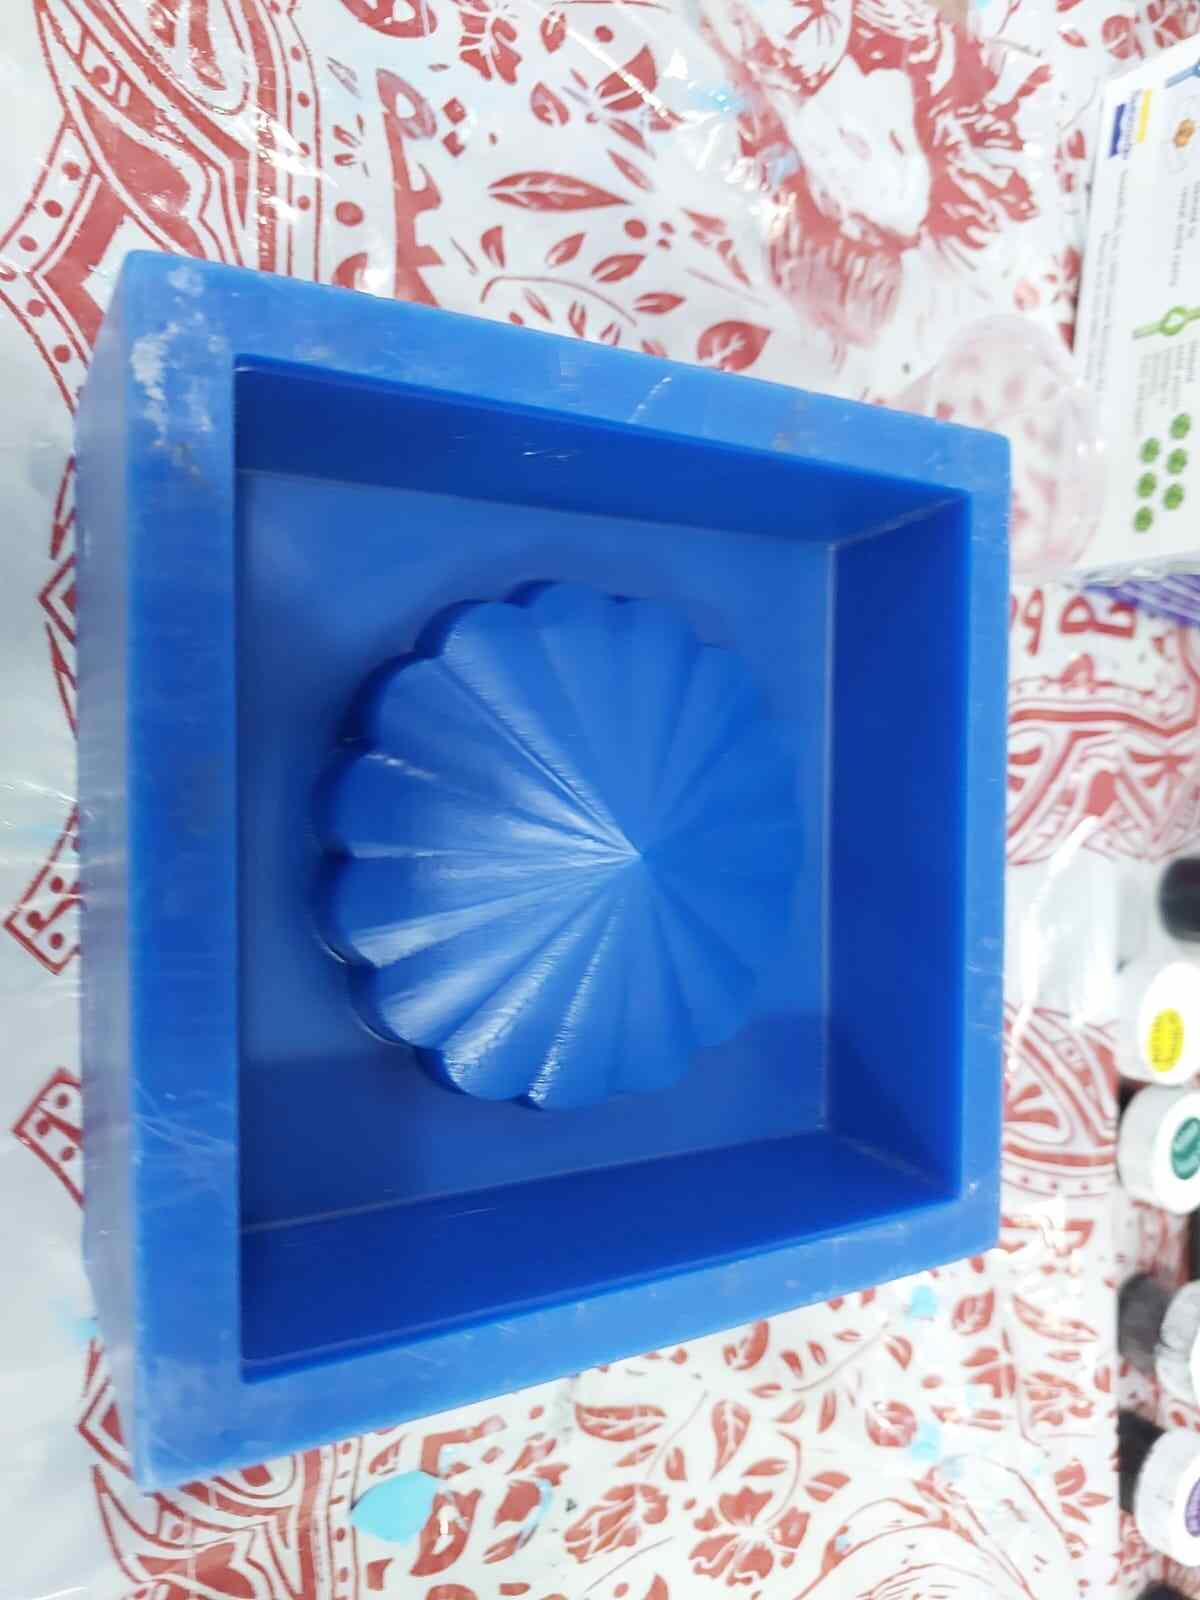
mold after cleaning and curing it with heat gun
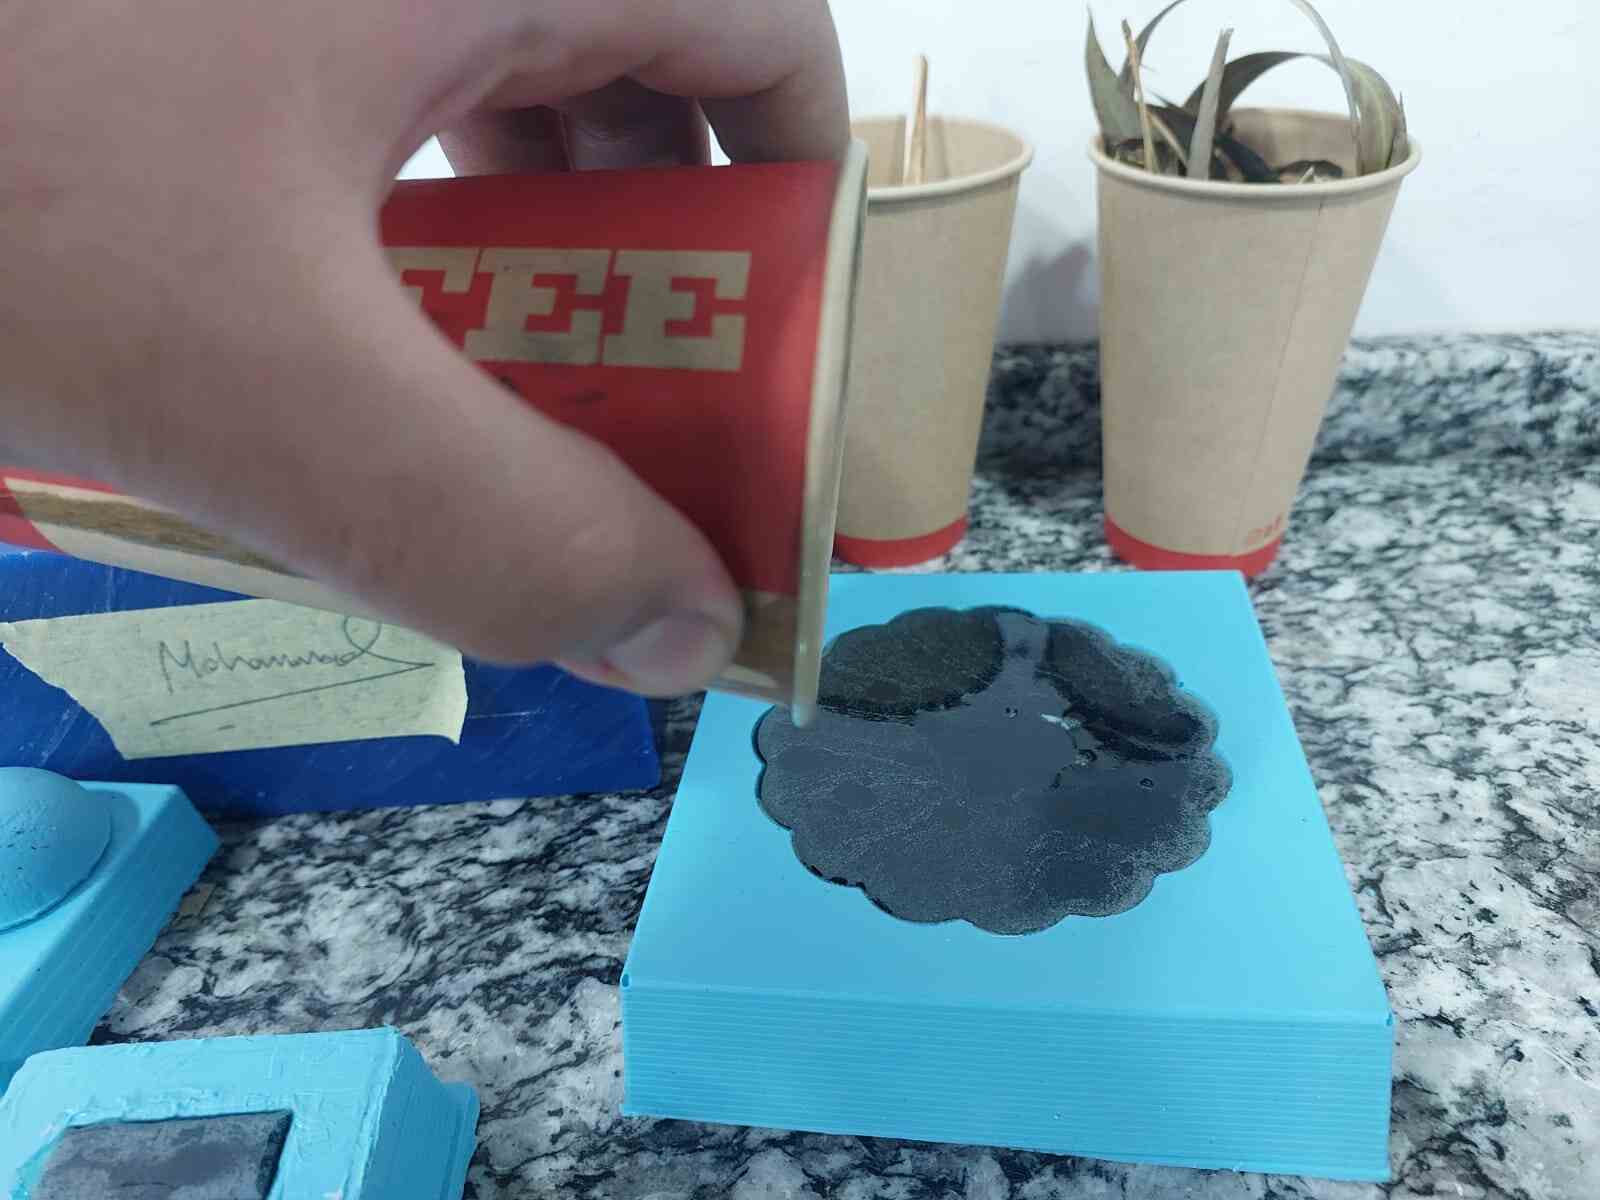
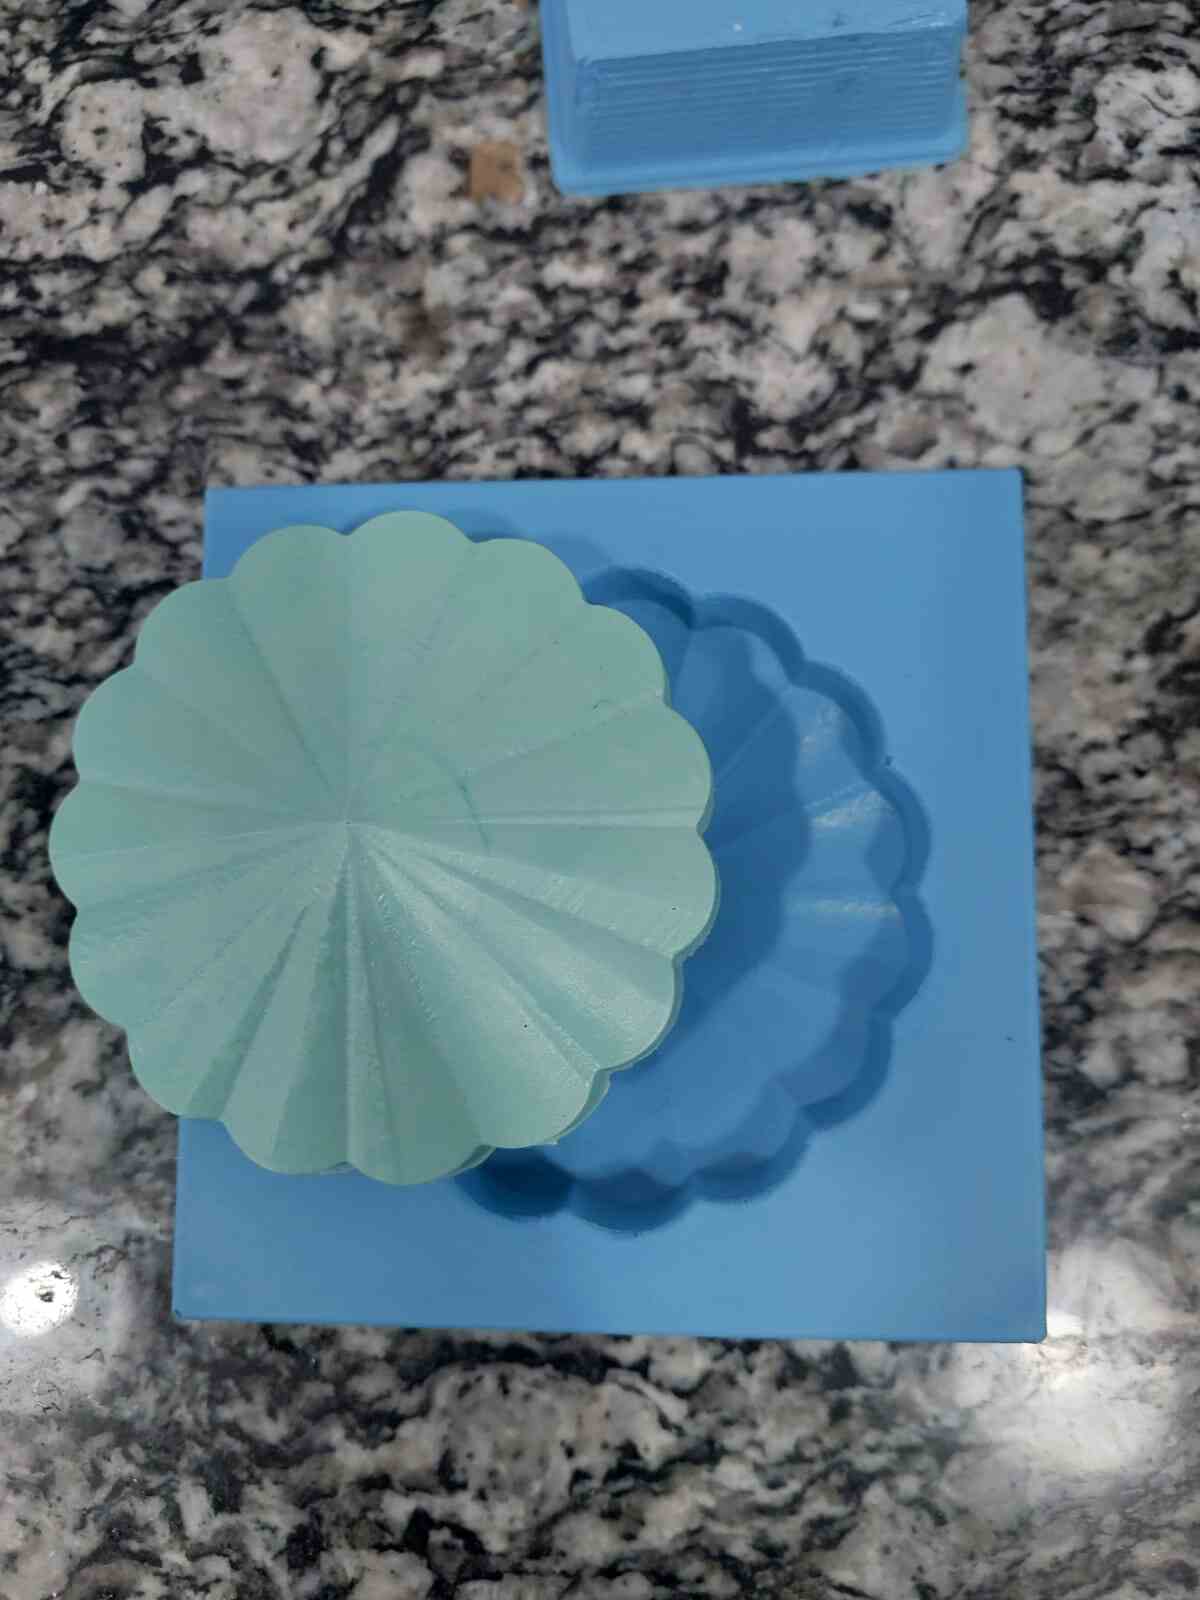
For the silicone mold, I opted for Oomoo 25 silicone rubber . To ensure the proper ratio, I used the weight method, mixing 100 parts of component A with 130 parts of component B. Once I measured the materials, I thoroughly mixed them until the color transformed into a uniform blue shade. Next, I carefully poured the mixed silicone rubber into the mold, making sure to distribute it evenly. To eliminate any potential air bubbles, I gently shook the mold and utilized a torch to remove bubbles that may have formed on the surface. After allowing the silicone to cure for approximately 75 minutes, following the recommended time mentioned in the datasheet, I retrieved my rubber mold. To create the actual piece, I turned to Smooth-Cast™ 305 liquid plastic . By weighing and combining 100 parts of component A with 90 parts of component B, I achieved the desired weight ratio for the mixture. The liquid plastic took approximately 30 minutes to fully cure.
silicone rubber quickly data sheet
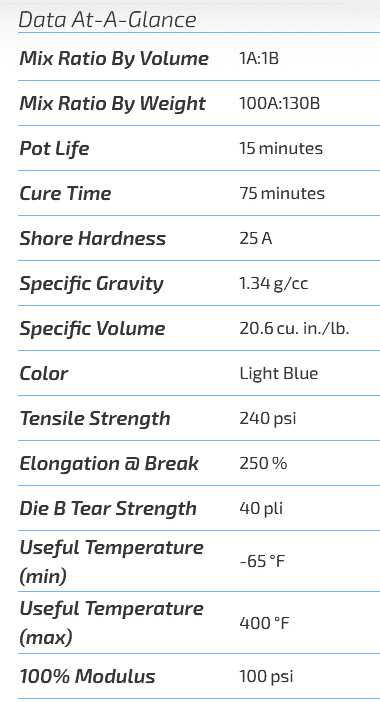
add material A and B by weight
mix material in good way
pour mixture
rubber mold is ready
using liquid plastic,quickly Data sheet ,I used the weight ratio for mixing
pouring the liquid plastic in the rubber mold
finally my master piece
Molding and Casting Week Conclusion
Throughout the molding and casting week, I had the opportunity to work with silicon and create beautiful molds of various objects. One of my favorite creations was a delicate flower mold that turned out to be incredibly detailed and visually appealing.
The process of molding and casting allowed me to explore my creativity and learn new techniques. Working with silicon was a fascinating experience as it offered flexibility, durability, and high fidelity in capturing intricate details.
The satisfaction I felt upon demolding the flower and seeing the final result was indescribable. The level of detail and the faithful reproduction of the original flower surpassed my expectations. It served as a testament to the capabilities of molding and casting techniques.
Not only did this project provide me with a beautiful decorative piece, but it also gave me valuable knowledge and skills in the field of molding and casting. I gained insights into material properties, mold preparation, and casting techniques, which I can apply to future creative endeavors.
I am incredibly proud of the outcome of my molding and casting week, and the flower mold will serve as a cherished reminder of my journey and the possibilities that lie within the world of mold making and casting.
Overall, this experience has been fulfilling and has sparked my passion for exploring further in the realm of molding and casting. I look forward to embarking on new projects and continuing to refine my skills in this captivating craft.
.svg)

