Week : Interface & Application Programming
Group Assignments:
Group assignment
In our group assignment, we explored different tools and platforms used for creating interactive applications. Here are the tools we discussed:
1- Processing: Processing is a powerful software sketchbook and programming language that simplifies the creation of interactive media, such as visual arts, animations, and multimedia applications. It provides a user-friendly interface, an integrated development environment (IDE), and a set of libraries that aid in coding and creative expression. With Processing, artists, designers, and programmers can bring their ideas to life through visual and interactive projects.
Example: Creating a simple animation of a bouncing ball on a canvas using Processing or making a game.
2- MIT app inventor:MIT App Inventor is a cloud-based tool that allows users to create mobile applications for Android devices without prior programming experience. It offers a drag-and-drop interface for assembling app components and a block-based programming language for defining app behavior. This platform enables individuals to transform their app ideas into reality quickly.
Example: Developing a mobile app that provides access to Fab Academy course materials, including lecture videos, assignments, and community forums.
3- Jupyter: Jupyter: Jupyter is an open-source web application widely used in scientific computing, data science, and machine learning. It enables users to create and share documents (notebooks) containing live code, equations, visualizations, and narrative text. Jupyter notebooks facilitate interactive data analysis, exploration, and collaboration.
Example: Using a Jupyter notebook with Python to analyze and visualize a dataset, such as plotting a line chart of some data.(similar to excel sheet) but jupyter notebooks provide a more flexible and customizable environment compared to Excel.
4- Bubble: Bubble: Bubble is a visual programming platform that empowers users to build web and mobile applications without coding. Its drag-and-drop interface simplifies the creation of user interfaces and allows for customization. Bubble offers hosting and scalable infrastructure for launching and running applications in the cloud.
Example: Building a web-based platform with Bubble for Fab Academy students and instructors to collaborate, share project documentation, and provide feedback on each other's work (That would add some fun).
In conclusion, we explored various tools and platforms for creating interactive applications. We discussed Processing, which is a versatile software sketchbook for visual arts and multimedia projects. MIT App Inventor was another tool we examined, enabling the creation of mobile apps without coding(just adding blocks). Jupyter, on the other hand, offered a flexible environment for data analysis and visualization. Lastly, Bubble stood out as a visual programming platform for building web and mobile applications. Overall, this assignment provided us with insights into diverse tools that facilitate interactive application development, catering to different skill sets and project requirements.
Individual Assignment:
for this week I need to write an application that interfaces a user with an
input &/or output device that I made ,so for me I will create an app that used
BlE connection to control microcontroller with led and buzzer
so I will use mit app inventor to build my app
,so in mit app inventor you will firstly sign uo to there website then just click on create app and an interface
with multiple bar will appear ,in mit app inventor there are two main pages designer and block pages
,one for controlling the user interface part and the other to control the logic behind the user interface
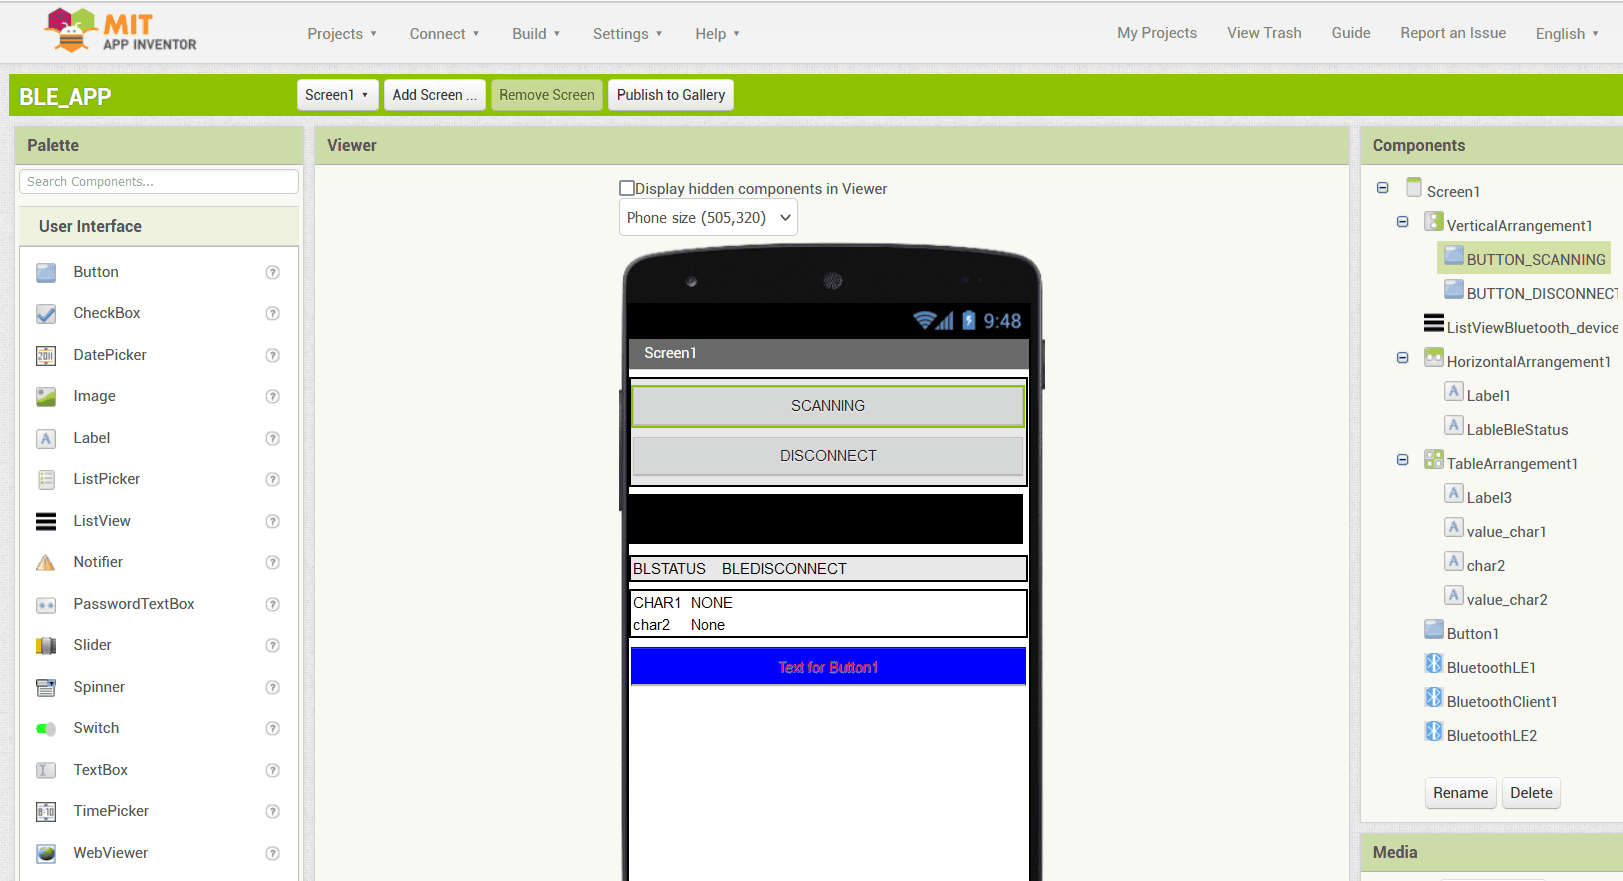
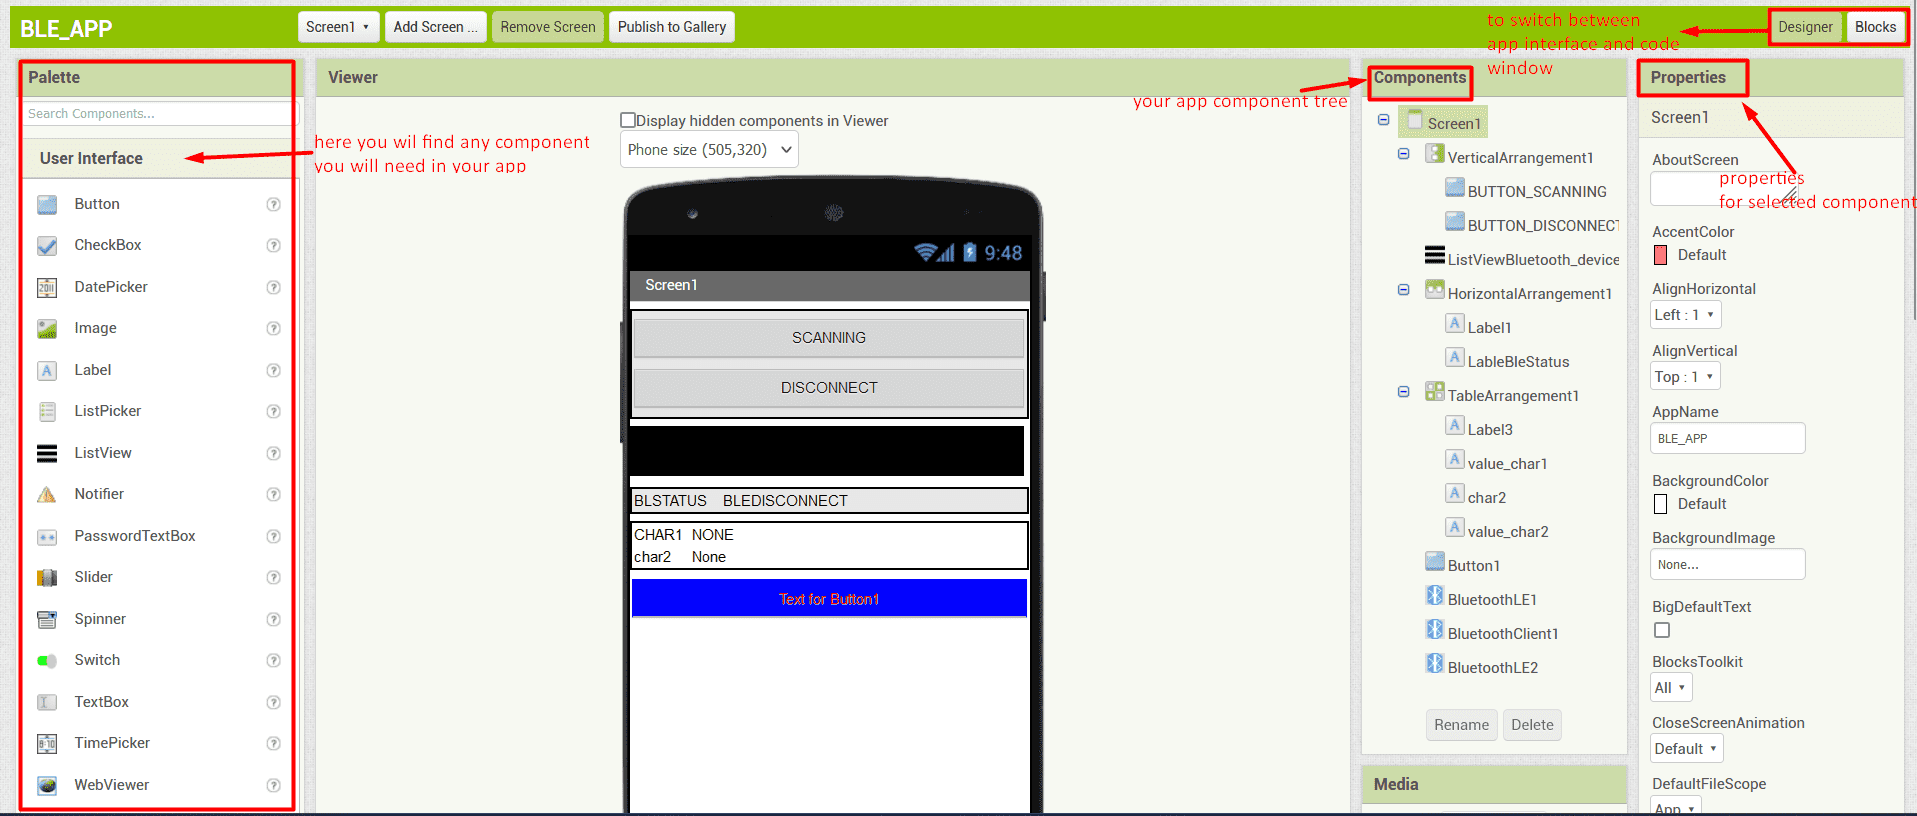
Here are some of the tools available in the Designer window:
- Palette: The Palette is located on the left side of the Designer window and contains all the components that can be added to the user interface of your app, such as buttons, text boxes, images, and more.
- Viewer: The Viewer displays a live preview of your app as you design it. This allows you to see how your app will look and behave as you add and adjust components.
- Component Tree: The Component Tree is located on the right side of the Designer window and displays a hierarchical view of all the components in your app. You can use this tool to organize and manage the components in your app.
- Properties: The Properties panel displays the properties of the currently selected component, such as its size, color, text, and other attributes. You can use this tool to customize the appearance and behavior of your app components.
- Media: The Media panel allows you to upload and manage media files, such as images and sounds, that you want to use in your app.
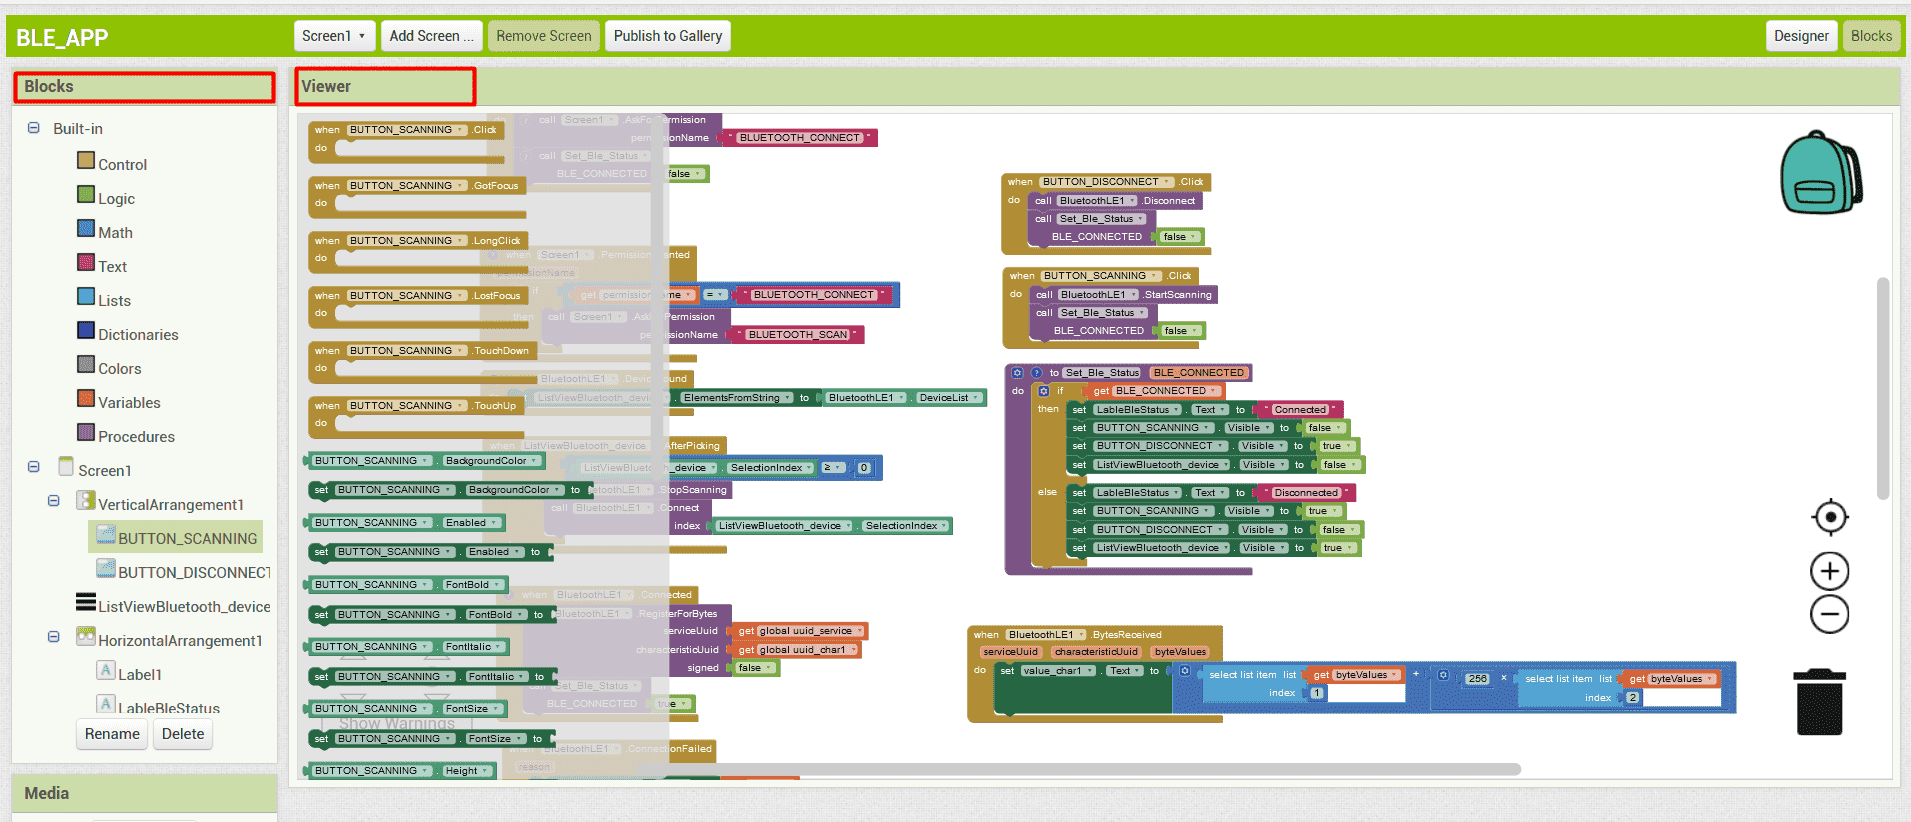
And here are some of the tools available in the Blocks Editor window:
- Block Palette: The Block Palette is located on the left side of the Blocks Editor and contains all the blocks that can be used to create the logic of your app. These blocks are organized into different categories, such as "Control," "Logic," "Math," "Text," and more.
- Blocks Viewer: The Blocks Viewer is located in the center of the Blocks Editor and displays the blocks that you have added to your app. You can drag and drop blocks from the Block Palette onto the Blocks Viewer to create your app's logic
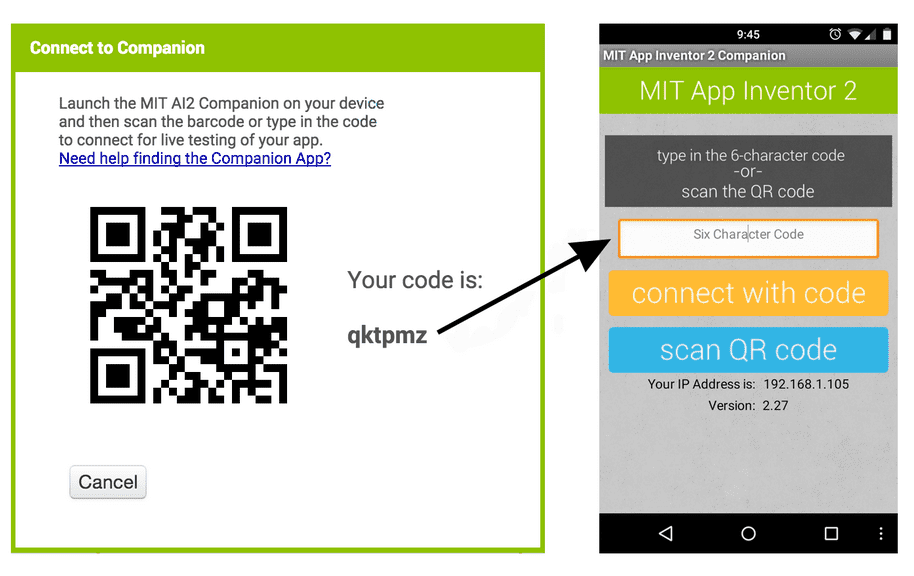
now to connect your app and simulate it on your phone you should download MIT AI2 Companion app on your phone then Go to App Inventor and open a project ,Choose “Connect” and “AI Companion” from the top menu in your browser , A dialog with a QR code will appear on your PC screen. On your device, launch the MIT App Companion app just as you would do any app. Then click the “Scan QR code” button on the Companion, and scan the code in the App Inventor window ,Within a few seconds, you should see the app you are building on your phone.


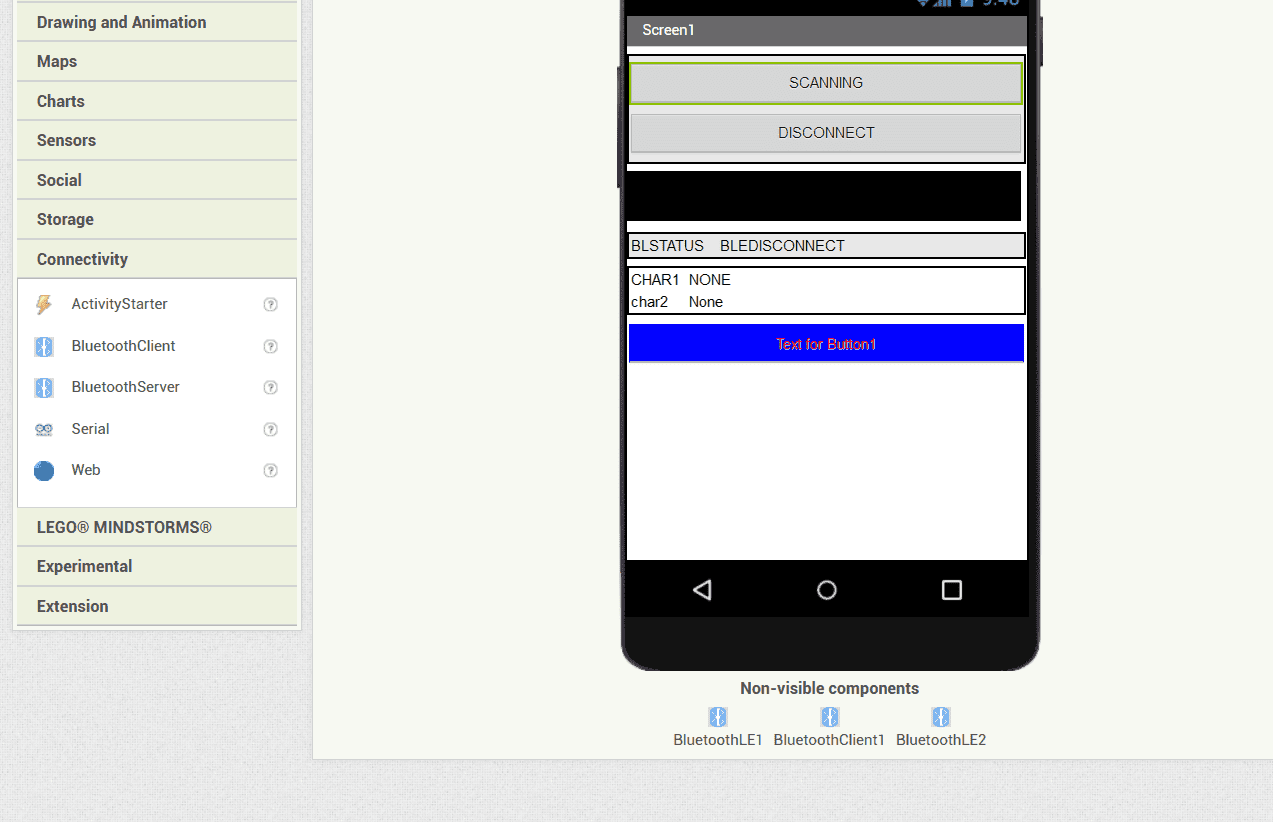
It's worth mentioning that in order to include BLE connection functionality in your app, you need to download an extension and then drag and drop it into your app. I initially faced a problem where my app couldn't request permission to use Bluetooth on my phone, which seems to be a common issue. To solve this, I added a dummy client Bluetooth connection component to my app.
The second issue I encountered was that even after scanning for devices to connect with, I couldn't establish a connection with any of them. However, I discovered that there is a new version of the BLE extension that addresses this problem, so I simply added it to my app to resolve the issue.
dummy client Bluetooth connection component
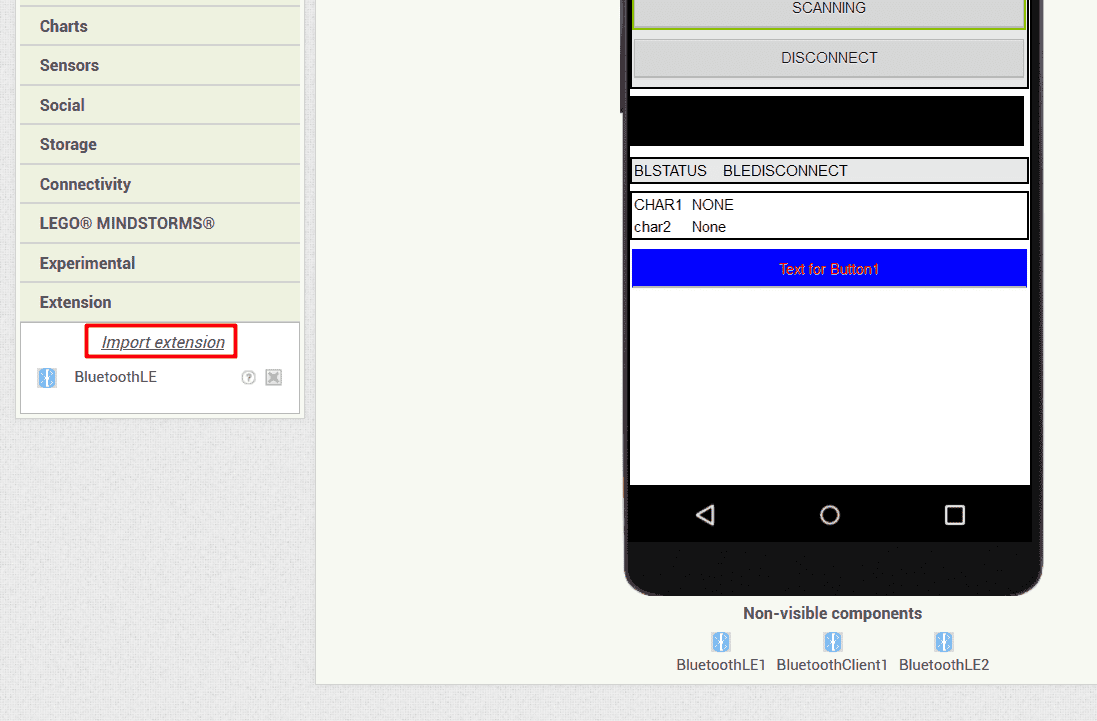
here you can import the extension that you need , In Non-visible components you can find the extensions that I used
lets make a fast look for the block code that I used inside my app to control other device, coding inside mit inventor are colorful and make it visually understandable
Define variable that I will use for uuid and characteristic...so colorful

This block of code will run when the app initially start

This block will ask the user to give permission to the app to use device bluetooth

This block put all the active bluetooth device to the user in a list

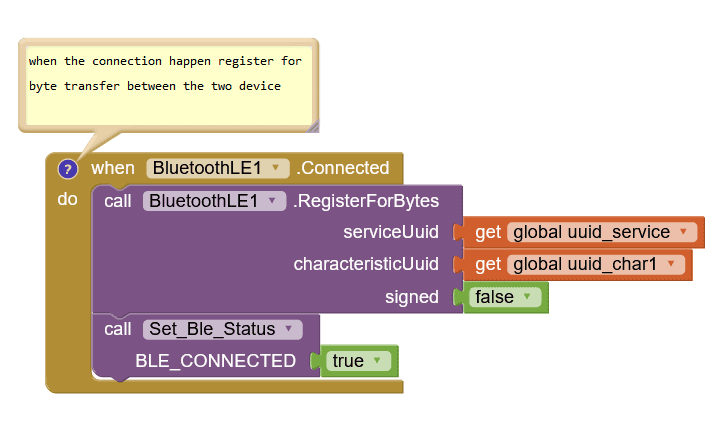
This block will run after the user pick a device from the list and make the connection with it
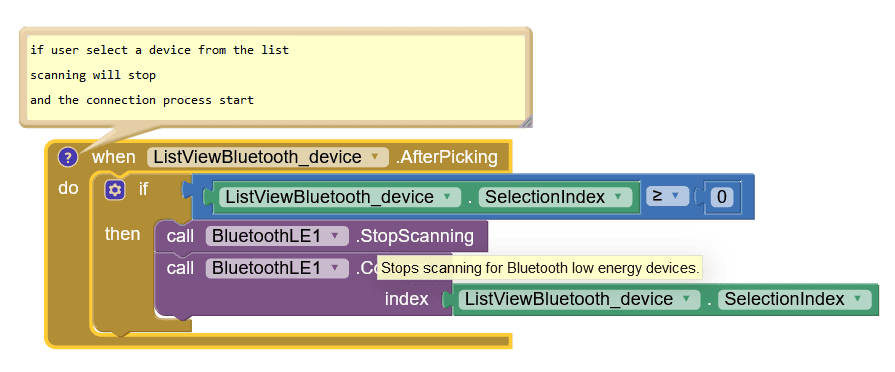
This block will register for bytes transfer between the devices after connection
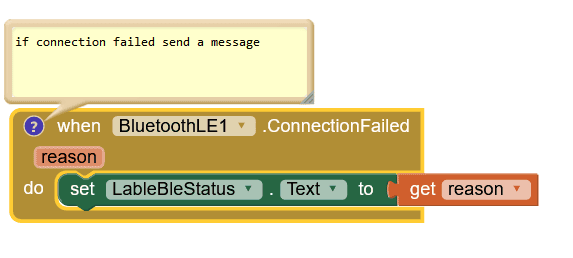
This block will send message if the connection failed
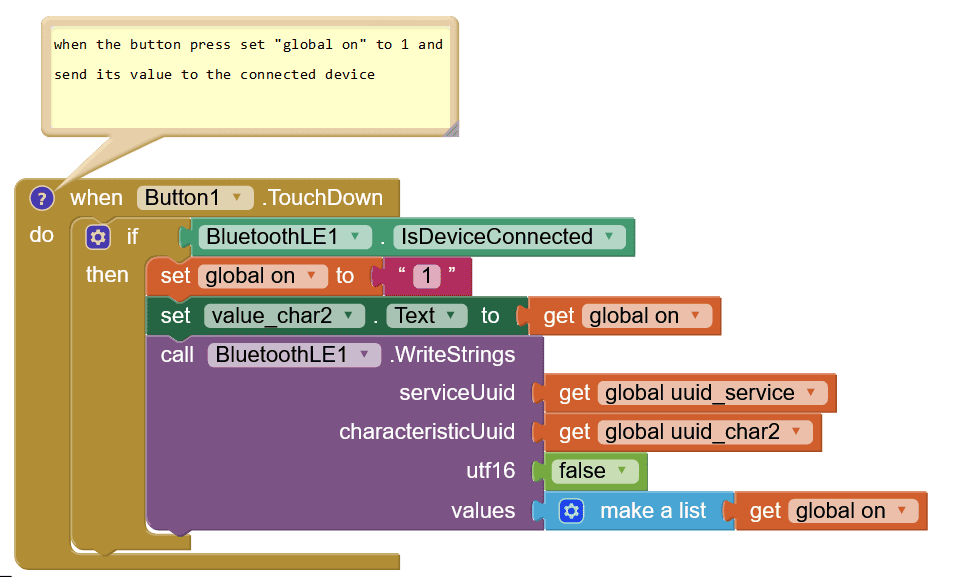
This block will run and send data to the connected device when the user press the button
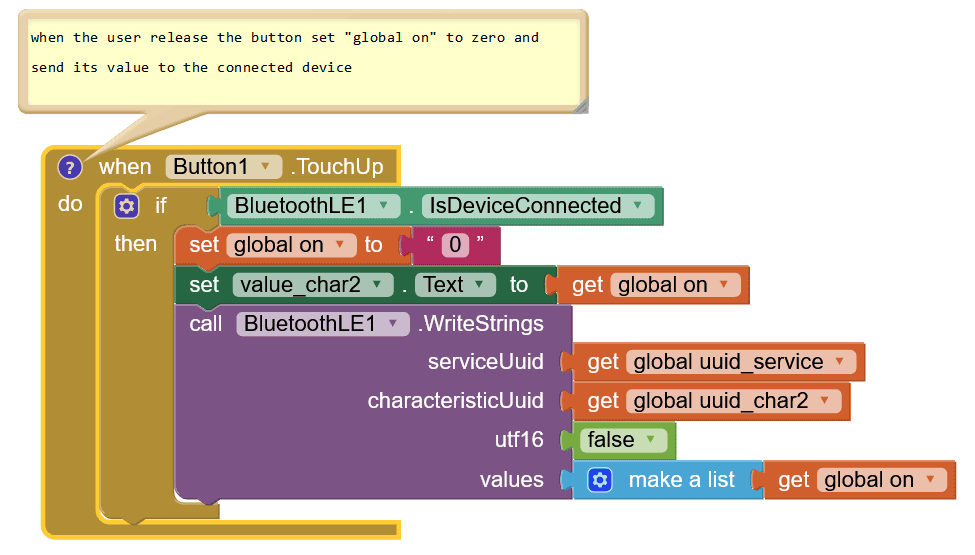
This block will run and send data to the connected device when the user release the button
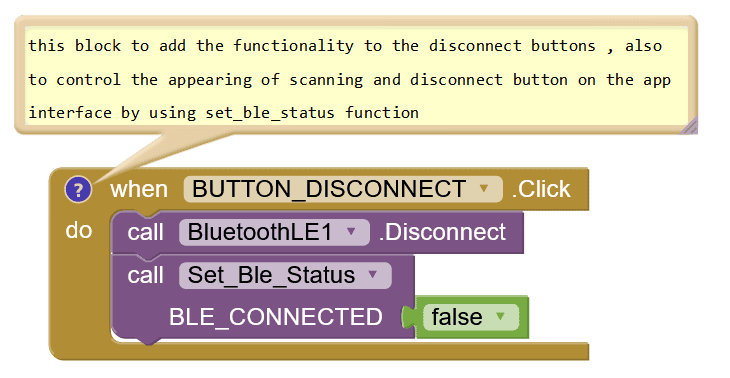
This block will run when the disconnect button is clicked and it will disconnect the bluetooth connection and run set_ble_status function
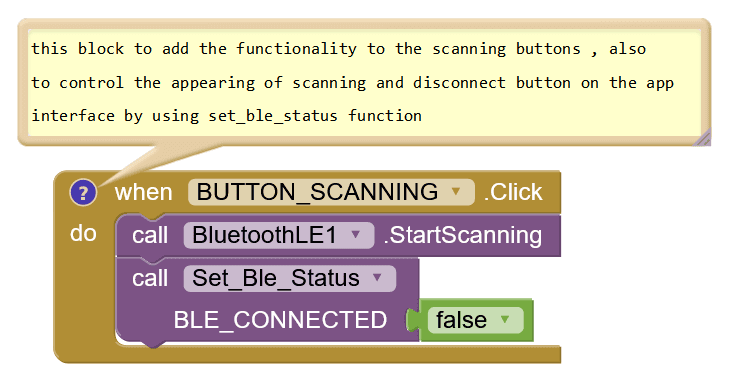
This block will run when the scanning button is clicked and it will start scanning for bluetooth device and run set_ble_status function
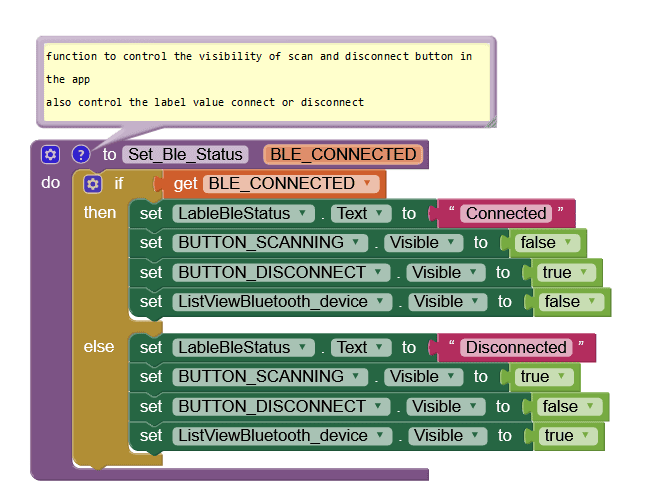
set_ble_status function to control the button showing for disconnect and scanning also to set value for labels " connected " and "disconnect"
set the value of char1 for the received data from the connected device after convert it

code for light control using arduino
                /*
                  Based on Neil Kolban example for IDF:
                  https://github.com/nkolban/esp32-snippets/blob/master/cpp_utils/tests/BLE%20Tests/SampleNotify.cpp
                  Ported to Arduino ESP32 by Evandro Copercini
                  updated by chegewara and MoThunderz
                */
                #include
                #include
                #include
                #include

                #define led_pin 27
                uint32_t counterpointer=3;

                BLEServer* pServer = NULL;
                BLECharacteristic* pCharacteristic = NULL;
                BLECharacteristic* pCharacteristic_2 = NULL;
                BLEDescriptor *pDescr;
                BLE2902 *pBLE2902;

                bool deviceConnected = false;
                bool oldDeviceConnected = false;
                uint32_t value = 0;

                // See the following for generating UUIDs:
                // https://www.uuidgenerator.net/

                #define SERVICE_UUID        "4fafc201-1fb5-459e-8fcc-c5c9c331914b"
                #define CHAR1_UUID          "beb5483e-36e1-4688-b7f5-ea07361b26a8"
                #define CHAR2_UUID          "e3223119-9445-4e96-a4a1-85358c4046a2"

                class MyServerCallbacks: public BLEServerCallbacks {
                    void onConnect(BLEServer* pServer) {
                      deviceConnected = true;
                    };

                    void onDisconnect(BLEServer* pServer) {
                      deviceConnected = false;
                    }
                };

                class CharacteristicCallBack: public BLECharacteristicCallbacks {
                  void onWrite(BLECharacteristic *pChar) override {
                    std::string pChar2_value_stdstr = pChar->getValue();
                    String pChar2_value_string = String(pChar2_value_stdstr.c_str());
                    int pChar2_value_int = pChar2_value_string.toInt();
                    counterpointer=pChar2_value_int;
                    Serial.println("pChar2: " + String(pChar2_value_int));
                  }
                };

                void setup() {
                  Serial.begin(115200);
                  pinMode(led_pin,OUTPUT);

                  // Create the BLE Device
                  BLEDevice::init("ESP32");

                  // Create the BLE Server
                  pServer = BLEDevice::createServer();
                  pServer->setCallbacks(new MyServerCallbacks());

                  // Create the BLE Service
                  BLEService *pService = pServer->createService(SERVICE_UUID);

                  // Create a BLE Characteristic
                  pCharacteristic = pService->createCharacteristic(
                                      CHAR1_UUID,
                                      BLECharacteristic::PROPERTY_NOTIFY
                                    );

                  pCharacteristic_2 = pService->createCharacteristic(
                                      CHAR2_UUID,
                                      BLECharacteristic::PROPERTY_READ   |
                                      BLECharacteristic::PROPERTY_WRITE
                                    );

                  // Create a BLE Descriptor

                  pDescr = new BLEDescriptor((uint16_t)0x2901);
                  pDescr->setValue("A very interesting variable");
                  pCharacteristic->addDescriptor(pDescr);

                  pBLE2902 = new BLE2902();
                  pBLE2902->setNotifications(true);

                  // Add all Descriptors here
                  pCharacteristic->addDescriptor(pBLE2902);
                  pCharacteristic_2->addDescriptor(new BLE2902());

                  // After defining the desriptors, set the callback functions
                  pCharacteristic_2->setCallbacks(new CharacteristicCallBack());

                  // Start the service
                  pService->start();

                  // Start advertising
                  BLEAdvertising *pAdvertising = BLEDevice::getAdvertising();
                  pAdvertising->addServiceUUID(SERVICE_UUID);
                  pAdvertising->setScanResponse(false);
                  // set value to 0x00 to not advertise this parameter
                  pAdvertising->setMinPreferred(0x0);
                  BLEDevice::startAdvertising();
                  Serial.println("Waiting a client connection to notify...");
                }

                void loop() {
                    // notify changed value
                    if (deviceConnected) {
                        pCharacteristic->setValue(value);
                        pCharacteristic->notify();
                        value++;
                        delay(1000);

                        if (counterpointer==1){
                        digitalWrite(led_pin,HIGH);
                        Serial.println("helooooooooooooooo");
                        // Serial.println(digitalRead(led_pin));
                        // tone(piezo, 1000); // Send 1KHz sound signal...
                        // delay(1000);        // ...for 1 sec
                        // noTone(piezo);     // Stop sound...
                        // delay(1000);        // ...for 1sec
                    }else{
                      digitalWrite(led_pin,LOW);
                    }

                    }
                    // disconnecting
                    if (!deviceConnected && oldDeviceConnected) {
                        delay(500); // give the bluetooth stack the chance to get things ready
                        pServer->startAdvertising(); // restart advertising
                        Serial.println("start advertising");
                        oldDeviceConnected = deviceConnected;
                    }
                    // connecting
                    if (deviceConnected && !oldDeviceConnected) {
                        // do stuff here on connecting
                        oldDeviceConnected = deviceConnected;
                    }
                }
code for buzzer control using arduino
                /*
                  Based on Neil Kolban example for IDF:
                  https://github.com/nkolban/esp32-snippets/blob/master/cpp_utils/tests/BLE%20Tests/SampleNotify.cpp
                  Ported to Arduino ESP32 by Evandro Copercini
                  updated by chegewara and MoThunderz
                */
                #include
                #include
                #include
                #include

                #define piezo 5
                #define led_pin 10
                uint32_t counterpointer=3;

                BLEServer* pServer = NULL;
                BLECharacteristic* pCharacteristic = NULL;
                BLECharacteristic* pCharacteristic_2 = NULL;
                BLEDescriptor *pDescr;
                BLE2902 *pBLE2902;

                bool deviceConnected = false;
                bool oldDeviceConnected = false;
                uint32_t value = 0;

                // See the following for generating UUIDs:
                // https://www.uuidgenerator.net/

                #define SERVICE_UUID        "4fafc201-1fb5-459e-8fcc-c5c9c331914b"
                #define CHAR1_UUID          "beb5483e-36e1-4688-b7f5-ea07361b26a8"
                #define CHAR2_UUID          "e3223119-9445-4e96-a4a1-85358c4046a2"

                class MyServerCallbacks: public BLEServerCallbacks {
                    void onConnect(BLEServer* pServer) {
                      deviceConnected = true;
                    };

                    void onDisconnect(BLEServer* pServer) {
                      deviceConnected = false;
                    }
                };

                class CharacteristicCallBack: public BLECharacteristicCallbacks {
                  void onWrite(BLECharacteristic *pChar) override {
                    std::string pChar2_value_stdstr = pChar->getValue();
                    String pChar2_value_string = String(pChar2_value_stdstr.c_str());
                    int pChar2_value_int = pChar2_value_string.toInt();
                    counterpointer=pChar2_value_int;
                    Serial.println("pChar2: " + String(pChar2_value_int));
                  }
                };

                void setup() {
                  Serial.begin(115200);
                  pinMode(led_pin,OUTPUT);

                  // Create the BLE Device
                  BLEDevice::init("ESP32");

                  // Create the BLE Server
                  pServer = BLEDevice::createServer();
                  pServer->setCallbacks(new MyServerCallbacks());

                  // Create the BLE Service
                  BLEService *pService = pServer->createService(SERVICE_UUID);

                  // Create a BLE Characteristic
                  pCharacteristic = pService->createCharacteristic(
                                      CHAR1_UUID,
                                      BLECharacteristic::PROPERTY_NOTIFY
                                    );

                  pCharacteristic_2 = pService->createCharacteristic(
                                      CHAR2_UUID,
                                      BLECharacteristic::PROPERTY_READ   |
                                      BLECharacteristic::PROPERTY_WRITE
                                    );

                  // Create a BLE Descriptor

                  pDescr = new BLEDescriptor((uint16_t)0x2901);
                  pDescr->setValue("A very interesting variable");
                  pCharacteristic->addDescriptor(pDescr);

                  pBLE2902 = new BLE2902();
                  pBLE2902->setNotifications(true);

                  // Add all Descriptors here
                  pCharacteristic->addDescriptor(pBLE2902);
                  pCharacteristic_2->addDescriptor(new BLE2902());

                  // After defining the desriptors, set the callback functions
                  pCharacteristic_2->setCallbacks(new CharacteristicCallBack());

                  // Start the service
                  pService->start();

                  // Start advertising
                  BLEAdvertising *pAdvertising = BLEDevice::getAdvertising();
                  pAdvertising->addServiceUUID(SERVICE_UUID);
                  pAdvertising->setScanResponse(false);
                  // set value to 0x00 to not advertise this parameter
                  pAdvertising->setMinPreferred(0x0);
                  BLEDevice::startAdvertising();
                  Serial.println("Waiting a client connection to notify...");
                }

                void loop() {
                    // notify changed value
                    if (deviceConnected) {
                        pCharacteristic->setValue(value);
                        pCharacteristic->notify();
                        value++;
                        delay(1000);

                        if (counterpointer==1){
                        digitalWrite(led_pin,HIGH);
                        Serial.println("helooooooooooooooo");
                        Serial.println(digitalRead(led_pin));
                        tone(piezo, 1000); // Send 1KHz sound signal...
                        delay(1000);        // ...for 1 sec
                        noTone(piezo);     // Stop sound...
                        delay(1000);        // ...for 1sec
                    }else{
                      digitalWrite(led_pin,LOW);
                    }

                    }
                    // disconnecting
                    if (!deviceConnected && oldDeviceConnected) {
                        delay(500); // give the bluetooth stack the chance to get things ready
                        pServer->startAdvertising(); // restart advertising
                        Serial.println("start advertising");
                        oldDeviceConnected = deviceConnected;
                    }
                    // connecting
                    if (deviceConnected && !oldDeviceConnected) {
                        // do stuff here on connecting
                        oldDeviceConnected = deviceConnected;
                    }
                }
.svg)

