Networking and Communications
This week I was prompted to establish communication between one of my boards and another machine using either WIFI of Bluetooth.
As Kris found out, the most beginner-friendly yet allowing further development way would be to use the Seed Xiao ESP32C3 development board equipped with WIFI and Bluetooth capabilities and operate it through my laptop's Terminal using Fablab's WIFI network and WIFI REST API.This method I will be able to use later for interface design for my project.
According to ChatGPT: The WiFi_REST_Lib is a library for the Arduino platform that helps you create a web service that can be accessed over Wi-Fi using HTTP requests. It allows you to create endpoints that can be used to retrieve, create, update, or delete resources on the server. To use it, you need to include the library in your Arduino project, connect to a Wi-Fi network, and define the endpoints for your web service. You can define an endpoint by specifying the HTTP method (such as GET, POST, PUT, or DELETE) and the URL path. Then, you can write the code to handle the request and send a response back to the client. Finally, you start the server and handle incoming client requests. The WiFi_REST_Lib makes it easy to create a simple web service without needing to worry about the low-level details of handling HTTP requests and responses.
Seed Xiao ESP32C3 and Arduino software
Configuring the Arduino software to work with the board takes additional steps
- Adding ESP32 board package to Arduino IDE
In the File > Preferences, "Additional Boards Manager URLs" field paste the url below: https://raw.githubusercontent.com/espressif/arduino-esp32/gh-pages/package_esp32_index.json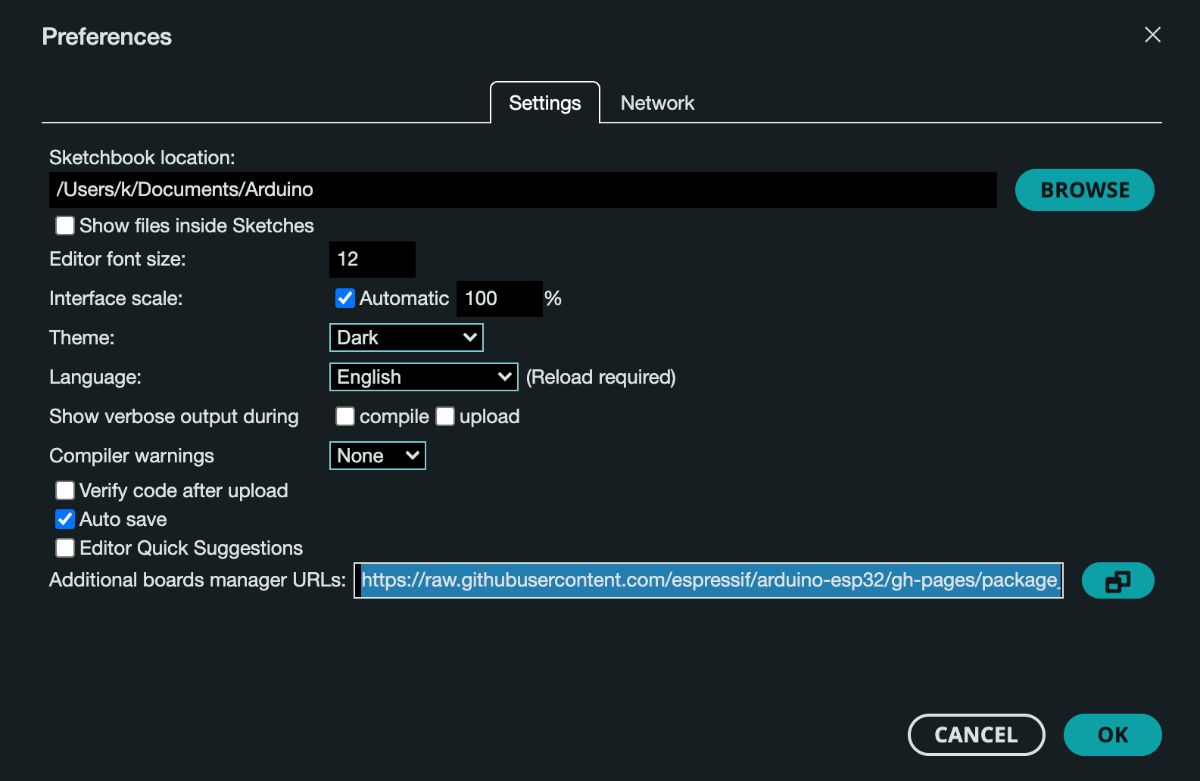
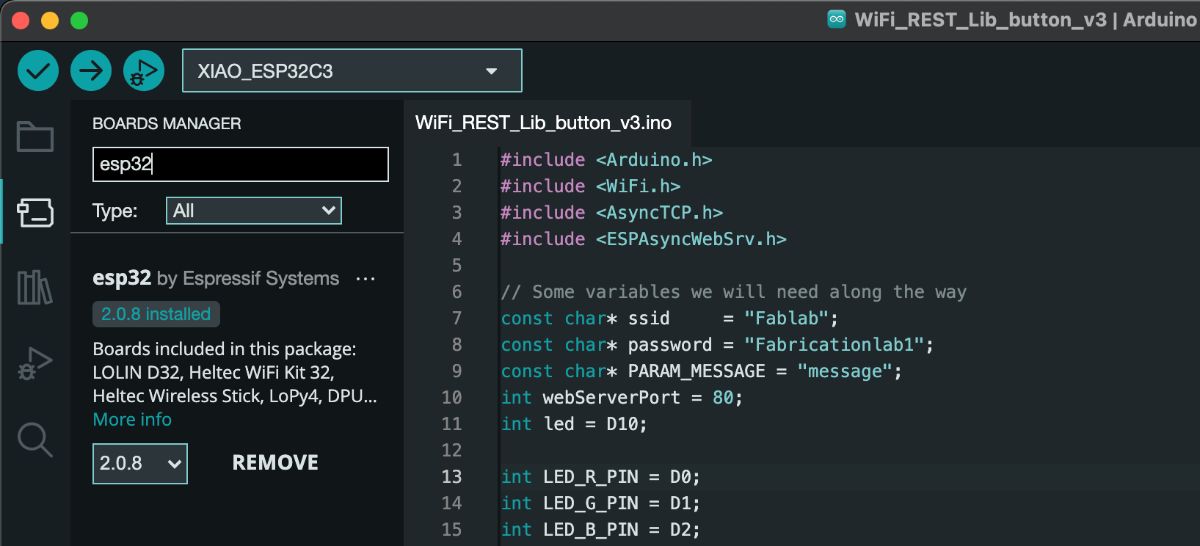
- Installing the esp32 library.
In the Tools > Board > Boards Manager..., type "esp32" in the search box, select the latest version of esp32, and install it.
WiFi_REST_Lib
As Kris found out, there is a library available that makes use of the REST API with Seed Xiao ESP32C3 boards easier - WiFi_REST_Lib.
It requires three additional libraries to be installed via the Arduino software Library Manager
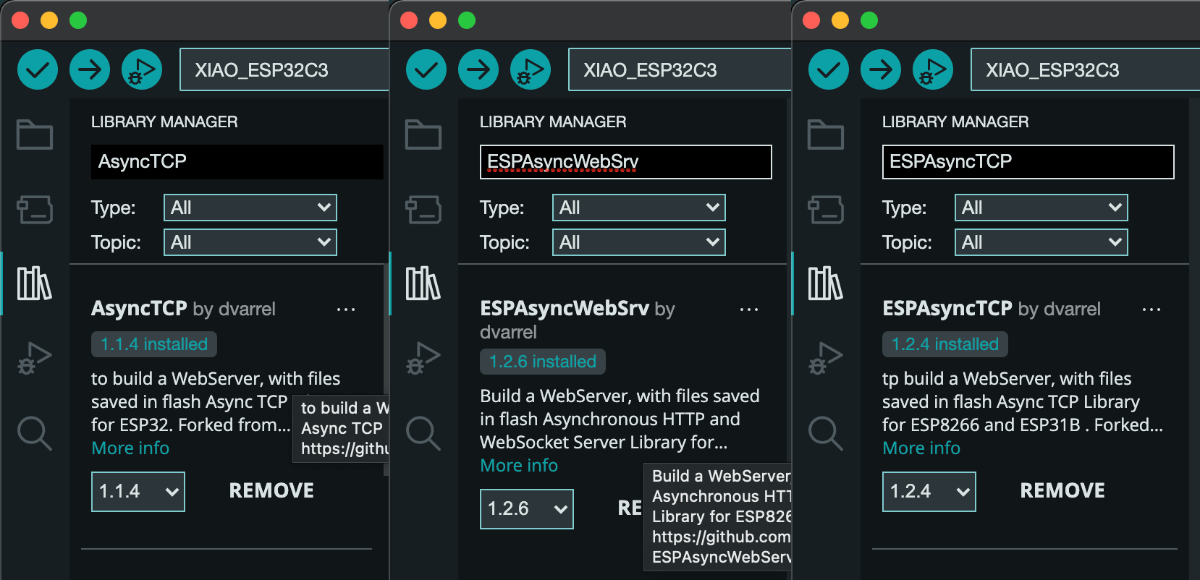
ESPAsyncWebSrv library bug fix
The library contains a bug that may be fixed the following way:
In the ESPAsyncWebSrv folder created after the library installation, there should be AsyncWebSocket.cpp file.
In the line 832 the text return IPAddress(0U); should be changed to return IPAddress(static_cast. The change shoudl be saved in the file.
Blink example breakdown
Whole blink example code
 #include
#include
#include
#include

// Some variables we will need along the way
const char* ssid     = "Fablab";
const char* password = "Fabricationlab1";
const char* PARAM_MESSAGE = "message";
int webServerPort = 80;
int led = D10;

// Setting up our webserver
AsyncWebServer server(webServerPort);

// This function will be called when human will try to access undefined endpoint
void notFound(AsyncWebServerRequest *request) {
  request->send(404, "text/plain", "Not found");
}

void setup() {
  pinMode(led, OUTPUT);

  Serial.begin(115200);
  delay(10);

  // We start by connecting to a WiFi network
  Serial.print("Connecting to ");
  Serial.println(ssid);
  WiFi.begin(ssid, password);

  while (WiFi.status() != WL_CONNECTED) {
    delay(500);
    Serial.print(".");
  }

  Serial.println("");
  Serial.println("WiFi connected");

  // We want to know the IP address so we can send commands from our computer to the device
  Serial.println("IP address: ");
  Serial.println(WiFi.localIP());

  // Greet human when it tries to access the root / endpoint.
  // This is a good place to send some documentation about other calls available if you wish.
  server.on("/", HTTP_GET, [](AsyncWebServerRequest *request){
    request->send(200, "text/plain", "Hello, world");
  });

  // Usage IP_ADDRESS/led?state=1 where /led is our endpoint and ?state=on is a variable definition.
  // You can also chain variables like this: /led?sate=off&color=blue
  server.on("/led", HTTP_GET, [](AsyncWebServerRequest *request){
    bool state; // LED state
    if (request->hasParam("state")) {
      // The incoming params are Strings
      String param = request->getParam("state")->value();
      // .. so we have to interpret or cast them
      state = ((param == "on") ? HIGH : LOW); // Look up Terary Operator (e.g. https://www.programiz.com/cpp-programming/ternary-operator)
    } else {
      state = LOW;
    }

    // Send back message to human
    String response = "Turning LED ";
    response += state ? "on" : "off";
    request->send(200, "text/plain", response);

    // Operate LED
    digitalWrite(led, state);
  });

  // If human tries endpoint no exist, exec this function
  server.onNotFound(notFound);

  Serial.print("Starting web server on port ");
  Serial.println(webServerPort);
  server.begin();
}

void loop() {
  // Nothing needed here at the moment
}
The ternary operator
It is a shorthand way of writing an if-else statement in a single line of code.
The syntax for the ternary operator is as follows:
condition ? value_if_true : value_if_false;
Breakdown
Including all the necessary libraries that I have installed in the previous steps
#include
#include
#include
#include
// Some variables we will need along the way
const char* ssid     = "Fablab";   // wifi network name
const char* password = "PASSWORD GOES HERE";   //wifi network password
const char* PARAM_MESSAGE = "message";
int webServerPort = 80;
int led = D10;   // defining the LED pin
// Setting up our webserver
AsyncWebServer server(webServerPort);
// This function will be called when human will try to access undefined endpoint
void notFound(AsyncWebServerRequest *request) {
request->send(404, "text/plain", "Not found");  //show 404 error
}
 void setup() {
  pinMode(led, OUTPUT); // setting up the led pin as an output pin

  Serial.begin(115200);  // starting the Serial communication
  delay(10);   // adding delay to be able to read what Serial shows
// We start by connecting to a WiFi network
  Serial.print("Connecting to ");
  Serial.println(ssid);
  WiFi.begin(ssid, password);
  while (WiFi.status() != WL_CONNECTED) {
    delay(500);
    Serial.print(".");
  }

  Serial.println("");
  Serial.println("WiFi connected");

  // We want to know the IP address so we can send commands from our computer to the device
  Serial.println("IP address: ");
  Serial.println(WiFi.localIP());
 // Greet human when it tries to access the root / endpoint.
  // This is a good place to send some documentation about other calls available if you wish.
  server.on("/", HTTP_GET, [](AsyncWebServerRequest *request){
    request->send(200, "text/plain", "Hello, world");  // display "Hello, world" message as plain text
  });
  server.on("/led", HTTP_GET, [](AsyncWebServerRequest *request){  //creating the endpoint with name "led" available at   curl 193.167.5.143/led
    bool state; // LED state  // defining the state variable of type boolean
    if (request->hasParam("state")) {  //defining the "state" variable as an endpoint parameter
      // The incoming params are Strings
      String param = request->getParam("state")->value();  // creating the String variable "param", assigning it what is stored in the "state" variable
      // .. so we have to interpret or cast them
      state = ((param == "on") ? HIGH : LOW); // Look up Terary Operator (e.g. https://www.programiz.com/cpp-programming/ternary-operator)
    } else {
      state = LOW;
    }
// Send back message to human
String response = "Turning LED ";
response += state ? "on" : "off";
request->send(200, "text/plain", response);
// Operate LED
digitalWrite(led, state);
});
// If human tries endpoint no exist, exec this function
server.onNotFound(notFound);
Serial.print("Starting web server on port ");
Serial.println(webServerPort);
server.begin();
}

void loop() {
// Nothing needed here at the moment
}
Connecting to and operating a custom board
The idea was to connect to my previously made pcb, which included the Seed Xiao RP2040 development board, a tactile switch, potentiometer and an RGB LED. For the sake of the exercise, I aimed to have the tactile switch turn on the LED (and turn it off when pressed again) and have the user define the hue of the LED by giving a number.
The Seed Xiao RP2040 development board does not have networking features, so I swapped it with the Seed Xiao ESP32C3 board that had Bluetooth and Wifi enabled. The pinout of the board is exactly the same and the board was soldered on pins and headers, otherwise it wouldn't be possible.
I first declared the necessary pins and variables
int led = D10;

int LED_R_PIN = D0;
int LED_G_PIN = D1;
int LED_B_PIN = D2;
int POT_PIN = D3;
int BUTTON_PIN = D9;

int potValue = 0;
bool ledOn = false;   // the initial state of the led was to be off

int red_value = 0;
int green_value = 0;
int blue_value = 0;
int hue = 0;
pinMode(LED_R_PIN, OUTPUT);
pinMode(LED_G_PIN, OUTPUT);
pinMode(LED_B_PIN, OUTPUT);
pinMode(BUTTON_PIN, INPUT);
pinMode(led, OUTPUT);
server.on("/", HTTP_GET, [](AsyncWebServerRequest *request){
request->send(200, "text/plain", "Welcome to Saskias ESP32C3!");   // my very own welcome message to be send as a response to the initial request
});
  server.on("/button", HTTP_GET, [](AsyncWebServerRequest *request){  //setting up the button endpoint (available at IP address/button)
    // is the button pressed or not?
    String response = "Currently the button is ";  //respond with the "Currently the button is " string as a reponse to the button request
    response += !digitalRead(BUTTON_PIN) ? "not pressed" : "pressed";
/*
digitalRead(BUTTON_PIN) reads the state of a button connected to a pin specified by BUTTON_PIN.    request->send(200, "text/plain", response);
!digitalRead(BUTTON_PIN) evaluates to true if the button is not pressed (i.e., the pin reads LOW), and false if the button is pressed (i.e., the pin reads HIGH).
The ternary operator ? : is used to choose between two possible values based on the result of the previous expression. If the button is not pressed, the value "not pressed" is selected, otherwise the value "pressed" is selected.
The resulting value is appended (added in the end) to the String variable "response" using the += operator.
*/
  });

 server.on("/led", HTTP_GET, [](AsyncWebServerRequest *request){  //add the "led" endppoint (available at IP address/led)
    if (request->hasParam("state")) {  //if the led enpoint has a parameter named "state"...
      String stateString = request->getParam("state")->value();  //extract the value stored in it and store it and store as stateString string
      ledOn = (stateString == "on" ? true : false);  // condition ? value_if_true : value_if_false;
    }
    if (ledOn) {
      setColor(hue);
    } else {
      analogWrite(LED_R_PIN, 255);  // assign the RED_R_PIN the value of 255
      analogWrite(LED_G_PIN, 255);
      analogWrite(LED_B_PIN, 255);
    }
    String response = "Currently the LED is ";
    response += (ledOn ? "on" : "off");   //condition ? value_if_true : value_if_false;
    request->send(200, "text/plain", response);
  });

    server.on("/hue", HTTP_GET, [](AsyncWebServerRequest *request){ // add the "hue" endpoint (available at IP address/hue)
    if (request->hasParam("value")) {  // check if the endpoint has a parameter "value"...
      String valueString = request->getParam("value")->value();   // if yes, create a string of it
      int value = valueString.toInt();  // declare an int "value", convert the valueString to an integer and assign it to the int "value"
      int hue = map(value, 0, 1023, 0, 255);   //map the value int from 0-1023 to 0-255 to use as the hue value
      setColor(hue);  //execute the  setColor function with value (hue)
    }
    String response = "Currently the RGB value is ";
    response +=  String(red_value) + ", ";   // append the "Currently the RGB value is " with the red, green and blue values stored as strings and separated with comas (", ")
    response +=  String(green_value) + ", ";
    response +=  String(blue_value);
    request->send(200, "text/plain", response);
  });
                                            void setColor(int _hue) {
  hue = _hue;  //assign the local "hue" variable the value of the global "hue" variable (_hue)
  // Calculate the RGB values based on the hue
  red_value = cos((hue + 120) * 0.01745) * 127 + 128;
  green_value = cos(hue * 0.01745) * 127 + 128;
  blue_value = cos((hue - 120) * 0.01745) * 127 + 128;


  // Set the LED colors
  analogWrite(LED_R_PIN, red_value);
  analogWrite(LED_G_PIN, green_value);
  analogWrite(LED_B_PIN, blue_value);
}
Whole code with hue, led and button endpoints
#include
#include
#include
#include

// Some variables we will need along the way
const char* ssid     = "Fablab";
const char* password = "Fabricationlab1";
const char* PARAM_MESSAGE = "message";
int webServerPort = 80;
int led = D10;

int LED_R_PIN = D0;
int LED_G_PIN = D1;
int LED_B_PIN = D2;
int POT_PIN = D3;
int BUTTON_PIN = D9;

int potValue = 0;
bool ledOn = false;

int red_value = 0;
int green_value = 0;
int blue_value = 0;
int hue = 0;

// Setting up our webserver
AsyncWebServer server(webServerPort);

// This function will be called when human will try to access undefined endpoint
void notFound(AsyncWebServerRequest *request) {
  request->send(404, "text/plain", "Not found");
}

void setup() {
  //pin setup
  pinMode(LED_R_PIN, OUTPUT);
  pinMode(LED_G_PIN, OUTPUT);
  pinMode(LED_B_PIN, OUTPUT);
  pinMode(BUTTON_PIN, INPUT);
  pinMode(led, OUTPUT);

  Serial.begin(115200);
  delay(10);

  // We start by connecting to a WiFi network
  Serial.print("Connecting to ");
  Serial.println(ssid);
  WiFi.begin(ssid, password);

  while (WiFi.status() != WL_CONNECTED) {
    delay(500);
    Serial.print(".");
  }

  Serial.println("");
  Serial.println("WiFi connected");

  // We want to know the IP address so we can send commands from our computer to the device
  Serial.println("IP address: ");
  Serial.println(WiFi.localIP());

  // Greet human when it tries to access the root / endpoint.
  // This is a good place to send some documentation about other calls available if you wish.
  server.on("/", HTTP_GET, [](AsyncWebServerRequest *request){
    request->send(200, "text/plain", "Welcome to Saskias ESP32C3!");
  });

  server.on("/button", HTTP_GET, [](AsyncWebServerRequest *request){
    // is the button pressed or not?
    String response = "Currently the button is ";
    response += !digitalRead(BUTTON_PIN) ? "not pressed" : "pressed";
    request->send(200, "text/plain", response);
  });

  server.on("/potentiometer", HTTP_GET, [](AsyncWebServerRequest *request){
    int potValue; // potentiometer value
    if (request->hasParam("potValue")) {
      // The incoming params are Strings
      String param = request->getParam("potValue")->value();
      // .. so we have to interpret or cast them
      potValue = param.toInt(); // Look up Terary Operator (e.g. https://www.programiz.com/cpp-programming/ternary-operator)
      hue = map(potValue, 0, 1023, 0, 255);
      setColor(hue);
    }

    // Send back message to human
    String response = "Potentiometer value is  ";
    response += String(potValue);
    request->send(200, "text/plain", response);
  });

  server.on("/led", HTTP_GET, [](AsyncWebServerRequest *request){
    if (request->hasParam("state")) {
      String stateString = request->getParam("state")->value();
      ledOn = (stateString == "on" ? true : false);
    }

    if (ledOn) {
      setColor(hue);
    } else {
      analogWrite(LED_R_PIN, 255);
      analogWrite(LED_G_PIN, 255);
      analogWrite(LED_B_PIN, 255);
    }

    String response = "Currently the LED is ";
    response += (ledOn ? "on" : "off");
    request->send(200, "text/plain", response);
  });

  server.on("/hue", HTTP_GET, [](AsyncWebServerRequest *request){
    if (request->hasParam("value")) {
      String valueString = request->getParam("value")->value();
      int value = valueString.toInt();
      int hue = map(value, 0, 1023, 0, 255);
      setColor(hue);
    }

    String response = "Currently the RGB value is ";
    response +=  String(red_value) + ", ";
    response +=  String(green_value) + ", ";
    response +=  String(blue_value);
    request->send(200, "text/plain", response);
  });

  server.onNotFound(notFound);

  Serial.print("Starting web server on port ");
  Serial.println(webServerPort);
  server.begin();
}

void loop(){
  //
}

void setColor(int _hue) {
  hue = _hue;
  // Calculate the RGB values based on the hue
  red_value = cos((hue + 120) * 0.01745) * 127 + 128;
  green_value = cos(hue * 0.01745) * 127 + 128;
  blue_value = cos((hue - 120) * 0.01745) * 127 + 128;

  // Set the LED colors
  analogWrite(LED_R_PIN, red_value);
  analogWrite(LED_G_PIN, green_value);
  analogWrite(LED_B_PIN, blue_value);
}