8. Embedded programming
This week I learned about Embedded programming.
8.0 Assignment of this week
8.0.1 Group assignment
Compare the performance and development workflows for other architectures
8.0.2 Individual assignment
Read the data sheet for your microcontroller.
Use your programmer to program your board to do something.
Extra credit: try other programming languages and development environments
8.1 Comparison(as group assignment)
There are several architectures in microcontrollers themselves and microcontrollers on board.
I would like to start with a comparison of PIC and AVR, which had competed each other in 8 bit microcontroller market for a long time.
As for me, I had a longer experience with PIC than AVR(I will write about it again in the following chapter). So I was quite surprised at the popularity of AVR when I joind maker communities.
I expect that I would be able to know the reason of the popuarity by comparing them.
8.1.1 PIC vs AVR
![]()
![]()
A long time war between PIC vs AVR came to an end when Microchip acquired Atmel in 2016. There were several rumors saying Microchip would cease AVR, but it haven’t been realized.
I think that Microchip have gotten access to enormous market and communities where AVR had ruled better than PIC.
Many parameters are similar in both PIC and AVR but there are some parameters that surely differ when compared:
| PIC | AVR | Note | |
| Manufacturer | Microchip Technology Inc. | Atmel Corporation | Atmel was acquired by Microchip in 2016. |
| Frequency, Number of I/O pins, RAM, Flash Memory |
wide variation | wide variation | These parameters are similar in both PIC and AVR. |
| Working Voltage | 4.5V (older series) |
3.3V | AVR have been focused on low-voltage previously, PIC now has been transformed for the low-voltage operation, too. |
| Target Connectors | RJ11 sockets | ISP/UPDI interfaces | AVR has made it simple in terms of circuit design and development. |
| Advanced Interfaces | USB, CAN and Ethernet | None | AVR can use external chips, such as FTDI USB to serial chips, Microchip Ethernet controllers or Philips CAN chips. |
| Development IDE | MPLAB X | Microchip Studio (formerly Atmel Studio), Arduino IDE |
By acquisition of Atmel by Microchip, The IDEs have been integrated. But many makers would prefer Arduino IDE. |
| Instruction Set | CISC | RISC | 'R' in 'AVR' is said to mean 'RISC'. RISC processors have fewer, simpler instructions compared with CISCs. |
| C Compilers | MPLAB XC8 | WINAVR | WINAVR is ANSI C based on GCC compiler which makes it easy to port code and use standard libraries. Since AVR is designed for C in the beginning, the code output is small and fast. PIC has more features compared to AVR but it’s code becomes larger because of the structure of PIC. |
| Assembly language | PIC assembly language is tedious with everything forced to operate through the accumulator, forces to use bank switching | AVR assembly language is very easy with lots of instructions and the ability to use all 32 registers as accumulator | Although I am not familiar with assembly language, It seems that AVR is better to work on in terms of programming by assembly language. |
| Programmers | PIC Kit 4 | STK500, Atmel-ICE, JTAG-ISP, AVRISP, TinyISP, Arduino and now PIC Kit 4 | Development of PIC programmer is said to be difficult compared with AVR. There are several programmers available for AVR. |
As a result, PIC and AVR are, because of their different characteristics, not rival competing in the same market, but they have their own domains.
It seems that AVR is more open and easier than PIC in terms of programming, maybe it is why AVR is so popular in maker communities.
References:
PIC vs AVR: Which Microcontroller to choose for your Application by Abhiemanyu Pandit Mar 27, 2019
8.1.2 Arduino vs Mbed
![]()
![]()
Next chapter is about microcontrollers on board. I compared Arduino with Mbed, in other words, comparison of 8 bit with 32 bit.
Maybe the comparison isn’t fair that there are already 32 bit Arduinos on the market. But considering that the most popular Arduino is a 8 bit UNO, it would make sense.
Originally, microcontrollers on board had been designed as development boards for microcontrollers, but as they were so convenient, they often have been ‘embedded’ in final products. It is especially the case as for Arduinos.
| Arduino | Mbed | Note | |
| Overview | Combination of various Arduino boards and deveopment tools | Combination of various Mbed boards and deveopment tools | |
| Sponsored by | Arduino LLC | ARM Ltd. | |
| IDE | Arduino Desktop IDE Arduino Cloud |
ARM Keil Studio | The IDE for Mbed was formerly called Mbed Complier, but seems to be renamed. |
| Programming Language | Arduino | C++ | Arduino language is based on C/C++, but is slightly different. |
| Location of IDE | local(Desktop IDE) cloud(Web Editor) |
cloud | |
| Processers | 8 bit AVR(UNO) | 32 bit ARM Cortex-M based | There are also 32 bit Arduinos |
| Frequency | 8-16 MHz | 48-96 MHz | |
| Memories | 32 KB Flash /2 KB SRAM /1 KB EEPROM(UNO) |
Varies by products | |
| Working Voltage | 2.7-5.5 V | 3.3 V | |
| Interfaces | USB, Digital I/O, Analog I/O, PWM out, I2C, SPI, etc. | USB, Digital I/O, Analog I/O, PWM out, I2C, SPI, etc. | Number of pins varies by products. Some products also have wireless connectibility(Wi-Fi, BlueTooth) |
The word ‘Mbed’ was apparenty created from the word ‘embedded’. It is a little confusing that Mbed is also served as Mbed OS, which is RTOS for IOT devices.
Mbed boards are generally more powerful than Arduinos, but Arduinos seem to be prefered by maker communities, maybe reflecting the long time colaborations and contributions each other.
8.1.2.1 micro:bit is Mbed, too
![]()
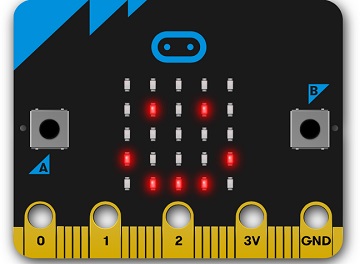
micro:bit was developped by BBC for educational purpose, especially intended for younger people.
It has many interesting features and became popular, but currently it is rather hard to find one in market maybe suffered from world-wide supply shortage of semi-conductors.
micro:bit is designed with Mbed architecture, so it can be programmed with Mbed Compiler.
It stands out in Mbed familly with a special feature: It also can be programmed by other languages like MicroPython, MakeCode(internally JavaScript) and Scratch.
![]()
![]()
8.2 Individual assignment
8.2.1 Read the data sheet
I planned to use my DIY ATTiny45 board for the assignment of this week, so I searched the data sheet of the controller on internet. It was found easily. It came as ATTiny25/45/85 datasheet.
Over 140 pages long, I couldn’t read through all pages of the datasheet, but I understood that there were very comprehensive descriptions about the specifications of the controllers and everything necessary for handling of them.
Datasheet:
Atmel 8-bit AVR Microcontroller with 2/4/8K Bytes In-System Programmable Flash
Datasheet(Japanese)
8.2.2 Programming the boards to do something
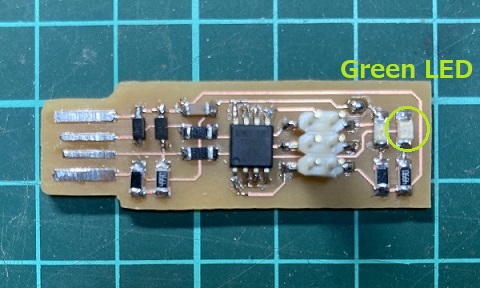
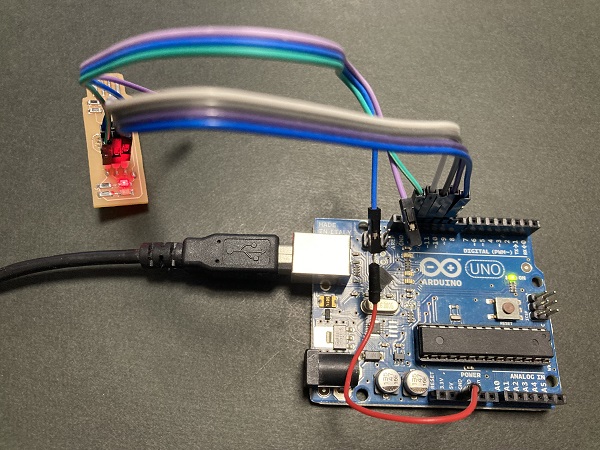
I made a small, stick-shaped ATTiny45 mounted board for the assignment of week04. It was originally intended as an ISP programmer, but I have not succeeded in activating it as a programmer yet(I suspect V-USB on Windows related issues).
So I decided to use it as an ATTiny ‘blink’ board. The green LED on the board is connected to Pin7(PB2) of ATTiny45, so it can be programmable.
I used various programmers for programming the board. Either of them worked well. Arduino IDE was used as a programming interface.
Sketch for the task:
blink.ino
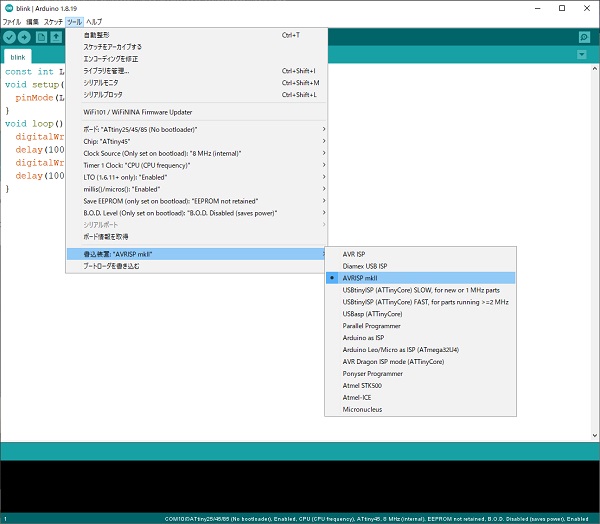
8.2.2.1 AVRISP Mk2:
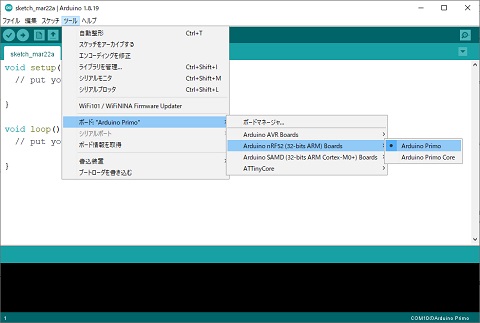
It was the most straight forward to programming the board with AVRISP Mk2. Just select AVRISP Mk2 as a writer in tools menu of Arduino IDE.
Settings of Arduino IDE:
Writing:
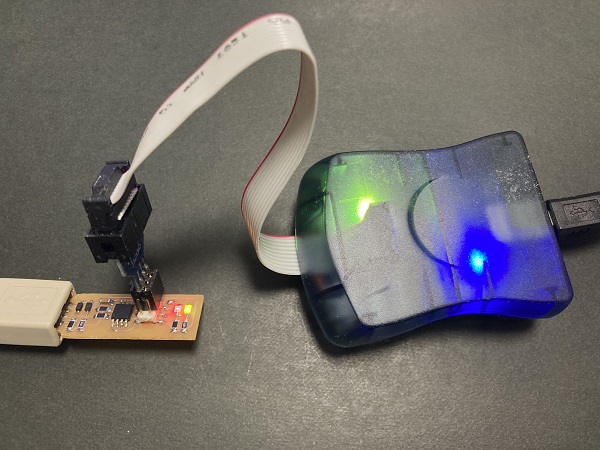
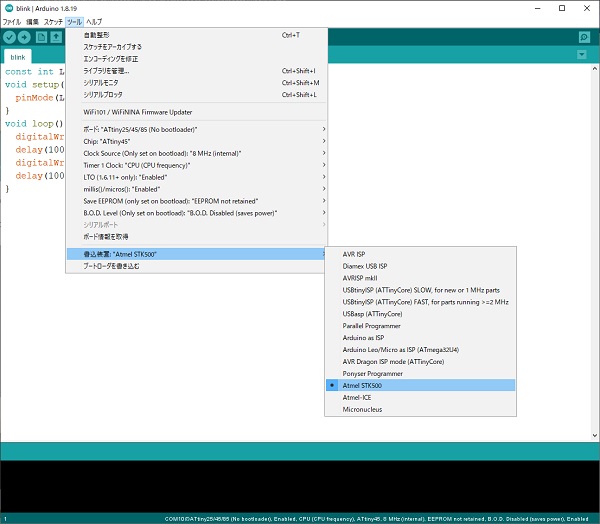
8.2.2.2 A third party programmer:
I used Pololu USB AVR Programmer v2.1. It emulates STK500 and also can work as a USB-serial adapter. It was as easy as AVRISP Mk2.
Settings of Arduino IDE:
Writing:

8.2.2.3 Arduino UNO as ISP:
Arduino also can be used as an ISP programmer for AVR or Arduino itself. I needed a bit longer procedure to programming the board with Arduino.
Official tutorial:
Arduino as ISP and Arduino Bootloaders
Sketch for the task:
ArduinoISP.ino
Wiring diagram:
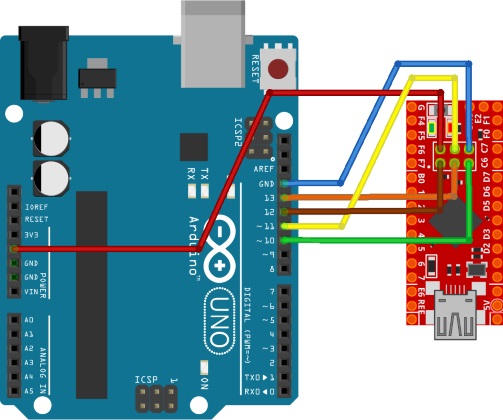
Settings of Arduino IDE:
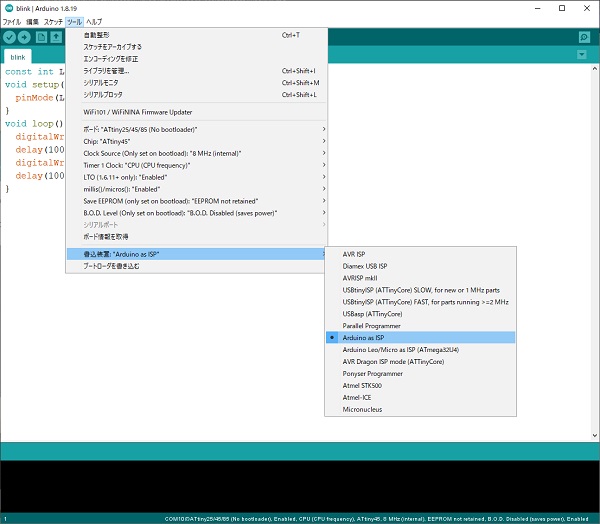
Writing:
Result:
8.3 Other programming languages and development environments
8.3.1 Assembly language and MPLAB for PIC
I have used PIC for a long time for my hobby projects(Indoor model airplane). Weight reduction was an essential demand for designing ultra light model airplanes.
There were few or no commercial products available for the purpose then, so we should develop very small instruments for our projects by ourselves.
At this time, PIC10F series were available. The series had a very small foot print and weighed less than 0.1 grams!
Ultra small IR receiver for indoor model airplanes designed by toko-san who was a leading member of our indoor model airplane community:
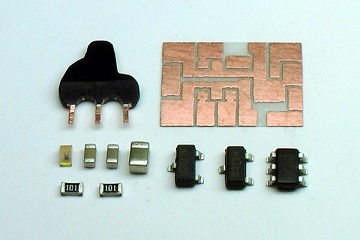

Built up weight of the receiver was only 0.3 grams or so. The control code was also written by toko-san using assembly language.
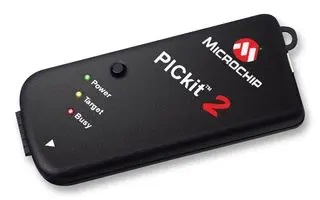
We compiled the code using MPLAB to a small hex file(only a few words long), burned it to PIC10Fs using PICkit 2, soldered these small chips on the PCB. A magnifier was necessary for the work!
Working sample:
It was a very small R/C ornithopter with wing span 80 mm and weighed 1.5 grams. It might be the smallest R/C ornithopter in the world at that time.
References:
Indoor Airplane World by toko since 2004
8.3.2 C++ and Mbed compiler for Nordic nRF5x boards and micro:bit
As I wrote in the former chapter, micro:bit is a member of Mbed family and it can be programmed with Mbed compiler and other languages/IDEs.
Main processor of micro:bit is Nordic nRF5x(nRF51822 ARM Cortex-M0 for V1.5 and nRF52833 ARM Cortex-M4F for V2). So micro:bit can be handled as Nordic nRF5x Mbed board.
One of the main features of micro:bit is wireless communication ability between micro:bits each other(Micro:bit Radio) or with PCs/smart phones(BLE:Bluetooth low energy).
I wrote a program in which a micro:bit acts as a wireless controller and another nRF5x board acts as a receiver.
Working sample:
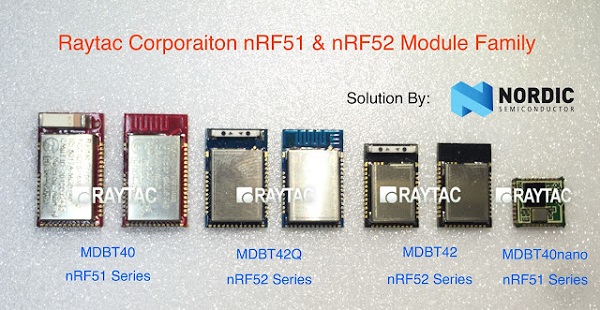
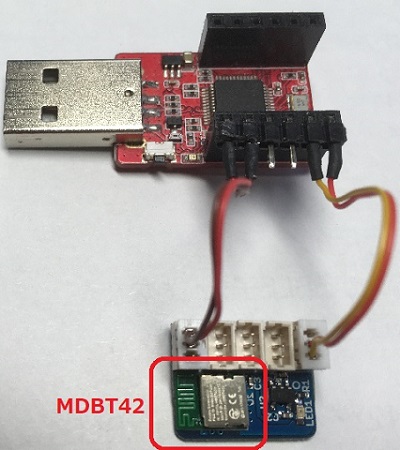
I used Raytac MDBT42 module as a receiver.
It contains Nordic nRF52832 under its metal shield. It has a very small foot print(L 13.8 x W 8.8 x H 1.9 mm) and light weight(0.38 - 0.40 grams) suitable for small R/C toys or wearable devices.
Raytac nRFx family:
Programming MDBT42 module using RedBearLab BLE Nano(maybe the smallest development board for nRF5x):
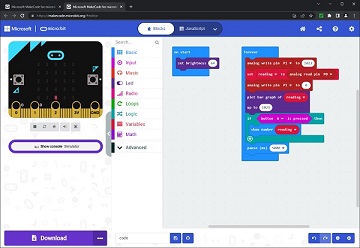
8.3.3 MakeCode for Nordic nRF5x boards
Microsoft MakeCode, or Microsoft Block Editor, is a ‘Low-Code’ program editor exclusive for micro:bit intended for younger people.
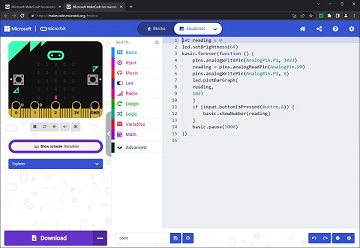
It runs on web browsers. Users can make programs by stacking ‘Blocks’ instead of writing codes. The block codes are translated into JavaScript codes internally and conpiled to hex files.
A few years ago, I found that the hex files MakeCode generated could also work in nRF5x boards, not only in micro:bit.
To make the hex files work in nRF5x boards, I should remove a few lines from the files. Unless the operation, the hex files wouldn’t work in nRF5x boards.
Maybe these operations are out of maker support scope, I don’t describe a detail, but it certainly works!
8.3.4 Arduino IDE for micro:bit?
I have heared that nRF5x boards can also be programmed with Arduino IDE. If it is true, micro:bit may be programmed with Arduino IDE, too. I would like to try them soon!