Week 1.5: Project management
This week I worked on installing necessary software, building the website you are currently reading and beginning the documentation process.
Installing Necessary Software
I began by installing some necessary software: * KiCAD 6.0.1 - installed from here * Visual Studio Code 1.63.2 - installed from here * Python 3.10.2 and pip 21.3.1 - installed from here * mkdocs 1.2.3 * Git 2.35
Most of these installs were done via install wizards and relatively seemless. For software that required some extra thought to install, I have documented my process below.
Installing Python and pip
I followed instructions from the page of a 2021 student, Jules Topart, to install Python with the necessary settings. Specifically, our instructor David Taylor had warned us to pay close attention to “Add Python to Path”. I confirmed python was correctly installed by opening Windows powershell to access the command prompt and using the command:
python --version
Python 3.10.2
pip install --upgrade pip
pip --version
Installing mkdocs
Once pip was installed, installation of mkdocs was a simple command:
pip install mkdocs
pip install mkdocs-material
pip install mkdocs-Git-revision-date-localized-plugin
I later found out that I had installed both pip and mkdocs “locally” in my user folder rather than “globally”, because I was not using the command prompt as an administrator.

Seeing this error message and remembering David Taylor had stressed the importance of global installation, I uninstalled both mkdocs and pip, and entered command prompt as an administrator to reinstall pip and mkdocs, which seemed to resolve the issue. Additionally, I have setup my Windows powershell to always run as an adminstrator by following the guide here to change a setting in the application properties.
Installing Git 2.35
I then turned to the process of installing Git to my computer, to which I am a total laymen. I relied on Jules’ instructions regarding the installation process. First, I installed Git for windows version 2.35 from here and ran the setup wizard.
I left most of the default settings alone, not having a deep understanding of their meaning. However I changed a few per Jules’ instructions: * Uncheck ‘Install Git GUI here’ - Neil has stressed that a Git GUI can be a crutch * Set Visual Studio Code as Git’s default editor
After installation was complete, I checked if it was succesful using the command:
Git --version
Git version 2.35.0.windows.1
Setting up SSH and cloning the repo
In order to get my SSH key and clone my GitLab repo, I followed Jules Topart’s and Teddy Warner’s documentation. Also helpful, was a presentation given to us by our local professor, Dr. David Taylor, and our global recitation with Krisjjanis Rijnieks. Lastly, Git’s own documentation is helpful for this process as well.
First I generated my unique SSH key with the command
ssh-keygen -t ed25519 -C "cwhorvat@ncsu.edu
Users\horva/.ssh/id_ed25519
I then navigated to this directory and copied my unique ssh key. Then I followed the instructions to input my unique ssh key into the GitLab webpage. Per others instruction, I used a public key (.pub). Image credit to Dr. David Taylor.
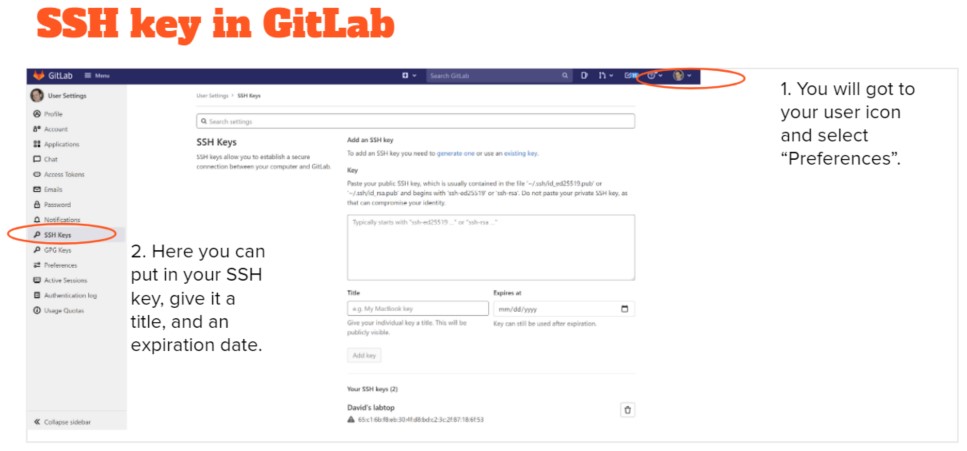
Having successfully given GitLab my SSH key, I then created a directory called C:\GitFab. This is where I decided to clone my git repository using the command
git clone git@gitlab.fabcloud.org:academany/fabacademy/2022/labs/charlotte/students/charles-whittemore.git
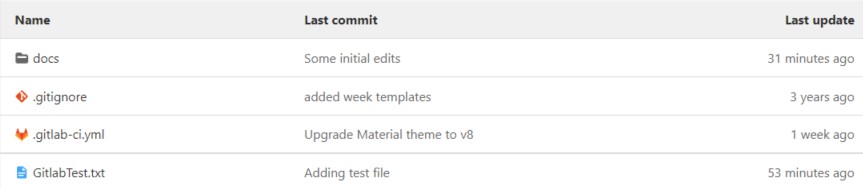
Beginning Web Development
At this point, I believe I have successfully linked GitLab and my local machine. In order to test this, I created a file text.txt inside my local GitFab directory. Through a series of commands,
git add .\GitlabTest.txt
git status
git commit -m "Adding test file"
git push
Next I began digging into the documentation here to begin customizing my site using mkdocs. Also useful was mkdocs official documentation site, this markdown cheatsheet and this page covering then kramdown syntax for more advanced options. To commit/push changes to the webpage, I used the same process outlined above. However, I have found that the following command can be useful to have a live preview of the webpage after staging changes, but before committing or pushing them to the repo.
mkdocs serve
I started with building the main page, deleting the introductory text, and adding an “under-construction” picture for kicks. Additionally, I began to construct the about me, student agreement, and week 01 pages. One noteworthy lesson here was how to scale images with mkdocs using the command
{:height="164px" width="626px"}
Attempting to embed a pdf into about me page
Began by trying to follow these instructions and this documentation.
But realized that I was headed in the wrong direction and that stackoverflow page might not meet my exact needs. I believe there is a simpler way of embedding a pdf with HTML code by following these instructions. Attempting the command
<embed src="/CH-CareerUpdate2022.pdf" type="application/pdf">

Which tells me that the pdf application is probably working, but it cannot find my pdf file. Unfortunately, this was as far as I could get and for now I have settled for uploading my pdf as a jpg. Update: Our global grader Yuichitamiya showed me how to correctly embed a pdf using the following code,
<embed src="./CH-CareerUpdate2022.pdf" type="application/pdf" width="100%" height=800>
Note the extra “./”. I have replaced the PDF on my about page accordingly.
Project Management software
I decided to give one of the project management/Gant chart software’s a try, in an effort to become more digitally organized throughout Fabacademy. Thus began the task of finding and using the right software. My criteria we’re as follows: * Usable and user friendly. I don’t want to have to think much to use the software * The software should not get in the way of productivity, but rather aid it. Therefore, I should be naturally brought back to using it over time. * Free and/or affordable * Not tightly controlled or at risk of a changing business model * Open source and supported is a plus
With these properties and Neil’s suggestions in mind, I have settled on GanttProject for now. Luckily, this program has good export functions should I need to change softwares down the road. So I downloaded the latest free version and watched the tutorial video here.
Update from a few days later: this software is not very user friendly by modern standards. I do not find myself naturally brought back to it over time. I will likely look towards a different productivity software eventually.
Installing Chocolatey and git-sizer
My understanding is that chocolatey will help me install other things easily. First, I installed Chocolatey following the “individual” instructions here.
Then I used choco to install git-sizer with the command
choco install git-sizer
Installing CAD Query
Followed directions here. Realized I needed to use command prompt instead of powershell, so that I could use the curl command.
Note: later on, I got lost and was unable to open cq-editor. In an effort to retrace my steps, I uninstalled miniforge and began a fresh installation. For some time, the key step I was missing was to activate the miniforge environment as detailed in the link above.
My understanding is that I’ve downloaded miniforge locally under my user account (as opposed to for all users) so that I can run a version of python 3.9 without damaging my computers primary Python install (currently 3.8). Then once its activated, I was able to install cadquery and cq-editor using conda commands. For the future, I need to use the following command in the terminal to activate miniforge.
:: Activate
cmd /K ""%USERPROFILE%/Miniforge3/Scripts/activate.bat" "%USERPROFILE%/Miniforge3""
This will add (base) to the command line and then I can run the GUI, cq-editor with the command.
cq-editor
Write-Host "Activating miniforge and opening CQ-Editor"

cd \
cd .\Users\horva\miniforge3
cmd /K ""%USERPROFILE%/Miniforge3/Scripts/activate.bat" "%USERPROFILE%/Miniforge3""
cq-editor
Running log of Web Dev.
My documentation conventions and good practices
- functions should be in bold
- List goals of each section at the top of each page
- Test all links
Issue with pipeline and Hard Reset
Unfortunately, I made too many commits without pushing to the repo. Having committed many images and design files, my push was above the limit of 10 MB and failed. Naturally, I thought deleting those files locally, and then repushing/committing would resolve the issue. We think what happened was that I was able to delete parts of those files, but not parts of those files stored in the hidden .git file. Even after deleting all of them, the push was still too large. Therefore, we went for the “nuclear option” suggested on this page. This was a good option because I was sure to backup all of my changes, images, and design files. So I ran a hard reset to the origin/master, origin/HEAD, which was 6 commits outdated. Starting from this fresh slate, I was able to add back in the backed up changes piece by piece. Problem solved. Credit to my sister, Avery Horvath for helping me through this pipeline crisis.
Avery’s instructions for pushing to group site
Avery has been a huge help for our team with regards to git, especially as it pertains to our group site. Here is her suggested workflow for making changes to the group site. -commit your local changes -‘git pull’ -resolve any conflicts git pull created and commit anything thats modified in git status after the conflicts are resolved -git push
Issue with order of assignments
I ran into a small issue where the assignment pages were listed out of order on my webpage. This led to Dr. Fagan missing my Project management page when it came time for grading. This was when I realized it was out of order and far down the list, see below.
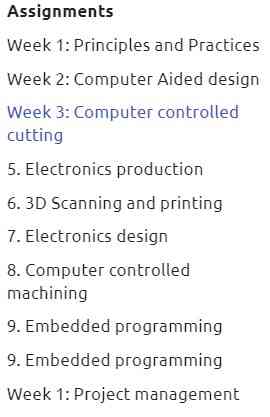
I could tell this was most likely because I renamed project management from week 2 to week 1.5. That said, I made this change in 3 places and it wasn’t until I looked at the file names that I realized the issue.
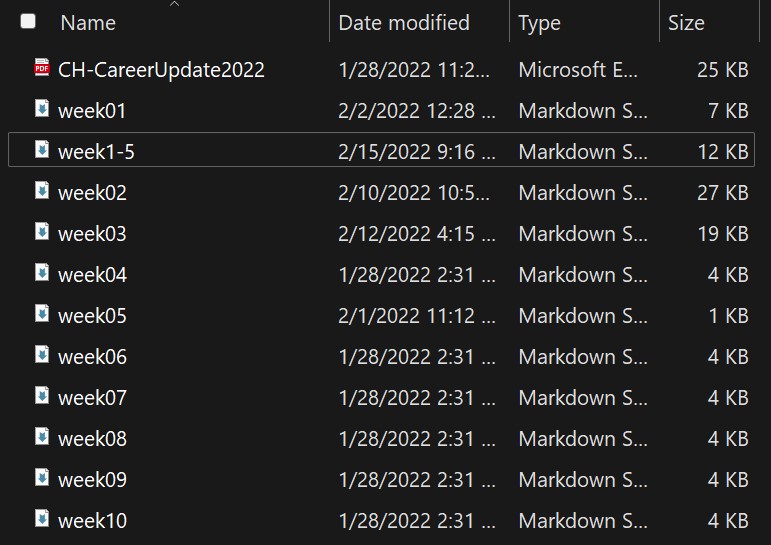
By forgetting the leading zero on week1-5.md, I was asking the table of contents to list week 1.5 between week 9 and 10. Once adding this leading zero week01-5.md and adding a hyphen to week01-.md, the section took its rightful place between week 1 and 2.
Landing Page Development
Taking inspiration from other students, I wanted to create a pretty landing page with a grid of the weekly assignments. I quickly realized that most of these students started their sites with HTML templates that make this sort of thing easier. With a little searching, I found other students had success using this HTML template Phantom. So I started by importing the entire contents of this template into my repo, and pasting the index code into my index.md. This worked surprisingly well and gave me the grid of images I was looking for. By adjusting the thumbnail images in the file structure, the texts, the styles, and the links, I was able to approach a look that I was going for. That being said, this theme does a lot beyond this simple image grid and I got the sense that a lot of the JS, CSS, and HTML code was fighting my initial mkdocs site. Fonts and menu’s we’re incongruent between my homepage and the rest of my site. Honestly, I couldn’t believe how good it was at reconciling these differences. Even still, I didn’t feel good about copying someone else’s code as a black box, crossing fingers, and hoping for the best. Luckily, I was simulating everything with the command mkdocs serve, so none of these changes had been pushed yet.
With the help of Adam Durrett, I then started anew creating my own image grid with html code. This is how I created the current landing page which is still a work in progress.
All works shared on this site 'A Fab Academy Journey with Charlie Horvath' by Charles W. Horvath are licensed under Attribution-NonCommercial-ShareAlike 4.0 International![]()
![]()
![]()
![]()