15. Interface and application programming.
Each week, I feel like an astronaut exploring unexpected environments. This week, I have landed on the planet: interfaces and application programming. More than Electronics, I have discovering now programming. I will start a Mooc about C after the fabacademy.
This assignment is very difficult to be on time because this is the last three weeks for the students (in the engineering school I work) to finish their end study project. I need to admit that I will not able to deliver the final project on time…
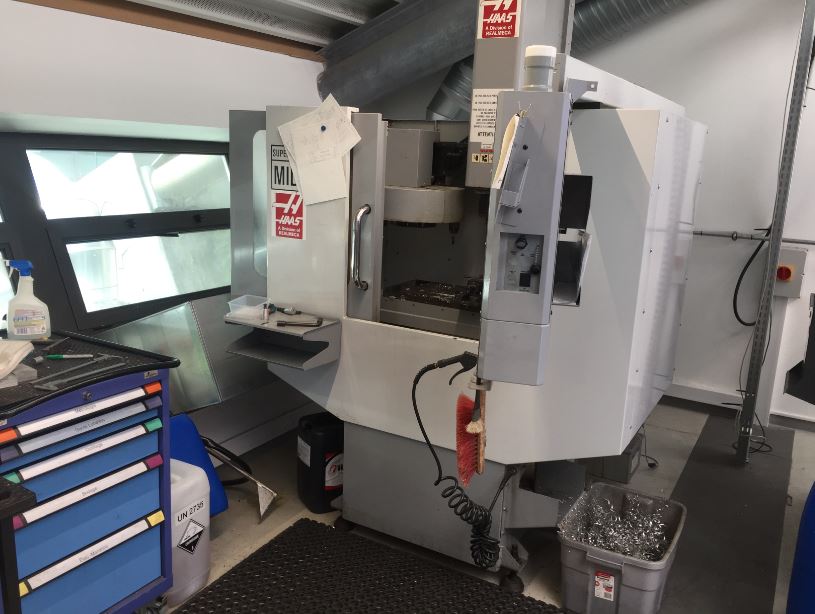
I have spent more time learning the haas cnc machine and welding.
Processing
Processing is a flexible software sketchbook and a language for learning how to code within the context of the visual arts.
quick tutorials for drawing.
I have watched some tutorials for the basics of processing. netprof
origins
lines
ellipse
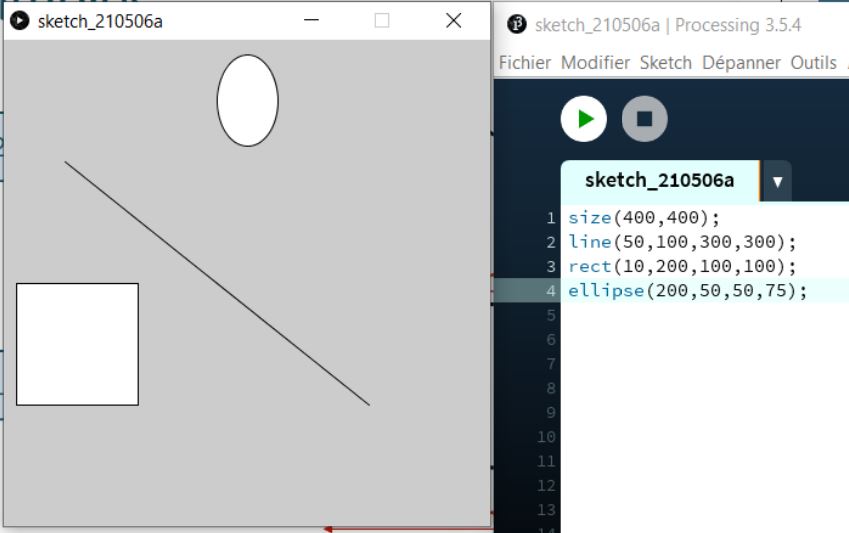
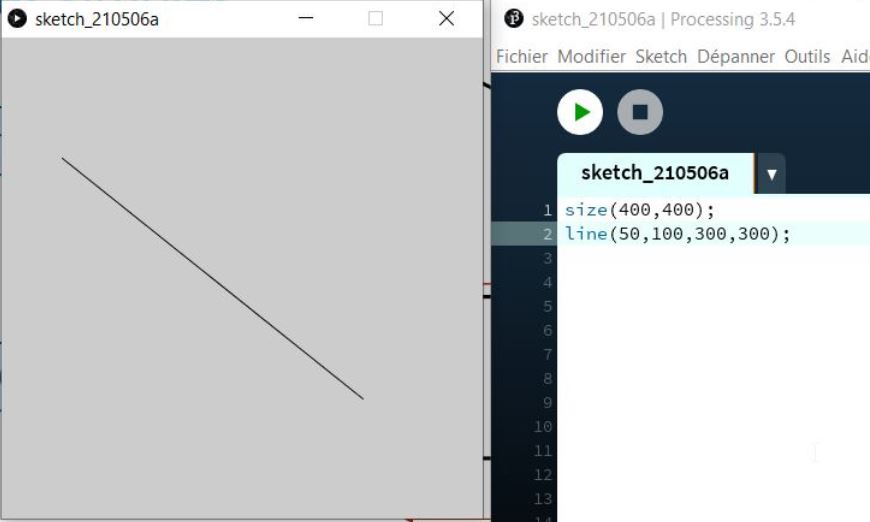
//create a windows
size(400,400);
line(50,100,300,300);
rect(10,200,100,100);
ellipse(200,50,50,75);
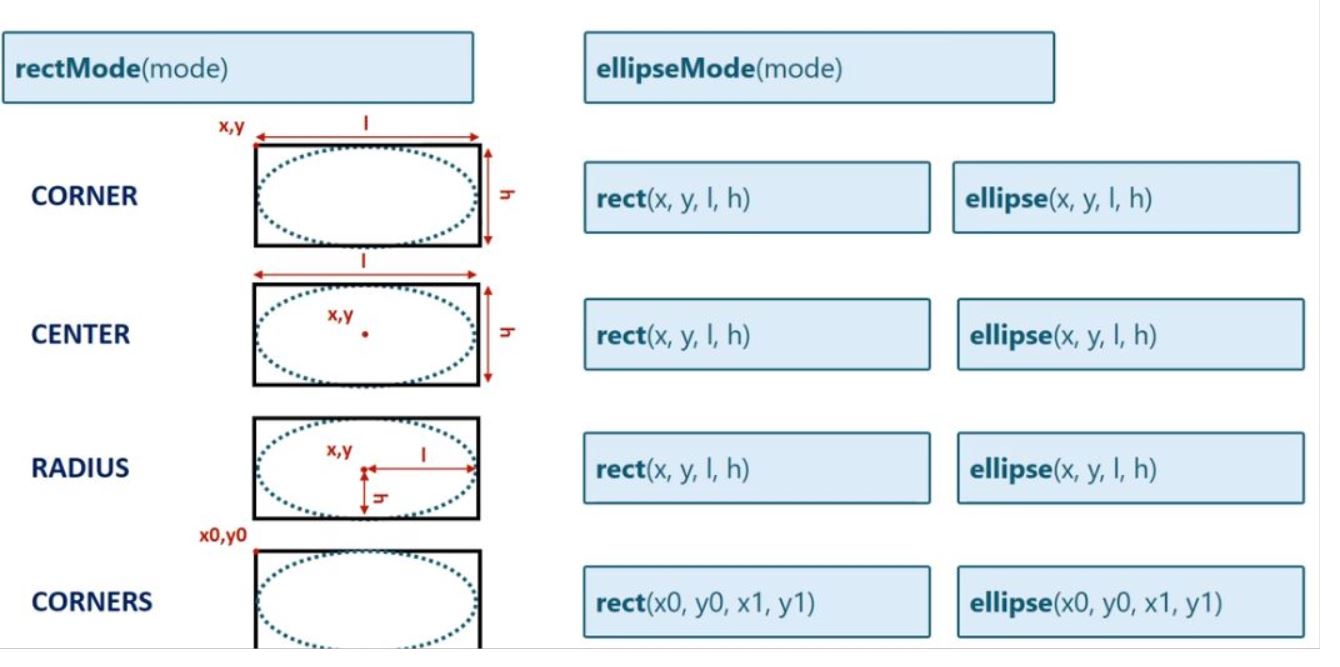
ellipse and rectangle parameters
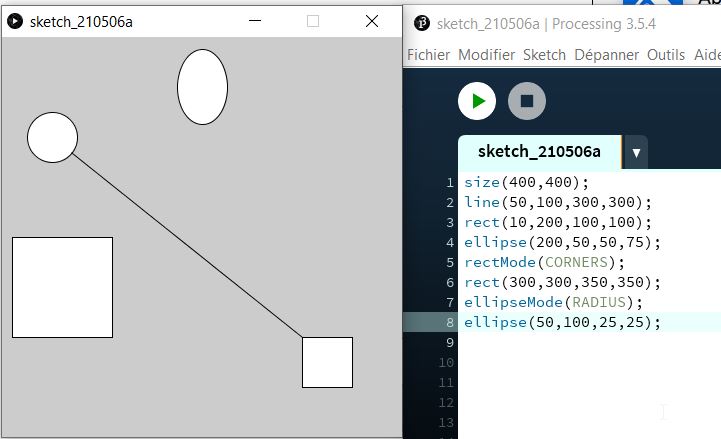
//create a windows
size(400,400);
line(50,100,300,300);
rect(10,200,100,100);
ellipse(200,50,50,75);
rectMode(CORNERS);
rect(300,300,350,350);
ellipseMode(RADIUS);
ellipse(50,100,25,25);
Arc
Arc parameters
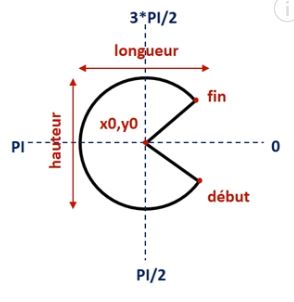
Arc
arc(x0,y0,length,height,start,end); Start and End are measured in radian = [0 - 2pi]
Triangle and quadrilatere
triangle(x1,y1,x2,y2,y3);
quad(x1,y1,x2,y2,x3,y3,x4,y4)
triangle and quadrilatere parameters
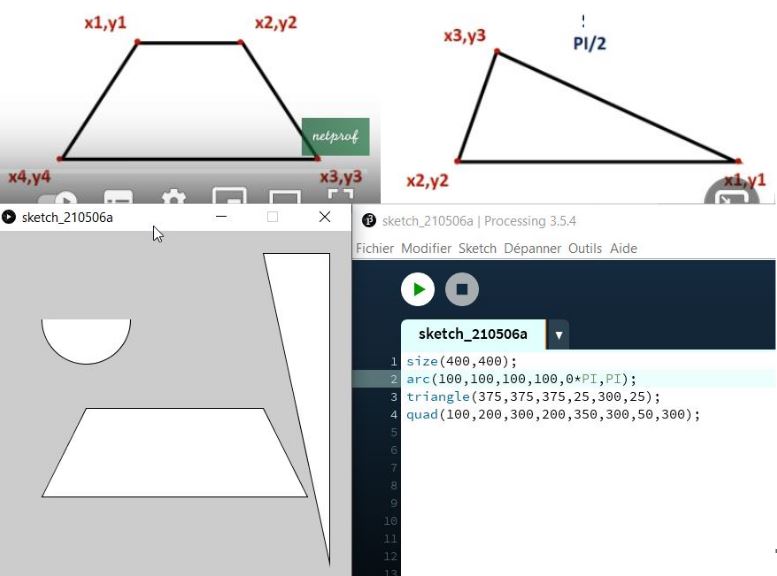
size(400,400);
arc(100,100,100,100,0*PI,PI);
triangle(375,375,375,25,300,25);
quad(100,200,300,200,350,300,50,300);
Freeform shapes:
polyline

Start of the shape:
beginShape()
Add vertex:
vertex(x,y)
End of shape:
endShape()
Connecting start/end
endShape(CLOSE)
size(400,400);
beginShape();
vertex(25,25);
vertex(50,50);
vertex(75,25);
vertex(100,50);
vertex(125,25);
vertex(150,50);
endShape();
TEXTING
text(“Hello”,x0,y0)
Aligning text
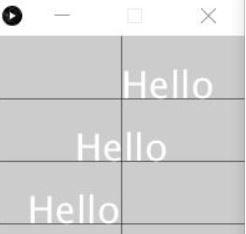
Size
textSize(height)
Align text horizontaly
textAlign(alignX) LEFT/CENTER/RIGHT
Align text verticaly and horizontaly
textAlign(alignX,alignY) BOTTOM CENTER TOP
size(200,400);
strokeWeight(0.5);
line(0,50,200,50);
line(0,100,200,100);
line(0,150,200,150);
line(100,0,100,400);

textSize(30);
text("Hello",100,50);
textAlign(CENTER);
text("Hello",100,100);
textAlign(RIGHT);
text("Hello",100,150);
Colors: RGB RED GREEN BLUE:
RED: R=255;G:0;B=0 GREEN: R=0;G=255,B=0 BLUE: R=0;G=0;B=255; BLACK: R=0;V=0;B=0;
Transparency: ALPHA [0-255]
Colorize the background
BackGround(r,v,B)
Stroke and Fill
Colorize the stroke:
stroke(r,v,b)
Modify alpha on stroking
stroke(r,v,b,a)
noStroke()
fill a space:
fill(r,v,b)
Modify alpha on filling
fill(r,v,b,a)
No fill
nofill()
size(400,400);
background(255,150,150);
stroke(0.200,0);
fill(0,0,255);
rect(200,200,100,100);
noStroke();
fill(0,255,0);
arc(200,200,50,50,0.5*PI,2*PI);
stroke(255,255,255);
noFill();
triangle(200,200,200,400,400,200);
masterpiece

Stroke options:
Smooth Stroke
smooth()
Modify the weight of stroke
strokeWeight
Modify the join of strokes
strokeJoin(type) MITER/BEVEL/ROUND
stroke joins

Modify the end style of stroke
strokeCap(type) PROJECT/ROUND/SQUARE
stroke cap

size(400,300);
background(0,150,150);
smooth();
noFill();
strokeJoin(ROUND);
strokeWeight(8.0);
rectMode(CENTER);
rect(200,150,250,150);
strokeWeight(6.0);
strokeCap(ROUND);
line(75,75,200,150);
line(200,150,325,75);
stroke cap

Order
Modifications.
When you modify a style, the following commands appears with this style. You need to add a new style for the next commands.
layers
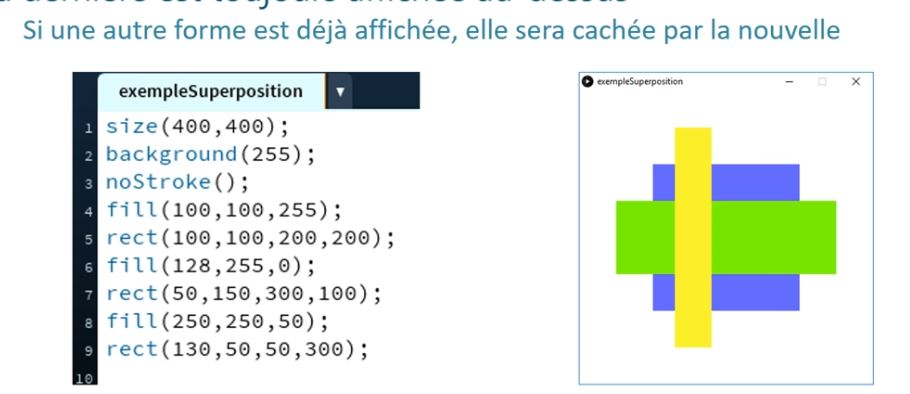
If you want to selective modifications, you need to use two functions as brackets:
| ( | ) |
|---|---|
pushStyle() |
popstyle() |
how to interact:
I have followed the “one hour of code” from Daniel Shiefmann

the coding train Daniel Shiefmann
// Once at the start.
void setup() {
//set up the size of the canvas
size(5 00;400)
}
//loop
void draw(){
background();
fill;
stroke
}
moving stuffs:
void setup() {
size(500,400);
}
void draw() {
background(0);
stroke(255);
fill(128);
ellipse(mouseX, mouseY, 100, 100);
}
MouseX+50
mouseX/3
having a path:
void setup() {
size(500,400);
background(0);
}
void draw() {
stroke(255);
fill(128);
ellipse(mouseX, mouseY, 100, 100);
}
_mousepressed_

Conditional statement:
void setup() {
  size(500,400);
}

void draw() {
  background(0);
  stroke(255);
  fill(128);

  if (mousePressed) {
    rect(250,200,100,100);
  } else {
    ellipse(250, 200, 100, 100);
  }
}

Clear the background from the se
void setup() {
  size(500, 400);
  background(10, 80, 100);
}

void draw() {
  if (mousePressed) {
    background(10, 80, 100);
  }

  stroke(255, 255, 255);
  fill(160, 220, 90);
  ellipse(mouseX, 200, 300, 300);

  fill(160, 210, 230);
  rect(245, mouseY, 10, 240);

  fill(255, 255, 255);
  ellipse(mouseX, mouseY, 70, 70);
}
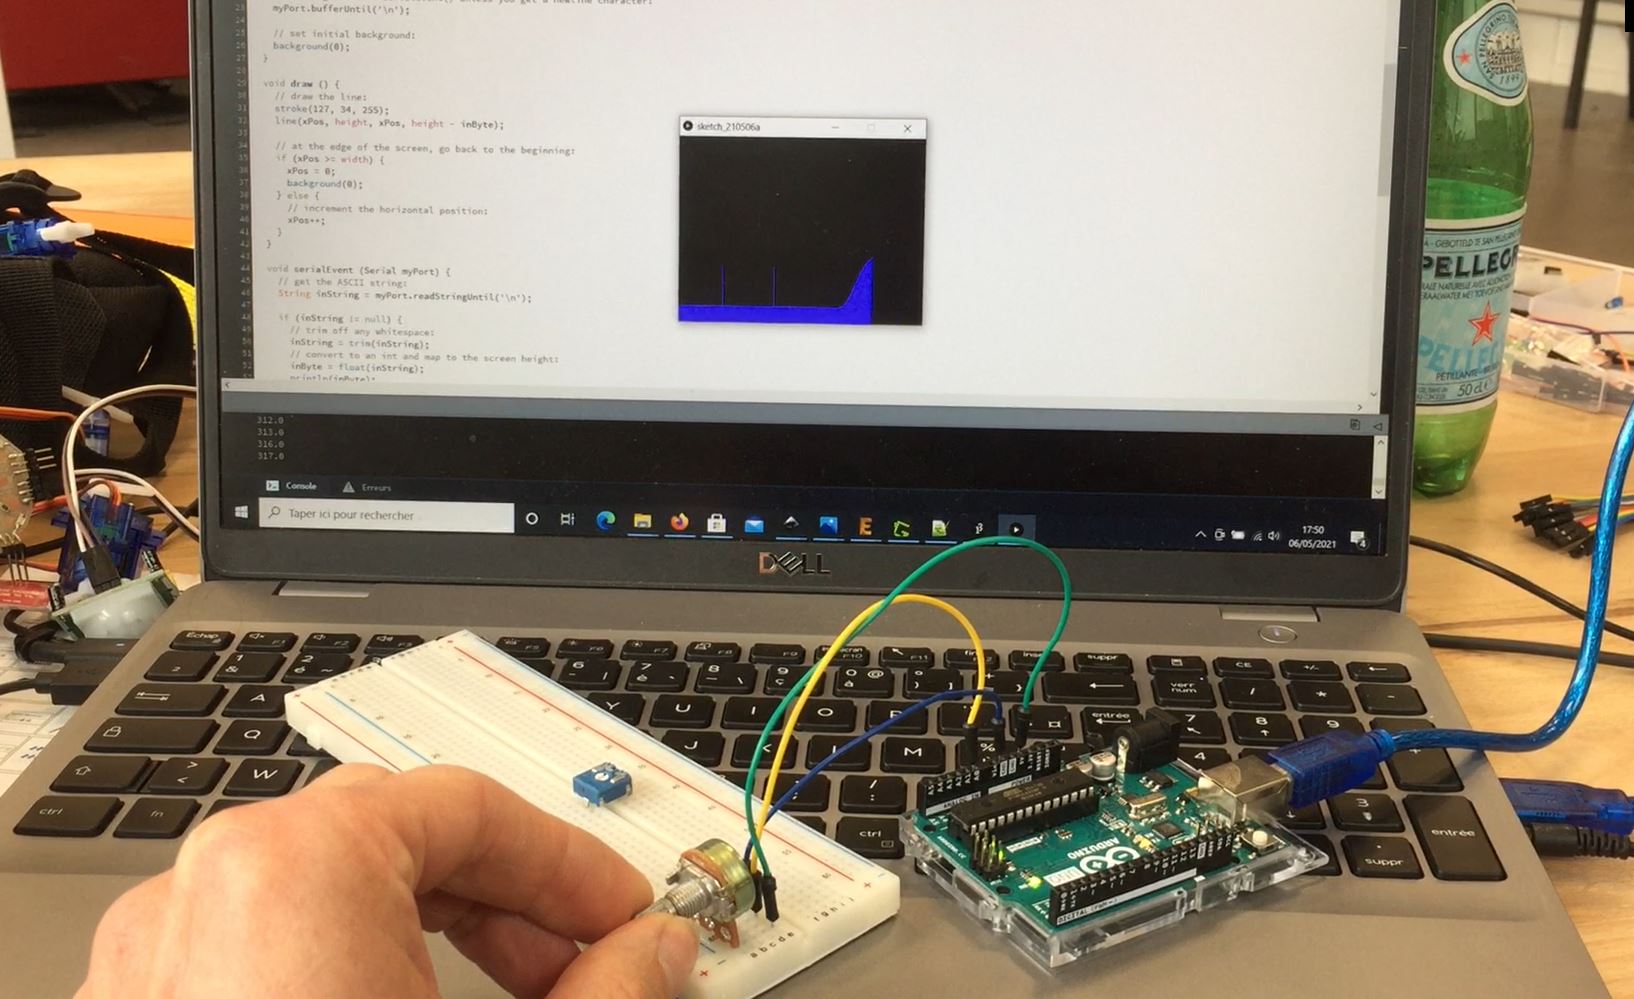
Fabacademy tutorial: Arduino/Processing.
To learn, I have followed the fabacademy tutorial I have programmed the arduino to get from the serial port information. The results of the moving potentionmeter is sent to the computer via the fonction “serial.println”. Once processing is launched, the serial communication allows to make a graphic simulation of the moving potentiometer.
First, plug the potentiometer to Arduino.
graph program

Program Arduino with the following code.
graph
/*
  Graph

  A simple example of communication from the Arduino board to the computer: The
  value of analog input 0 is sent out the serial port. We call this "serial"
  communication because the connection appears to both the Arduino and the
  computer as a serial port, even though it may actually use a USB cable. Bytes
  are sent one after another (serially) from the Arduino to the computer.

  You can use the Arduino Serial Monitor to view the sent data, or it can be
  read by Processing, PD, Max/MSP, or any other program capable of reading data
  from a serial port. The Processing code below graphs the data received so you
  can see the value of the analog input changing over time.

  The circuit:
  - any analog input sensor attached to analog in pin 0

  created 2006
  by David A. Mellis
  modified 9 Apr 2012
  by Tom Igoe and Scott Fitzgerald

  This example code is in the public domain.

  http://www.arduino.cc/en/Tutorial/Graph
*/

void setup() {
  // initialize the serial communication:
  Serial.begin(9600);
}

void loop() {
  // send the value of analog input 0:
  Serial.println(analogRead(A0));
  // wait a bit for the analog-to-digital converter to stabilize after the last
  // reading:
  delay(2);
}
Go to Processing, and enter the code.
 import processing.serial.*;

  Serial myPort;        // The serial port
  int xPos = 1;         // horizontal position of the graph
  float inByte = 0;

  void setup () {
    // set the window size:
    size(400, 300);

    // List all the available serial ports
    // if using Processing 2.1 or later, use Serial.printArray()
    println(Serial.list());

    // I know that the first port in the serial list on my Mac is always my
    // Arduino, so I open Serial.list()[0].
    // Open whatever port is the one you're using.
    myPort = new Serial(this, Serial.list()[0], 9600);

    // don't generate a serialEvent() unless you get a newline character:
    myPort.bufferUntil('\n');

    // set initial background:
    background(0);
  }

  void draw () {
    // draw the line:
    stroke(127, 34, 255);
    line(xPos, height, xPos, height - inByte);

    // at the edge of the screen, go back to the beginning:
    if (xPos >= width) {
      xPos = 0;
      background(0);
    } else {
      // increment the horizontal position:
      xPos++;
    }
  }

  void serialEvent (Serial myPort) {
    // get the ASCII string:
    String inString = myPort.readStringUntil('\n');

    if (inString != null) {
      // trim off any whitespace:
      inString = trim(inString);
      // convert to an int and map to the screen height:
      inByte = float(inString);
      println(inByte);
      inByte = map(inByte, 0, 1023, 0, height);
    }
  }

##
We have a visualization of the interface.
This is a summup of the processings basics basics
French tutorials on Processing.
https://fr.flossmanuals.net/processing/les-variables/
Creating an interface with the input of my project.
I have modified a Fabacademy tutorial to used the potentiometers of my joystick. I thought it will be easy, but I really need to learn more about programming langages.
Problems
How to manage two data inputs. For the fab tuto, there was just one input.
Jules told me to make an array to separate the incoming data. Hum…, well…, “what you are talking about?”
First think about the variables:
There are different variables I need to know to continue programming and they are not the same from one langage to another one.
https://fr.flossmanuals.net/processing/les-variables/
int
We can stock a whole number in Processing, 3 for instance, in a int variable.
int entier;
entier = 3;
print(entier);
float
Decimal number such as 2,3456.
float decimal;
decimal = PI;
print(decimal);
double
A more detailed decimal number.
double long_decimal;
long_decimal = PI;
print(long_decimal);
boolean
A variable with Two stats: (true) or (False) used for conditions.
boolean vraifaux;
vraifaux = true;
println(vraifaux);
char
This variable stocks a character ( a letter) See quotations.
char lettre;
lettre = 'A';
print(lettre);
string
This variable stocks text. See double cotations.
String texte;
texte = "Bonjour!";
print(texte);
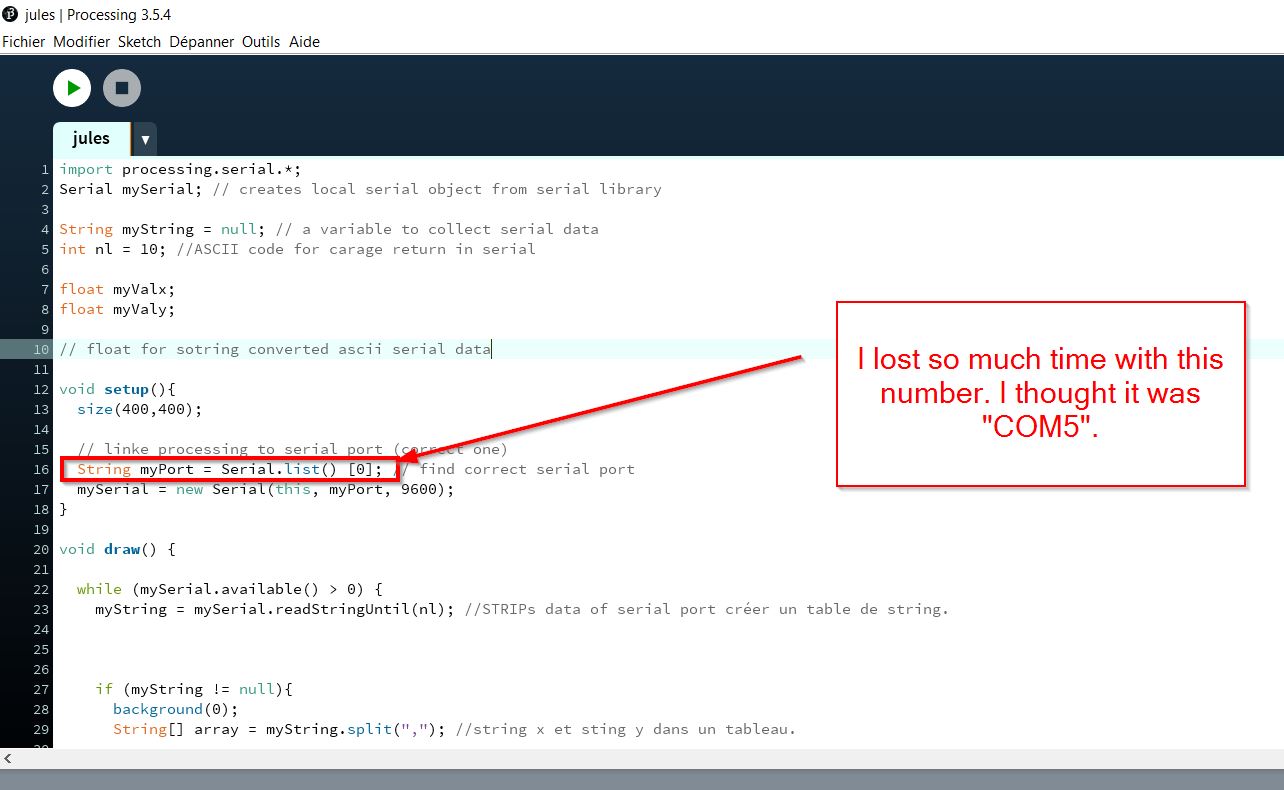
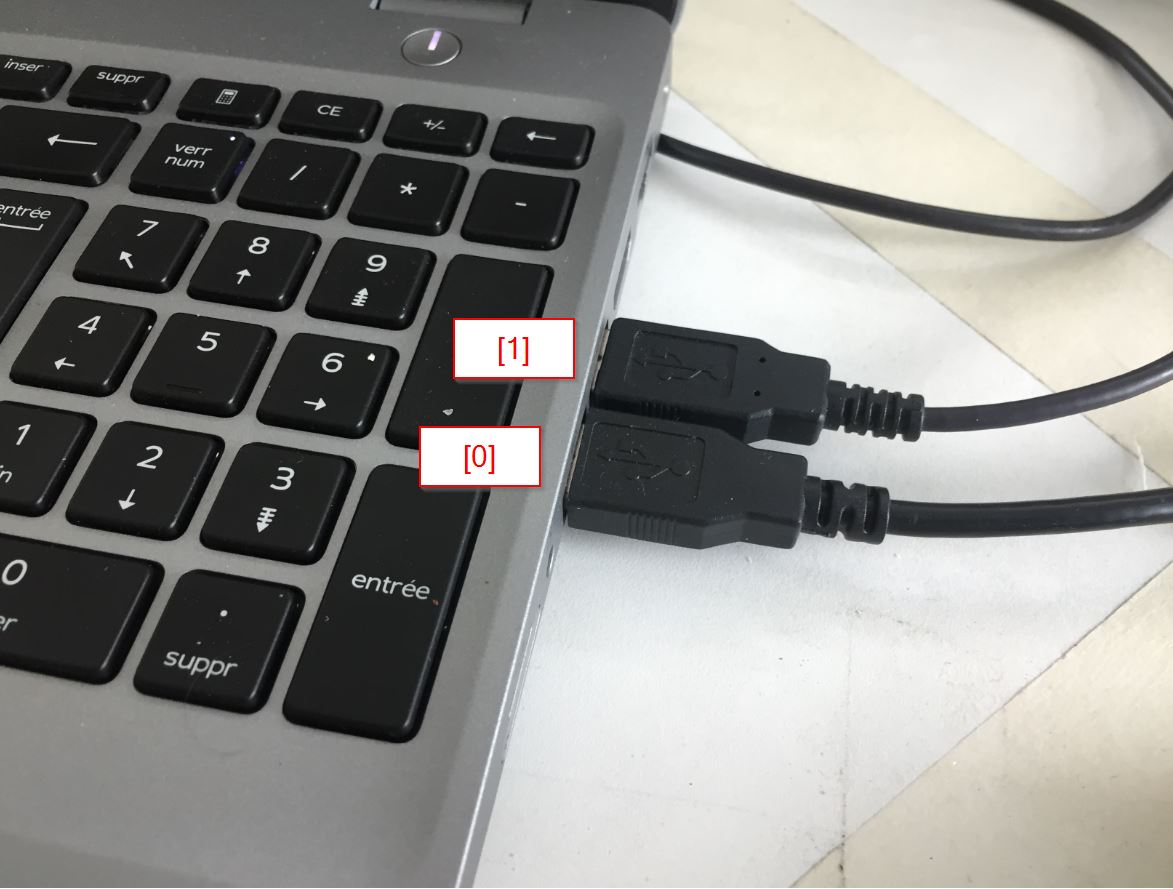
[FAIL] serial port. Instead of “COM5# I should have put [0] or [1]. That two numbers means the two USB connecte on my computer.
Arrghh, that become to be sharped for my brain....
[FAIL] function SPLIT, I spend a lot of time, hopefully some students of my school and Jules Topart helped me.
import processing.serial.*;

Serial mySerial; // creates local serial object from serial library

String myString = null; // a variable to collect serial data
int nl = 10; //ASCII code for carage return in serial

float myValx;
float myValy;

// float for sotring converted ascii serial data

void setup(){
  size(200,400);

  // linke processing to serial port (correct one)
  String myPort = Serial.list() [0]; // find correct serial port
  mySerial = new Serial(this, myPort, 9600);
}

void draw() {

  while (mySerial.available() > 0) {
    myString = mySerial.readStringUntil(nl); //STRIPs data of serial port créer un table de string.
    String[] array = split(myString,[,]); //string x et sting y dans un tableau.


    myValy = float (array[1]);

    if (myString != null){
      background(0);
     println(myValy);
    myValx = float (array[0]); // takes data from serial and turns it inot number , couper la variable en deux.
      println(myValx);
      myValx = myValx/1023 *height;


      rectMode(CENTER);
      rect(width/2, height-(myValx/2),100, myValx);
    }
  }
}
I spent a lot of time trying to debugg this alert:
 Axel from my school, found the problem.
String[] array = myString.split(",");
get x,y from serial monitor (arduino)
Processing: Moving the X-Axe:
When I was working on the Y axe, there were a lot ot fail alerts, I did not know why and where the problem was.
Finally…
solution: unpplug, plug the usb stick.
import processing.serial.*;
Serial mySerial; // creates local serial object from serial library

String myString = null; // a variable to collect serial data
int nl = 10; //ASCII code for carage return in serial

float myValx;
float myValy;

// float for sotring converted ascii serial data

void setup(){
  size(400,400);

  // linke processing to serial port (correct one)
  String myPort = Serial.list() [0]; // find correct serial port
  mySerial = new Serial(this, myPort, 9600);
}

void draw() {

  while (mySerial.available() > 0) {
    myString = mySerial.readStringUntil(nl); //STRIPs data of serial port créer un table de string.


    if (myString != null){
      background(0);
      String[] array = myString.split(","); //string x et sting y dans un tableau.

      myValx = float (array[0]);
      println(myValx);
      myValy = float (array[1]);
      println(myValy);

      myValx = myValx/1023 *height;
      myValy = myValy/1023 *height;


      rectMode(CENTER);
      rect(width/4, height-(myValx/2),100, myValx);

  rectMode(CENTER);
      rect(3*width/4, height-(myValy/2),100, myValy);


    }
  }
}
Finally, it is working on Processing!! Hurrah !!
I do not have time to finish for this week, the teachers and students from my school need me for
Axel recommand me to Learn C langage instead of Python to understand more about electronics.
More option: Installing android on processing.
[FAIL]I had some issues installing the option with Sylvain.
Options: android
sdk