2. Project management
There are several ways to be set up for blogging the incoming works. The fabacademy provides each student a “data space” on their website. You can use a site generator called mkdocs. I will explain how to get the terminal of Linux on windows. You can skip this step if you are on linux.
How to use the linux terminal on windows.
The more practical way would be working on the linux environment. But it could be convienent to get the terminal on the both versions, especially if you work on windows 3d softwares such as autodesk Fusion.
But the real question is :What is the terminal??
Terminal is An Interface Between Human and Computer.
- I have found Linux vocabulary
Human and computer are two independent entities. Human need an interface to put information into the computer and read output from it. These days, input device of personal computers includes: keyboard, mouse, and microphone. Output device includes monitor and speaker. They are commonly called peripheral devices. But in the Unix and Linux world, input and output devices are called terminal. The opposite of terminal is the host, which includes devices like CPU, RAM, HDD and so on.
To my mind, Terminal is An Interface Between Human and Computer. Through a windows, you type commands in order to get programs working.
Windows has his own “terminal” called powershell, I will trick windows to get the Linux terminal.
installing WSL windows Subsytem Linux.
Go to the microsoft store and get WSL
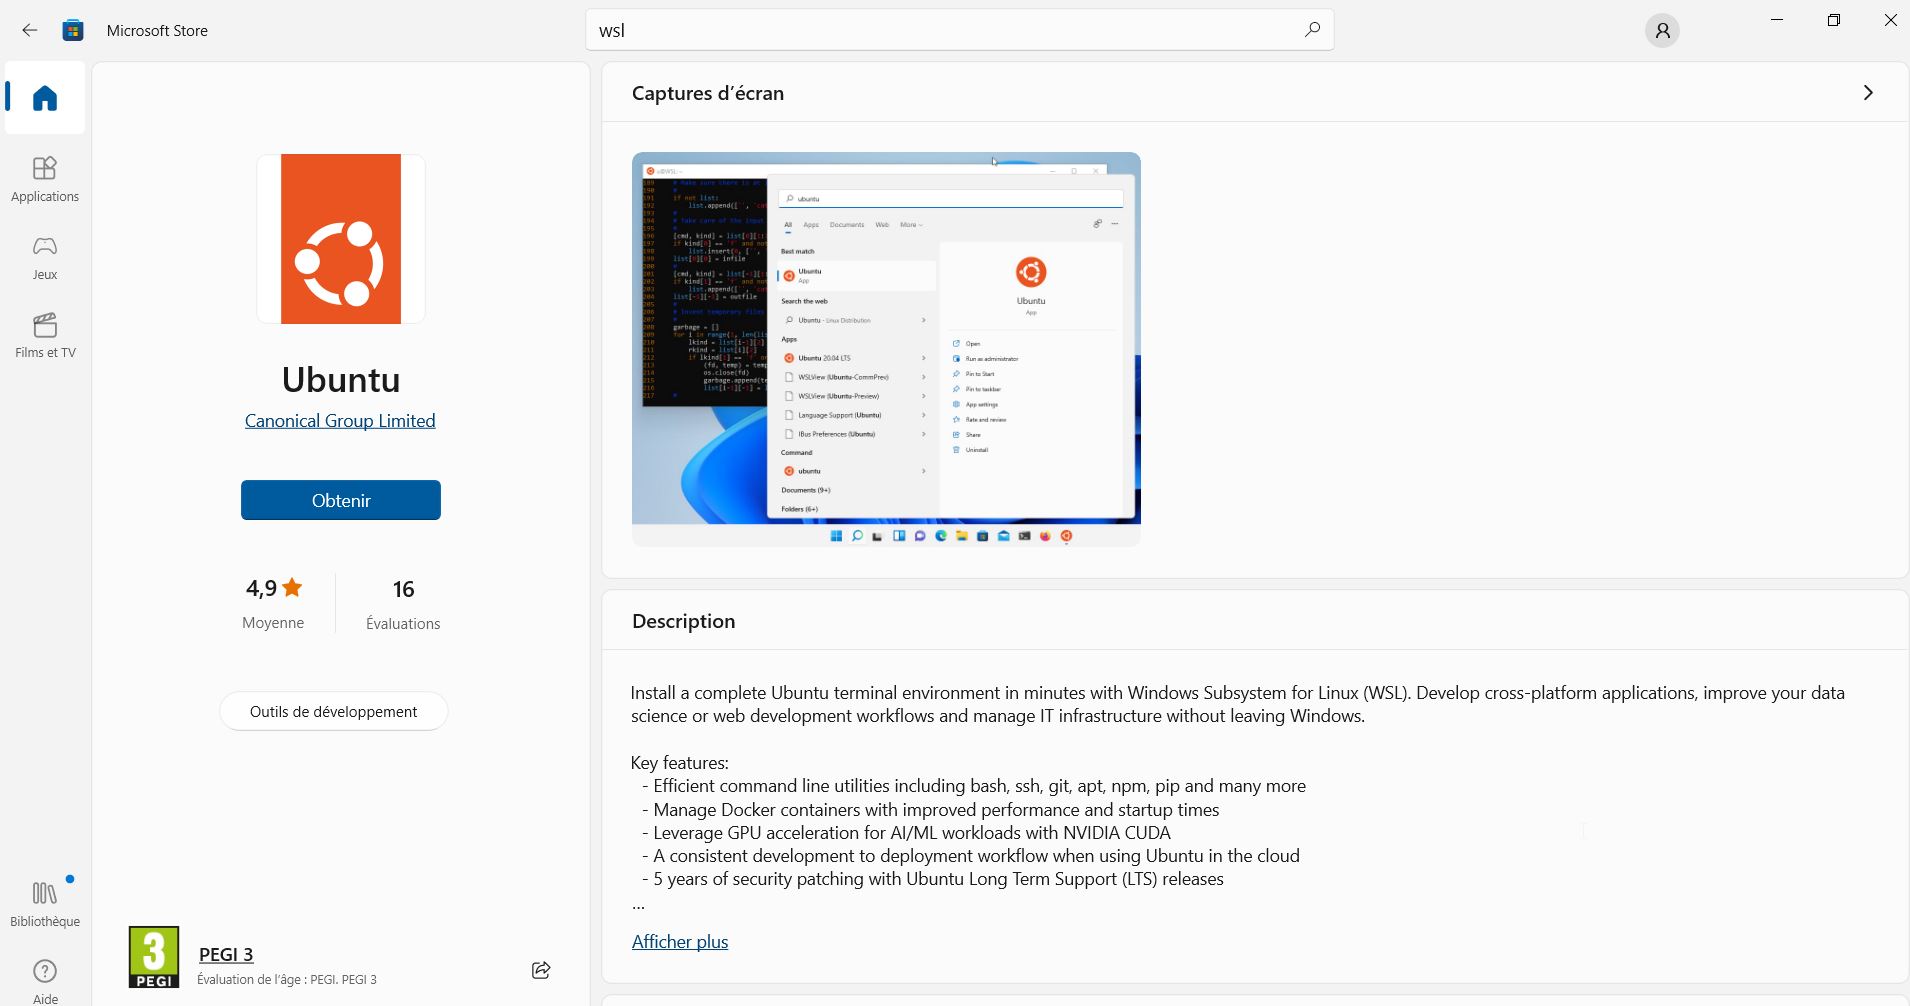
You can select the terminal.
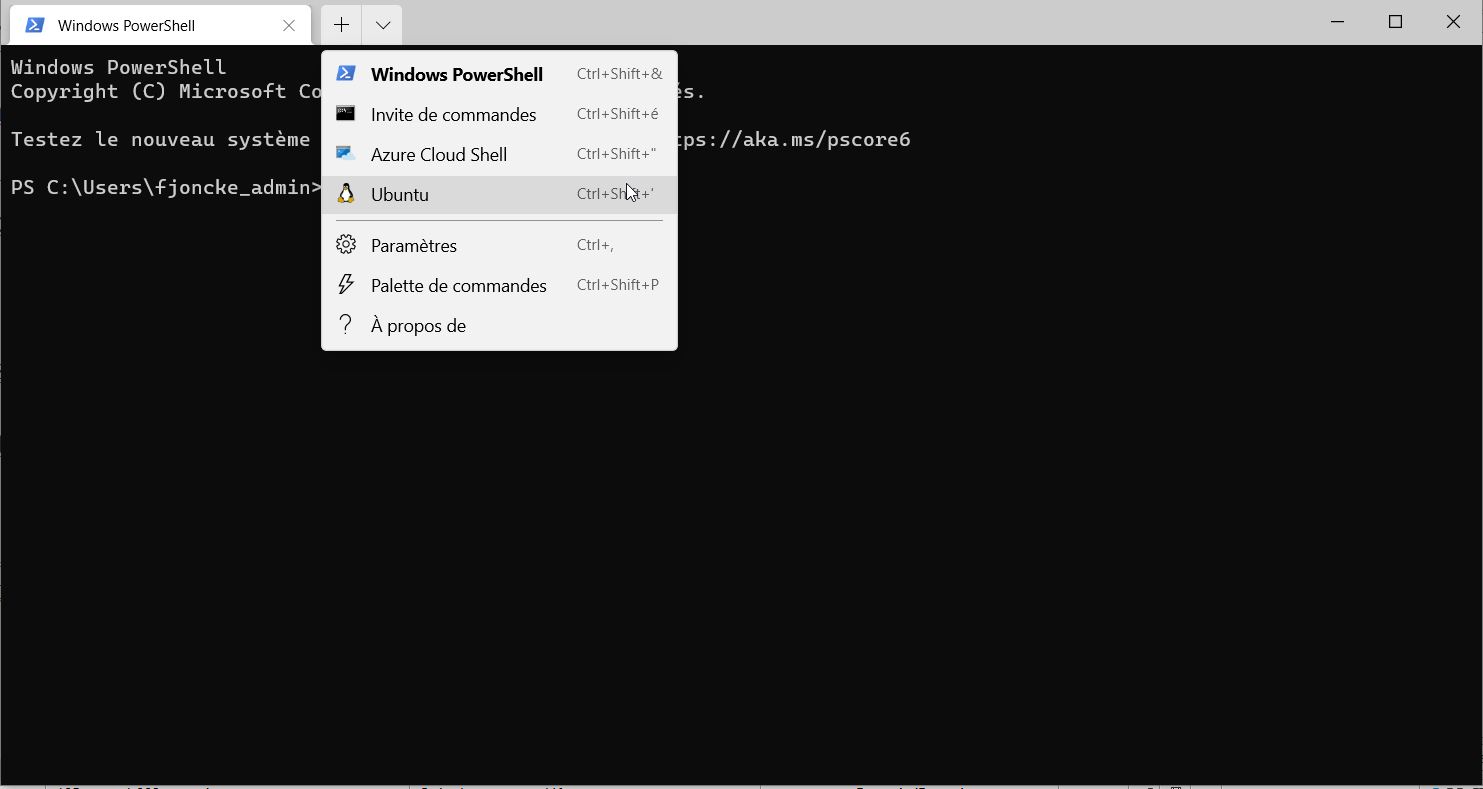 Then you run the terminal and you create your login and password.
There are some basic commands to know:
| command | Function |
|---|---|
| cd | change the directory (folder) |
| mkdir | Create a folder |
| rm | remove |
| ren | rename |
| pwd | where am I? |
| ls | List of files where I am |
| dir | List of files where I am |
| cd | change the directory (folder) |
| cd | change the directory (folder) |
| cd.. one folder up |
more infos
cat see . rerpertoire actuel
To work, you need to install different applications such as Python and PIP python.
Python: is commonly used for developing websites and software, task automation, data analysis, and data visualization. Since it’s relatively easy to learn, Python has been adopted by many non-programmers such as accountants and scientists, for a variety of everyday tasks, like organizing finances.
PIP is the python package manager. You need it as well. [NDLR 2023] I found out that apt in the linux command is the general package manager of the terminal. You can check it those are already installed:
$ python3 --version
Python 3.8.10
pip --version
pip 20.0.2 from /usr/lib/python3/dist-packages/pip (python 3.8)
If it is not installed, install them:
$ sudo apt get install python3
$ sudo apt get install python3-pip
If there are already installed, you can also check if you need to upgrade your version.
sudo apt update -y && sudo apt upgrade -y
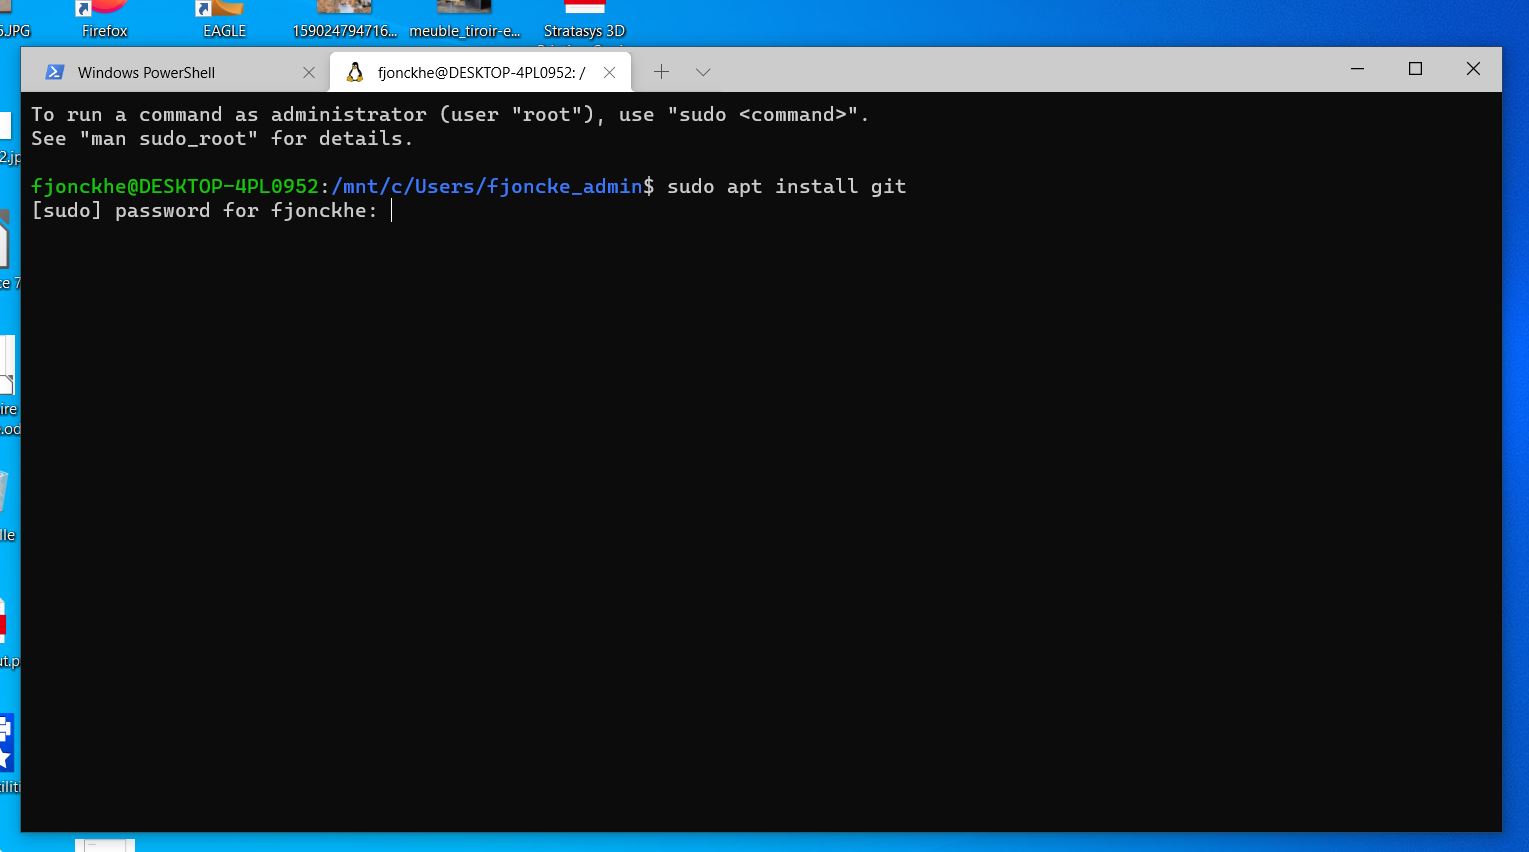
All the assignments have to be written online by using a git documentation. So we are going to install git:
$ sudo apt get install git
Why GitLab?
“As Gitlab is an open-source platform that facilitates version control of projects, it is the platform that will use to manage our documentation and projects.
Each student has their own repository. A repository is what is used to store your codebase in GitLab and change it with version control. Each one of us has to generate their SSH key as our personal login key for safe login.
$ sudo apt install git
I ran the following command to configure my Git username and email configured.
$ git config --global user.name "Your Name Comes Here"
$ git config --global user.email you@yourdomain.example.com
SSH aka Secured SHell, a secured method of remote access.
How does it work?
From Hostinger
The significant advantage offered by SSH over its predecessors (Telnet) is the use of encryption to ensure a secure transfer of information between the host(Fabacademy repository) and the client(myself)
There are 3 differents kind of encryption: Symmetrical encryption - Asymmetrical encryption - Hashing We are using the asymmetrical encryption.
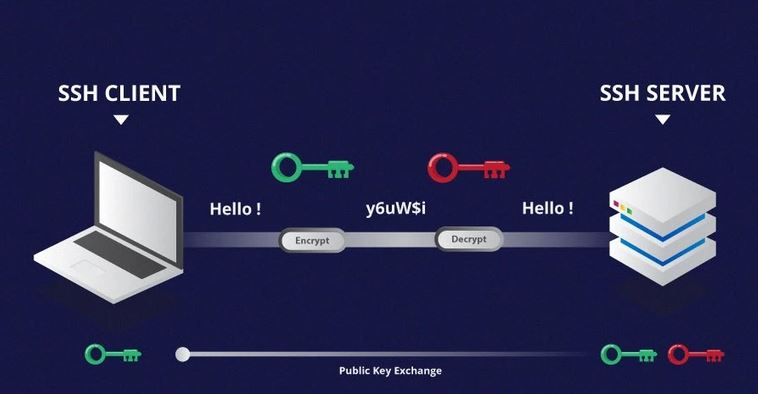
A public key can be used by any individual to encrypt a message and can only be decrypted by the recipient who possesses their particular private key, and vice versa. These consist of extensive and seemingly random combinations of numbers and symbols, however, both public and private keys are paired using complex mathematical algorithms.
For example, in order to authenticate the sender, a message is encrypted using their own private key. Therefore, the message can only be decrypted using that specific sender’s public key. Note that both encryption and decryption mechanisms are automatic processes – you don’t need to do anything manually.
Unlike the general perception, asymmetrical encryption is not used to encrypt an entire SSH session. Instead, it is used during the key exchange algorithm of symmetric encryption. Before initiating a secured connection, both parties generate temporary public-private key pairs and share their respective private keys to produce the shared secret key.
Once a secured symmetric communication has been established, the server uses the client’s public key to generate and challenge and transmit it to the client for authentication. If the client can successfully decrypt the message, it means that it holds the private key required for the connection – the SSH session then begins.
TO SUM UP: I have depicted this process according to the mail box. Anybody can drop you a message in a mailbox(which is the public key). Except the owner of the mailbox key (you, the owner of the private key) nobody can have access to your mail.
usefull links https://www.youtube.com/watch?v=CGjZ7y42M7Q&ab_channel=PurpleGiraffe
So now, get back on the terminal and type:
$ ssh-keygen
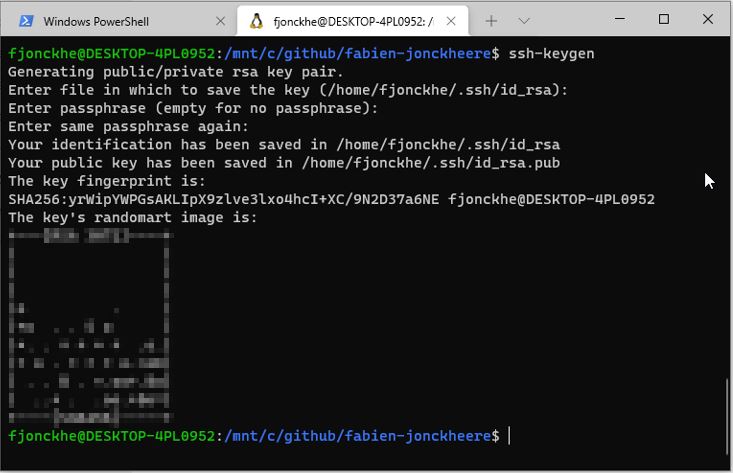
You have generated the private key called :id_rsa and the public key called id_rsa.pub Both of them are saved in the folder: home\user.ssh
You send the public key to the “Fabacademy server”. You never share your private key, it is just located to your computer. It will generate the connection between your computer and the server and you will able to read the server messages. If you want to communicate with different colleagues, they also have to create a pair of public/private keys. They send your the public one. Each colleague keep their own key. It is also possible to add a password on the private key. The secure level is according to the size of bits (64,128,256 bits). A hacker could be able to enter your datas with a 64 bits key, it will not be possible. You can open the public key via your text editor, copy it.
Next, you sign in on your fabacademy gitlab account on https://gitlab.com/users/sign_in
Go to your remote repository (fabacademy server) via your account. Edit your profil.

You can go to the ssh section.
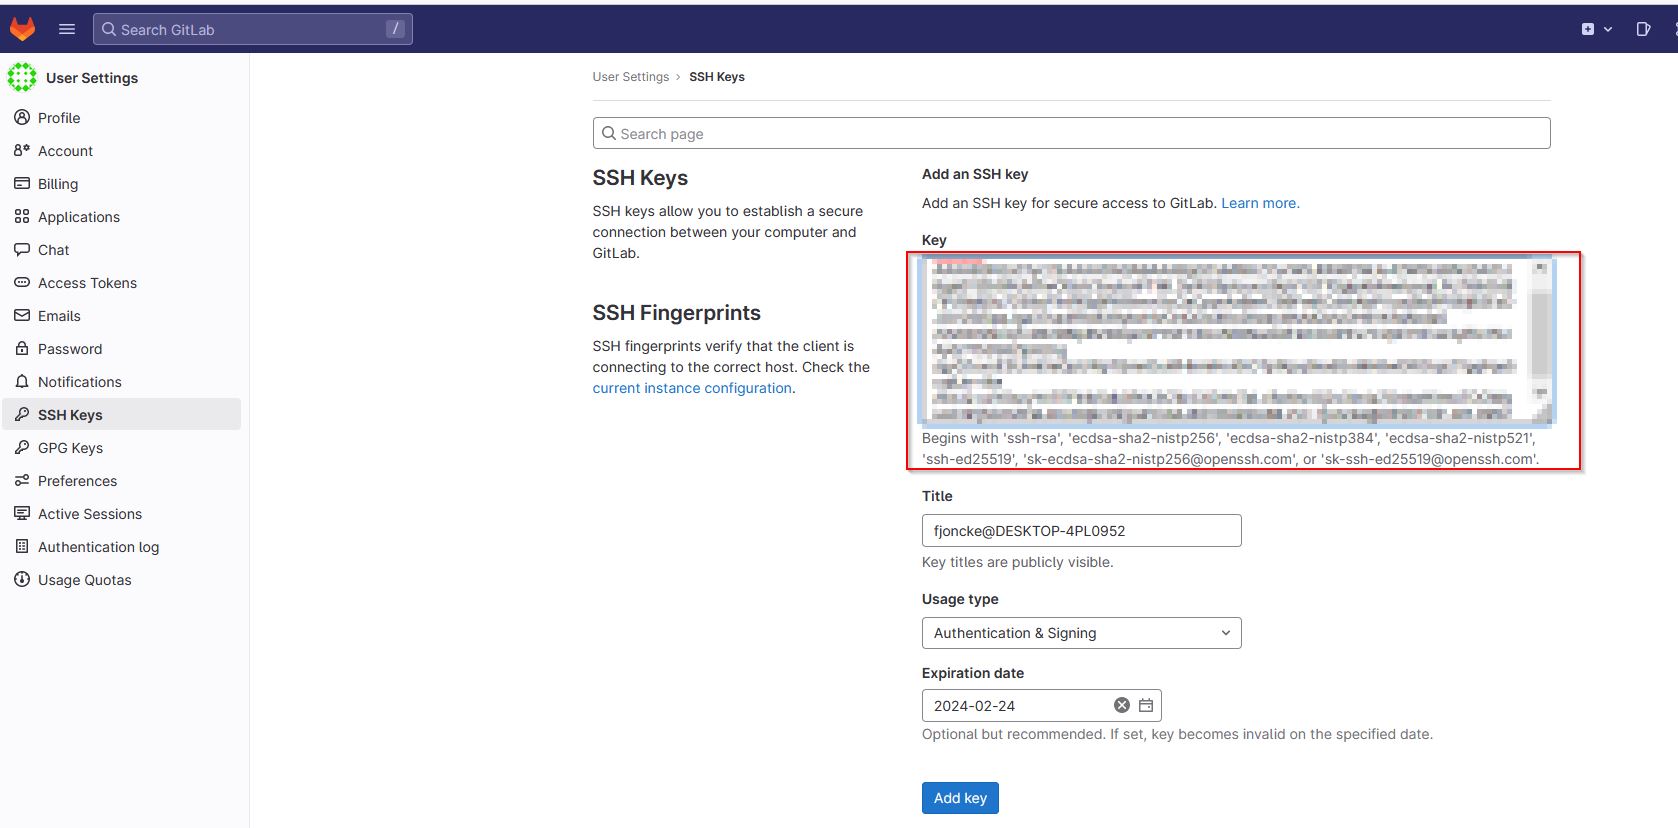 On the right text editor, you can paste your public key.
Cloning your repository.
We have to get the git information to clone my fabacademy repository to my computer (local server).
So the option is “clone With SSH”.
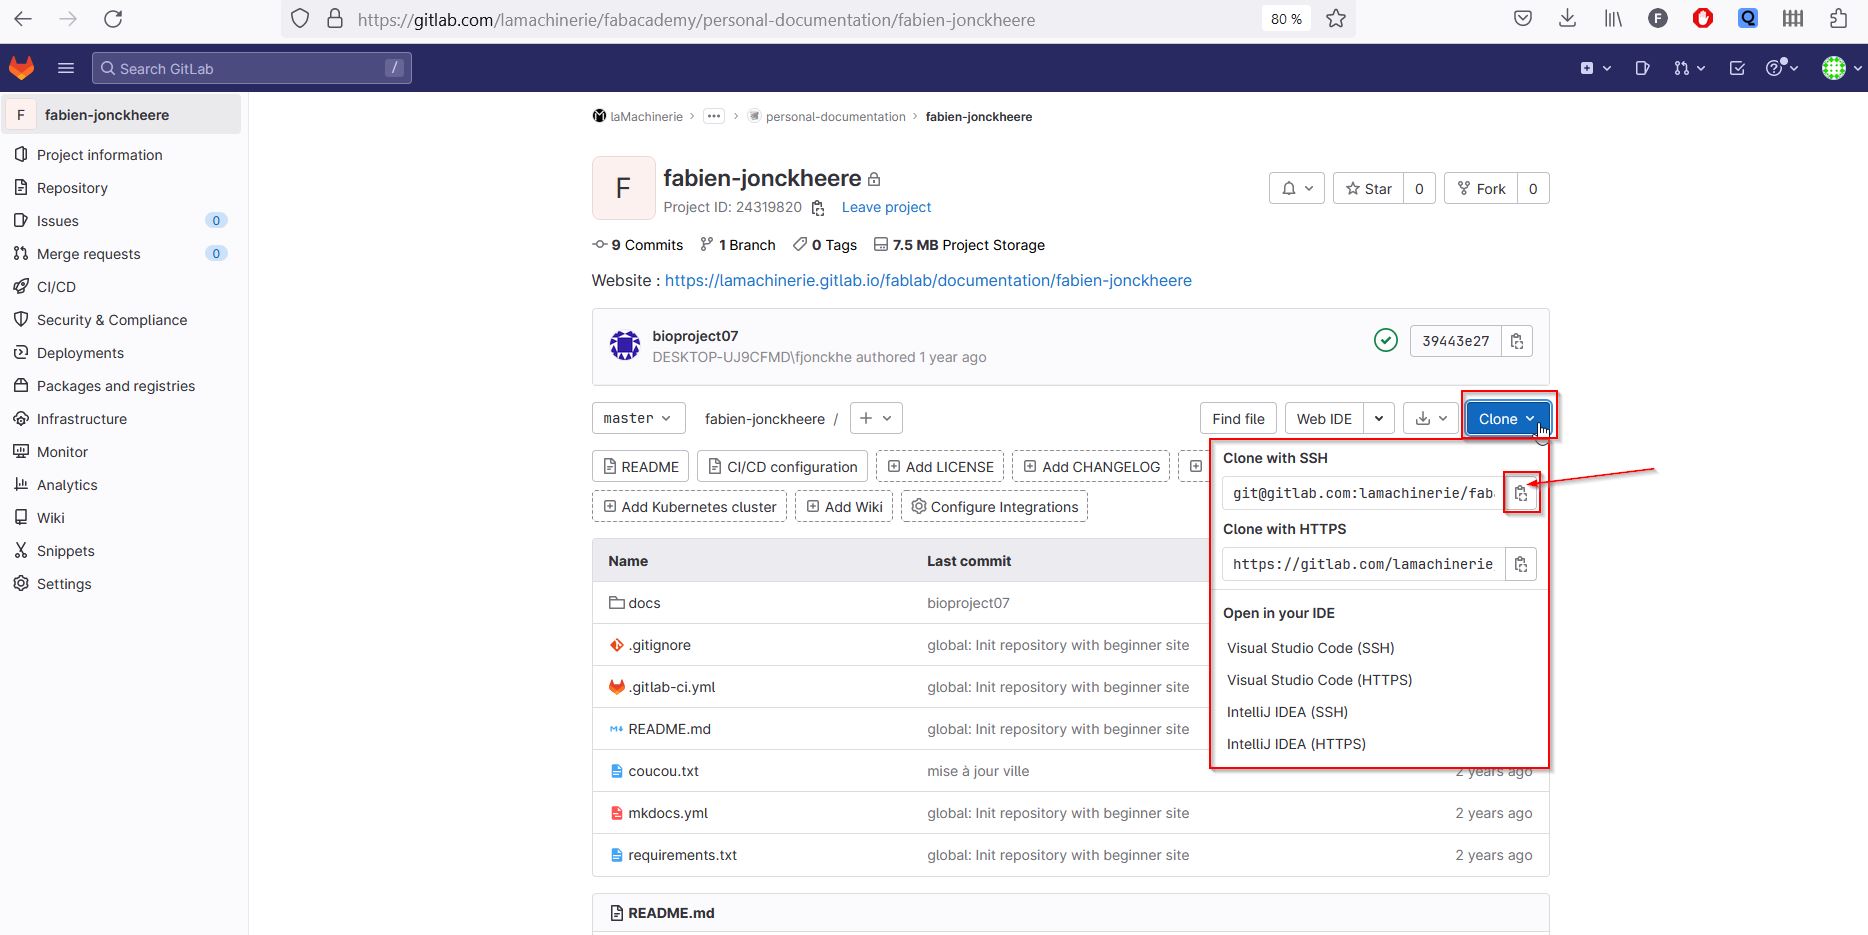
Get back on the terminal, and use the git clone function and paste the “clone with SSH” content.
$ git clone git@gitlab.com:lamachinerie/fabacademy/personal-documentation/fabien-jonckheere.git
Ok the architecture of the student website is installed on your local computer and available to use directly.. If I go to C:\github\fabien-jonckheere, I will see folders and files, let’s understand:
mkdocs.yml    # The site configuration file.
requirements.text #All add-ons for Python.
docs/         # All site content/files should be in this folder.
    index.md  # The homepage.
    files/    # Put files you'd like available in your site here (except videos)
    images/   # You can put your images in here
    abc.md... # Other markdown pages and folders
We are going to install mkdocs and its add-ons. Let’s explore!
installing mkdocs
To be able to build your documentation on your personal computer, you should install MkDocs on it. That will give you the opportunity to edit Markdown and preview final website side-by-side on your desktop (or laptop) computer.
what is Mardown?:
By writing markdown language, it translates it into html/css, which can be deployed into a static website through gitlab.
$ pip install mkdocs
If the installation is not complete you can run the file downloaded called: requirements.text. /// If you begin from scratch I recommand to follow the tutorial from Krisjanis Rijnieks It contains all you need to run properly your website according to python. So you have to use the pip manager. I was disturbed because it is a text file. So I opened it and you will find all the add-ons you need. It is just a command.
Curious, open the file on the terminal (So cool, now I talk as a developer!!) by using a command called cat, which is an text editor.
$ cat requirements.text
You will see add-ons needed for running your fabacademy web.
# Documentation static site generator
mkdocs >=1.1.2, ==1.1.*
mkdocs-git-revision-date-localized-plugin ~= 0.8.0

# Add your custom theme if not inside a theme_dir
# (https://github.com/mkdocs/mkdocs/wiki/MkDocs-Themes)
mkdocs-material ~= 6.2
you can run it direct via the pip manager:
$ pip install -r requirements.txt
MkDocs plugin that enables displaying the date of the last git modification of a page. The plugin uses babel and timeago.js to provide different localized date formats. Initial fork from mkdocs-git-revision-date-plugin.
Open the Yml file, to customize your website:
*Replace the text below to customize your site*
site_name: Fabien Jonckheere - Fab Academy
site_description: Fab Academy documentation site for Fabien Jonckheere
site_author: Fabien Jonckheere
copyright: Copyright 2021 Fabien Jonckheere - Creative Commons Attribution Non Commercial

site_url: http://fabacademy.org/2021/labs/lamachinerie/students/fabien-jonckheere/

extra:
  social:
    # For other social icons at https://squidfunk.github.io/mkdocs-material/setup/adding-social-links/
    - icon: fontawesome/brands/instagram
      link: https://instagram.com/fabacademany
    - icon: fontawesome/brands/facebook
      link: https://facebook.com/fabacademany
    - icon: fontawesome/brands/twitter
      link: https://twitter.com/fabacademany
    - icon: fontawesome/brands/linkedin
      link: "https://linkedin.com/in/academany"

theme:
  name: material
  palette:
    # try other colors https://squidfunk.github.io/mkdocs-material/getting-started/#primary-colors
    primary: deep
    accent: indigo
  font:
    # See available fonts at https://fonts.google.com/
    text: Ubuntu
    code: Ubuntu Mono
  icon:
    logo: material/school
  favicon: images/favicon.svg
  features:
    - navigation.tabs
    - navigation.instant

plugins:
  - search
  - git-revision-date-localized:
      fallback_to_build_date: true

markdown_extensions:
  - extra
  - smarty
  - admonition
  - codehilite:
      guess_lang: false
  - toc:
      permalink: true
I will take more time to customize my website later.
Local preview of my website.
Once you have documented and you want to preview the result on a browser. Go back on the terminal, we will use a function called:
$ mkdocs serve
You will get this terminal feedback:
INFO    -  Building documentation...
INFO    -  Cleaning site directory
INFO    -  Documentation built in 4.26 seconds
[I 230303 08:42:39 server:296] Serving on http://127.0.0.1:8000
INFO    -  Serving on http://127.0.0.1:8000
If you click directly on [ctrl] + Http://127.0.01.8000 You will see the preview on your website. This adress is also called localhost:8000
Publishing local to global!
Next step, we are going to push our works online! Go to terminal, first function is to add all your updates.
$ git add --all
That is strange, it is not really adding, you have to name your updates by
$ git commit -m " your commit message "
Everything seems ok , so now we push online!
$ git push
git issues.
In 2023, I had many git problems because I have changed computer, the ssh keys, a repo misunderstanding ( my repo was a stand by one before being a normal student one)
Anyway, I had this issue that I have made a branch,…
I have used tools I never used before:
Some mentors suggested me some functions such as :
git status. It tells you if everything is cleared:
fjonckhe@DESKTOP-4PL0952:/mnt/c/github/2023/fabien-jonckheere$ git status On branch master Your branch is up to date with ‘origin/master’.
nothing to commit, working tree clean
git log. It provides you the list of the last commits:
fjonckhe@DESKTOP-4PL0952:/mnt/c/github/2023/fabien-jonckheere$ git log
commit 2fdc3b9aa2ef47ed93bcfa0e11c88310cf39a12b (HEAD -> master, origin/master, origin/HEAD) Merge: a44e4a9 207b418 Author: fabienjonckheere fabien.jonckheere@polytech-lille.fr Date: Wed Mar 8 18:07:14 2023 +0100
Merge branch ‘master’ of gitlab.fabcloud.org:academany/fabacademy/2021/labs/lamachinerie/students/fabien-jonckheere
commit a44e4a94fd17fd91bd58412e08b85021057e90e1 Author: fabienjonckheere fabien.jonckheere@polytech-lille.fr Date: Wed Mar 8 18:06:41 2023 +0100
branch01
commit cdf0362464a69d690355592378b47bb659cb07da Author: fabienjonckheere fabien.jonckheere@polytech-lille.fr Date: Wed Mar 8 17:53:31 2023 +0100
img for week 13
commit 207b4188e5f6269e3fd7ce370b72fe61f43aac73 Author: fabienjonckheere fabien.jonckheere@polytech-lille.fr Date: Wed Mar 8 17:08:40 2023 +0100
agreement
commit 43d7cc1e41905b68064a8a5822aa44754590b74a Author: fabienjonckheere fabien.jonckheere@polytech-lille.fr Date: Wed Mar 8 15:54:11 2023 +0100
git reset HEAD~ You modified some files, added and deleted a lot of lines from your files, but you want to go back. That’s why it is important to use the git log to have an understanding of your current git branch and its commit.*
To stop an application in the terminal: CTRL + C
softwares on Linux are distributed as a package
package: archive containing all files and instructions to run a software on an operating system.
According to ubuntu, (a normal linux distribution) or debian, the format is .deb It is also important to have the good package to install on your operating system. If it is firefox for my 64bits computer, you need to install: firefox_60.0.1-5_amd64.deb It looks like the install program from Windows: .exe
How to install the package: you need a package manager : APT
The package manager will install , uninstall, update your softwares. It is linked to a lot of repositories which contain software package. A repository is controlled under the distributors and it will guarantee you an updated version of the software you are looking for. It works as a play store .
There are two managers called: APT and DPKG
APT uses dpkg to Install Packages
When APT (or its cousin, Apt-get) installs a package, it’s actually using dpkg on the back-end to accomplish that. In that way, dpkg acts more as an “under the hood” tool for APT’s more user-friendly interface. APT Can Download Packages
With APT, you can retrieve a file from a remote repository and install it, all in one command. This saves you from the work of manually finding and downloading the package before installation.
With dpkg, you can only install local files you’ve already downloaded yourself. It can’t search remote repositories or pull packages from them. Dpkg Won’t Install Dependencies
When you install a package with dpkg, that’s all that will happen: the system will simply install the package. Some packages, however, need additional software called dependencies in order to operate. If this is the case, dpkg might warn you with an error message.
Install softwares (such as ffmpeg: Tools for transcoding, streaming and playing of multimedia files) on linux terminal:
- Update package
$ |sudo apt update
2.look for your package
$ | apt-cache search ffmpeg update
$ | apt-cache search ffmpeg update
ffmpeg - Tools for transcoding, streaming and playing of multimedia files
3.install your package:
$ | sudo apt install ffmpeg
N.B You can install different softwares on the same command line:
$ | sudo apt install ffmpeg firefox vlc libreoffice
update packages:
- Update package
$ |sudo apt update
- Select your chosen package:
$ |sudo apt install --only-upgrade ffmpeg
- Update all packages:
$ |sudo apt upgrade
uninstall a package:
- Select your chosen package:
$ |sudo apt remove ffmpeg
- You can erase all configuration files:
$ |sudo apt purge ffmpeg
What is installed on my linux?
via apt
$ | apt list --installed
via dpkg
$ | dpkg-query -l
FFMPEG
I am in the directory where my videos take place and I launch the software.
fjonckhe@DESKTOP-4PL0952:/mnt/c/github/FabJonck/16.wildcard week/2023$ ffmpeg
If it is correct, the terminal will reply to you these informations.
ffmpeg version 4.2.7-0ubuntu0.1 Copyright (c) 2000-2022 the FFmpeg developers
  built with gcc 9 (Ubuntu 9.4.0-1ubuntu1~20.04.1)
  configuration: --prefix=/usr --extra-version=0ubuntu0.1 --toolchain=hardened --libdir=/usr/lib/x86_64-linux-gnu --incdir=/usr/include/x86_64-linux-gnu --arch=amd64 --enable-gpl --disable-stripping --enable-avresample --disable-filter=resample --enable-avisynth --enable-gnutls --enable-ladspa --enable-libaom --enable-libass --enable-libbluray --enable-libbs2b --enable-libcaca --enable-libcdio --enable-libcodec2 --enable-libflite --enable-libfontconfig --enable-libfreetype --enable-libfribidi --enable-libgme --enable-libgsm --enable-libjack --enable-libmp3lame --enable-libmysofa --enable-libopenjpeg --enable-libopenmpt --enable-libopus --enable-libpulse --enable-librsvg --enable-librubberband --enable-libshine --enable-libsnappy --enable-libsoxr --enable-libspeex --enable-libssh --enable-libtheora --enable-libtwolame --enable-libvidstab --enable-libvorbis --enable-libvpx --enable-libwavpack --enable-libwebp --enable-libx265 --enable-libxml2 --enable-libxvid --enable-libzmq --enable-libzvbi --enable-lv2 --enable-omx --enable-openal --enable-opencl --enable-opengl --enable-sdl2 --enable-libdc1394 --enable-libdrm --enable-libiec61883 --enable-nvenc --enable-chromaprint --enable-frei0r --enable-libx264 --enable-shared
  libavutil      56. 31.100 / 56. 31.100
  libavcodec     58. 54.100 / 58. 54.100
  libavformat    58. 29.100 / 58. 29.100
  libavdevice    58.  8.100 / 58.  8.100
  libavfilter     7. 57.100 /  7. 57.100
  libavresample   4.  0.  0 /  4.  0.  0
  libswscale      5.  5.100 /  5.  5.100
  libswresample   3.  5.100 /  3.  5.100
  libpostproc    55.  5.100 / 55.  5.100
Hyper fast Audio and Video encoder
usage: ffmpeg [options] [[infile options] -i infile]... {[outfile options] outfile}...

Use -h to get full help or, even better, run 'man ffmpeg'
fjonckhe@DESKTOP-4PL0952:/mnt/c/github/FabJonck/16.wildcard week/2023$
Converting an audio/ video:
codecs: flux (video, audio, subtitles) ffmpeg -codecs
format: extension du fichier. could check with :
ffmpeg -formats
I would like to convert a wave file inot a mp3 one:
ffmpeg -i music.wav music.mp3
You will get a compressed file. From cd, you have wave files, better quality codec wave –> mp3 codec
une ligne de commande prend moins de memoire qu’un logiciel avec une interface.
convering a video
ffmpeg -i video.avi video.mp4
Change format ( without re-encoding)
ffmpeg -i video.mp4 -c copy video.avi
c = codecs: sous ttires, flux autdio video, on le copie et on change le format
i= input music.wav input music.mp3 output
Convert a phone video (uncompressed) to
The memory storage could be divided by 3. 150mb–>50mb
just use the first encodage from mpeg
ffmpeg -i video.mp4 newvideo.mp4
1080p full hd 600mo 1go –> 60Mo
camescope - apn - non compressé ==> vers une compression.
comment extraire le son d’une video: Extract audio from video.
ffmpeg -i video.mp4 audio.mp3 ogg audio open source format
couper le son d’une video:
ffmpeg -i video.mp4 -vcodec copy -an
an =audio no
Extraire une partie de fichier audio ou video:
ffmpeg -i video.mp4 -ss hh:mm:ss -c copy out.mp4
ss=start stream -c copy = pas de réecondage
ffmpeg -i video.mp4 -ss hh:mm:ss -c copy -to 00:00:15 out.mp4
scinder un fichier en 2
ffmpeg -i video.mp4 -t 00:00:10 -c copy part1.mp4 -ss 00:00:10 -c copy part2.mp4
Fusionner plusieurs fichiers en un seul:
create a txt file called info.txt and write: file ‘video1.mp4’ file ‘video2.mp4’
ffmpeg -f concat -i info.txt -c copy out.mp4 -f concat fusion
nb il peut avoir un problème, codecs différents videos provenant d’utilisateurs différents;
il faut faire un reencodage dans la fonction, ou faire le reencodage avant la fonction concat.
liens fabacademy tools
https://fabacademy.org/2019/labs/barcelona/local/clubs/codeclub/ffmpeg/
robot suiveur https://www.youtube.com/watch?v=ftEUFq2oWlM&ab_channel=OpenProgramming
Command lines from Luc:
ffmpeg -i input_video -vcodec libx264 -crf 25 -preset medium -vf scale=-2:1080 -acodec libmp3lame -q:a 4 -ar 48000 -ac 2 output_video.mp4

ou

ffmpeg -i input_video -vcodec libx264 -b:v 1000k -vf scale=-2:1080 -an output_video.mp4

1:57 PM


variable bit rate 1080p MP3:

   ffmpeg -i input_video -vcodec libx264 -crf 25 -preset medium -vf scale=-2:1080 -acodec libmp3lame -q:a 4 -ar 48000 -ac 2 output_video.mp4

fixed bit rate 1080p MP2:

   ffmpeg -i input_video -vcodec libx264 -b:v 1000k -vf scale=-2:1080 -acodec mp2 -b:a 256k -ar 48000 -ac 2 output_video.mp4

no audio:

   ffmpeg -i input_video -vcodec libx264 -b:v 1000k -vf scale=-2:1080 -an output_video.mp4

ffmpeg -i plasmagrillab-non_compress.mp4 -vcodec libx264 -b:v 1000k -vf scale=-2:1080 -an plasmagrillab-compress.mp4

crop size (width:height:xoffset:yoffset):

   ffmpeg -i input_video -vf crop=1500:800:200:100 -vcodec libx264 -b:v 1000k -an output_video.mp4

trim time (-ss start time, -t duration):

   ffmpeg -i input_video -vcodec libx264 -b:v 1000k -an -ss 00:00:10 -t 00:00:10 output_video.mp4

mix audio and video:

   ffmpeg -i input_video -vcodec libx264 -b:v 1000k -vf crop=1120:876:0:100 -i input_audio -acodec mp2 -b:a 256k -ar 48000 -ac 2 -ss 00:00:20 -t 00:00:20 output_video.mp4

crop, pan, composite:

   ffmpeg -i input_video_1 -i input_video_2 -filter_complex '[1:v]crop=175:95:930:860[cropout];[cropout]scale=350:190[scaleout];[0:v][scaleout]overlay=10:10[outv]' -map '[outv]' -vcodec libx264 -b:v 1000k -map 0:a -acodec mp2 -b:a 256k -ac 2 -t 00:00:05 output_video.mp4

numbered images to video:

   ffmpeg -r 30 -i %04d.jpg -vcodec libx264 -b:v 1000k -vf scale=-2:1080 -an output_video.mp4
ARDUINO
I have installed Arduino from the Gnome Library ( kind of Ubuntu store) After that, the serial ports have to be set up for arduino, I have followed a tutorial on ubuntu-fr
sudo usermod -a -G tty Nom_utilisateur
sudo usermod -a -G dialout Nom_utilisateur
modifier les droits de /ttyACMO avec la commande (la carte doit être connectée)
sudo chmod a+rw /dev/ttyACMO
[]
https://docs.framasoft.org/fr/grav/markdown.html
https://github.com/rudametw/Learning-Git/blob/master/PDFs/TPGit.pdf
“Lorem ipsum dolor sit amet, consectetur adipiscing elit, sed do eiusmod tempor incididunt ut labore et dolore magna aliqua. Ut enim ad minim veniam, quis nostrud exercitation ullamco laboris nisi ut aliquip ex ea commodo consequat. Duis aute irure dolor in reprehenderit in voluptate velit esse cillum dolore eu fugiat nulla pariatur. Excepteur sint occaecat cupidatat non proident, sunt in culpa qui officia deserunt mollit anim id est laborum.”
“Lorem ipsum dolor sit amet, consectetur adipiscing elit, sed do eiusmod tempor incididunt ut labore et dolore magna aliqua. Ut enim ad minim veniam, quis nostrud exercitation ullamco laboris nisi ut aliquip ex ea commodo consequat. Duis aute irure dolor in reprehenderit in voluptate velit esse cillum dolore eu fugiat nulla pariatur. Excepteur sint occaecat cupidatat non proident, sunt in culpa qui officia deserunt mollit anim id est laborum.”
Useful links
Code Example
Use the three backticks to separate code.
// the setup function runs once when you press reset or power the board
void setup() {
  // initialize digital pin LED_BUILTIN as an output.
  pinMode(LED_BUILTIN, OUTPUT);
}

// the loop function runs over and over again forever
void loop() {
  digitalWrite(LED_BUILTIN, HIGH);   // turn the LED on (HIGH is the voltage level)
  delay(1000);                       // wait for a second
  digitalWrite(LED_BUILTIN, LOW);    // turn the LED off by making the voltage LOW
  delay(1000);                       // wait for a second
}
Gallery

Video
From Vimeo
Sound Waves from George Gally (Radarboy) on Vimeo.