It's time to make something BIG !
I LOVE THE CNC MACHINE !!!!! I’m extremely excited about it, and I can’t wait to use it! !!
This assignment is focused on making something BIG with the aid of a CNC machine. After Prof. Neil’s session, we had an online session with FABLAB Bahrain where we learnt how to run the CNC machine.
I used Shopbot the full size PRSalpha CNC (96 inches x 48 inches x 6 inches) machine when I worked at FABLAB Jubail in 2016. This machine enables us to design large objects like furniture. I love to design furniture pieces. Actually, one of my dreams is to be a furniture designer and own my own brand.
Firstly , let’s start with the group assignment to know more about the Shopbot CNC machine.
Group assignment
In the group assignment we were asked to test runout, alignment, speeds, feeds, and toolpaths for our machine.
You can check the group assignment in this link : Group Assignment.
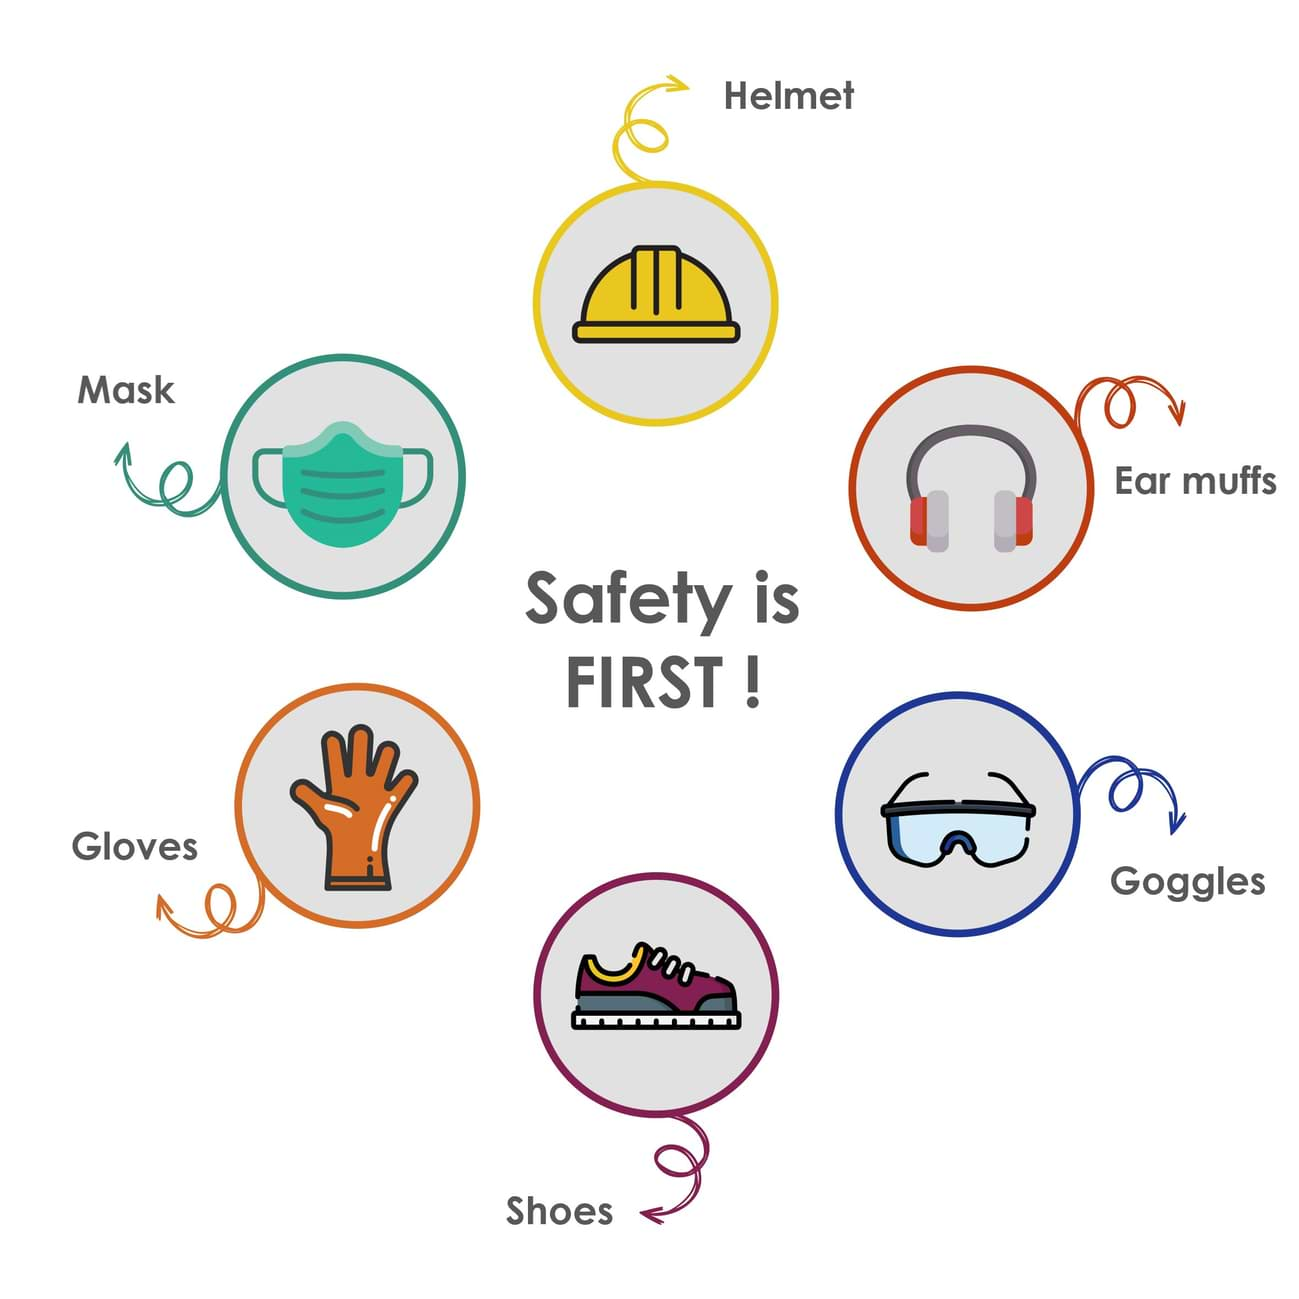
Because safety always comes FIRST, I will start by talking about safety precautions. When we want to use the CNC machine, we MUST be aware of the following :
Now, let’s discover the CNC machine and the process of how it is used from start till we get the final product.
Shopbot CNC Machine
What is CNC machine ?

A CNC (computer numeric control) tool is used in prototyping and full production to achieve the following :
The machines are programmed with CNC machining language called G-code, which instructs machines on where and how to move and controls all the following features :
CNC machines are the perfect tool for production of big pieces applications such as furniture. It has a variable speed spindle to adjust the cutting speed, depending on what type of material we use with it. The shopbot can cut very simple two dimensional shapes and very complicated three dimensional sculptures.
Shopbot CNC Machine Specifications:
How does ShopBot CNC work ?
ShopBot Tools, like all CNC tools, move a cutter around a big table (X and Y axis) and move it up and down as well (Z axis).
The main parts of CNC ShoBot machine :

Emergency Stop Switch: It is used for stopping the machine during emergencies.
Reset switch: It is for the initial stage to have the clean MicroController and ready to process the data from the computer's serial communication. The machine will not communicate with the computer until you reset the drivers.
Start Button: It is for starting the spindle before the process of the cutting starts.
Materials:
We can use a variety of materials including :
To get more information about Shopbot CNC machine click on this link: Shopbot.
Cutting Tools:
CNC machining utilizes a subtractive process that uses cutting tools. There are two basic kinds of cutting tools for the ShopBot:
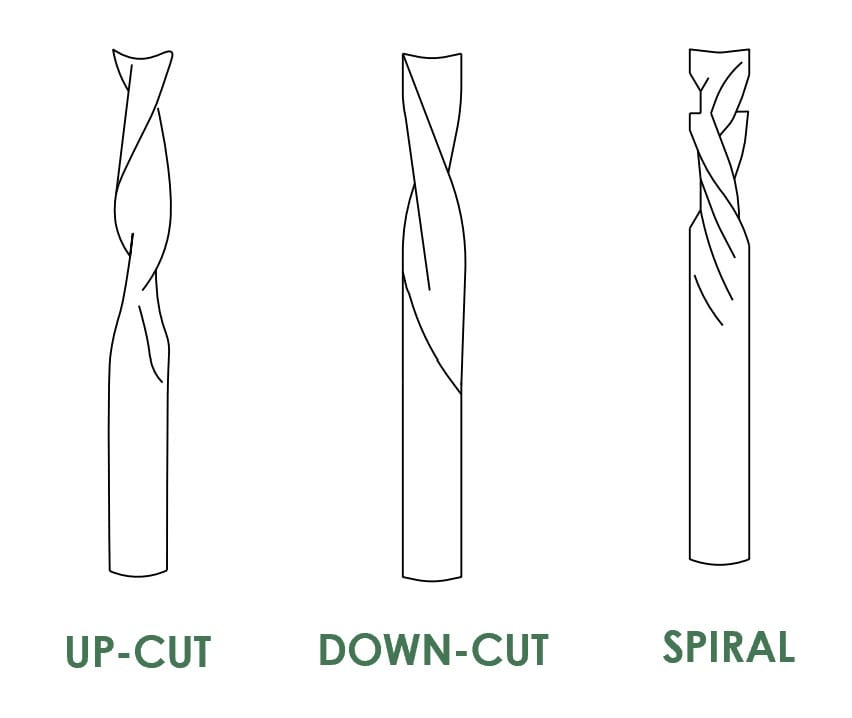
There are two common styles of end mills:
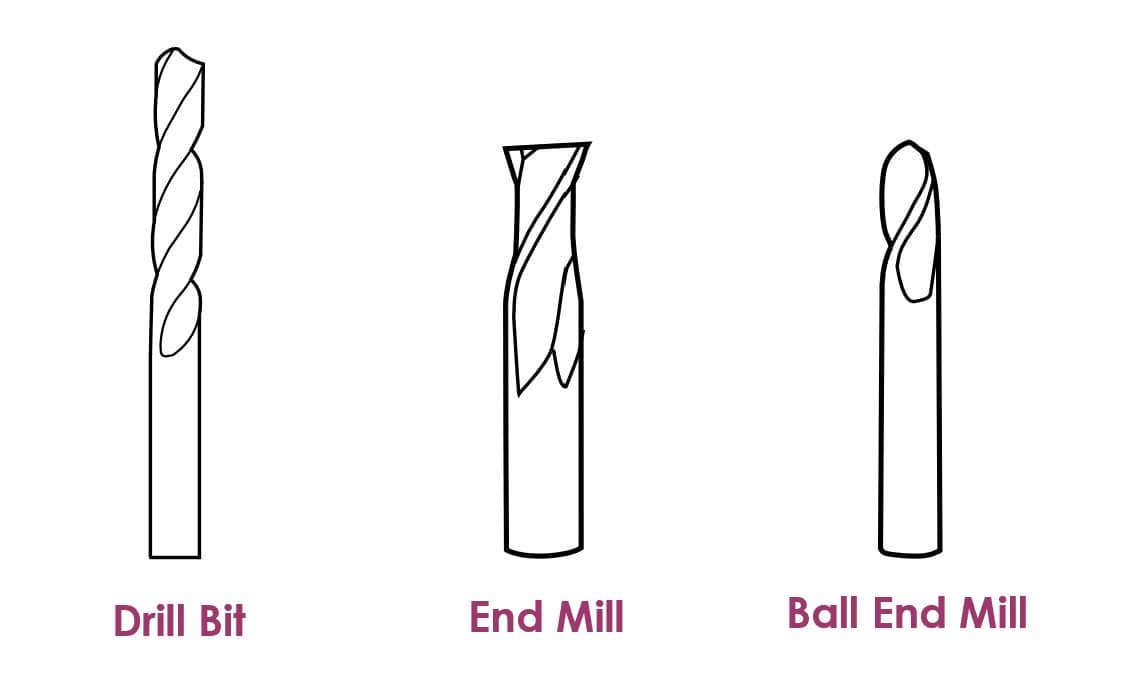
Each end mill has a tip which is shaped and designed for a particular purpose. Some common cutter shapes are ball nose, fish tail, surface planing, v-carving, and straight.
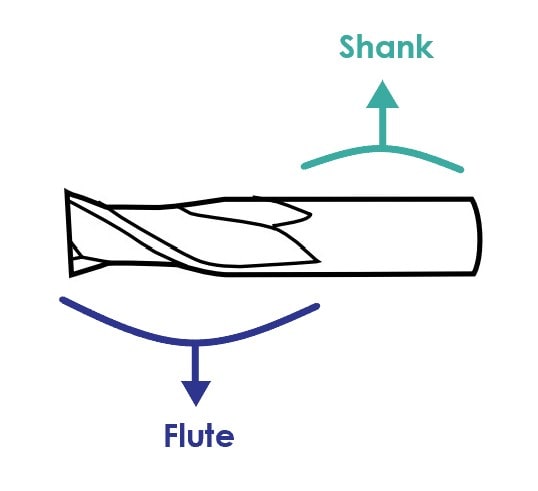
Cutting tools have two parts:
There are so many options out there for router bits that it may be difficult to decide which one is the right router bit for our application. Some bits are available as:
The difference between an up cut router bit and a down cut router bit is the direction of the flutes.
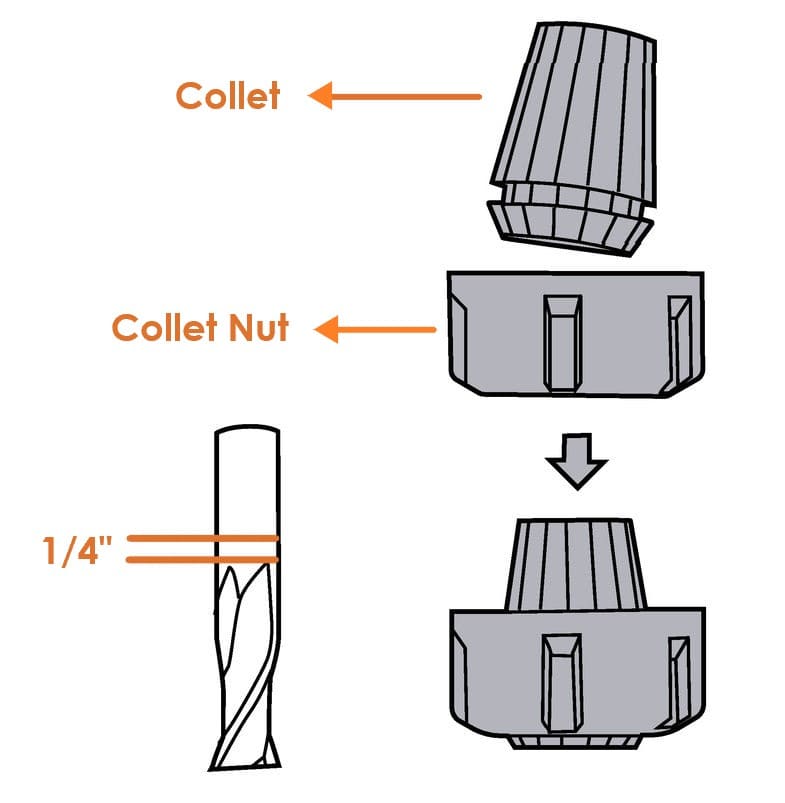
To insert the tooling :
1. Select the appropriate collet for your tool. The shank of the end mill must be the same size as the collet.
2. Push it into the collet nut until it clicks.
3. Put the collet nut onto the spindle.
4. Insert the tool into the hole in the collet, and push it in until the flutes are almost touching the collet ( Keep ¼” space between the collet and the flutes
).5. Hand tighten the collet holder on the spindle.
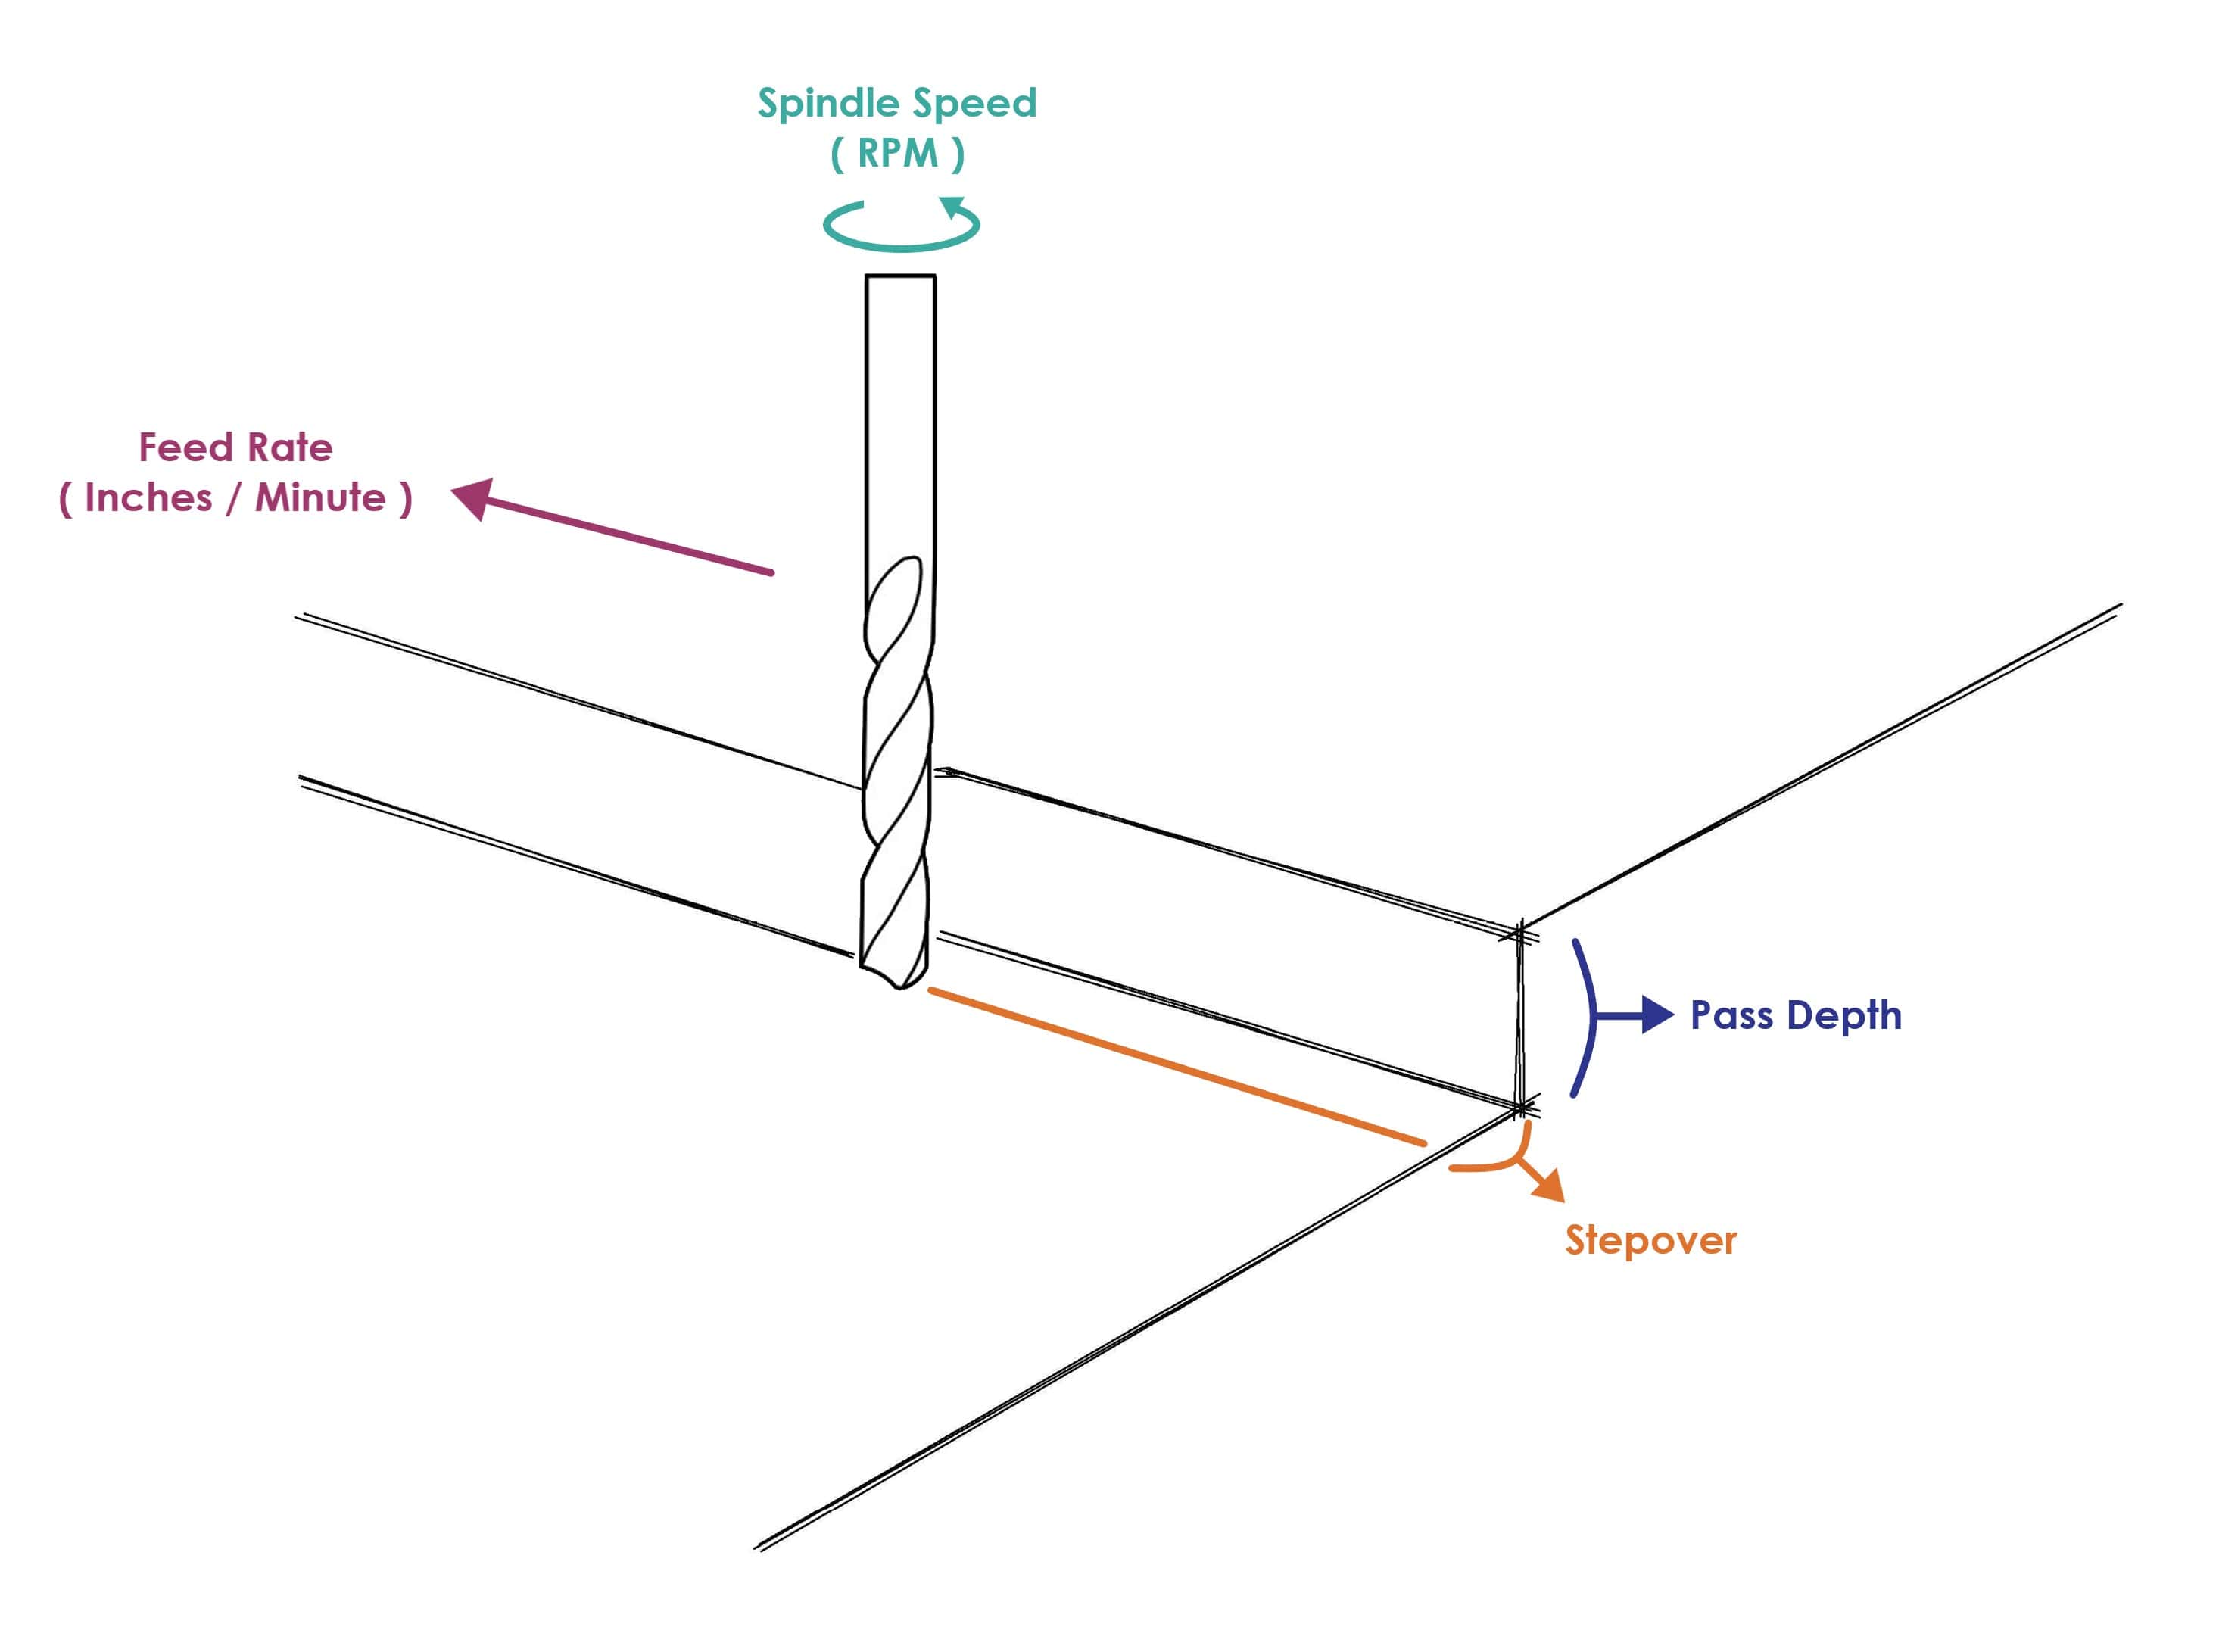
CNC Machine Features:
The feeds and speeds are defined for each bit and material type within the toolpathing software.
Now, I am going to explain the main softwares that we have to use to cut products in the Shopbot CNC machine.
Software
VCarve Software
What is VCarve software ?
A computer software called VCarve Pro is used to specify the type of carving required, the tooling details, cutting parameters and name for the tool path. It is also to control the path that the machine follows while cutting.
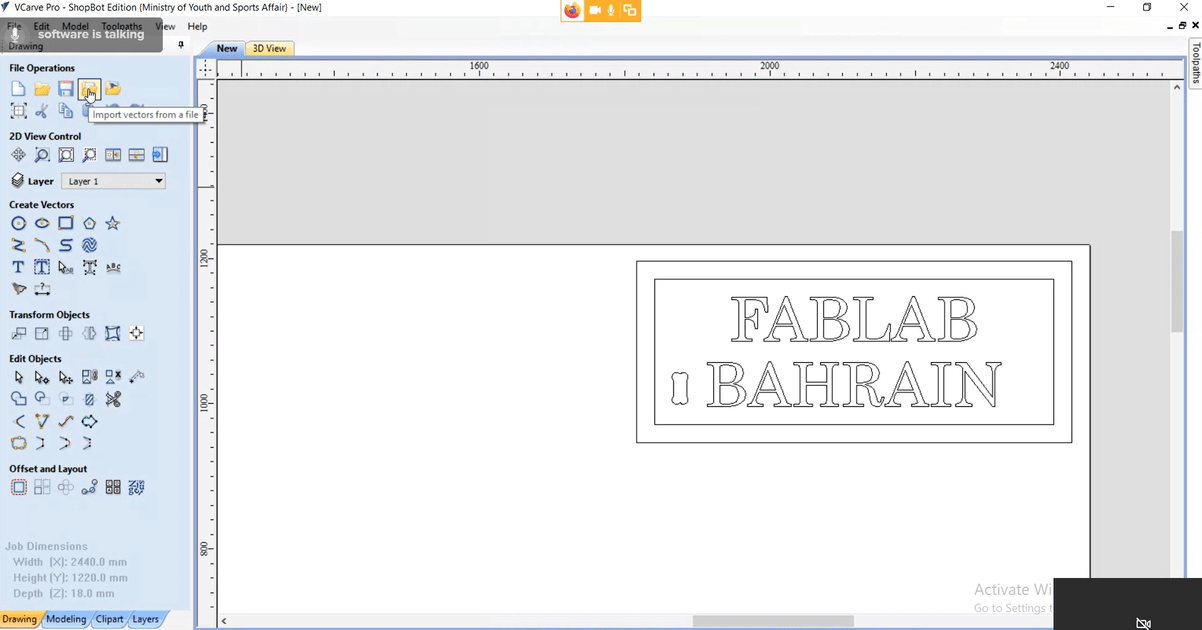
This is the interface of the VCarve :
Vcarve has a very simple interface that contains the following:
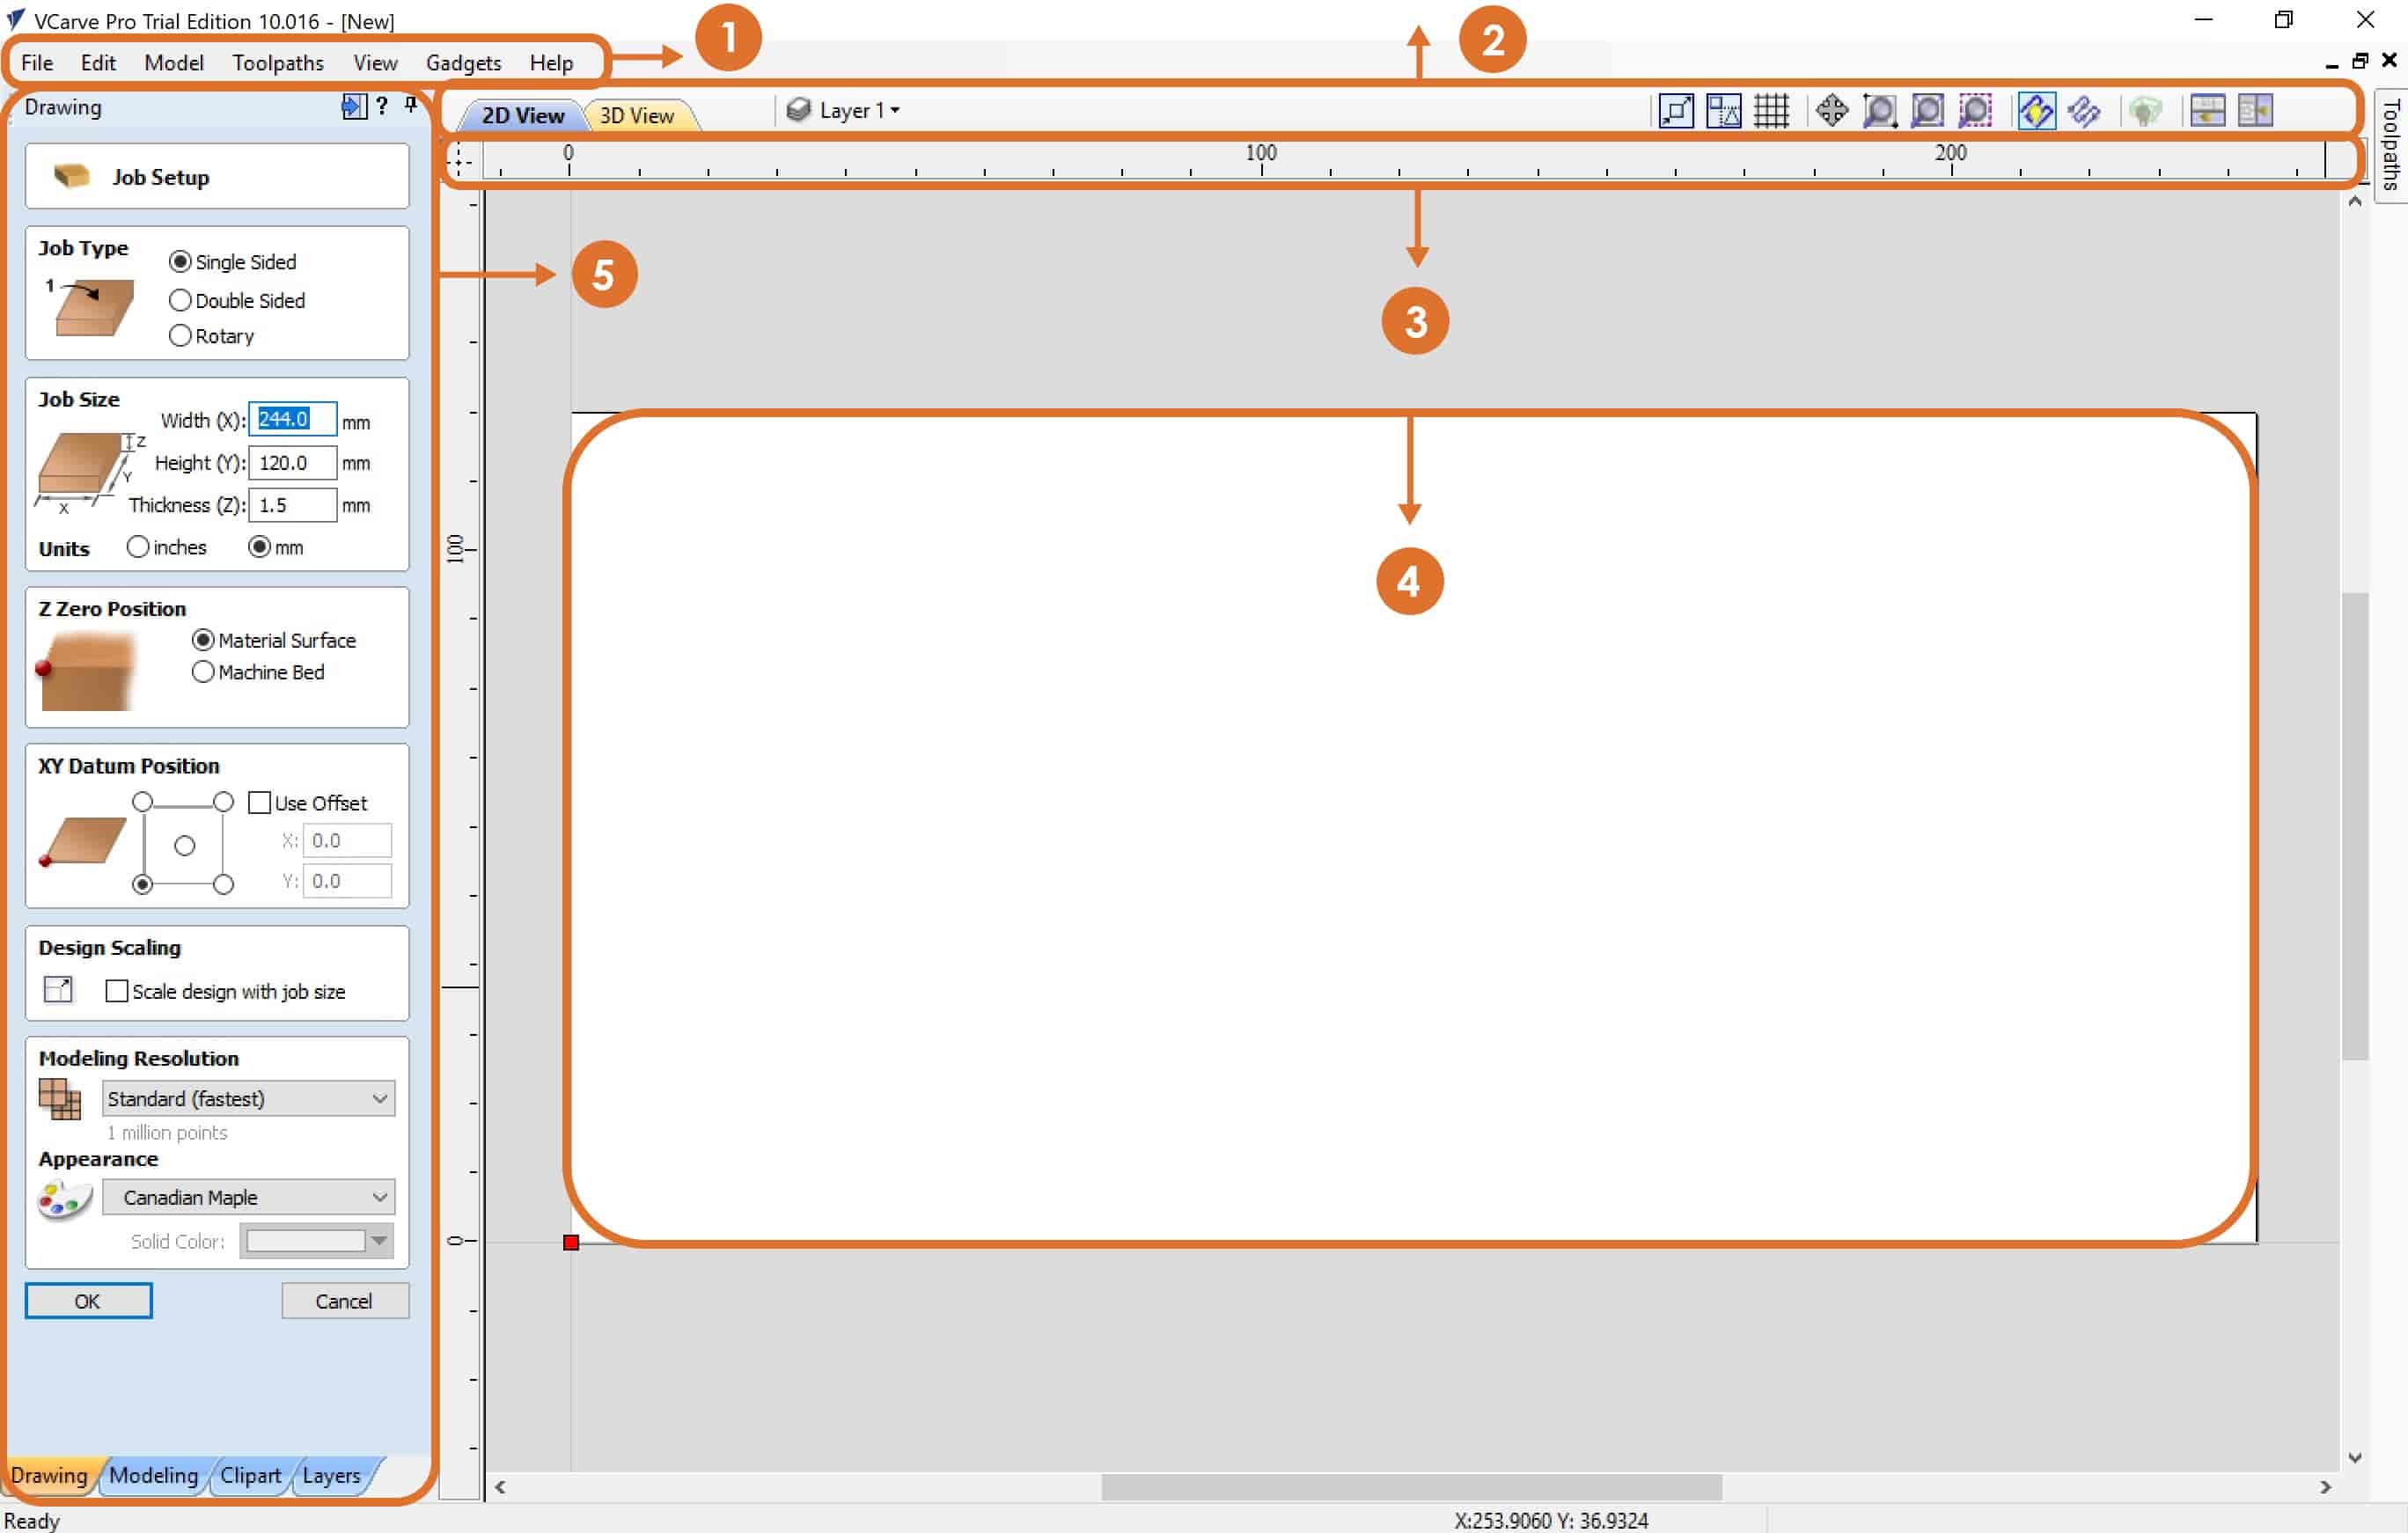
1. Menu Bar : Clicking on any of the options on the menu bar (File, Edit etc.) will result in a drop-down menu appearing with choices related to that topic. Many of these are just an alternative way to access functions.
2. Navigation Toolbar : To switch between 2D view and 3D view. Beside that, you can manage layers and then you can find a view toolbar that can be useful and that will help you while you design.
3. Ruler : The Rulers are permanently displayed in the 2D view to help with positioning, sizing and alignment.
4. Job Area : It is the working space that contains all the designs.
5. Job Setup :
Job Type : To set what type of work you'll create. One-sided work or double-sided.
Job Size : To set the job size dimensions ( W , L , D ), which we need to come up with to know our design parts. I prefer to set the job size to be equal to the actual material dimensions. This will prevent us from wasting the material, and it will enable us know the exact location of each job. You can change the unit ( Inch or mm ). I prefer to use mm.
Z Zero Position : To set Z Zero position.
XY Datum Position: To set the origin point. By default is the lower left corner.
Modeling Resolution : To set resolution and color for the 3d objects.
To create a new document click on “OK”. Then you will get new panels.
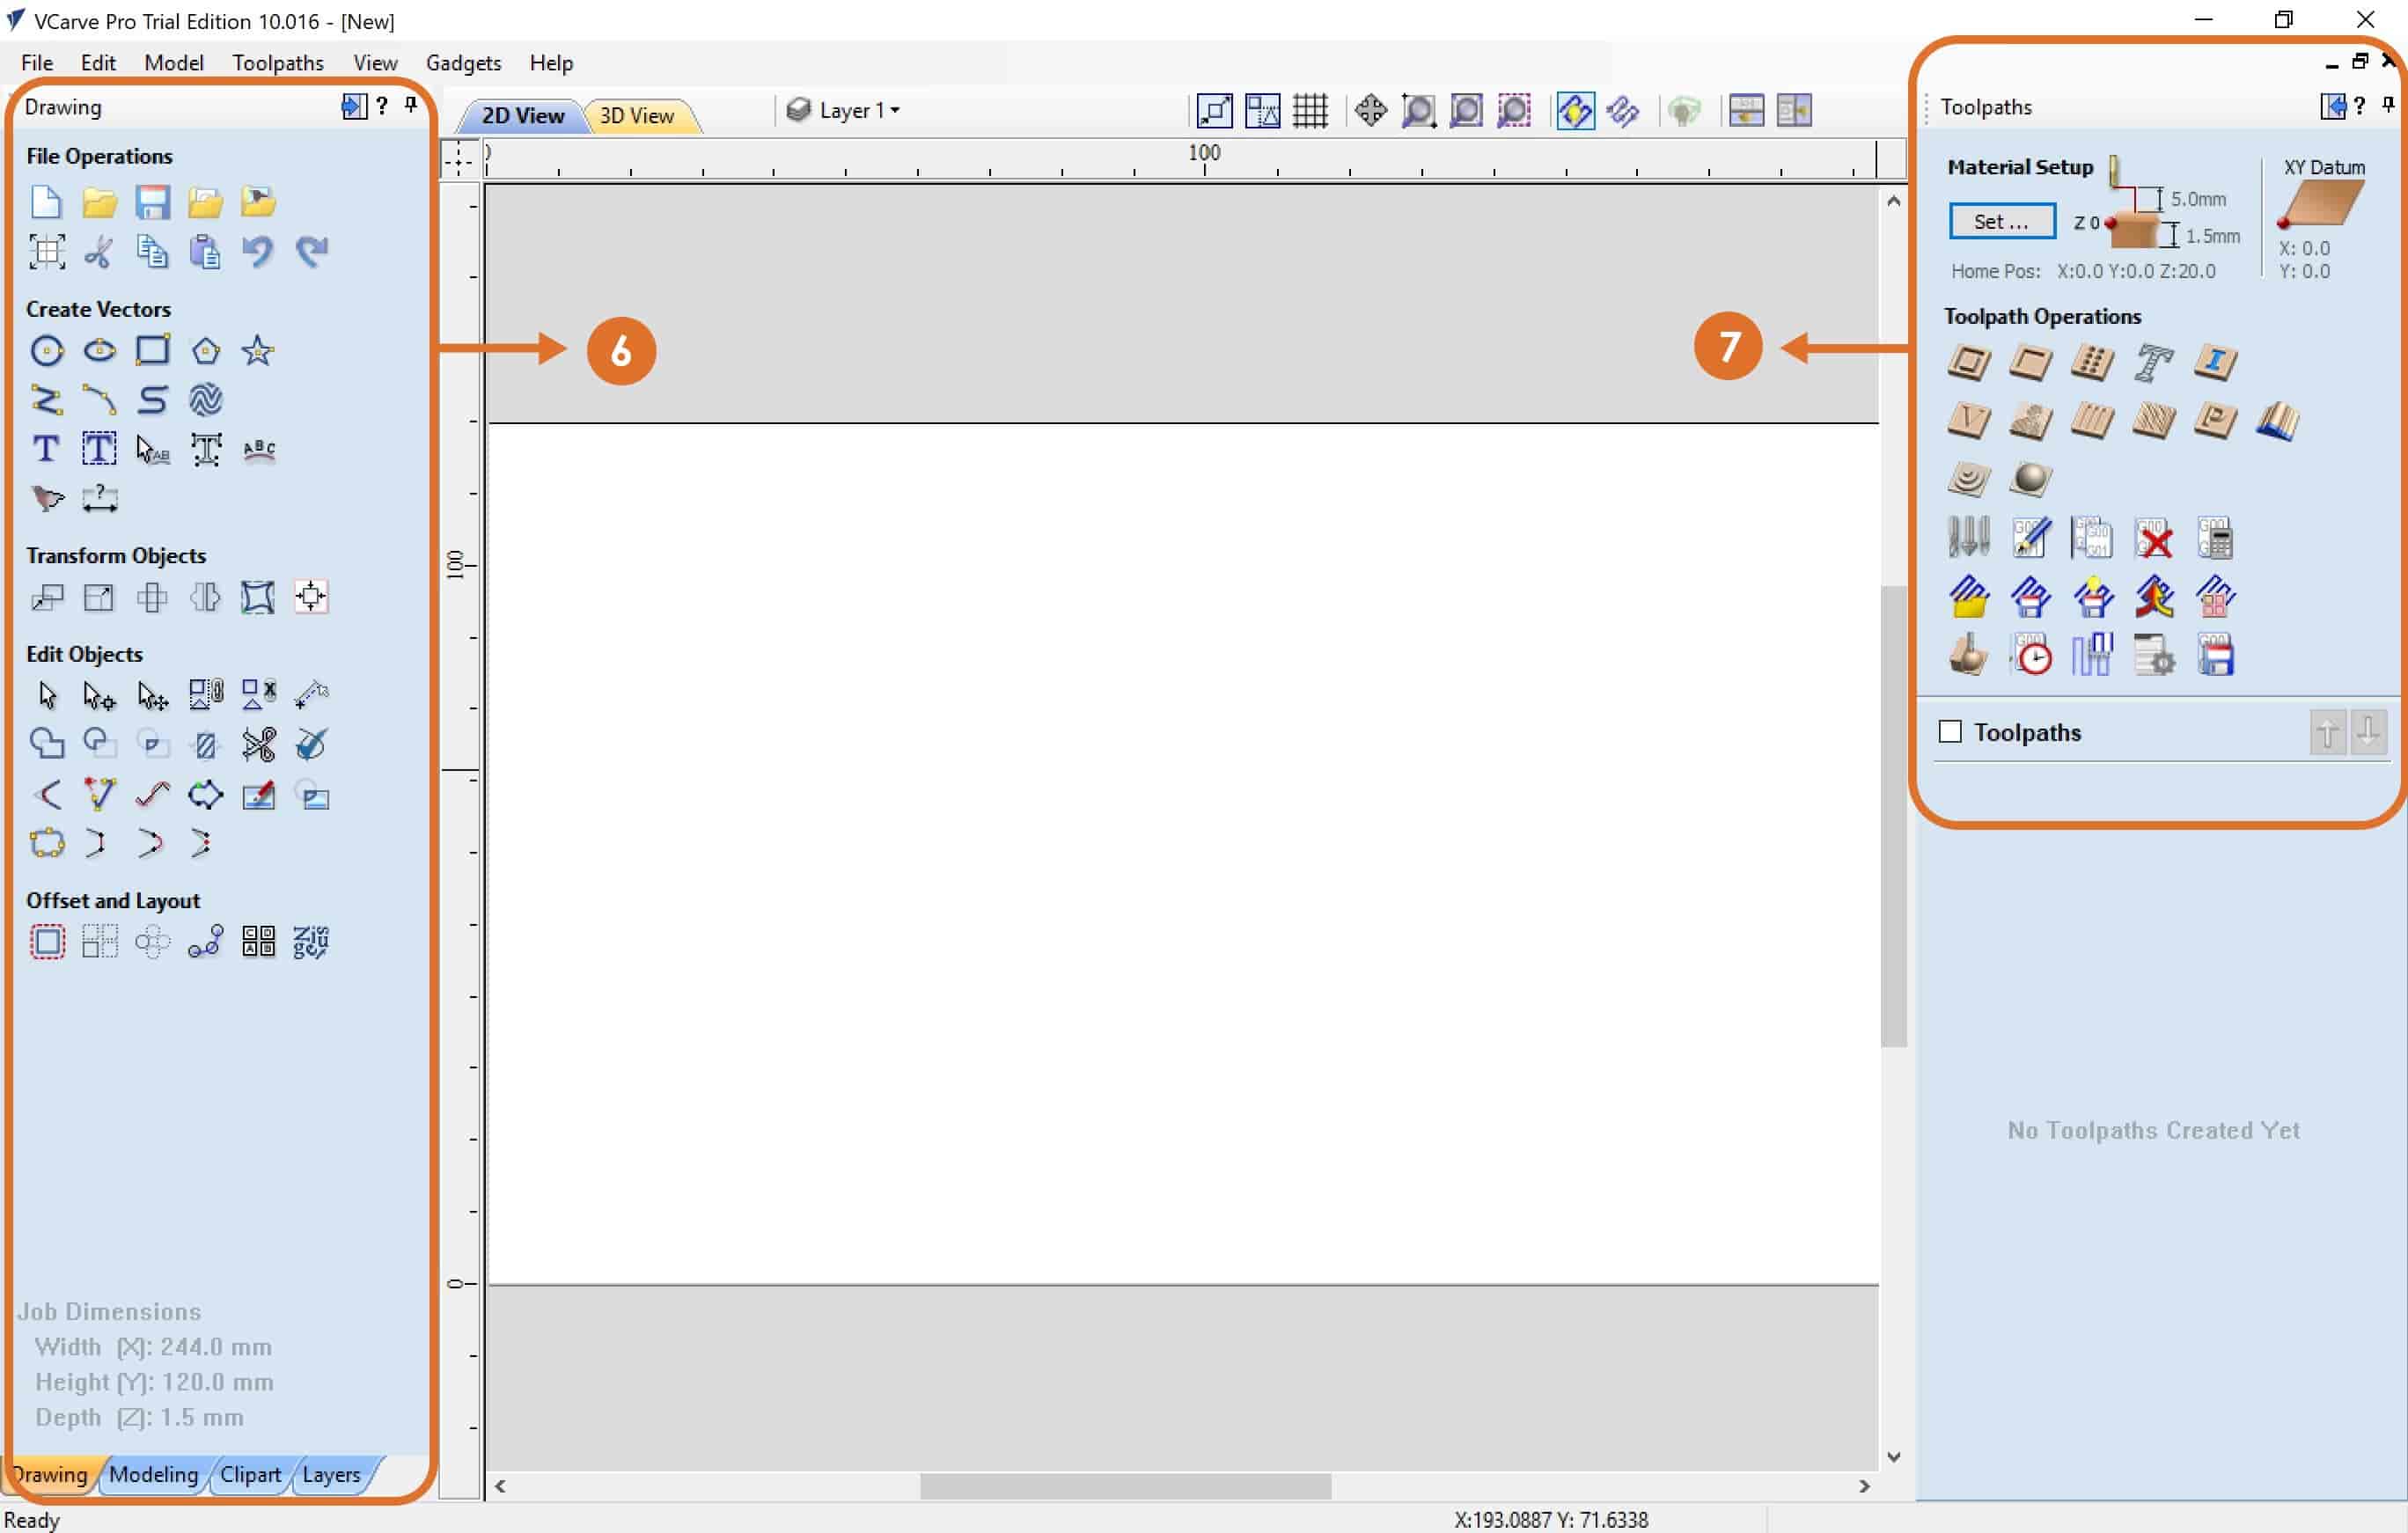
6. Design Panel : All tools to design and modify designed objects. You can switch between a group of tools with tabs at the bottom of the design panel.
7. Toolpaths : To set the material setup and select the different types of toolpaths that you need for your design.
Material Setup :
Create tool paths:
Vcarve has the ability to do many types of toolpaths., I will explain the main toolpaths that we usually use in 2D designs :
Profile tool path: It provides the flexibility for cutting 2D shapes out on the material by following a closed path with optional tabs / bridges. It also ensures perfect edge quality.
What is Tabs (Bridges) ?
Tabs are added to open and closed vector shapes, and to hold parts in place when cutting them out of material.
There are 3 options to determine how the tool is positioned relative to the selected vectors:
Pocket tool path: To remove materials from the interior of a path down to the specified depth.
Drilling tool path: Drilling allows the centers of selected closed vectors to be drilled to a specified depth.
To save the file:
For more information about VCarve software : Vcarve Pro User Manual
What is ShopBot Control Software?
This is the software that controls the CNC machines.
ShopBot control software interface:
PhotoThe “Easy” Control Panel: This panel gives us access to essential machine information and controls.
The KeyPad: The KeyPad allows us to manually move the X,Y,Z axes of the machine.
Individual Assignment:
In this assignment, we have to make, design, mill and assemble something BIG. To start this assignment, there are steps that we have to follow to get the final product:
1. Design the geometry by using any design software, then export it out.
2. Import the design to Vcarve software then define all the tool paths that will control the shopbot.
3. Load the material, bit and set up the machine.
4. Control the machine by using ShopBot control software.
Once we have that all set, then we are ready to cut. We are going to run the files that we will go through to cut the part out and we will be done!
After that we will assemble all the parts together. We will then do the finishing.
Let’s Make It !
On this day, Coronavirus (Covid-19) has started and spread to Saudi Arabia. Our government ordered a 24 hours curfew in all the cities. These days are so hard for all of us, mainly because we have to stay at home all the time. For this reason, I decided to make a game board table to enable the family spend their time at home in a fun way by gathering and playing together.
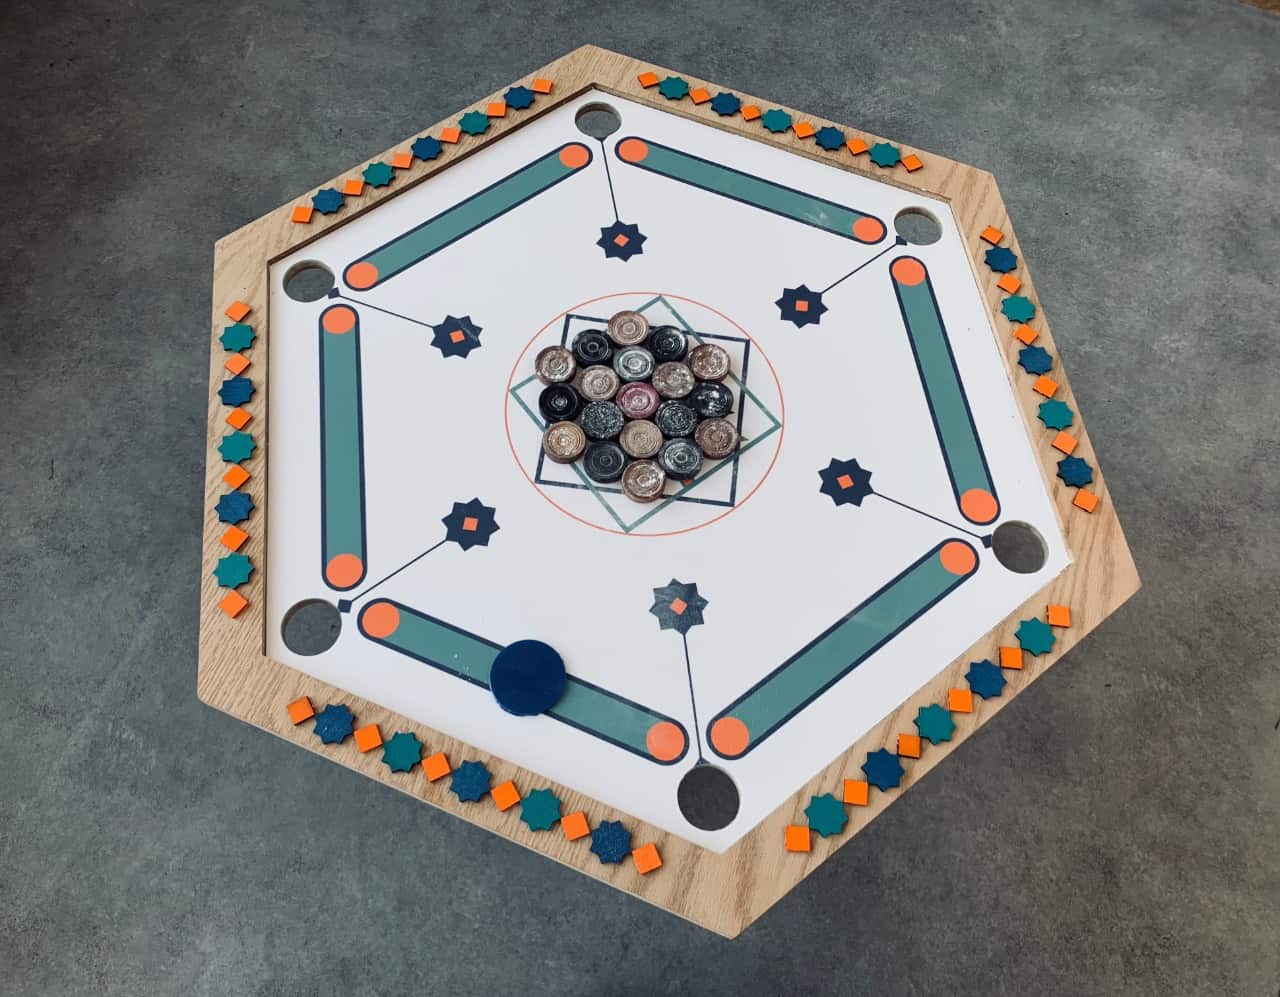
The board game that I’m going to make is called ( Carrom - كيرم ). It’s a traditional tabletop game. The game is very popular in South Asia and the Middle East. This game of carrom originated in India.
Carrom is played by propelling discs with the fingers with the aim of potting them into one of four corner pockets on a wooden playing board.
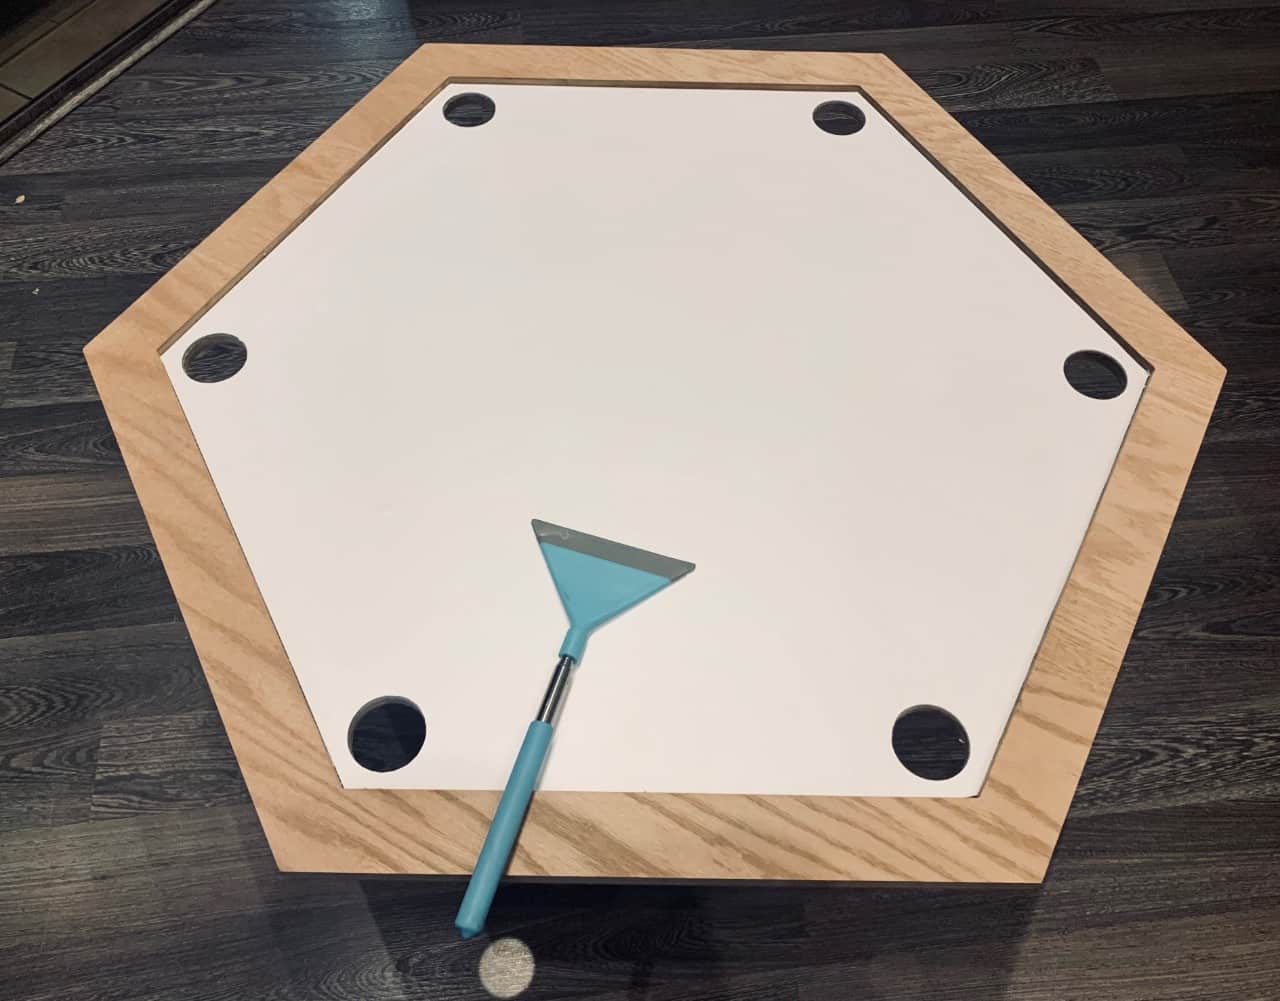
The popular shape for the game board is square, but I decided to make its shape polygon with 6 corners.
This game board table will consist of 5 pieces :
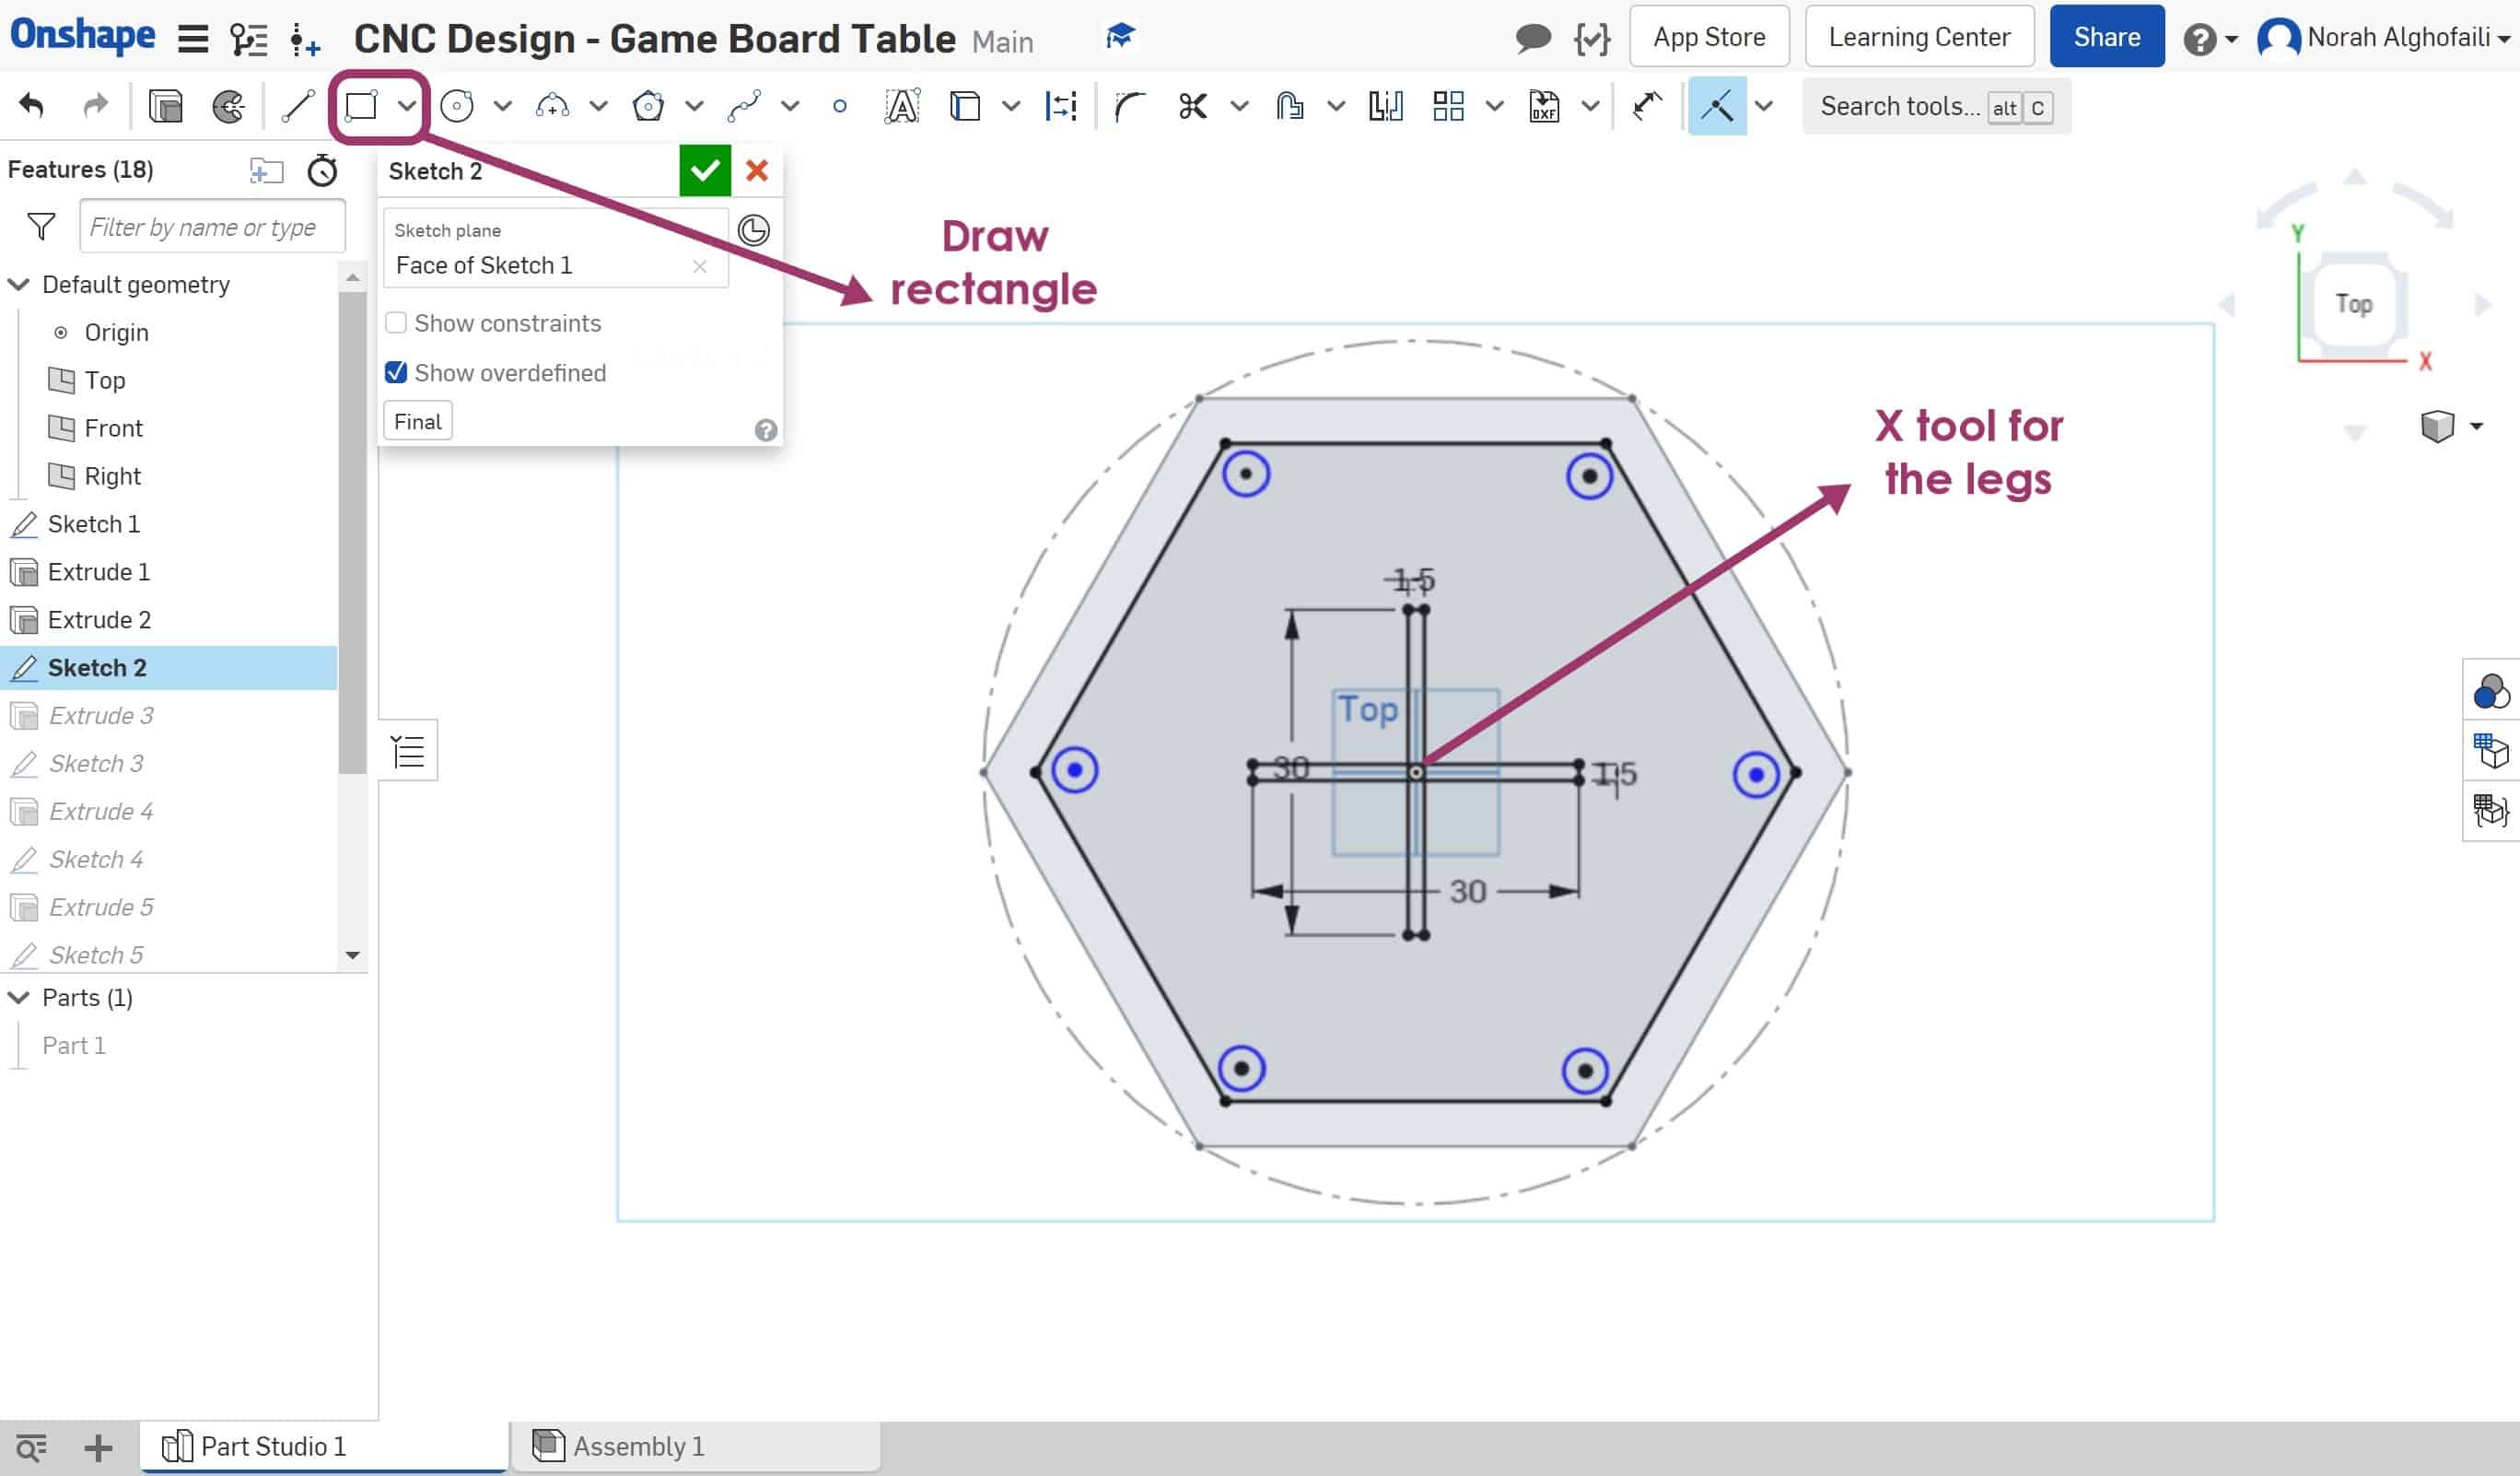
What is X tool ?
X-tool as a neat substitute for seating arrangements at social gatherings. The benefits of this technique is its easy assemblage and its precise fix.
The Design :
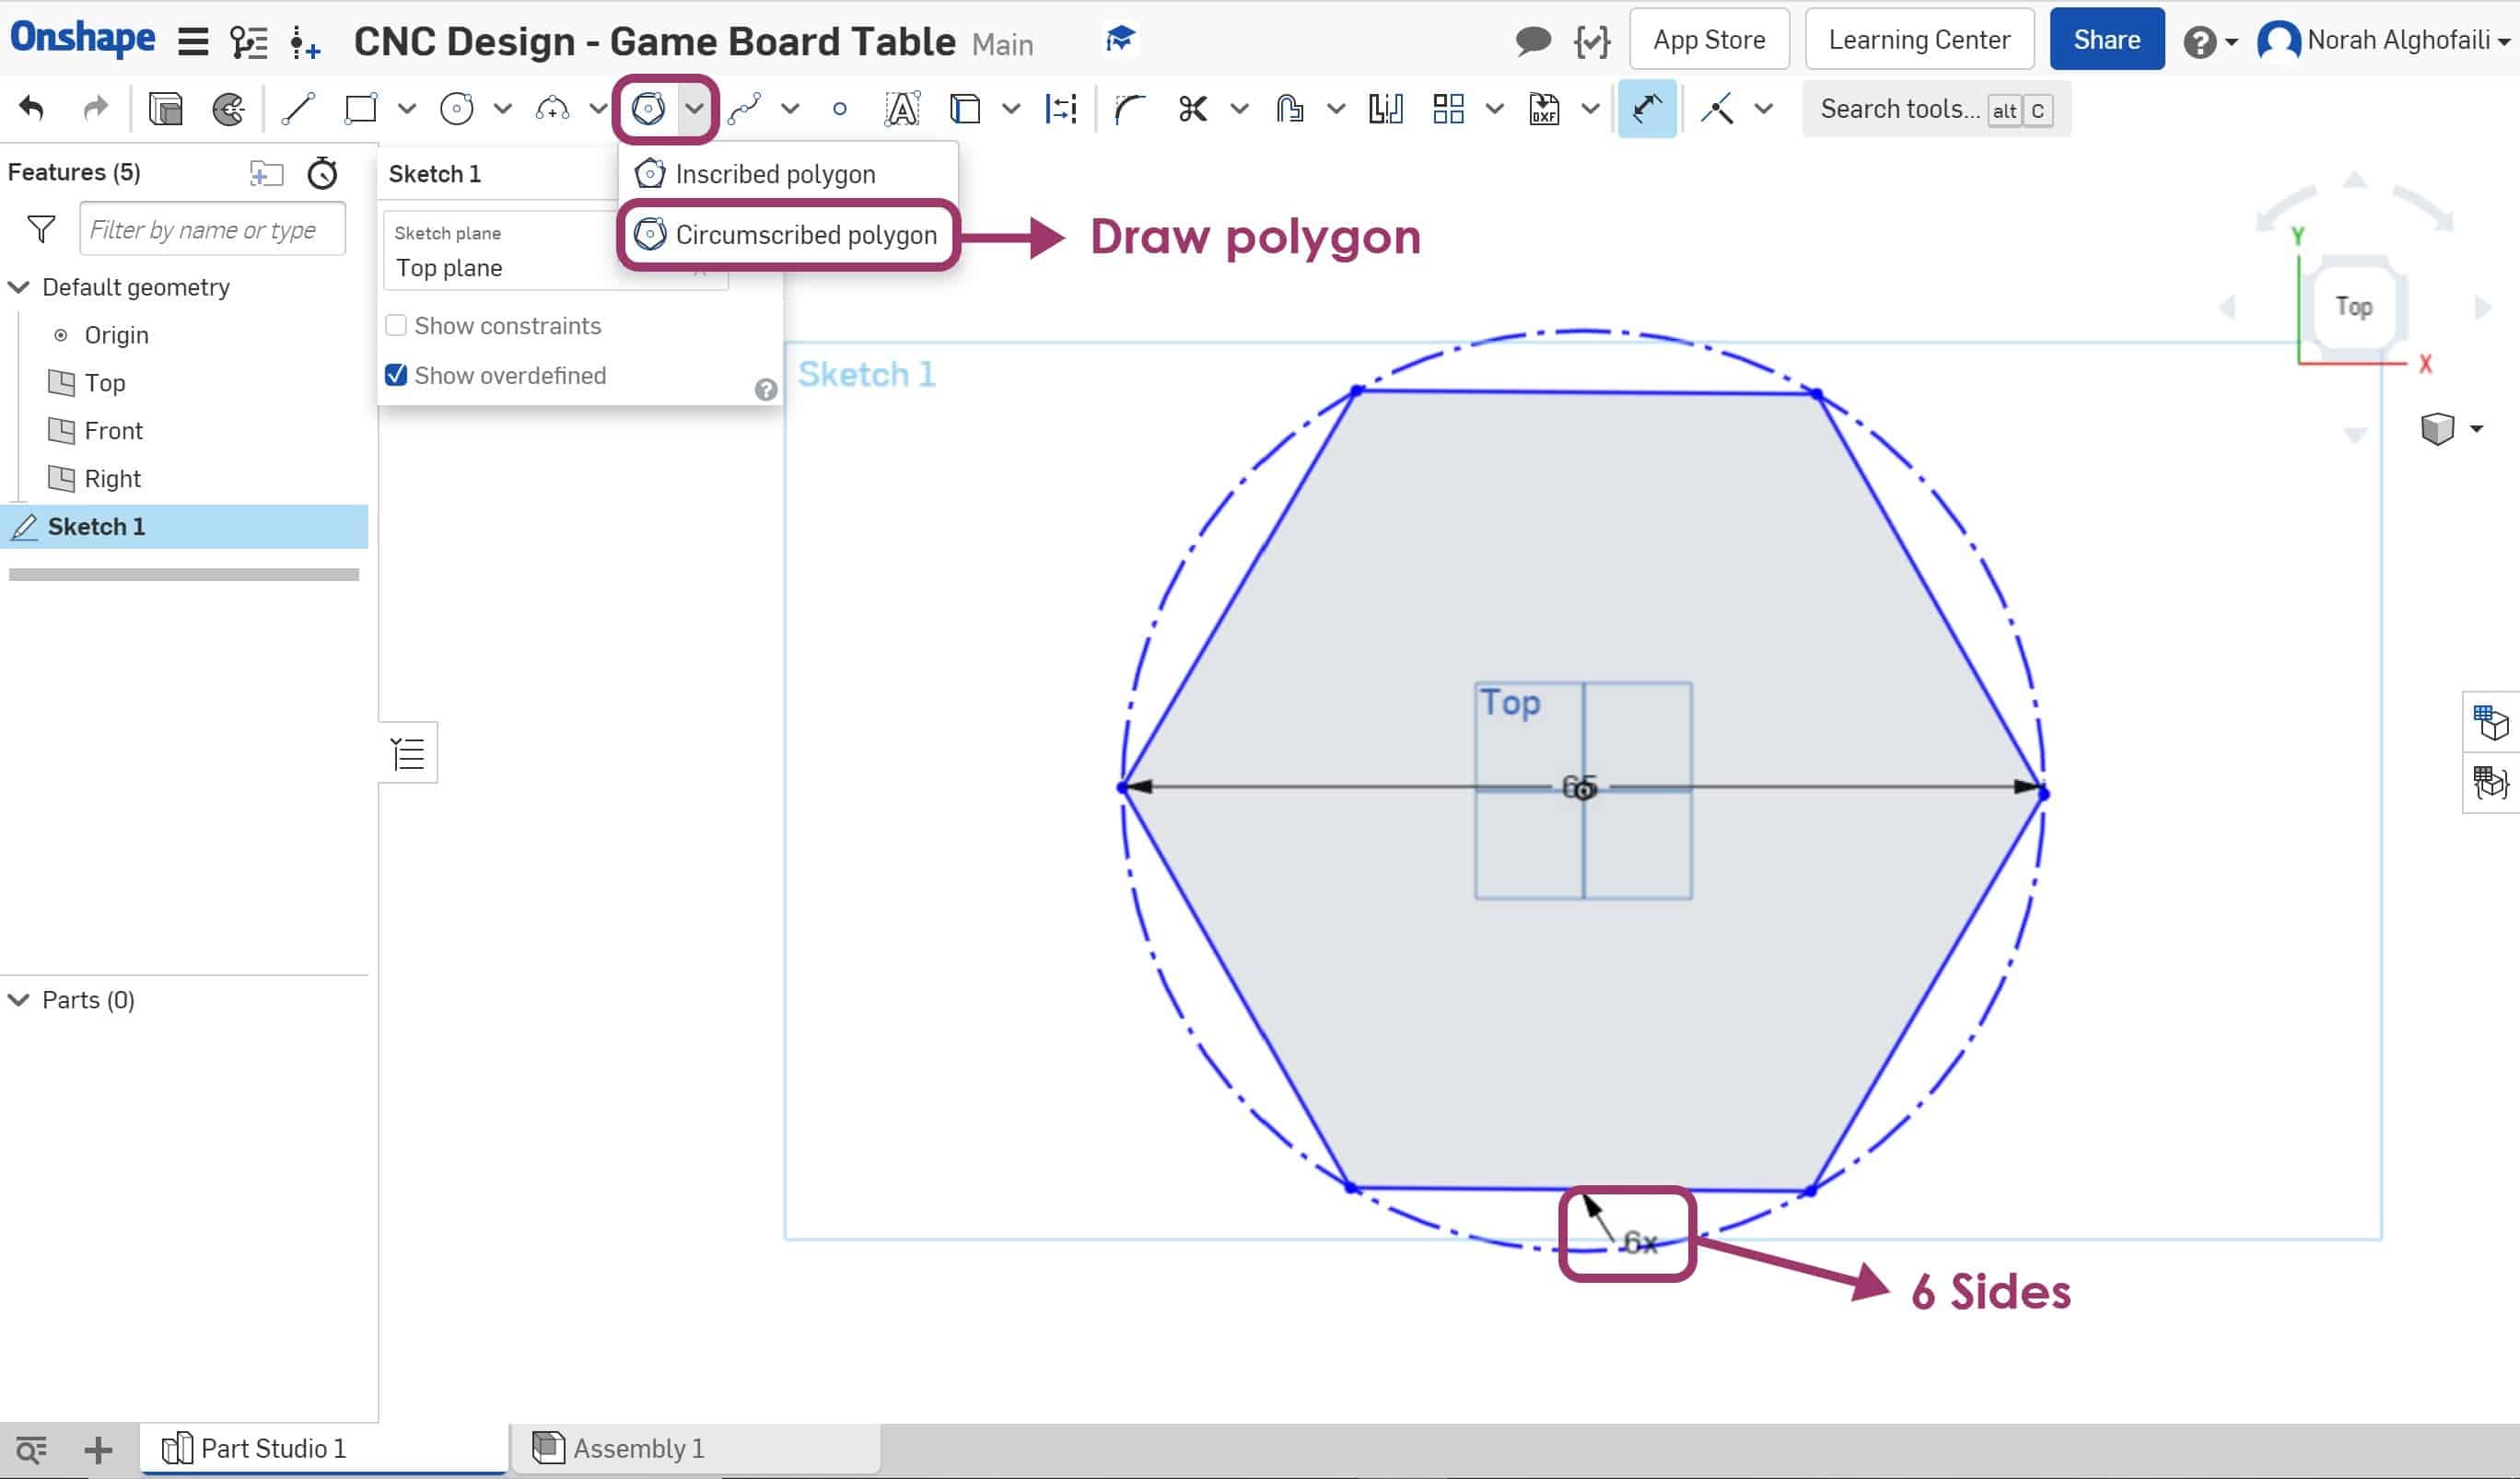
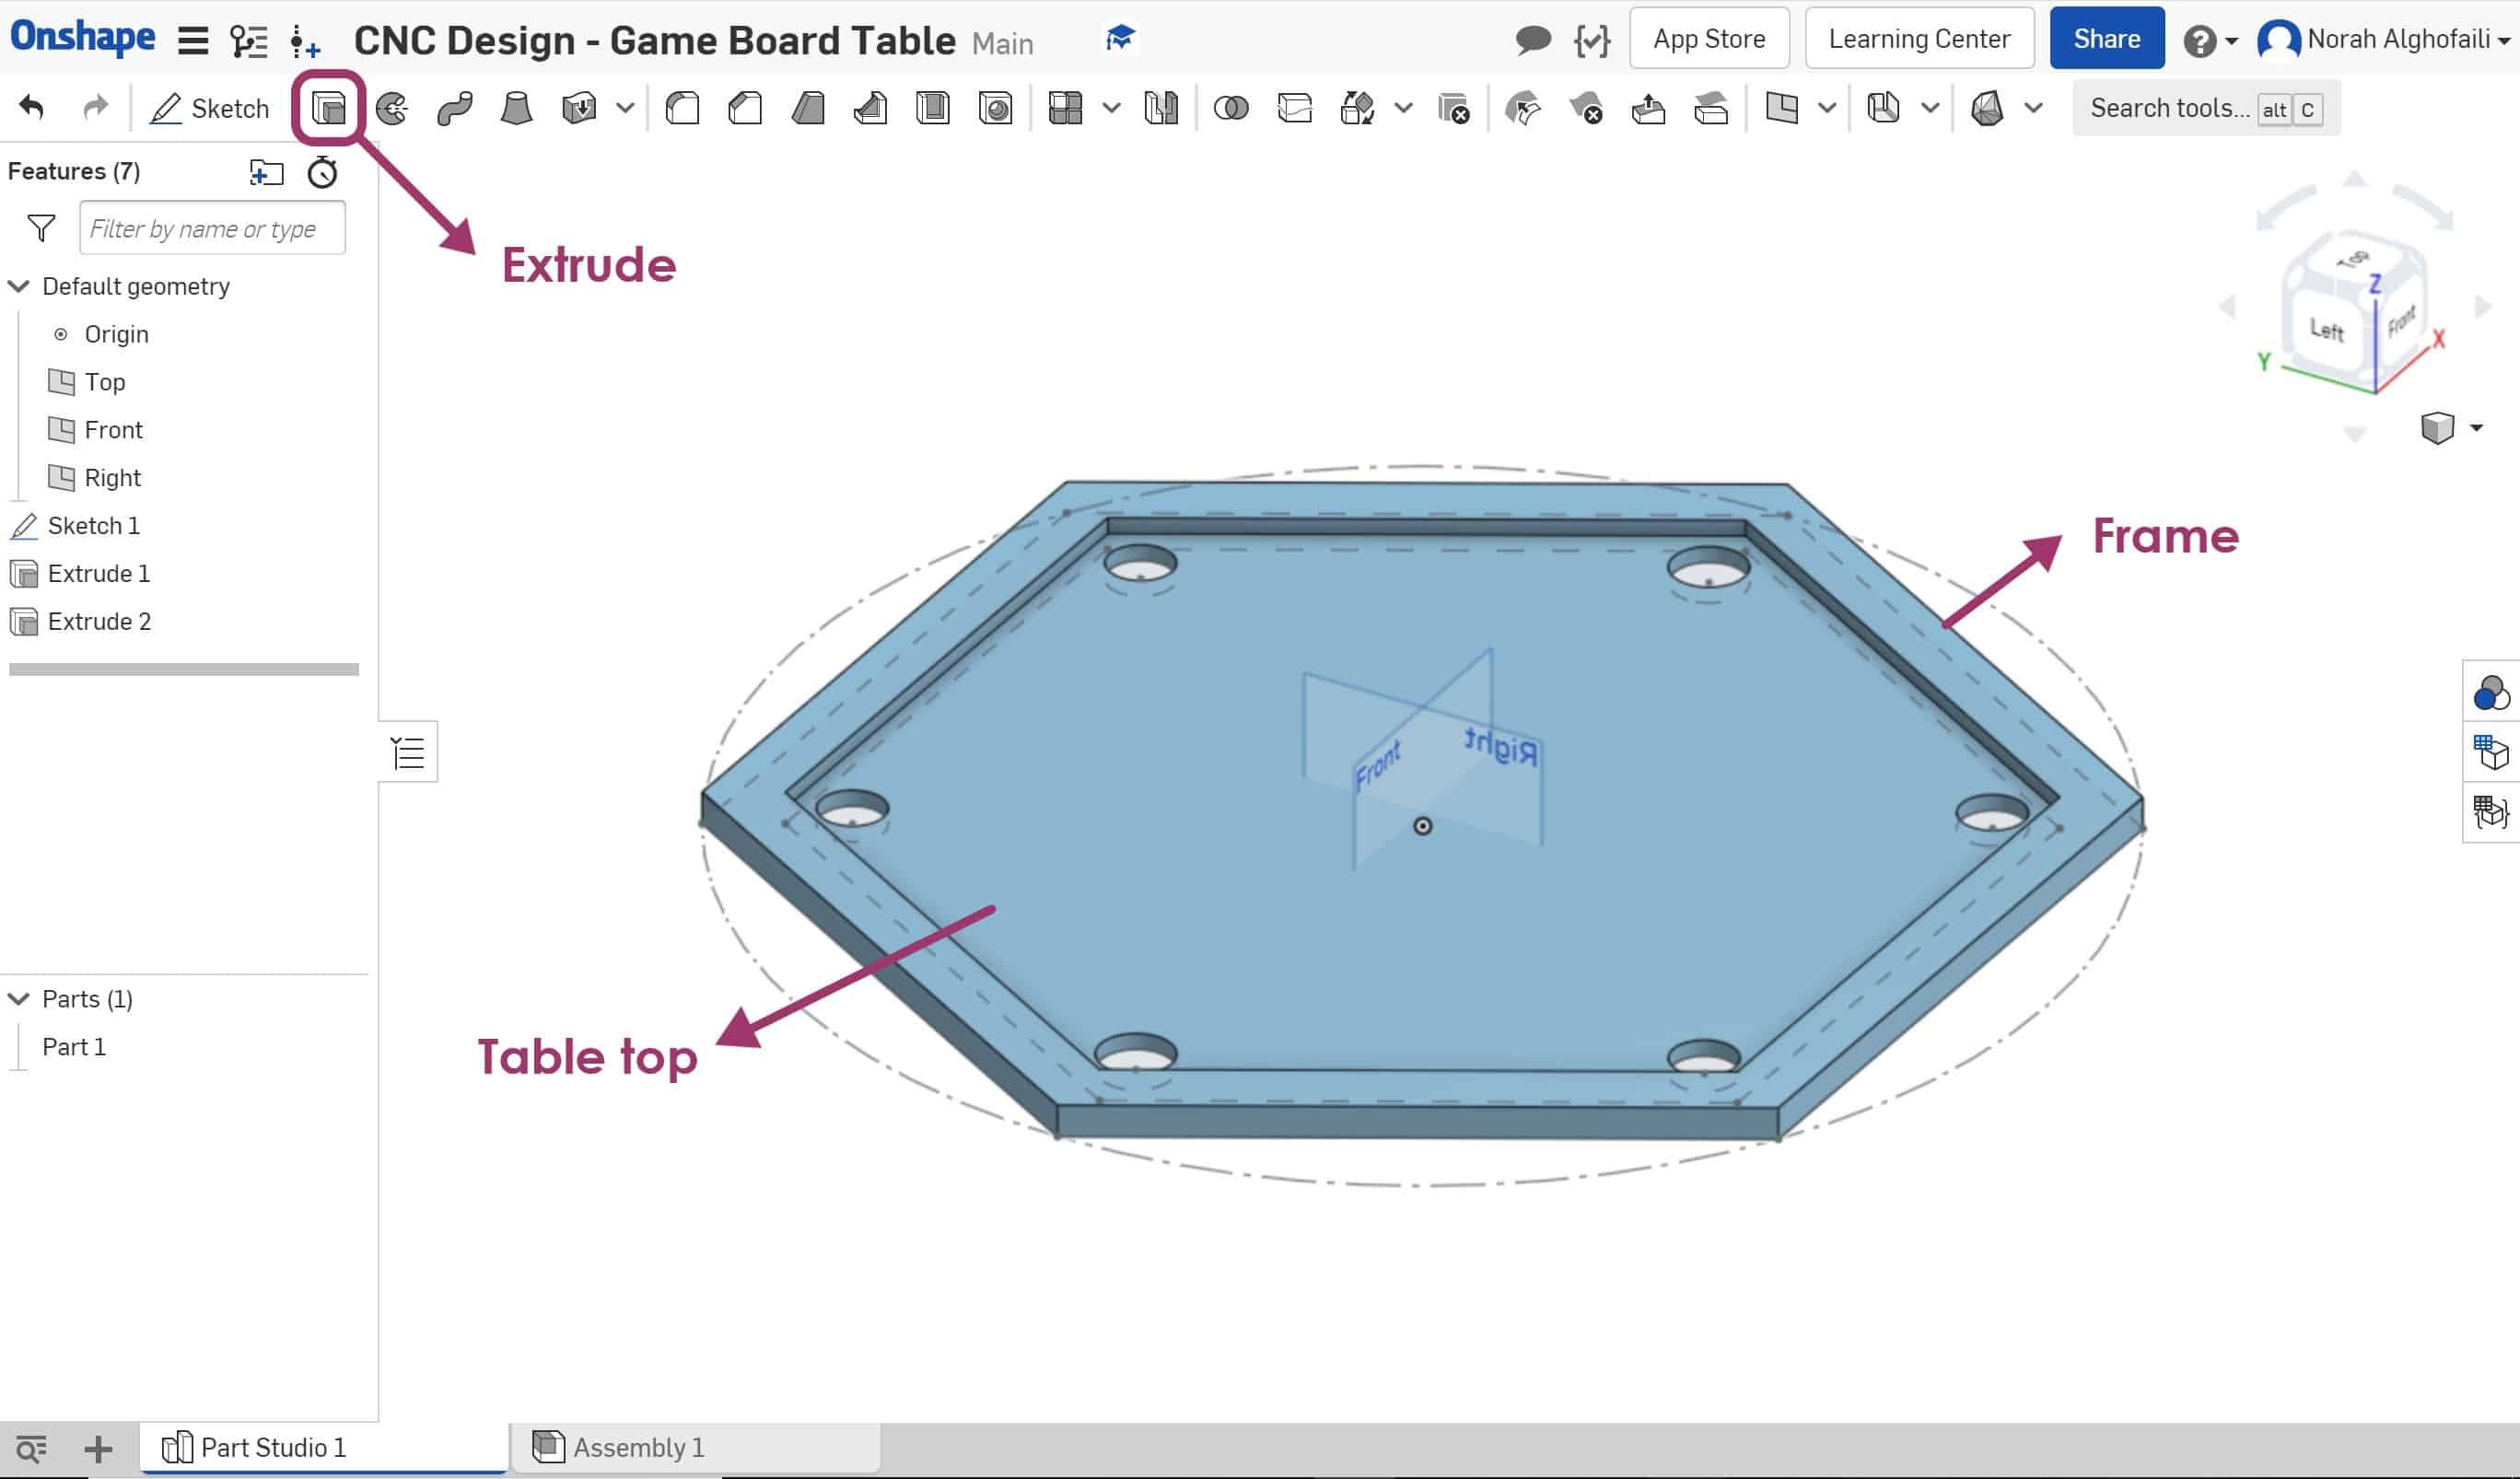
As I am now familiar with Onshape, I used it to design the game board table.
1. Draw a polygon as a top of the table with 6 sides.
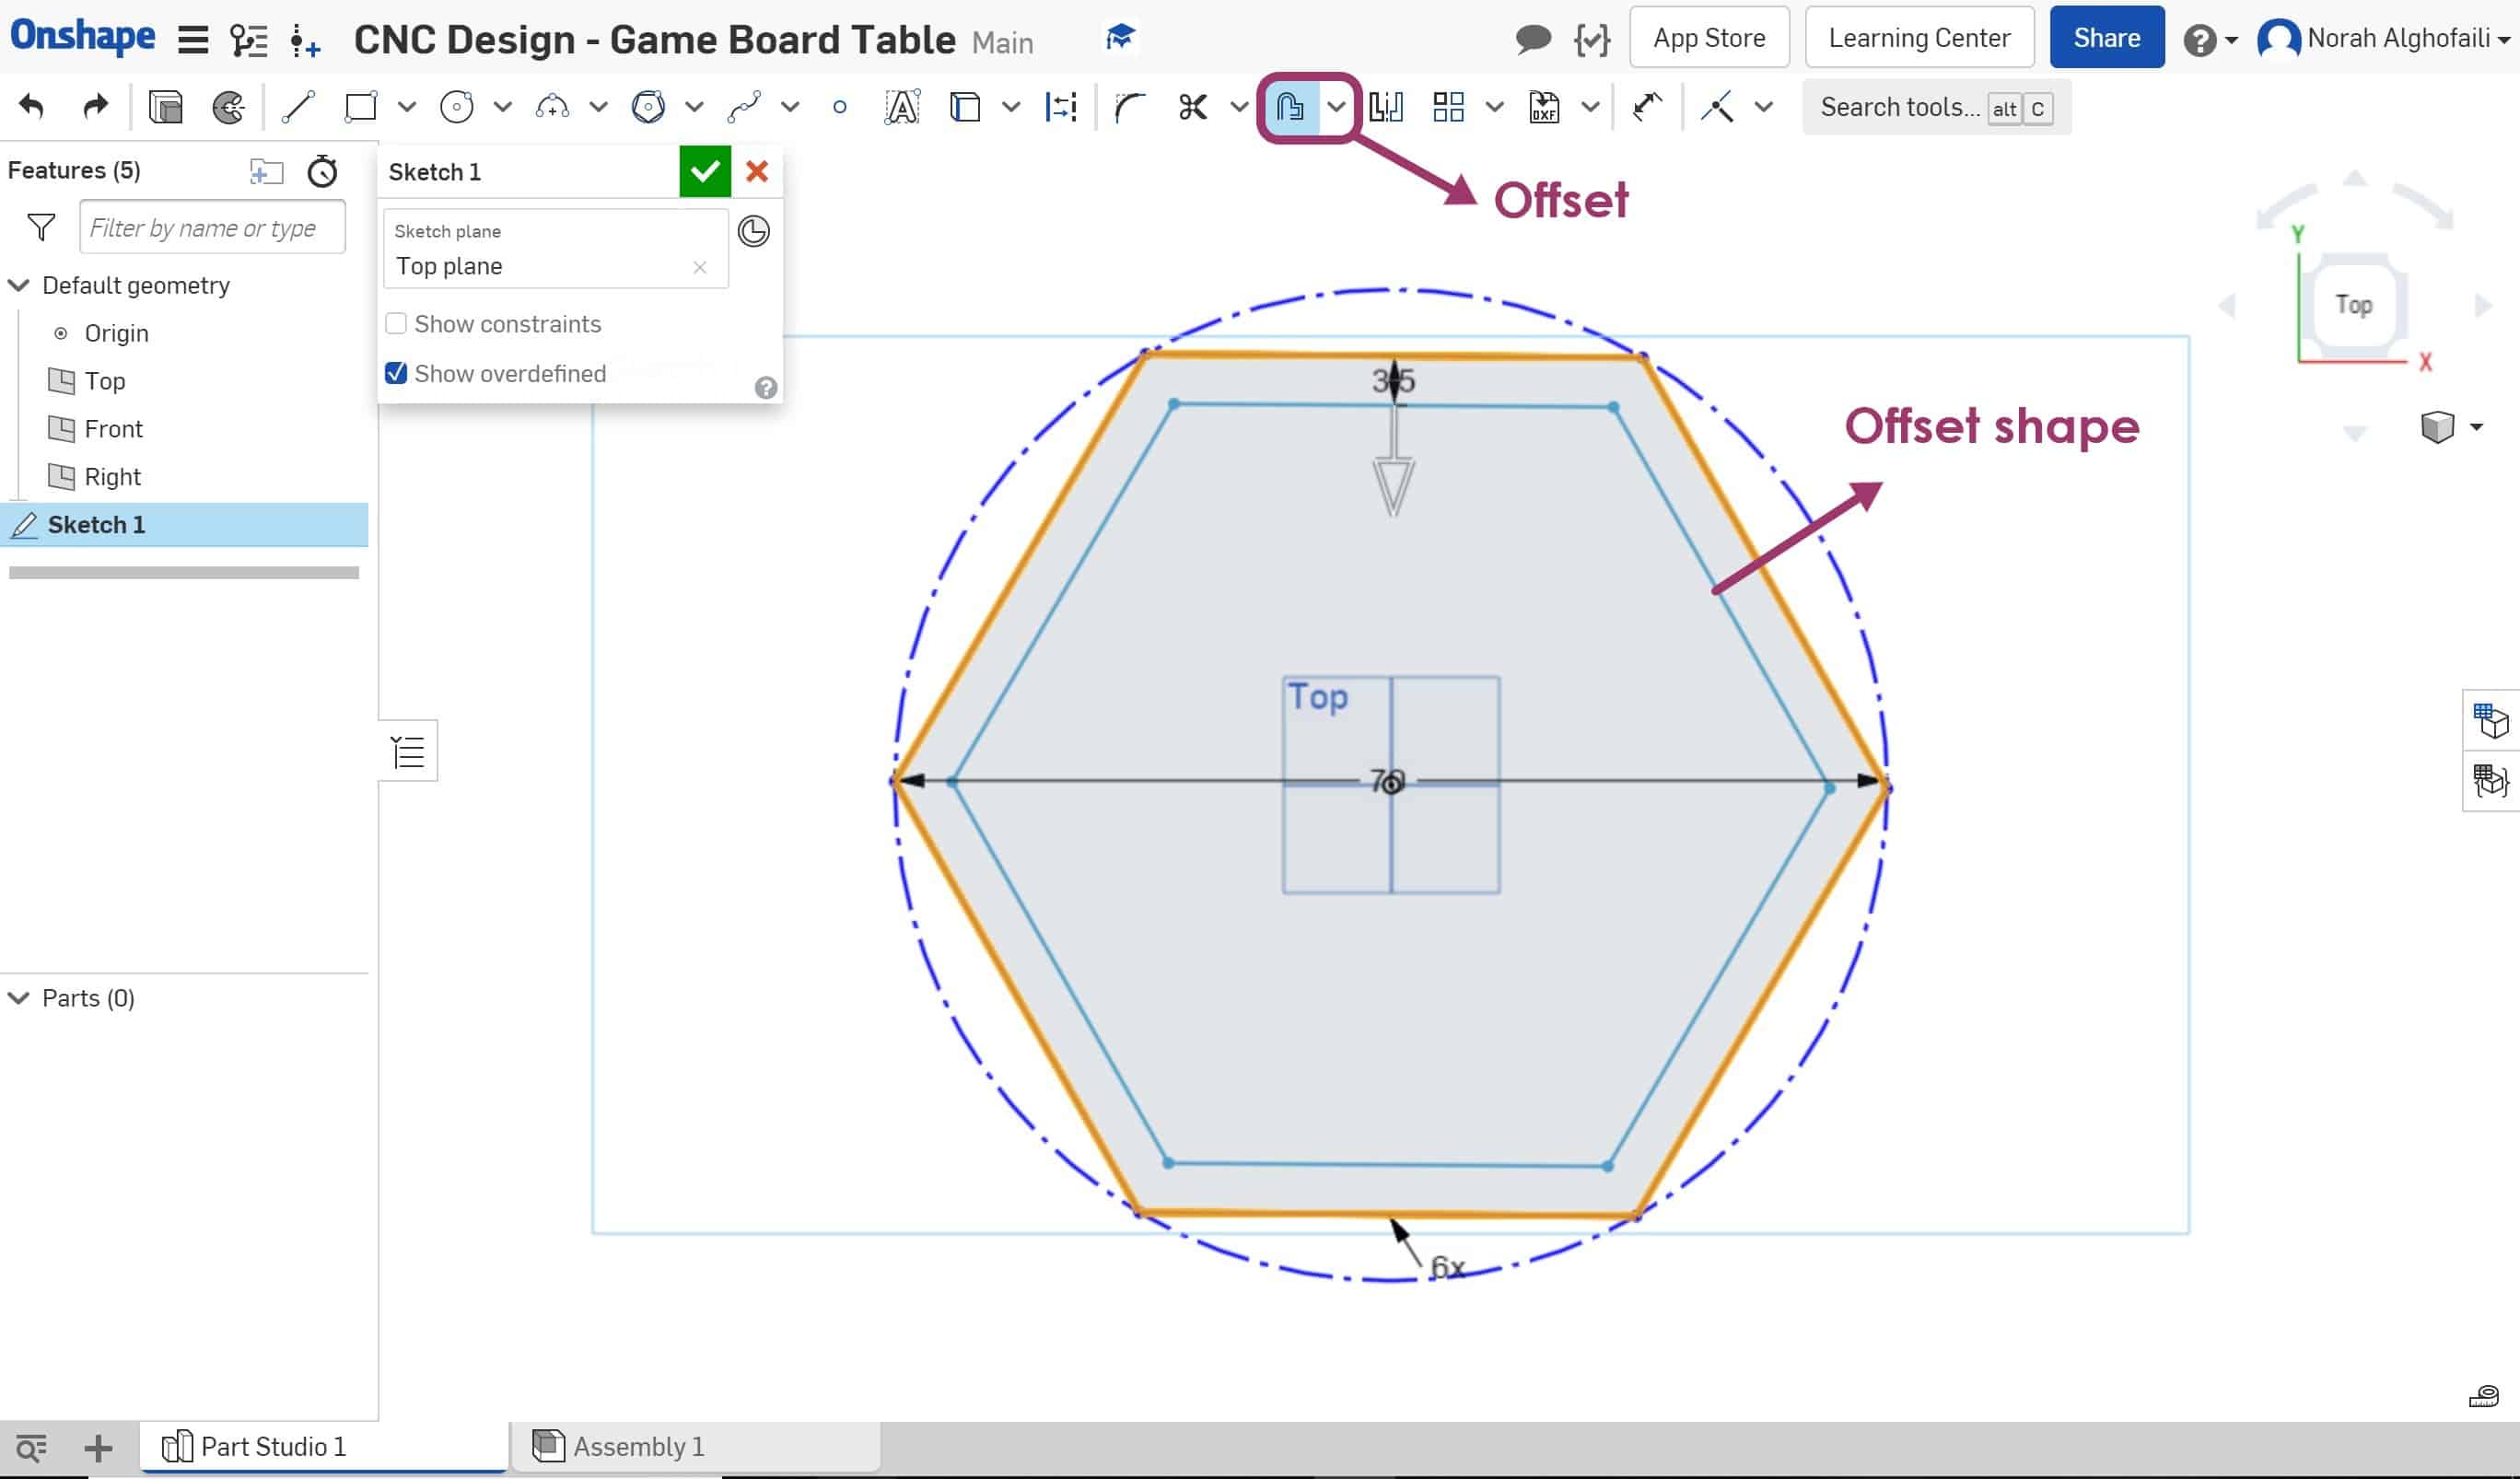
2. To make a frame, select the shape and use offset with 3.5 cm distance inside the previous shape.
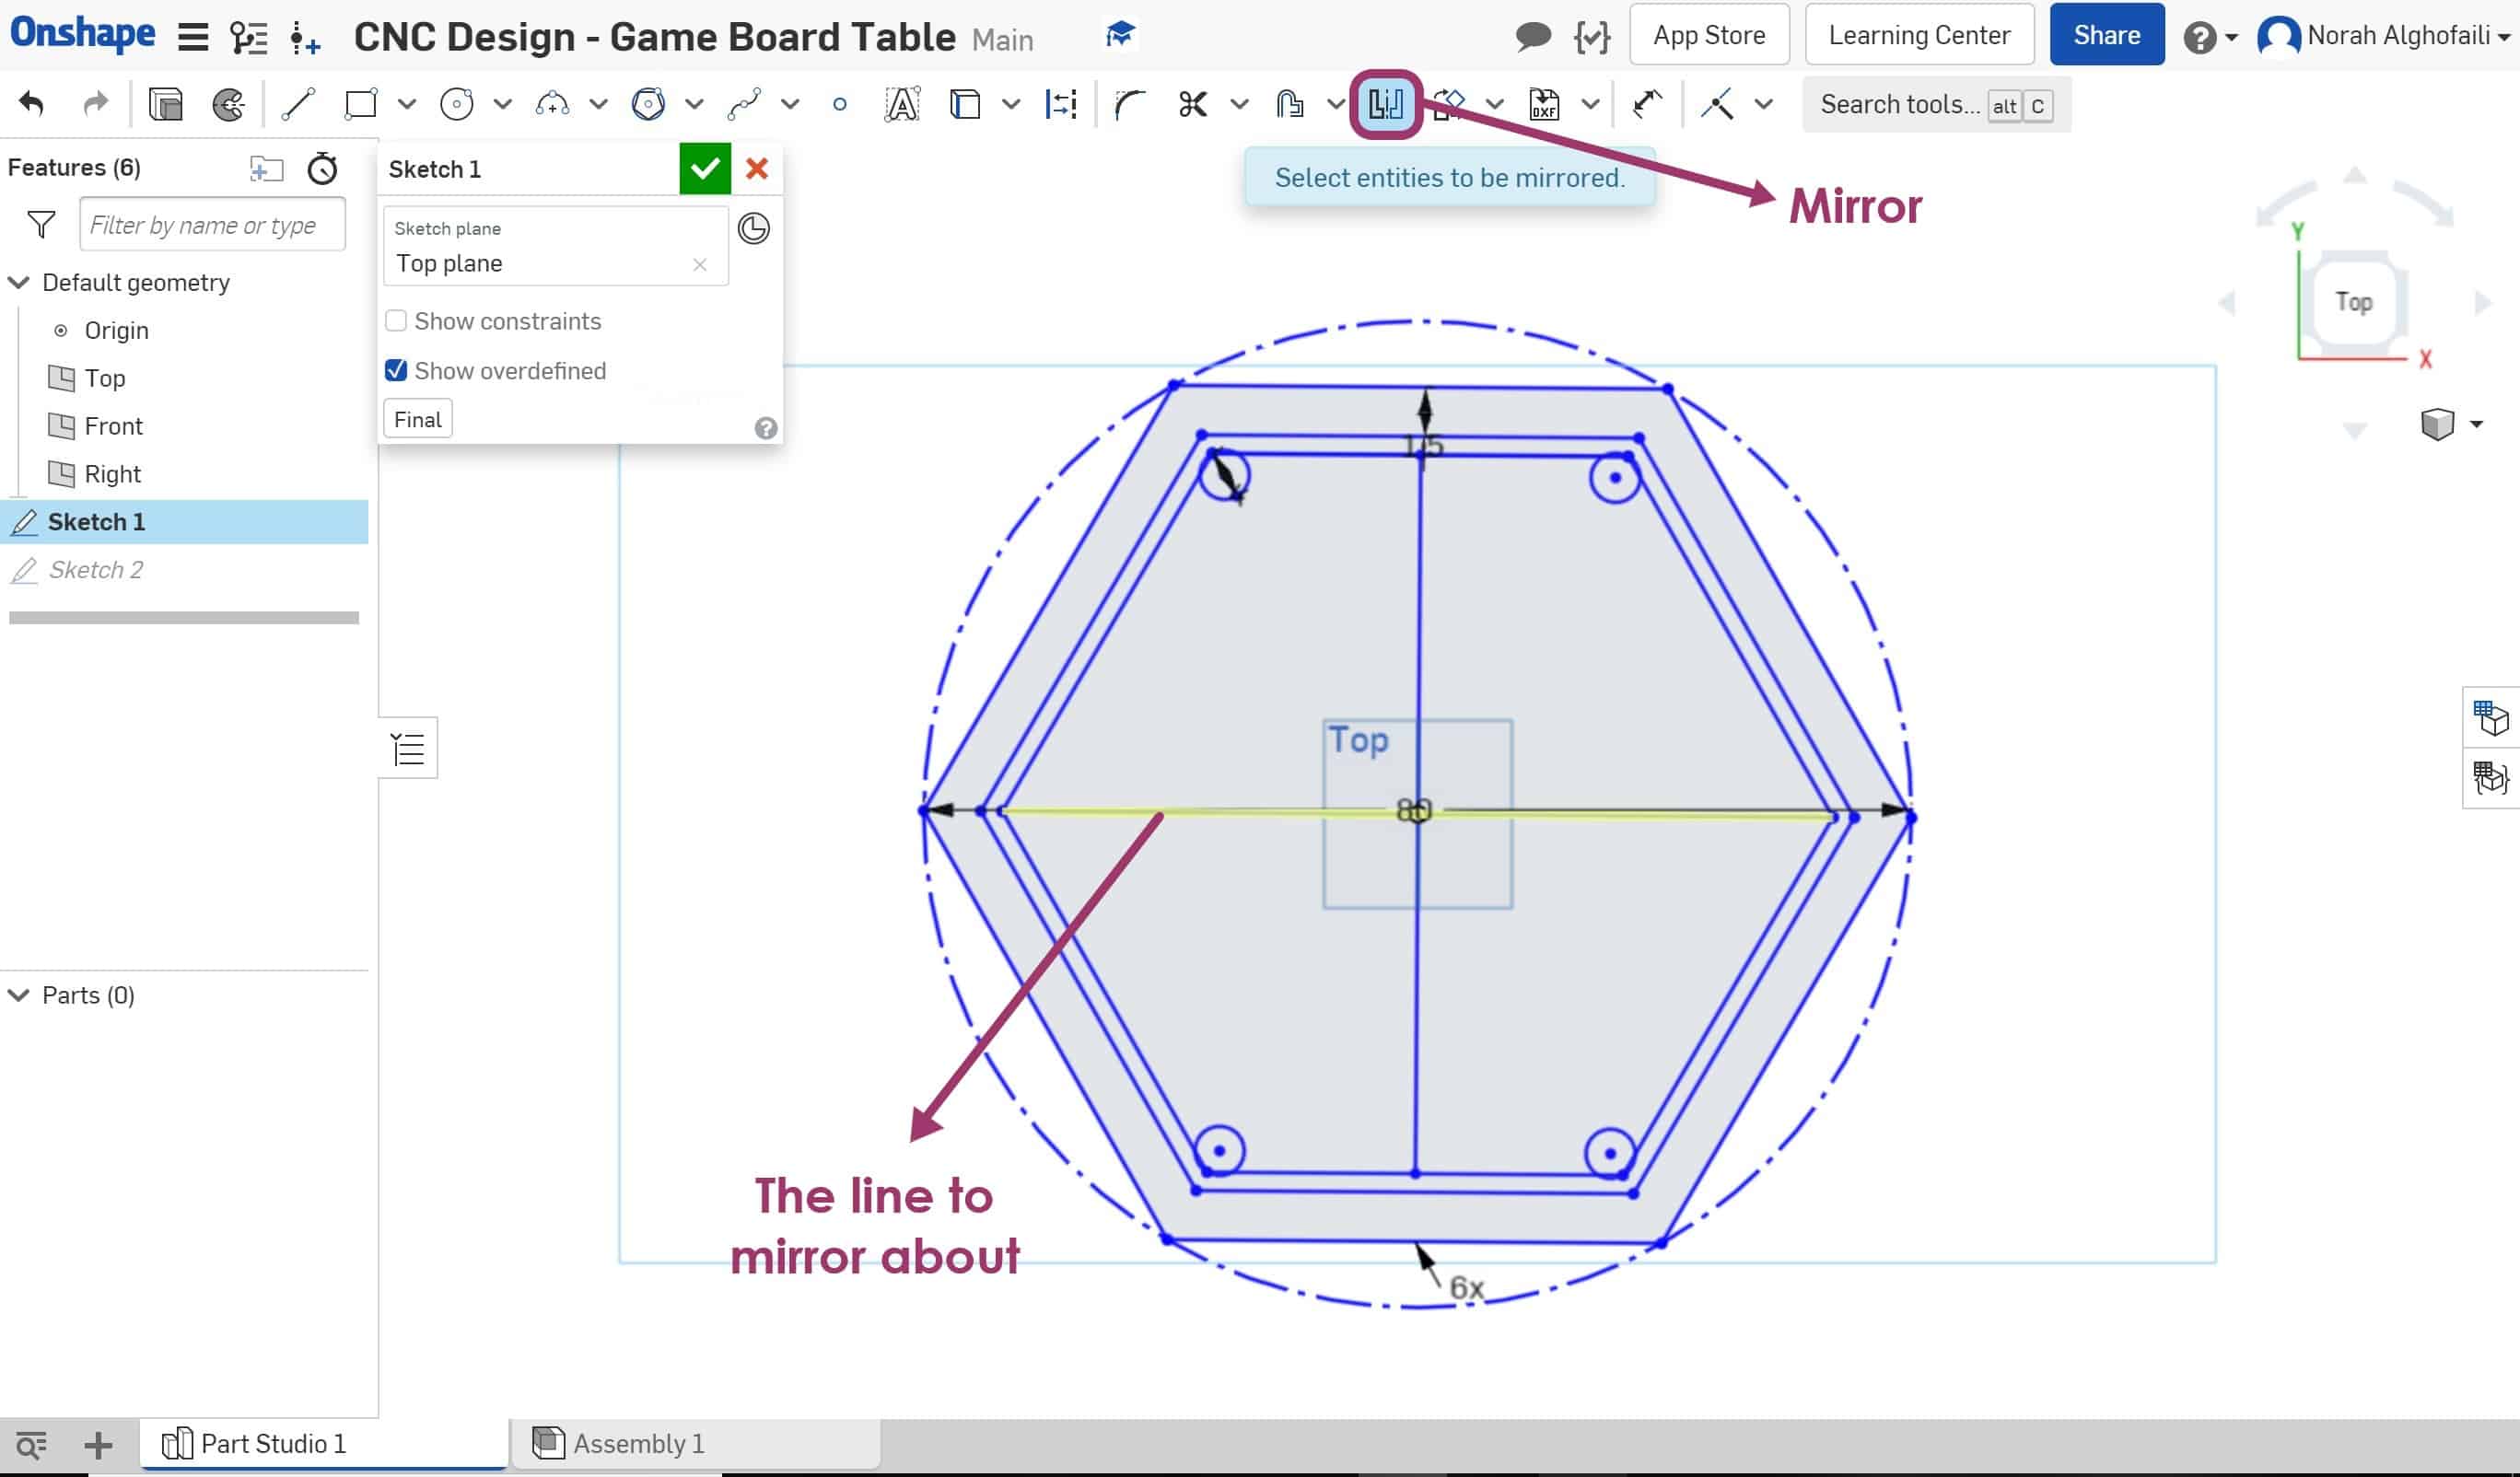
3. Draw a circle on the corner > Then use the mirror to make copies.
4. Extrude the top and frame of the table by using the extrude feature with depth = 1.5 cm for the top of the table and the depth = 2 cm for the frame.
5. Copy the top of the table > Then draw the X tool on the center to adjust the legs with dimensions ( W=1.5 cm and L= 30 cm ) then subtract it from the object.
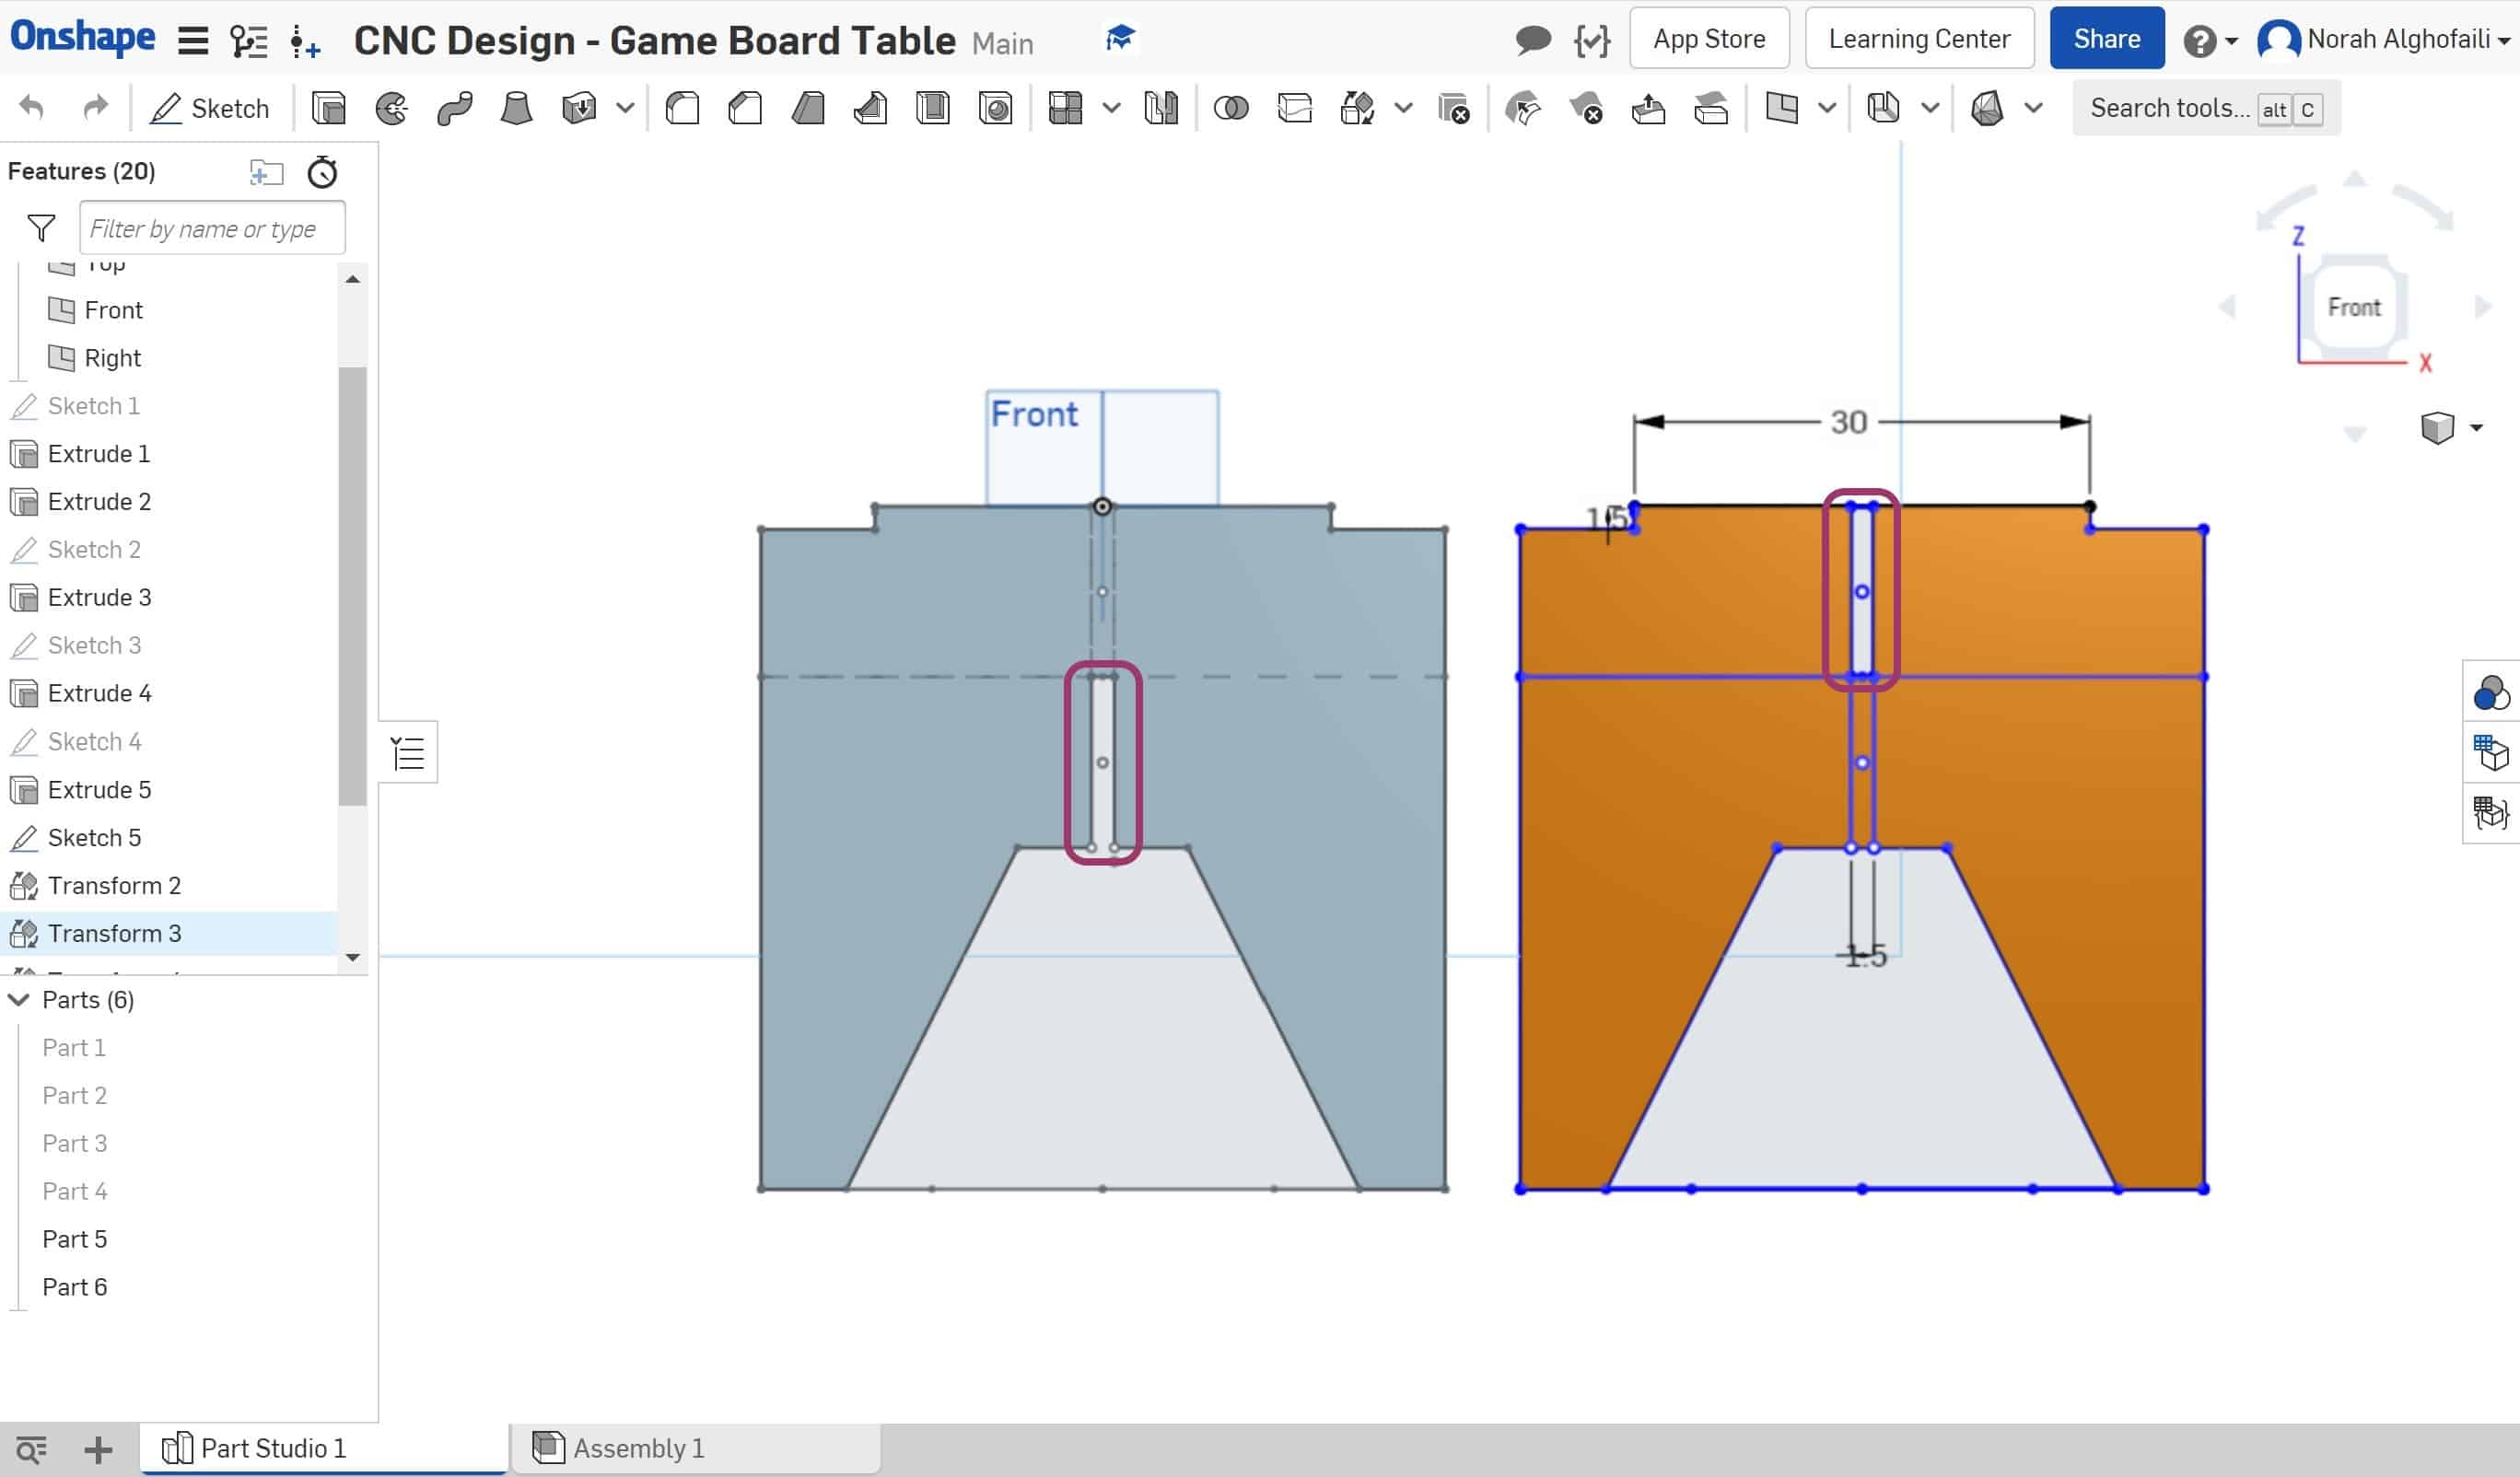
6. Draw the two legs by using a square ( W=45 cm and L= 45 cm ), then subtract and extrude some parts with depth 1.5 cm.
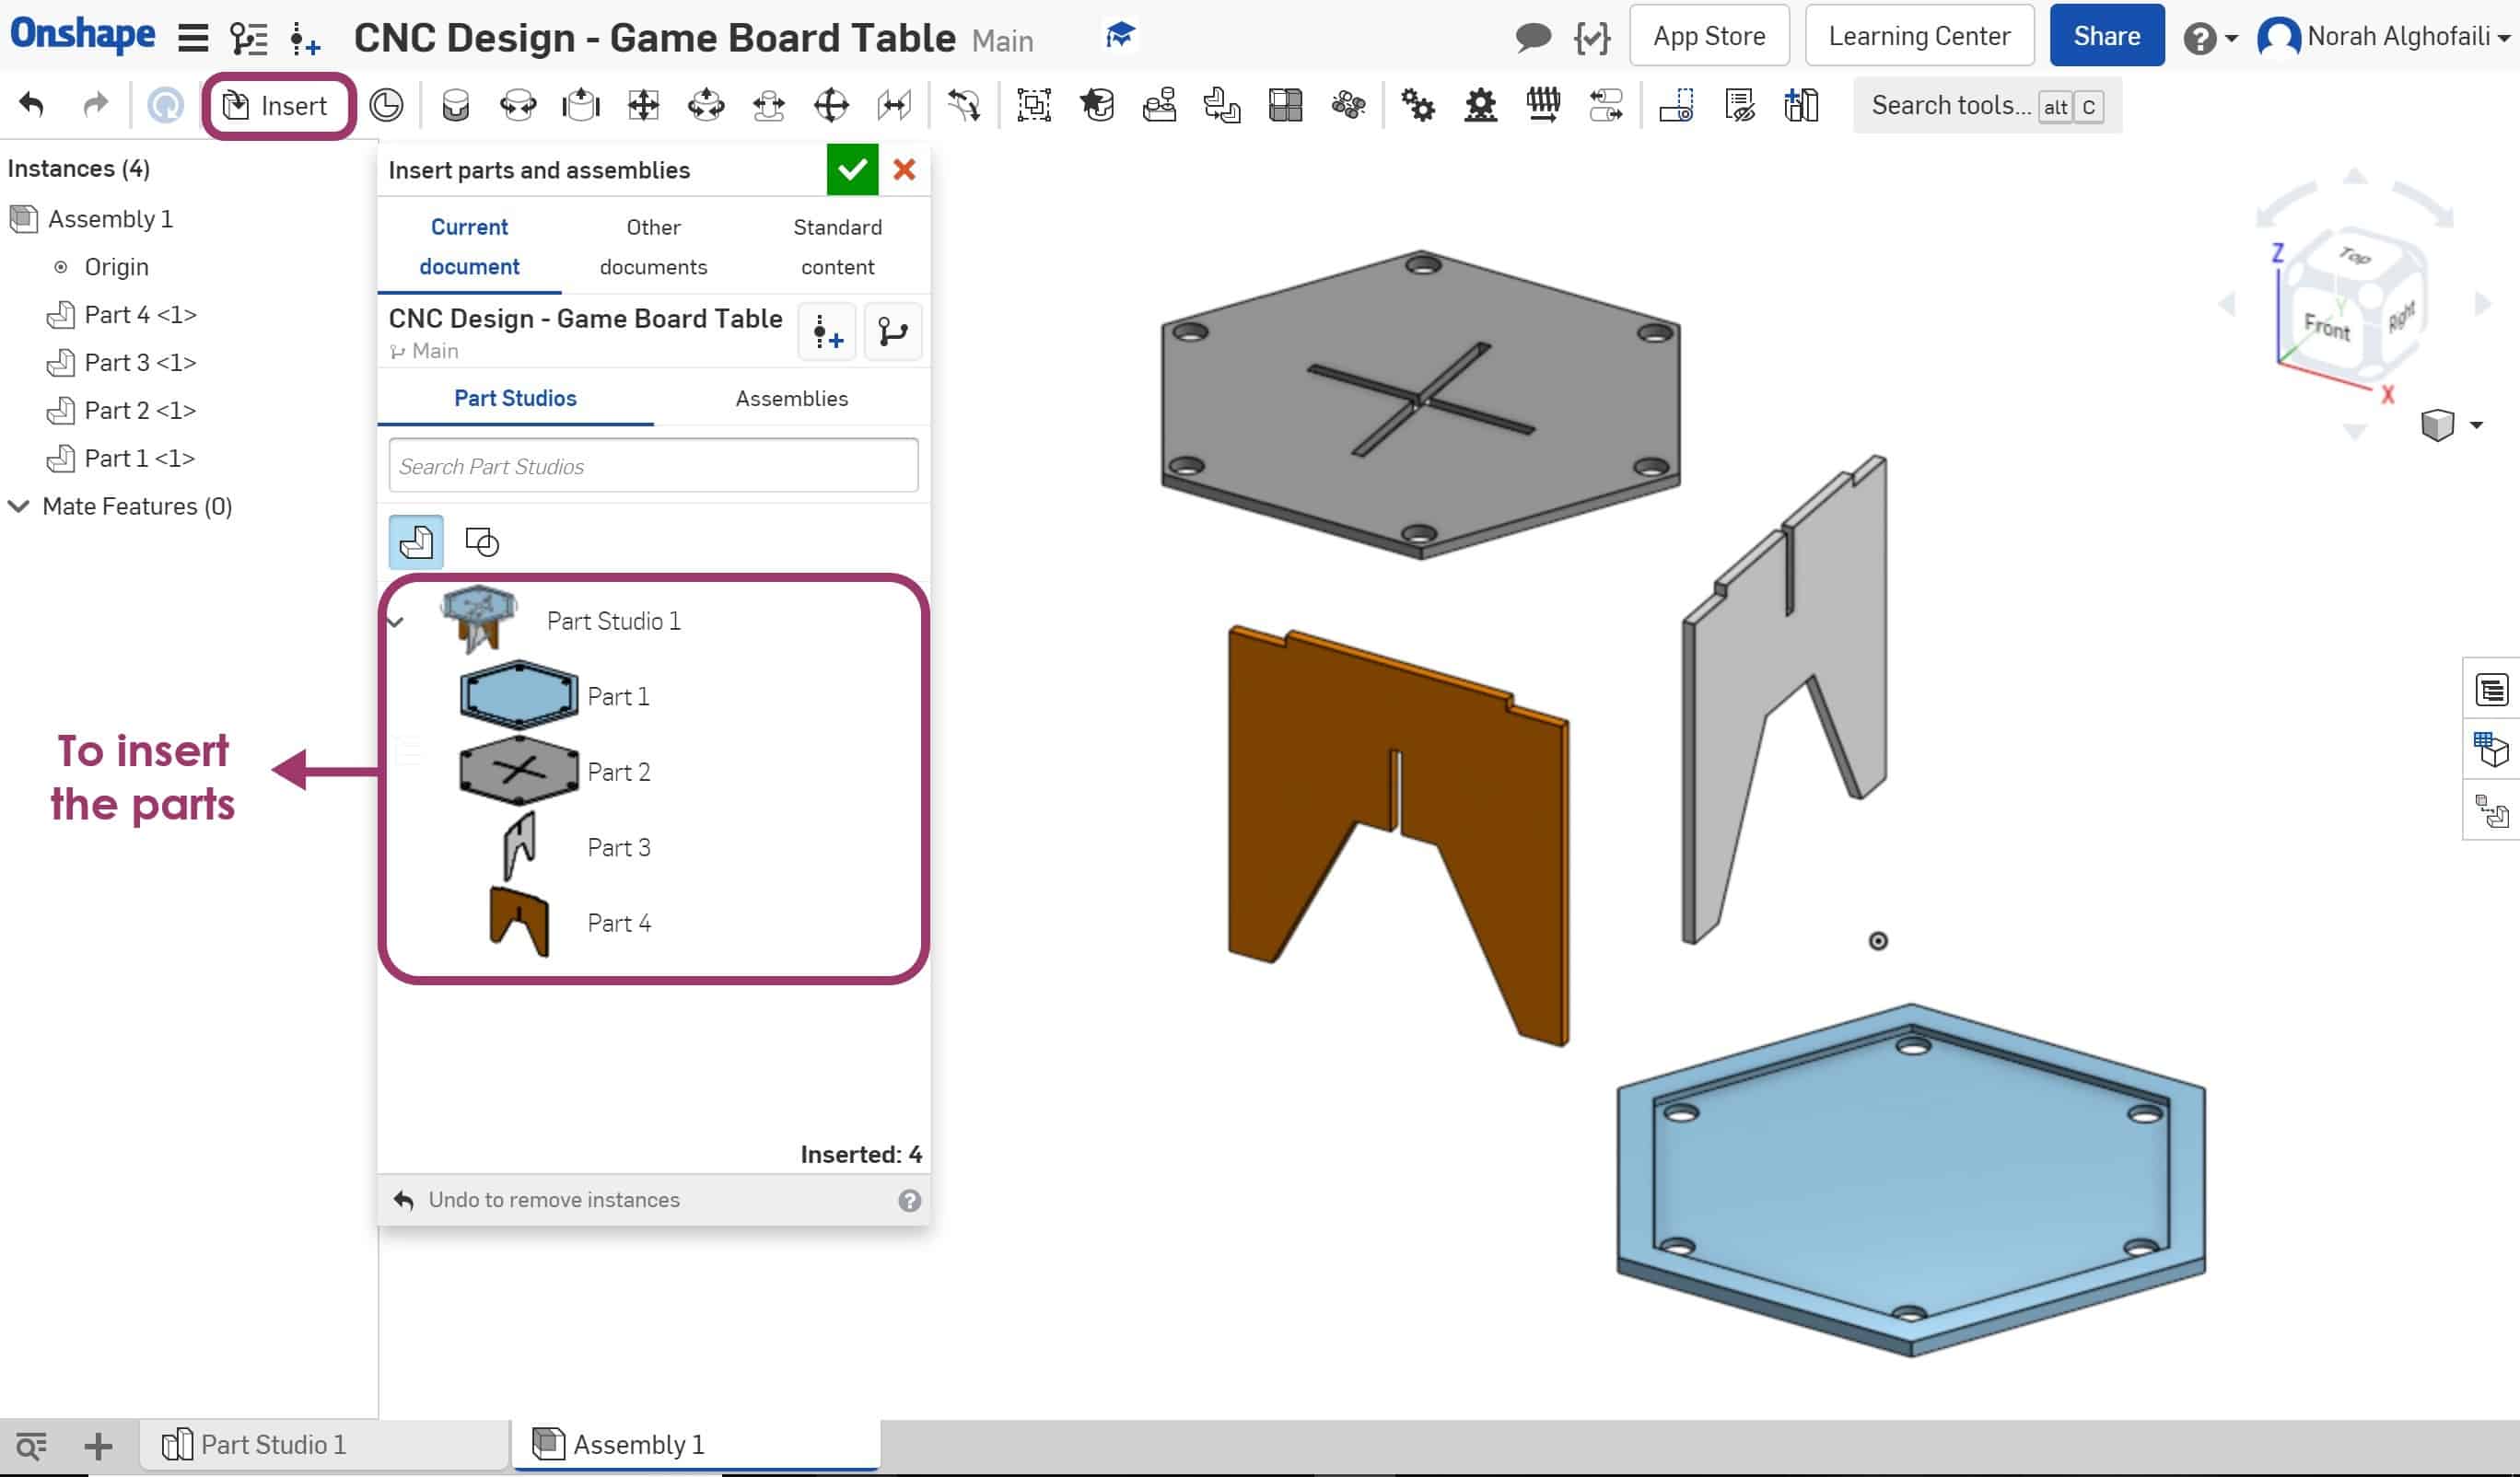
7. Go to assembly and insert all the design parts > Then press on fastened mate to assemble all the parts together.

Fabrication :
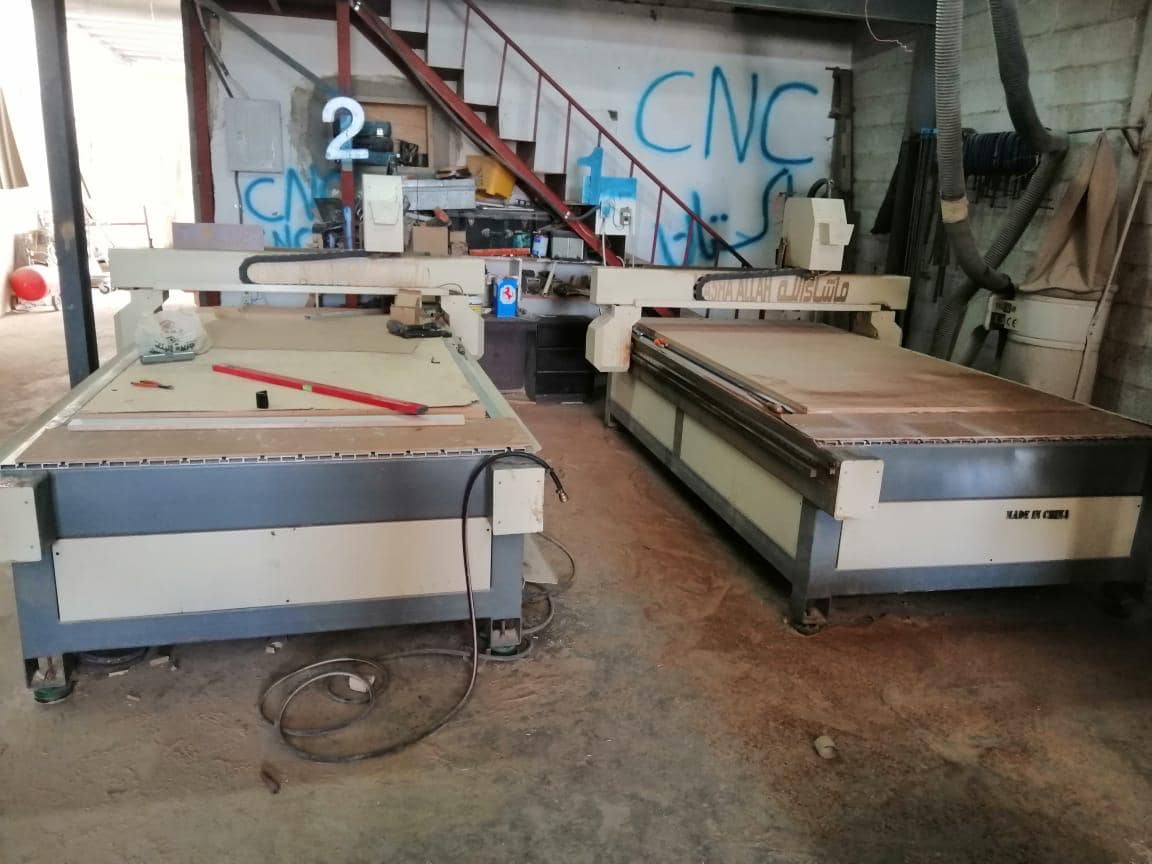
Now, we have to send the design to the machine to start cutting but unfortunately we do not have access to the shopbot CNC during the COVID 19 pandemic. We tried to search about a workshop that has a CNC machine. Finally, we found a workshop that has a CNC workshops machine called Senrgy router 1325. Most of the workshops have CNC machines made in china.
The software that we will use with this machine is called Artcam.
What is Artcam Software ?
ArtCAM is a unique software program which enables us to create impressive, high-quality three-dimensional products starting out as two-dimensional bitmap or vector based artwork. It is used with wood engraving machines.
Artcam Interface :
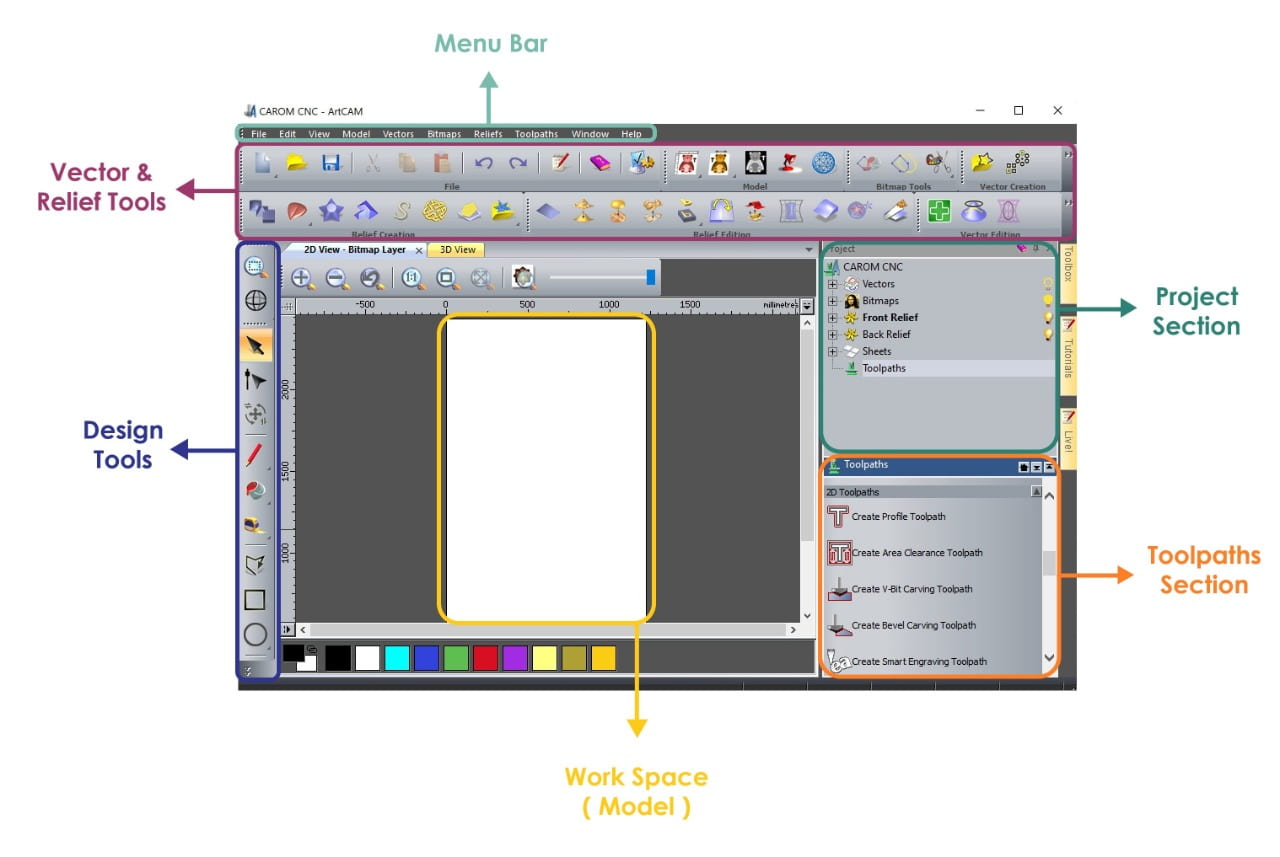
How to use Artcam Software ?
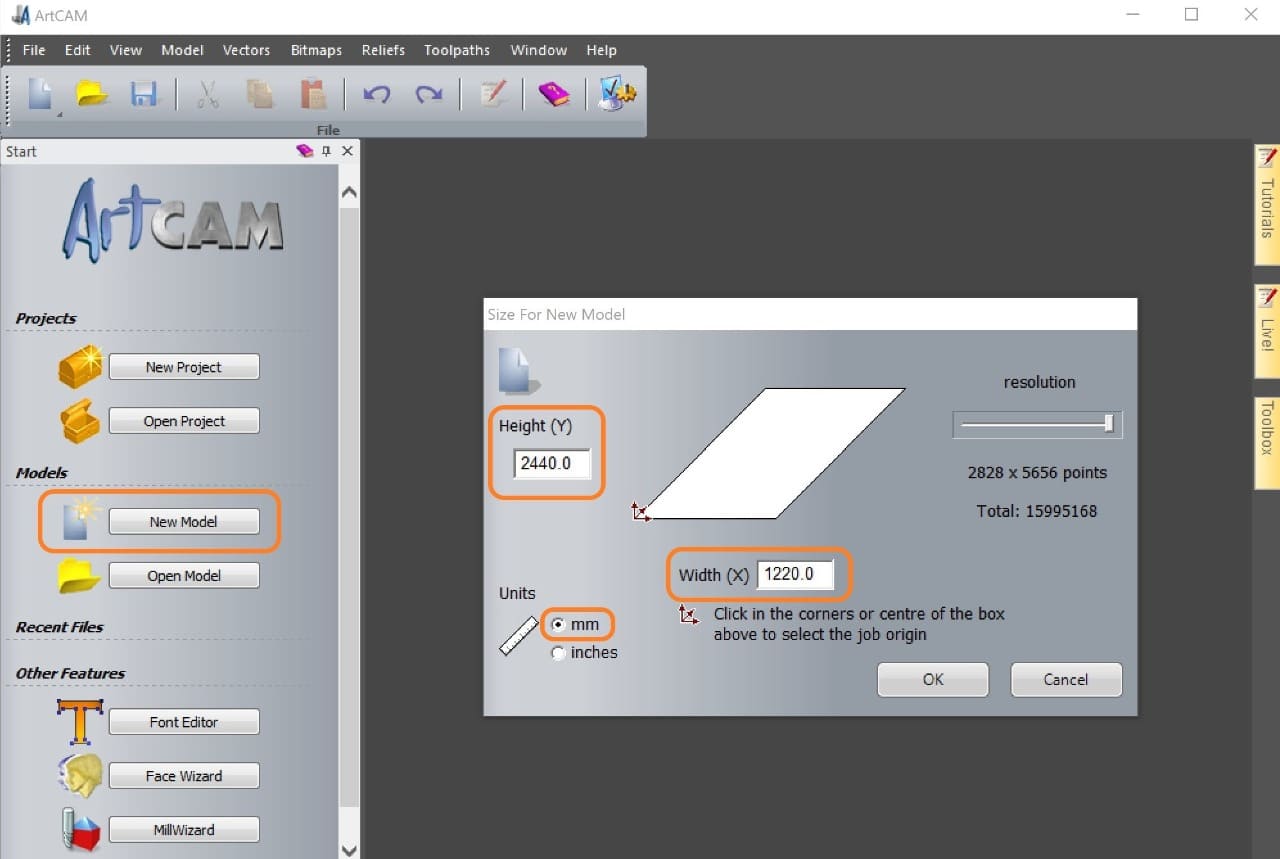
First, I opened the Artcam software and created a new model by choosing the unit ( mm ) and typing the width and height of the material as shown below :
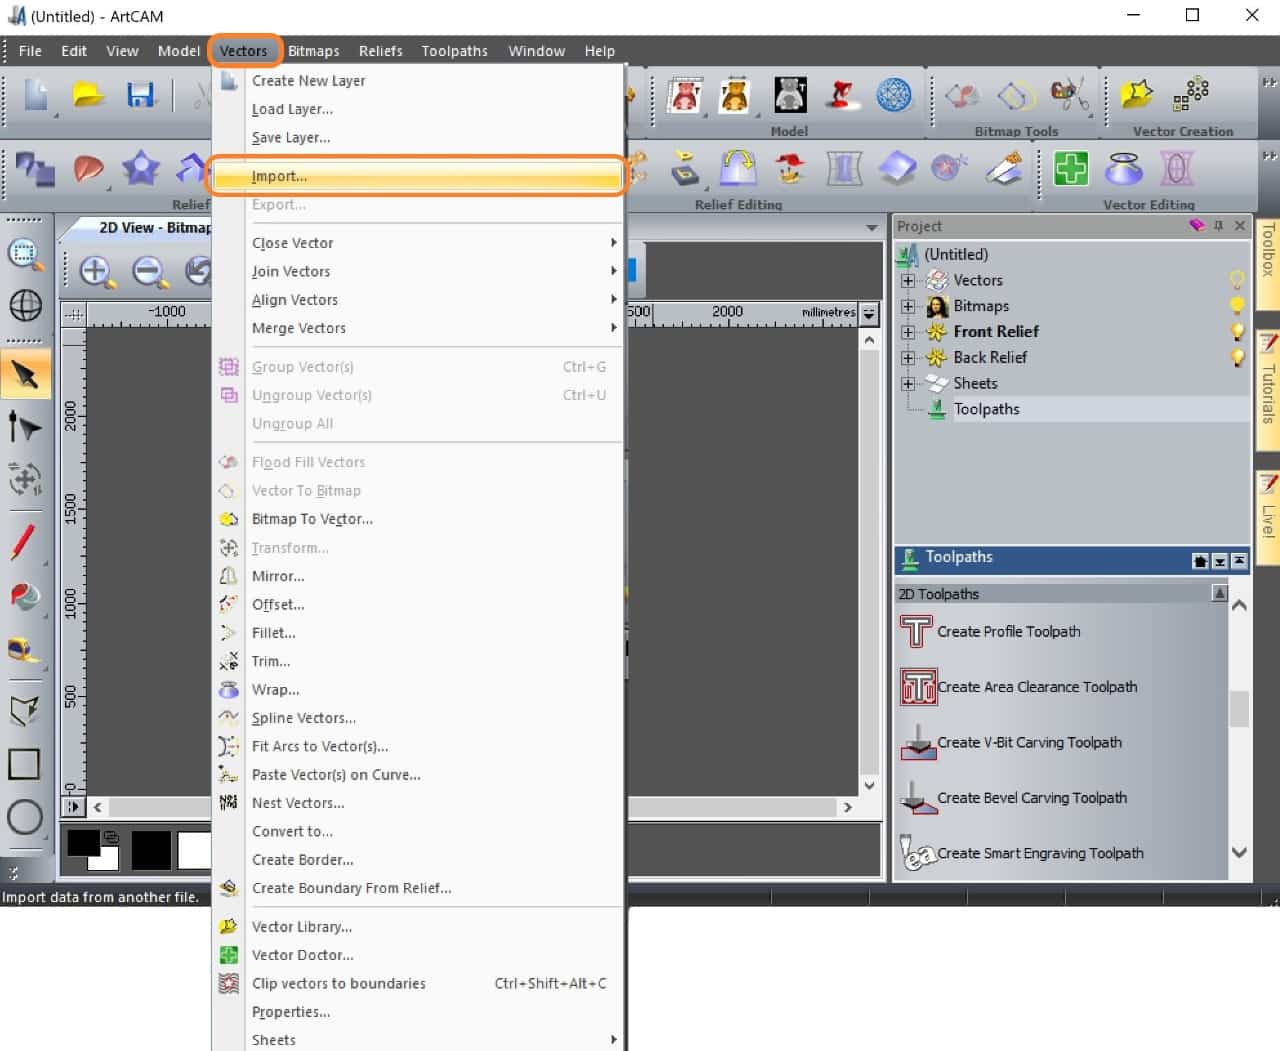
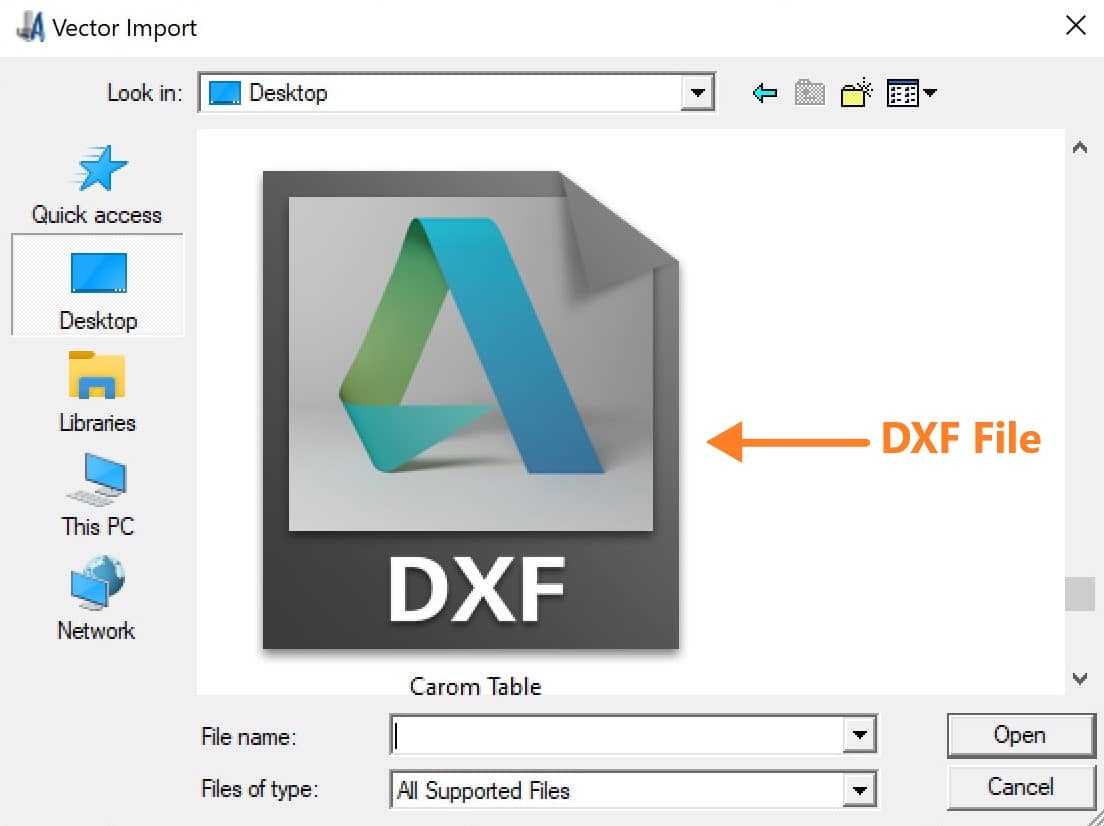
Then, I imported the design as DXF file by going to vector > Import.
After that, I did the toolpaths. In the toolpaths section we have two main functions that I am going to use :
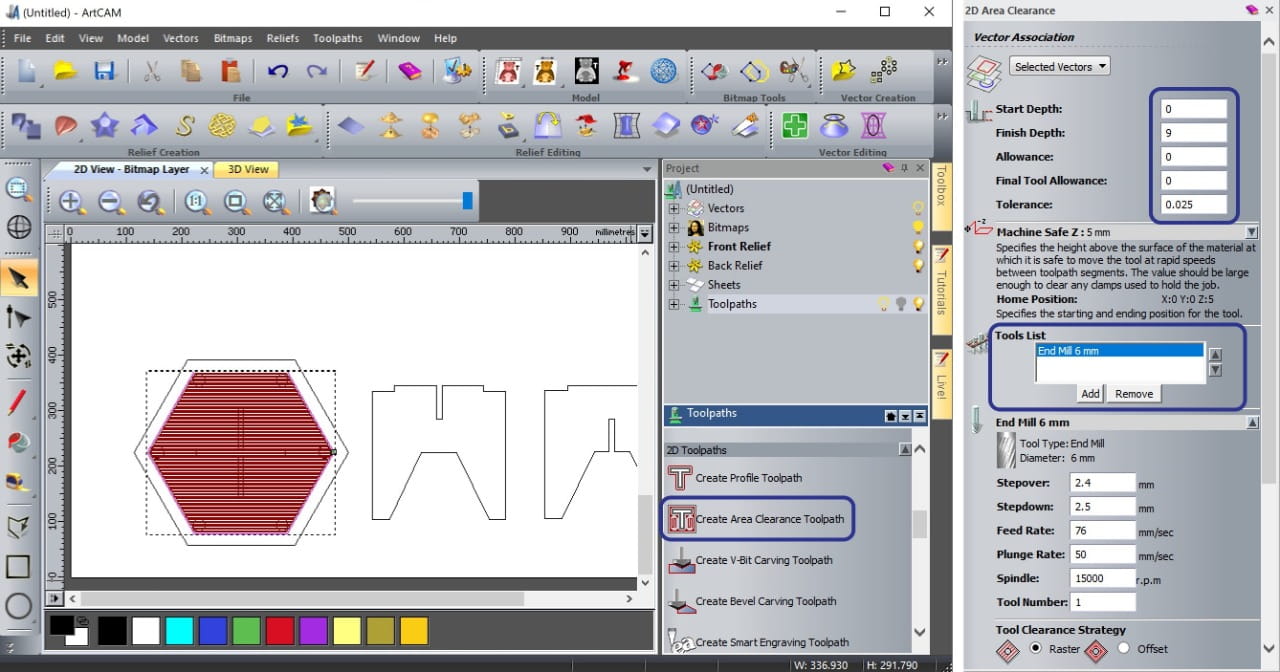
Area Clearance Toolpath
I selected the part that I want to engrave then I clicked on Toolpaths > Area clearance. Then, I changed the settings as follow :
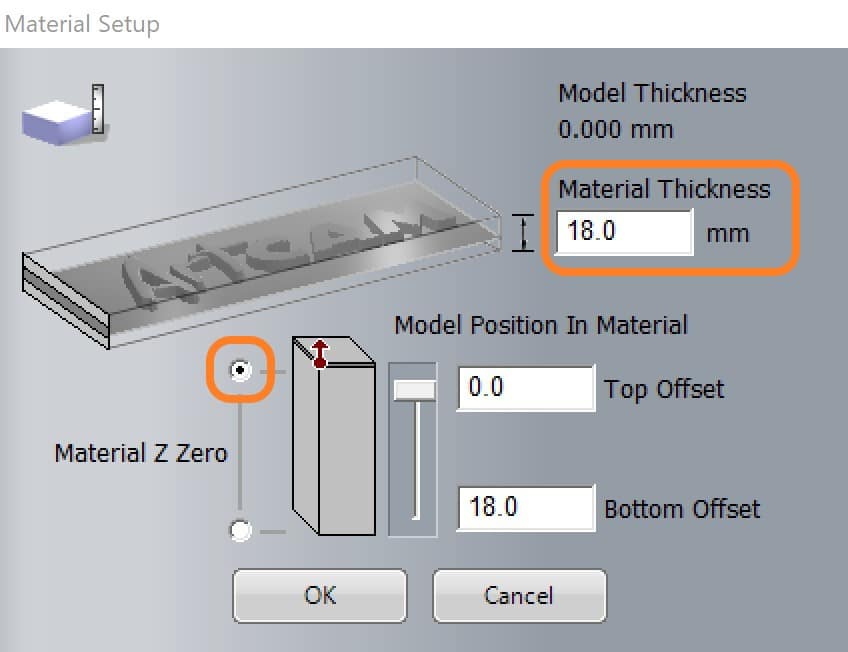
I identified the material settings.
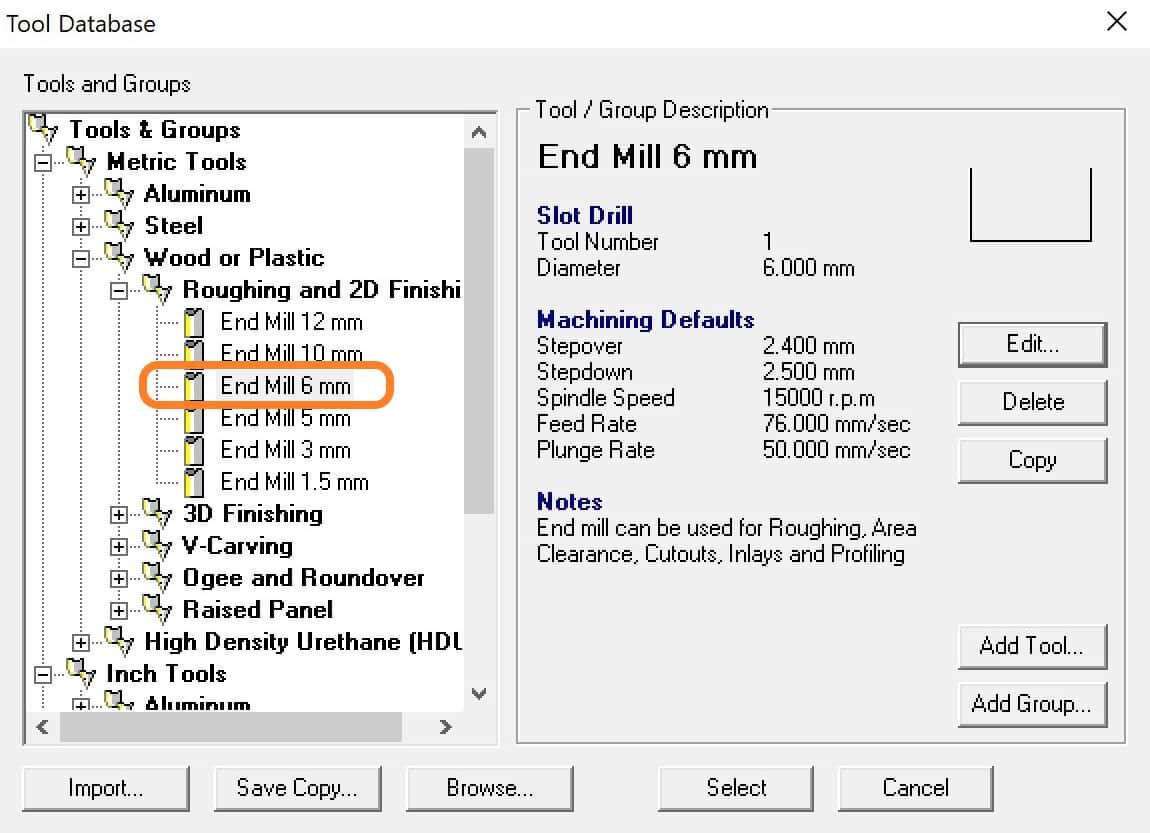
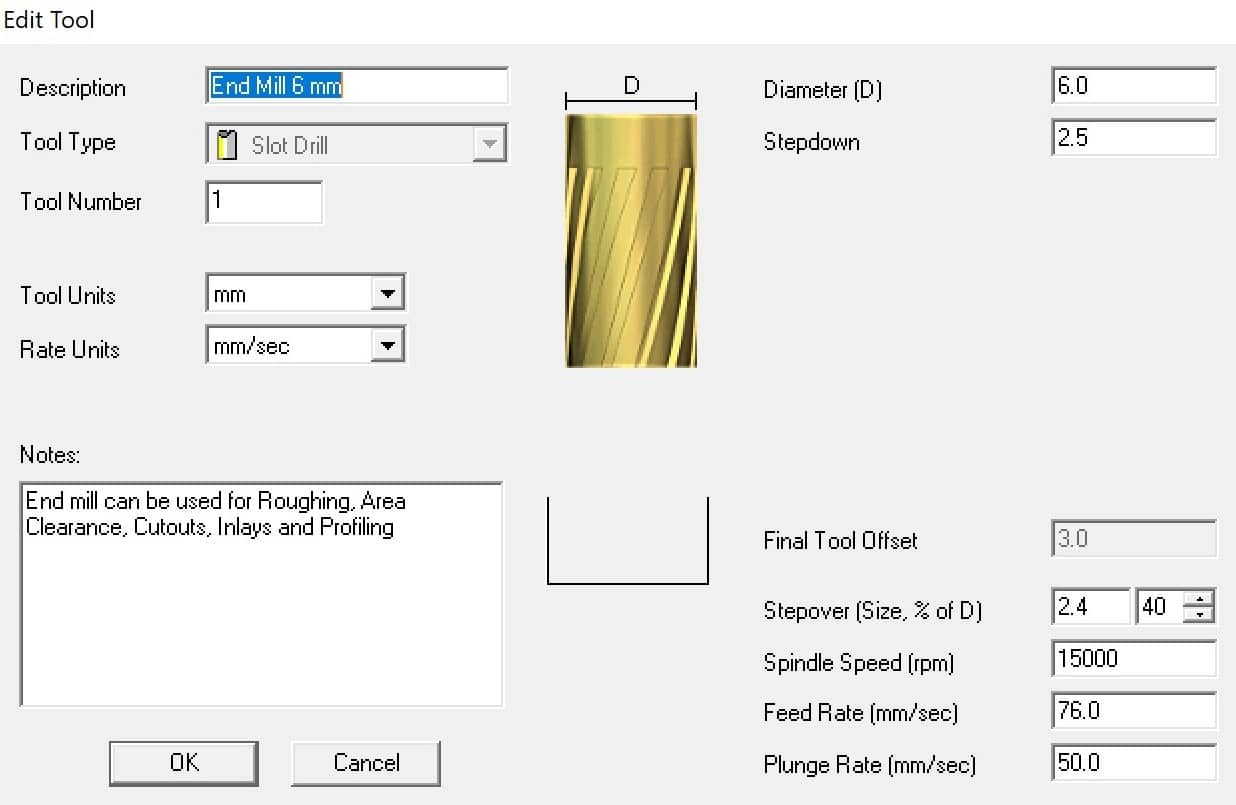
After that, I chose the bit End Mill 6mm.
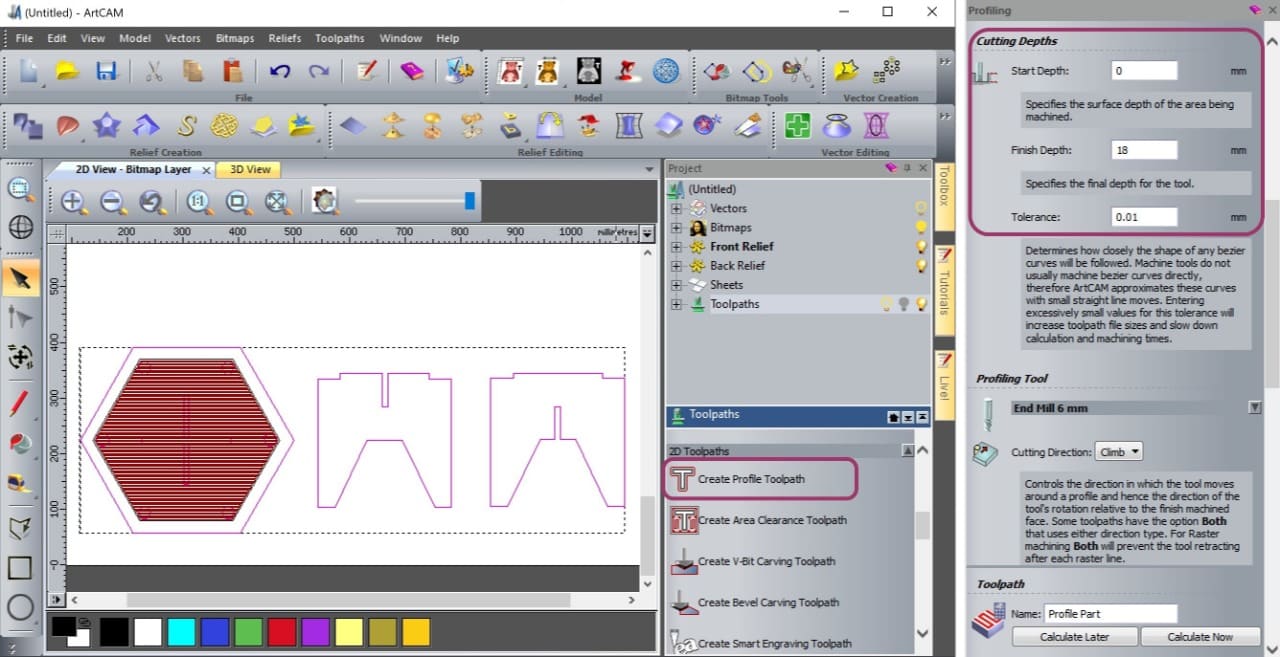
Profile Toolpath
After that, I selected the part that I want to cut then I clicked on Toolpaths > Profile . After that, I changed the settings as follow :
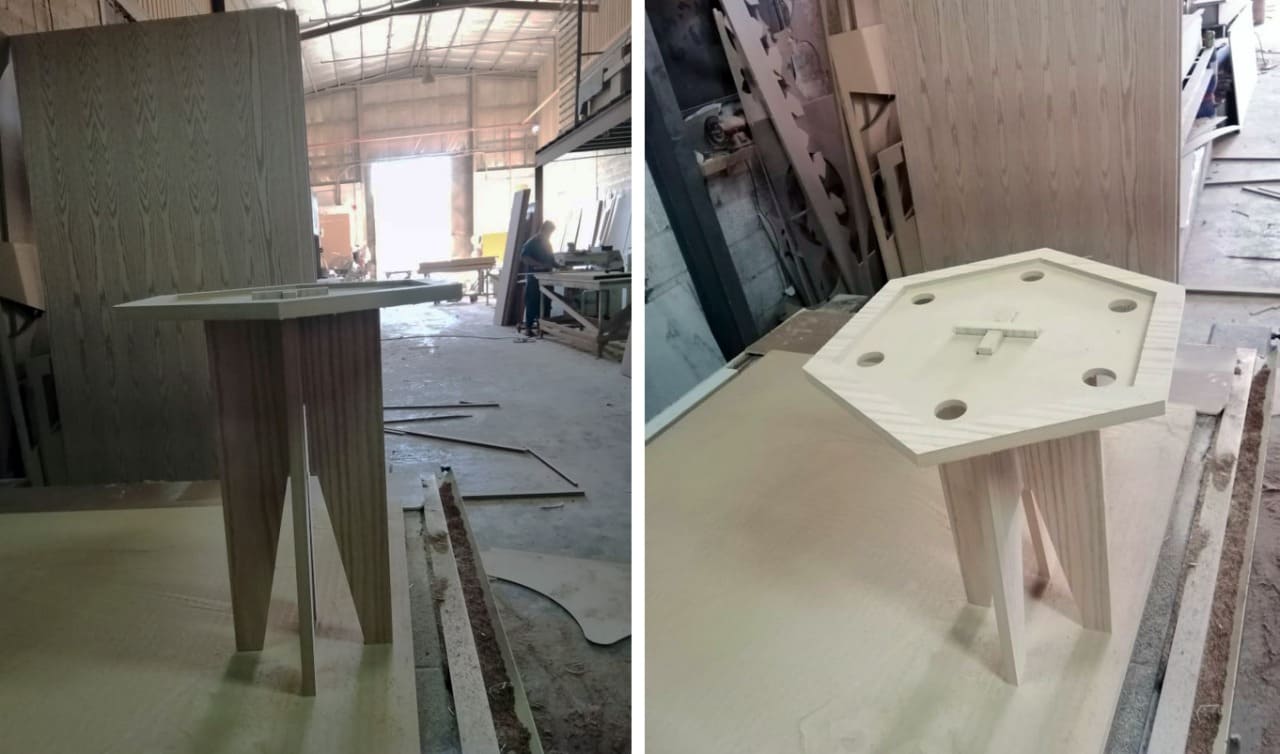
Let's MAKE It !
Assembly:
This is the first try, the dimensions look incorrect.
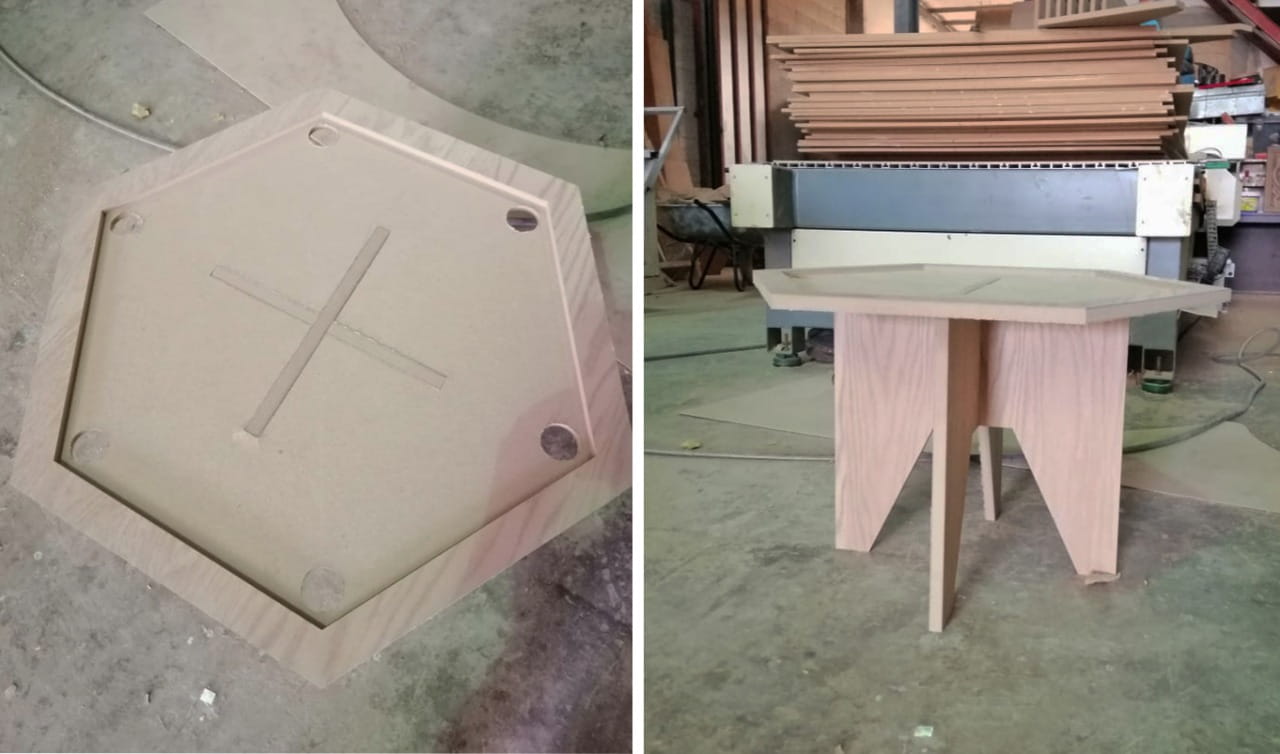
I adjusted the dimensions then I made it again!
Finishing :
I am going to design a sticker to stick it on the top of the table by using illustrator software.
Then, I will decorate the table by using a pattern made by laser cutter.
Also, I am going to make a small drawer to put the striker, carrom men and the queen on it.
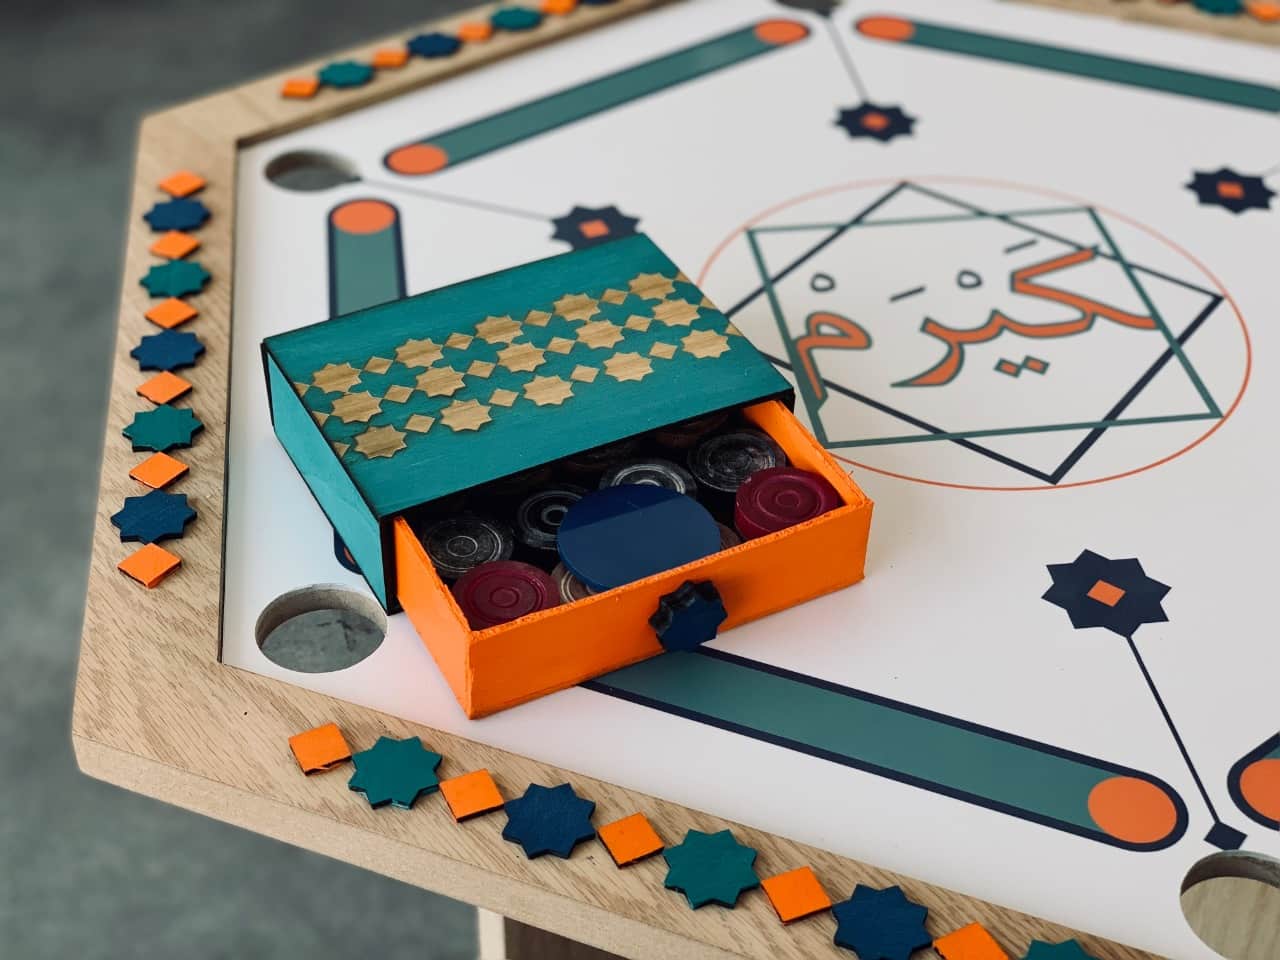
This is the final result ! It looks AMAZING!