Molding and Casting
Group Assignment
Also documented in the group assignment page.
To make the mold we used Mold Max 30 silicone. The page has the essencial set of instructions/guidelines to use the material.
Safety
Use in a properly ventilated area (“room size” ventilation). Wear safety glasses, long sleeves and rubber gloves to minimize contamination risk. Wear vinyl gloves only. Latex gloves will inhibit the cure of the rubber.
We checked the Technical Bulletin and the Safety Data Sheet, reading carefully “Section 2 – Hazard(s) Identification” and “Section 4 - First Aid Measures”.
For the casting material, Smooth-Cast 300 resin was used.
Safety
Materials should be stored and used in a warm environment (23° C). These products have a limited shelf life and should be used as soon as possible. All liquid urethanes are moisture sensitive and will absorb atmospheric moisture. Mixing tools and containers should be clean and made of metal, glass or plastic. Mixing should be done in a well-ventilated area. Wear safety glasses, long sleeves and rubber gloves to minimize contamination risk.

We checked the Smooth-Cast 30 Technical Bulletin and also the Safety Data Sheet.
We made several casts of the individual assignment, but not with different materials because for molding and casting we used the only the available materials. Resin curing results were always the same because we didn’t mix with different A/B ratios.
Individual Assignment
Design and Modeling
I started by designing my model in Rhino, a chess Knight. I like to play chess and have long desired to make my own set. In my mind, pieces have personalities based on on the type of movements they do, and how I think of them. The night is usually represented by a horse, so I designed one that is aggressive, defiant and stout, with it’s chest out and it’s head leaning down, as if it was standing on it’s back legs.

Chess pieces follow standatized norms, such as piece height and base with, in relation to board square size. The International Chess Federation references these in this document.
Recommended height of the pieces is as follows: King – 9.5 cm, Queen – 8.5 cm, Bishop – 7 cm, Knight – 6 cm, Rook – 5.5 cm and Pawn – 5 cm. The diameter of the piece’s base should measure 40- 50% of its height. These dimensions may differ up to 10% from the above recommendation, but the order (e.g. King is higher than Queen etc.) must be kept.
I won’t be folloing many of the other rules, but regular measurements help with consistency. I designed a base which I will reuse for the other pieces, and made sure measurments were correct.
 |
|---|
| Final design of the chess knight piece |
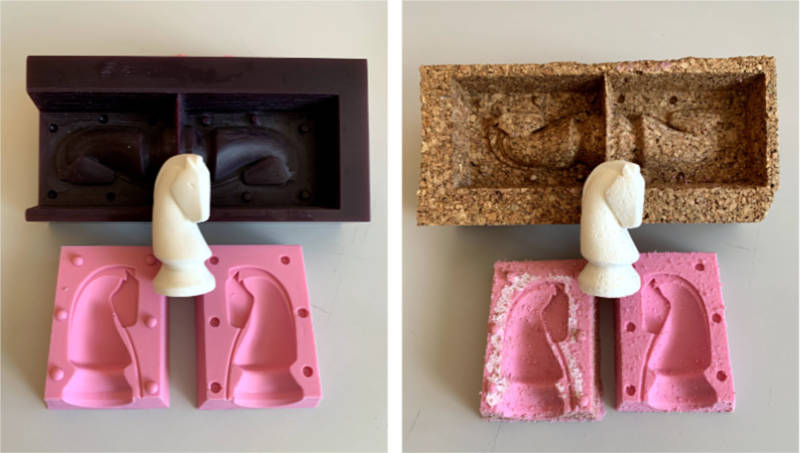
I also made sure there would be no areas or mold prisons that would prevent unmolding; the ears, for example, go all the way to the horsehair.
Next, I prepared the model for machining, in accordance with my Fab Manager, Filipe Silvestre’s instructions. I split the model in two horizontal halves, adding an air escape path in the chin of the horse. I’ll be filling the mold from the base, and as resin pools in the top of the head, an air bubble would form in the chin.

I also added pins to help align the two solicone halves and a 10º angle to the mold walls, to facilitate machining and unmoling.
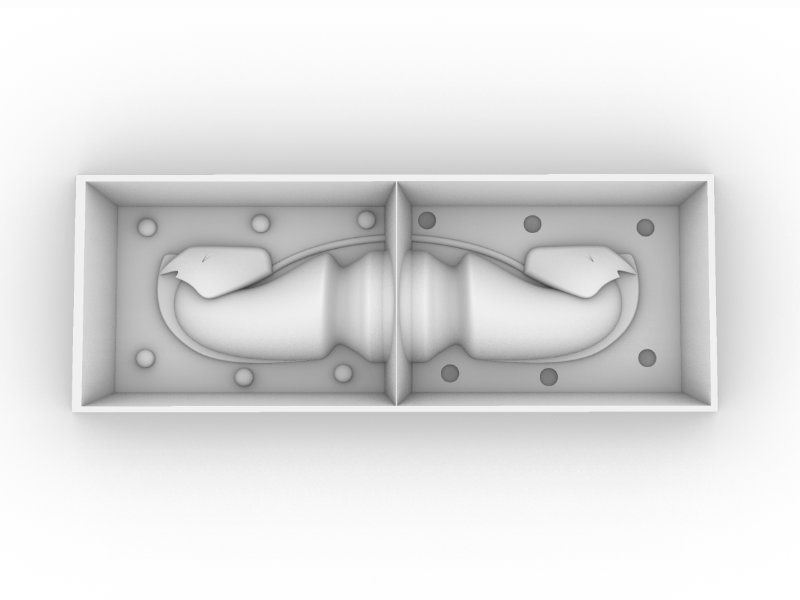 |
|---|
| Mold in two halves |
3D Machining
I then exported the model in STEP format and imported it into Fusion 360. I’m more comfortable modeling in Rhino, but Fusion has a good CAM module which I will use to prepare all the milling operations.
Since I used an Inventables Carvey CNC, and this machine isn’t originally supported by Fusion, I needed a post-processor for the paths calculated in Fusion in order to prepare the output .nc file to be read by Instructables Easel, Carvey’s online CNC controller software.
I found this post-processor and instructions on how to install it at inventables’ website.
I couln’t find an actual Instructables Carvey machine profile, so in my setup I selected an Autodesk Generic 3 axis machine.
Mill Bits
I setup the tools I was going to use for the operations: a 2mm 8 flute Flat endmill for a rough pocketing pass, a 2mm lollipop endmill for 2 parallel surface finishing passes and a 0.8mm detailing pass.
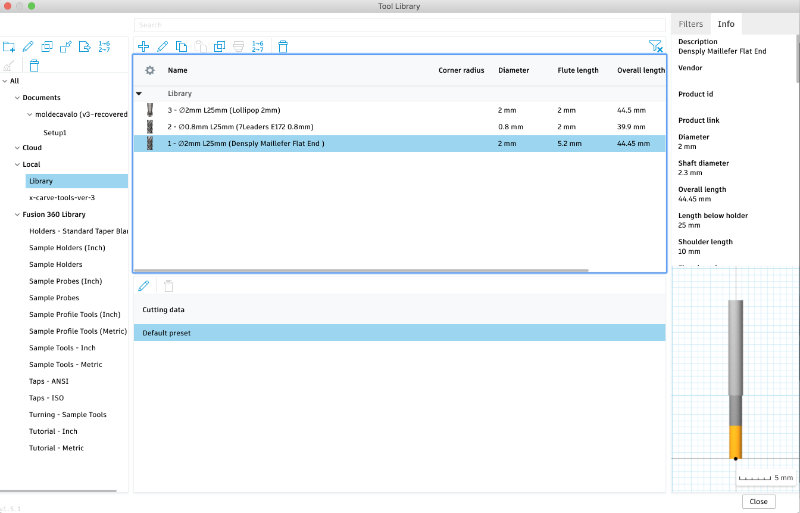 |
|---|
| Tool setup in Fusion 360 |
Feeds and speeds were determined according Center for Bits and Atom’s Fablab Speed and Feeds Calculator, for the material of Wax, converted all the values to metric and plugged them into Fusion on the respective fields.
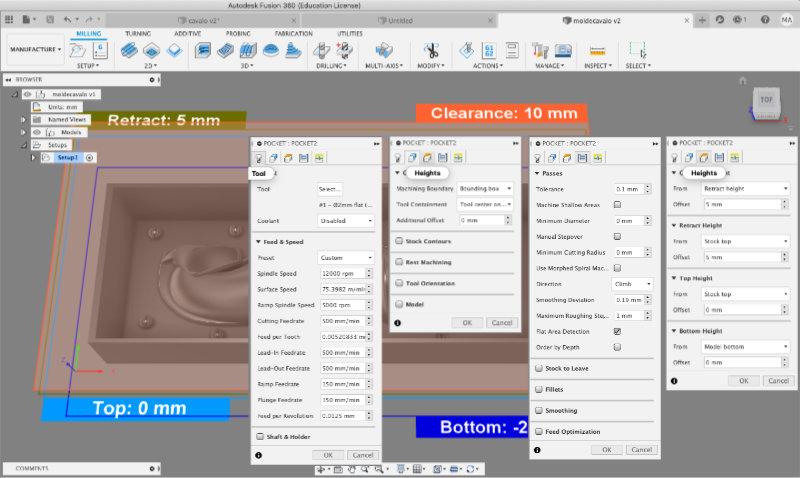 |
|---|
| roughing setup in Fusion 360 |
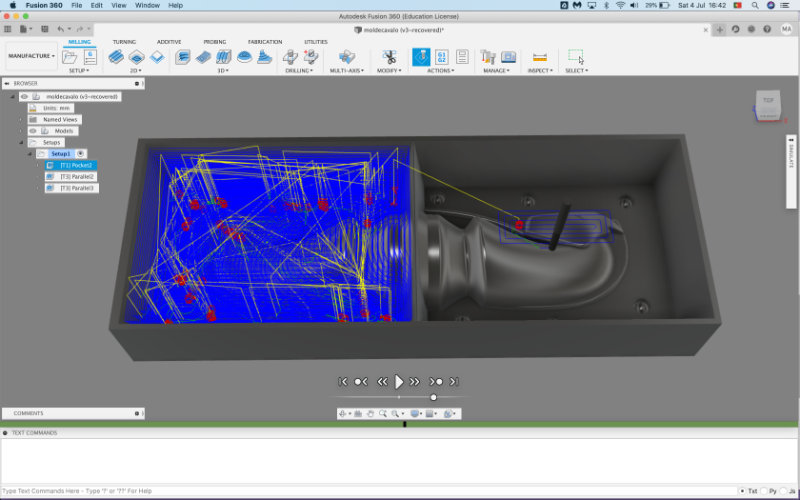 |
|---|
| verifying the pocketing operation in simulation: almost 2 hours |
A lot of time was lost with the very conservative 150mm/min Ramp and Plunge feedrates; a simulation with more aggressive but safe 500mm/min would have saved 1h of milling, but I had already started when I found out. The next smooting operations went much faster, at about 10 minutes each perpendicular way, but also because there was much less material to remove.
Once I was happy with the projected paths, I exported them using the command post-process, and chosing Carvey as the Inventables Post-Processor
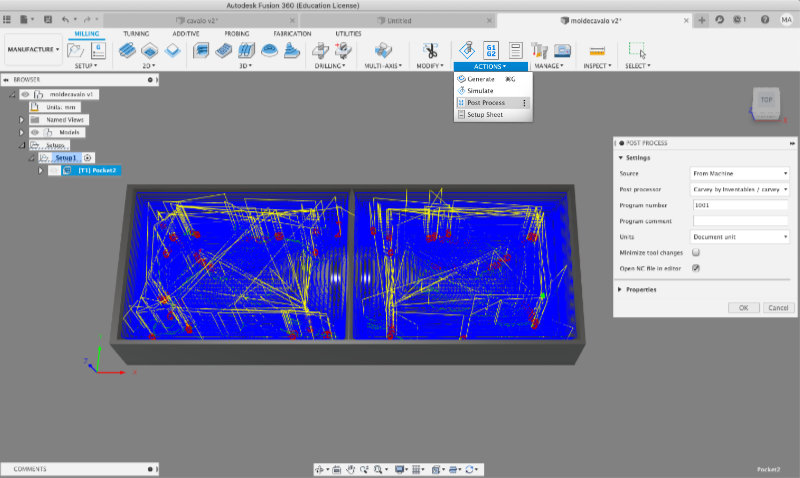 |
|---|
| Exporting .nc file from Fusion 360 |
Then I headed over to inventables’ Easel website, logged in to my free account and loaded the g-code from the file menu.
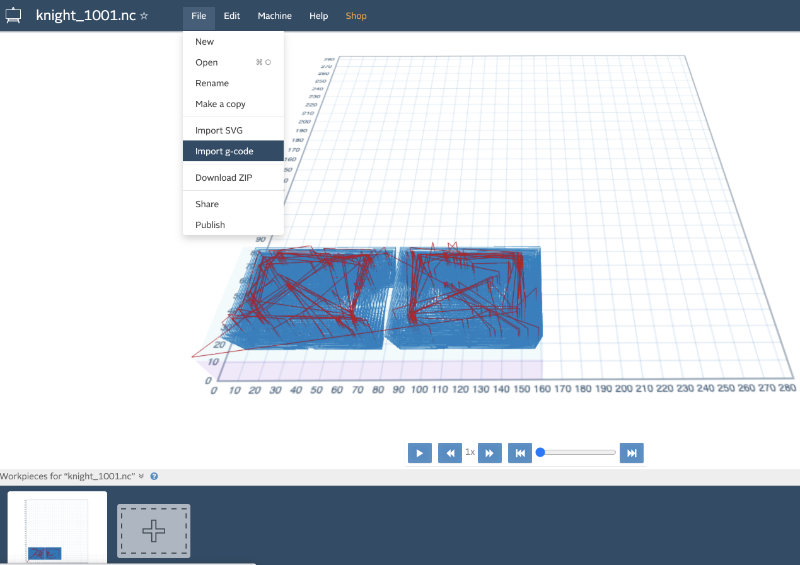 |
|---|
| Loading Gcode in Easel |
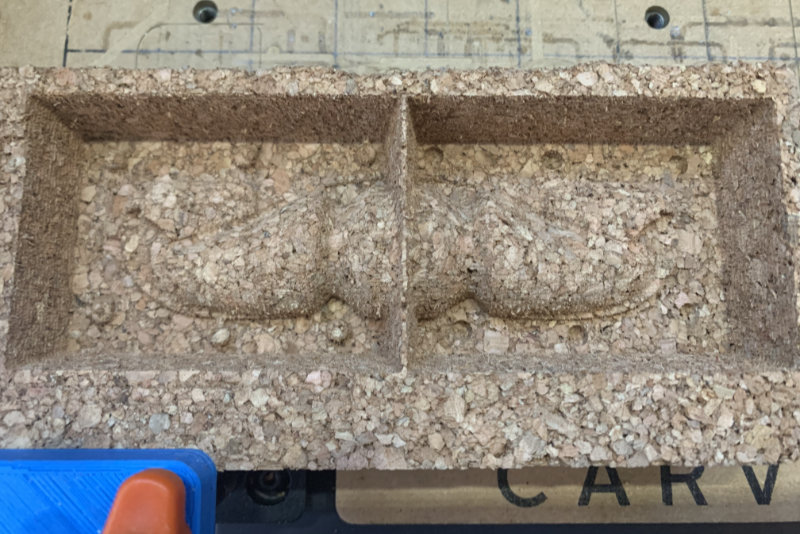
As we didn’t have a lot of Wax to test milling operations, we decided to save that to final milling and test my first attempts on spare cork that was laying around. We cut it to size with a saw and fixed it on the work area.
Once I loaded the right tool on the mill, checked Carvey was on and connected to the computer, I pressed the green Carve button and the machine came to life, homing the tool and starting to carve.
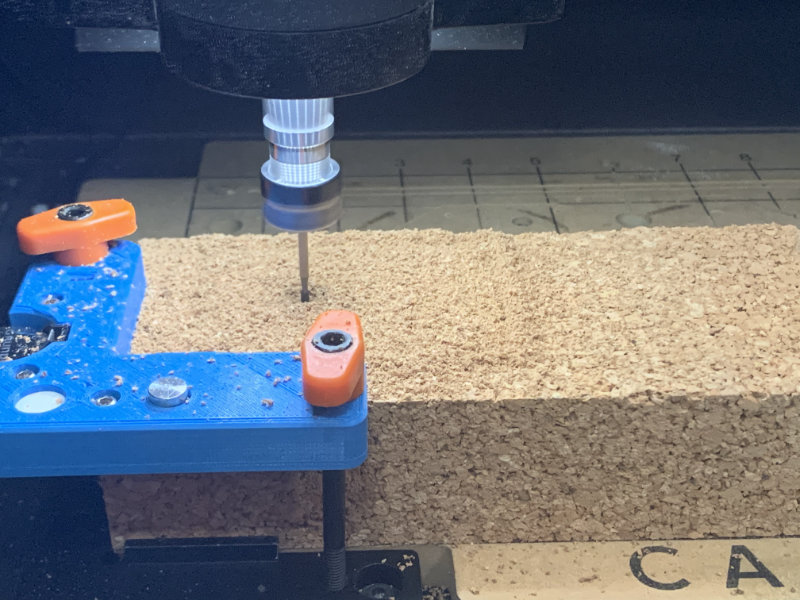 |
|---|
| Milling Cork on the Carvey |
 |
|---|
| After a roughing pocketing pass |
 |
|---|
| After the second 90º perpendicular parallel smoothing pass |
 |
|---|
| Surface detail |
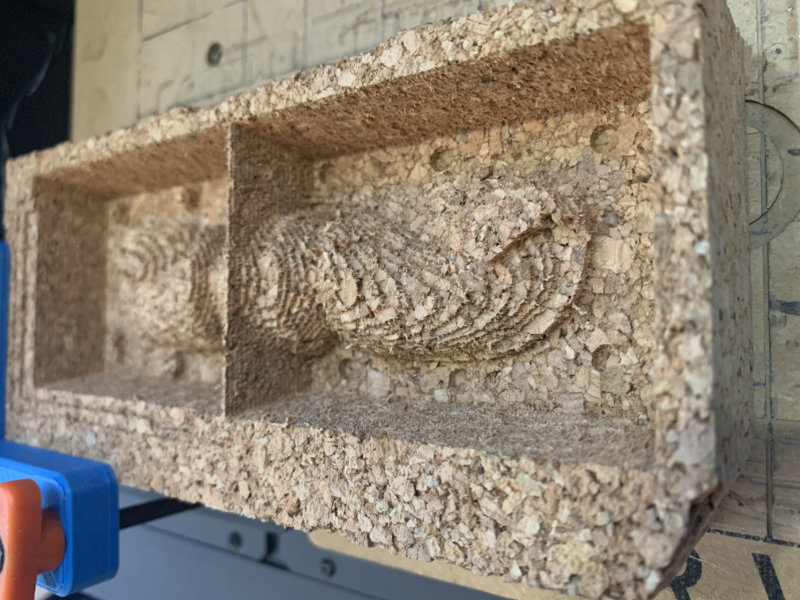
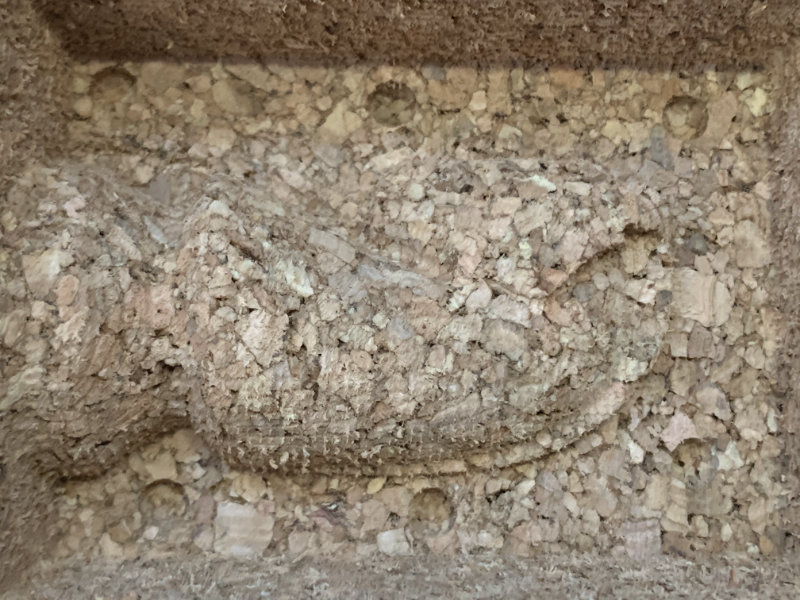
Although another denser pass was necessary to smooth out all the little cork fluff, it is clear that such a material inherently has a lot of texture, which will be captured by the silicone and transfered to the final resin model. I continued this experiment, and think this would be a great texture for the rook and it’s stacked rock resemblance, at a scale. Nevertheless, I will refine the steps and repeat the operations in Jewlers Wax for a smooth surface finish, which I think is more adequate to the Knight piece.
 |
|---|
| After a final smoothing pass |
I then applied wood varnish on one half of of the mold as an experiment and left it out to dry. I wanted to check if it made a difference in demolding, and how much detail the process retained on each half.
 |
|---|
| After a final smoothing pass |
I then proceeded to mill the jewlers wax. As before, I starting with a Pocket Clearing pass to remove most of the wax, followed by a Parallel smoothing pass, and several Morphed Spiral, Pencil and another Parallel, to try to smooth out the mold.
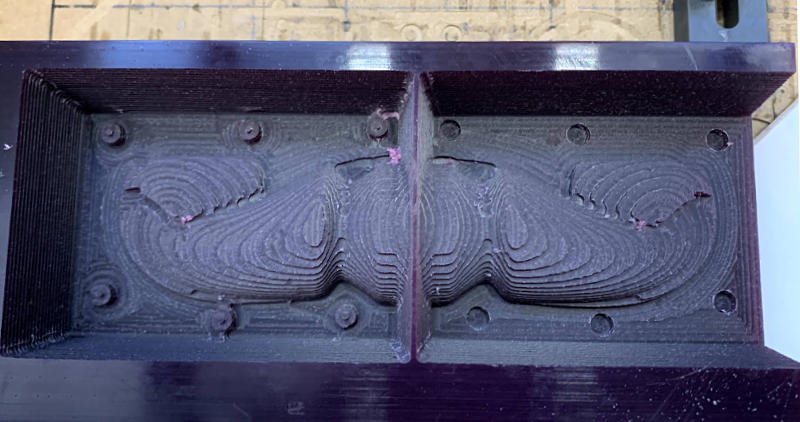 |
|---|
| After roughing pass |
 |
|---|
| After 1st smoothing pass - pretty, but not quite smooth |
One issue I found was that when doing a roughing pass you should use the “stock to leave” parameter so as not to remove material all the way to model perimeter. Subsequent passes with the lollipop mill didn’t remove all the marks of the roughing pass for this reason. I tried using a negative offset of .25mm on a morphed spiral pass, effectiverly carving into the model making it marginally that much smaller, but the parameter was limited by the mills’ diameter. Had I had anothe wax block to use, I would have restarded smarter; never the less, I think I managed a moderately smooth outcome, helped by a small amount of polishing in a few small areas.
 |
|---|
| After 2nd smoothing pass - still not quite |
 |
|---|
| After 3rd smoothing pass - Almost, but the scalloping pass left an unwanted finish |
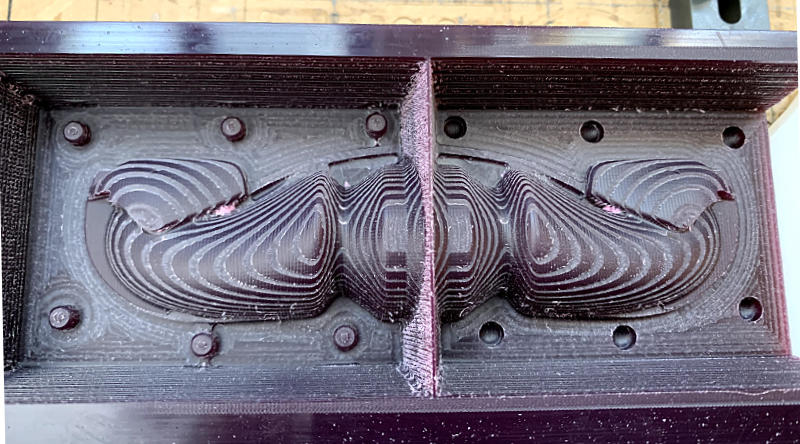
 |
|---|
| Final wax mold |
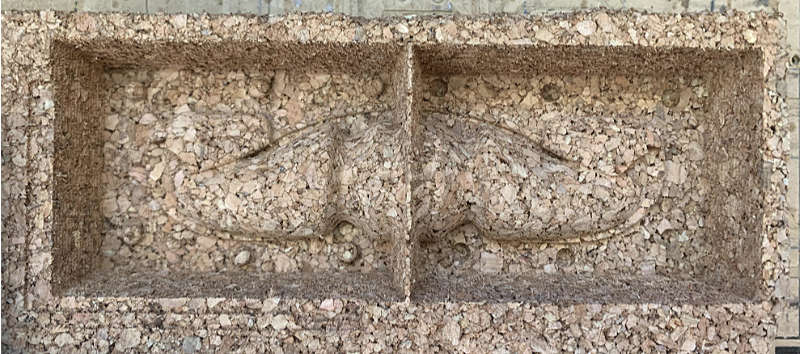
Another issue was that because I had started with the cork, I failed to set the stock dimentions in fusion to the wax block, so there was a whole wall that got knocked down. I figured it wasn’t a big issue as that could be covered with acrylic when preparing the mold for the silicone, a luckily that worked.
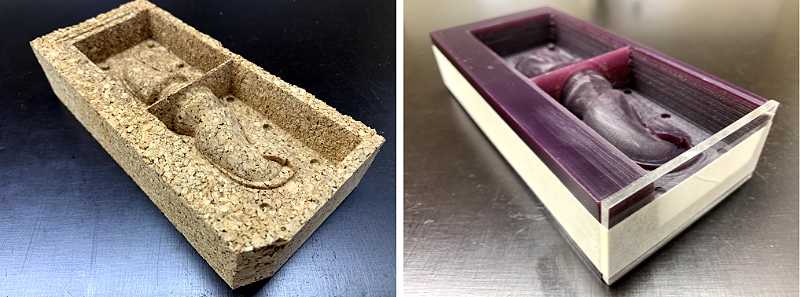 |
|---|
| Both molds ready for Silicone |
Molding
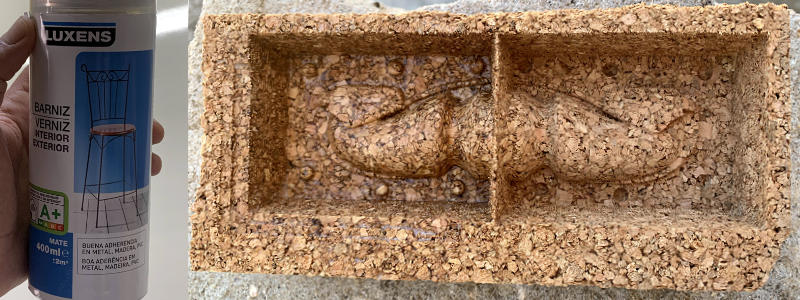
Finally, with both molds in hand, time came to prepare and pour the silicone. In Rhino I had calculated the needed volume to be approximately 133921mm^3, or 133.921cc. Moldmax 30’s datasheet stated that it has a “specific gravity” of 1,18g/1cc, which equated to me needing 158.02 grams of silicone for each mold. The mix “Ratio By Weight” is of 100A:10B, so I weighed 320g of A and 32g of B, prepairing more than I needed to account for losses due to viscosity on the cups walls and such.
I measured A and B in separate paper cups, then mixed both in a larger cup then degassed the pink mix in a vaccuum container, taking care for the mix not to overflow the cup, as it expands quite a lot under the negative pressure of the vaccuum chamber. After that, and as a test, I placed the container on a vibrating platform Filipe Silvestre had made for this purpose. It worked well and some more bubbles popped up from the mix. As this silicone has a working time of 24 hours, there was plenty of time to try and get it as bubble free as possible.
 |
|---|
| Silicone components and final mix on the vibrating platform |
I then poured the silicone into the molds, trying to do it from fairly high above in order to keep the stream slim, so as to mitigate bubbles still in the mix, as well as trying not to let the stream move much to prevent air from being trapped in it.
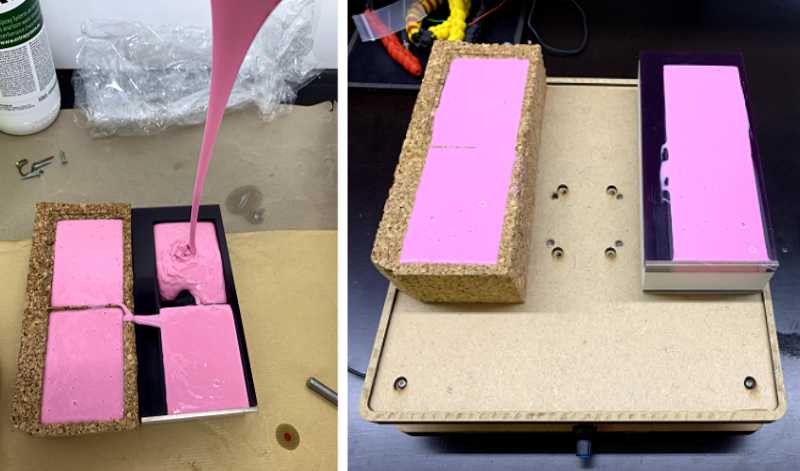 |
|---|
| Pouring the silicone onto the molds and letting them vibrate all the bubbles out |
Finally I placed the molds in the vibrating platform to force any possible bubbles up while the silicone slowly cured.
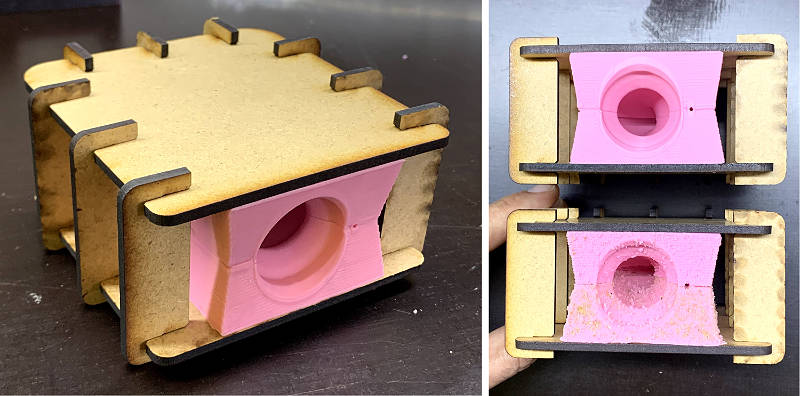
In the meantime, I designed and laser cut a supporting frame for the mold, in 3mm MDF. The silicone mold would have thin walls and Filipe suggested it’d need support in order to maintain some rigidity while casting the resin. So I went back to Rhino, modeled everything based on my previous 3d models, and then extracted the curves to use on the laser cutter with the MDF we had at hand.
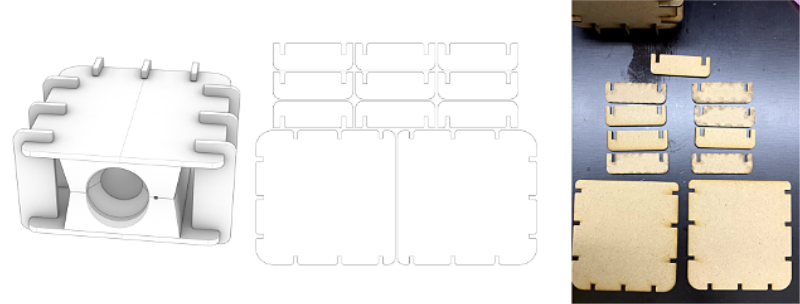 |
|---|
| Laser cut Mold-holder to support silicone mold |
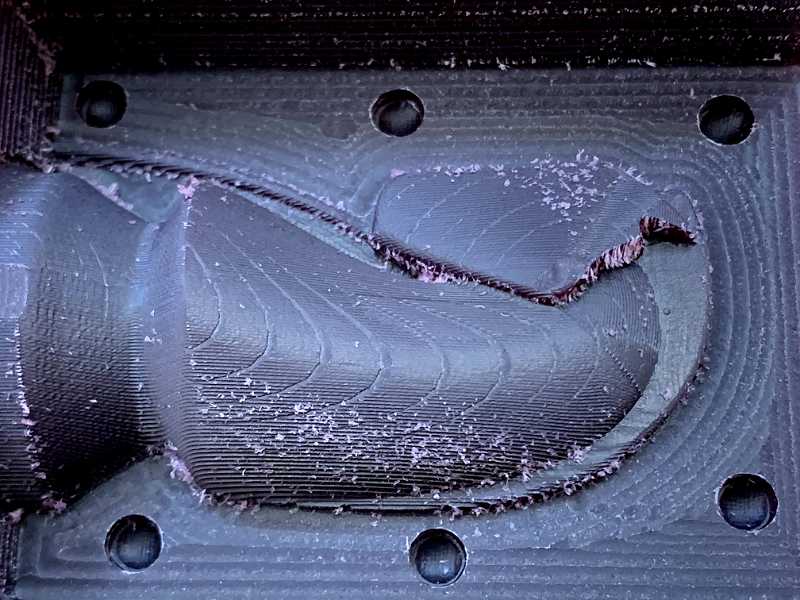
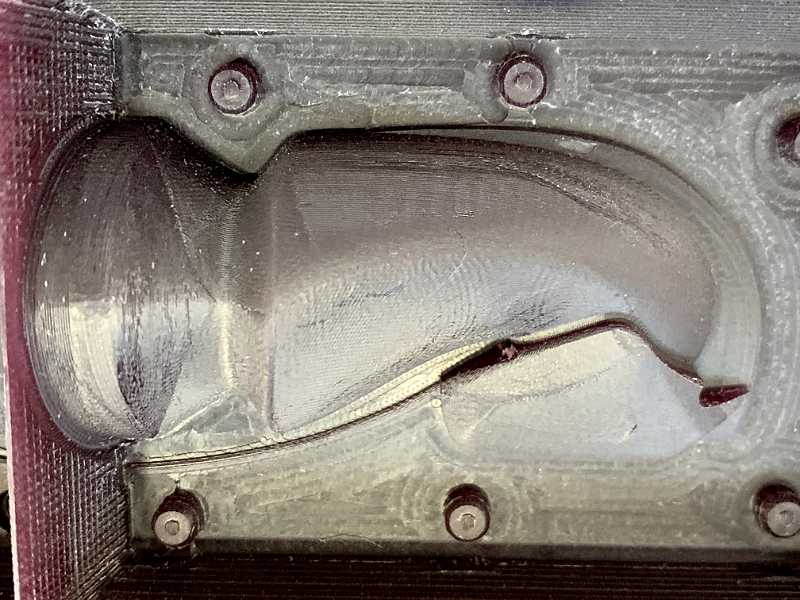
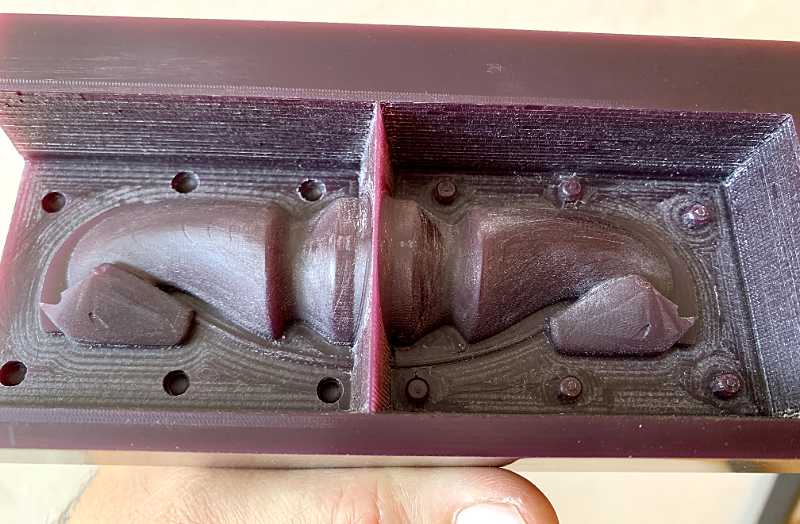
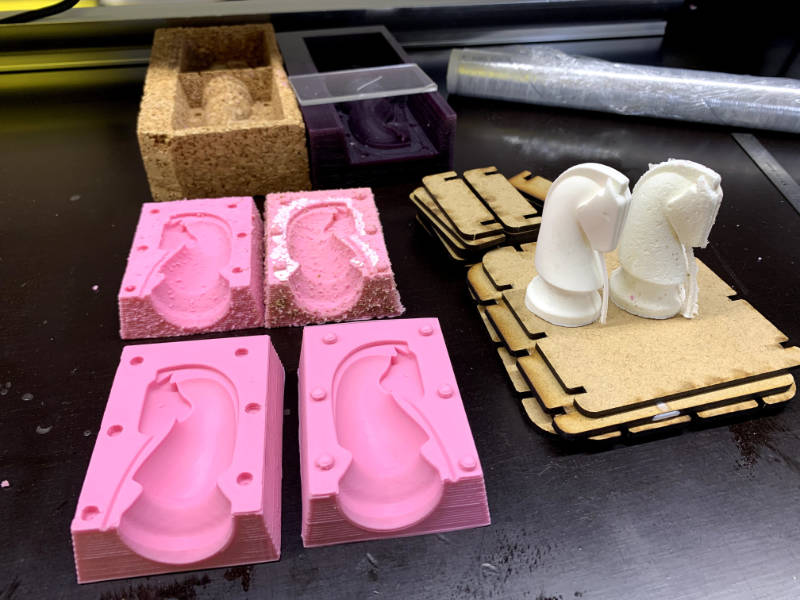
Once the silicone was cured, It was time to remove them from the cork and wax molds.
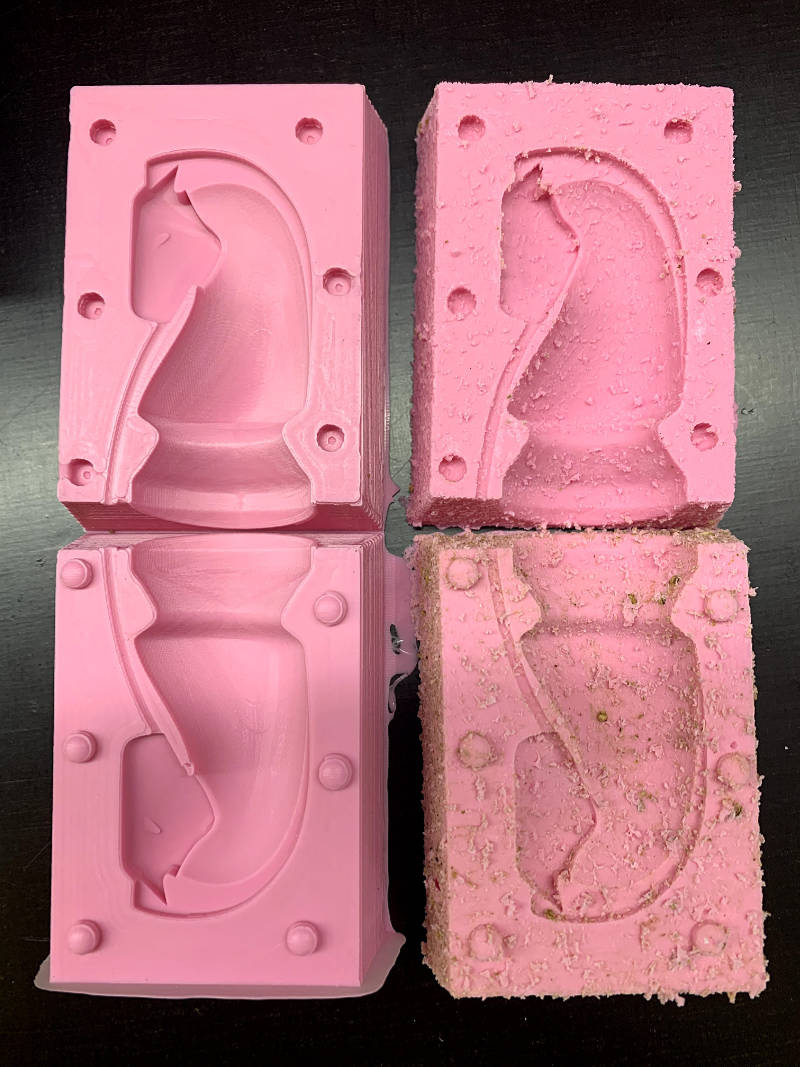 |
|---|
| Silicone molds |
On inspection, it was clear the silicone captured all the details faithfully. The cork mold had a lot of material structure, and the half that hadn’t been coated with varnish even got some cork stuck in the silicone. The wax mold was as smooth as the original, which I found quite impressive. Both molds were bubble free, which attests to a good job with de-bubbling as well as the vibrating platform.
Casting
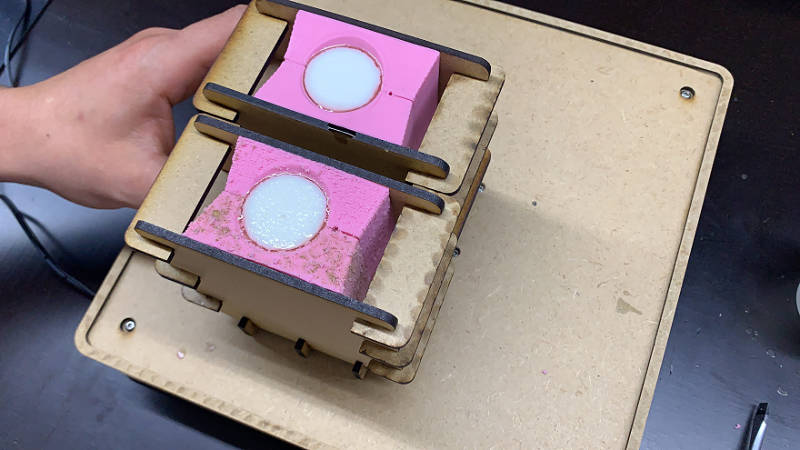
After a litte cleanup of the silicone molds, it was time to pour the resin. I aligned the molds as best I could in the MDF supports and started preparing the resin.
 |
|---|
| Ready for casting |
I had calculated I needed about 25g of resin for each piece, so I made slightly more than the necessary amount to account for some losses.
This resin has a Mix Ratio By Volume of 1A:1B and a Mix Ratio By Weight of 100A:90B. I figured it was easier to do it by volume, so I measured about 30g of water in two paper cups, marked the line so as to have equal volumes and dried the cups.
Smooth Cast 300 has a very short pot life of only 3 minutes and it cures in 10 minutes, so I had to work fast once A and B were mixed.
I poured A and B into the cups up to the line and poured both into a 3rd cup, counting time as I frantically mixed the two. As time was running out and the resin getting pretty hot, I poured it into the two molds, which were being held by Filipe on the vibrating platform. Very quickly, the resin went from transparent to white, as it grew harder.
 |
|---|
| Casting |
After a short wait, the molds could be opened and the results examined.
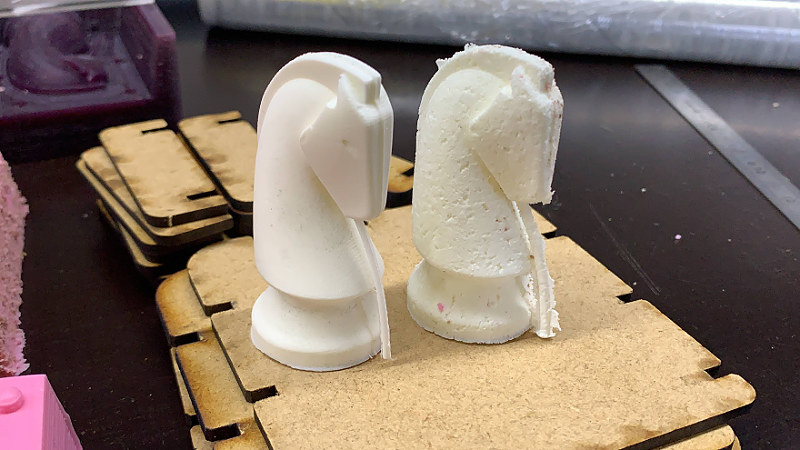 |
|---|
| Cast Knights |
The final pieces came out nearly perfect. The resin made it all the way through the air escape on the chin and there were no trapped bubbles. On the other hand, the middle line is visible and there was some flashing on the cork mold. In hind sight, it seems I made a slight mistake while modeling the joining pegs in rhino, as they don’t exactly line up, there is a slight missalignment, even on the 3d model. Easy fix, but I’d have to start the milling from scratch. So in this case I sanded the part a bit to smooth the joining line and the result is passable.
 |
|---|
| Cast Knights with all the parts |
All in all I am quite happy with the results and having learned enough to make it better next time.
 |
|---|
| Final results |
Files:
Fusion 360 model
Rhino model
Laser cut mold holder
Group assignment
- Review the safety data sheets for each of your molding and casting materials
- Make and compare test casts with each of them
Individual assignment
- Design a 3D mould around the stock and tooling that you’ll be using, mill it (rough cut + (at least) three-axis finish cut), and use it to cast parts.