Networking and Communications
For this week’s assignment I used my barduino board and a commercial ESP32 development board to experiment with ESP-Wifi-MESH networking. According to Espressif’s documentation,
Mesh Networking
ESP-WIFI-MESH is a networking protocol built atop the Wi-Fi protocol. ESP-WIFI-MESH allows numerous devices spread over a large physical area (both indoors and outdoors) to be interconnected under a single WLAN (Wireless Local-Area Network). ESP-WIFI-MESH is self-organizing and self-healing meaning the network can be built and maintained autonomously.
What’s particular about Mesh Networking, is that instead of all nodes having to be in range of the main access point, they just have to be in range of each other, as long as one or more are connected. They relay the relevant information between nodes.
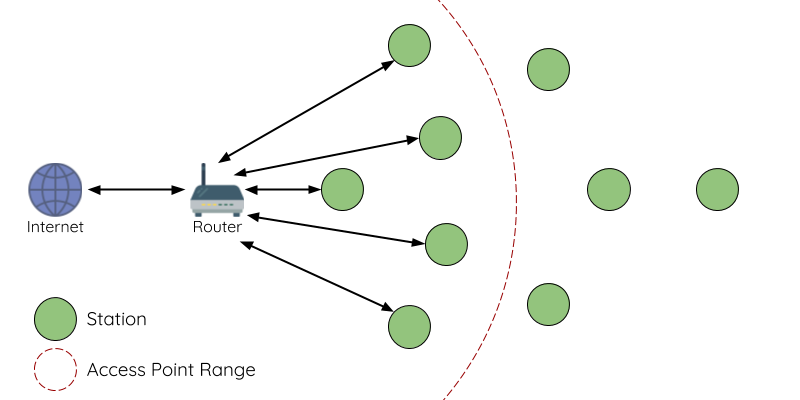
A regular network works this way:
Whereas a Mesh Network works this way:

It’s like each device or node is also an access point, they can self-organize and dynamically talk to each other to ensure that the packets reach their final node destination.
In order to program my mesh network, I followed a Random Nerd tutorial on the subject.
Standing on the shoulders of people who actually know what they’re doing, I followed the tutorial to install a library that takes care of the particulars of creating a simple mesh network using esp8266 and esp32 hardware, in order to allow the programmer to work with a mesh network without having to worry about how the network is structured or managed. It’s aptly named painlessMesh. To run on ESP32, I also needed the AsyncTCP library. If I had some ESP8266 modules to add to this network, I’d need the ESPAsyncTCP library.
Once I had all the libraries and dependencies installed in Arduino IDE, I opened the simplest example sketch, the StartHere. This is an example sketch that gets uploaded to each of the ESP32 modules (or 8266 if you have them), and as soon as that’s done, they start blinking the default leds and sending messages to each other. In this case, they send “Hello from node 3864417485 (a number that identifies it in the network) myFreeMemory: (how ever much memory is has)”
I only changed the led pin on my Barduino board to make sure it lit up, as the default is not the same in the development module. The code checks if LED_BUILTIN is defined, as LED_BUILTIN is a predefined macro in many Arduino and compatible development boards that specifies the pin number of the built-in LED. If LED_BUILTIN is not defined, and in my lab made Barduino, this line defines the macro LED to be pin 13, as a fallback. This way I can upload the very same code to each board and it will run as expected.
I asked ChatGPT to help me understand the code and how it works. I leave that explanation here:
ChatGPT’s explanation of the code
How the Code Works on Each Node Same Functionality Across Nodes:
Each node needs to perform the same set of tasks: send and receive messages, handle new connections, blink an LED, and measure delays. By uploading the same code to each node, you ensure that they all have the same capabilities and can interact seamlessly.
Dynamic Role Assignment: The code is designed to dynamically handle its role in the network. For example, each node will broadcast messages, handle incoming messages, and update its connections list as other nodes join or leave the mesh. The painlessMesh library handles the details of mesh networking, so each node operates independently but cooperatively.
Network Flexibility: With the same code on each node, the network becomes more robust and flexible. Nodes can join and leave the network without requiring changes to the firmware, making the network self-healing and adaptable. Key Points of the Code
Initialization: Each node initializes its mesh network with mesh.init(MESH_SSID, MESH_PASSWORD, &userScheduler, MESH_PORT);.
Sending Messages: The sendMessage function broadcasts a message from each node, which includes the node ID and free memory. This function is scheduled to run at random intervals between 1 and 5 seconds.
Receiving Messages: The receivedCallback function handles incoming messages and prints them to the serial monitor.
Handling New Connections: The newConnectionCallback function is triggered whenever a new node joins the network, resetting the blink task to reflect the new number of nodes.
Handling Connection Changes: The changedConnectionCallback function updates the list of nodes and resets the blink task when connections in the network change. Practical Implementation
Upload Process: You compile and upload the code to each of the ESP8266/ESP32 devices that will act as nodes in the mesh network. This ensures that all devices have the same firmware.
Operation: Once powered on, each node runs the same code, initializing itself and starting to communicate with other nodes in the mesh. The painlessMesh library handles the underlying network protocols, making sure that all nodes can discover each other and form a cohesive network.
By using the same code on each node, you leverage the strengths of the painlessMesh library, which is designed to create and maintain a self-organizing, resilient mesh network. This approach simplifies the development and deployment process, ensuring consistent functionality across the entire network.
I find this very interesting and will look into it in the future, not only tro expand the range of sensing devices in the land at home, for example to collect information on pool water level, garden moisture, or other things like that. Also, there’s BLE mesh networking, and I’d like to explore and see if that can be used to synchronize several audio speakers, like my final project.
Files
Checklist
Group assignment
- Send a message between two projects
Individual assignment
- Design, build, and connect wired or wireless node(s) with network or bus addresses
Learning outcomes
-
Demonstrate workflows used in network design
-
Implement and interpret networking protocols and/or communication protocols
Have you?
- Linked to the group assignment page
- Documented your project.
- Documented what you have learned from implementing networking and/or communication protocols
- Explained the programming process/es you used.
- Outlined problems and how you fixed them
- Included design files (or linked to where they are located if you are using a board you have designed and fabricated earlier) and original code.