14. Networking and communications
This week it’s about using and connecting several boards to share inputs or outputs to get info or activate outputs.
The MQTT server of Oscar
In this case in class we are using a MQTT server that one of the instructors (Oscar) is holding in his house. The idea is to connect there and from there connect to other students boards to get inputs or outputs.
Here is the repository and here is the class
MQTT it’s a protocol (As it’s http or ftp) that stands for “Message Queuing Telemetry Transport”. The idea it’s that it’s quite lightweight.
In this case Oscar has a server in his house (that’s a rasberry pi), with a MQTT broker. Something like this schema:
this image is from the repository of the class
So in this class we are going to be “suscribed” to certain “topics” and we are going to send messages also as “topics”. Here are the code to publish and to subscribe.
//to publish
client.publish("input/david", msg);

//to suscribe

client.subscribe("output/david");
remember to like and subscribe this documentation
When any message that the brokes recieves (or generates) that it’s output/david, the board will read it. And when publish something in input/david the server will deliver it or, in this case, show it in the screen. Today I got to be seen on screen and also I played music when another student (Benjamin Scott) set the potenciometer to a certain threshold.
Implementing the code
In the repository, in /multinetworking/remote/example.ino, we can find a C++ code to flash in the board we have adapting it. This one are prepared to a NodeMCU (ESP8266), but it’s flexible enough to use other boards with wifi (in this case we have several ESP32 barduino boards). In that case you have to substitute the include for other wifi implementation.
But also, you need to install the PubSubClient library. Open the Library manager in Arduino menu Sketch -> Include Library -> Manage Libraries and search for the PubSubClient library, install it.
First connect to the broker
Then we set up the credentials. The ssid for our network name, the password to access the wifi and the credentials of the mqtt broker. That one it’s on Oscar side and he lend us them.
Here is the first iteration I made:
#include <ESP8266WiFi.h>
#include <PubSubClient.h>

// SETUP WIFI CREDENTIALS
const char* ssid = "REDACTED"; //delete when upload
const char* password = "REDACTED"; //delete when upload
const char* mqtt_server = "REDACTED"; //delete when upload
const char* mqtt_user = "REDACTED"; //delete when upload
const char* mqtt_pass = "REDACTED"; //delete when upload

WiFiClient espClient;
PubSubClient client(espClient);

void setup() {
  pinMode(BUILTIN_LED, OUTPUT);
  Serial.begin(9600);
  setup_wifi();
  client.setServer(mqtt_server, 1883);
  client.setCallback(callback);

  // PUT THE CODE TO START YOUR SENSORS HERE

}

void loop() {

  if (!client.connected()) reconnect();
  client.loop();

  // Publish every 1000 milliseconds
  if (millis() % 1000 == 0) {

    // READ YOUR SENSOR DATA HERE
    float value = random(100);

    // Send value as characters
    char msg[50];
    snprintf (msg, 50, "%f", value);
    Serial.print("Publish message: ");
    Serial.println(msg);

    // SET THE TOPIC TO PUBLISH HERE
    client.publish("input/david", msg);
  }
}

void callback(char* topic, byte* payload, unsigned int length) {

  Serial.print("Message arrived [");
  Serial.print(topic);
  Serial.print("] ");
  for (int i = 0; i < length; i++) {
    Serial.print((char)payload[i]);
  }
  Serial.println();

  String strPayload = String((char*)payload);

  // Serial.println(strPayload.toFloat());
  // Serial.println(strPayload.toInt());

  // USE RECEIVED DATA HERE
  if (strPayload.toInt() > 5) digitalWrite(LED_BUILTIN, LOW);
  else digitalWrite(LED_BUILTIN, HIGH);

}

void reconnect() {

  // Loop until we're reconnected
  while (!client.connected()) {

    Serial.print("Attempting MQTT connection...");
    // Create a random client ID
    String clientId = "ESP8266Client-";
    clientId += String(random(0xffff), HEX);

    // Attempt to connect
    if (client.connect(clientId.c_str(), mqtt_user, mqtt_pass)) {
      Serial.println("connected");

      // SET THE TOPIC TO SUBSCRIBE HERE
      client.subscribe("output/david");

    } else {

      Serial.print("failed, rc=");
      Serial.print(client.state());
      Serial.println(" try again in 5 seconds");
      // Wait 5 seconds before retrying
      delay(5000);

    }
  }
}

void setup_wifi() {

  delay(10);
  // We start by connecting to a WiFi network
  Serial.println();
  Serial.print("Connecting to ");
  Serial.println(ssid);

  WiFi.begin(ssid, password);

  while (WiFi.status() != WL_CONNECTED) {
    delay(500);
    Serial.print(".");
  }

  Serial.println("");
  Serial.println("WiFi connected");
  Serial.println("IP address: ");
  Serial.println(WiFi.localIP());
}
The code works properly and sends randon numbers from 0 to 100 every second.
Input implementation
Ok, now it’s time to get the sensors back and check if we can send the data from the moist sensor.
The NodeMCU only has one Analog input so the pin is easy to remember. But for more details you should check out the input week because I copypasted the code from there.
This is the code with the input implemented.
It’s important that I had to convert the int into float because if I didn’t the message wasn’t properly sent.
#include <ESP8266WiFi.h>
#include <PubSubClient.h>

// SETUP WIFI CREDENTIALS
const char* ssid = "REDACTED"; //delete when upload
const char* password = "REDACTED"; //delete when upload
const char* mqtt_server = "REDACTED"; //delete when upload
const char* mqtt_user = "REDACTED"; //delete when upload
const char* mqtt_pass = "REDACTED"; //delete when upload

//input setup

const int analogInPin = A0;  // Analog input pin that the potentiometer is attached to
int sensorValue = 0;        // value read from the pot


WiFiClient espClient;
PubSubClient client(espClient);

void setup() {
  pinMode(BUILTIN_LED, OUTPUT);
  Serial.begin(9600);
  setup_wifi();
  client.setServer(mqtt_server, 1883);
  client.setCallback(callback);

  // PUT THE CODE TO START YOUR SENSORS HERE

}

void loop() {

  if (!client.connected()) reconnect();
  client.loop();

  // Publish every 1000 milliseconds
  if (millis() % 1000 == 0) {

    // READ YOUR SENSOR DATA HERE


      // read the analog in value:
  sensorValue = analogRead(analogInPin);
  // map it to the range of the analog out:


 float value = sensorValue;
    // Send value as characters
    char msg[50];
    snprintf (msg, 50, "%f", value);
    Serial.print("Publish message: ");
    Serial.println(msg);

    // SET THE TOPIC TO PUBLISH HERE
    client.publish("input/david", msg);
  }
}

void callback(char* topic, byte* payload, unsigned int length) {

  Serial.print("Message arrived [");
  Serial.print(topic);
  Serial.print("] ");
  for (int i = 0; i < length; i++) {
    Serial.print((char)payload[i]);
  }
  Serial.println();

  String strPayload = String((char*)payload);

  // Serial.println(strPayload.toFloat());
  // Serial.println(strPayload.toInt());

  // USE RECEIVED DATA HERE
  if (strPayload.toInt() > 5) digitalWrite(LED_BUILTIN, LOW);
  else digitalWrite(LED_BUILTIN, HIGH);

}

void reconnect() {

  // Loop until we're reconnected
  while (!client.connected()) {

    Serial.print("Attempting MQTT connection...");
    // Create a random client ID
    String clientId = "ESP8266Client-";
    clientId += String(random(0xffff), HEX);

    // Attempt to connect
    if (client.connect(clientId.c_str(), mqtt_user, mqtt_pass)) {
      Serial.println("connected");

      // SET THE TOPIC TO SUBSCRIBE HERE
      client.subscribe("output/david");

    } else {

      Serial.print("failed, rc=");
      Serial.print(client.state());
      Serial.println(" try again in 5 seconds");
      // Wait 5 seconds before retrying
      delay(5000);

    }
  }
}

void setup_wifi() {

  delay(10);
  // We start by connecting to a WiFi network
  Serial.println();
  Serial.print("Connecting to ");
  Serial.println(ssid);

  WiFi.begin(ssid, password);

  while (WiFi.status() != WL_CONNECTED) {
    delay(500);
    Serial.print(".");
  }

  Serial.println("");
  Serial.println("WiFi connected");
  Serial.println("IP address: ");
  Serial.println(WiFi.localIP());
}
Output implementation
Last but not least, now try to play music when other person says so (while still having the input implementation). The base is covered here in the output week part 2.
I had to touch here a little more. In this case the code should be written better to have events and subscriptions (so I can have faster notes) because the “delay” problem of threads. Today wasn’t the day to solve that but I could make something that works. When the threshold goes over 3000 it plays random chromatic notes. If the threshold goes under 3000, it stops.
Here is the code.
#include <ESP8266WiFi.h>
#include <PubSubClient.h>

// SETUP WIFI CREDENTIALS
const char* ssid = "REDACTED"; //delete when upload
const char* password = "REDACTED"; //delete when upload
const char* mqtt_server = "REDACTED"; //delete when upload
const char* mqtt_user = "REDACTED"; //delete when upload
const char* mqtt_pass = "REDACTED"; //delete when upload


//input setup

const int analogInPin = A0;  // Analog input pin that the potentiometer is attached to
int sensorValue = 0;        // value read from the pot

//output setup

const int freqs[] = {261.63, 293.66, 329.63, 349.23, 392, 440, 493.88, 523.25};
const int ledPin = 2;

WiFiClient espClient;
PubSubClient client(espClient);

void setup() {
  pinMode(BUILTIN_LED, OUTPUT);
  Serial.begin(9600);
  setup_wifi();
  client.setServer(mqtt_server, 1883);
  client.setCallback(callback);

  // PUT THE CODE TO START YOUR SENSORS HERE

}

void loop() {


  if (!client.connected()) reconnect();
  client.loop();

  // Publish every 1000 milliseconds
  if (millis() % 1000 == 0) {

    // READ YOUR SENSOR DATA HERE


      // read the analog in value:
  sensorValue = analogRead(analogInPin);
  // map it to the range of the analog out:


 float value = sensorValue;
    // Send value as characters
    char msg[50];
    snprintf (msg, 50, "%f", value);
    Serial.print("Publish message: ");
    Serial.println(msg);

    // SET THE TOPIC TO PUBLISH HERE
    client.publish("input/david", msg);
  }
}

void sound(int frequency, int noise, int miliseconds)
{
//  Serial.println("this note has: " + frequency + "Hz ");
  analogWriteFreq(frequency);
  int max_amplitude = 512;
  for (miliseconds; miliseconds > 0; miliseconds = miliseconds -20)
  {
  int amplitude = max_amplitude + random(16) * noise;
  analogWrite(ledPin, amplitude);
  delay(20);
  }

}

void callback(char* topic, byte* payload, unsigned int length) {

  Serial.print("Message arrived [");
  Serial.print(topic);
  Serial.print("] ");
  for (int i = 0; i < length; i++) {
    Serial.print((char)payload[i]);
  }
  Serial.println();

  String strPayload = String((char*)payload);

  // Serial.println(strPayload.toFloat());
  // Serial.println(strPayload.toInt());

  // USE RECEIVED DATA HERE
  if (strPayload.toInt() > 3000){
    Serial.println("playing");
          int rnd = random(4);
          int duration = 150 * rnd;
          //set if this is a silence or a note
          rnd = random(3);
          if (rnd == 3)
          {
            analogWrite(ledPin, 0);
            delay(duration);
          }
          else
          {
            Serial.println("note");
             sound(freqs[random(8)], random(8), duration);
          }
    }
    else{
      analogWrite(ledPin, 0);
    }
}

void reconnect() {

  // Loop until we're reconnected
  while (!client.connected()) {

    Serial.print("Attempting MQTT connection...");
    // Create a random client ID
    String clientId = "ESP8266Client-";
    clientId += String(random(0xffff), HEX);

    // Attempt to connect
    if (client.connect(clientId.c_str(), mqtt_user, mqtt_pass)) {
      Serial.println("connected");

      // SET THE TOPIC TO SUBSCRIBE HERE
      client.subscribe("output/david");

    } else {

      Serial.print("failed, rc=");
      Serial.print(client.state());
      Serial.println(" try again in 5 seconds");
      // Wait 5 seconds before retrying
      delay(5000);

    }
  }
}

void setup_wifi() {

  delay(10);
  // We start by connecting to a WiFi network
  Serial.println();
  Serial.print("Connecting to ");
  Serial.println(ssid);

  WiFi.begin(ssid, password);

  while (WiFi.status() != WL_CONNECTED) {
    delay(500);
    Serial.print(".");
  }

  Serial.println("");
  Serial.println("WiFi connected");
  Serial.println("IP address: ");
  Serial.println(WiFi.localIP());
}
And it worked! = D
Hero shot!
Here it’s what Arman, another student took from his computer:
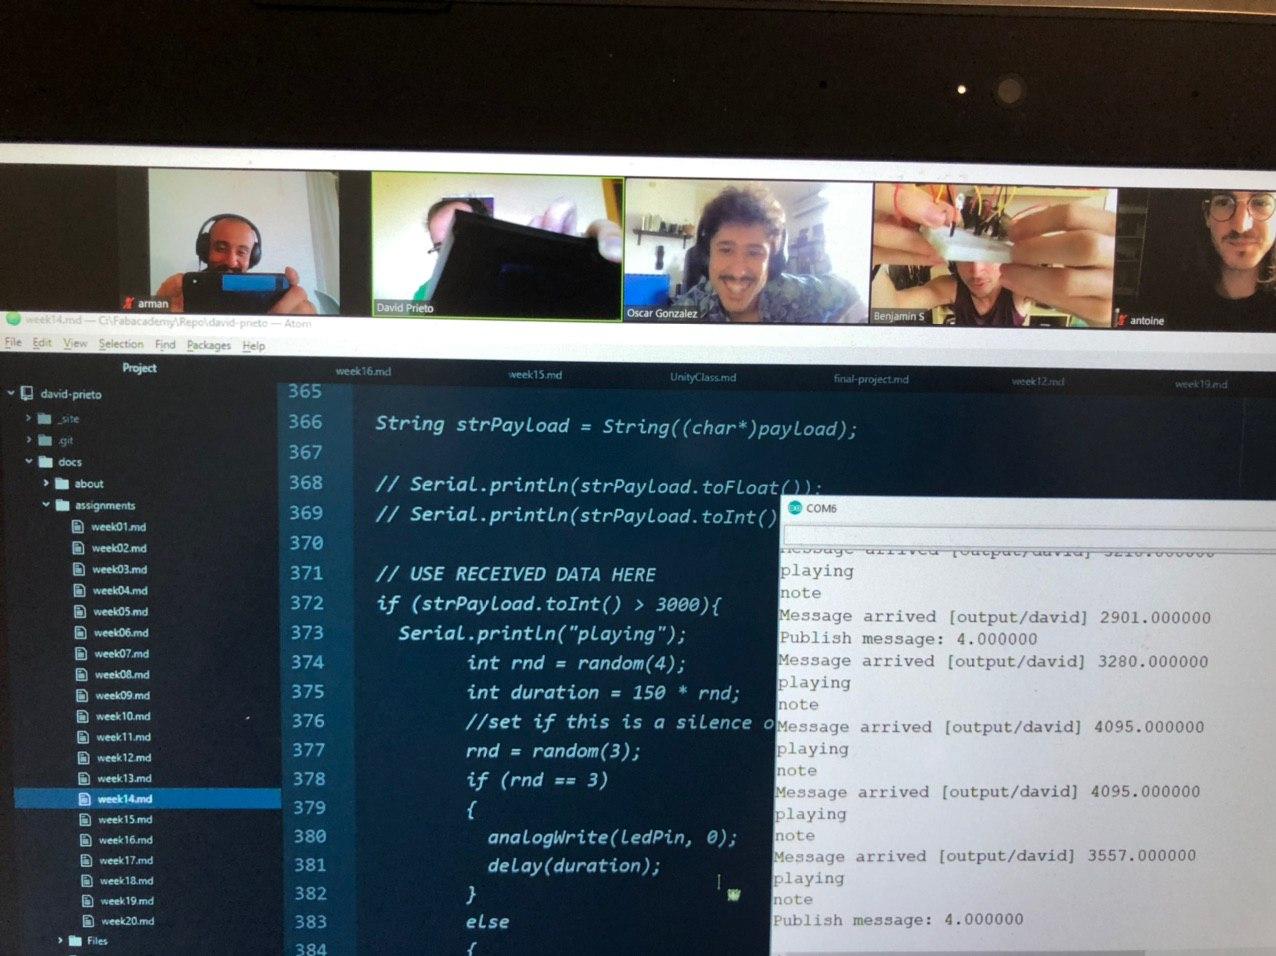
yay it works and we have testimonies
What I’ve learnt from this
-
What MQTT is.
-
That sometimes the quotes “” can be misleading and be a different character encoding, so better not to copy/paste them into a IDE because you may get encoding errors.
-
That a MQTT broker probably it’s not what I need for my Final Project. It’s good for prototyping but I’d need all the pieces connected via wifi.
-
That document everything is awesome because I could bring easily the work I did from past weeks for today. Also it’s useful because I usually write down the stupid fails I have. So when I go back I can see “THE PIN 2 IT’S THE D4 BECAUSE POTATO” and say to myself “thanks David from the past for your wise advise because if you didn’t write it down I’d be lost in the pin nomeclating system”
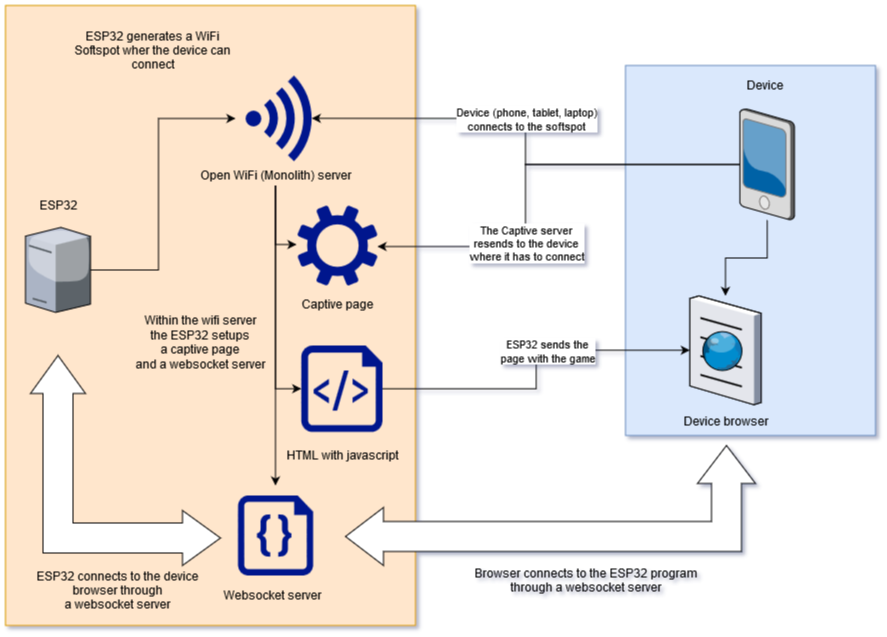
Extra points in the final project development
In the final project I’m trying to make a captive webpage so you should totally check it out if you’re interested
Also here you can see an schema of what I did for the network of the Final project
Useful links
- What it’s MQTT
- Repository of MQTT broker/client/subscriber
- Barcelona class about the MQTT broker/client/subscriber
Captive web
Websocket stuff
I2C in a ATTiny1614
Ok, so the next challenge is to connect an ATTiny through I2C to the barduino so I can put more stuff into the Monolith. Here is the documentation I’m going to use as reference.
And as I far I understand that I need a connection that has:
-
Ground
-
SCA
-
SCL (Santiago de Chile Airport code, of course)
-
VCC.
So let’s include that into our board and then go back if we can do something with it! = )
Here in the week of electronic design I’m going to talk about the board.