Week 10. Moulding and Casting
The main objectives are to review the safety data sheets for each of molding and casting materials, then make and compare tests with each of them. Design a 3D mold around the stock and tooling that you'll be using, machine it, and use it to cast parts as the individual project.
Group Work
Materials
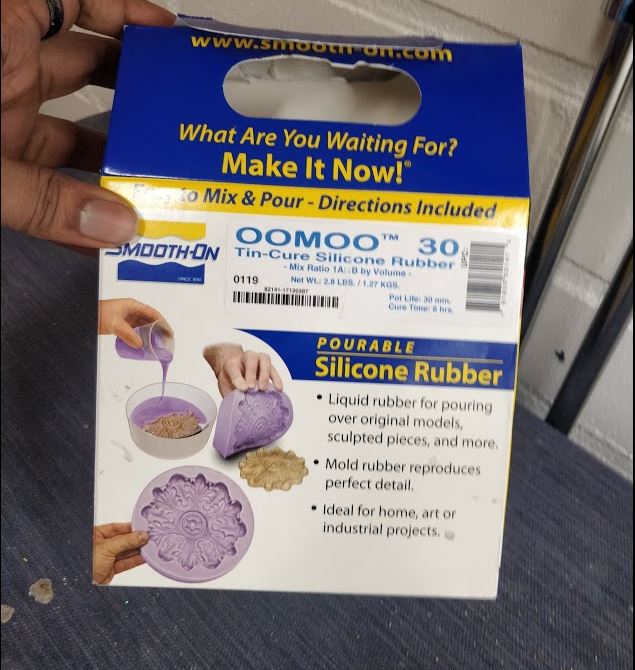
OOMOO
-
Cure at room temperature with negligible shrinkage. OOMOO™ 30 has a 30-minute pot life, with a six-hour cure time. Safety data sheet
-
Good for making simple one- or two- piece block molds.
-
Use in a properly ventilated area (“room size” ventilation). Wear safety glasses, long sleeves and rubber gloves to minimize contamination risk. Wear vinyl gloves only. Latex gloves will inhibit the cure of the rubber. Store and use material at room temperature (23°C). Storing material at warmer temperatures will also reduce the usable shelf life of unused material. These products have a limited shelf life and should be used as soon as possible. Stir Parts A and B thoroughly before using.
-
Safety: Keep Out of Reach of Children. Be careful. Use only with adequate ventilation. Contact with skin and eyes may cause irritation. Flush eyes with water for 15 minutes and seek immediate medical attention. Remove from skin with waterless hand cleaner followed by soap and water.
Smooth-Sil 940
-
Silicones cure at room temperature with negligible shrinkage. It is suitable for making production molds of any configuration, large or small. These silicones exhibit good chemical, abrasion and heat resistance. Materials such as plasters, concrete, wax, low-melt metal alloys or resins (urethane, epoxy or polyester) can then be cast into these silicone rubbers without a release agent. Safety Data Sheet
-
Safety: Be careful. Use only with adequate ventilation. Contact with skin and eyes may cause irritation. Flush eyes with water for 15 minutes and seek immediate medical attention. Remove from skin with waterless hand cleaner followed by soap and water.
Smooth-Cast® 300
-
The Smooth-Cast™ 300 Series of liquid plastics are ultra-low viscosity casting resins that yield castings that are bright white and virtually bubble free. Vacuum degassing is not necessary. Pot life 3 min, cure time 10 min. Safety Data Sheet
-
Safety - Wear safety glasses, long sleeves and rubber gloves to minimize contamination risk. Use only in a well-ventilated area
-
Preparation - These products have a limited shelf life and should be used as soon as possible. Materials should be stored and used in a warm environment (23°C). All liquid urethanes will react with moisture in the air, causing bubbles. Use in a low humidity environment (below 50% RH). Mixing containers should have straight sides and a flat bottom. Mixing sticks should be flat and stiff with defined edges for scraping the sides and bottom of your mixing container.
Cement
-
Under normal use product is not expected to be hazardous to the environment. It has an irritating effect on moist skin after prolonged contact. Eye contact with may cause serious injury, Inhalation of the large quantity of cement dust over a long period of time leads to lungs disease. Safety Data Sheet
-
Safety- Wear glasses, long glowes and mask.
Plaster
-
May cause cancer (Inhalation) - May cause damage to organs (lungs/respiratory system) through prolonged or repeated exposure (Inhalation) Precautionary statements 1 - Obtain special instructions before use - Do not handle until all safety precautions have been read andunderstood - Do not breathe dust, mist, spray, vapors - Wear appropriate PPE - If exposed or concerned: Get medical advice/attention - Get medical advice/attention if you feel unwell - Store locked up - Dispose of contents/container to comply with local/regional/national/international regulations. Safety Data Sheet
-
Safety- Wear glasses, long glowes and mask.
VytaFlex™ 20
-
Using Smooth-On’s exclusive “V-Polymer™” technology, VytaFlex™ urethane rubbers offer superior physical and performance properties for casting concrete. VytaFlex™ urethanes are available in 10A, 20A, 30A, 40A, 50A and 60A Shore hardness’s and feature convenient one-to-one by volume mix ratios. Vacuum degassing is not necessary and VytaFlex™ rubbers cure with negligible shrinkage to a durable rubber that will last in production. Safety data sheet
-
VytaFlex™ mold rubbers work especially well for casting pigmented / colored concrete. Molds made with VytaFlex™ Series urethanes will render accurate and uniform colored castings.
-
Preparation - Store and use at room temperature (73°F/23°C). These products have a limited shelf life and should be used as soon as possible. Use in a low humidity environment (below 50% RH). Mixing containers should have straight sides and a flat bottom. Mixing sticks should be flat and stiff with defined edges for scraping the sides and bottom of your mixing container. Good ventilation (room size) is essential. Wear safety glasses, long sleeves and rubber gloves to minimize contamination risk.
-
Safety - Wear safety glasses, long sleeves and rubber gloves to minimize contamination risk. Use only in a well-ventilated area
Review all the safety data sheets for each of your moulding and casting materials, then make and compare test casts with each of them. Cast different mould using existing material in our lab using different mould materials and casting resins. So that we prepare a chart of materials and its preparation conditions and its end users and applications. The detailed list of materials for mould fabrications are shown below,
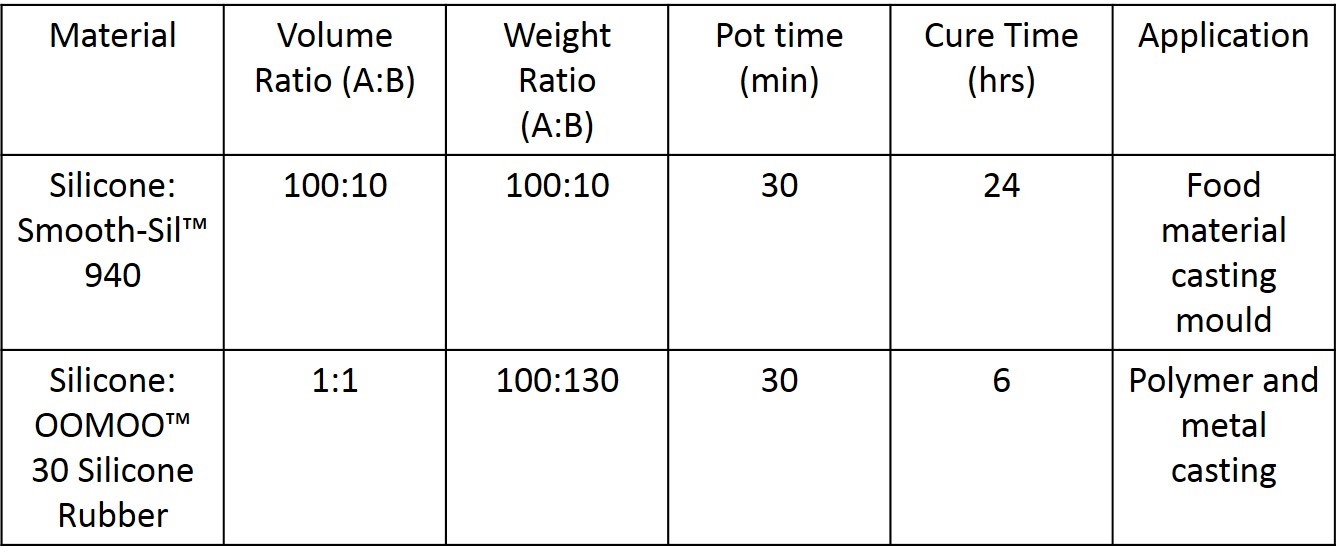
See the table below which contains mould materials, weight or volume ration, mixing or preparation time, curing time and applications.
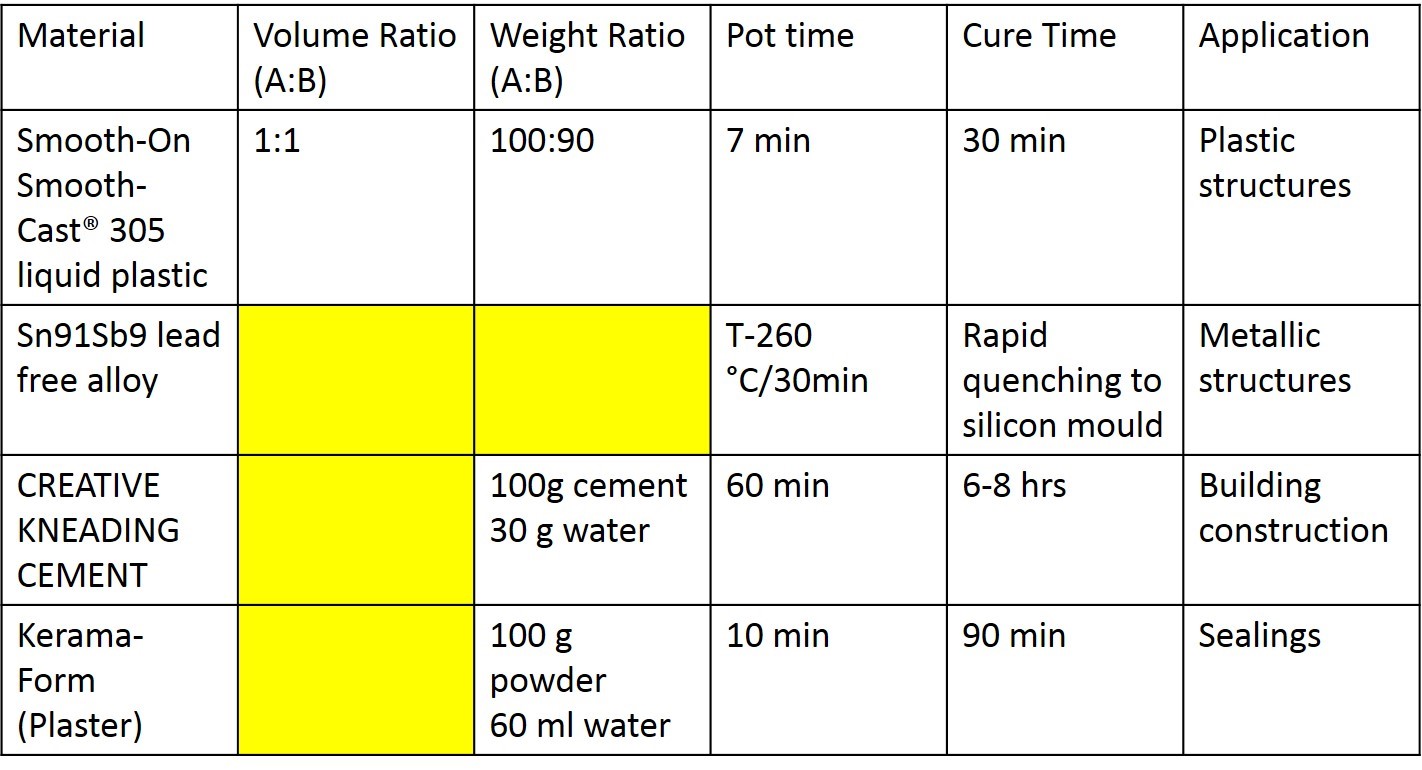
The table below presents the cast materials and its process time and applications
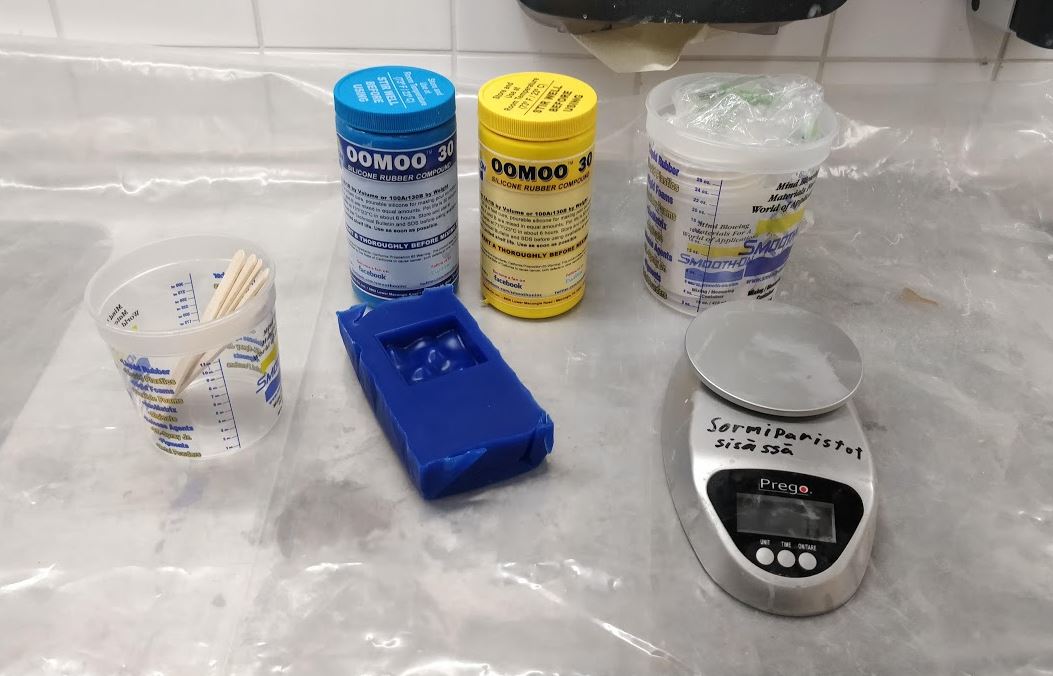
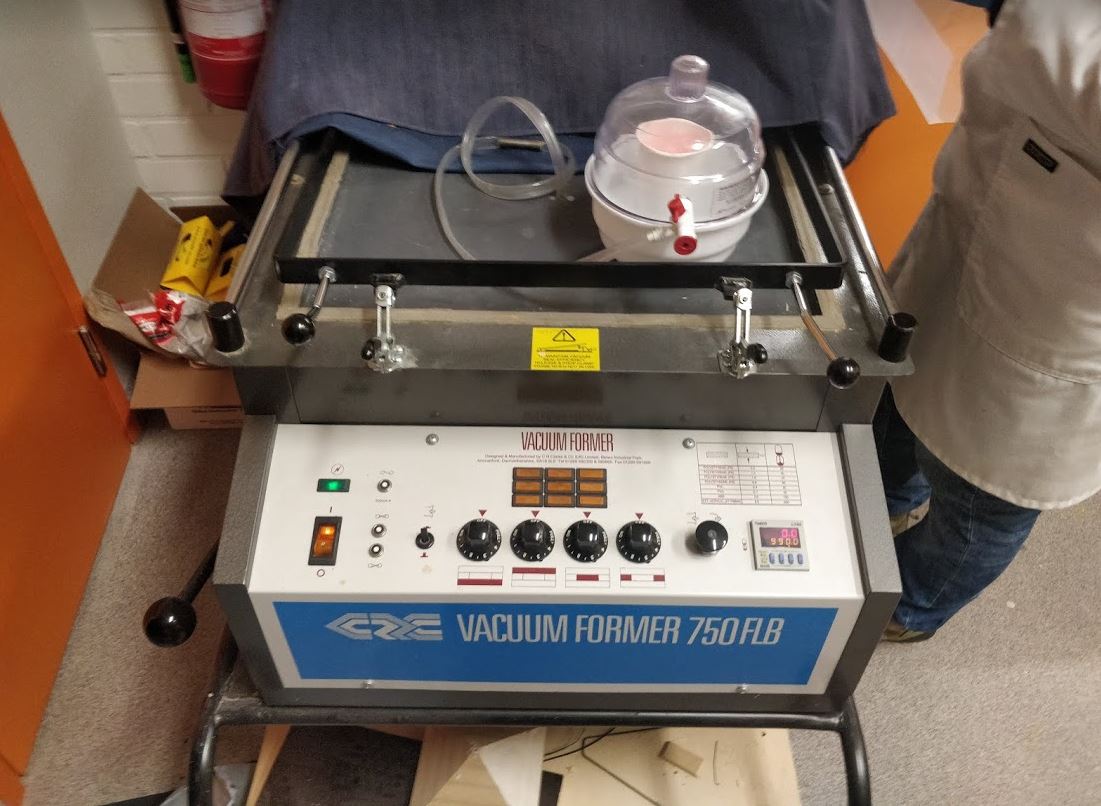
The materials and its processing conditions are described in the above tables. The methods and equipment described for the mould, and cast material processing are nitril glows for chemical handling, weighing machine for accurately weigh the raw materials for the preparations. Vacuum desiccator for de-airing the mixed slurry to avoid bubbles during or after curing. Wooden sticks for mixing the slurry, plastic cups used as mixing container, Syringes used to fill the cast materials. All instruments are shown in the below figure,
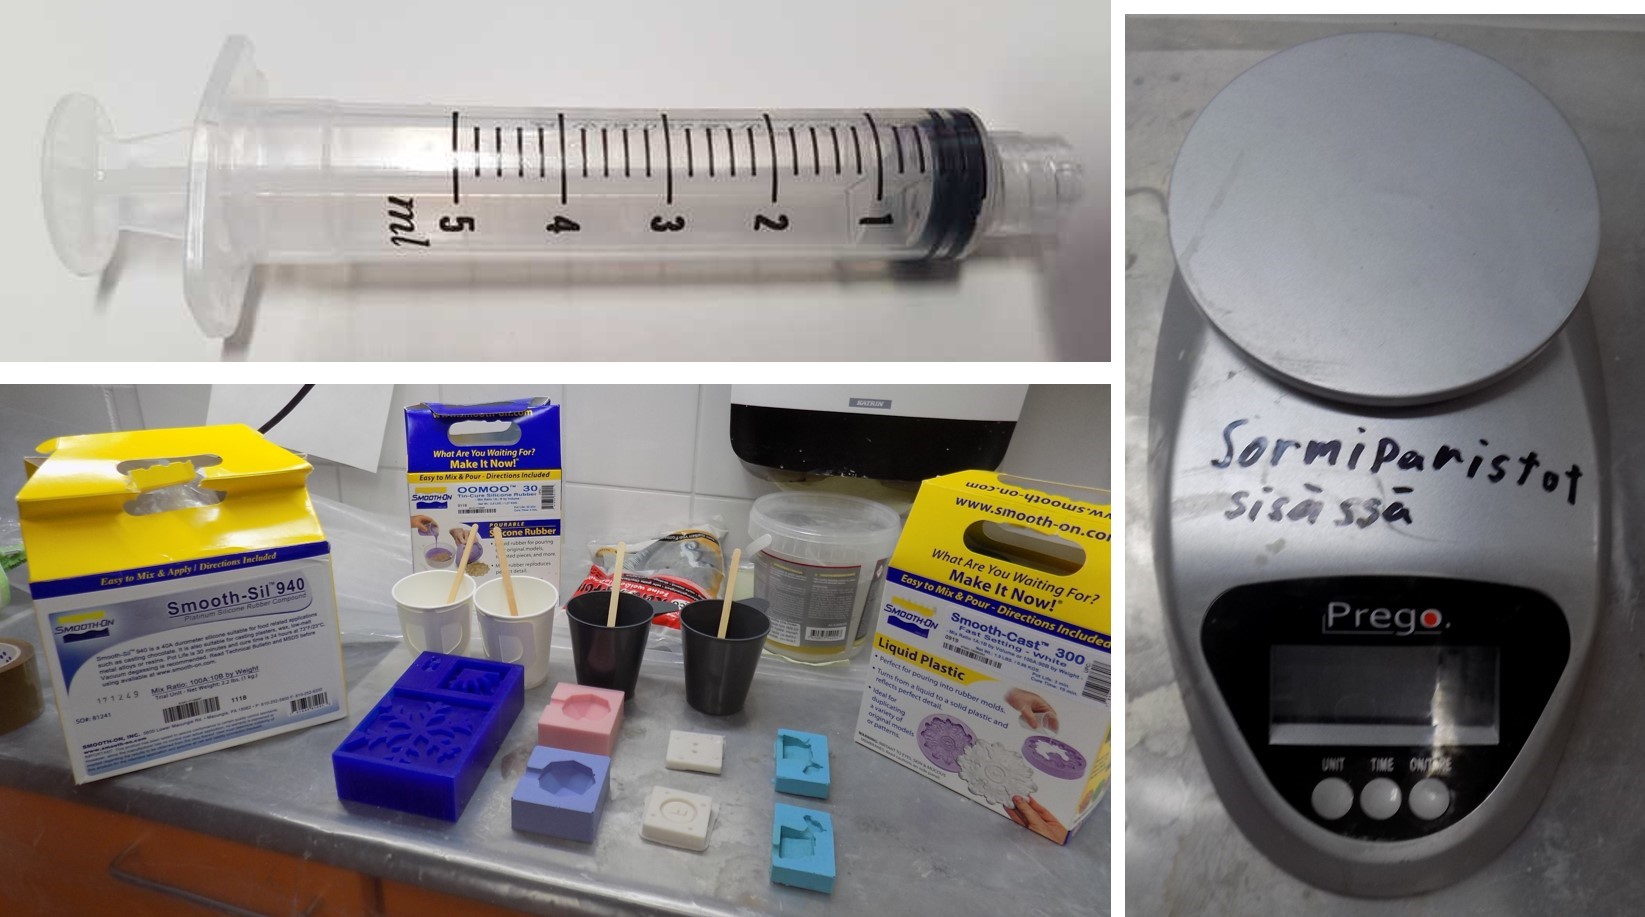
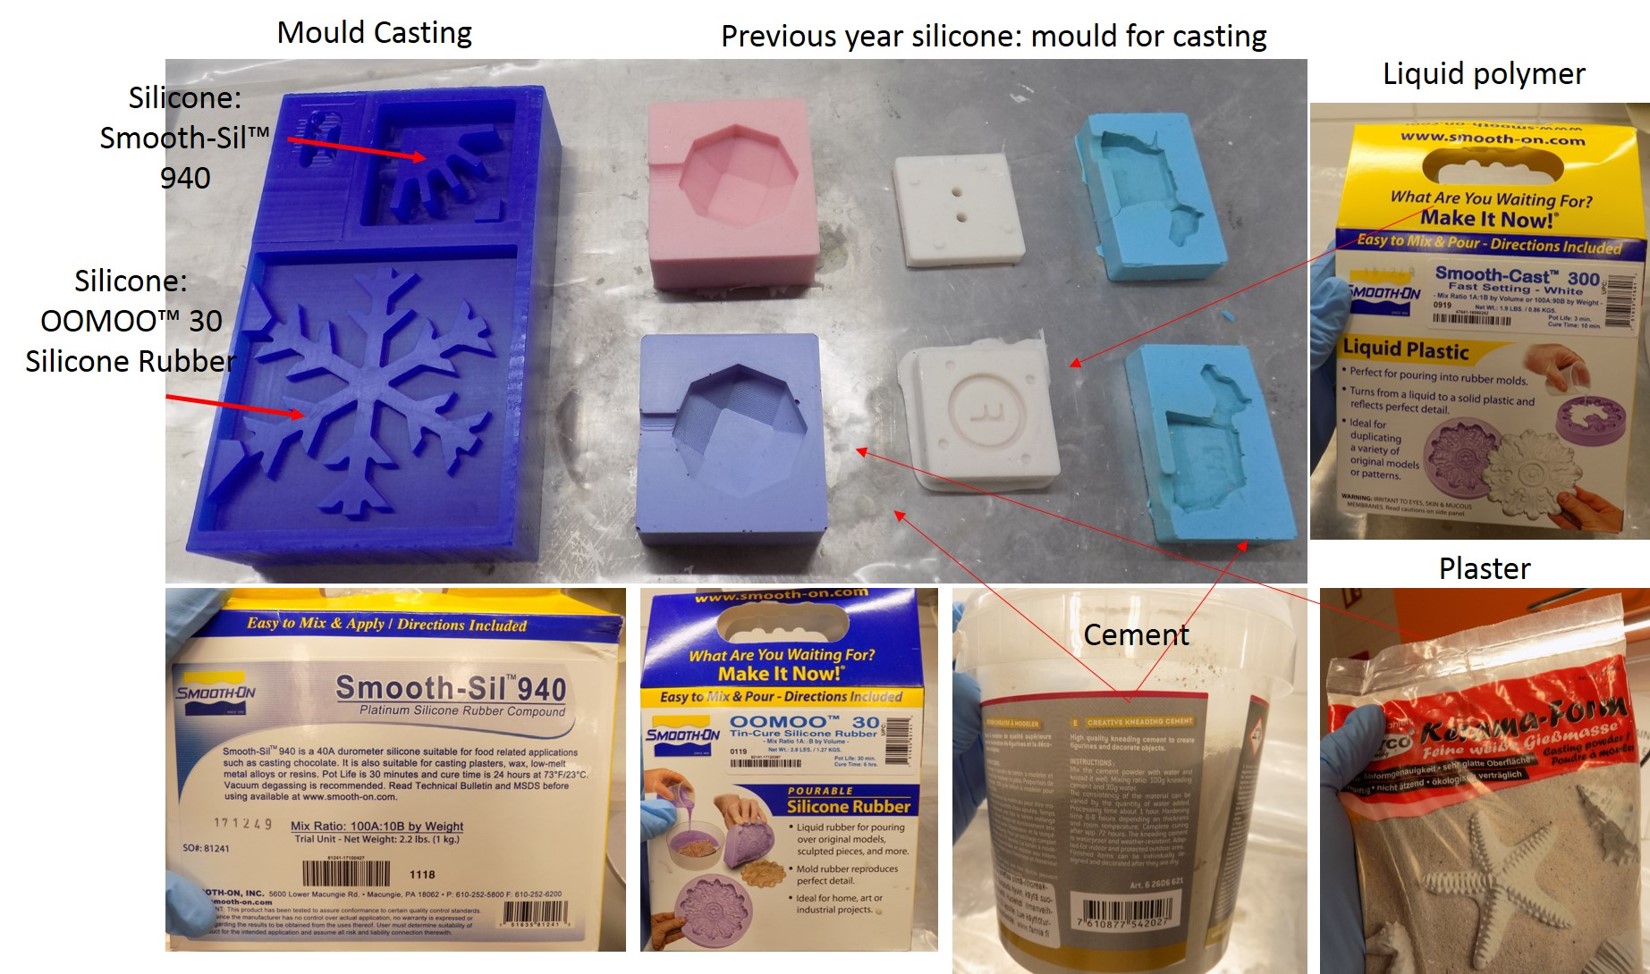
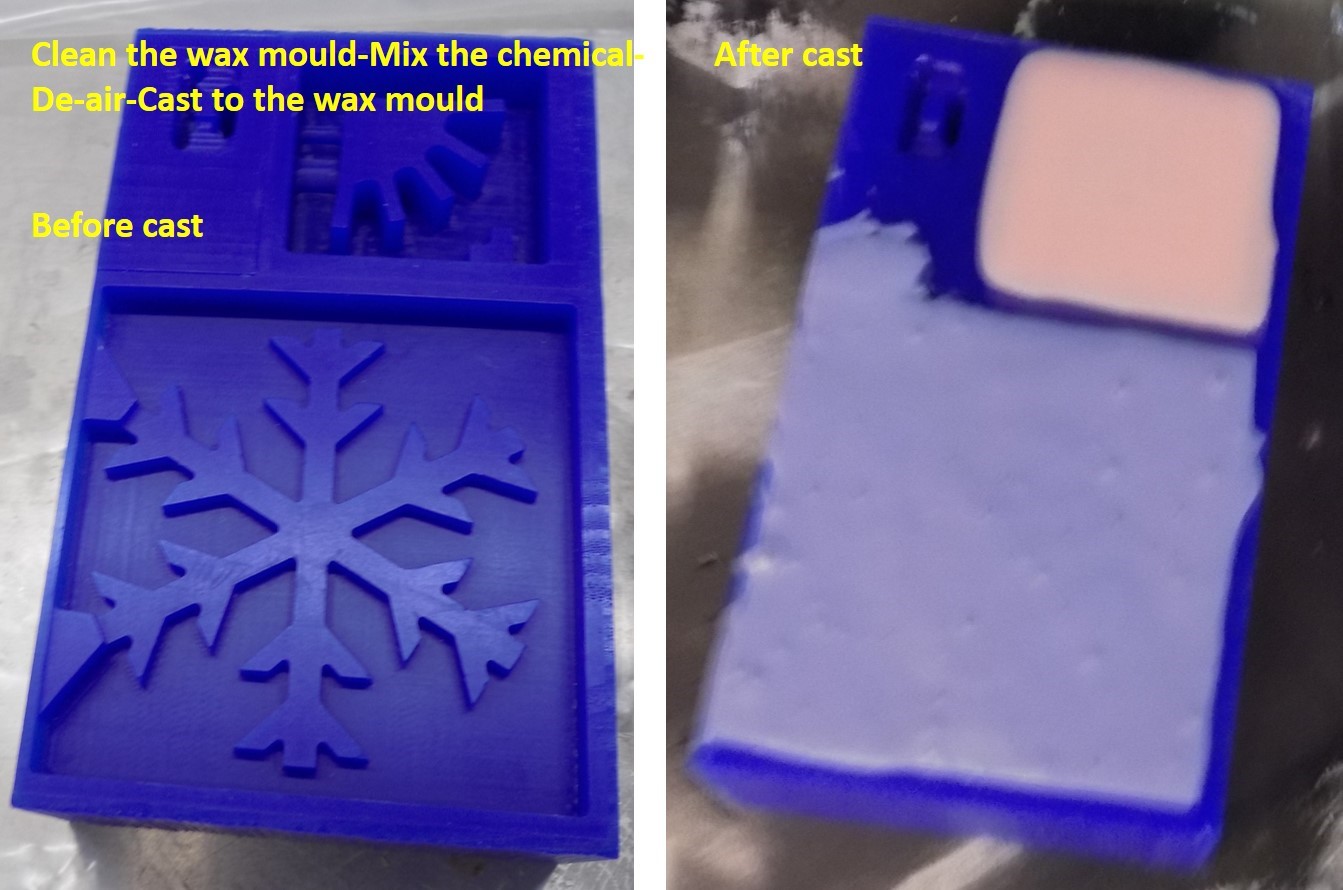
We are planned to make materials for mould Silicone: Smooth-Sil™ 940 and Silicone: OOMOO™ 30 Silicone Rubber first using an existing model designed and fabricated by last year Fablab students. All materials preparations conditions are explained in the above tables. For mould casting, we used vacuum desiccator for de-air the slurry after thorough mixing of A and B. See figure below materials and mould used for the group work.
All the raw materials contain two parts except cement and plaster. See the weight ratio and pot time and curing time of the above tables. Based on our wax fabrication, we calculate approximately total weight around 70 g for silicon: Sill 940 and for OOMOO30 approximately total 100 g used for casting. Both materials have pot time 30 minute but curing time is Still 940 has 24 hr, and OOMOO 30 has 6 hr. See the process steps before and after casting to the wax mould.
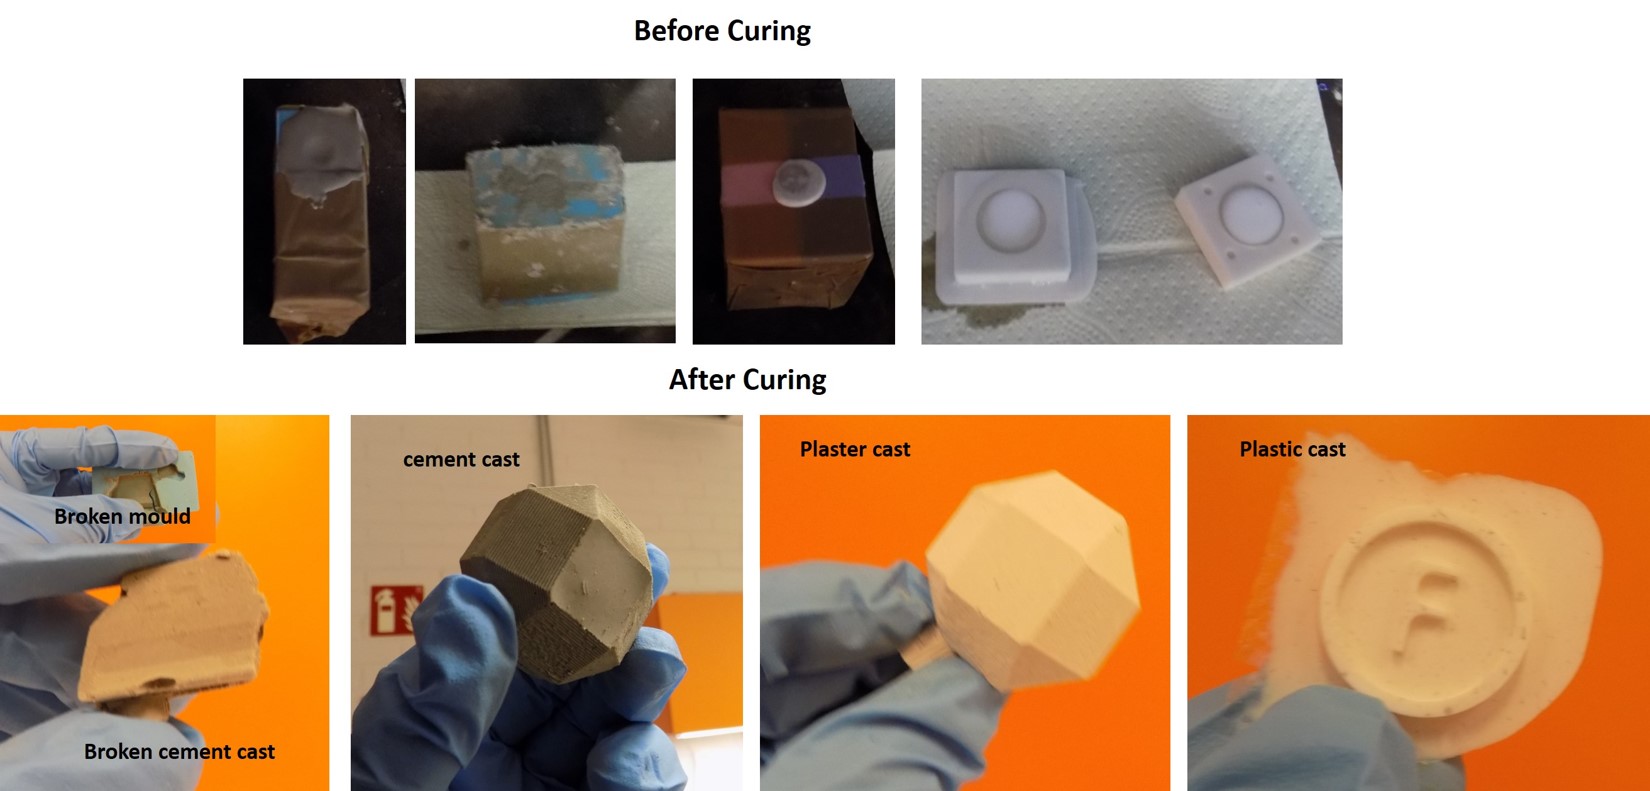
In the same time, other members start to take the weight of cement and water, Plaster and water, liquid polymer (A & B) Smooth-Cast 300 for mixing and casting to the previous year’s rubber mould. Similarly, the exact weight of composition you can find in the table explained at the beginning of documentation. In the case of plaster, we did de-airing to reduce the air bubbles. All other cast materials used are free from air bubbles. We kept all the cast for overnight curing; all material will cure if we take the next day. One cement cast was broken due to the broken mould used for the cast. All the remaining cast was successful. All the other cast was perfect. See the figure below,
Figures of cement, plaster and polymer cast before and after curing
Figures of Rubber cast mould after curing,
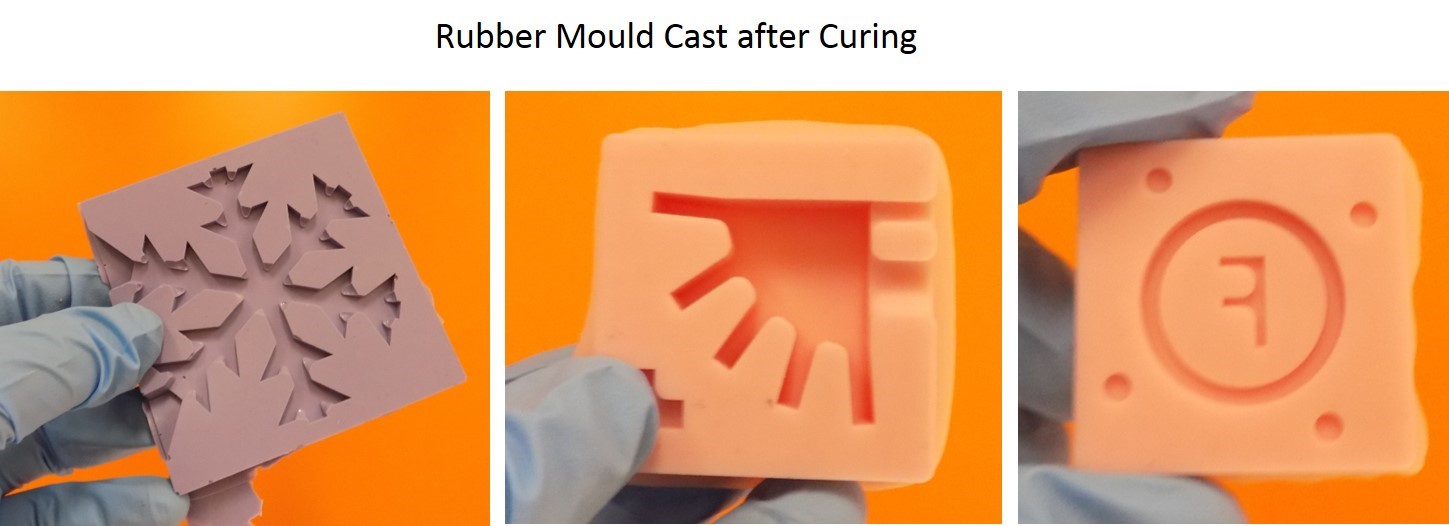
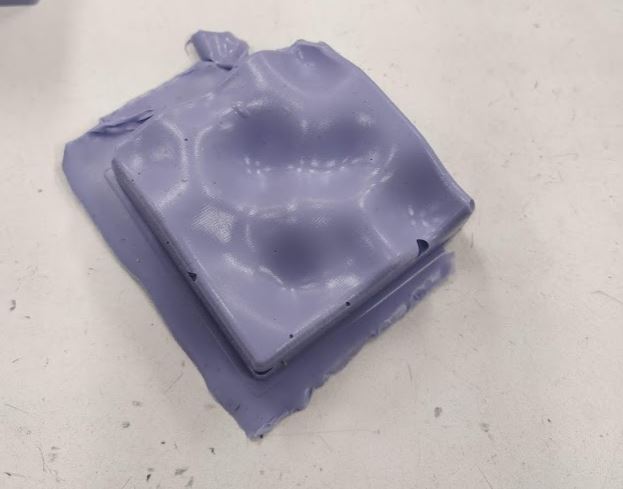
OOMOO 30 rubber mould is not suitable for sharp edges design we observed some defects in the mould. OOMOO 30 slurry was very difficult to de-air fully with our limited setup. Silicon still 940 is good casting materials, the limitation is, 24 hr curing time. Another cast material tested such as liquid plastic is a clear suspension, dust particle will lose the finishing. To properly clean the mould before cast. Cement and plaster-work well with rubber mould. I decided to choose, OOMOO 30 mould for my individual work, if I have enough time I will use Silicone: still 940 as well. For cast material, I am planning to choose, liquid plastic, and it takes less time to cure.
Individual work
Making the design
I wanted to create uneven surface geometry so I started with sketching a simple square. The dimensions of the model wax were given as 75mm*145mm*30mm.
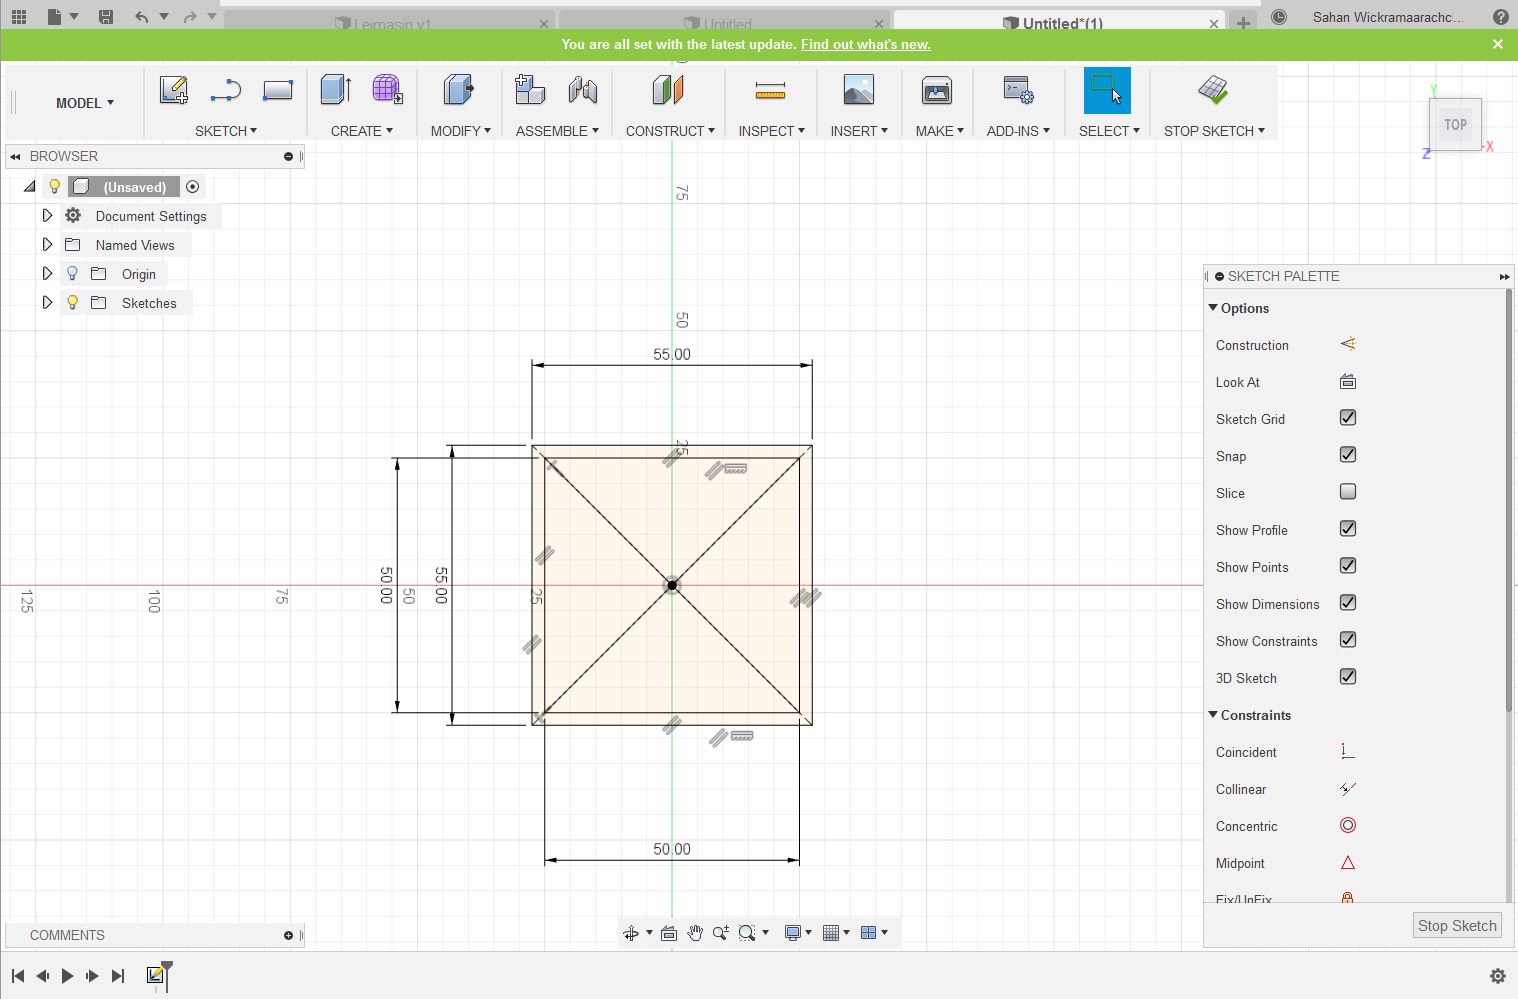
Next, I created the outline for the model with 5mm rectangle outside. Later I extruded the block up to 30mm. After going to Create-Create form I opened the sculping menu.
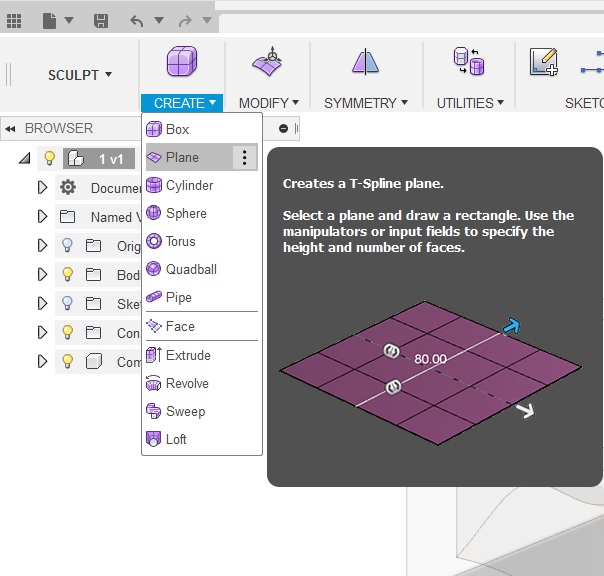
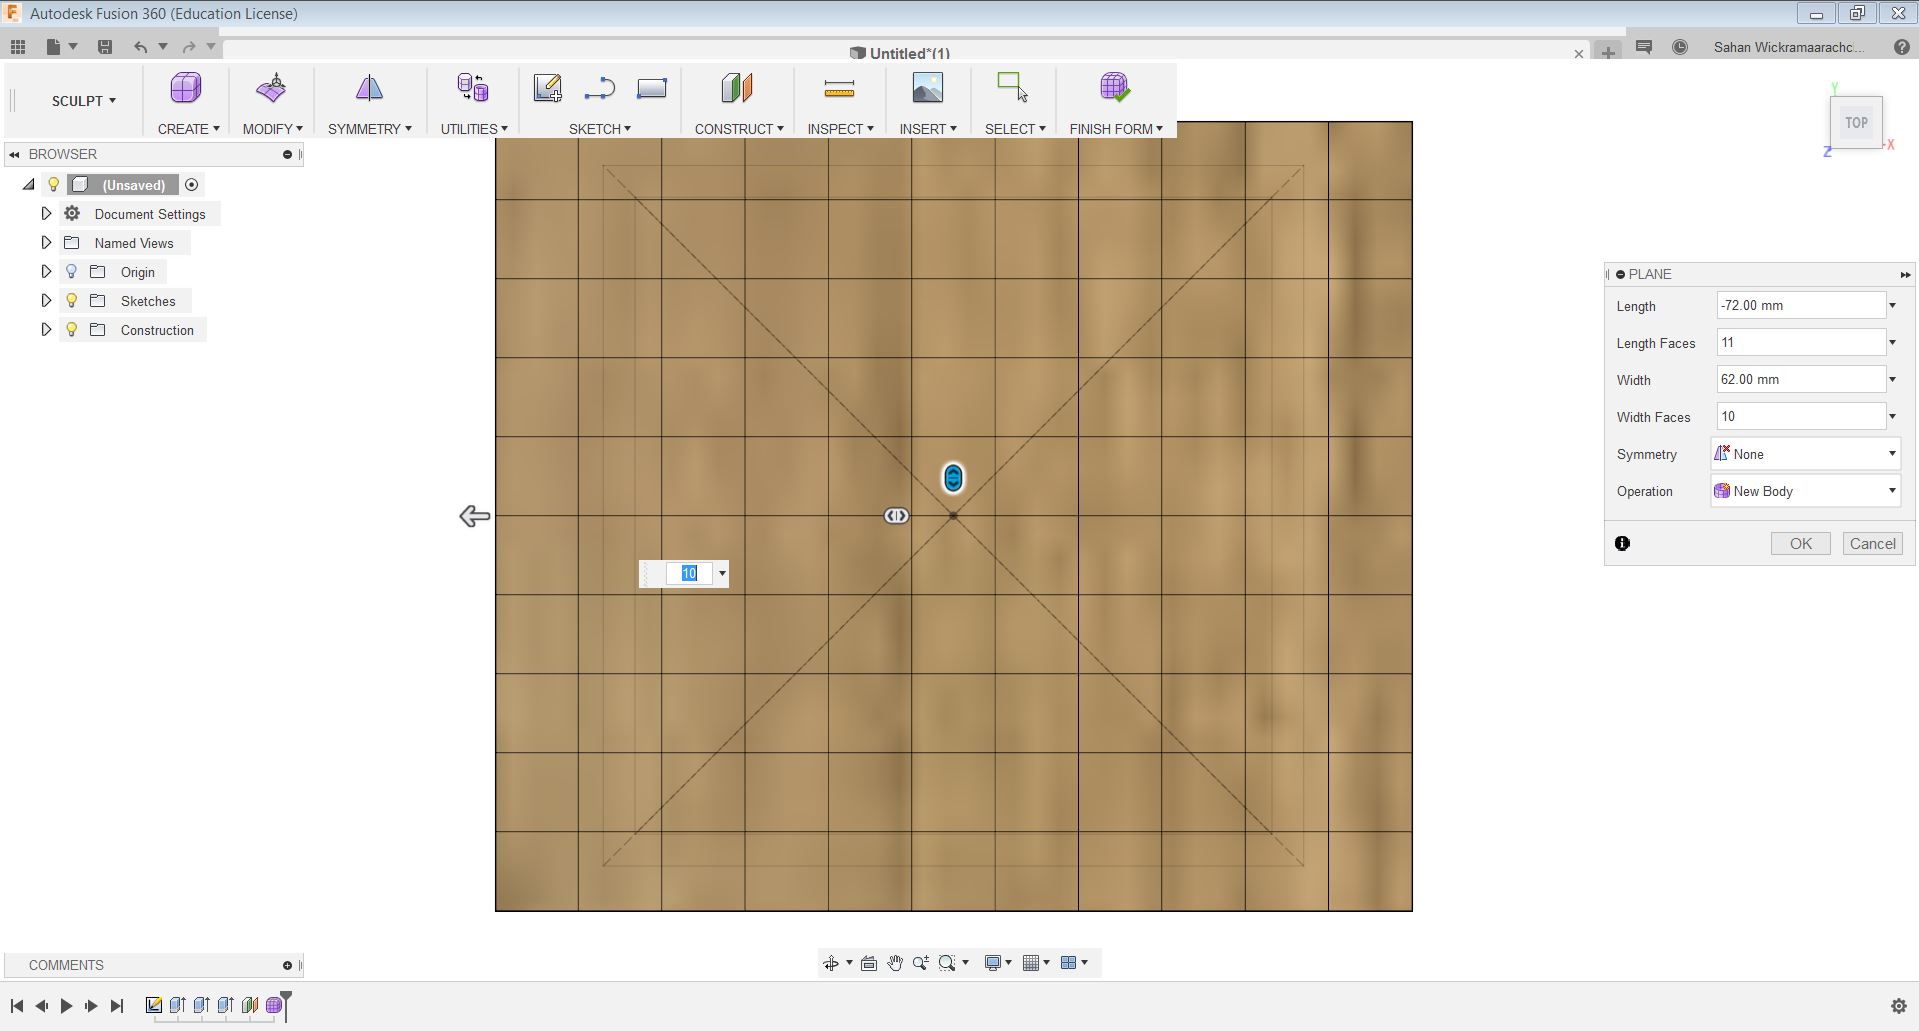
Then I selected the Create- Create a plane. Later I increased the number of cells in the grid by moving the blue sliders on x and y-axis.
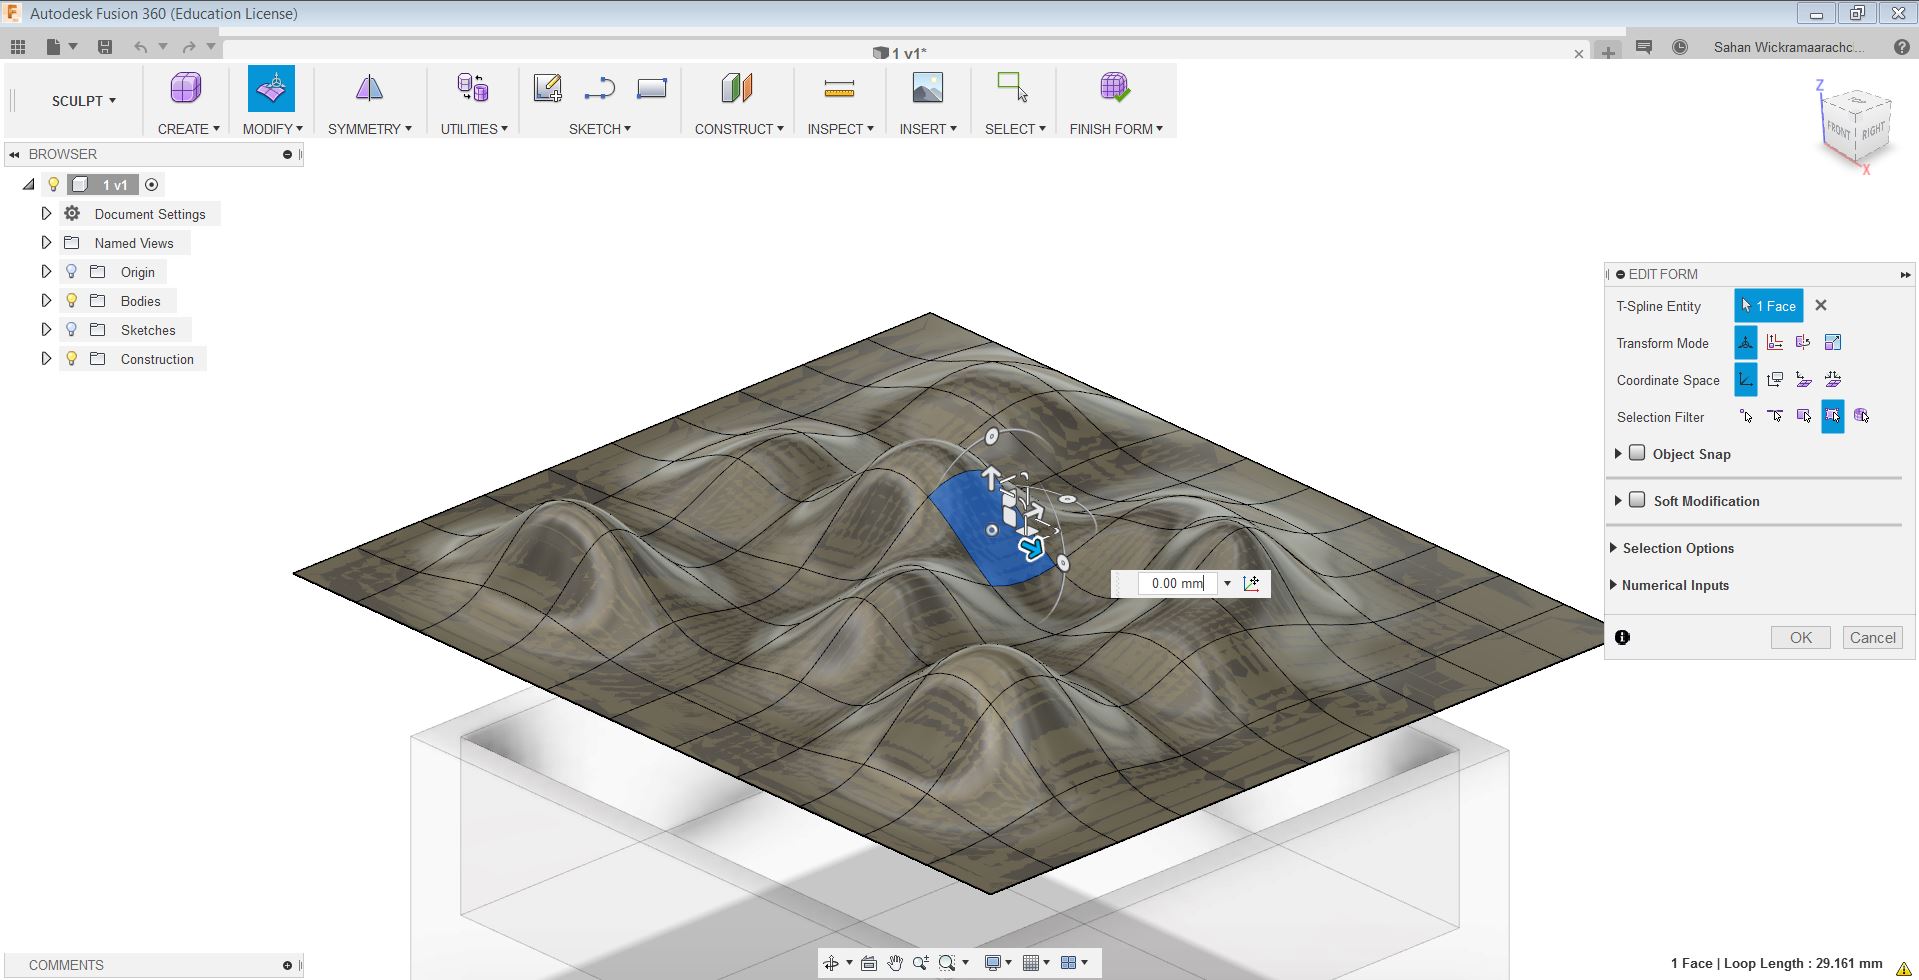
After that right-clicking on a cell and edit form, I could change the shape of the plane.
After finalizing the plane I pressed modify and replace the plane.
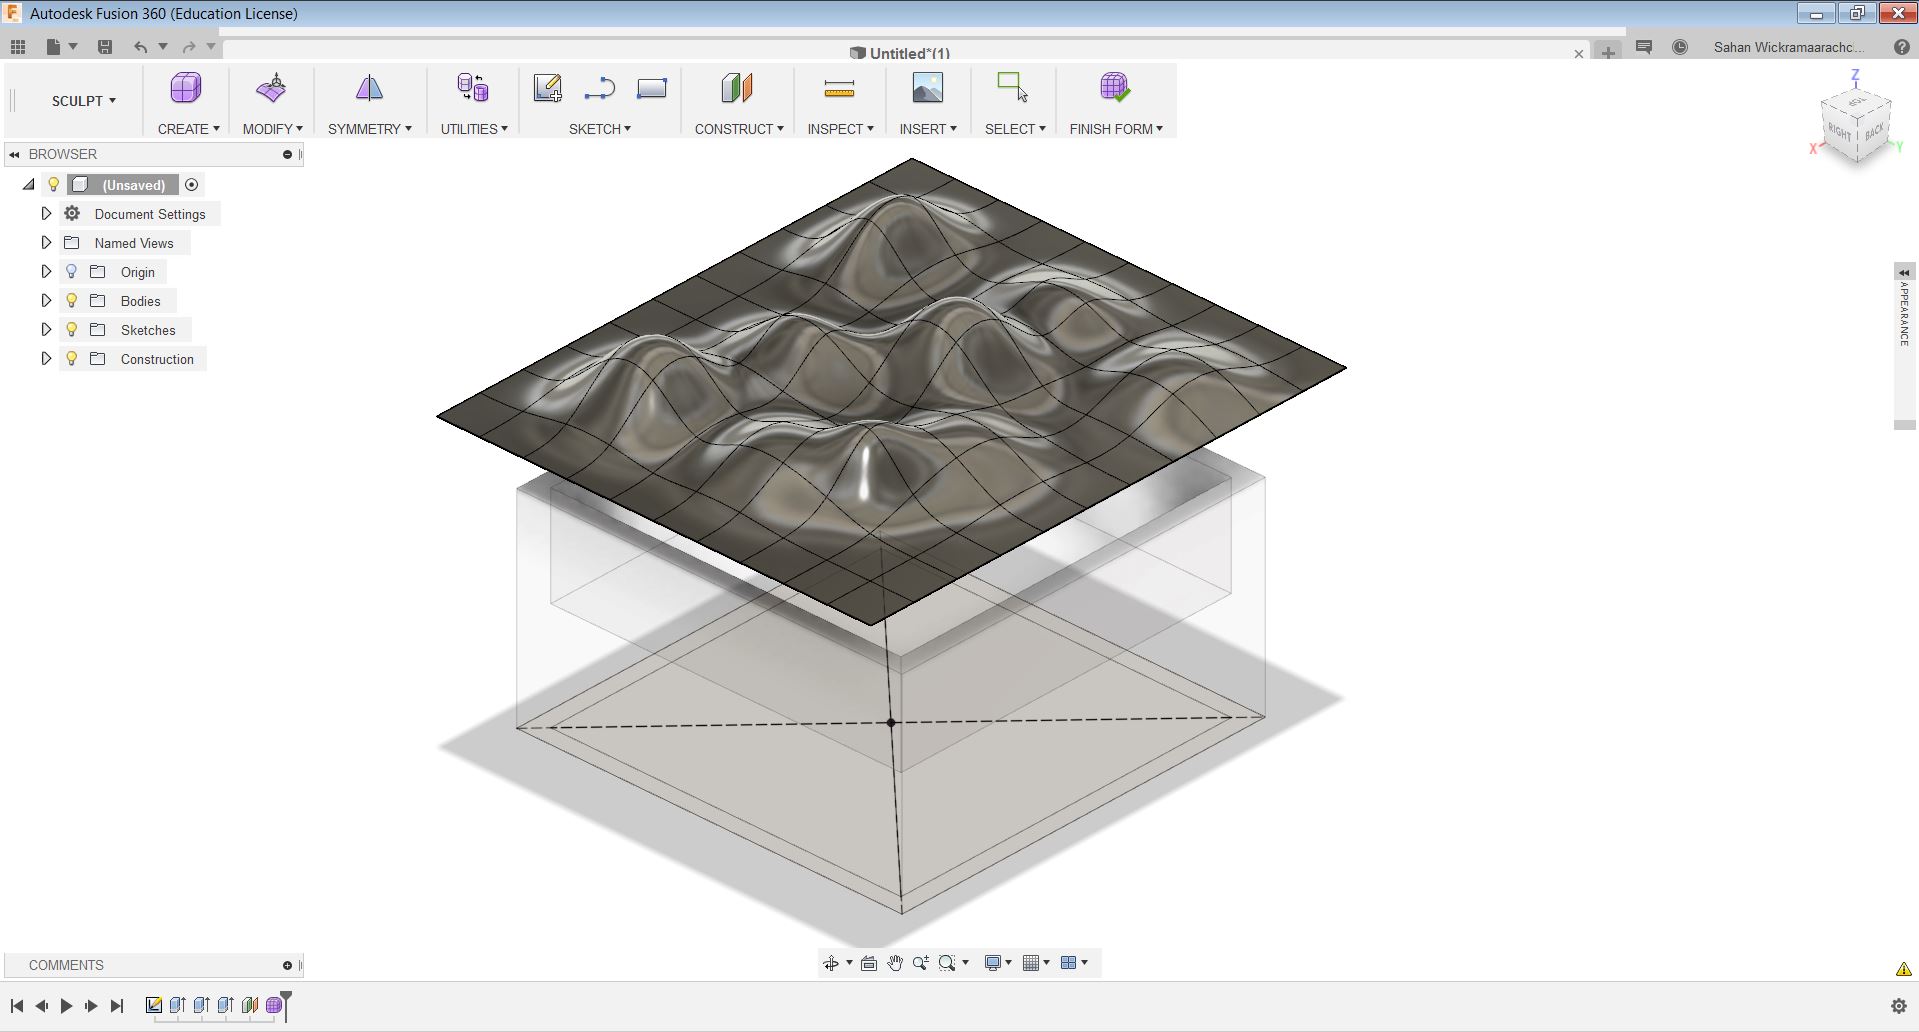
Then I merged the two layers and deleted extra amount by simpling selecting that and pressing delete.
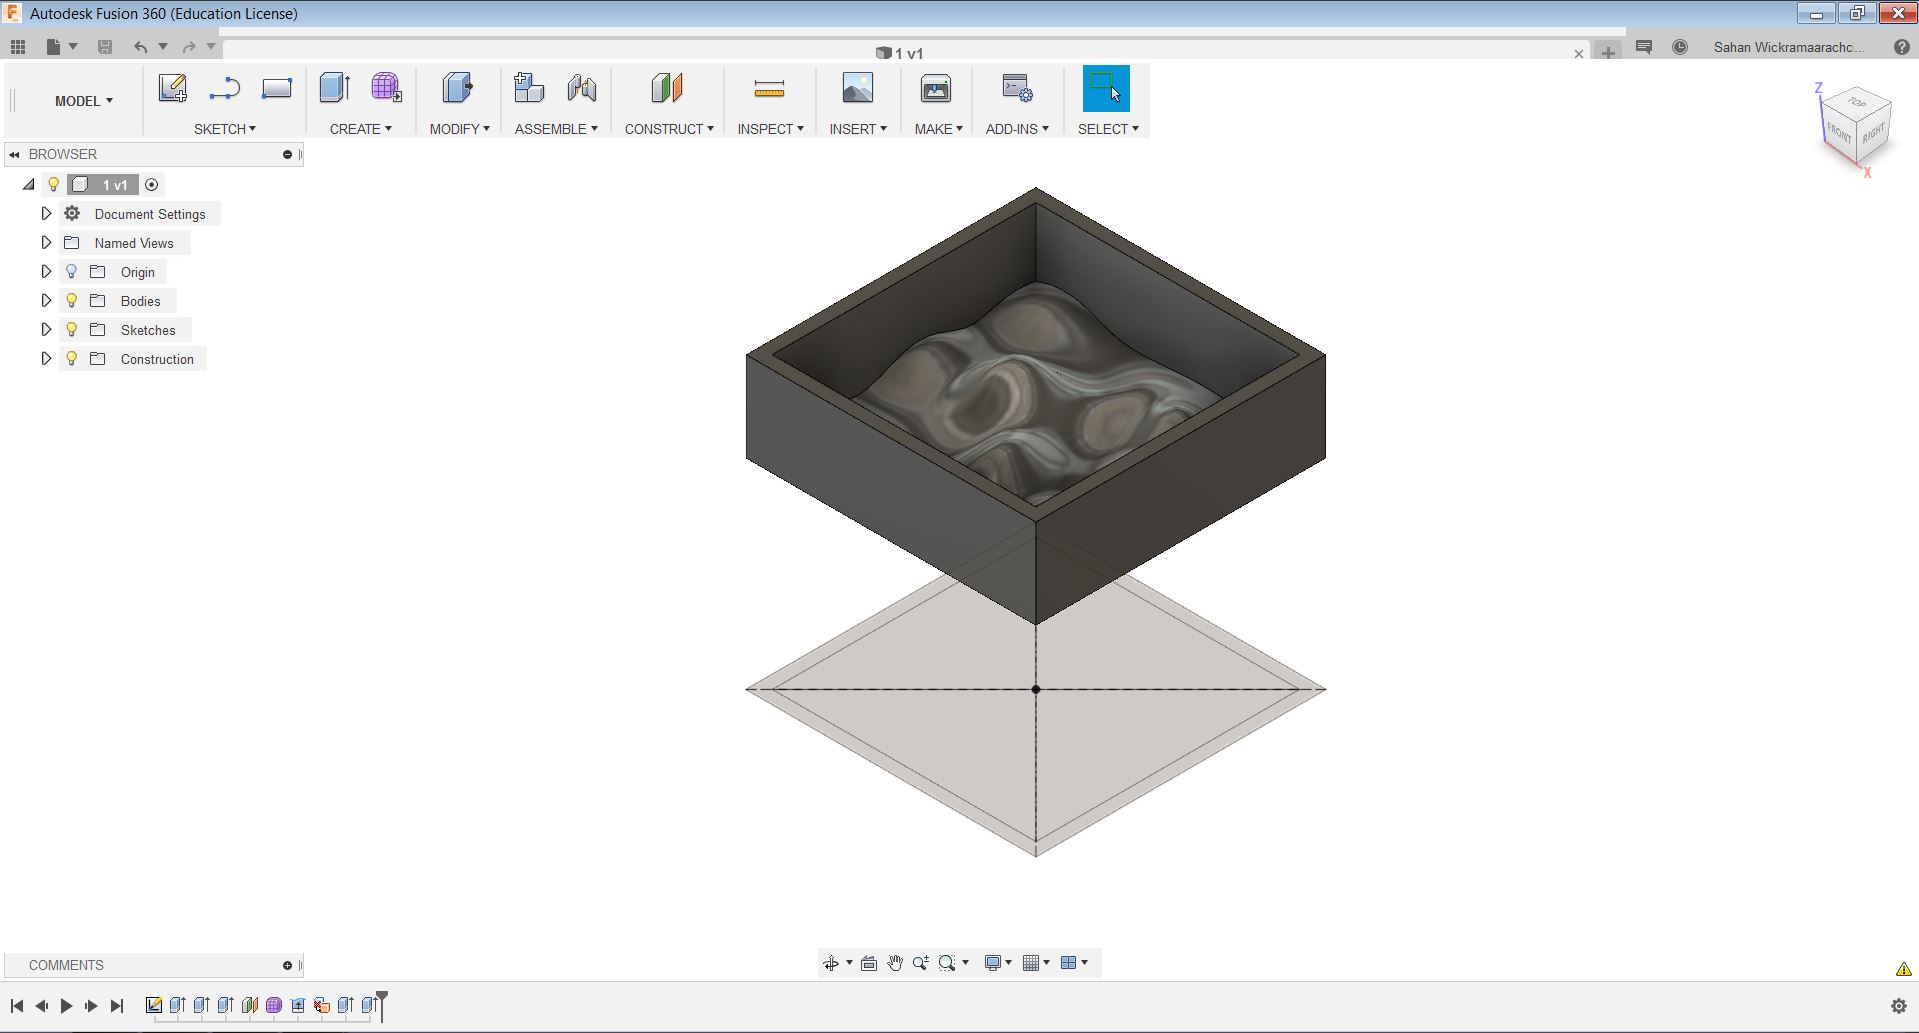
Then I exported the model as an stl file.
Milling the mold
To create the toolpath , I used Modela software. I used 3.18mm flat milling bit to rough cut the wax stock and the 1.5 Ball bit 'to finish cut the model. Opened up the .stl file I made with Fusion, and started with Set -> model. First set up the model so it is facing the right way, by selecting the top surface and/or rotating the model and then changed the origin to match the milling machine origin point, which is the front left corner. I changed material to modeling wax. From Modeling Form remove margins if there exist any.
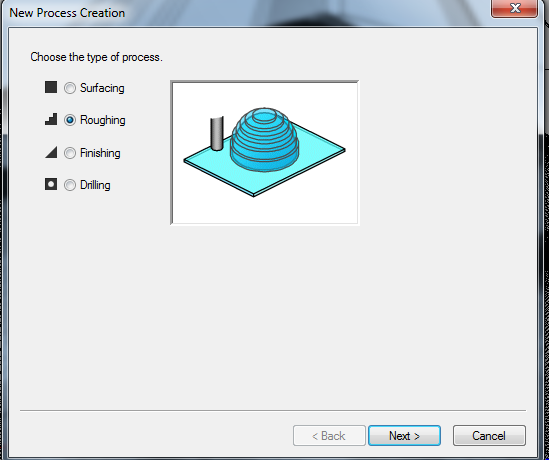
First select roughing opriong from the New process creation window.
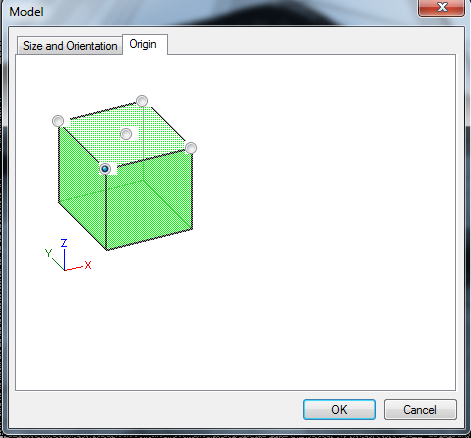
select the origin point from the next origin window
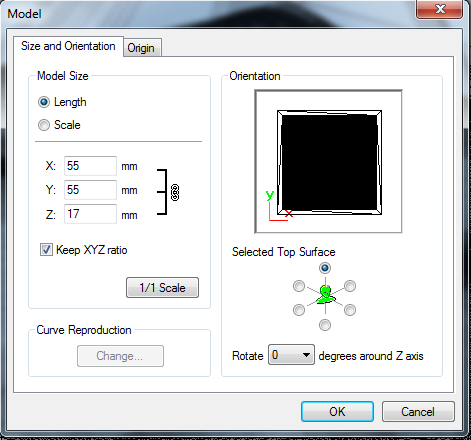
check the orientation of the model.
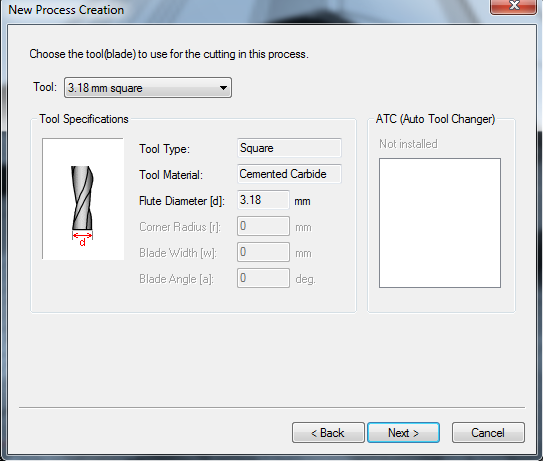
choose the correct tool from the menu.
From the new process, select finishing. Then go with defaults except change path type to Contour Lines and tool selection to 3.18mm flat. Accept, and tool path is generated.
For the finishing, cut follow the same process with the changed tool as 1.5 ball bit and the path scan lines as x+y.
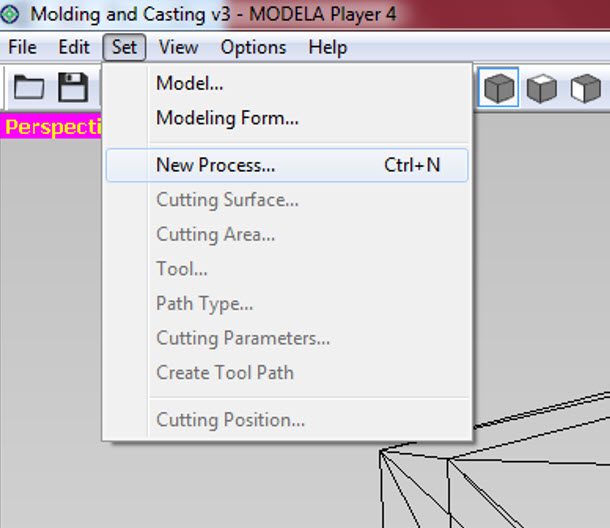
select set>new process
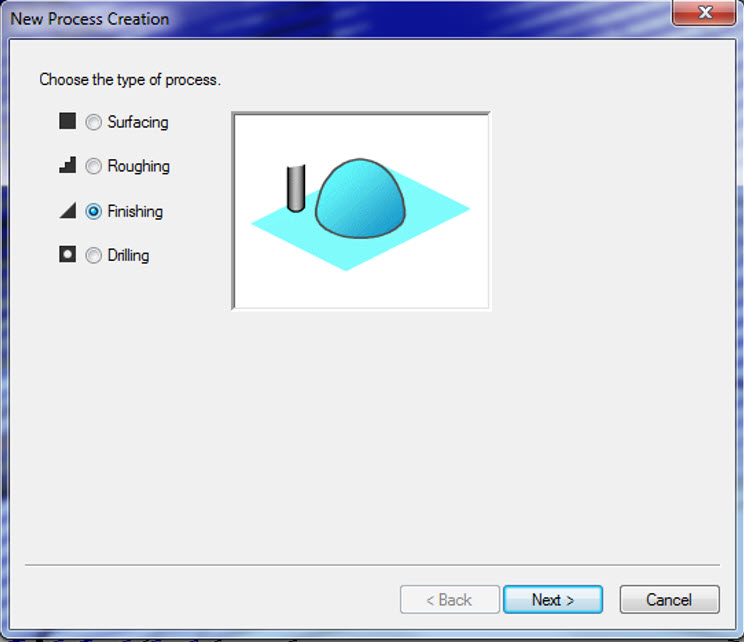
select finishing
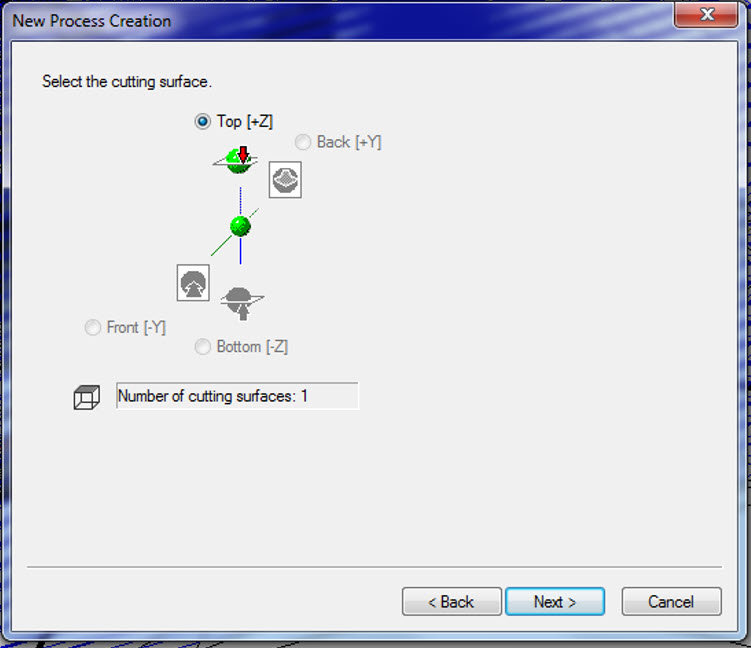
select the correct cutting surface
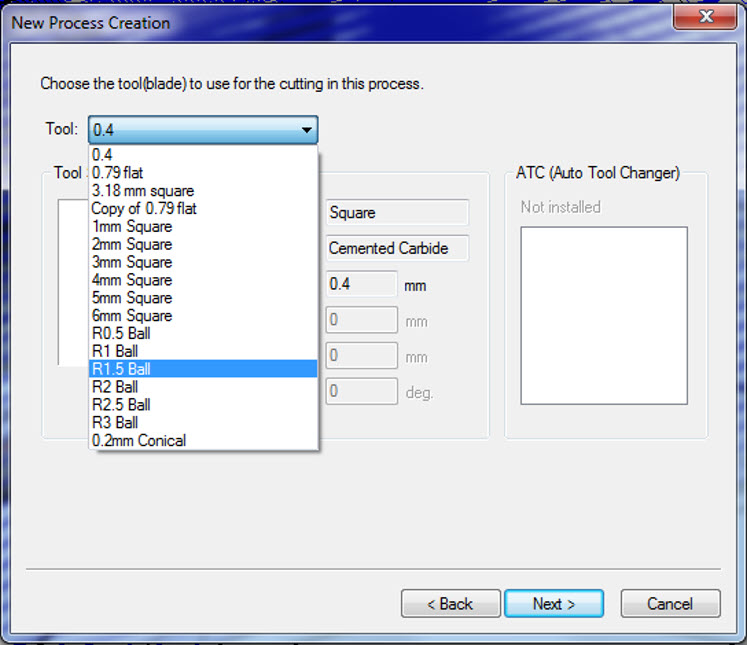
select the correct tool from the dropdown menu.R1.5ball bit is the correct one in this case
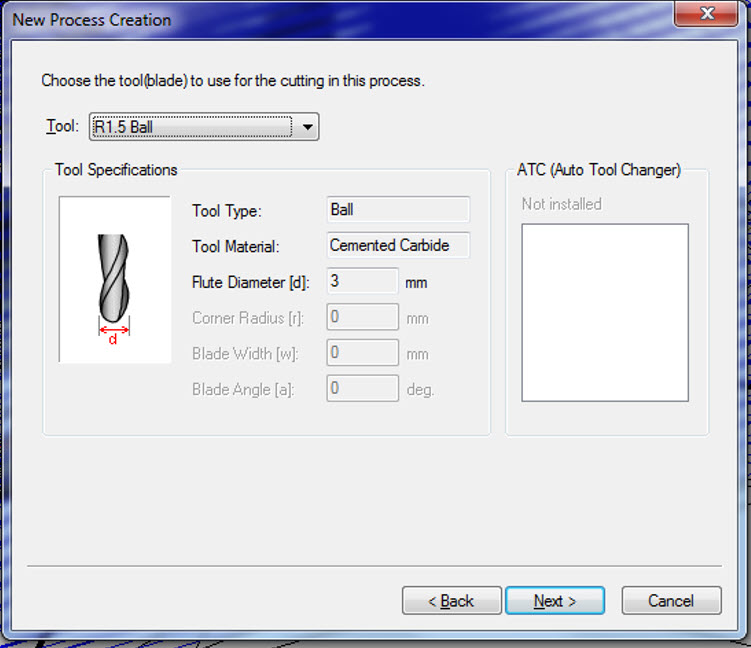
check the dimentions of the tool again
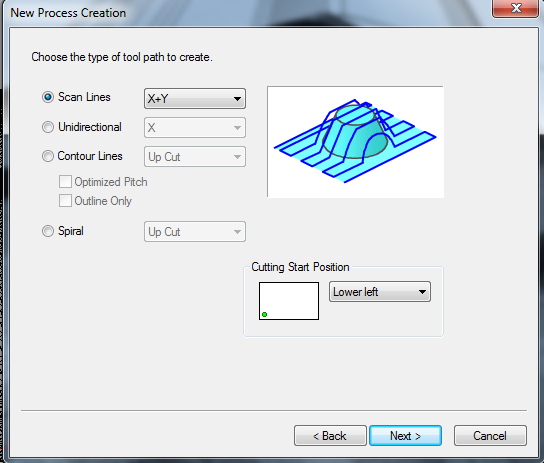
select the scan lines as x+y
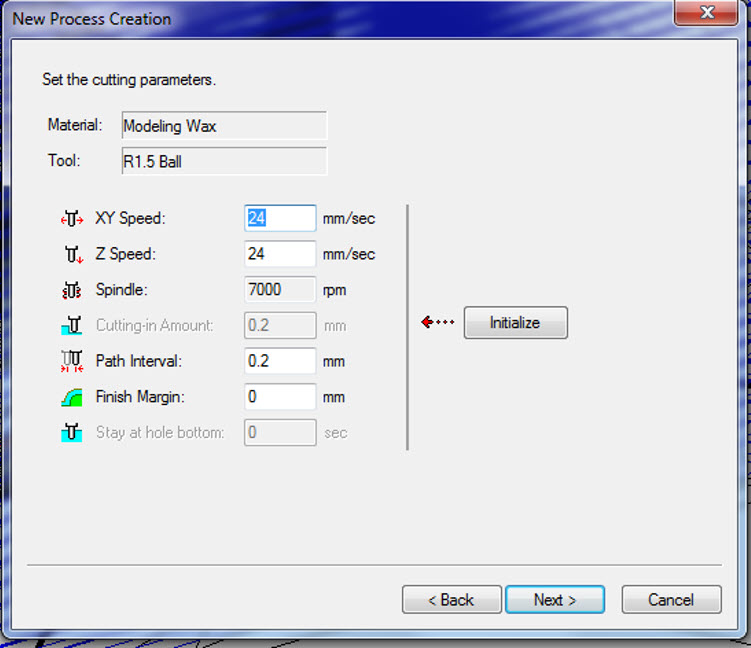
set the cutting xy speed

create a process name
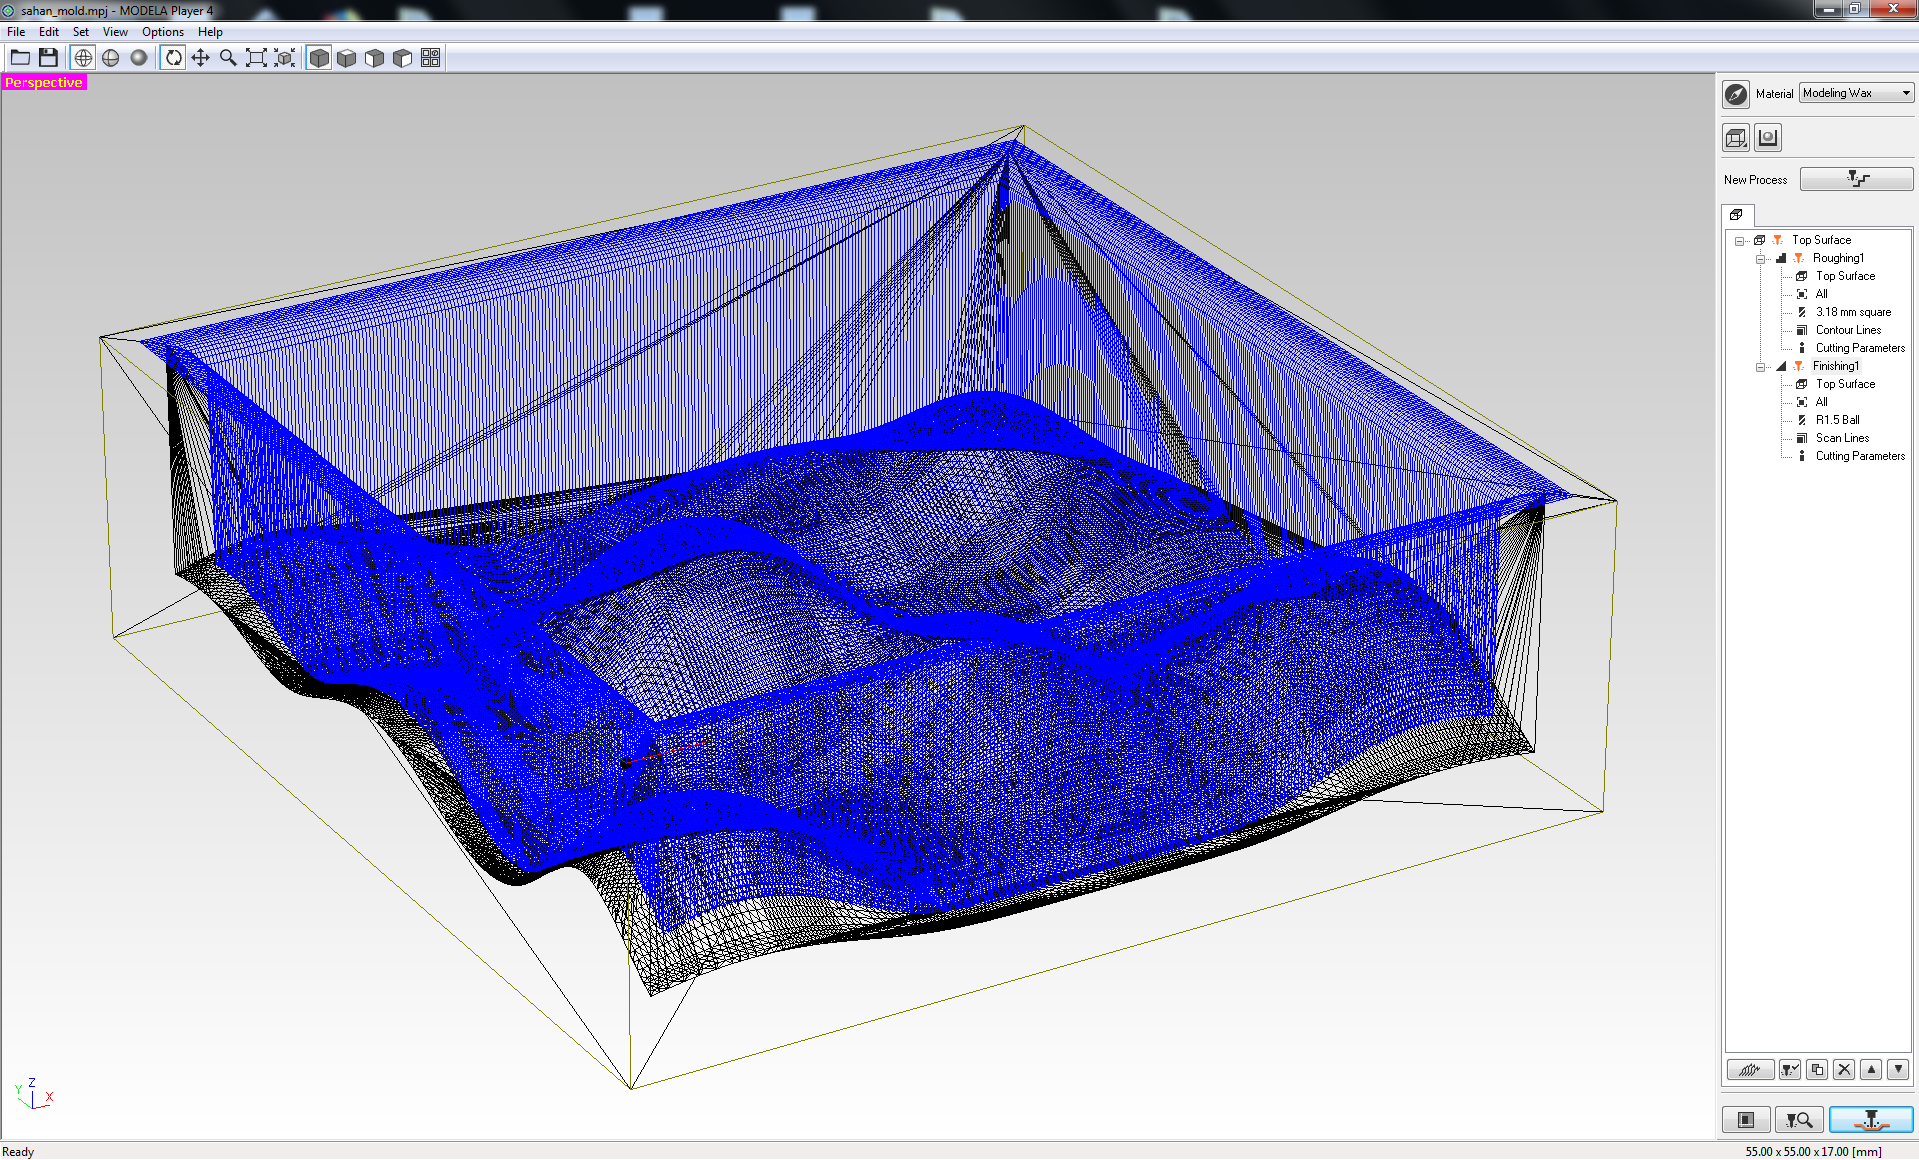
Final cut was really smooth
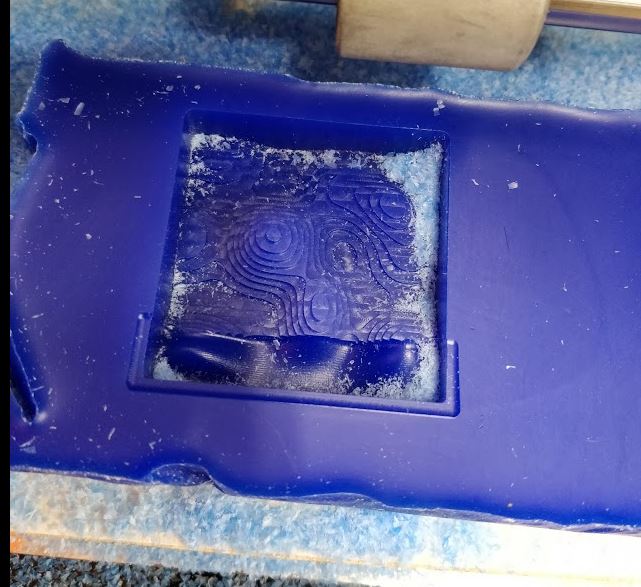
Molding
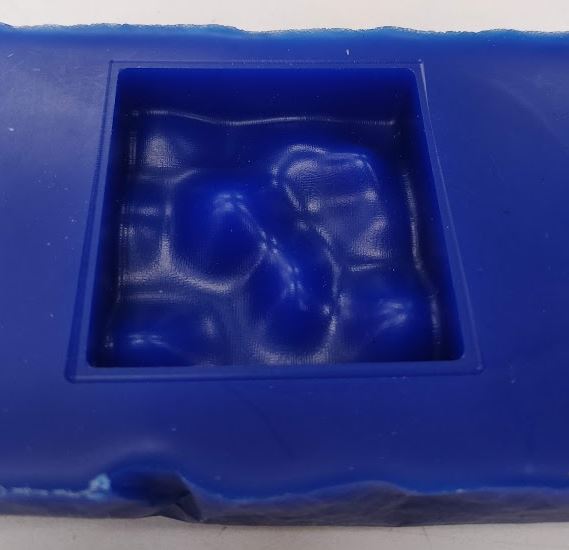
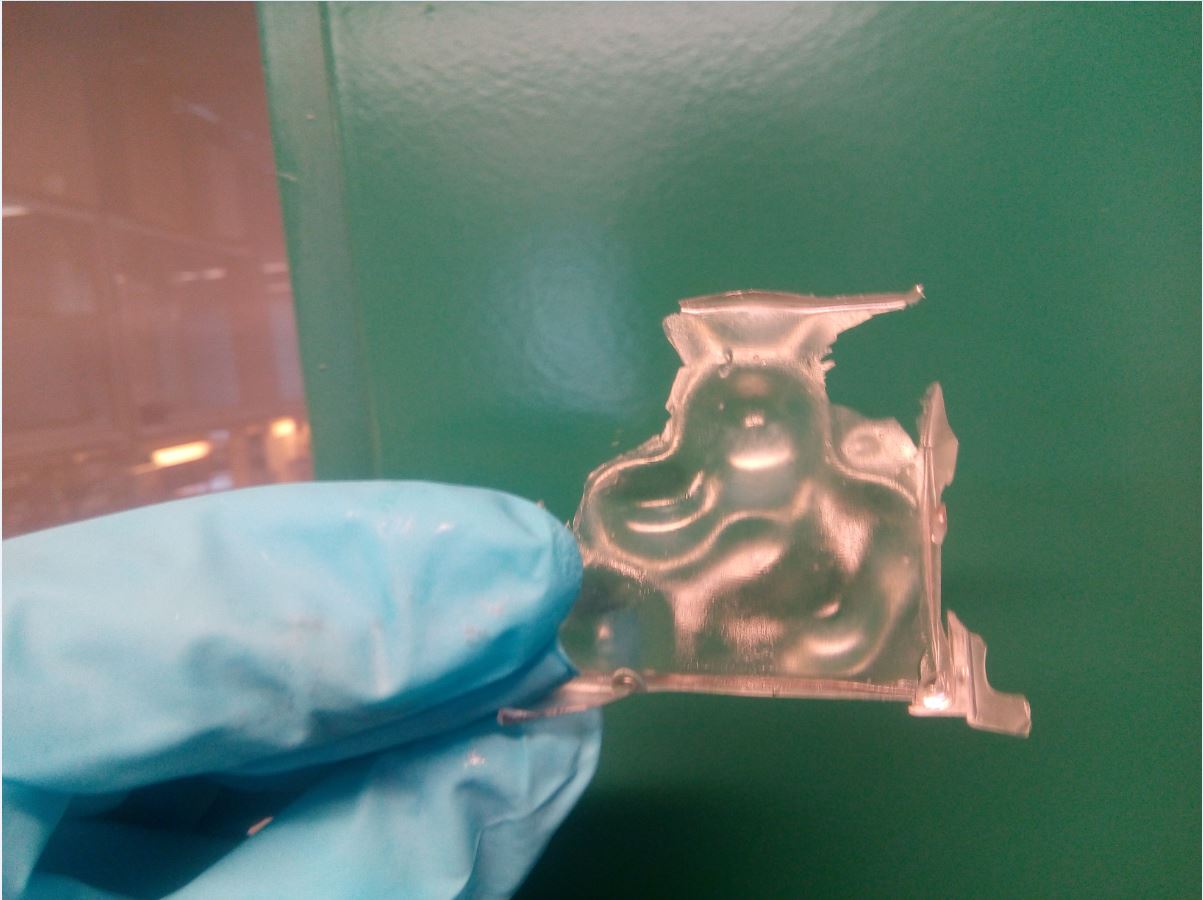
I used the Oomoo 30 to make the mold. It has Pot life: 30 minutes Curing time: 6 hours To prepare the silicone, it is necessary to mix the content of two different bottles. I decided to mix by weight which is 10:13 by A: B bottles.

Then I used the vacuum former to reduce the bubbles as much as possible after mixing it properly. It's good to keep an eye on curing. I left the mixture in vacuum for about 15 minutes.
I slowly poured the silicone on the lowest point of the wax mold and let it flow to the entire mold and to the top of the surface. After 6 hours I took the silicone mold.
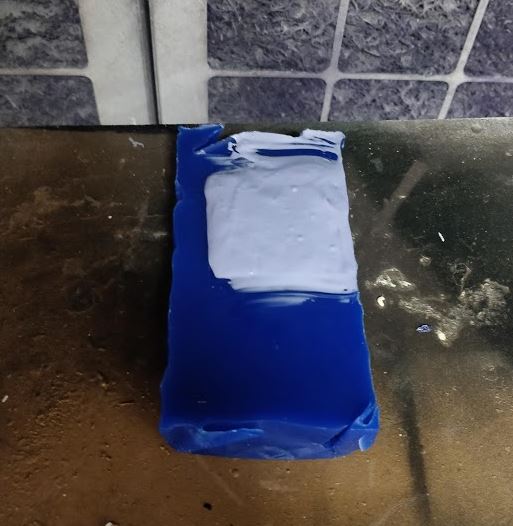
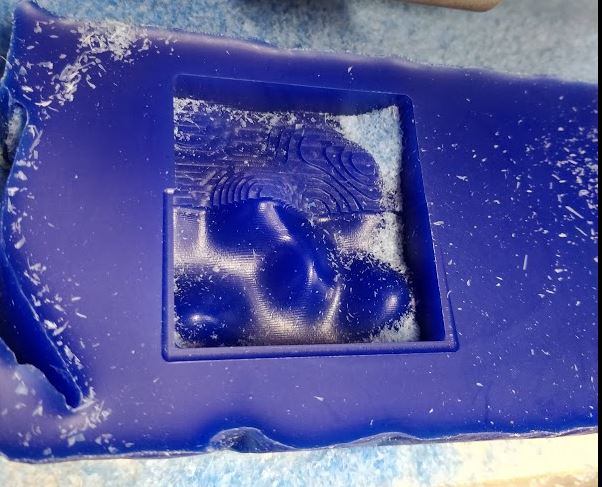
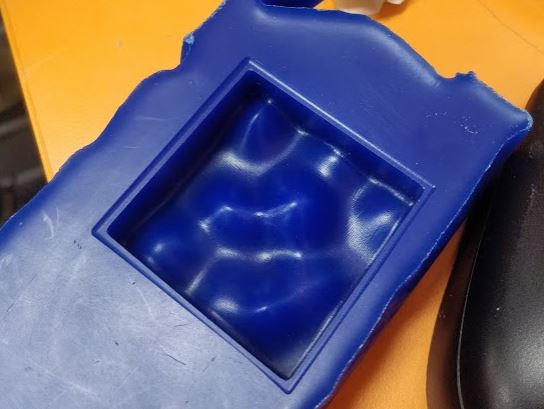
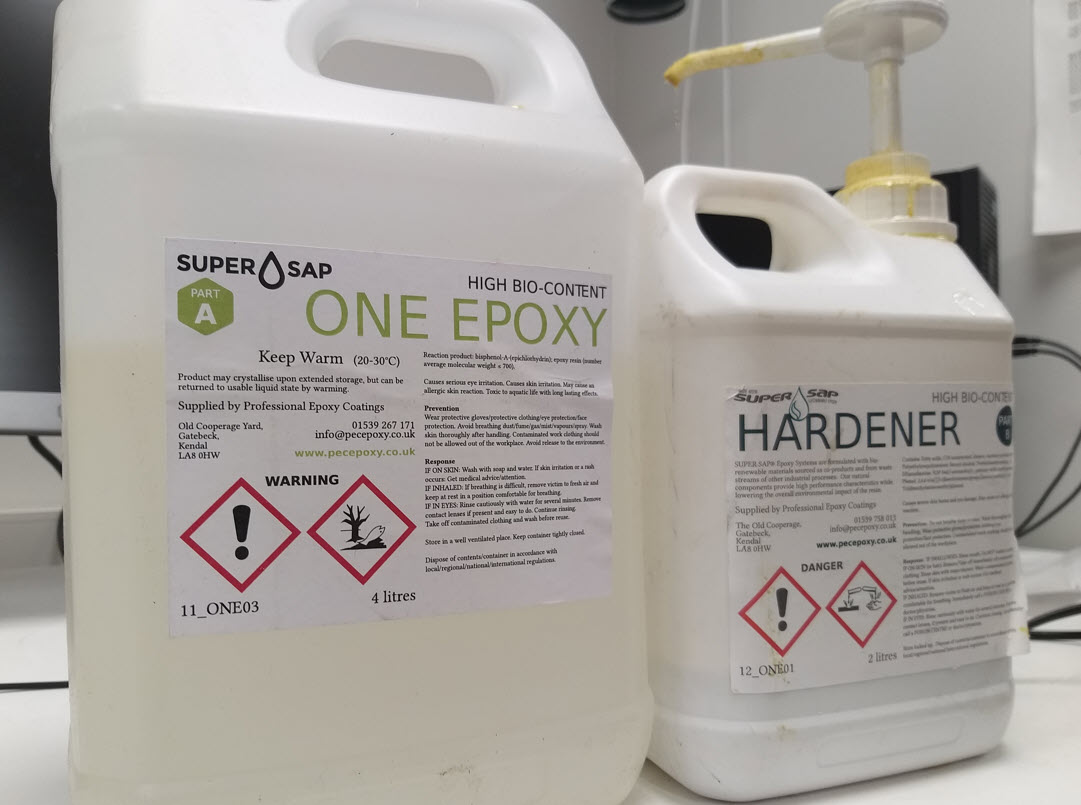
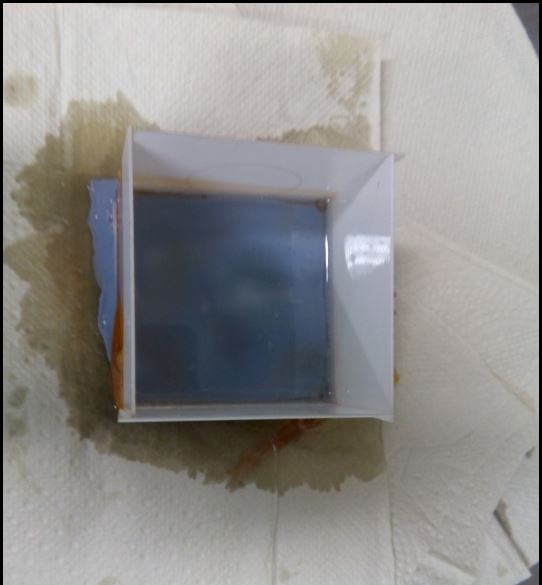
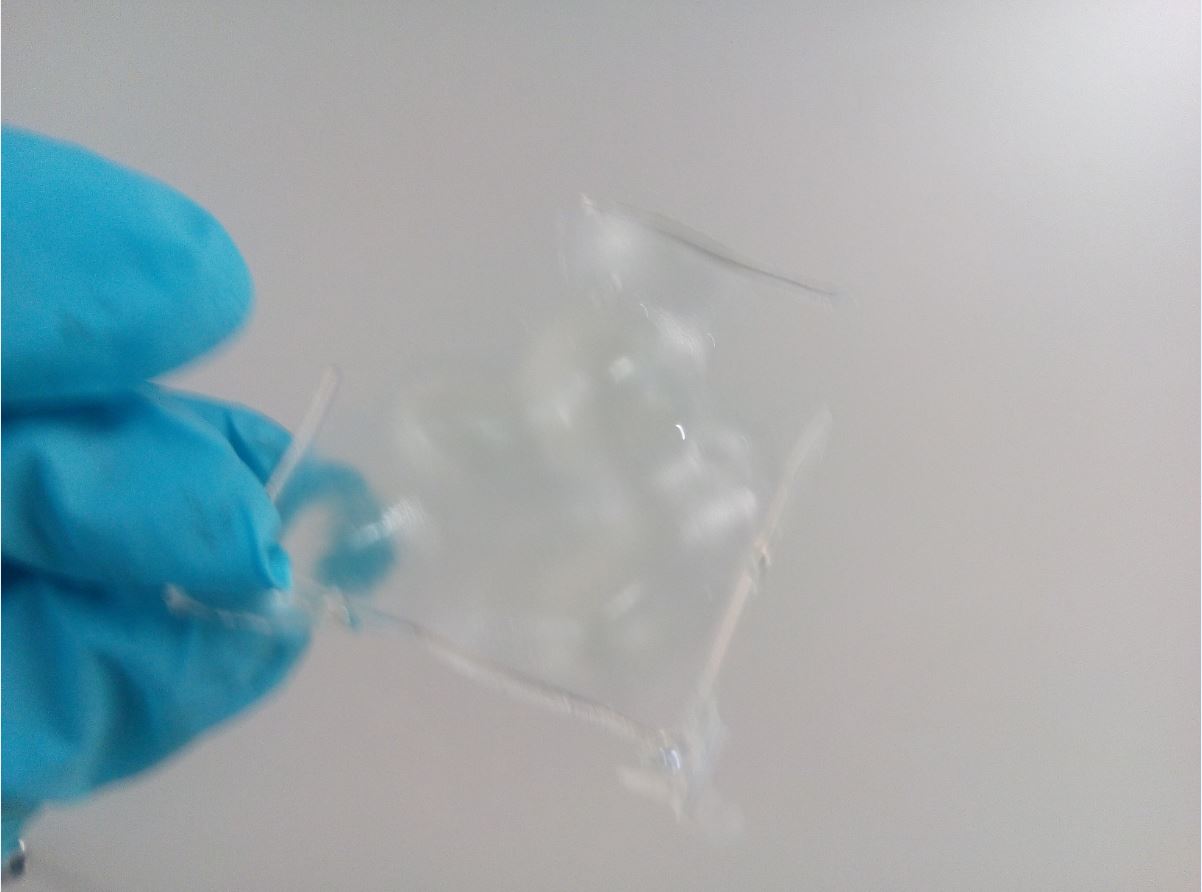
After the making the sillicone mold I decided to cast using Epoxy. I had to cover my mold on four sides because the it was not designed properly. I decided to use clear epoxy and hardener with a weight ratio of 25:5, pot time is 30 min and curing is 8 hrs. It generally doesn’t require wearing a respirator mask and tends to be the most forgiving of environmental factors, such as humidity. I also like that epoxy resin generally has the longer pot time, so it’s great for beginners that are still fumbling and getting used to working with resin.
Reflection
There were several mistakes I have done in this week. To begin with, the design of the mold was incorrect. I should have made a double-sided mold to overcome the design issue. Moreover, It is visible from the Oomo mold that there are air bubbles trapped inside. I should have used the vacuum generator to remove the air bubbles when it is in the mold as well. Finally, all the above factors caused to get an incomplete cast. If I were to do the casting again using the same mold, I could use a laser cut box to overcome to missing walls of the design or else I have to create a double-sided mold.
Models files
F3d fileof the design