wk.15-Interface & application programming
Firstly... making the connections

I decide how in the networking assignment, work with the fabunalduino or local arduino, because i used or created an interface in processing software, because arduino is perfectly compatible with this interface, and also because my interface in processing is a little program that read and send music data for light the LED line. for this also I decided work with the same board of the networking assignment, because this have the line LED and the male connectors, necessary to send the music data of the fabduino to the board .My work is based in the work of two people , the first in the project of Diana Lange, for how save the music data in a text file, and second in the project of Scott C, by how reading text file in arduino IDE.
I decide how in the networking assignment, work with the fabunalduino or local arduino, because i used or created an interface in processing software, because arduino is perfectly compatible with this interface, and also because my interface in processing is a little program that read and send music data for light the LED line. My work is based in the work of two people , the first in the project of Diana Lange, for how save the music data in a text file, and second in the project of Scott C, by how reading text file in arduino IDE.
Creating & Loading... my own code in the arduino IDE
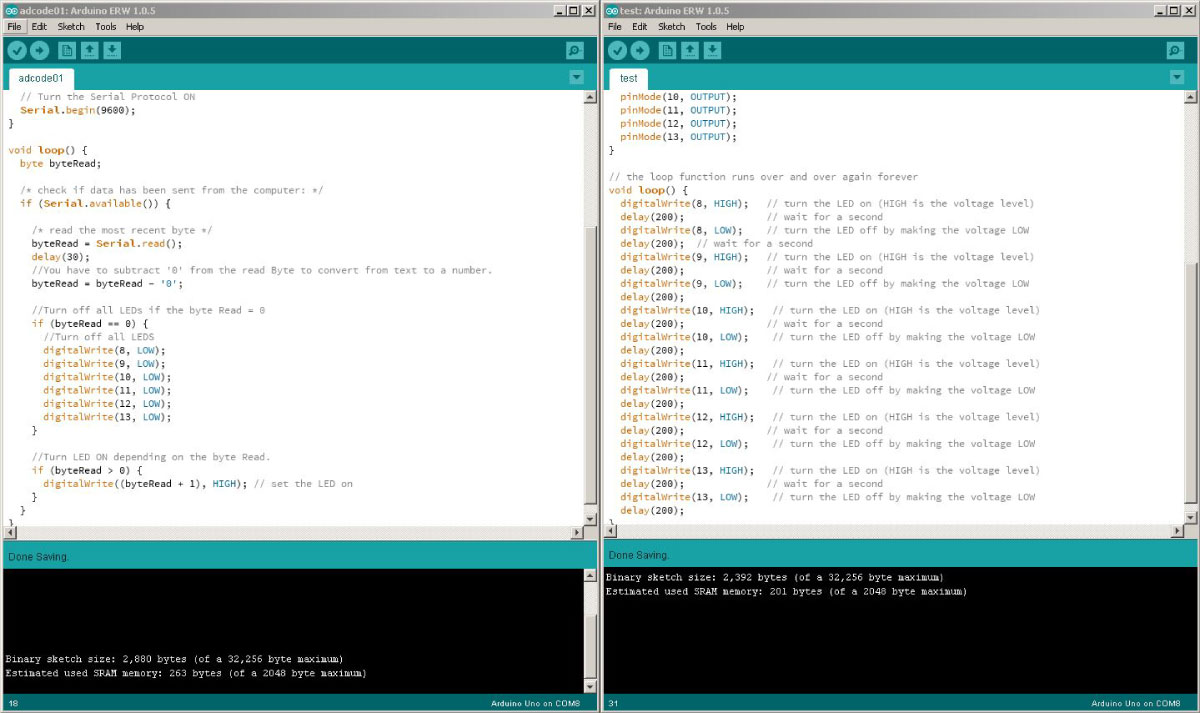
After of look my "concept referents", I wrote a test code for the test of my leds circuits (right window), after this i begin to develop the fabunalduino code in the arduino IDE, this using the serial communications protocols, where the program will read the .txt file with the music data.
void setup() {
  // initialize digital pin 13 as an output.
  pinMode(8, OUTPUT);
  pinMode(9, OUTPUT);
  pinMode(10, OUTPUT);
  pinMode(11, OUTPUT);
  pinMode(12, OUTPUT);
  pinMode(13, OUTPUT);
}

// the loop function runs over and over again forever
void loop() {
  digitalWrite(8, HIGH);   // turn the LED on (HIGH is the voltage level)
  delay(200);              // wait for a second
  digitalWrite(8, LOW);    // turn the LED off by making the voltage LOW
  delay(200);  // wait for a second
  digitalWrite(9, HIGH);   // turn the LED on (HIGH is the voltage level)
  delay(200);              // wait for a second
  digitalWrite(9, LOW);    // turn the LED off by making the voltage LOW
  delay(200);
  digitalWrite(10, HIGH);   // turn the LED on (HIGH is the voltage level)
  delay(200);              // wait for a second
  digitalWrite(10, LOW);    // turn the LED off by making the voltage LOW
  delay(200);
  digitalWrite(11, HIGH);   // turn the LED on (HIGH is the voltage level)
  delay(200);              // wait for a second
  digitalWrite(11, LOW);    // turn the LED off by making the voltage LOW
  delay(200);
  digitalWrite(12, HIGH);   // turn the LED on (HIGH is the voltage level)
  delay(200);              // wait for a second
  digitalWrite(12, LOW);    // turn the LED off by making the voltage LOW
  delay(200);
  digitalWrite(13, HIGH);   // turn the LED on (HIGH is the voltage level)
  delay(200);              // wait for a second
  digitalWrite(13, LOW);    // turn the LED off by making the voltage LOW
  delay(200);
}
#include/* This program was created by ScottC on 8/5/2012 to receive serial signals from a computer to turn on/off 1-9 LEDs */ void setup() { // initialize the digital pins as an output. pinMode(8, OUTPUT); pinMode(9, OUTPUT); pinMode(10, OUTPUT); //pinMode(10, OUTPUT); // Turn the Serial Protocol ON Serial.begin(9600); } void loop() { byte byteRead; /* check if data has been sent from the computer: */ if (Serial.available()) { /* read the most recent byte */ byteRead = Serial.read(); delay(30); //You have to subtract '0' from the read Byte to convert from text to a number. byteRead = byteRead - '0'; //Turn off all LEDs if the byte Read = 0 if (byteRead == 0) { //Turn off all LEDS digitalWrite(8, LOW); digitalWrite(9, LOW); digitalWrite(10, LOW); } //Turn LED ON depending on the byte Read. if (byteRead > 0) { digitalWrite((byteRead + 1), HIGH); // set the LED on } } }
Processing code

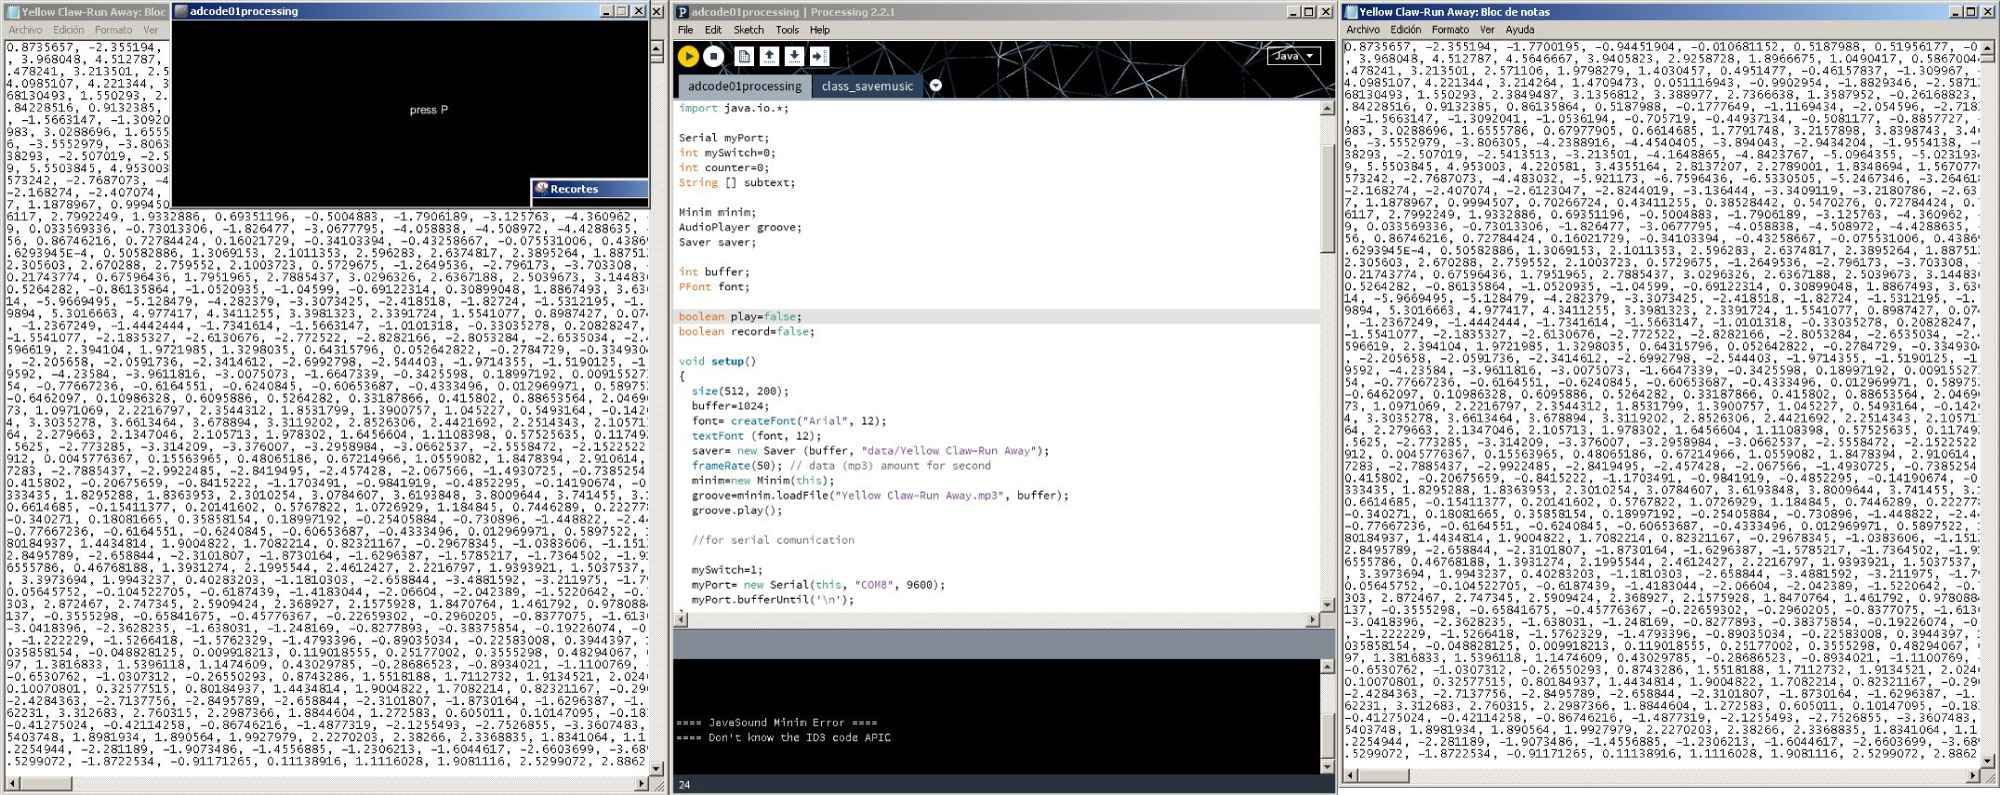
How the i say previously, now i created my code in the processing interface, where the program functions in a simple way, I created a window of 512 for 200 pixels that everything happens, first you must press "R or r" for start the reading .mp3 file, after the window show the save process, and finally you must press "P or p" for activate or send the music data to arduino or in my case to fabunalduino. (is important several things, you must define the usb port or board com, also is necessary load the .mp3 files in processing in the menu bar "sketch-add file").
//display music with this code
//code reference of the Diana Lange

import ddf.minim.*;
import processing.serial.*;
import java.io.*;

Serial myPort;
int mySwitch=0;
int counter=0;
String [] subtext;

Minim minim;
AudioPlayer groove;
Saver saver;

int buffer;
PFont font;

boolean play=false;
boolean record=false;

void setup()
{
  size(512, 200);
  buffer=1024;
  font= createFont("Arial", 12);
  textFont (font, 12);
  saver= new Saver (buffer, "data/Yellow Claw-Run Away"); // File place save
  frameRate(50); // data (mp3) amount for second
  minim=new Minim(this);
  groove=minim.loadFile("Yellow Claw-Run Away.mp3", buffer);//name the .mp3 file
  groove.play();

  //for serial comunication

  mySwitch=1;
  myPort= new Serial(this, "COM8", 9600);
  myPort.bufferUntil('\n');
}
void draw()
{
  background(0);

  if (record)
  {
    saveMusicData();
  } else if (play)
  {
    sendMusicData();
  } else {
    text("press R", width/2, height/2);
  }
}


void keyPressed()
{
  if (key=='r' || key=='R')
  {
    record=true;
    play=false;
  } else if (key=='p' || key=='P')
  {
    record=false;
    play=true;
  }
}

void saveMusicData()
{
  if (groove.isPlaying())
  {
    fill (247);
    text ("Saving music," + " Current frame: " + str(frameCount), 20, 20);
    stroke (247);
    for (int i= 0; i < groove.bufferSize (); i++)
    {
      int x= i*width/groove.bufferSize();
      float y=(groove.left.get(i)+groove.right.get(i))*25; // the music data
      point (x, y+height/2);
      saver.setElement(y);
    }
    saver.increaseLength();
  } else
  {
    saver.saveData();
  }
}
void sendMusicData()
{
  if (mySwitch>0)
  {
    readData("D:/ad/fabacademy/wk15/adcode01processing/data/Yellow Claw-Run Away.txt");
    mySwitch=0;
  }
  if (counter < subtext.length)
  {
    myPort.write(subtext[counter]);
    delay(50);
    myPort.write('0');
    delay(50);
    counter++;
  } else
  {
    delay(50);
    mySwitch=1;
  }
}
void readData(String myFileName)
{
  File file=new File(myFileName);
  BufferedReader br=null;
  try {
    br=new BufferedReader(new FileReader(file));
    String text=null;

    while ( (text=br.readLine ())!=null) {
      subtext = splitTokens(text, ",");
    }
  }
  catch(FileNotFoundException e) {
    e.printStackTrace();
  }
  catch(IOException e) {
    e.printStackTrace();
  }
  finally {
    try {
      if (br != null) {
        br.close();
      }
    }
    catch (IOException e) {
      e.printStackTrace();
    }
  }
}

void stop()
{
  groove.close();
  minim.stop();
  super.stop();
}
Text file "music data" resulting and sending process.
This is the result of the reading of the music data, where the program to interpreted and compiled the music information in a series numbers.
In general... How system work
The system work in two steps, the first with the processing code for the save a .txt file with several data number of the .mp3 files (you choose the .mp3 track), for this step the program asks you press R to run the recording, after the program ask you press P to run the sending the data to the fabduino,and in my case to my networking board , because also i work with this for this assigment (but for this process is necessary as mentioned previously load the code done in the arduino IDE in the local fabduino), but in order of explain better the process this is the steps list of the how run and works the interface:
Final interface (saving music data)
Final interface (sending music data)
For testing my program, I worked with the same board used in the networking assignment, because this have the optimal connections system (LED to AVRISP SMD - 2X03SMD) for receiving the music data text file, generating in the processing interface.