12. Interface and Application Programming
Assignment
Individual assignment 1 :
Write an application that interfaces a user with an input &/or output device that you made
Group assignment:
Compare as many tool options as possible
Group assignment
Group:
● - Xinhui Hu
● - Zhengya Gong
● - Yazan Barhoush
● - Noora Nyberg
The detail of group assignment
Group assignment:
Because I used processing for my weekly assignment, I try to explain how to text “Hello, World” in processing.
What is Processing? Processing is a flexible software sketchbook and a language for learning how to code within the context of the visual arts. Since 2001, Processing has promoted software literacy within the visual arts and visual literacy within technology. There are tens of thousands of students, artists, designers, researchers, and hobbyists who use Processing for learning and prototyping.
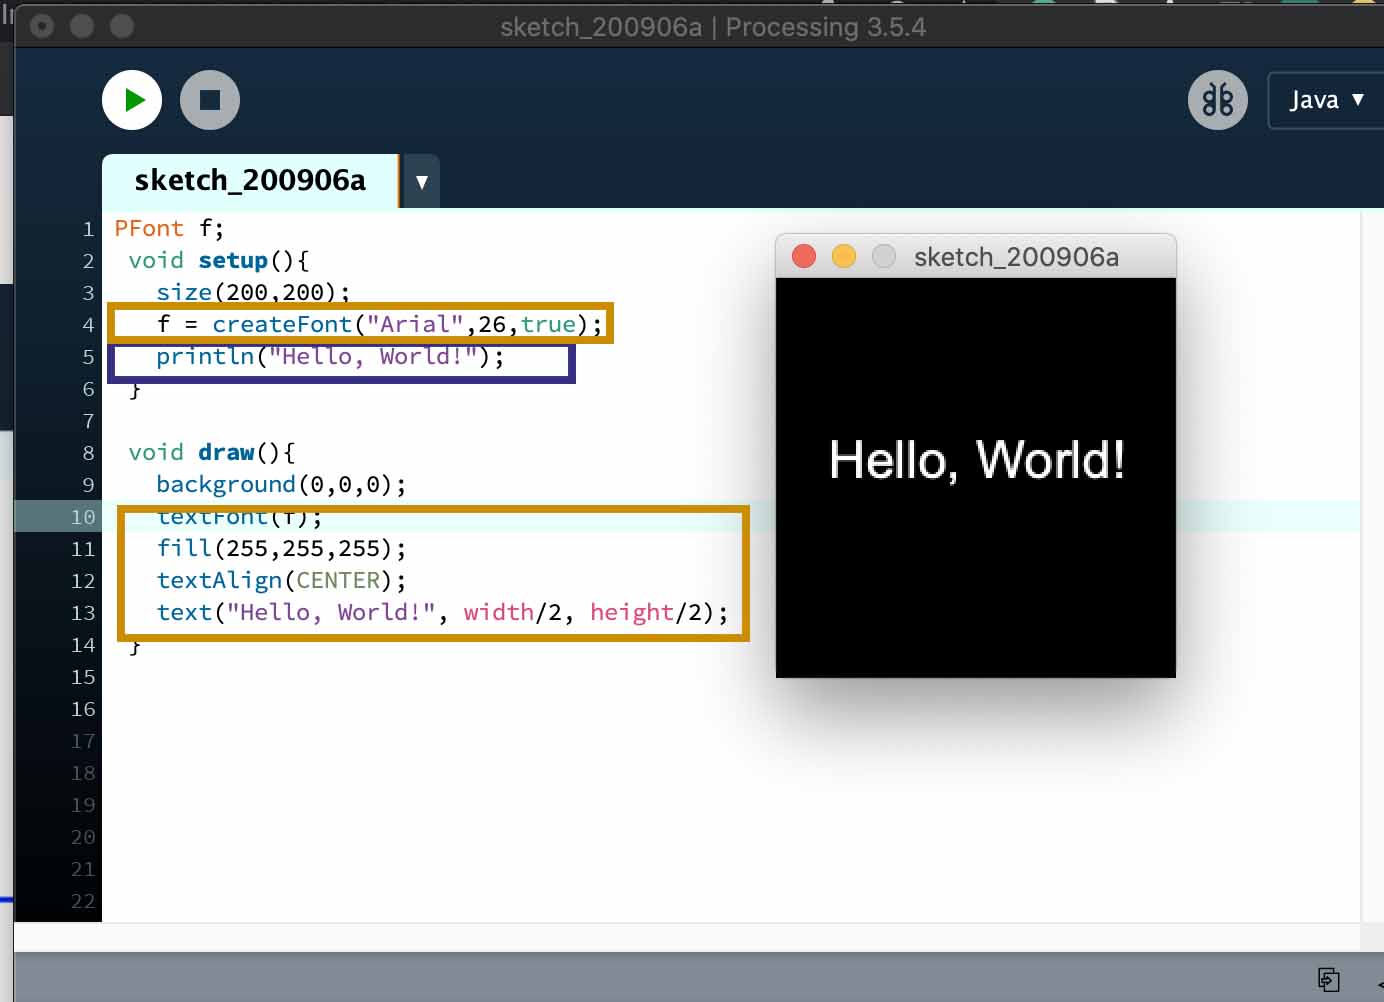
In this example I have showed how to print “Hello world!” in the console (used for testing purposes, e.g. error-messages) and how to print it on a window. Window is created with size(x,y) and it’s background is set as (0,0,0)(black).
Marked with blue squares on picture above is two ways to print on text on the console. Less useful way to print it is to put it under the Setup-section of the code. This will print it only once when the software is launched. Another way is to put it under the Draw-section. This will print it in every loop. Useful case would be inside an if-sentence to see that the code actually works properly. I put it inside comment (//) for this example because without if-sentence it activates it in every loop which means that it spams it.
Marked with orange squares on the picture above is the way to print “Hello world!” on the window. This took few more lines compared to printing only on the console. First declaring Font and then creating the font. In the draw()-section I had to specify which font is used, it’s fill color, text aligning and finally calling the text()-function. Text has 3 arguments which are displayed text, X- and Y-coordinate. In my case I just used width/2 and height/2 to center it near middle.
PFont f;
 void setup(){
   size(200,200);
   f = createFont("Arial",26,true);
   println("Hello, World!");
 }

 void draw(){
   background(0,0,0);
   textFont(f);
   fill(255,255,255);
   textAlign(CENTER);
   text("Hello, World!", width/2, height/2);
 }
Individual assignment:
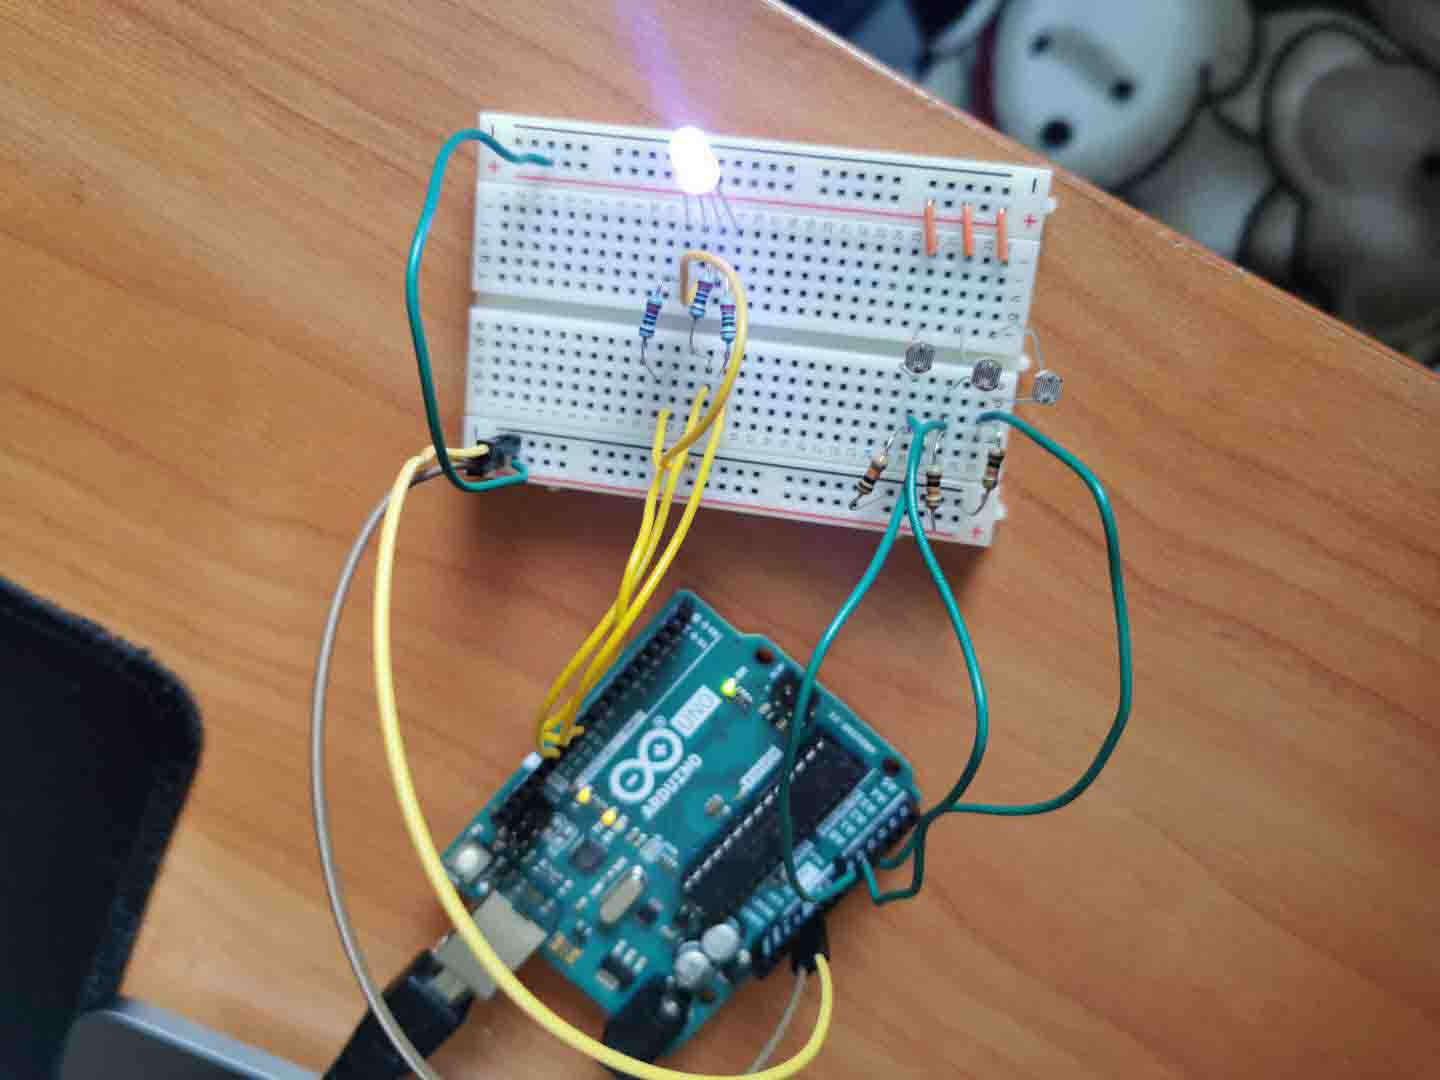
This week I used the RGB Led created a lamp that changes colors according to the color of mouse’s position in the image with Arduino and Processing.
● Step1. Prepare the components.
RGB LED 1
220 OHM RESISTOR 3
ARDUINO UNO BOARD 1
WIRING 5
● Step2. Build the circuit.
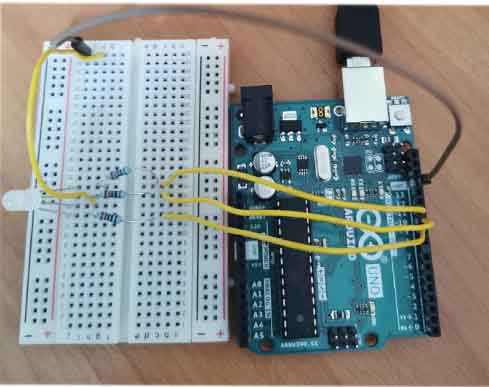
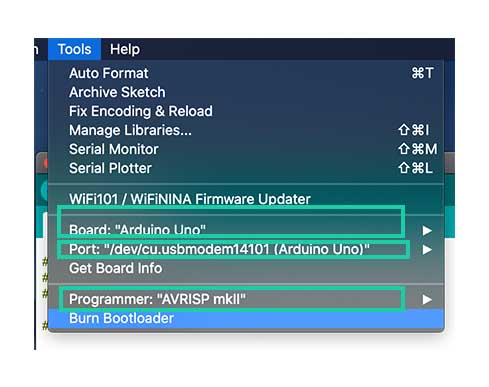
● Step3. Connect to my laptop. I used the USB cable to connect the Arduino board to my laptop. I opened the Arduino IDE and set all settings as shown in the tool.
● Step4. Programming with Arduino and Processing.
I downloaded the code from - GitHub,and edited it according to my work, and defined the RED_PIN= 9, BLUE_PIN= 10, and GREEN_PIN= 11, also install it in Arduino.
#define RED_PIN     9
#define BLUE_PIN    10
#define GREEN_PIN   11

#define NUM_BYTES   3

char led_color[NUM_BYTES] = {0, };
unsigned char R, G, B;

void RGB(unsigned char r, unsigned char g, unsigned char b) {
  analogWrite(RED_PIN, r);
  analogWrite(BLUE_PIN, b);
  analogWrite(GREEN_PIN, g);
}

void setup() {
  // put  setup code here, to run once:
  Serial.begin(9600);

// start serial communication at 9600bps, Serial.begin() means I used serial communication.
}

void loop() {
  // put  main code here, to run repeatedly:

    while(Serial.available() == 0);

// Get the number of bytes (characters) available for reading from the serial port. This is data that’s already arrived and stored in the serial receive buffer (which holds 64 bytes).

    Serial.readBytes(led_color, NUM_BYTES);//reads characters from the serial port into a buffer.

    R = (unsigned char)(led_color[0]);
    G = (unsigned char)(led_color[1]);
    B = (unsigned char)(led_color[2]);

//unsigned chars, means I sent 3 bytes: one with the R value, other with the G value and other with the B value.

    RGB(R, G, B);

}
I use asynchronous serial communication for sending data between processing and Arduino. It basically send the bytes of data of the colors taking from the processing to the Arduino and then Arduino decode these values and sending this combination to RGB led pins. So basically It works as a byte by byte values of Red, green and blue color through asynchronous communication to RGB LED.
Then the RGB led is working. By searching the code, I got a better understanding, like Serial.begin() is for Sets the data rate in bits per second (baud) for serial data transmission. For communicating with Serial Monitor, make sure to use one of the baud rates listed in the menu at the bottom right corner of its screen. You can, however, specify other rates - for example, to communicate over pins 0 and 1 with a component that requires a particular baud rate. Also, Serial.available() is to Get the number of bytes (characters) available for reading from the serial port. This is data that’s already arrived and stored in the serial receive buffer (which holds 64 bytes). Moreover, Serial.readBytes() is to reads characters from the serial port into a buffer. The function terminates if the determined length has been read, or it times out. AnalogWrite() Writes an analog value (PWM wave) to a pin. Can be used to light a LED.
The following code for Processing.
import processing.serial.*;

// The primaries are red, yellow, and blue. The secondaries are green,
// purple, and orange. The tertiaries are  yellow-orange, red-orange,
// red-purple, blue-purple, blue-green, and yellow-green.

int segs = 12;
int steps = 6;
float rotAdjust = TWO_PI / segs / 2;
float radius;
float segWidth;
float interval = TWO_PI / segs;

color bc =  color(0, 0, 0);
byte [] rgbdata = new byte[64];


Serial ardPort; // DECLARE SERIAL PORT FOR  COMMUNICATION

void setup() { // setup() runs once

  size(200, 200);
  background(0);
  smooth();
  ellipseMode(RADIUS);
  noStroke();

  // make the diameter 90% of the sketch area
  radius = min(width, height) * 0.45;
  segWidth = radius / steps;

  println(Serial.list()); // Gets a list of all available serial ports. Use println() to write the information to the text window.
  ardPort = new Serial(this, Serial.list()[1], 9600); //initialize the serial port and set the baud rate to 9600

 // swap which line is commented out to draw the other version
 // drawTintWheel()

  drawTintWheel();
}

void draw() { // draw() loops forever, until stopped
  // rectMode(CORNER);
  bc = get(mouseX, mouseY); // get the color, when mouse stop
  //println("R G B = " + int(red(bc)) + " " + int(green(bc)) + " " + int(blue(bc)));
  rgbdata[0] = (byte(int(red(bc))));
  rgbdata[1] = (byte(int(green(bc))));
  rgbdata[2] = (byte(int(blue(bc))));

  // hold the last value when mouse moves away from the wheel
  if ((rgbdata[0] ^ rgbdata[1] ^ rgbdata[2]) != 0) {
    ardPort.write(rgbdata[0]);
    ardPort.write(rgbdata[1]);
    ardPort.write(rgbdata[2]);
  }
}

void drawTintWheel() { // Set the color of each round to 12 equal
  for (int j = 0; j < steps; j++) {
    color[] cols = {
      color(255, 255, ((255/(steps-1))*j)),
      color(255, ((170)+(170/steps)*j), 255/steps*j),
      color(255, ((127)+(127/steps)*j), (255/steps)*j),
      color(255, ((102)+(102/(steps-2))*j), (255/steps)*j),

      color(255, (255/steps)*j, ((255)/steps)*j),
      color(255, (255/steps)*j, ((127)+(127/steps)*j)),
      color(255, (255/steps)*j, 255),
      color(((127)+(127/steps)*j), (255/steps)*j, 255),

      color(((255)/steps)*j, (255/steps)*j, 255),
      color((255/steps)*j, 255, ((102)+(102/steps)*j)),
      color((255/(steps))*j, 255, (255/(steps))*j),
      color(((127)+(127/steps)*j), 255, (255/steps)*j)
    };

//Use the ARC () function to draw the sectors and fill in the colors
    for (int i = 0; i < segs; i++) {
      fill(cols[i]);
      arc(width/2, height/2, radius, radius,
      interval*i+rotAdjust, interval*(i+1)+rotAdjust);
    }
    radius -= segWidth;
  }
}
A color wheel is generated using Processing and the RGB value under the mouse pointer is transmitted to the Arduino via the serial port which ultimately modifies the PWM to generate the color on the RGB LED.
setup()
The setup() function is run once, when the program starts. It’s used to define initial enviroment properties such as screen size and to load media such as images and fonts as the program starts. There can only be one setup() function for each program and it shouldn’t be called again after its initial execution.
If the sketch is a different dimension than the default, the size() function or fullScreen() function must be the first line in setup().
Note: Variables declared within setup() are not accessible within other functions, including draw().
draw()
Called directly after setup(), the draw() function continuously executes the lines of code contained inside its block until the program is stopped or noLoop() is called. draw() is called automatically and should never be called explicitly. All Processing programs update the screen at the end of draw(), never earlier.
Also, there can only be one draw() function for each sketch, and draw() must exist if you want the code to run continuously, or to process events such as mousePressed().
Defines the dimension of the display window width and height in units of pixels. In a program that has the setup() function, the size() function must be the first line of code inside setup(), and the setup() function must appear in the code tab with the same name as sketch folder. The background() function sets the color used for the background of the Processing window. Draws all geometry with smooth (anti-aliased) edges.
Also, the basic element to draw the wheel is ellipse using the instruction ellipseMode(RADIUS); for a given value of radius. Before that the size(200, 200); instruction set the size of processing window. With in this window with given values of variable RADIUS the function drawTintWheel() is drawing the colour wheel, it is actually using for loop to Set the color of each round to 12 equal steps. After setting the colour with this for loop the ARC () function is used to draw the sectors and fill in the colors in colour wheel.
I was using mouseX and mouseY in processing to get the RGB values and sending them through Asynchronous serial communication. as an example this line bc = get(mouseX, mouseY);take the information of colours from mouse. following this line the next few lines hold the last value when mouse moves away from the wheel, ardPort.write(rgbdata[0]); these instructions send the values of RGB to Arduino one by one, as shown in the processing code.
Useful links
Individual assignment 2 (for final project):
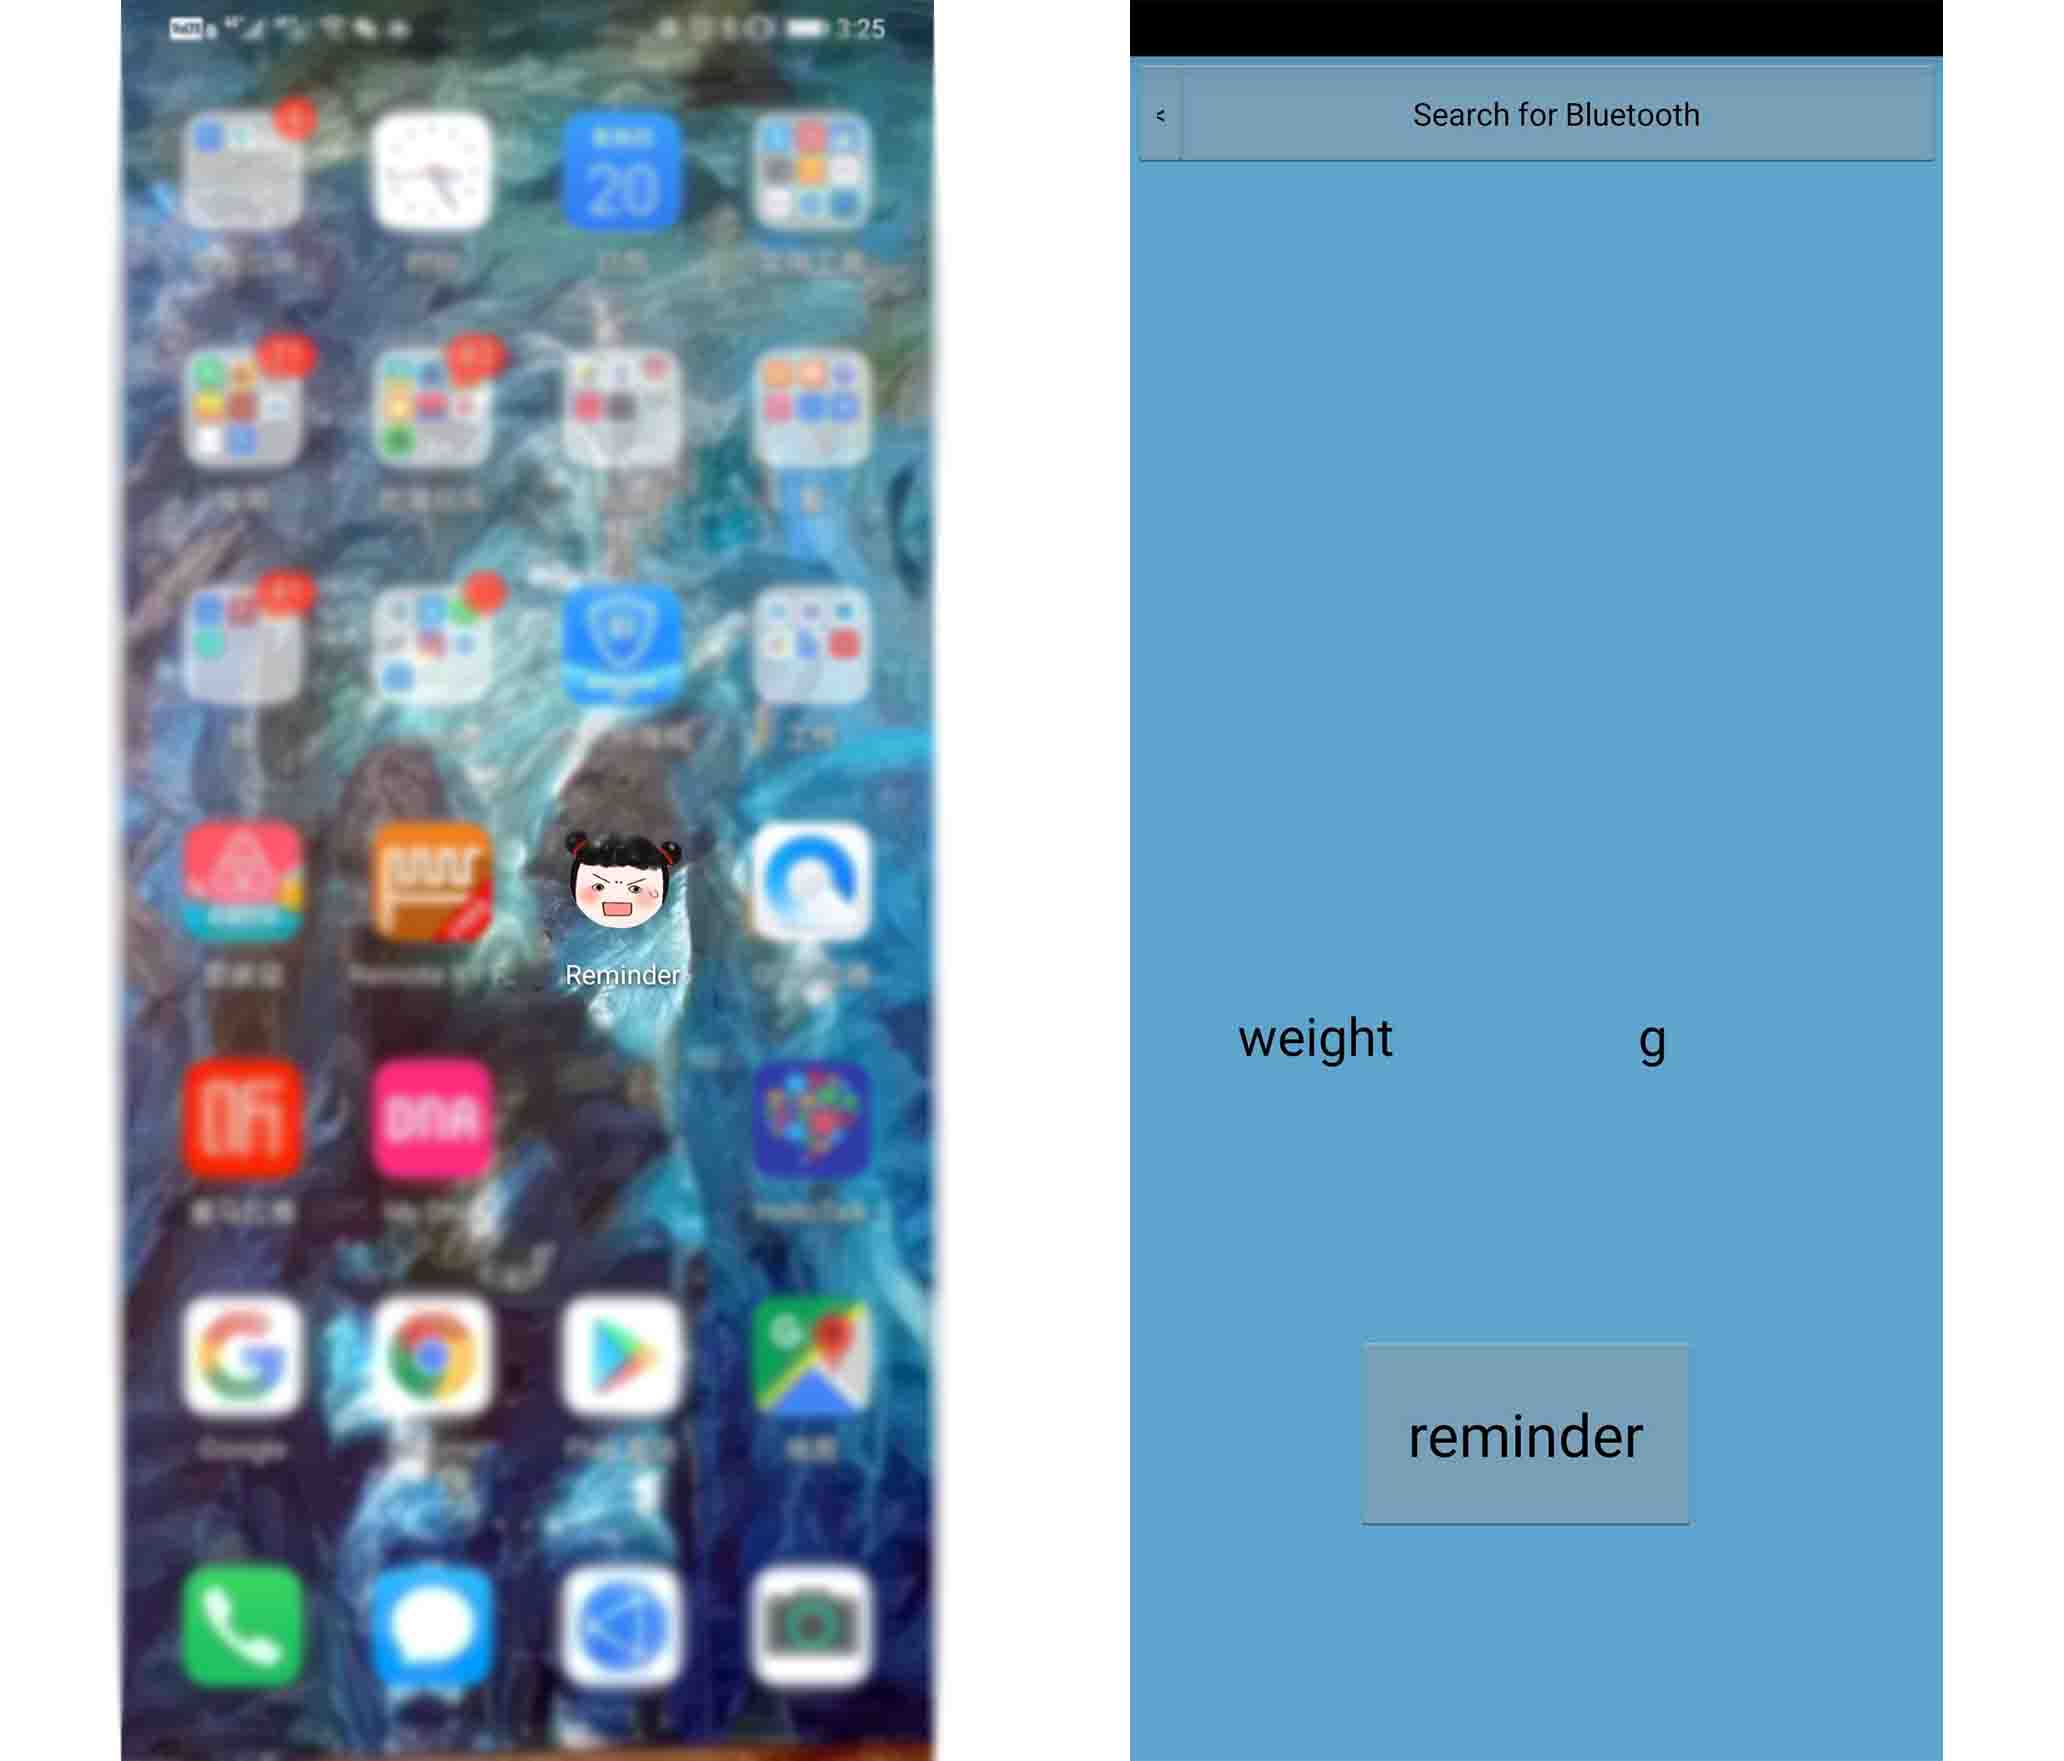
For this week’s task, I created an APP for my final project, and employed Bluetooth to connect my phone and my board to measure the item weight, when the weight is less than 100g, my phone shown the weight and remind me.
I am using the board that contains a HX711 BALANCE MODULE WITH LOAD CELL, STC89C52 microcontroller, LCD1602, HC-5 BLUETOOTH. my goal is present the data coming from the load cell directly to the mobile phone.
The detail of board programming
Create an APP
I am using E4A to create the APP for my final project. E4A is an all-Chinese Android programming language that was officially released on June 1, 2013. It is positioned for enterprises, webmasters, developers, network companies, various handheld devices, etc., based on Android system APP development. The programming of Android APP code in the language is very in line with the programming thinking habits of the Chinese people and can make the Chinese people extremely easy to use. E4A will eventually develop into the world’s first full Chinese Android APP development language with simple and powerful applications.download link
I choose E4A to create the App, because it is easy to create and the language is Chinese that familiar with me. I also learned the code and how to use the software online. This is a forum and you need to register first. When you register, you can search for all the tutorials you need. However, please note that if you need to download code, you need to become a VIP user, which means you need to pay for it.
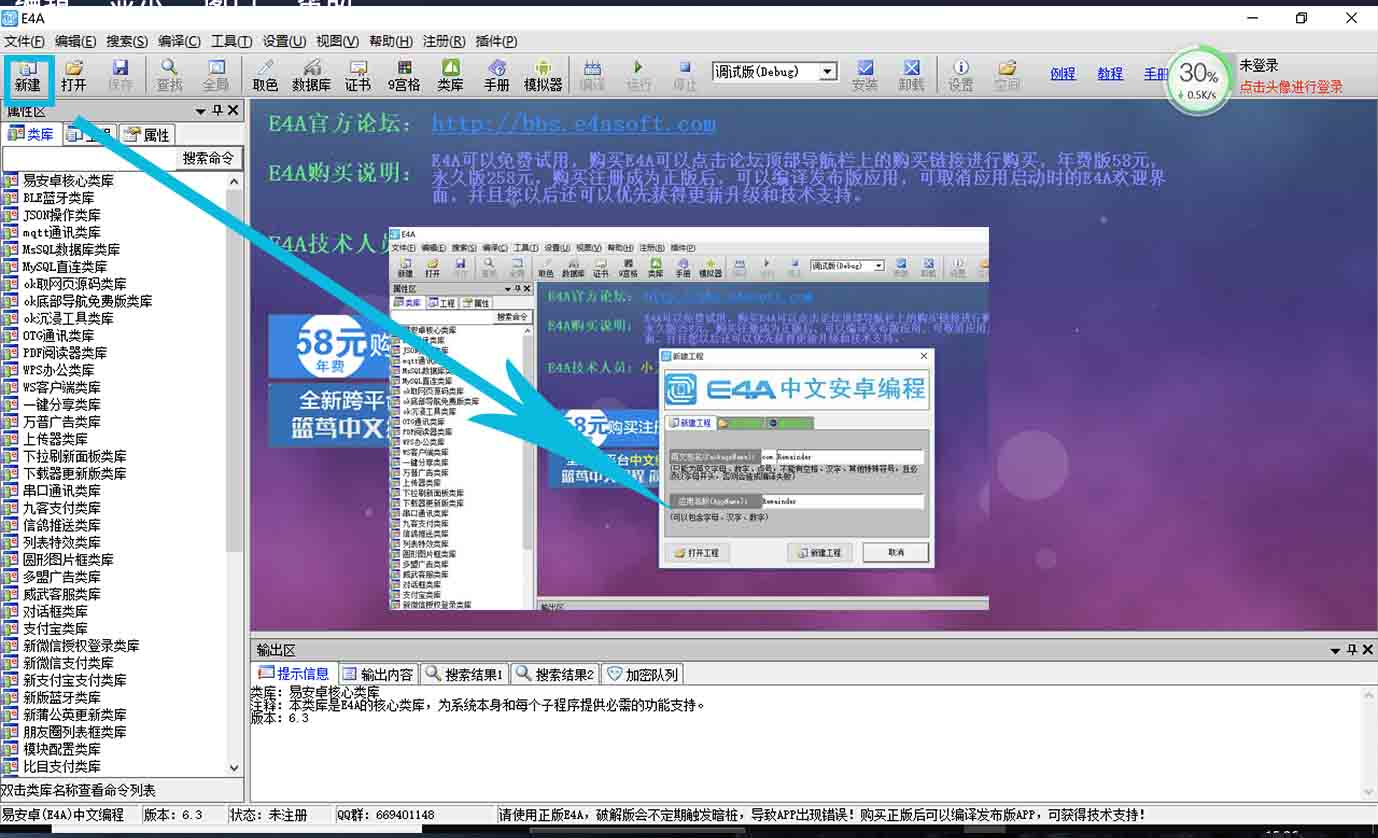
● Step1. Download E4A software. It is only for Windows system and free, I am glad that my laptop is a dual system and I can switch the system freely.
● Step2. Open the software, and create a new project and store it in my computer, also text the App name and package name.
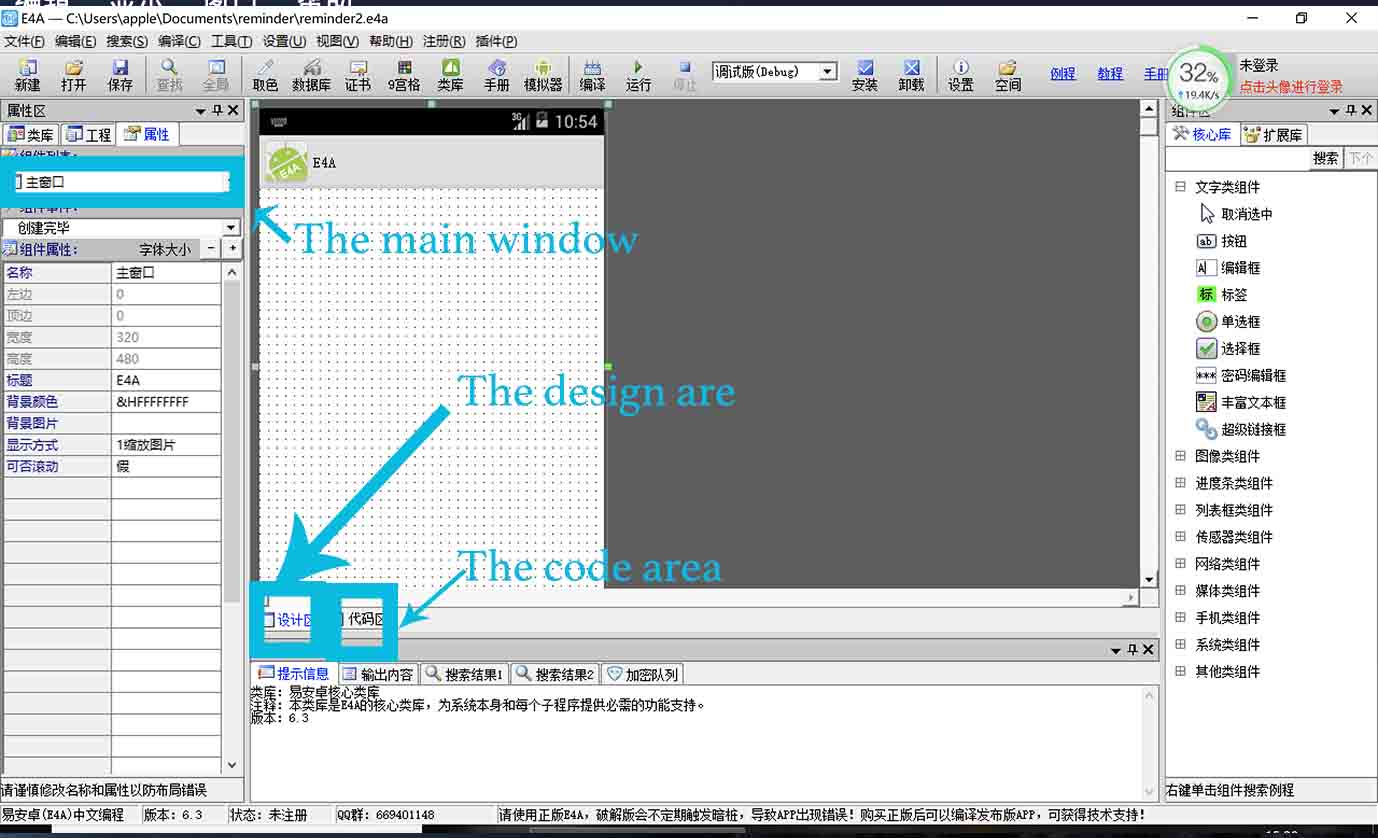
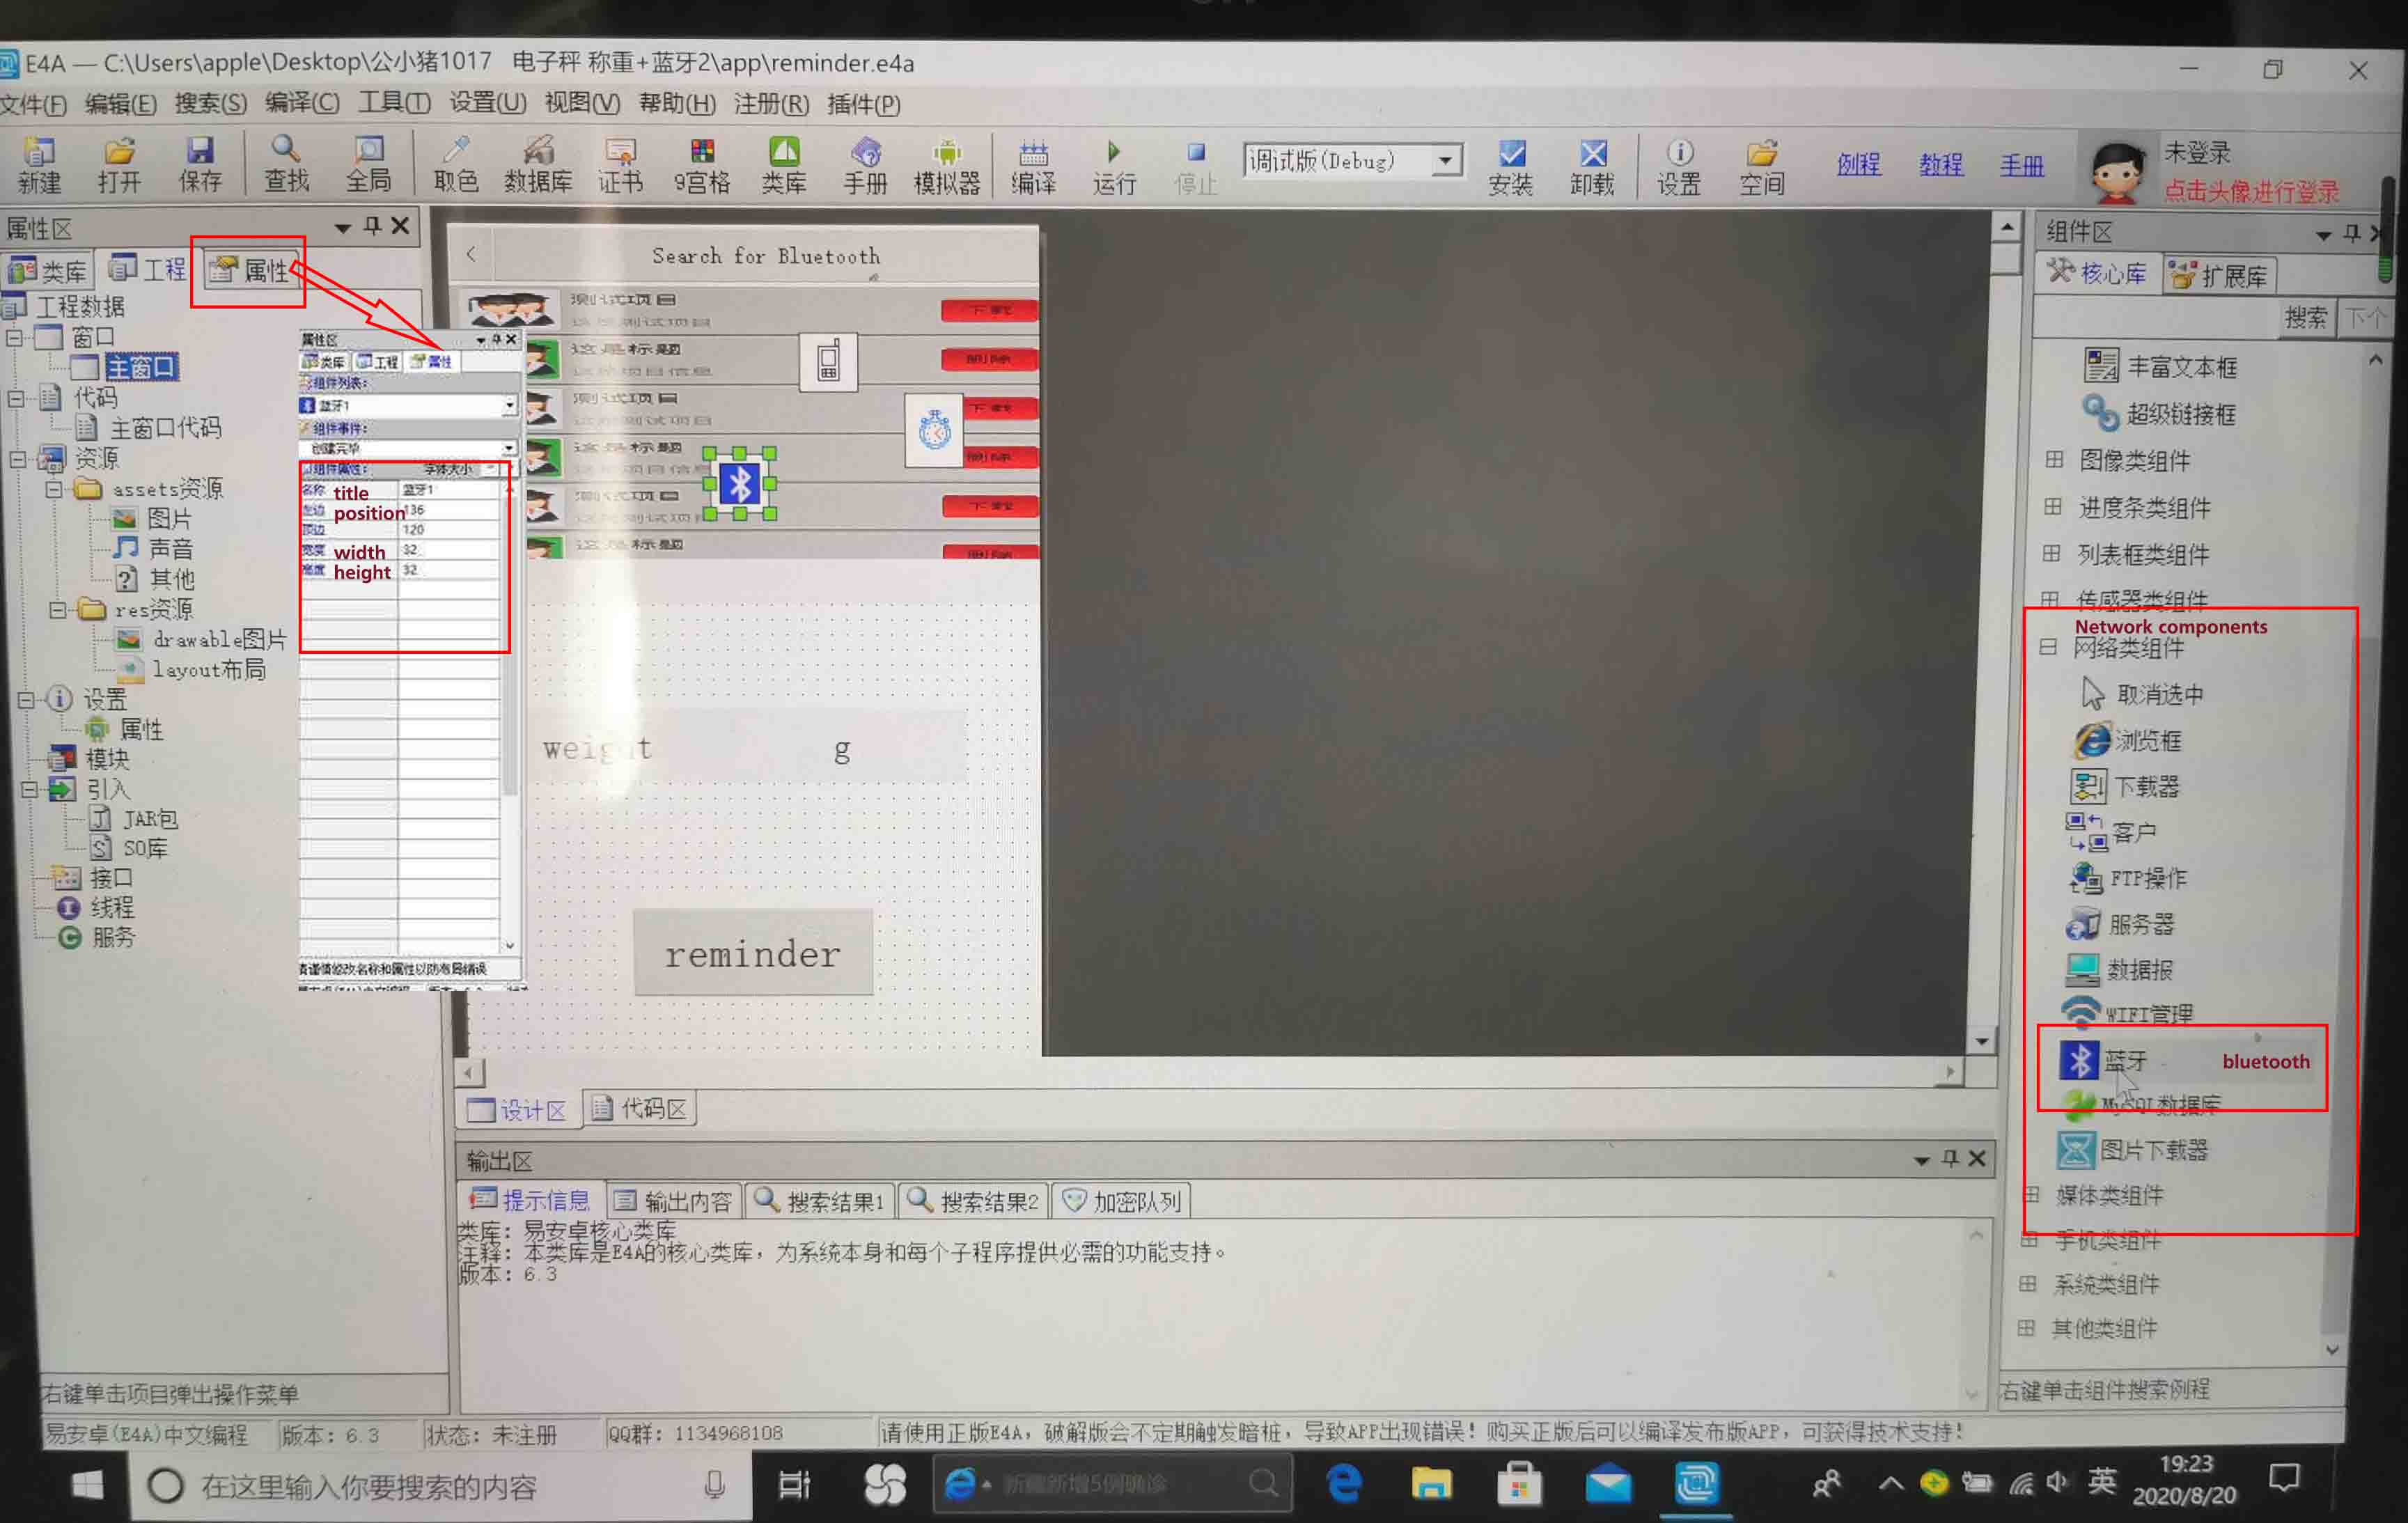
Then the software shown like the following figure.The left window displays the properties of the component, such as color, display style, location, height, and width.The bottom window displays various prompts and search functions.The window on the right is the various components and their sub-menus. Such as text component, graphics component, progress bar component, sensor component, network component, media component and so on.
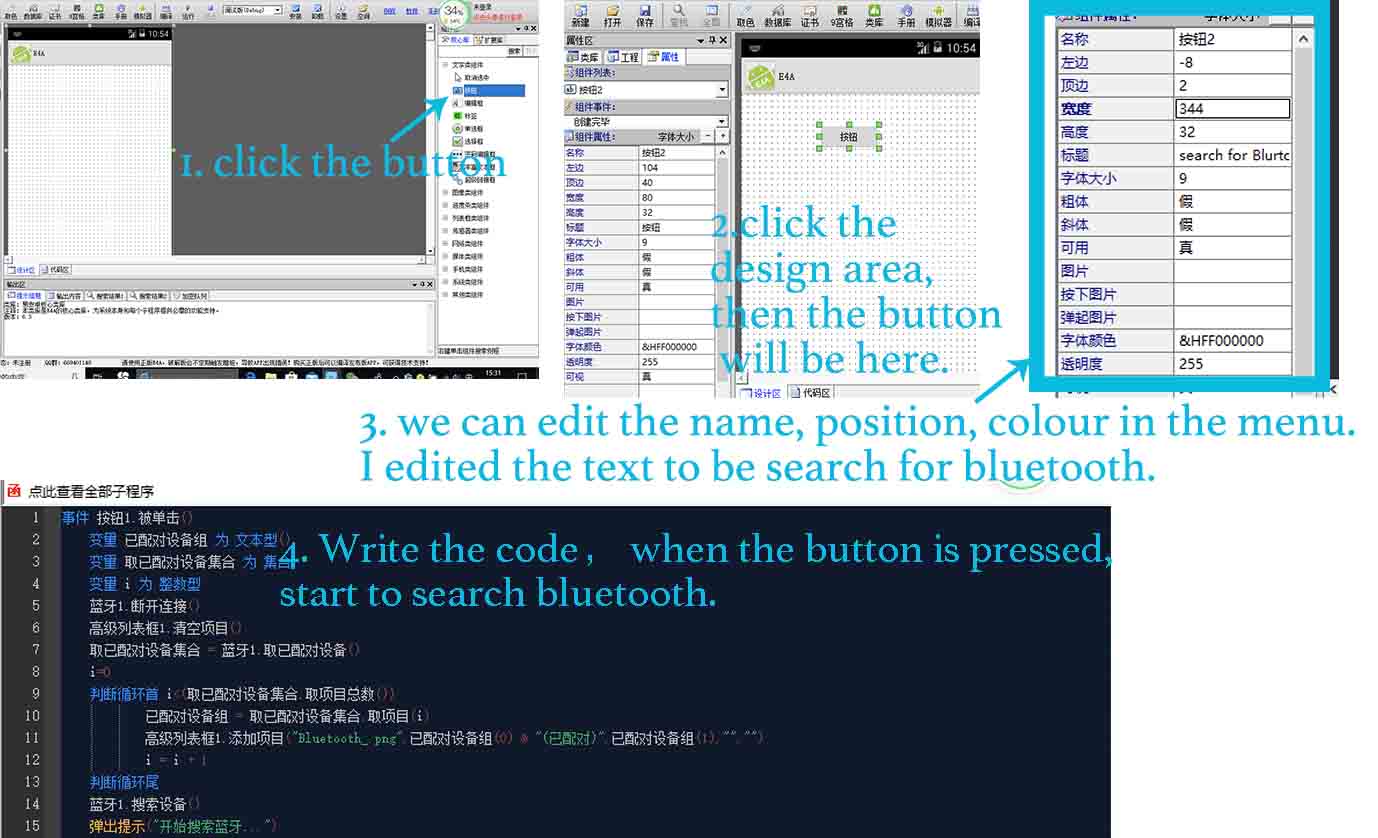
● Step3. Create the button for searching the bluetooth, and code for the button.
The first, I created the button shown searching the bluetooth. I clicked the button under the text component sub-menu, then clicked the design area, the button will be in the main design area automatically.
Also, I can set up the properties of the button that I created by click the left window. In the left window, I can set the button name, the position and height and width, also the font, color, size and transparency of the text.
Then, writing code in the code area. For the searching the Bluetooth, when it is pressed, start to search bluetooth.
The main part is to create the bluetooth, and write the code.
Firstly, I searched the bluetooth in sub-menu of Network components in the right window , and clicked the design area. In the left window, we can set the title, position, height and width.
Secondly, when I right click the Bluetooth, we can see the menu here, related to it. When I click the second one, that is the code related to Bluetooth, also in the bottom area, it is the code and explanation in the following figure.
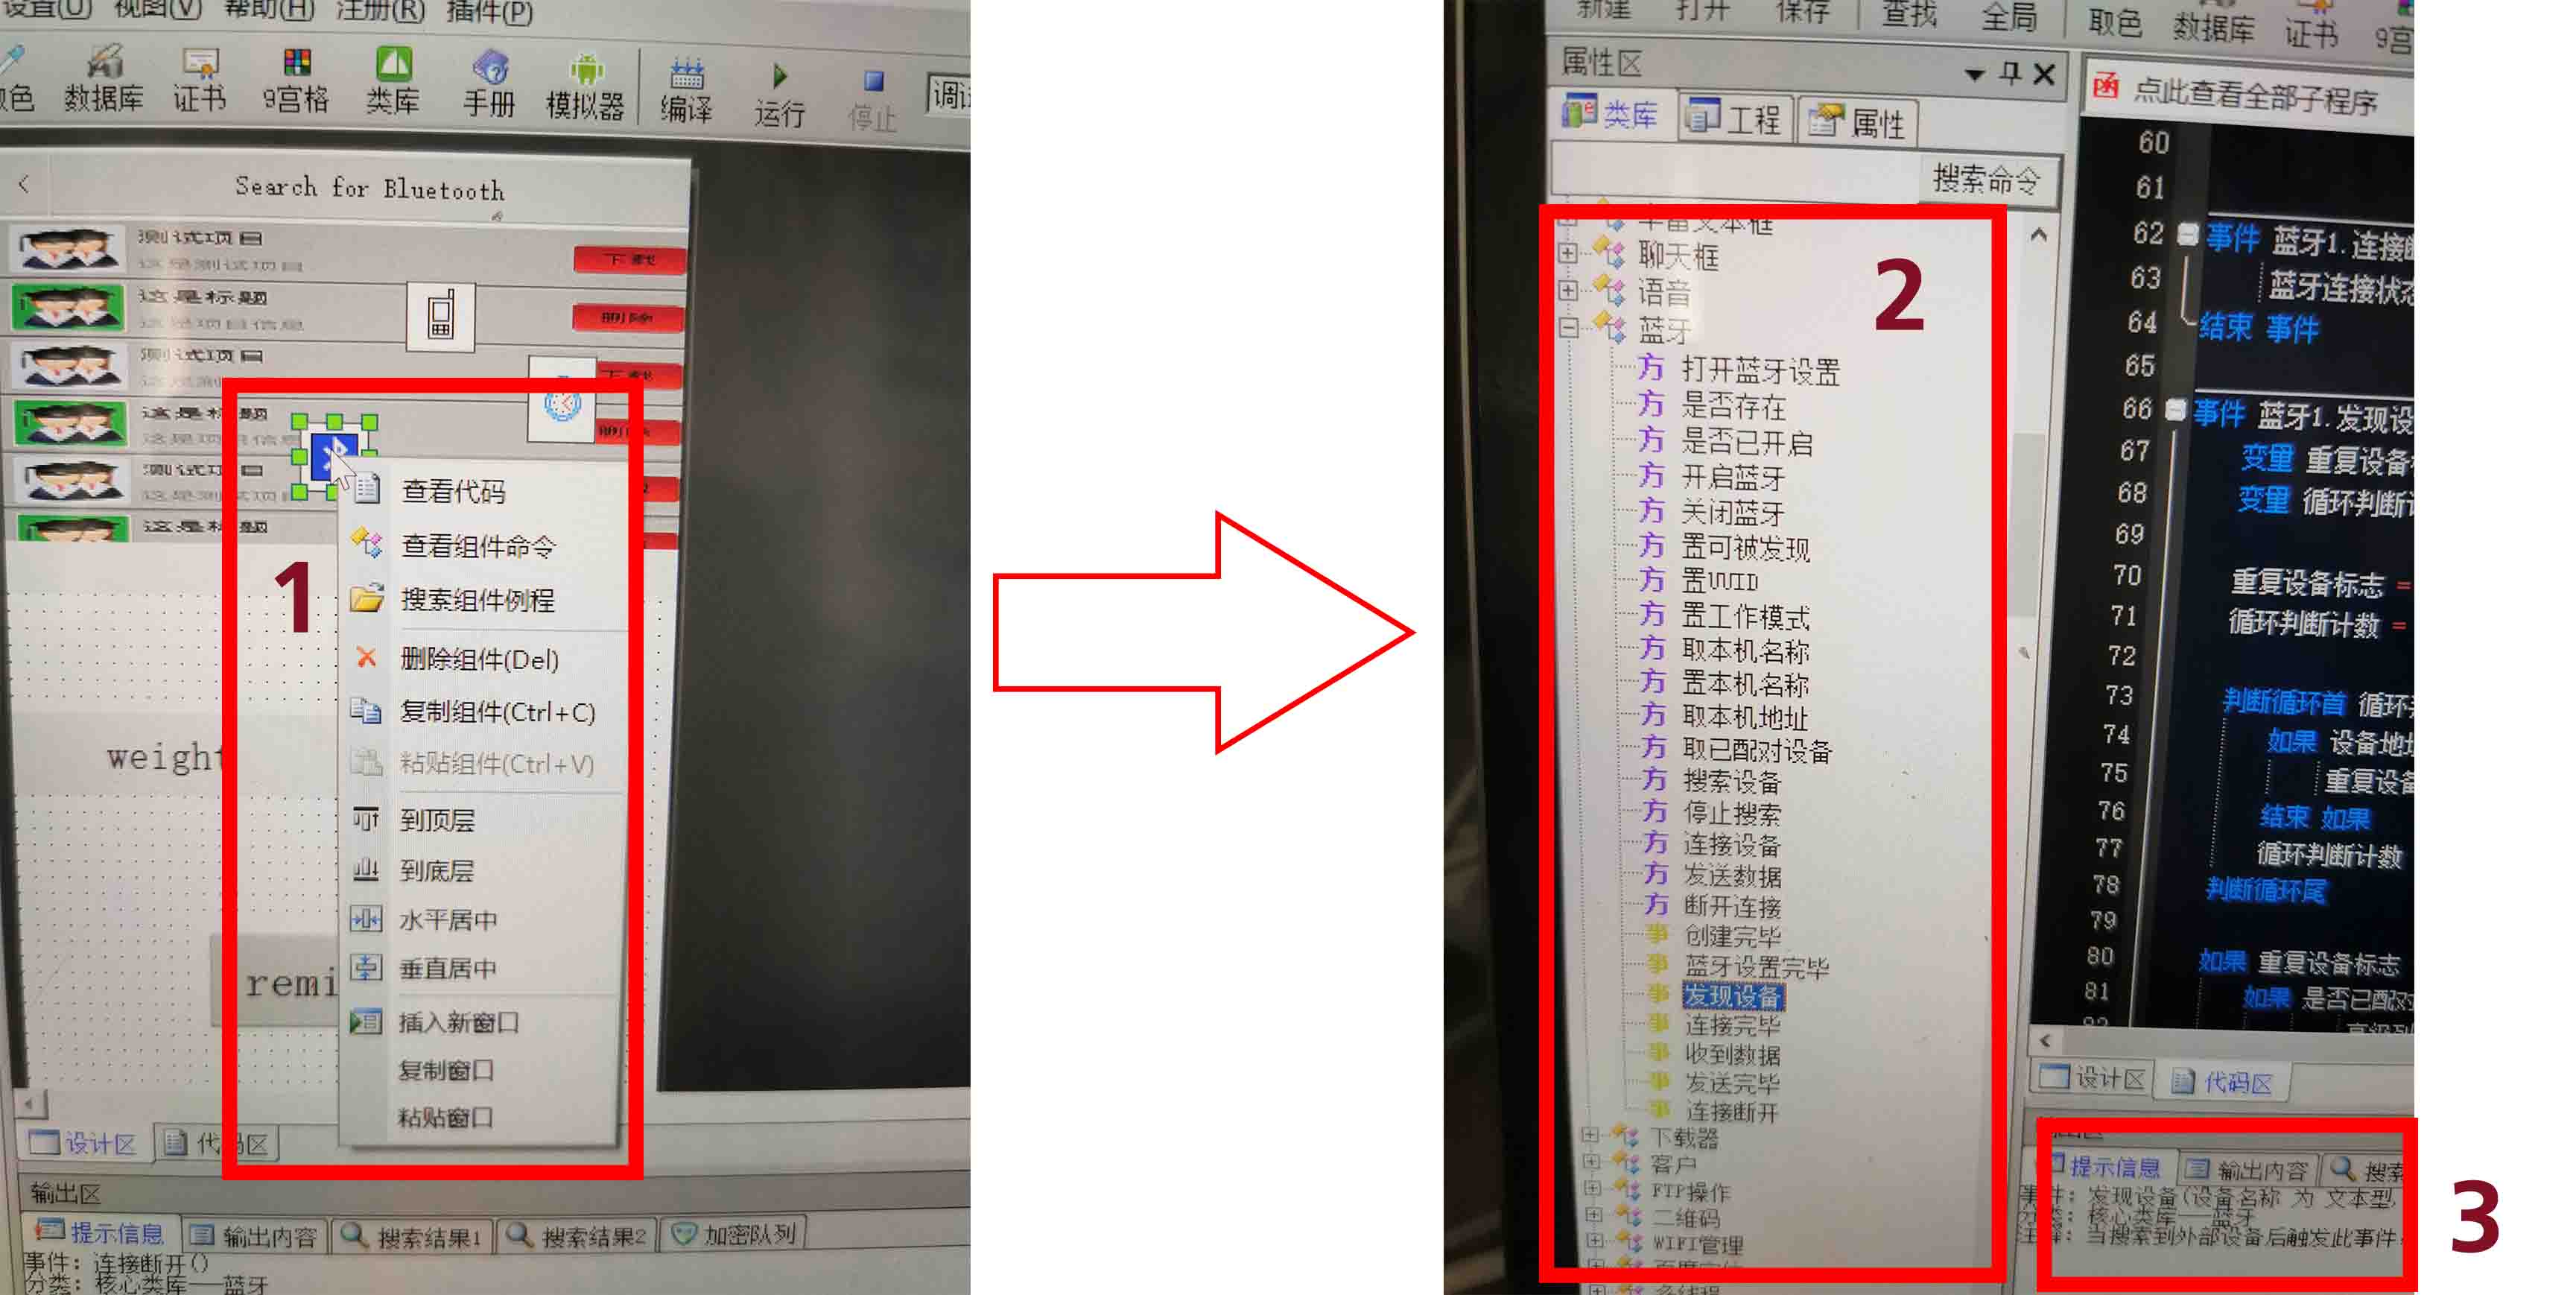
Third, I clicked the code area, and write code here. For example as the following figure.
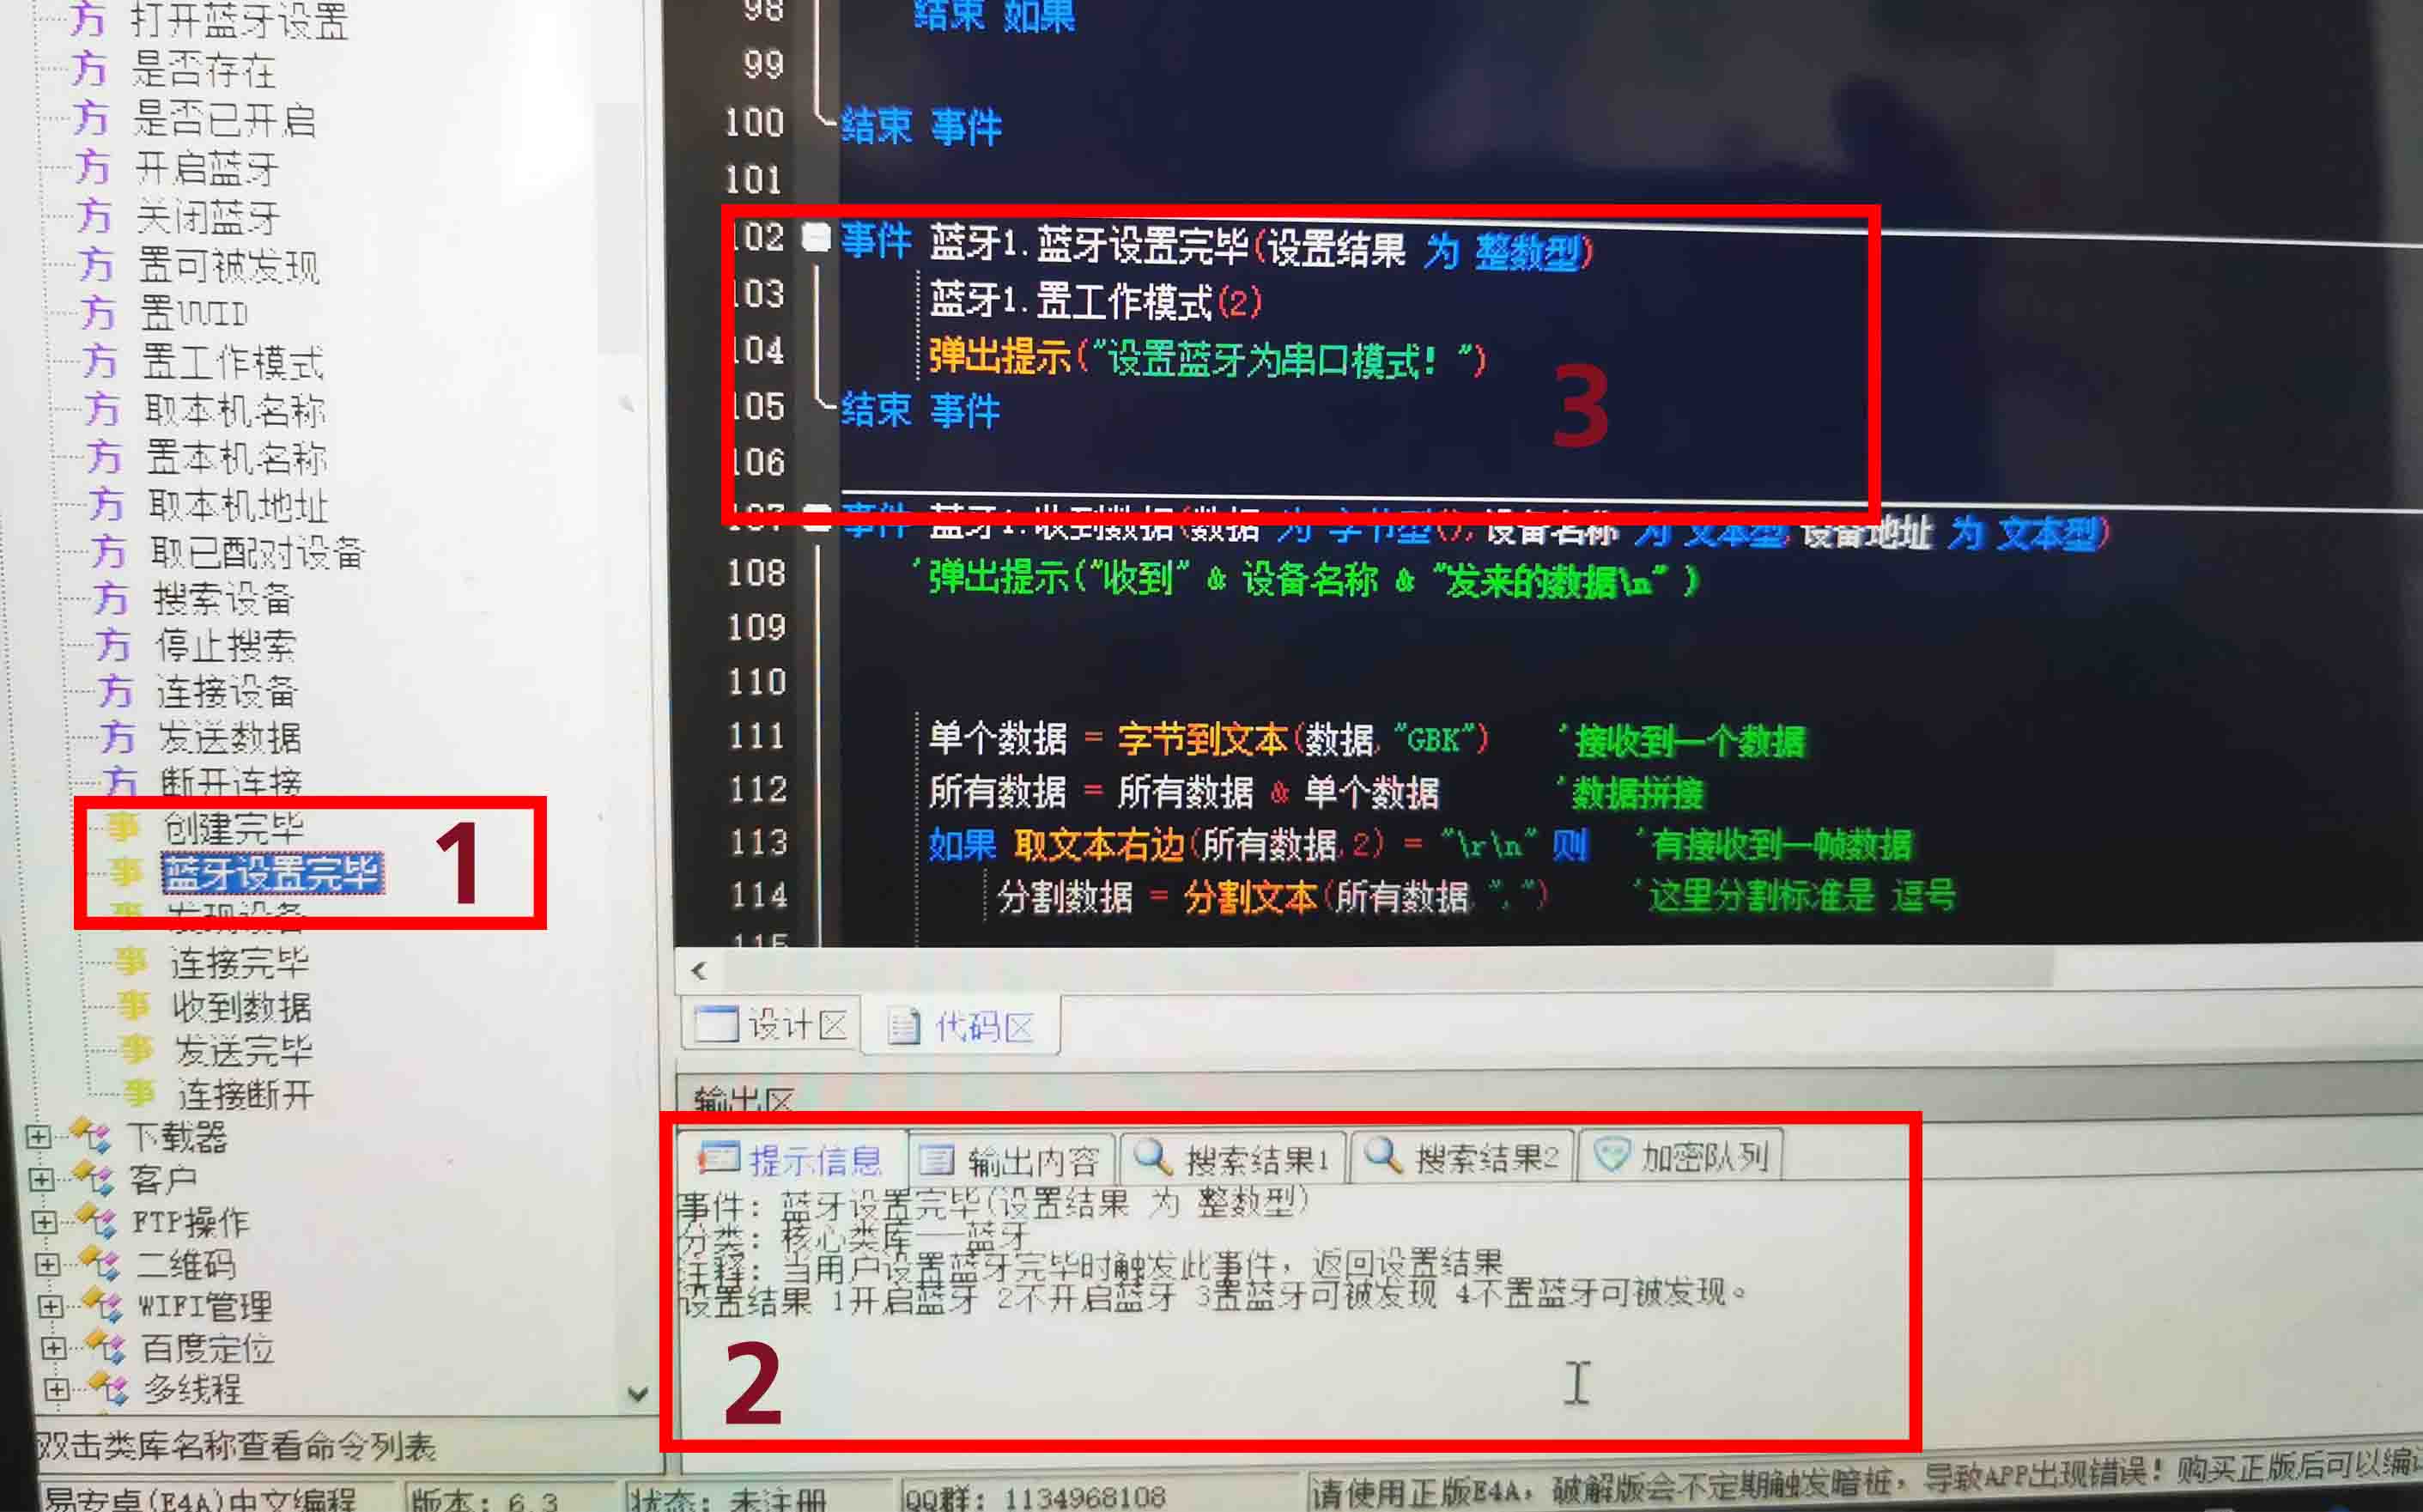
In step 1, A list of the series of Bluetooth codes, such as searching Bluetooth, turn on Bluetooth and so on. I clicked the define function bluetooth1.setup(int set_result).
In step 2, the code explanation.
In step 3, the code area for setting Bluetooth to serial-port mode.
事件 蓝牙1.蓝牙设置完毕(设置结果 为 整数型) # define function bluetooth1.setup(int set_result)
     蓝牙1.置工作模式(2) # bluetooth1.mode(2) ## set the bluetooth1 to serial port mode
     弹出提示("设置蓝牙为串口模式!") #print("Set Bluetooth to serial-port mode")
结束 事件 # end function definition
● Step4. Using the same way to create other button, text, and and write the code.
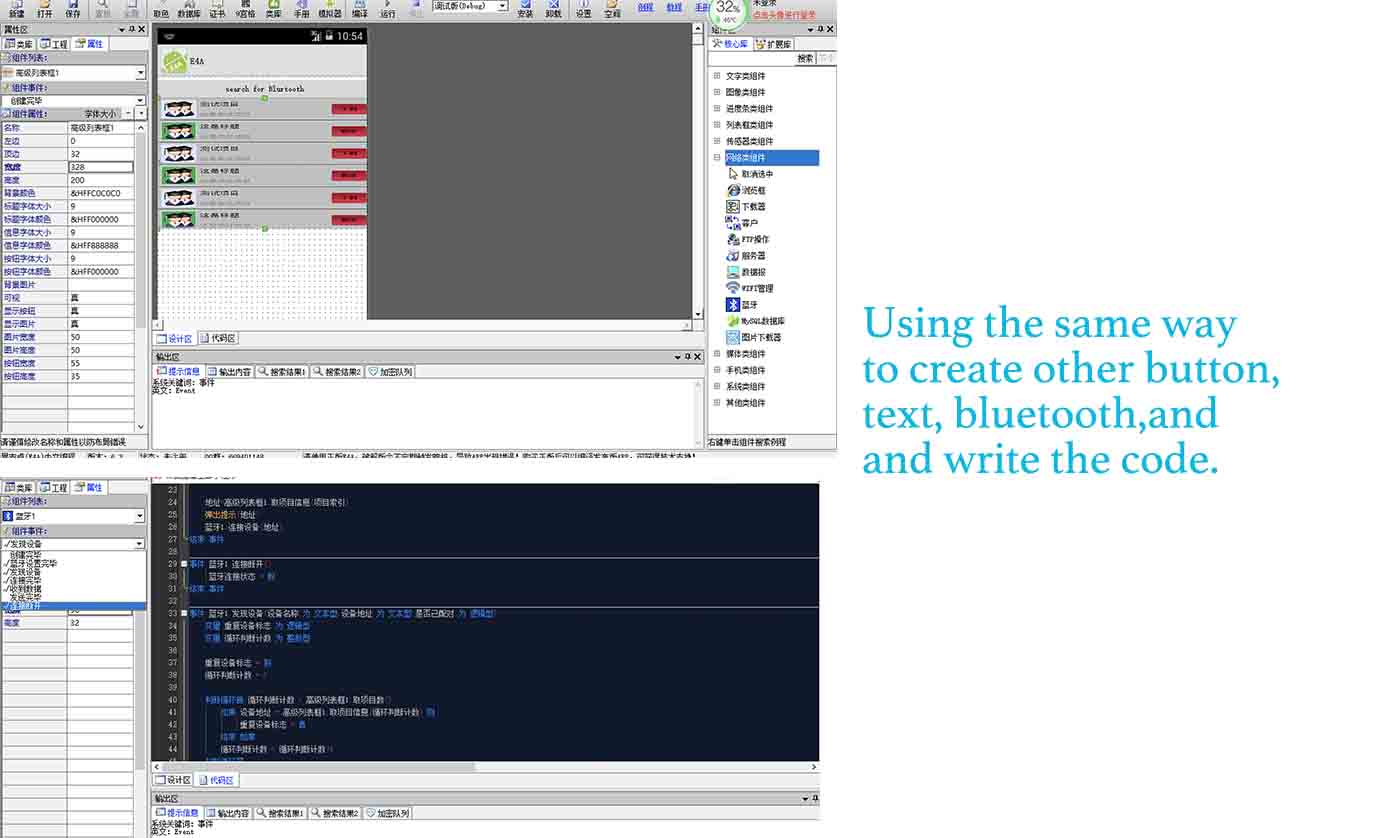
For example, creating a button, and setting when it pressed, writing code to be ” the first line: when it has been pressed, the second line: the phone is vibrating for 100 milliseconds, the third Line: the alarm to be false, which means stop”.
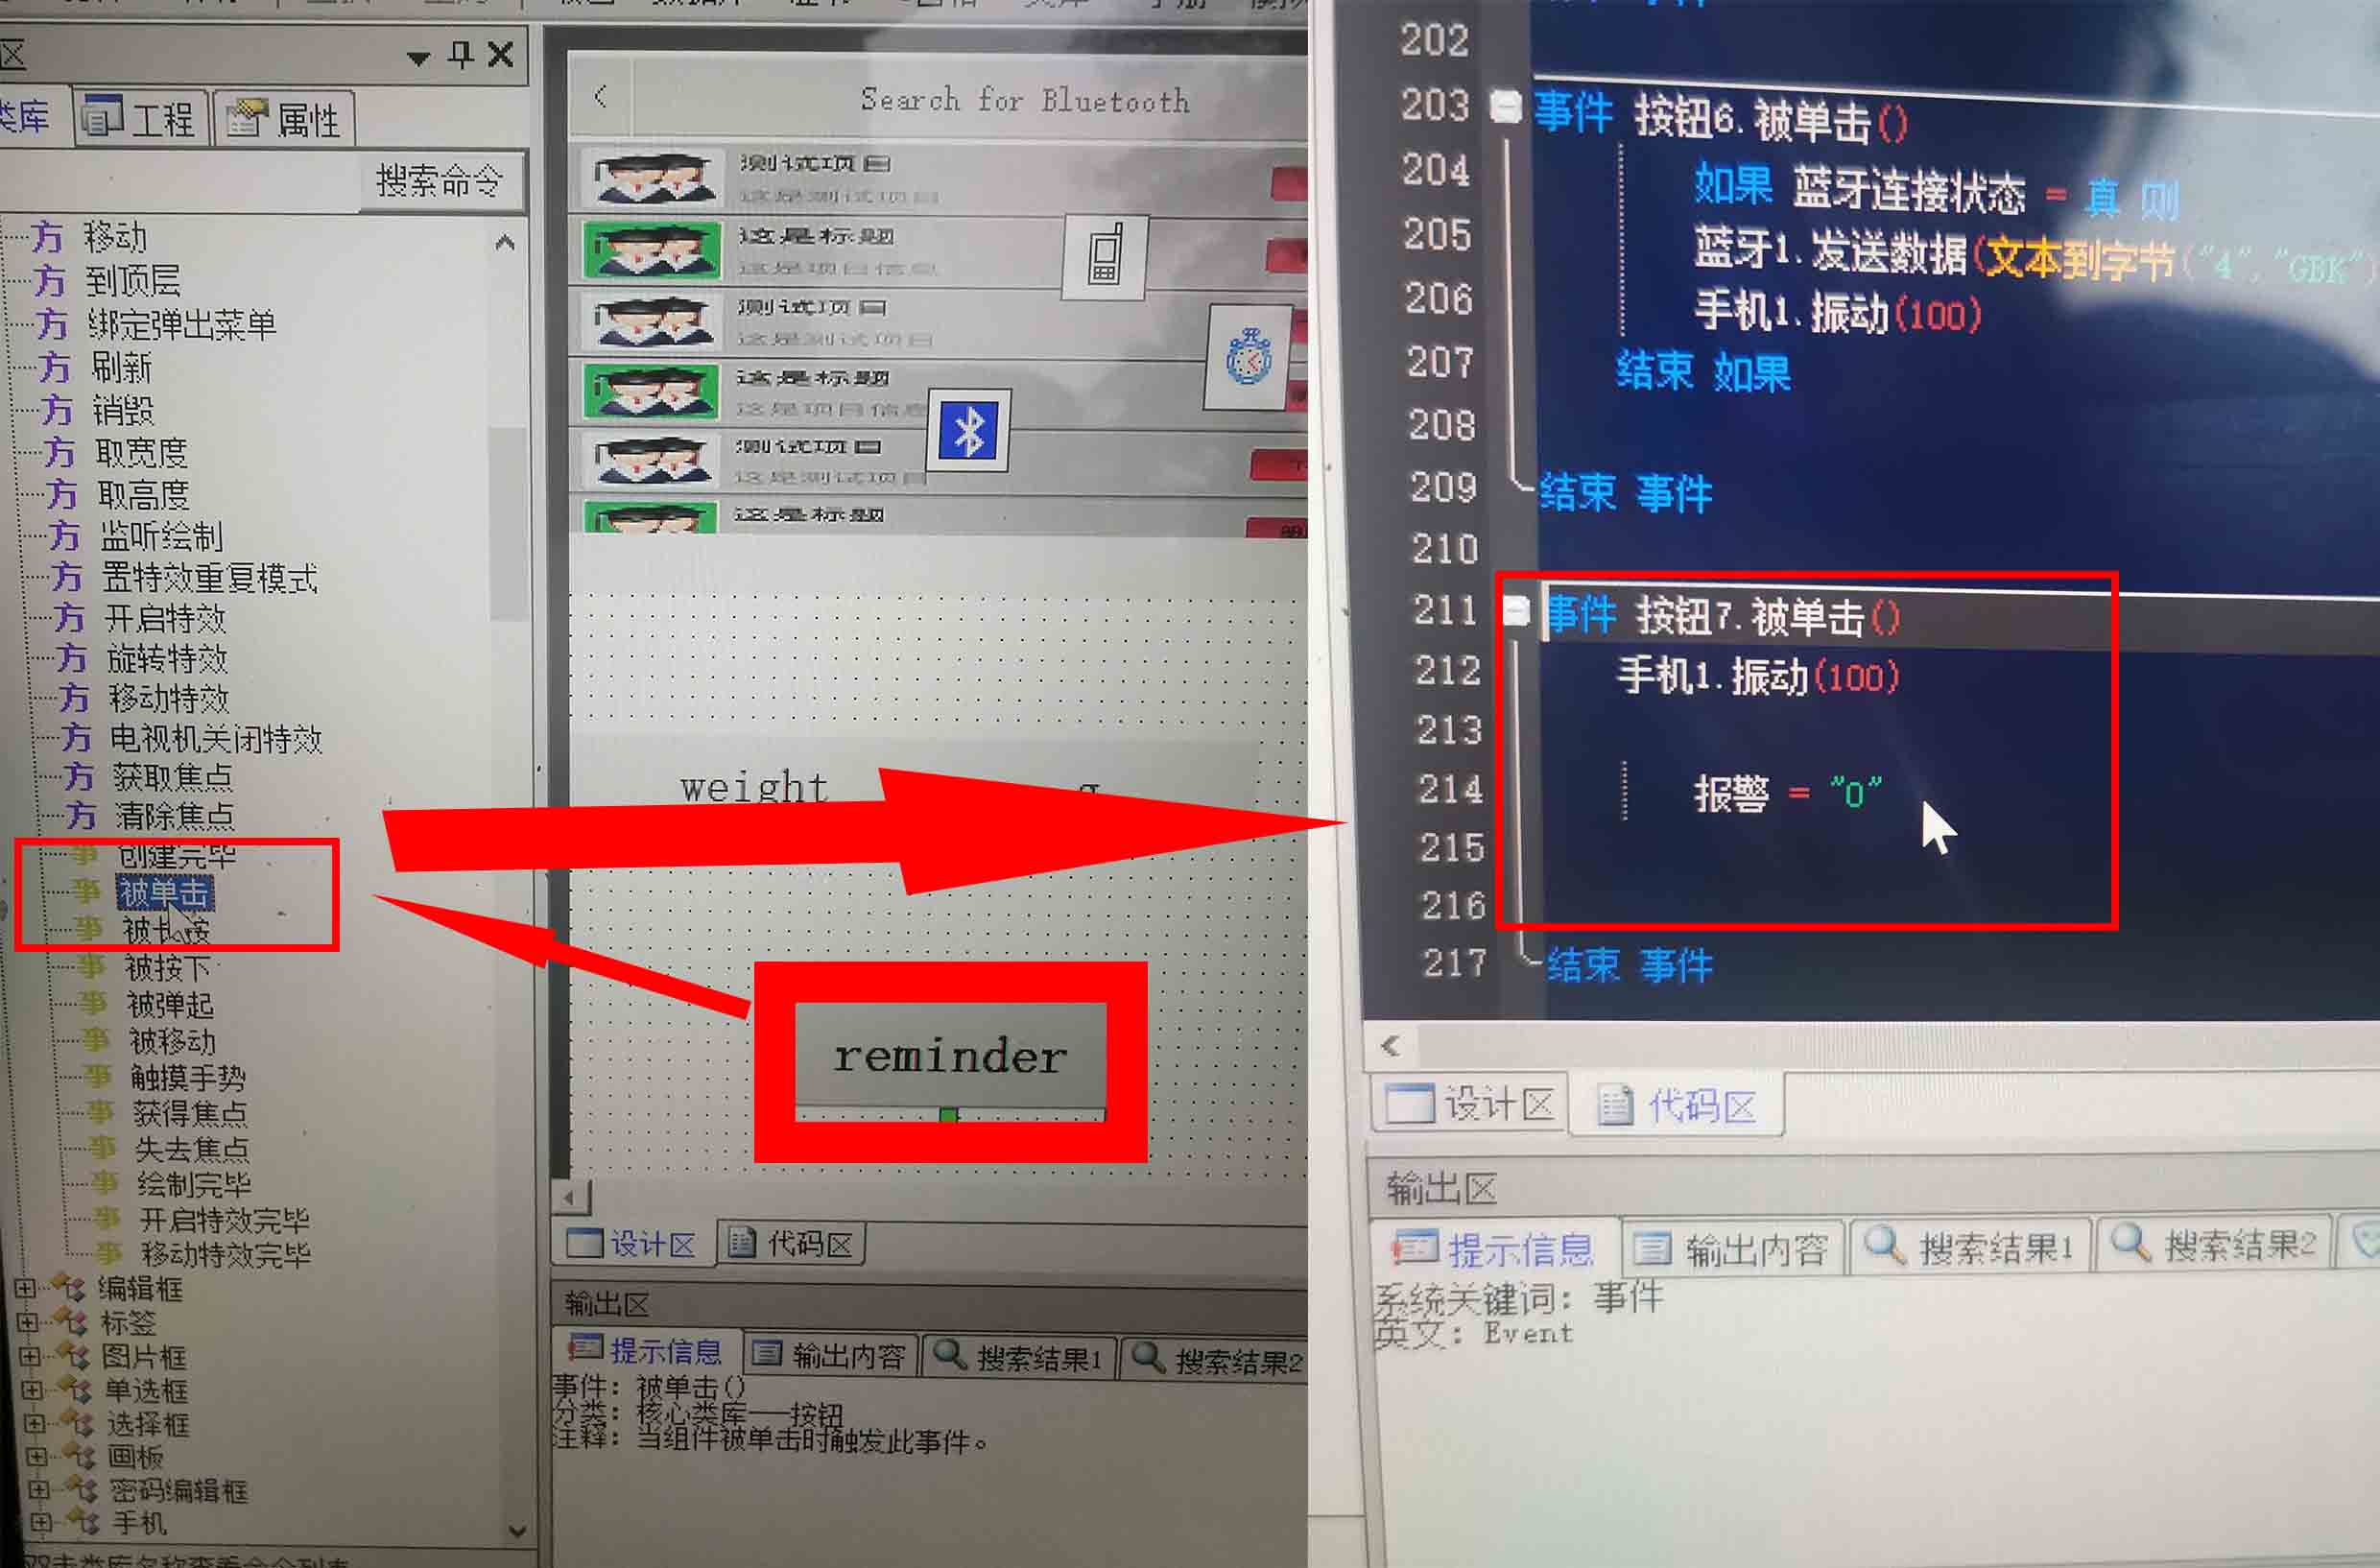
Also, I sending the weight as a string via Bluetooth.
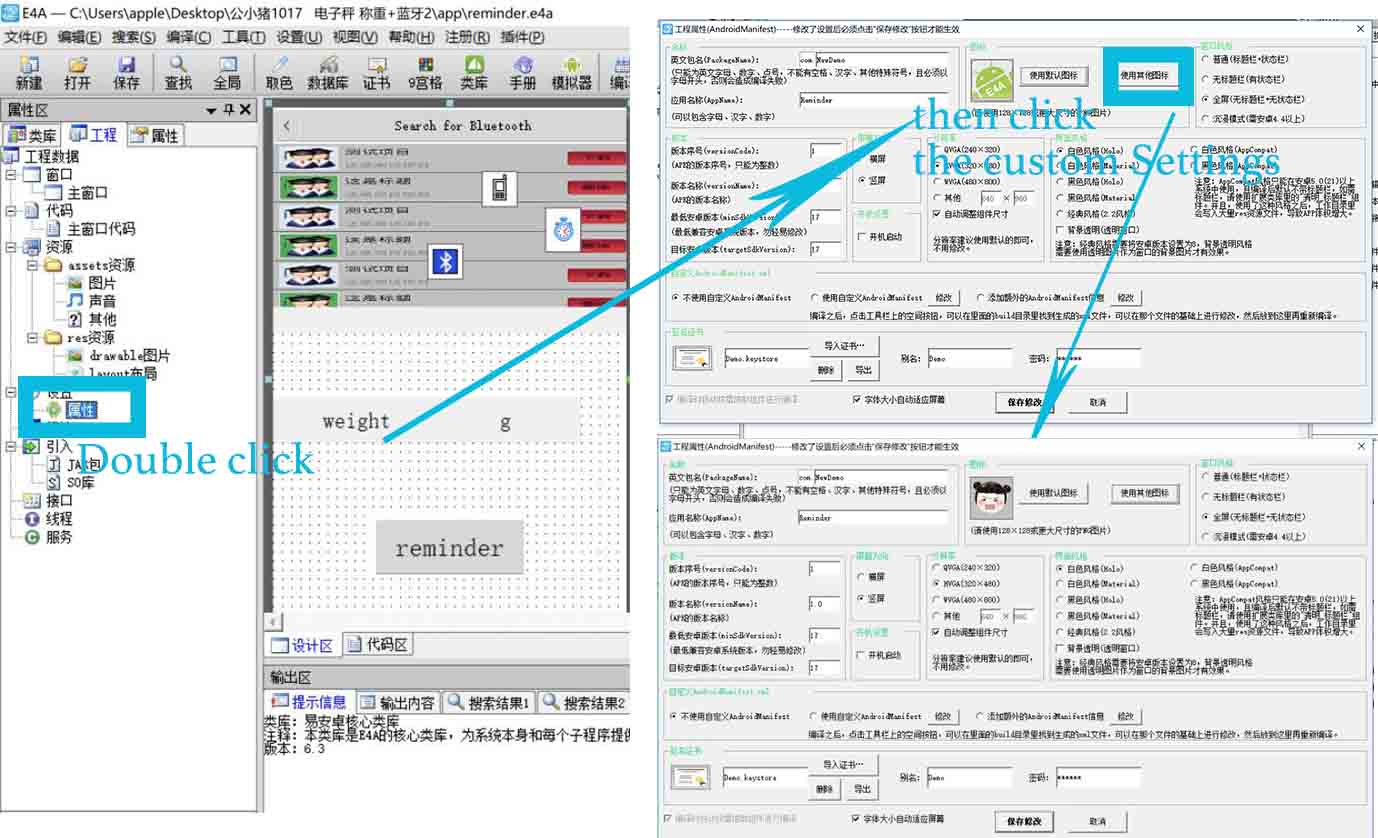
● Step5. Because I designed a Cartoon portraits for the presentation, so I would like to use it to be the ICON for the APP. So I click the attribute, and choose the icon that I designed in presentation week from default to custom Settings.
'下面开始定义蓝牙用到的一些变量 # The following section is for defining variables
变量 蓝牙连接状态 为 逻辑型 # bool blueToothStatus
变量 单个数据 为 文本型 # str one_input
变量 所有数据 为 文本型 # str all_input
变量 分割数据 为 文本型() #str divided_input
变量 报警 为 文本型    # str alarm


'下面定义报警部分  #Defining the alarm for the device
变量 设备报警 为 整数型  # int device_alarm

'下面定义退出用到的变量  # Defining the variables for quitting the app
变量 启动时间 为 长整数型 # long initiate_time


事件 主窗口.按下某键(键代码 为 整数型,传址 屏蔽 为 逻辑型) # define function when pressing some key on the main interface, set the var keyboard_input as integer, set addressing passing as bool
    如果 键代码 = 返回键 则  #if keyboard_input == "return"  (return button)
        如果 取启动时间() - 启动时间 >2000 则 # if actual-initiate_time.() - initiate_time >2000  [actual_initiate_time.() is a built-in function]

            弹出提示("再按一次退出程序")# print("Tap again for quitting the app")
            启动时间 = 取启动时间() #initiate_time = actual_initiate_time.()
        否则 # else
            结束程序() #break
        结束 如果 #end if
    结束 如果 #end if
结束 事件 # #end function definition

事件 主窗口.创建完毕() #define function main_interface.built()
    报警 = "1" # alarm ="1"
    主窗口.背景颜色=&HEE519FC9 #main_interface.color(&HEE519FC9)
    如果 蓝牙1.是否存在() = 假 则 #if bluetooth1.exist() == false
        信息框("信息","本机找不到蓝牙设备,程序将退出!","确定") # print("Notice", "No Bluetooth Device, Quitting the App!", "OK")
        结束程序() # break
    否则 #else
        如果 蓝牙1.是否已开启() = 假 则 #if bluetooth1.connected()== false
             蓝牙1.开启蓝牙() # bluetooth1.connected()
        否则 #else
             蓝牙1.置工作模式(2) #bluetooth1.mode(2) ##set bluetooth1 to mode 2, which is serial-port mode
             弹出提示("设置蓝牙为串口模式!")  #print("Set Bluetooth to serial-port mode")
        结束 如果 #end if
    结束 如果 #end if

    设备报警 = 0 #alarm = 0

结束 事件 # end function definition

事件 高级列表框1.表项被单击(项目索引 为 整数型) #define function  superior_list.itemclicked(int item_index) ## When an item in the list is clicked, set the index as integer
    变量 地址 为 文本型 # str item_address


    蓝牙1.断开连接() # bluetooth1.disconnect()

    地址=高级列表框1.取项目信息(项目索引)# item_address = superior_list.iteminformation (index) ## assign the index as the address of the clicked item
    弹出提示(地址) # print(item_address)
    蓝牙1.连接设备(地址) # bluetooth1.connect(item_address)
结束 事件 #end function definition


事件 蓝牙1.连接断开() # define function bluetooth1.disconnect()
     蓝牙连接状态 = 假 # blueToothStatus == false
结束 事件 #end function definition

事件 蓝牙1.发现设备(设备名称 为 文本型,设备地址 为 文本型,是否已配对 为 逻辑型) #define function bluetooth1.discover(str device_name, str device_address, bool pair_status )
    变量 重复设备标志 为 逻辑型 # bool repeated_paired_device
    变量 循环判断计数 为 整数型 # int repeat_count

    重复设备标志 = 假 # repeated_paired_device == false
    循环判断计数 = 0 # repeat_count = 0

    判断循环首 循环判断计数 < 高级列表框1.取项目数() # if repeated_paired_device < superior_list.itemcount() ## if the repeated paired device is less than the items in the superior_list
        如果 设备地址 = 高级列表框1.取项目信息(循环判断计数) 则 if device_address = superior_list.iteminformation(repeat_count)
             重复设备标志 = 真 # repeated_paired_device == true
        结束 如果 #end if
        循环判断计数 = 循环判断计数+1 # repeat_count += 1
    判断循环尾 #break

    如果 重复设备标志 = 假 则 # if repeated_paired_device == false
        如果 是否已配对 = 真 则 # if pair_status == true
                 高级列表框1.添加项目("Bluetooth_.png",设备名称 & "(已配对)" ,设备地址,"","") # superior_list.add("Bluetooth_.png", device_name & "paired", device_address, "","")
            否则 #else
                 高级列表框1.添加项目("Bluetooth_.png",设备名称 & "(未配对)" ,设备地址,"","") # superior_list.add("Bluetooth_.png", device_name & "unpaired", device_address, "","")
        结束 如果 # end if

    结束 如果 #end if

结束 事件 #end function definition

事件 蓝牙1.连接完毕(连接结果 为 逻辑型,设备名称 为 文本型,设备地址 为 文本型,连接模式 为 整数型) # define function bluetooth1.connected(bool conn_result, str device_address, int conn_mode)
    如果 连接结果 = 真 则 # if conn_result == true
        蓝牙连接状态 = 真 # blueToothStatus = true
        弹出提示("与设备 " & 设备名称 & " 连接成功!") # print("Successfully connected to" & device_name)
    否则 #else
        蓝牙连接状态 = 假 # blueToothStatus = false
        弹出提示("与设备 " & 设备名称 & " 连接失败!") # print("Unable to connect to" & device_name)
    结束 如果 #end if

结束 事件 end function definition

事件 蓝牙1.蓝牙设置完毕(设置结果 为 整数型) # define function bluetooth1.setup(int set_result)
     蓝牙1.置工作模式(2) # bluetooth1.mode(2) ## set the bluetooth1 to serial port mode
     弹出提示("设置蓝牙为串口模式!") #print("Set Bluetooth to serial-port mode")
结束 事件 # end function definition

事件 蓝牙1.收到数据(数据 为 字节型(),设备名称 为 文本型,设备地址 为 文本型) #define function bluetooth1.receivedata(str data, str device_name, str device_address)
    '弹出提示("收到" & 设备名称 & "发来的数据\n" ) # print("Received Data from" & device_name)


     单个数据 = 字节到文本(数据,"GBK")    '接收到一个数据 # one_input = byte_to_str(data, "GBK")  ##receiving a single input
     所有数据 = 所有数据 & 单个数据       '数据拼接 # all_input = all_input & one_input ## cumulating all input
     如果 取文本右边(所有数据,2) = "\r\n" 则   '有接收到一帧数据 # if all_inputp[-2] ==“\r\n” ## when reach the end of a line (\r\n is the default line separator)
         分割数据 = 分割文本(所有数据,",")     '这里分割标准是 逗号 # divided_input = text.divide(all_input, ",") ## text.divide() is a built-in function.
       # In this step, when detecting the end of the line (\r\n), separate all_input by comma with the built-in function text.divide()

         如果 取数组成员数(分割数据)>2 且 取文本右边(分割数据(0),4)="Data"  则  '到这一步,基本数据就接收对了,可以开始处理了 # if counting(divided_input) >2 AND divided_input(-4)="Data"
     # The purpose of this step is to verify whether divided_input contains >2 elements and whether the right most four strs are "Data", if so, the data are in right format
             标签7.标题 = 分割数据(1) # tag7. title() = divided_input(1)
             如果 分割数据(2)="1" 则 # if divided_input(2) == "1"
                如果 报警 = "1"  则 # if alarm == "1"
                    手机1.振动(100) # phone1.viberate(100)

                     播放音乐("666666.mp3") # play.("666666.mp3")

                    结束 如果 # end if

            否则 # else
                报警 = "1" # alarm = "1"
            结束 如果 "end if"


         结束 如果  '数据处理完毕 # end if ##data processed

         所有数据 = "" '在实际测试发现,推荐传输速率最快100ms/n,否则因为太快,接收的时候是两遍数据 # all_input =""
             ## In this step, the upload rate should be 100ms/n, otherwise the data will be received twice
     结束 如果 #end if
结束 事件# end function definition


事件 按钮1.被单击() # Define function button1.clicked()
    变量 已配对设备组 为 文本型() # str paired_devices
    变量 取已配对设备集合 为 集合 # group paired_devices.group() ## Retrieve the paired_devices and save in the format of group
    变量 i 为 整数型 # int i
    蓝牙1.断开连接() # bluetooth1.disconnect()
    高级列表框1.清空项目() # superior_list.clear() clear the list
    取已配对设备集合 = 蓝牙1.取已配对设备() # paired_devices= bluetooth1.paired_devices()
    i=0
    判断循环首 i<(取已配对设备集合.取项目总数()) # if i < paired_devices.counting() ## if i is smaller than the amount of paired devices
            已配对设备组 = 取已配对设备集合.取项目(i) # paired_devices = paired_devices.item(i)
            高级列表框1.添加项目("Bluetooth_.png",已配对设备组(0) & "(已配对)",已配对设备组(1),"","") superior_list.add("Bluetooth_.png", paired_devices(0)& “paired” ,"paired_devices(1)")
            i = i + 1
    判断循环尾# end if
    蓝牙1.搜索设备() # bluetooth1.searchdevice()
    弹出提示("开始搜索蓝牙...") # print("Begin to Search for Bluetooth Device")
结束 事件 # end function definition


事件 按钮2.被单击() # Define function button2.clicked()
    如果 蓝牙连接状态 = 真 则 # if blueToothStatus == true
        蓝牙1.发送数据(文本到字节("1","GBK")) # bluetooth1.send(str_to_byte("1","GBK"))
        手机1.振动(100)# phone1.viberate(100)
    结束 如果 #end if
结束 事件 # end function definition

事件 按钮3.被单击()  # Define function button3.clicked()
    如果 蓝牙连接状态 = 真 则 # if blueToothStatus == true
        蓝牙1.发送数据(文本到字节("2","GBK")) # bluetooth1.send(str_to_byte("2","GBK"))
        手机1.振动(100)# phone1.viberate(100)
    结束 如果 #end if
结束 事件 # end function definition

事件 按钮4.被单击() # Define function button3.clicked()
    如果 蓝牙连接状态 = 真 则 if blueToothStatus == true
        蓝牙1.发送数据(文本到字节("3","GBK")) # bluetooth1.send(str_to_byte("3","GBK"))
        手机1.振动(100)# phone1.viberate(100)
    结束 如果 #end if
结束 事件 # end function definition

事件 时钟1.周期事件() # Define function clock,.periodic() # define a periodic event for the clock
    如果 设备报警 = 1 则 # if device_alarm == 1
        手机1.振动(100)  # phone1.viberate(100)

         播放音乐("fengmingqi.mp3") # play.("fengmingqi.mp3")
    结束 如果 # end if


结束 事件 end function definition

事件 手机1.电池状态改变(状态 为 整数型,剩余电量 为 整数型,温度 为 整数型) # define phone1.batterystatus(int b_status, int left_battery, int temp)

结束 事件 #end function definition

事件 标签7.被单击() # define function tag7.clicked()

结束 事件 #end function definition

事件 按钮5.被单击() # define function button5.clicked()
    结束程序() #break
结束 事件#end function definition

事件 按钮6.被单击() # define function button6.clicked()
        如果 蓝牙连接状态 = 真 则 # if blueToothStatus == true
        蓝牙1.发送数据(文本到字节("4","GBK")) bluetooth1.send(str_to_byte("4","GBK"))
        手机1.振动(100)# phone1.viberate(100)
    结束 如果 #end if
结束 事件 # end function definition

事件 按钮7.被单击() #define function button7.clicked()
    手机1.振动(100) # phone1.viberate(100)

        报警 = "0" # alarm ="0"


结束 事件 #end function definition
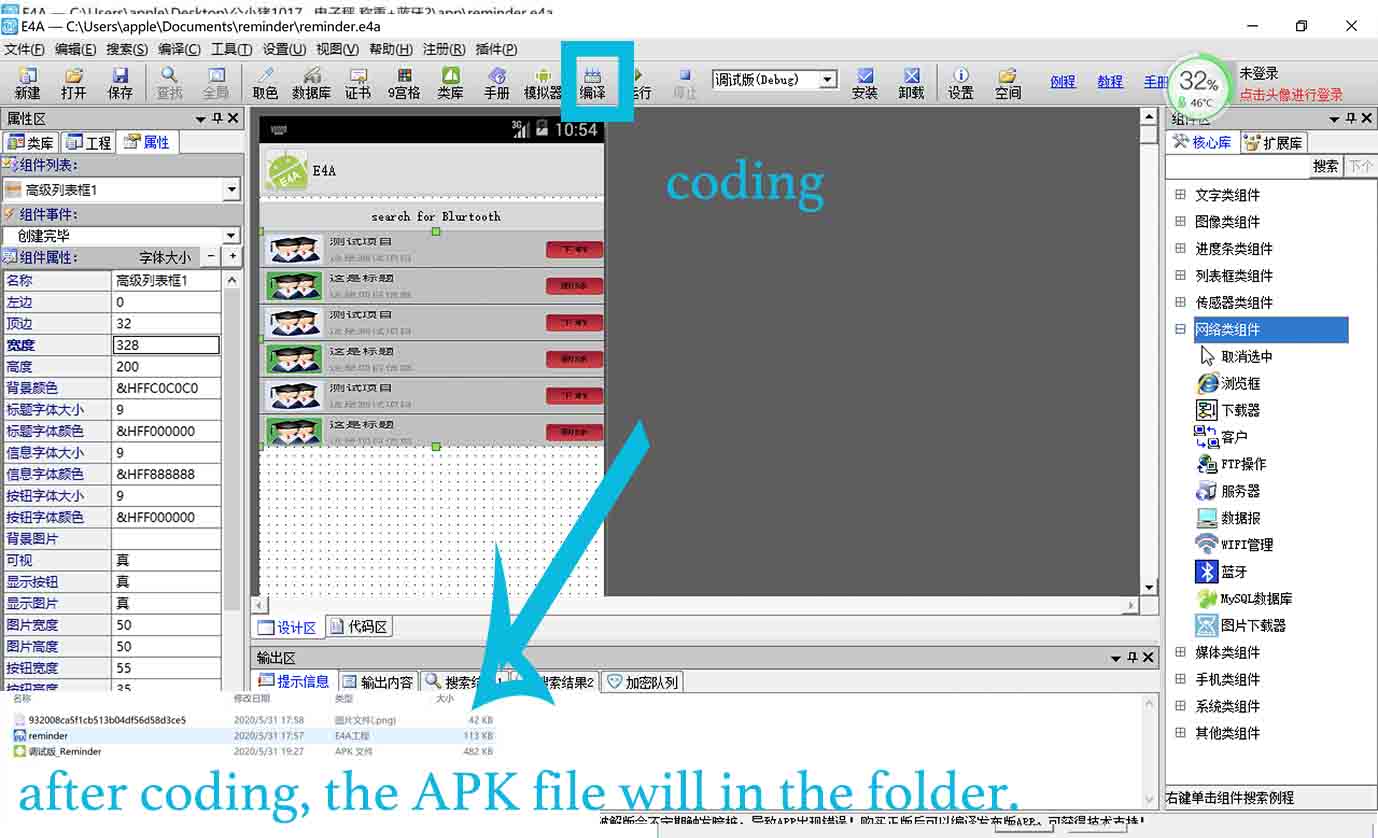
● Step6. Click coding. It will automatically create the APK file (for E4A, it can not export the code, just APK file), and save it in my computer.
● Step7. I have been designed and programmed my board that included the Bluetooth in the input device week and output device week, that means when I download the app to my phone and install it, it will be working.
● Step8. I used WeChat to send the APK file from my computer to my phone, and when I click it, it can be installed in my phone.
Finally, I tested it.
In this week, I faced too much problems, especially the code. I lack the programming ability, even though I have learned a lot of new knowledge in the Fablab. But programming has always been a challenge for me, so I chose E4A using Chinese.In this process, I looked at a lot of cases, and in the forum and netizens to discuss. Finally, I finished the assignment for this week. Programming is very difficult, but it also arouses my great interest. I have started to learn other mainstream programming languages, and I hope I can design various apps independently in the future.
Also, all code and files can be downloaded from my final project page.