13. Invention, Intellectual Property, and Income
Assignment
Develop a plan for dissemination of your final project prepare drafts of your summary slide (presentation.png, 1920x1080) and video clip (presentation.mp4, 1080p HTML5, < ~minute, < ~10 MB) and put them in your root directory
Assignment
Dissemination Plan
There are many open source licenses: GNU AGPLv3, GNU GPLv3, Mozilla public license 2.0, Apache license 2.0, MIT license, and Unlicense. These mentioned licenses are highly protected to unconditional orders, and there are different conditions for source disclosure, licensing, and copyright notice, the same license (for modification), and changes.
I compared the different license:
Creative Commons (CC) : Is free, easy-to-use copyright licenses provide a simple, standardized way to give your permission to share and use your creative work which is comprised of 6 main licenses with specific conditions listed below: Attribution (by), ShareAlike (SA), NonCommercial (NC), NoDerivatives (nd)
MIT: The MIT License is a permissive free software license originating at the Massachusetts Institute of Technology. It applies for software and is free of charge and without limitation, the rights to use, copy, modify, merge, publish, distribute, sublicense, and/or sell copies of the Software.
Apache: The Apache License is a permissive free software license written by the Apache Software Foundation. The license allows the user of the software the freedom to use the software for any purpose, to distribute it, to modify it, and to distribute modified versions of the software, under the terms of the license, without concern for royalties.
I decided to choose the Creative Commons Attribution NonCommercial 4.0 International: for my project and Apache for my coding part.
After finishing FabAcademy I’m planning to get all materials together and post it somewhere. Maybe, it is time to make a post on WIKIHOW. I haven’t decided yet, but I would like to receive a feedback and any ideas how I can improve the design and code from the internet community.
A major reason that encourages me to make such a decision has been that my project is based on the helpful from many previous free tutorials, without which I would not figure out how to achieve my design. Thus, I hope that my design can also be such a tutorial that help people who want to make their own project.
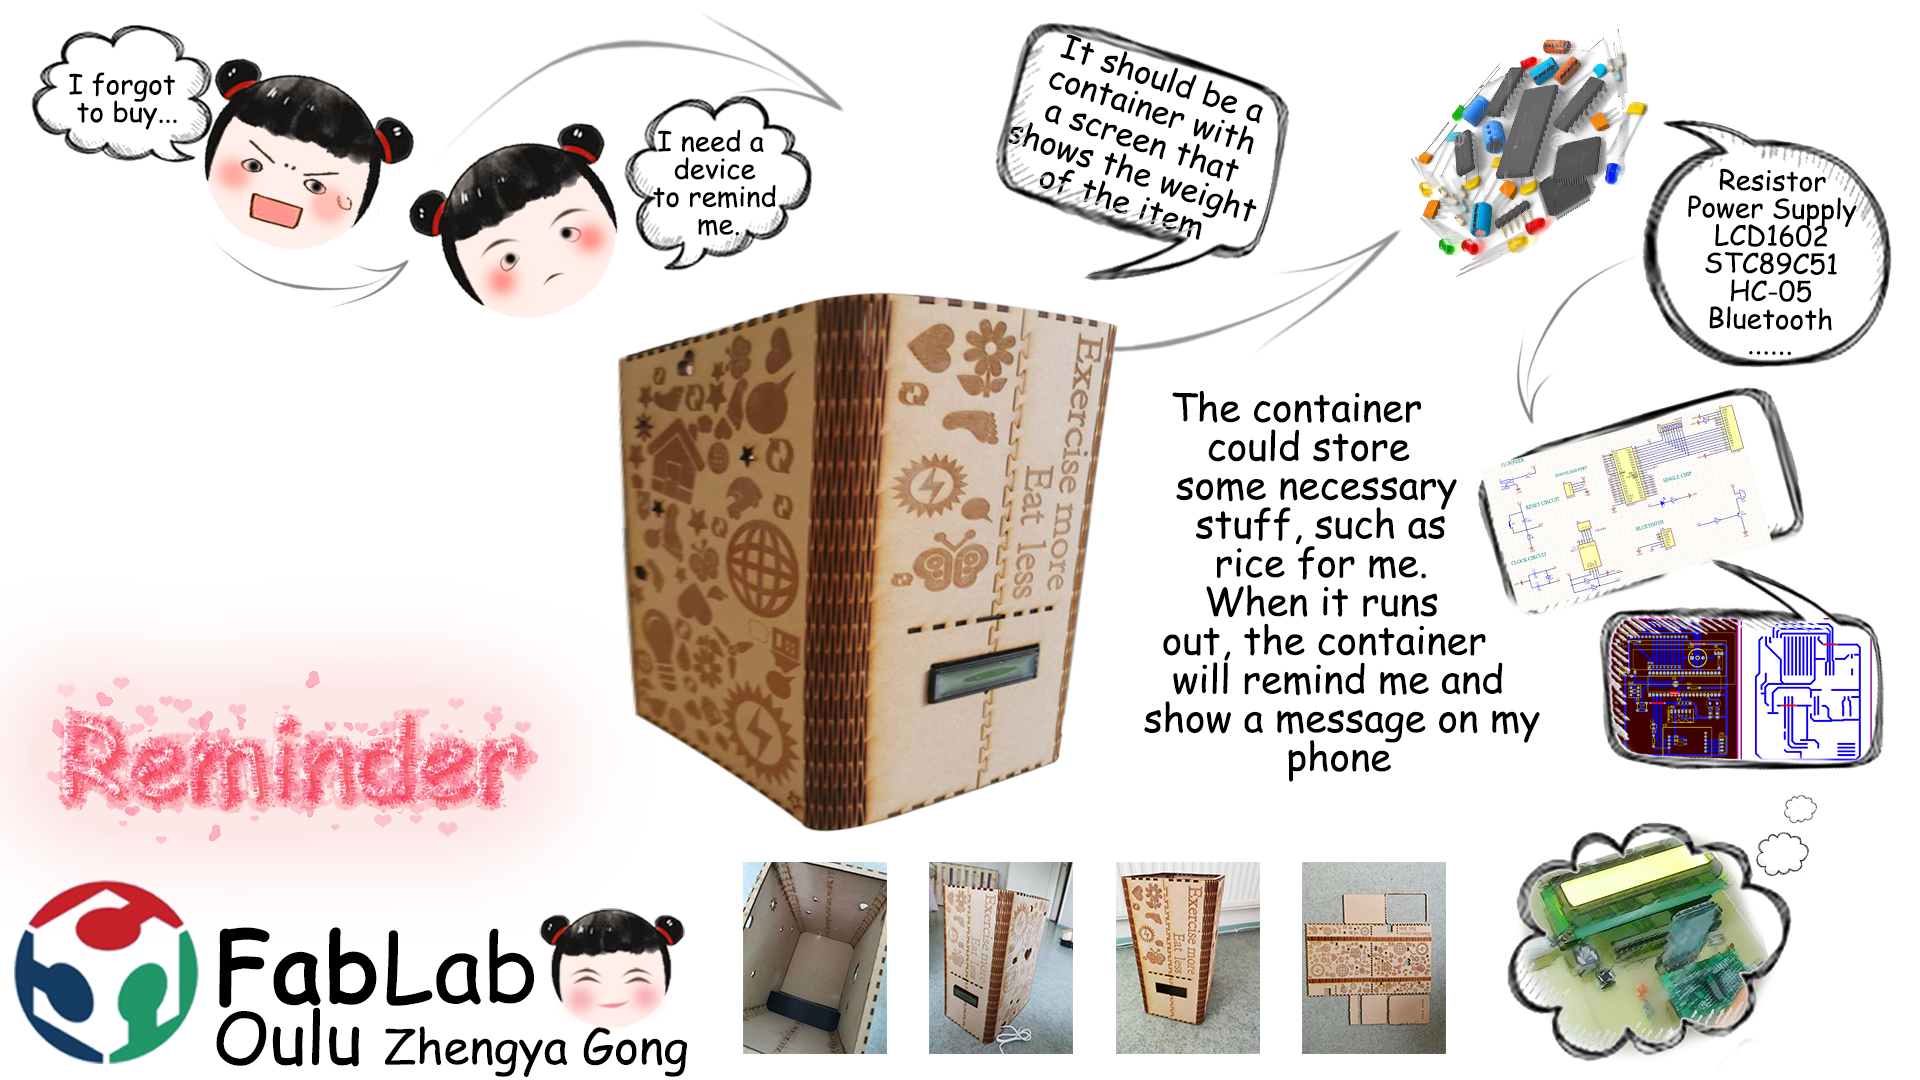
Draft of My Summary Slide
I started working on my slide, so it was updated to the point where I was making progress so far. It already includes my name, the name of the project, the name of the Fab lab, a sketch of the project, a brief description. However, I will add a photo of my finished project later. Maybe I need to come up with a better name for this project too!
Draft of My Video Clip
I chose iMovie for my project presentation video.
Run this iMovie and then import media files to edit
When you run this iMovie equivalent for PC, just click “Import” option to load your wanted video, photo, music files from your computer to the User’s album. Then drag videos to the corresponding video Timeline, drag photo to the middle Timeline, and drag music to the Music Timeline. Of course, if you don’t want to add photo and music, just disregard the related operation.
Note: You may drag several videos in one go, but don’t drag one to another, or you’ll split the video. Of course, you can re-arrange them by drag-and-drop.
Edit videos, audio and photos
Edit Video/Audio
Double click your wanted video/audio clip on Timeline, you can open the editing panel. You can get Video and Audio bar. The video bar allows you to crop, rotate, adjust and speed video, while the audio tool lets you edit the audio track, including Volume, Fade in/out, and Effect (Voice change). Note that if you add an additional audio to combine the video, you need to turn down the original sound of the video.
Split video/audio
To split a video/audio clip, first, select it, next, move the Time Indicator to any position you want, and then click the scissor button.
Trim video/audio to the length you want
To trim video/audio to any length you want, just drag the left or right edge of the clip to the length you want.
Edit photos
If you add a photo or picture, you can create a cool Picture-in-Picture video in clicks. Simply double click the photo added in the timeline to pop up the photo editing window, where you can apply any one of about 36 Motion (Ken-Burn) effects by double clicking it. To delete the motion effect, just right click the photo in the Timeline and then select “Delete Motion” from the submenu. Hit the “Advance” option in the window, you can also rotate, mark the photo or add some other effects like Alpha, shadow and border etc.
More other editing tips
This Microsoft version of iMovie equivalent provides more cool editing tools. For example, you can add titles, transition effects, intro/credits, voiceover and more. If need, you can go to Guide of Wondershre Filmora to get the detailed steps.
Export your video creation
Now, you can export and share your great masterpiece. This iMovie equivalent PC offers you four methods: Device, Format, YouTube and DVD. If you want to watch it on your device like iPhone 5, this app lets you convert it to almost all popular devices to choose. If you want to share it with your family or friends, you can burn it to DVDs for more convenient sharing. Or just save it in the format you want. This app contains nearly any popular video formats for uses. Just have a fun.
Production Possibility
I guess I’m not the only one who always forgets to buy necessary stuff. If possible, I’d like to continue to improve the design, and product it as gifts for friends or elders who always forgot to buy necessary items.
Reflection
At the evaluation stage, Jane found my video’s size is 17281080, which should be 19201080. I don’t know the reasons, cos I following -Neil’s instructions:edited.
variable bit rate 1080p MP3:

ffmpeg -i input_video -vcodec libx264 -crf 25 -preset medium -vf scale=-2:1080 -acodec libmp3lame -q:a 4 -ar 48000 -ac 2 output_video.mp4
Also, I tried
ffmpeg -i input video -vcodec libx264 -crf 25 -preset medium -vf scale=1920:1080 -acodec libmp3lame -q:a 4 -ar 48000 -ac 2 output_video.mp4
However, it did not change, also 1728*1080. Then I googled and tried to figure out the solution. Finally, I got it, and hope it will help others.
ffmpeg -i i.mp4 -vcodec libx264 -crf 25 -preset medium -vf scale=1920:1080,setsar=1:1 -acodec libmp3lame -q:a 4 -ar 48000 -ac 2 output_video.mp4