Applications and implications
1. Weekly Brief Summary
This week, I discussed with the instructor how to proceed with the Final Project.
My goal for my final project is to create a 3D printer that lamination of 2D or 3D data using water-based materials and freezing and solidifying the output at -℃ environment.
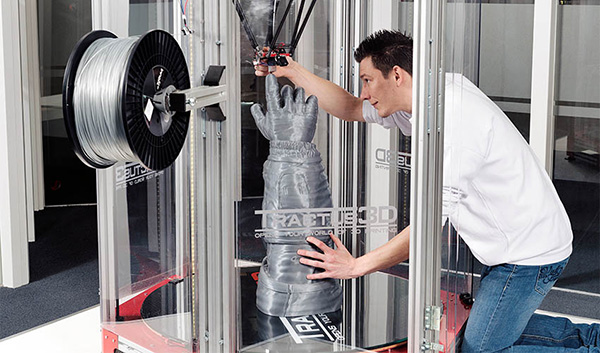
I verified the structure of the 3D printer with reference to the works of “CERAMBOT” and “3D Potter” and FabAcademy graduates.
I will update the necessary materials and parts as we proceed with the project.
↓
I’ve given up on developing the Ice 3D Printer.
The reason is that I judged that I couldn’t achieve the goal of the project in this FabAcademy period.
I first struggled with the material development stage.
So I couldn’t proceed with the project because I was planning to verify the structure of the 3D printer based on the materials.
So I decided to switch to a back-up plan: making “Lighting Accessories”.
These accessories will not only glow, but also allow the wearer to change the color of the accessory to the color of their choice, and interactively change colors in response to ambient light and sound.
2. Weekly Assignment Requirement
Propose a final project masterpiece that integrates the range of units covered.
Your project should incorporate:
- 2D and 3D design
- additive and subtractive fabrication processes
- electronics design and production
- microcontroller interfacing and programming
- system integration and packaging
- Where possible, you should make rather than buy the parts of your project.
- Projects can be separate or joint, but need to show individual mastery of the skills, and be independently operable.
See Final Project Requirements for a complete list of requirements you must fulfil.
Learning outcomes
- Define the scope of a project
- Develop a project plan
Have you
- What will it do?
- Who has done what beforehand?
- What will you design?
- What materials and components will be used?
- Where will they come from?
- How much will they cost?
- What parts and systems will be made?
- What processes will be used?
- What questions need to be answered?
- How will it be evaluated?
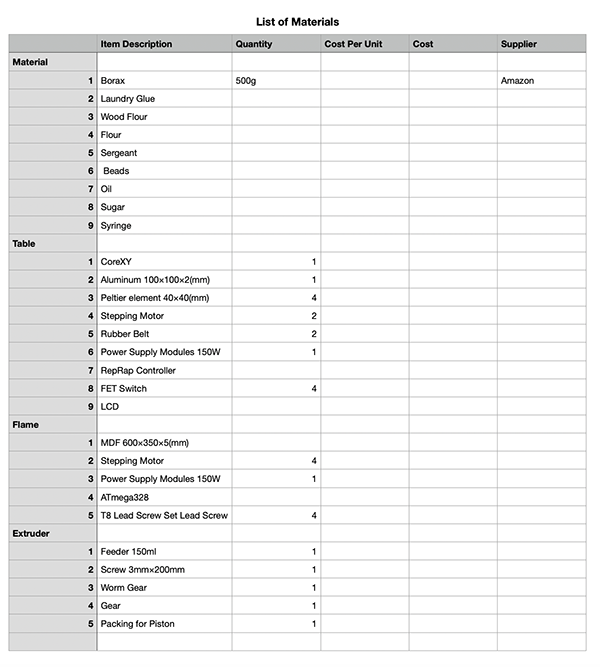
The answers to the questions above will allow you to create your BOM (Bill Of Materials).
3. Description of Assignment Work
I changed the content of the final project from “Ice 3D Printer” to “Lighting Accessories”.
At Week10, I documented “Applications and Implications” of “Ice 3D Printer”.
The “Applications and implications” of “Lighting accessories” are documented on the Final Project page.
Lighting Accessories
What will it do?
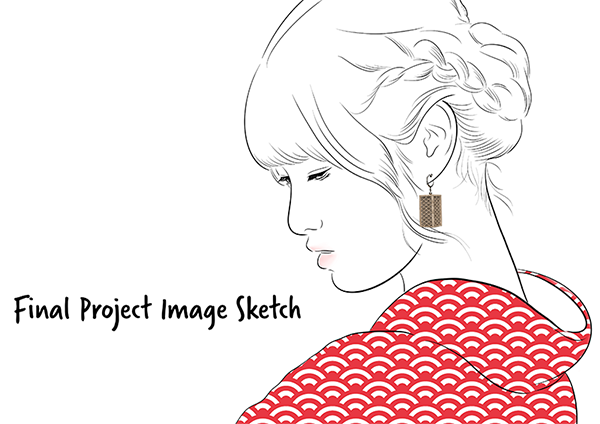
This is a glow-in-the-dark accessory based on the traditional Japanese “Andon” lighting technique.
This accessory is designed to be worn with a kimono or yukata.
At events such as festivals and fireworks displays, the lighting changes according to the music and brightness of the surroundings.
You can also program the lighting to match the design of the kimono or yukata you are wearing.
- Idea Sketch

- Image Sketch
- 3D Modeling
[Normal ver.]
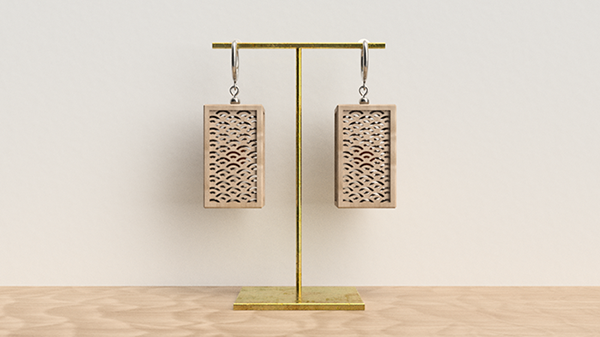
[Lighting ver.]

I have created two image images when the LED is lit and when it is not lit.
This was created on week03.
I have modelled this Accessories to a size of 20mm wide, 20mm deep and 35mm high.
This will be the size of the final accessories.
Who has done what beforehand?
I looked for examples similar to the accessories I was making.
So I decided to brush up on my ideas based on a few reference examples.
(1) Output Device Idea
I based the production of the project on several reference examples. The first example I used as a reference was a [wristband] developed by PIXMOB that was used in a live performance by [Taylor Swift]. The wristband is a receiver that controls an infrared irradiator with DMX, and the wristband understands the signal and can buy colors and emit light. It came with [LED] [infrared receiver LED] [button battery] as a use part. I used this product as a reference to figure out how [KOSAI] works.
| Product Appearance | Inside the product |
|---|---|
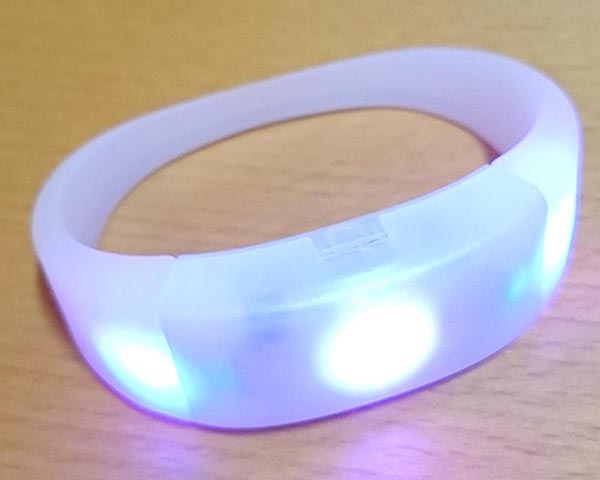 |
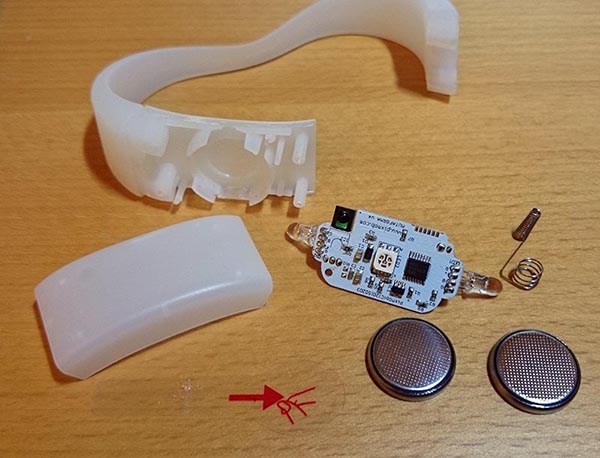 |
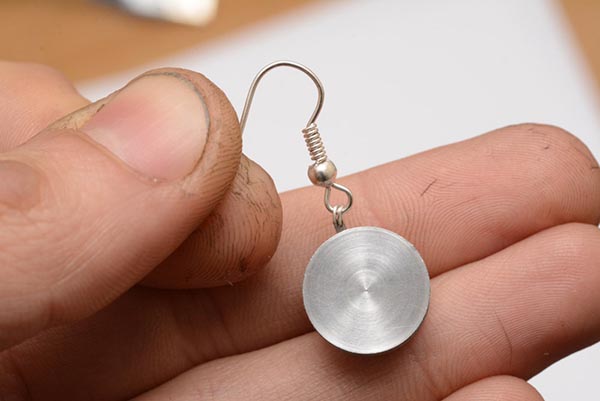
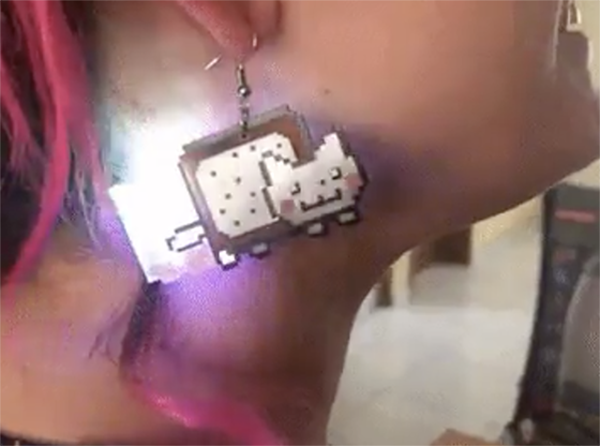
(2) Programmable LED Earrings
We also needed to be cautious about [size] and [weight] in producing the accessories. So we used the example of charliestar, which controls [Neopixel] in [ATtiny9]. I’ve also made my own wearable board to fit this accessory as small as possible in both [size] and [weight].
(3) Peltier element idea(I’m not thinking about this idea now.)
At first I was considering a glowing accessory powered by a Peltier element, but due to weight and design considerations, I decided not to use it at this time.
What will you design?
In order to make this accessory a practical design, we plan to keep the weight down to about 10 grams.
I also decided to use an infrared communication system to control the LED lighting pattern of the earrings.
The reason why I didn’t use [ATtiny45] is because of memory problem. The reason why I didn’t use [ATtiny45] is because of the memory problem.
I wanted to prepare [X number] of colors to make some LED lighting patterns.
So I decided to use [ATtiny85], which has a lot of memory capacity.
In order to control analog information such as ambient sound and light sent by infrared communication, I decided to use an ESP32.
The accessory with the ESP32 built in is the [obi clamping].
The ESP32 takes the information received from the light and sound sensors and combines it with the lighting patterns to send the information to the earring side using an infrared communication system.

What materials and components will be used?
Where will they come from?
How much will they cost?
About Earrings Components
The earring will be ATtiny85 to control the lighting of the Neopixel.
We plan to use 2 x 2 pairs of neopixels for a total of 4.
Two 1.5V button batteries are used to power each accessory.
An infrared receiver (PIC79603) will be installed at the bottom of the accessory to receive the signals from the ESP32.
Parts used
| component | vender | cost(JPY) | quanitity | total | notes |
|---|---|---|---|---|---|
| ATtiny85 | Akitsukidenshi | ¥250 | 2 | ¥500 | shop link |
| Neopixel_WS2813 | Akitsukidenshi | ¥30 | 2 | ¥60 | shop link |
| Infrared receiver_PIC79603 | Akitsukidenshi | ¥120 | 2 | ¥240 | shop link |
| Coin battery_LR44/1.5V | Akitsukidenshi | ¥100 | 1 | ¥100 | shop link |
About Obi Clasp Components
Inside the obi clasp is a circuit that uses the ESP32 and a 1000mAh rechargeable lithium battery.
The ESP32 also controls an infrared transmitter to read input from the sound sensor, light sensor, accelerometer, and potentiometer and send the information to the side of the earring.
The battery is designed for up to three hours of use.
We have also decided to incorporate a charging circuit to make this a rechargeable device.
Parts used
| component | vender | cost(JPY) | quanitity | total | notes |
|---|---|---|---|---|---|
| Wi-Fi module ESP-WROOM-32 | Akitsukidenshi | ¥550 | 1 | ¥550 | shop link |
| Rechargeable lithium battery(1000mAh) | MakerFocus(Amazon) | $22.99 | 1 | $22.99 | shop link |
| infrared transmitter_OSI5FU5113A-40 | Akitsukidenshi | ¥200 | 1 | ¥200 | shop link |
| Sound sensor_WM-61A | Akitsukidenshi | ¥50 | 1 | ¥50 | shop link |
| Photosensor_L-31ROPT1C | Akitsukidenshi | ¥200 | 1 | ¥200 | shop link |
| Accelerometer_ADXL345 | Amazon | ¥720 | 1 | ¥720 | shop link |
| Power switch_SS12D01G4 | Akitsukidenshi | ¥25 | 1 | ¥25 | shop link |
| Lithium Ion Charging Module_TP4056 | Amazon | ¥680 | 1 | ¥680 | shop link |
What parts and systems will be made?
What processes will be used?
-
Input device
・Photosensor (L-31ROPT1C)
・Sound sensor (WM-61A)
・Accelerometer (ADXL345)
・IR receiver (PIC79603) -
Output device
・Neopixel (WS2813)
・Infrared transmitter (OSI5FU5113A-40) -
Subtractive
・Earrings & Obi Clasp Exterior (Laser cutter fabrication) -
Additive
・Obi Clasp Body (3D printer fabrication)
How is the project going to be developed?
Schedule
| part.1 2020/6/9~6/11 |
part.2 2020/6/12~6/18 |
part.3 2020/6/19~6/25 |
part.4 2020/6/26~7/2 |
part.5 2020/7/3~7/7 |
Final 2020/7/8 |
|
|---|---|---|---|---|---|---|
| Description of Work | Breadboard circuit design & Programming |
Circuit Design & Board Design at EAGLE |
Cutting boards with the SRM-20 & Soldering & Program and Verification |
Exterior Design & Revision work |
Photography and video recording & Preparation of presentation data |
Presentation Day |
1st spiral
- The earring is designed to weigh about 10 grams or less.
- Create a program that makes the accessory glow like a lantern.
- Use the band clasp as a controller to control the earring’s glow with ambient sound and light.
2nd spiral
- To further reduce the weight of the earring, it is designed with a flexible substrate and other materials to further reduce the weight of the earring.
- Neopixel’s light will shine all the way to the back side.
- Waterproof the earring.
- Increase the shape of the design.
- Simplify the design to reduce manufacturing costs (mainly manufacturing time).
3rd spiral
- Develop workshop kits and courses to make these accessories.
What questions need to be answered?
- Can I make a board that fits the accessories under 10 grams?
- Can the controller placed near the belly communicate with the earring without problems?
- Can the design of accessories and the board be compatible?
How will it be evaluated?
The wearer and visitors to the FabLab will be asked to answer if the design can get instructions from women.
Ice 3D Prinnter
What will it do?
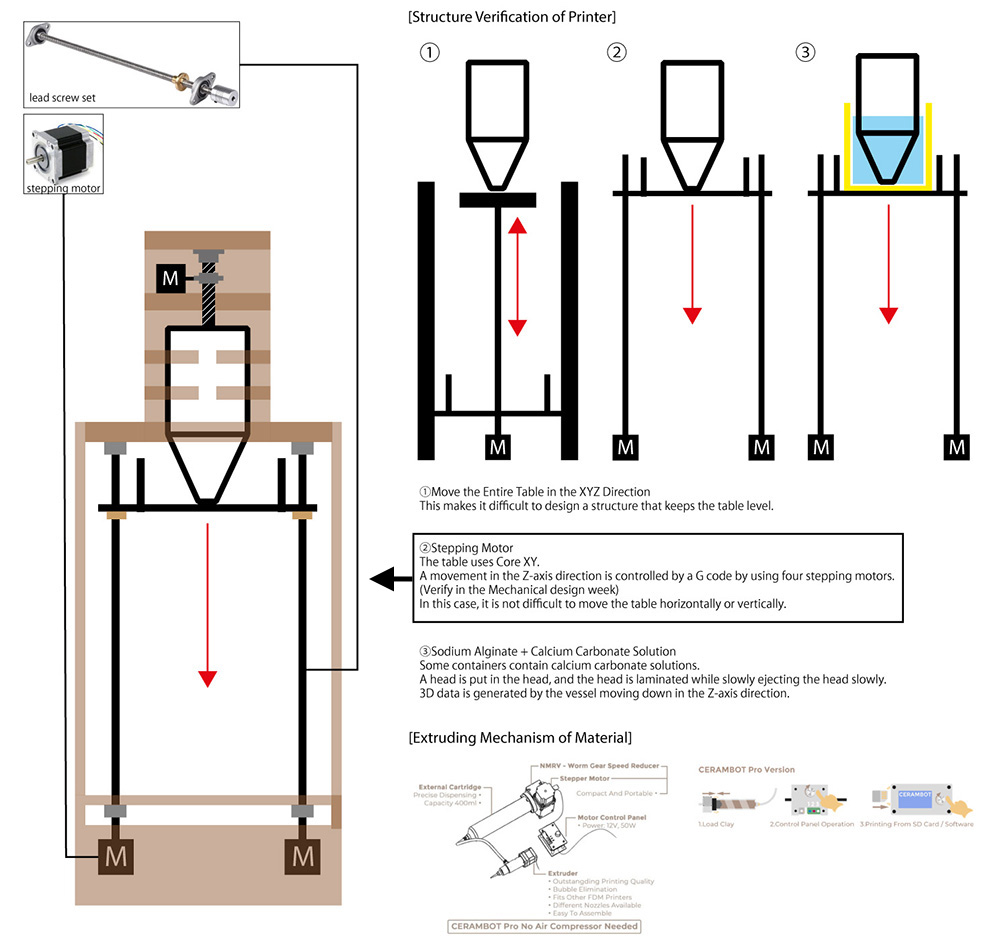
The final project I propose is a 3D printer that lamination 2D or 3D data using water-based materials and freezing and solidifying the output at -℃ environment.
- Idea Sketch
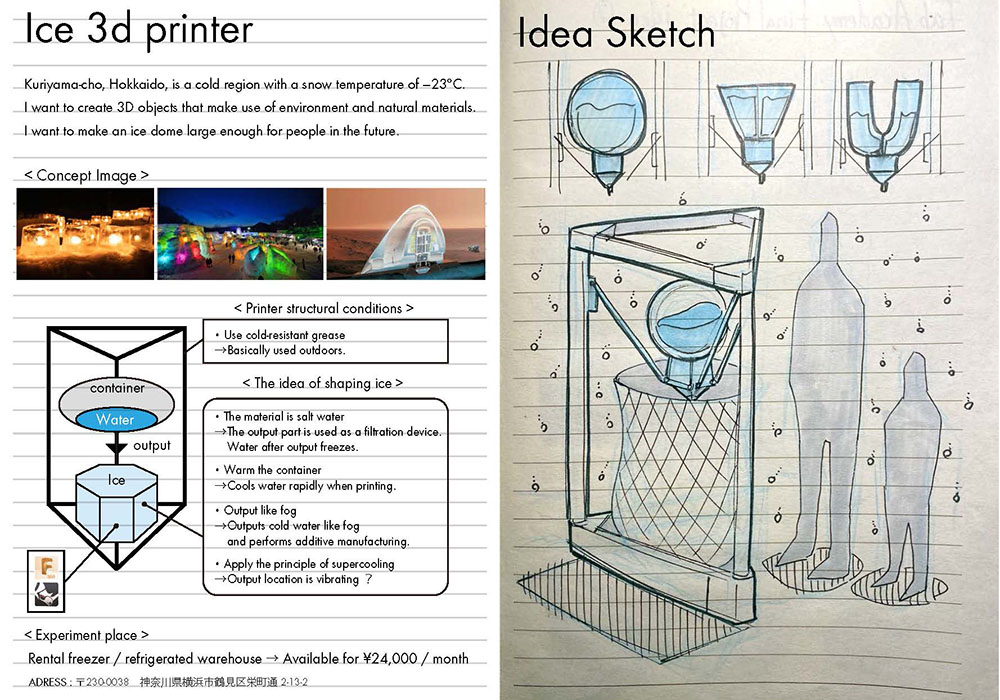
In my first sketch of ideas, I was thinking of a way to layer the material while iceing as it leaves the extroducter.
But this was a real difficult idea, so I thought about another way.
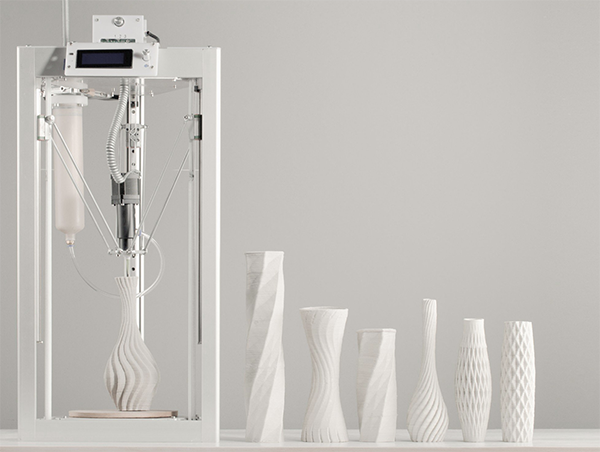
I looked at the structure of the 3D printer and how it solidifies clay such as “CERAMBOT” and “3D Potter”.
- Brushup Sketch
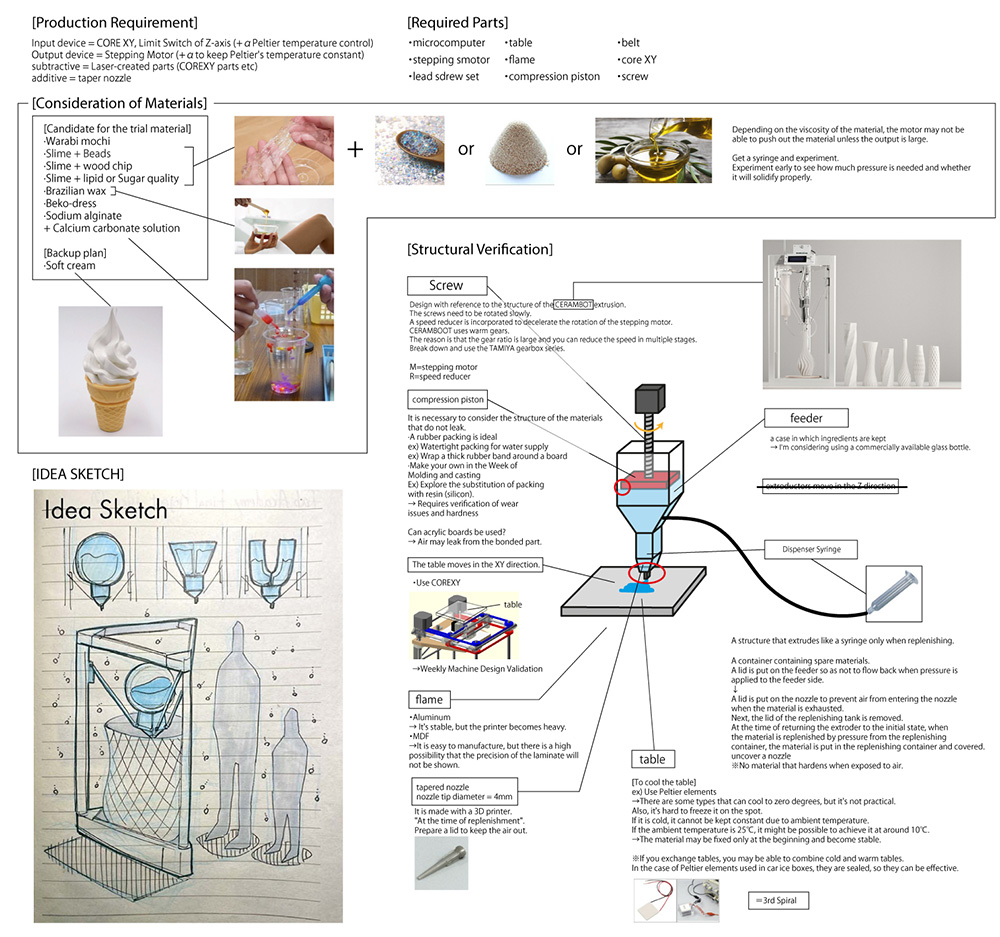
While verifying the materials and parts necessary for the 3D printer that I want to make and the mechanism that I referred to, I summarized them into an idea sheet.
Based on this idea sheet, we created a simple 3D model.
- 3D Model
Who has done what beforehand?
External Case
(1) 3D Ice Printer - McGill University
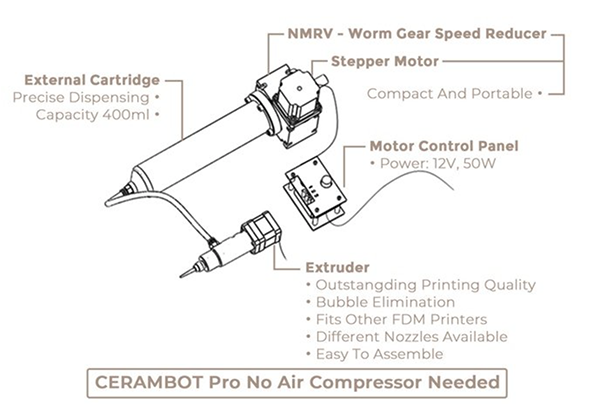
(2) CREAMBOT

FabAcademy Other Final Project Case
(1) 3D Clay Printer - Carina H. Kristensen
(2) 3D Cream Printer - Machine Project(Harvard Section)
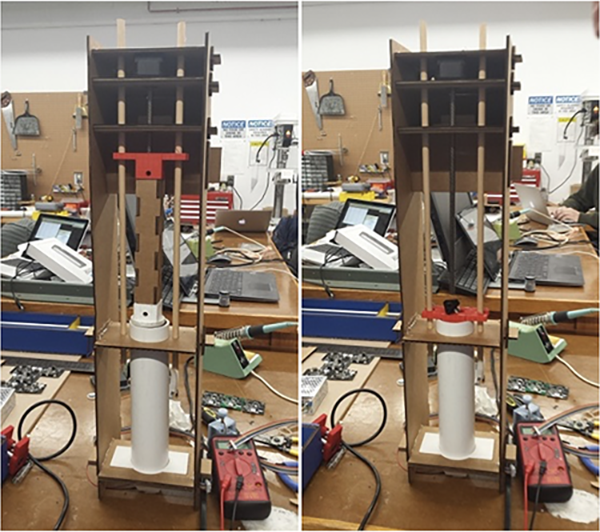
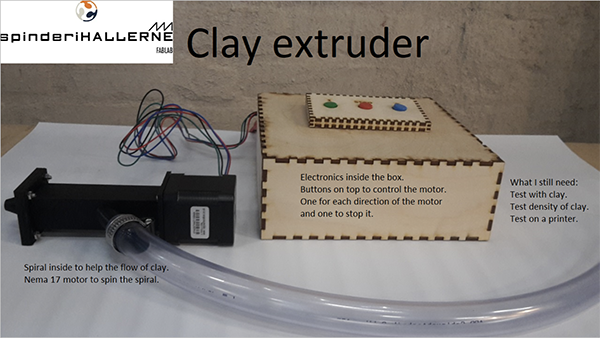
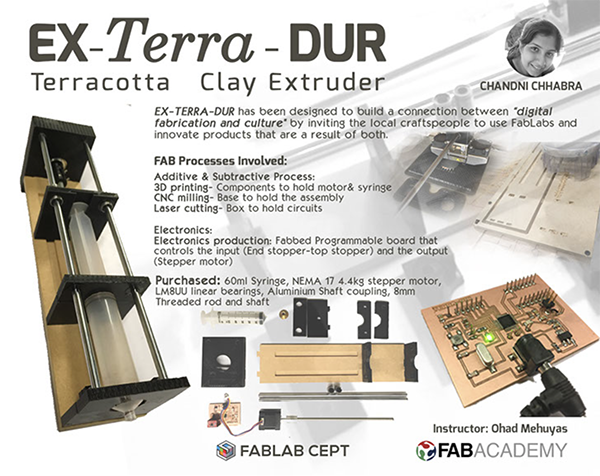
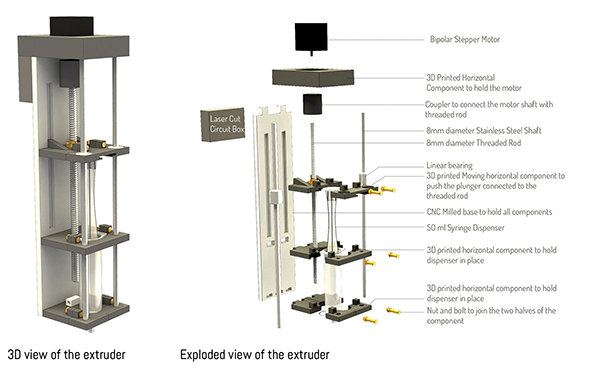
(3) Terracotta Clay Extruder - Chandni Chhabra
What will you design?
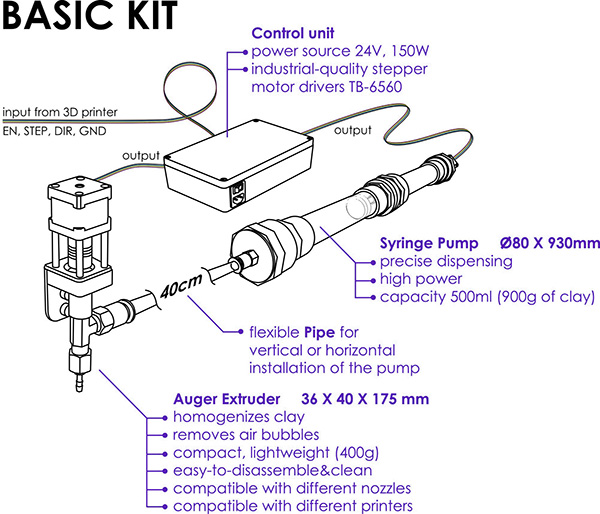
- Extruder
An extruder using StepperMotor is also a tank that stores materials at the same time.
When the material runs out, the extruder rotates in reverse to replenish the material.
This operation is designed so that it can be done with a switch.
- Cold Bed
Use a Peltier element and temperature sensor to keep the table that outputs the material cool at a constant temperature so that the output can be firmly fixed to the table.
Also, make it possible to check the temperature condition on a display.
What materials and components will be used?
Where will they come from?
How much will they cost?
**What parts and systems will be made?
What processes will be used?
-
Input device
・CORE XY
・Limit Switch of Z-axis
・Peltier & temperature control -
Output device
・Stepping Motor
・To keep Peltier’s temperature constant -
Subtractive
・Flame(Laser cutter fabrication)
・Table of CoreXY(Laser cutter) -
Additive
・Molding of the taper nozzle(3D printer)
・Extroder holder production(3D printer)
What questions need to be answered?
The first task is to develop the output material.
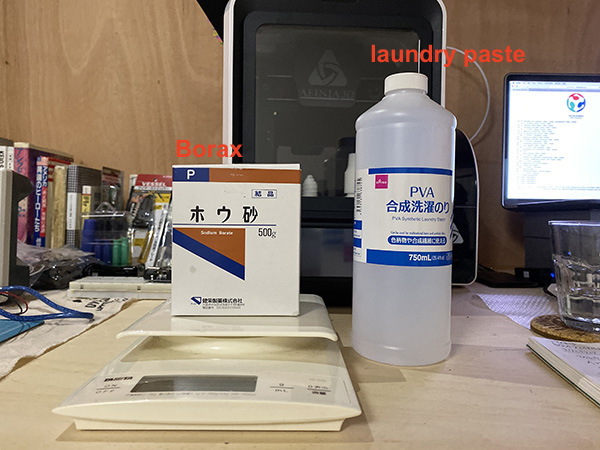
I plan to use slime-like substances as potential materials.
I prepared [water + borax + laundry paste] for making slime.
I made slime under 3 different conditions.
| Hot Water | Laundry Paste | Borax Water | |
|---|---|---|---|
| ① | 65g | 65g | 2g |
| ② | 65g | 65g | 3g |
| ③ | 65g | 65g | 4g |
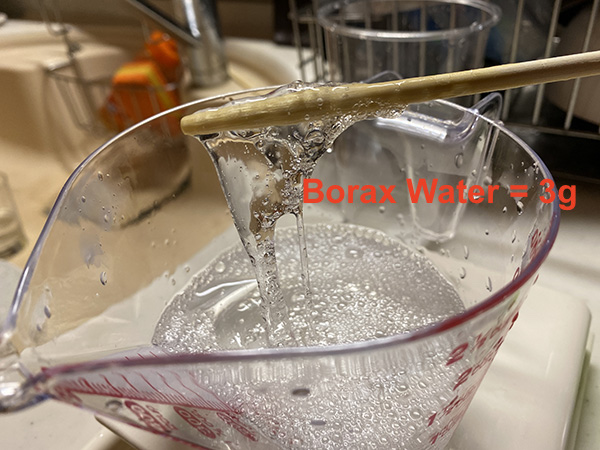
No.1 Slime
The first slime I made was 2g of borax water.
It’s easy to come out of the extruder because the slime is soft, but I decided that it was not suitable as a material because it did not stack.

No.2 Slime
The second slime I made had borax water set to 3g.
I thought the slime should be just right when mixed, but it took a lot of pressure to come out of the extruder.
I thought about some solutions such as increasing the nozzle hole of the extruder, but at the moment I decided that it was an inappropriate condition.
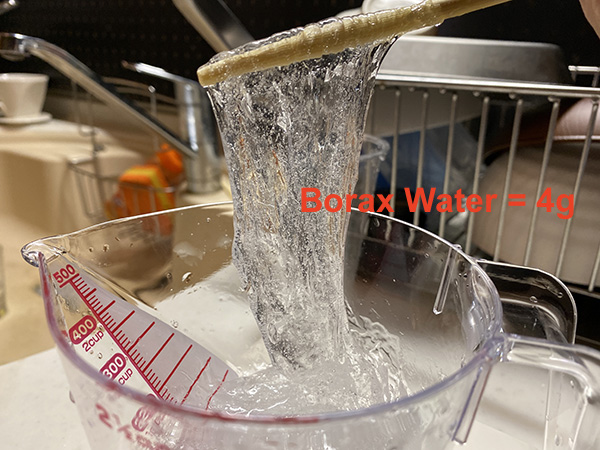
No.3 Slime
The third slime we made was 4g of borax water.
We decided this was not suitable for the material because the slime was too hard.
So I used it as a cleaning tool for the bookshelf.
I made 3 kinds of slime, but I couldn’t make slime with proper conditions as a material.
In order to make the slime a suitable hardness, I will try not only borax water, but also oil and other materials to adjust the hardness.
In addition, the nozzle hole of the extruder must be adjusted according to the hardness of the material. (2020.4.20)
↓
In the schedule, I decided to give up the production of “Ice 3D Printer” and switch to the production of Lighting Accessories if I could not develop the material by 2020/4/30 .
Since I could not develop the material by the deadline, I decided to recreate the schedule centered on the production of “Lighting Accessories”. (2020.4.30)
How will it be evaluated?
Goal of 1st Spiral
First, I would like to realize a function that can output 2D data like this video.
Goal of 2nd Spiral
Next, I would like to realize a function that can output 3D data like a movie.
The output is supposed to be frozen and solidified in the refrigerator.
Goal of 3rd Spiral
Eventually, I would like to make the printer huge and be able to output a modeled object of the same size as a person such as a kamakura.
Schedule
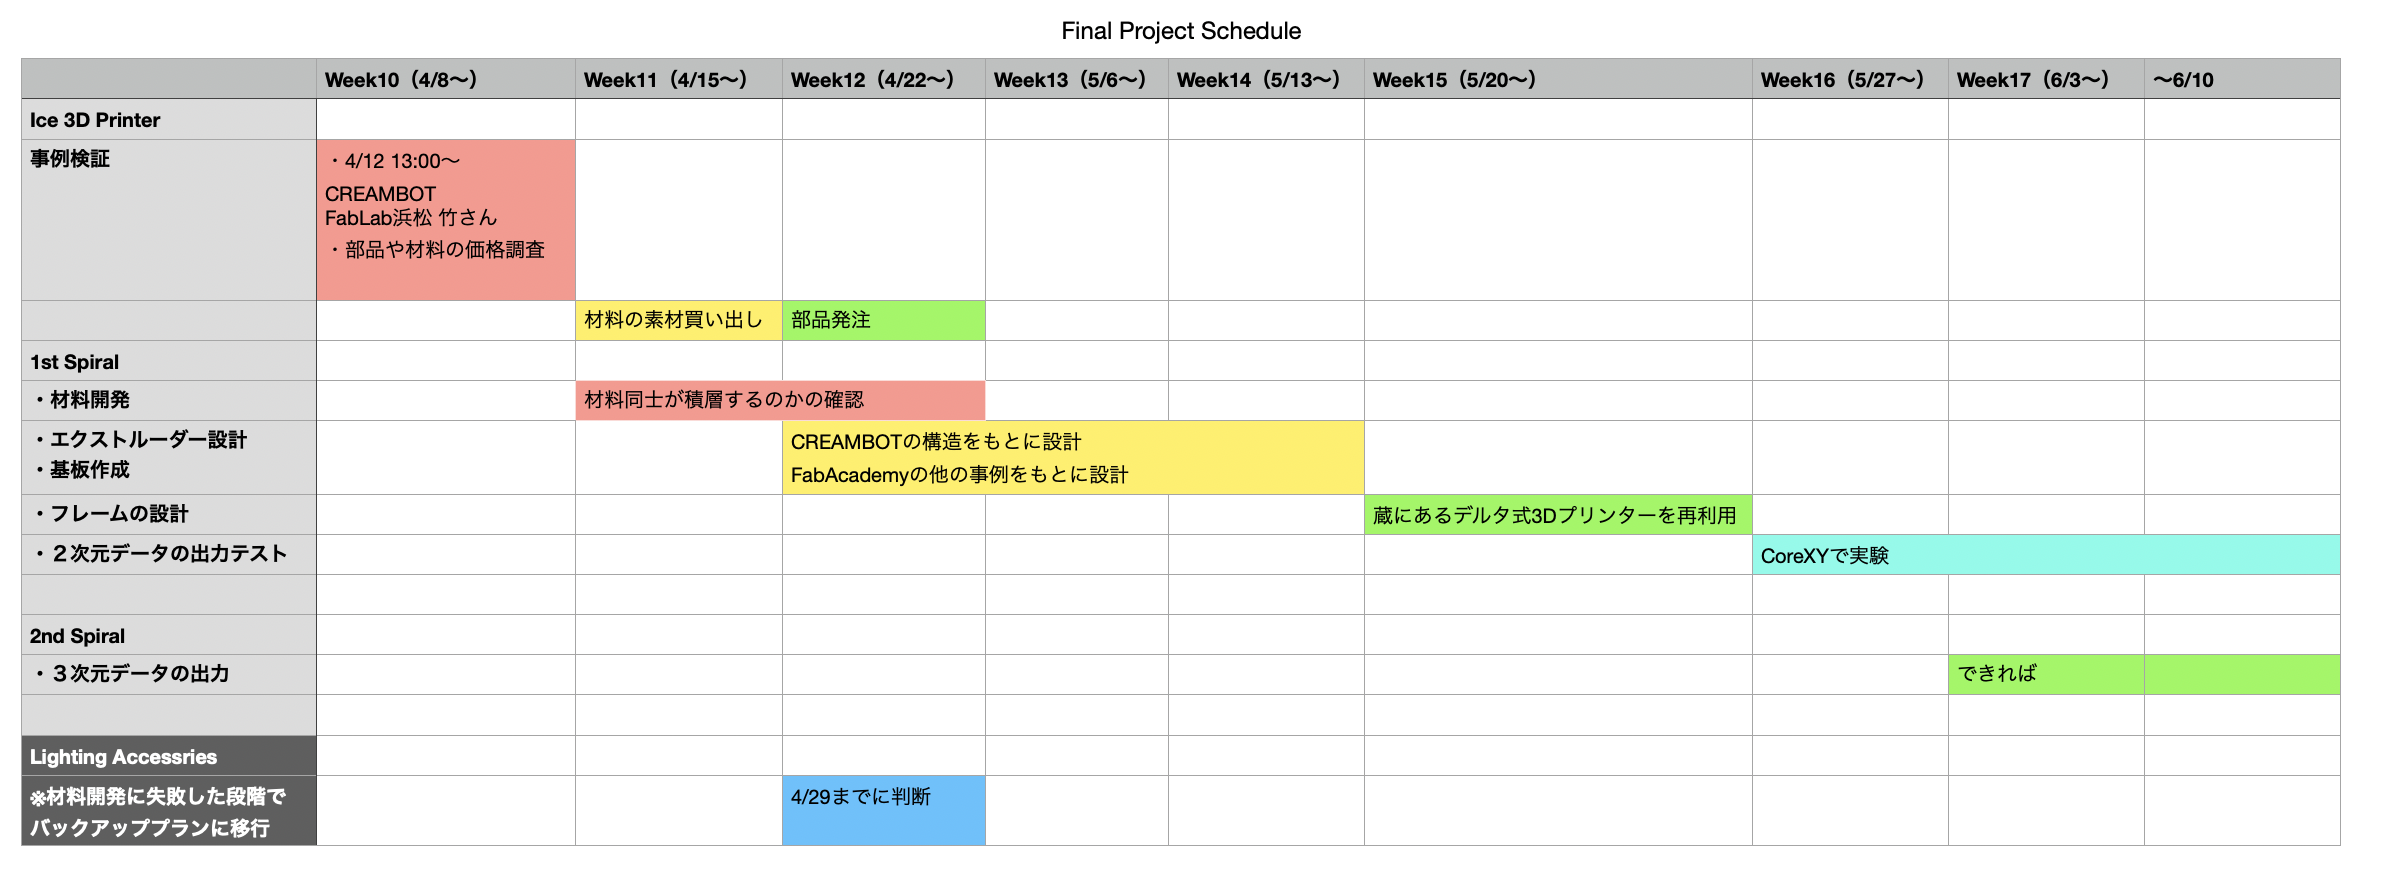
I created a production schedule focusing on material development.
If material development did not go well, I decided to proceed with production of backup plan “Lighting Accessories”.
4. Description of Important Weekly Learning Outcome
I set a deadline for material development as one of the time limits for Ice 3D Printer’s schedule.
The primary goal of this project is the design of the extruder.
The material of the materials used is the most important factor in developing an extruder.
This is because the hardness of the material can be used to determine how much pressure is required for extrusion, and the power of the prepared motor will change accordingly.
Also, this project has a lot of things to make, so it was a very difficult schedule.
5. Links to Files and Code
None
8. Appendix
None