16. Interface application programming
Write an application that interfaces with an input &/or output device that you made
The initial idea
During this week I would like to test how to configure a web server to communicate with my hello board. I wanted also have an architecture project for my final project.
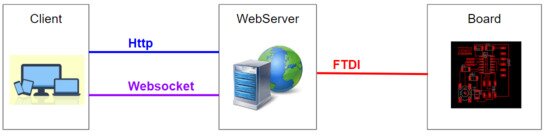
Let's develop
Try to create a server using Python
From the board to the server
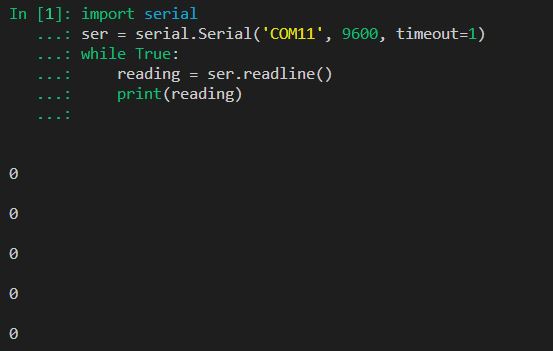
So I start to try connecting my board with my computer using only. I used pyserial to see if I can see my data.
I tested the following code in ipython terminal, and I start to undestand how the library pySerial worked.
import serial
ser = serial.Serial('COM11', 9600, timeout=1)
while True:
    reading = ser.readline()
    print(reading)
From the server to the client
After that, I tried to integrate this code with a Flask server, using Flask_socketIO for the direct communication with client and the python lib Threading to manage the communication between the server and the board.
My idea was to send data whitout styling in first time, but I was'nt able, I try diffrents ways with any success.
From the client to the server
I was blocked, so I try to change my thinking and to go from the client side to the server.
Using bootstrap, I start by making simple template for my application, and I choose to use Chart.js to make the graphics data.
After all, I've encountered the same problem, I wasn't able to communicate using the websocket with flask. I think I need to add a tool like ngnix or wsgi like middleware between the server and the client side.
Use Nodejs and ExpressJs
I spend too much time on this technologie, so I decide to switch from the python language to the javascript and use nodejs as a server. To help me, I used ExpressJs as framework for the server. I choose it, because it is the most light, modular and popular nodejs framework.
Manage node versions
I've already node on my desktop, but to deal with all versions of nodes, I really recommand to use NVM for all the management of node versions.
Learn by examples
I used a lot of javascript tools in my previous works, but I never create a node application, and never use ExpressJs. So I maid reaserch in google to find an example project to learn and starting my project from it.
So the best (simple, complete, extendable) application that I found, was express-ws-chat-sample, it was a chat using ExpressJS and Express-ws to deal with the websockets.
After cloning the project, the first thing that I've done, was to test the chat application, and read each file of the project to understand express framework.
They are three important files:
server.js: The file where the server is configured, and start to listenpublic/client.js: All the javascript code of the client sidepublic/index.html: The main html page
Communicate from the node server to the board
When I understood the application, I try to adapt it for my needs. I start to figure out how to communicate with the my board using node. So, I take the most popular library, the node serialport.
const SerialPort = require('serialport');
const Readline = require('@serialport/parser-readline');

var serialPort = new SerialPort(port, {
    autoOpen: false,
    baudRate: 9600
});

// parser data of the serial port
const parserialPortser = serialPort.pipe(new Readline({ delimiter: '\r\n' }));

parserialPortser.on('data', function(data) {
    // use this data parsed to send it after in the websocket
    console.log(data);
});
I add this code in server.js and see the log that I haved in my computer. After that I displayed the data without chart.
Integrate the client side
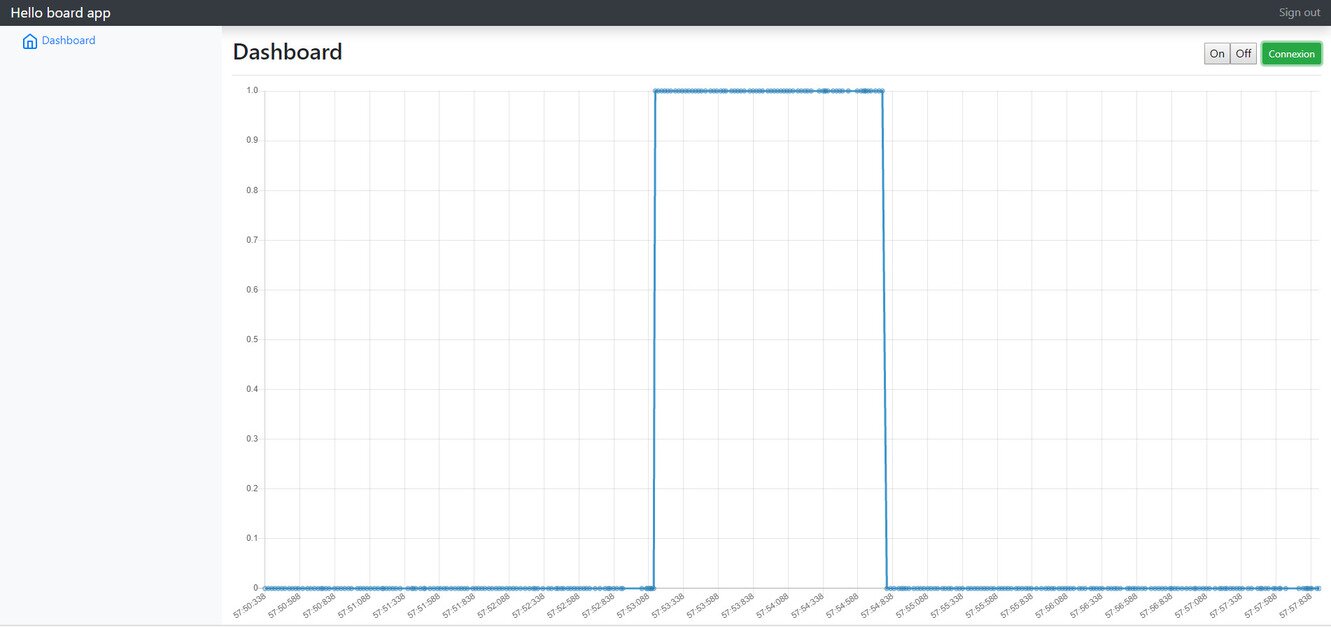
After that, I took the template that I maid on the flask app, and I integrate it on the express project. it was relatively easy, but I had some trouble with the display chart. So I decide, to put a delay when I'm sending data from the board. I looked video to learn more about chart js.
When I was able the receive data from the serial port, and display it in the chart, I was happy for this first victory.
The arduino code:
#include<Arduino.h>
#include<SoftwareSerial.h>
#define rxPin 1
#define txPin 0

// Constants
const int ledPin = A7;
const int btnPin = 8;

const char SWICH_SERIAL_ON = '1';
const char SWICH_SERIAL_OFF = '0';

// Variables
volatile int switchPrevious = 1;
volatile int switchState = 0;
volatile int isOn = 0;

// Serial software
SoftwareSerial myserial(rxPin,txPin);

void setup() {
    pinMode(ledPin, OUTPUT);
    pinMode(btnPin,INPUT);
    switchPrevious = digitalRead(btnPin);
    myserial.begin(9600);
}

void loop() {
    switchState = digitalRead(btnPin);
    if ((switchState == 0) && (switchPrevious == 1)){
        isOn = 1 - isOn;
        digitalWrite(ledPin, isOn);
        // delay to prevent other event
        delay(20);
    }
    switchPrevious = switchState;
    delay(20);
    myserial.println(isOn);
    if (myserial.available()) {
        char inChar = myserial.read();
        if (inChar == SWICH_SERIAL_ON) {
            isOn = 1;
            digitalWrite(ledPin, isOn);
        } else if (inChar == SWICH_SERIAL_OFF) {
            isOn = 0;
            digitalWrite(ledPin, isOn);
        }
    }
}
Add actions from the client side
I decide to improve my application, by sending data from the client side to my board by requesting the server.
I hade two choice to communicate from the client to the server, use http or wobsocket request, I choose the websockets because I already communicate with socket on one way.
I bind some event on button on and off, and onClick, I send action to the webserver with websockets.
HTML :
<button class="ledAction" value="0" type="button" class="btn btn-sm btn-outline-secondary">Off</button>
Client:
function sendAction(type, value) {
    var msg = { type, value };
    ws.send(JSON.stringify(msg));
}

$('.ledAction').on('click', function() {
    // Send button value
    sendAction(LED_ACTION, $(this).val());
});
Server
ws.on('message', message => {
var jsonMsg = JSON.parse(message);
    switch(jsonMsg.type) {
        case actions.LED_ACTION:
            mySerialPort.writeMsg(""+jsonMsg.value);
            break;
        // ... other actions ...
    }
});
Manage connexion between the server and the board from the client
The next functionnality that I've added was, the management of the connexion between the server and the board from the client side. The idea was to be able to interrupt and restart the connexion to the board.
So I added new actions and functions to manage the connexion.
<button id="connect" type="button" class="btn btn-sm ">Connexion</button>
Client:
const updateConnectBtn = value => {
    var btnLabel, classToRemove, classToAdd, valBtn;
    if(value) {
        btnLabel = DISCONNECT_LABEL;
        classToRemove = "btn-success";
        classToAdd = "btn-danger";
        valBtn = DISCONNECT_VALUE;
    } else {
        btnLabel = CONNECT_LABEL;
        classToRemove = "btn-danger";
        classToAdd =  "btn-success";
        valBtn = CONNECT_VALUE;
    }
    $('#connect').text(btnLabel);
    $('#connect').removeClass(classToRemove).addClass(classToAdd);
    $('#connect').val(valBtn);
}
Server
case actions.CONNECT_ACTION:
    mySerialPort.openSerialPort(callbacks.callbackEvntSerialPort);
    break;
case actions.CLOSE_ACTION:
    mySerialPort.closeSerialPort(callbacks.callbackEvntSerialPort);
    break;
Let's refactor and share
I decide to publish my project on github, and I hope he will help some peoples to deal with websockets and serial ports on node.
After creating my repo in github, I commit my project and I push it on the server.
I maid some refactor principally on the server, and I split the sever.js on 5 files:
server.js: the main file server, the centralize all the applicationserver/websockets.js: Manage all the websockets configurations and functionsserver/actions.js: Manage all actionsserver/serialport.js: Manage all the serialport configurations and functions
Setup database with the ORM Sequelize
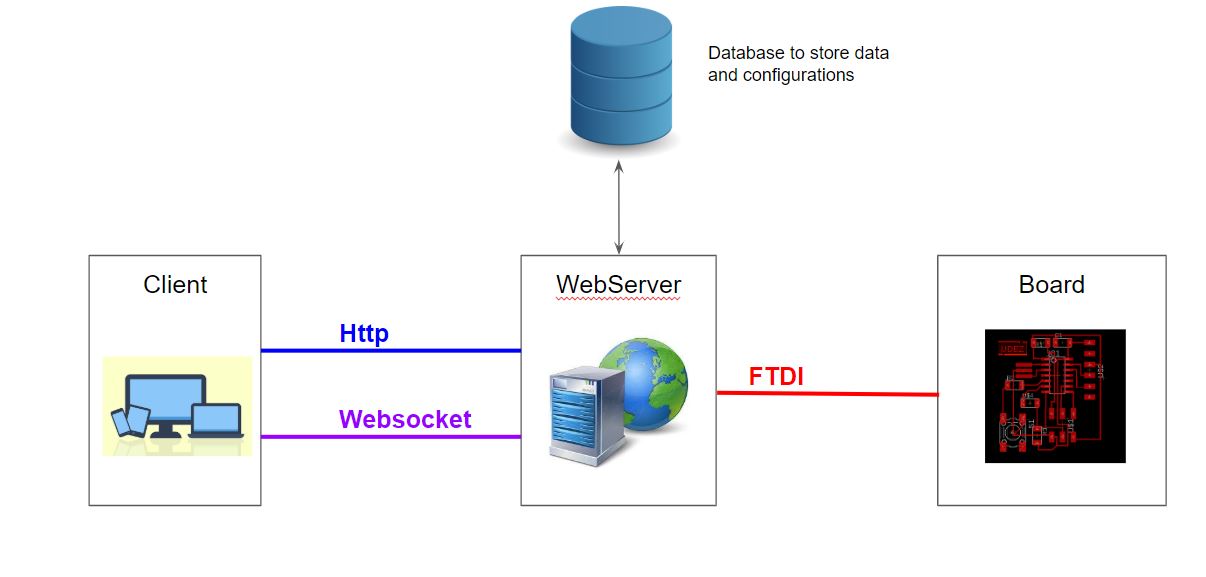
Install
Inpired by this github project, I started to implement sequelize in my app. My first goal is to store data of the state of my led. I choose sqlite database to simplify the setup.
# install ORM , CLI and SQLite dialect
npm install sequelize sequelize-cli sqlite3


# generate models
# init will generate two file, the config file with the models, and migrations folder
node_modules/.bin/sequelize init

# this command will create a new folder with the model and his migration file
node_modules/.bin/sequelize model:create --name LogBoard --attributes data:string

# this command will apply updates of migrations file in database
node_modules/.bin/sequelize db:migrate
For the moment, I wouldn' t complexify the application, so I will not add more tables and relations in my database.
Insert data in the database
In my action.js I add this few lines to store in my database each event that I have.
// import all models
var models  = require('./models');


// on callback action I store the log
const callbackAction = (action, data) => {
    callback(action, data);
    models.LogBoard.create({
        data: `${action} : ${data}`
    }).then(function() {
        console.log(`${action} : ${data} ok`);
    });
};
Demo app
You can find all the source code, just here.