4. Computer controlled cutting assignment
—group assignment: ~~characterize your lasercutter’s focus, power, speed, rate, kerf, and joint clearance~~
—individual assignment: ~~cut something on the vinylcutter~~ ~~design, lasercut, and document a parametric press-fit construction kit, accounting for the lasercutter kerf, which can be assembled in multiple ways,~~ and for extra credit include elements that aren’t flat
My Work
This week I worked on characterizing my laser cutter, making laser cutter test parts, making test parts that vary cutting settings and dimension.
I designed, lasercut, and documented parametric press-fit construction kit, accounting for the laser cutter kerf.
I also demonstrated the use of the vinyl cutter on several projects and provide instructions, a short demo, and an even shorter video below.
Laser Cutter/Engraver Research
Here in Guerin we have two Trotec laser cutters: a Speedy 360 and a Speedy 400. The only difference between them is the size of the bed. The Trotecs are CO2 and fiber laser engraving and cutting machines with a working area up to 39.4 x 24 inch. Trotec’s website says that our machines have a kerf of between .08 and .1 mm. This kerf problem shows up with a project students do here in the Guerin Lab. (See Triangle Project below.)
On the Trotec, we can create new materials for engraving and cutting. We do this pretty frequently as more users come to us and ask for new things. For example, traditionally, we engrave on birch plywood and acrylic. We only recently started engraving on paper. To do that, we had to set up a new material in the Trotec Job Control software.
The power and speed laser parameters are the most important settings in our material database. They can be set as a percentage between 0 and 100%.
Compare the settings for 6mm birch plywood and regular paper.
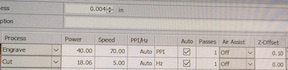
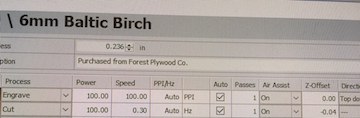
You can see that the power and speed are lower for engraving paper than for the 6mm plywood. The speed for cutting the paper is higher but the power is only 18% of the power needed to cut through the wood.
The Power laser parameter describes the output power of the laser. 100% is maximum power and we need all of that power to get through the plywood. For dark wood engravings or stamp engravings, you generally need high power but low values are used for materials such as paper.
The Speed laser parameter describes the movement of the laser head. Fast speeds lead to short exposure times, slow speeds lead to long exposure times. For example, large-scale engravings of some harder materials are engraved at high speeds between 80 and 100%, but for photo engravings with lots of detail on wood, the speed should not exceed 10%.
Note that cutting and engraving speeds are not comparable. Basically, cutting is slower than engraving…which makes sense. A “high” cutting speed is 10%.
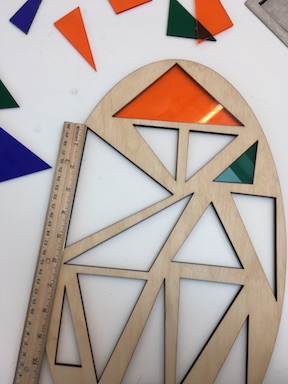
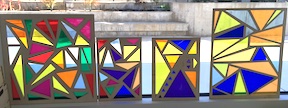
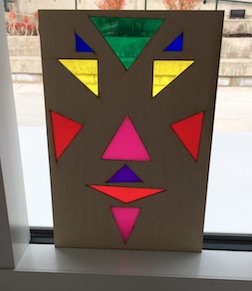
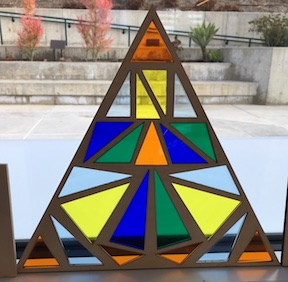
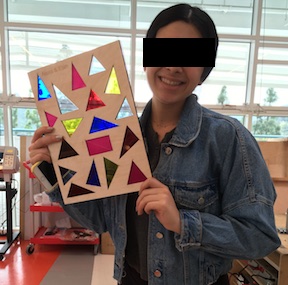
The Triangle Project
The Geometry students were tasked with making a piece of art (like a stained glass window) using only triangles. They had to use at least one of each kind of triangle they were studying (ex: right triangle, scalene triangle, isosoles triangle). I explained the “kerf” to them but they didn’t understand it until they started cutting out their plexi pieces using the same design they used to cut the wood. I require a “click fit” for this project.
So I tell them to measure carefully.
Then make the plexi pieces larger than the cut from the wood so the plexi clicks into the wood and stays there.
Sometimes the piece is really close to the click fit and just needs a little help (like a piece of tape along one edge).
They made some beautiful windows!!
The Kerf Conundrum
Sometimes kids just don’t understand the logic behind the “kerf problem”.
Here’s a demonstration I used to explain the problem.
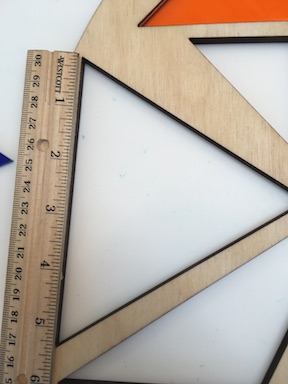
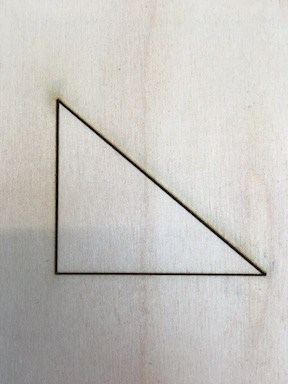
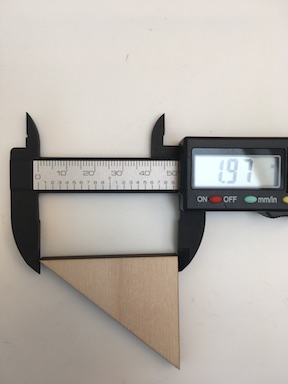
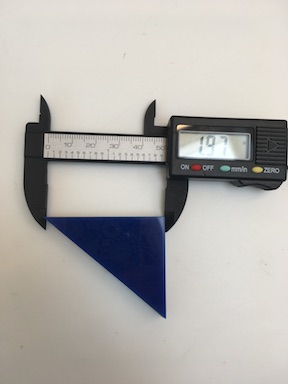
I drew a 2” wide triangle and cut it out of 6mm birch plywood.
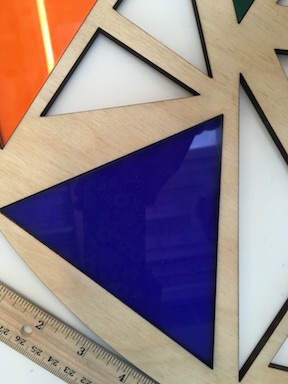
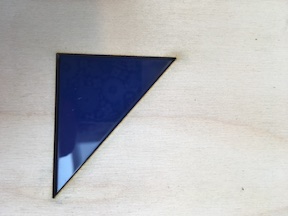
Then I cut a piece of plexi using the same pattern.
Then we measure the piece of wood that came out of the cut
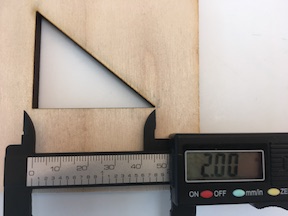
and we see that it is not 2 inches, but 1.97 inches instead. (.015” kerf – .03 in half because it occurs on both sides)
That leads to the conclusion that the plexi will also be 1.97 inches and will just fall right through the hole.
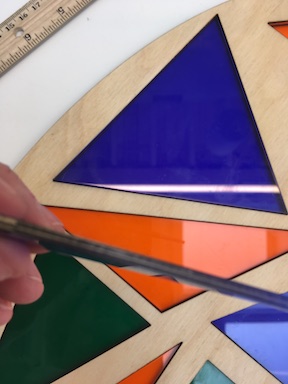
Students are challenged to figure out what the formula is for making their plexi cut pieces the right size to click fit into the hole. I also try to explain to them that the formula is tied to the size of the triangle. Small triangles are more adversely affected by the kerf. Like a small person who loses 10% of body weight is more adversely affected than a large person losing the same percentage of weight.
It also matters what shape is cut. This triangle project is especially difficult because of the various shapes triangles can take. If they had a Square Project, it might be easier.
Parametric with FreeCAD
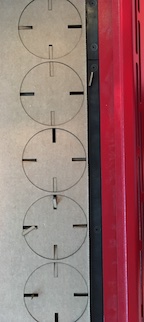
I have used FreeCAD before so when I read that I can’t use Inkscape to complete the parametric assignment, I went to FreeCAD. I started by going to the PartDesign Workbench and drawing a cylinder. I extruded it to the size I wanted by clicking and dragging – 80mm diameter and 4 mm in height. Our standard cardboard is 4 mm.
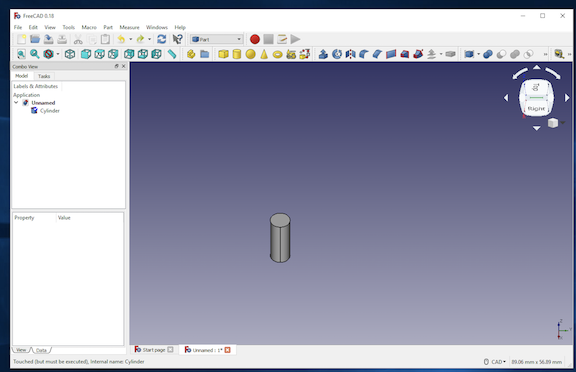
It took me a bit to remember how to look at the shape from different angles.
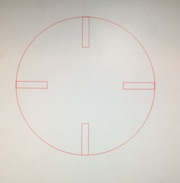
Then I created a rectangle shape for the slots, duplicated them (CNTL D) and spaced them evenly around the cylinder. (Use rotate command to 90 degrees)
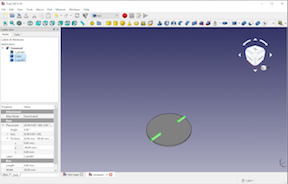
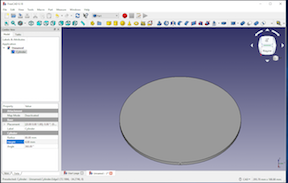
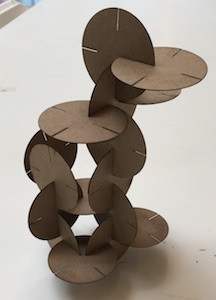
My first disk: 80mm diameter with 4mm slots 18mm long.
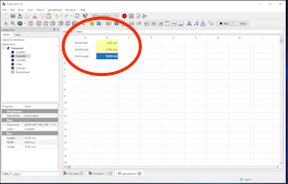
In FreeCAD, we use a simple spreadsheet to create our parametrics. We give each surface we want to be able to change an “alias” and a beginning measurement in the spreadsheet. Below you can see that the diameter of the circle and the length and width of the slots are in the spreadsheet. (Just 3 numbers.)
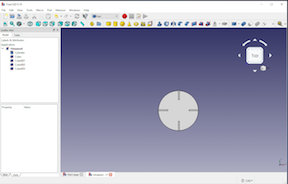
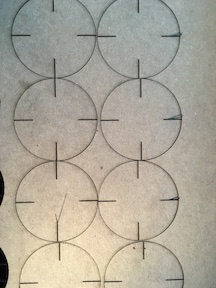
When we want to use this file with cardboard of different dimensions, we can simply change those numbers in the spreadsheet. (Diameter of disk and width and length of slot.) I do that with the “chipboard” cardboard which is .8mm.
I have to download my FreeCad file as a pdf to use CorelDraw as the printer driver in our Trotec.
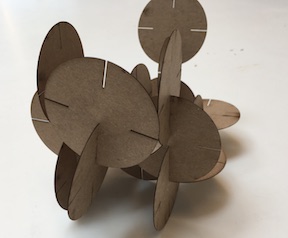
You can see that it cut very nicely in its original dimensions with the 4mm cardboard (so the slits are 4mm wide) and the disk is 80mm diameter.
When I wanted to change to the thinner cardboard we have for making stencils (.8mm), I just changed the numbers in the spreadsheet and cut it again.
Now the fitterwheel is 64mm diameter with a 15mm long, .8mm wide slot.
And here they are together.

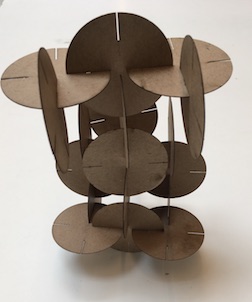
Construction Kit Animals
In order, they are dog, rabbit, giraffe
Some final thoughts on parametric design
Parametric design is terrific for those designs that you will want to resize for different uses. My goal was to make toys that can be made inexpensively and by everyone using different materials. If my designs are parametric, others don’t have to worry about redrawing everything in order to change from 6mm to 4mm material.
Individual Assignment on the Vinyl Cutter (The Least Appreciated, Most Under-Used Machine in the Lab)
In Guerin, we used to use the vinyl cutter infrequently because we can make multi-colored stickers on the Roland Large Format Printer.
We did make these Welcome signs a few months ago so that students, teachers and parents will feel more welcome in our space.

To make these stickers, there are very simple instructions.
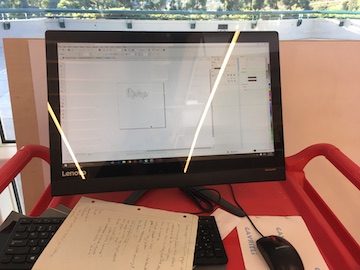
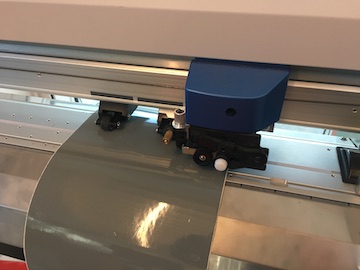
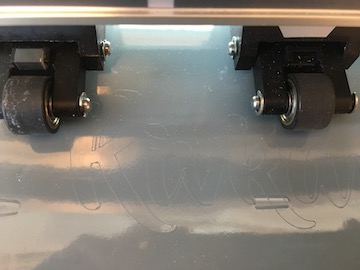
Here’s our vinyl cutter.
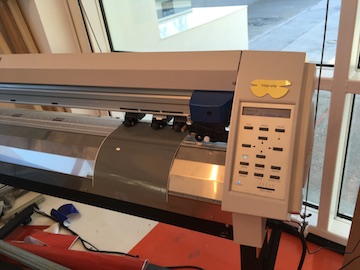
and the computer that runs it. To operate the vinyl cutter, we are using CorelDraw. It has an app for the Roland vinyl cutter that makes using that machine very straightforward.
- Load the roll of paper in the back with the paper coming up from the back. (farthest from the machine)
- Put the paper under the rollers.
- Rollers have to be under the gray-marked areas before they are locked into place.
- Turn on the machine.
- “Select Sheet “Roll” is the default. All of our sticker paper is on rolls, so that’s easy.
- Press “Enter”
- The machine measures the width of the vinyl.
- Pen Force is “0”
- Check the Speed. Should be 30 or less for vinyl.
- Check the Force. For ordinary vinyl on a roll: 120.
- On the computer, click on Corel and set up your graphics file.
- Set page width to the width of the vinyl.
- Put your graphic in the “page outline” in Corel.
- Turn off the fill in your graphic.
- Make your stroke “hairline”. (The color doesn’t matter.)
- You can put a rectangle around your object (also hairline) so you can pull it away from the paper (weed it) more easily.
- File –> Cutting
- Select printer as our Roland CAMM
- When your job is finished, use the Sheet Cut command on the Control Panel.
- Remember to put the roll of vinyl back where it belongs on the rack. :)
Super easy.
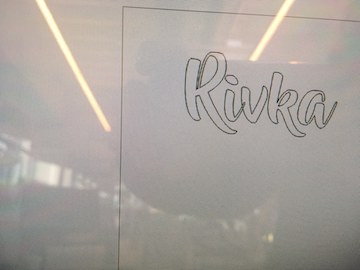
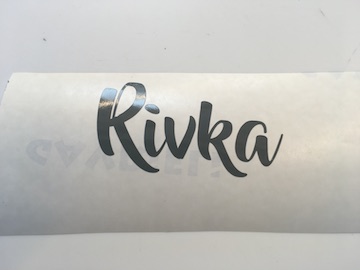
I made a laptop sticker for my daughter.
Here’s her name on the computer. No fill. Line is “Hairline”.
Here’s what the cutter looks like when it is cutting.
Here’s what the sticker looked like after it was cut out by the cutter.
You can see that there are little holes already cut out on the paper that I didn’t notice before (oops) so I recut her name on a clean piece of vinyl.
The next step is to peel away all of the sticker paper that is not part of the design. (Weeding) I use a pick, tweezers, and an Xacto blade.
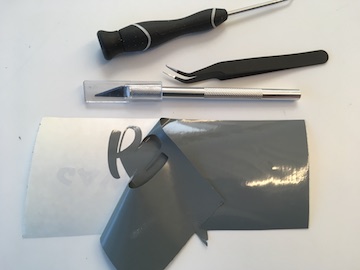
This work has to be done with patience. Neil told us to peel sideways rather than straight up so that the part that you want to remain stays put. Once you’ve done this process one or two times, it’s very natural.
It looks beautiful!
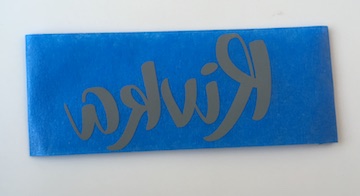
The next step requires transfer tape or just a wide blue tape. Here you can see that I have stuck the blue tape on top of my Rivka sticker.
![]()
Carefully pull up the transfer tape with the sticker attached to it backwards. This gives you a sticker ready to stick on whatever surface you choose.
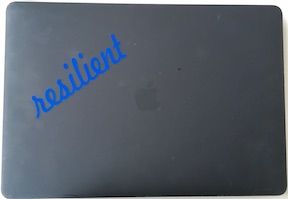
Later on we used the vinyl cutter as part of our class on Positive Psychology. Everyone needed to come up with a symbol or word that can give them strength when they need it. I made a sample sticker for my laptop.
For this project, using standard vinyl tape on a roll, the vinyl cutter settings are Speed (30) and Force (120).
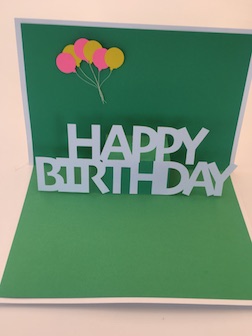
PopUp Card Project
We made this pop-up card as a sample. We’ll be teaching this project to Spanish students next week in time for Mother’s Day. The vinyl cutter needed to slow down (20) but hit harder (150 gf) to get through the card stock.
We used Inkscape “Path” functions to put the letters together. Type your letters in the normal Alphabet way. Then highlight the word and Path –> Object to Path. Now that the word is a path, you can Path –> Break Apart. You can now move each letter closer to the others. They have to overlap. Once you are finished overlapping all of the letters (side by side and top and bottom), use Path –> Union to make all of the letters into one picture.
When you are cutting cardstock on your Roland vinyl cutter, put a layer of transfer tape back on the paper. This will help protect your cutter, the blade, and give the letters something to stick to as they are being cut out.
It’s a cool project and I can’t wait to see what the students create!
Speed and Force Settings for the Roland Vinyl Cutter
- Cardstock for PopUp Card: Speed (20) Force (150)
- Vinyl on a Roll for Stickers: Speed (30) Force (150)
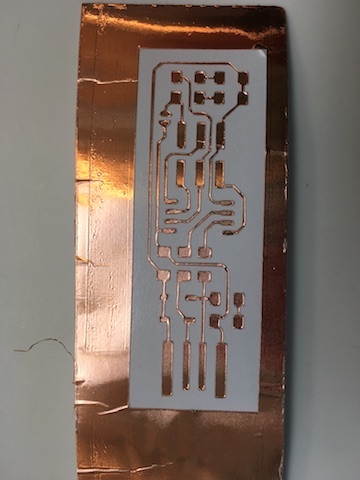
- Copper Tape: Speed (10) Force (30)