ORDER
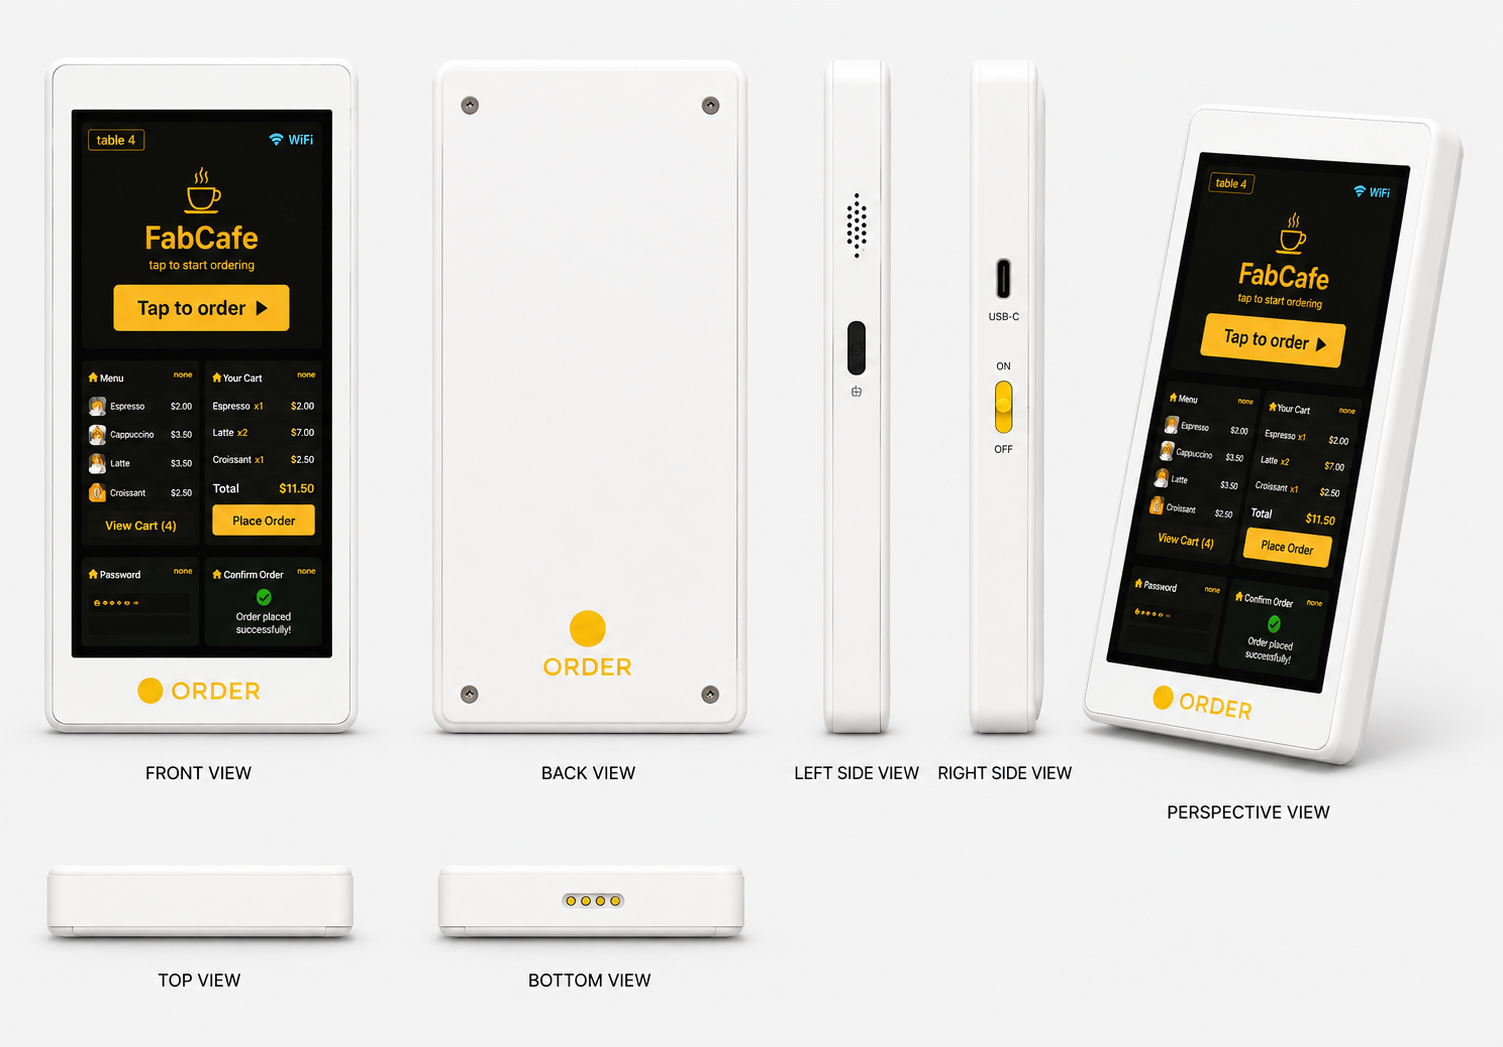
ORDER is a touchscreen ordering device that sits on a restaurant table. A guest browses the menu, taps what they want, and sends the order straight to the kitchen over WiFi. This page brings my whole final project together in one place, what it does, how I built it, and proof that it works. It pulls in the parts I made across the weeks and shows them working as one finished product.
The one minute video
This is my final project video. It is 1080p and kept small so it loads quickly.
The summary slide
This single slide sums up the project at a glance.

What it does
ORDER lets a guest at a restaurant table place their own order without waiting for a waiter to come over. The device shows the menu on a colour touchscreen. The guest taps a category, taps the dishes they want, adjusts quantities, and confirms. ORDER sends that order over WiFi to a small kitchen screen, so the staff see the table number and the items right away. It is built to cut waiting time, reduce mistakes from handwritten notes, and let one waiter cover more tables. I designed it to be cheap enough that a small restaurant in Kigali could put one on every table.
Who has done what beforehand
Self ordering is not new. Big chains use sit down tablet menus, and many restaurants use paper QR menus that open a website on the guest phone. Commercial table tablets exist but they are locked to a vendor and cost far more than a small restaurant here can pay. On the maker side, plenty of people have built ESP32 projects driving a touchscreen with the LVGL graphics library, and Fab Academy alumni have built kiosk style and menu style interfaces before. I read through those to understand the touchscreen and WiFi side. What I did not find was an affordable, fully open table unit that a small lab could make from scratch, board and enclosure included, so that is the gap ORDER fills.
What I designed
I designed the whole product, not just the code. I designed the menu interface that runs on the screen, the carrier board that holds the ESP32 and breaks out the display and power, and the enclosure that stands the device up at a comfortable angle on a table and protects the electronics. I designed the flow a guest moves through, from menu to cart to confirmation, and the small kitchen side display that receives the order. I also designed the layout of the screens so the text stays readable at arm length.
What sources I used
I used the Espressif ESP32 documentation for the microcontroller and WiFi, the LVGL documentation for the touchscreen interface, and the display and touch controller datasheets for wiring. I leaned on the Fab Academy tutorials and my own week pages for the board milling, 3D printing, and machining steps. I used the KiCad documentation for the schematic and board, and FreeCAD documentation for the enclosure. Where I borrowed an idea or a snippet I noted it on the matching week page.
What materials and components were used, where they came from, and what they cost
This is the bill of materials for one ORDER unit. Prices are in Rwandan francs and were the prices I actually paid.
- ESP32 development module, the brain and WiFi, from the Fab Lab Rwanda store, about 9,000 RWF.
- Capacitive touchscreen display module, the guest interface, ordered online and shipped in, about 22,000 RWF.
- Single sided copper clad FR1 stock for the carrier board, from the lab, about 1,500 RWF per unit area used.
- Headers, resistors, capacitors and a regulator for the board, from the lab inventory, about 2,000 RWF together.
- PLA filament for the printed front bezel and internal mounts, from the lab, about 2,500 RWF of filament used.
- Plywood sheet for the machined stand base, from a local hardware shop, about 3,000 RWF for the offcut used.
- Acrylic and the laser cut parts, from the lab stock, about 1,500 RWF.
- USB cable and 5V supply for power, from a local shop, about 3,000 RWF.
- Screws, standoffs and wire, from the lab, about 1,000 RWF.
That comes to roughly 48,000 RWF for one finished unit, around 38 US dollars at the time. Most of the cost is the screen. Everything else I made myself or pulled from lab stock, which is exactly the point of making rather than buying.
What parts and systems I made
The Final Project asks me to cover 2D and 3D design, additive and subtractive fabrication, electronics design and production, embedded programming, and system integration. Here is how ORDER maps onto each one, with a link to the week where I documented it.
- 2D design, the enclosure faces, the laser cut acrylic window and parts, and the machining toolpaths, see Computer Aided Design and Computer Controlled Cutting.
- 3D design, the angled stand, the front bezel that frames the screen, and the internal mounts that hold the board and display, see Computer Aided Design.
- Additive fabrication, the 3D printed bezel and mounts in PLA, see 3D Scanning and Printing.
- Subtractive fabrication, the milled carrier board and the machined plywood base plus the laser cut parts, see Electronics Production, Computer Controlled Machining and Computer Controlled Cutting.
- Electronics design, my own schematic and board that carries the ESP32 and breaks out the display and power, see Electronics Design.
- Electronics production, milling, stuffing and testing that board, see Electronics Production.
- Embedded microcontroller interfacing and programming, the firmware that reads the touchscreen, draws the menu, and talks WiFi, see Embedded Programming, Input Devices, Output Devices and Networking and Communications.
- Interface and application programming, the menu and the kitchen side display, see Interface and Application Programming.
- System integration and packaging, putting the board, screen, enclosure and firmware together into one product, see System Integration.
What processes I used
I drew the board in KiCad, milled it on the lab machine, and hand soldered the parts. I modelled the enclosure and stand in FreeCAD, 3D printed the bezel and mounts in PLA, laser cut the acrylic window, and machined the plywood base on the larger CNC. I wrote the firmware in the ESP32 toolchain using LVGL for the screen, flashed it over USB, and tested the WiFi link to the kitchen display. I assembled everything, ran power and signal wiring, and tested the full order flow end to end.
What questions I answered
The main questions I set out to answer were whether an ESP32 can drive a smooth menu on a touchscreen while also handling WiFi, whether a guest with no instructions can place an order on the first try, whether I could fit the board, screen and wiring into an enclosure I made myself, and whether the whole thing could be built cheaply enough to matter to a small restaurant. The build answered all four.
What worked and what did not
What worked, the board powers up reliably, the touchscreen is responsive, the menu reads clearly at table distance, and orders arrive on the kitchen display with the right table number and items. The enclosure stands at a good angle and feels solid. What did not work at first, my first board had a power trace that was too thin and browned out under the screen backlight, so I rerouted it and remilled. My first enclosure print warped because the base was too flat, so I added a raft and reprinted. The WiFi reconnect was flaky until I added a retry in the firmware. I documented each of these fixes on the matching week page.
How it was evaluated
I evaluated ORDER against the goals I set. I tested it on the bench and on a real table. I checked that the board passes power and signal correctly, that the screen draws the full menu without lag, that a first time user could complete an order without help, and that the kitchen display received every test order I sent. I timed an order at well under a minute, which was my target, and I recorded the working device in the one minute video above.
What the implications are
ORDER shows that a small lab can build an affordable table ordering device from scratch instead of buying a locked vendor tablet. For a small restaurant that means faster service, fewer order mistakes, and one waiter covering more tables, without a monthly fee. Because the board, enclosure and firmware are all open, another lab can rebuild it, change the menu, or adapt it for a clinic queue or a market stall. The broader implication is that custom, made not bought, electronics can compete with off the shelf products for local needs.
Design files
All the files needed to rebuild ORDER are here. Board files, enclosure files, and firmware
Licence and sharing
ORDER is shared openly under a Creative Commons licence for the design and documentation and an open source licence for the code, so anyone can rebuild it with credit. More on this is on my Invention, Intellectual Property and Income page.
What I learned
ORDER tied every week together. The biggest lesson was that the parts only became a product once they were designed to fit each other, the board to the screen, the screen to the bezel, the bezel to the stand, and that good documentation along the way is what made the final build possible without starting over.